DIY bath shelves. Rules for making shelves in a bathhouse
The Finnish sauna has a high temperature - from 90° C to 110° C, humidity 10-25%. Lovers of Russian baths prefer more low temperature from 40°C to 70°C, combined with high humidity 60-80%.
A Russian bath differs from a Finnish sauna not only in terms of temperature and humidity in the steam room. The fundamental difference between them is different speed movement of heated air flow, the use of birch and oak brooms in the Russian steam room.

Patting the steam bather lying on the shelf of a Russian steam room with a broom, the bathhouse attendant occasionally increases the temperature by pouring water on the hot stones of the heater. Burning wet steam, escaping from the slightly open door of the heater, quickly rises to the ceiling and, slowly cooling, settles and gradually fills the steam room.
- large distances between the boards of the beds are required;
- the seats are tilted to drain water;
- to make cleaning the bathhouse floor easier, the side walls are not sewn up or are removable;
- you need a wide indentation of the bench from the wall of the steam room.
Differences in the basic dimensions, height and structure of the shelves also add features to the soaring process itself.
IMPORTANT: in a Russian steam room it is necessary to maintain the ratio of the height of the shelf device and the distance to the ceiling.
The height of the upper bench is made so that there is a distance of one meter between the top of the head of the person sitting on the upper bench and the ceiling - for the normal arm span of the bathhouse attendant with a broom, gaining temperature in a cloud of steam.

The length of the shelves is regulated, which must be at least 220 cm, since it is advisable to take the bath procedure while lying down, exposing the body to massaging blows and stroking with a birch broom.
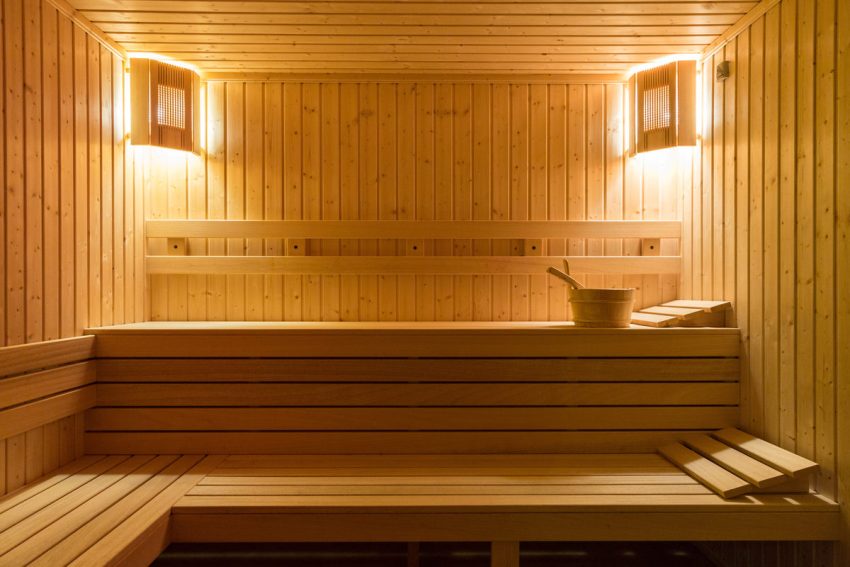
A traditional Russian bathhouse has only one or two steps of shelves located along one of the walls of the steam room; the steamer lies on a wide (at least 90 cm) upper bench.
IMPORTANT: benches in a Finnish steam room must be equipped with backs made of boards so that the person sitting does not burn his body on the hot wall cladding.
In a Finnish sauna, people often sit rather than lie on the benches, so the distance to the ceiling is shorter and the length of the loungers is not so critical.

You can often see special foot rests on the walls of a sauna, usually raised above the level of the body of a person lying on the upper bench.
Since the air in the sauna must warm up quickly, the size of the steam room is usually small, so the sauna shelves occupy the entire free perimeter of the walls, except for the wall with the door and heater.


Bath shelves can be of several types:
- compartment - when the beds in a small sauna are placed one above the other;
- complex bath shelves - with a retractable lower shelf or a folding upper shelf;
- in the shape of the letter “L”, when the bath seats are placed on two adjacent walls;
- Stepped shelves for spacious steam rooms have two or three steps, on which several steam lovers can comfortably sit.
Tree species used for making stands, bath chairs, backrests


The tree is playing important role in the interior and design of the bathhouse. Different types of wood behave completely differently at high temperatures and high humidity. Therefore, you should carefully choose the material for making shelves.
| Wood | Photo | Description |
|---|---|---|
| Pine and spruce |
| Pine and spruce may well be used to construct bath loungers, provided excellent quality pre-dried boards. In Finland itself, saunas are made from these types of trees; resin secretions do not appear at high temperatures if the board is well dried and treated. Pine and spruce give a special coniferous aroma, which has a beneficial effect on the general condition of a person. The rather high price of other types of wood forces many steam lovers to give preference to wall coverings made from inexpensive pine boards - clapboards, bath shelves, and backrests. IMPORTANT: the only condition is the absence of knots or cracks on the surface of the boards, good quality of drying of the material, carefully processed surface of the planks. |
| Aspen |
| Aspen - used for making bath shelves, as it does not release resin when heated. It has special fame among the people as a tree that successfully resists evil spirits and bad energy. The high cost of the material does not allow the production and widespread use of aspen bath seats, beds, and backrests. |
| Linden |
| Linden is an excellent material for making bath loungers. The structure of the wood is dense, has sufficient hardness, and low thermal conductivity. Linden lends itself well to technical processing; the design details of shelves and backs made from it are very durable. |
| Abash (Abachi) |
| Abash is the most expensive and beautiful material for the manufacture of bath loungers. African oak is not afraid high temperatures saunas. Loungers made from it do not burn the human body, since the material has low thermal conductivity and heats up very slowly. Successful advertising campaign made abash the most purchased wood for making bath shelves and saunas in the homes of wealthy nouveau riche. |


Prices for edged boards
edged boards
Stages of manufacturing a bath shelf

You can make bath shelves yourself if you follow a simple sequence of installing beams and boards, carefully process the material, and securely fasten the structural parts together.
IMPORTANT: the top boards of the couch must be attached to the supporting beams using oak wedges driven into pre-drilled holes in the parts. The use of metal nails or screws to assemble the deck chair is unacceptable. Hot steel caps can cause serious burns to the surface of the body.

1. Installation of racks
The racks on which the bath lounger is located must ensure the stability and strength of the entire structure. Typically, for the manufacture of the top row of beds, 4 to 6 racks are used, 1.05-1.15 m long, with a cross-section of 50x100 mm or 100x100 mm each, depending on the length of the shelf.


Frame bath shelves(one of the options)
The racks are connected to each other along the perimeter by rectangular bars 50X100 mm, onto which the load-bearing bars and boards of the bench are subsequently attached. The racks are attached to the wall with long (20 cm) dowel screws.
The timber for the upper seat posts can be used unpolished, without cracks or chips. A gap of 0.1 m is made between the wall and the adjacent rack - inserting pieces of thick boards for better circulation of hot air and improved ventilation of the shelf.

2. Assembling the supporting structure of the shelf
The supporting structure of the upper shelf must withstand the weight of the planks of the couch plus the mass of the people on top, so it is better to use a supporting beam with a cross-section of 50x100 mm or 50x120 mm.

Top row load-bearing beam with a cross section of 50x50 mm, it is attached across the length of the upper plane of the shelf every 0.5-0.6 m, depending on the thickness of the upper boards. The thinner the board, the more often the supporting bars should be located so that the boards do not sag under the weight of people sitting on them.
IMPORTANT: the bars must be attached with a slight slope (1-2°) from the wall towards the steam room, for better drainage of moisture from the wooden surface of the bath lounger.

The width of the top shelf is ideally made 0.9 meters for the convenience of steamers, but the size can be reduced to 0.6 m.
Fastening can be done either using nails or self-tapping screws.
3. Arrangement of the upper bed
Smoothly planed and polished boards of the bench, from 3 cm to 6 cm thick and from 0.1 m to 0.24 m wide each, are laid on the supporting bars at intervals of 1-2 cm, ensuring the free passage of hot air.
Fastening boards to load-bearing structure need to be done with wooden (oak) wedges into pre-drilled holes.
Boards arranged along the length of the bed look more aesthetically pleasing, but you can attach the boards of the top row across the bed. In this case, material is saved, since there is no need to pierce the load-bearing bars.


IMPORTANT: do not fasten the boards of the bench with nails or screws, leaving the caps on the surface of the benches. Only by recessing the metal parts of the fasteners 5-10 mm deep into the board can the steamer be protected from possible burns.
4. Arrangement of the lower shelf
When the height of the upper bath seat is 1.1 meters above the floor surface, for the convenience of the bath attendant working with a broom, the lower bench is lowered by 0.7 m.
The bottom shelf should be made at a distance of at least 0.3 meters from the floor - if it is used not only as a step for the bathhouse attendant, but also as a full-fledged bathhouse bench.

Most often in a Russian bath, the bottom step is made in the form of an attached bench on legs, which is removed while the steam room is being cleaned. But the installation of a fixed lower shelf is quite acceptable.
To do this, it is necessary to attach four load-bearing wooden beams with a cross-section of 50x100 mm to the posts of the upper bench at a height of 0.4 m from the floor surface, making a kind of rectangle out of them - the frame of the lower bench. This is done so that one part of the load-bearing rectangle protrudes beyond the surface of the upper shelf to a length of 0.4-0.6 m.
To the main racks load-bearing frame the bottom step can be secured with 12 cm long nails or self-tapping screws. In the corner and in the middle of the frame of the lower bench, four racks with a cross section of 50x100 mm or 100x100 mm resting on the floor are fastened with self-tapping screws or nails.
Every 0.5 m, load-bearing bars with a cross section of 50x50 mm are packed. The boards of the lower shelf are attached to them using wooden wedges driven into pre-drilled holes.

How to make shelves in a bathhouse - types of flooring for shelves
IMPORTANT: the surface of the benches is carefully sanded. The boards should not have sharp corners, chips or cracks.
The boards should not be too wide; the optimal ratio of width to thickness is four. The fifty board should ideally be 0.2 meters wide.
Video - Assembling a bath shelf with your own hands
After the construction of the bath beds is completed, they need to be impregnated with a protective solution, since the negative effects of water, air humidity, and high temperature destroy the structure of the wood quite quickly.

To protect wooden surfaces in the steam room, you must use environmentally friendly products, otherwise you risk your health. Wooden beds of Finnish saunas have long been impregnated with ordinary linseed oil, which perfectly protects against mold and mildew. The shelves of Russian baths were impregnated with a wax solution, which included purified turpentine and beeswax.
Ideally, you should apply the wax solution or linseed oil in two layers. Drying time for one layer is about 8 hours.
Bath loungers do not require preliminary preparation or processing, provided that the boards have been previously sanded with high quality. After application protective impregnation All wooden surfaces acquire water-repellent properties and a characteristic matte shine.


Correct device of the heater, rational use steam room space, cozy decoration relaxation rooms and careful assembly of steam room beds will bring health, joy and satisfaction from bathing procedures.

Wood impregnation prices
impregnation for wood
Video - The process of making a bath shelf
Video - DIY steam room shelves
Video – Sauna with sliding shelves
The level of comfort in the steam room largely depends on functional characteristics shelf - its height, design features and material of manufacture. You can make a convenient bath shelf yourself if you follow the basic rules.
Choosing the right material
For the manufacture of shelves and benches, it is recommended to use hardwood, and here's why: when it is heated, it does not release resin, which can burn and stick to the skin.
It is important to choose wood that is resistant to high temperatures and moisture, in which case the shelves can last for many years. But the key criterion is the thermal conductivity of the material:
Wood with low thermal conductivity – the best choice, since such a shelf does not overheat and does not burn the skin, allowing the steamer to lie directly on the boards without using a sheet.
The most popular types of wood for making shelves are aspen, linden and African abash oak.
Aspen is the most affordable material
In addition to its low price, aspen has certain healing properties. Traditionally, aspen is considered a tree that absorbs “negative energy.”
The aspen shelf is quite durable and practical to use. But carefully select aspen - without internal rot.
Linden - the best price/quality ratio
It is ideal for making shelves and benches, and here's why:
- This wood is easy to process, looks aesthetically pleasing, and when heated, emits a light, pleasant aroma, creating a microclimate favorable to health.
- Even at high temperatures, the wood does not burn, and there are no sweat stains left on it.
- Linden bath shelves are quite durable - the material does not crack or rot over time, but it may darken.
Abash (African oak) – good, but expensive
It is highly resistant to temperature and moisture, and resistant to stress. Due to its low thermal conductivity, the abash heats up very slowly, so you can use the shelf without fear at any temperature in the steam room.
You can find light and dark abasha wood on sale. During operation, the material retains its original appearance if it is pre-treated. But abash oak is an expensive material, alas.
The correct dimensions of the bath shelf

Often, many bath attendants make shelves in several tiers because “it’s beautiful” or they saw it in others. But the two- or three-tier shelves with steps came from saunas, where people sit, not lie.
Such options are not suitable in a Russian bath - they disturb the steamer. It is advisable to make shelves on one level.
To make places comfortable for sitting and lying, you should focus on the following proportions:
Shelf height in a Russian bath
The height of the shelf should correspond to the height of the soaring person. To prevent the steamer from having to bend down or, on the contrary, work with his hands at an uncomfortable height, the shelf should be located at the level of the thumb bone of the lowered hand. On average, the height is 70-80 cm.
It is advisable to leave a distance of at least 110 cm between the shelf and the ceiling of the steam room; in this case, you can not only lie on the shelf, but also sit comfortably.
Lenght and width
The shelf should be comfortable for lying on, so the length is at least 220 cm, so as not to rest your head against the wall and prevent your legs from dangling. Width – about 90 cm.
Shelves and benches in the steam room are placed along walls without windows, spanning the entire width of the wall. The number of shelves depends on the size of the steam room. If space allows, the width of the main shelf can be made for two - these will already be chambers.
If space is limited, the “compartment” option is used - the bench and shelves are adjacent to one wall, the shelf folds back and is fixed for the convenience of sitting on the bench. If necessary, the shelves return to their original position. Another option: the lower bench is retractable, and the shelves are attached permanently.
Important shelf design features
- It is preferable to install structures that are open at the bottom so that they are well ventilated from below, do not interfere with the ventilation of the room and make it easy to clean the floor.
- To make water drain faster from the shelf, it is made with a slight slope.
- Between the floor and the vertical posts of the shelf, pads made of plastic or thick rubber should be installed - this will prevent rotting of the wood of the posts and will extend the service life of the structure.
- The bath shelf should look aesthetically pleasing, have a smooth surface and rounded corners of the boards. The structural elements must be tightly adjusted to each other so that the shelves do not wobble or creak.
Methods of fastening boards
Particular attention is paid to fastening shelf boards and other external elements– it is important to exclude the possibility of accidental contact of screws or nails with metal while using the steam room.
There are several mounting methods:
- The easiest and fastest way is to embed the heads of the screws deeply into the wood.
- You can attach screws with back side designs.
- The most labor-intensive, but the safest and most eco-friendly option– the use of oak wedges, which are driven into pre-made holes.
If desired, a backrest is mounted on the wall to which the shelf is attached - usually these are three boards stacked on vertical racks from bars. The back allows you to sit comfortably on the shelf without fear of burning your back on the steam room lining. The back is made of the same material as the shelves. Gaps should be left between the boards for ventilation.
To increase comfort, you can place blocks on the end wall to support your legs: it is recommended to raise your legs higher than your head while lying on a shelf so that they warm up faster.
The process of making a shelf with a pull-out bench-lounger
This option will do for those who have a small steam room. The height of the steam room is 220 cm, width 180 cm, length 210 cm. This compact system of shelves fits on an area of 110x210x220 cm. The rest of the space is for the stove and for the steamer.

Costs For this shelf with a sunbed, 16 linden boards of 210 cm each, bars for the frame, screws, corners, Tikkurila wood impregnation were used - all together costing about 6,000 rubles. Everything is done by hand.
The top shelf is mounted at a height of 113 cm. Its width is 69 cm, length – 210 cm. The width of the pull-out lounger is 49 cm, and it also takes up space from wall to wall. The distance between the shelf and the lounger is 49 cm, making it convenient to use the lounger as a footrest while sitting on the shelf.
Since the upper stationary shelf is located significantly higher than required by the standards, for the convenience of the soaring, a bench of 3 boards, 36 cm wide, was additionally made. The distance between it and the shelf is 70 cm - this is a quite comfortable value.
The steam room shelf consists of two main elements: a supporting structure made of timber and flooring. The support is made of two load-bearing beams: they are installed along the width of the shelf and connected to each other by jumpers in increments of 50 cm:

One of the beams and the outer transverse beams are attached to the corresponding walls along the entire plane, the second beam is attached to the ends. To secure the lintels, grooves of the required size are made in the beams.
To support the second beam in this case, special racks resting on the wall are used. To ensure a tight connection, the ends of the racks are filed at the required angle. The structure is fastened with screws, two fasteners for each rack.
Thin, well-planed boards with rounded edges are placed on the manufactured frame. Slots 1-2 cm wide should be left between the boards to ensure rapid drainage of water and the necessary ventilation during drying.

The frame was covered with boards, leaving gaps for water to drain (there is also a bench in the photo)
It is important to use boards whose width does not exceed four times their thickness - such material dries well and is not susceptible to cracking during use.
In order to save space in the project under consideration, the width of the lounger is 69 cm, but it is recommended to make shelves at least 90 cm wide, which will require the use of 7 boards.
The principle of manufacturing a retractable lounger is the same as that of a shelf - the frame consists of two longitudinal bars with transverse struts. 5 boards were used for the flooring.
Retractable mechanism device
The design of the retractable “walking” mechanism requires special attention. How to make a folding shelf so that the bottom lounger slides under the top one? The bars are mounted to the end walls of the steam room. To them, and to the sides of the lounger on the inside, axles are attached, on which wooden planks are placed - levers. The corners of the slats should be filed (at least in the upper part) so that they do not interfere with the operation of the mechanism.
The thickness of the bars fixed to the wall must correspond to the thickness of the end elements of the lounger. To ensure that the slats sit tightly on the axle and move without play, wooden washers are installed.


The mechanism allows you to effortlessly extend the lounger to a strictly defined distance, which in this case is 0.8 of the length of the lever. The lounger rests on its legs in the fully extended or fully retracted position.
This retractable design is most suitable for steam rooms, in which the length of the shelves and the lounger completely occupy the wall.
Protective wood treatment
Before using the steam room, it is necessary to treat the wood from which the shelves are made. Frequent contact with hot, humid air leads to rapid destruction of the material and deterioration of its appearance. Proper prevention will help avoid the appearance of mold and rot.
Attention! Under no circumstances should the shelf be used for processing. chemicals, including the usual drying oil and varnish. Otherwise, as the temperature in the room increases, substances that have an unpleasant, pungent odor and can cause an allergic reaction will be intensively released into the air.
It is recommended to use impregnation specially designed for bath shelves and benches. It is made on the basis natural oils and allows you to create a protective film on the outer surface wooden structures without compromising the natural properties of wood. This product is odorless and does not emit harmful fumes when heated.
Cheaper and affordable option– edible flaxseed oil, which can be purchased at the grocery store. Hot oil is applied to the wood with a brush; it is recommended to rub it in well.
It is advisable to process the shelves by heating the stove well in the steam room - the oil polymerizes under the influence of high temperature. With another processing method, cold oil is rubbed in, and then the surface is heated with a hair dryer.
Bathhouse shelves and benches are a necessary attribute of every steam room. The key characteristic of this type of furniture is maximum functionality. Natural wood is traditionally used to make such structures. If necessary, you can assemble them yourself. However, to do this you will need to familiarize yourself with some rules and step-by-step instructions that will allow you to complete all the work correctly.
Most often in baths you can find two-tier structures. In this case, maximum functionality is achieved with the minimum area required for arranging the shelf. As a rule, the lower tier is used for sitting, and the upper tier is for lying. This design must be done correctly. A slight difficulty is that the width of the second floor must be sufficient to make it comfortable to lie on.

One of the most important criteria is the thickness of the structural components of the canopy - the log. The cost of the material depends on this indicator. The pattern in this case is as follows: the thicker the logs, the more expensive they are. However, it is not recommended to purchase products that are too thin, as they will sag under human weight.
Helpful information! To save on the construction of a bath shelf, it is recommended to place individual logs at a short distance from each other.
Before assembling bath furniture, you need to decide on its dimensions. The shelves in the steam room can have various sizes and shape. However, there are traditional, most common dimensions. In accordance with this standard, the total height of the structure should be 70 cm. The distribution of sizes between floors is as follows: for the 1st tier - 40, and for the top - 30 cm.
The distance between the lags is a mandatory rule that should be strictly adhered to. However, you should not make the distance too large. If necessary, these products can be made independently, but to do this you need to have at least minimal wood processing skills.
Before you begin assembling the bathhouse shelf, you should prepare materials, tools and make a drawing, according to which all subsequent work will be carried out. Its creation must be approached with all seriousness, since inaccuracies in the drawing will lead to installation errors.
You should take into account the number of people for whom the steam room was designed. The size of the room also plays an important role, so you should focus on them as well. As for choosing a location, it is not recommended to place shelves near the window opening. As a rule, this structure is placed along one of the blank walls, complementing the interior with benches.
What material is best to make a bath shelf from?
Many people advise using material made from leaf trees for these purposes. The reason for this choice is quite simple to explain: coniferous boards at high temperatures release resin, which, if heated strongly, can not only stain the body, but also cause a burn.
Experts recommend choosing boards made of material that has low thermal conductivity. Such wood has a heating limit. If the boards do not get very hot, then you can sit and lie on them without experiencing discomfort. Let's look at what types of wood are most often used to make a bathhouse shelf with your own hands.

Aspen. Aspen is a deciduous tree. This material is common, so it is not difficult to find and buy. Many people note the healing properties of such boards. Among technical characteristics Such materials are noted for their strength, resistance to rotting and long service life.
Linden. Boards made from this wood are considered the best in terms of price-quality ratio. Another advantage of linden products is that they have low thermal conductivity and a presentable appearance. Shelves made of linden boards are aesthetically pleasing and pleasing to the eye.
Products made from such material are easy to process, so it is recommended to buy them for people who have no previous experience in working with wood. Making a linden shelf in a bathhouse with your own hands is easier than constructing it from another material. When heated, linden boards emit a very light and pleasant woody smell, which has a calming effect. In addition, they are easy to care for. One of the disadvantages of this material is that it darkens over time. However, this does not in any way affect operational characteristics tree.
Maple. Many experts note that this tree species is a good alternative to linden boards. Products made from this material are more durable and therefore practically do not deform over time. Like linden boards, elements made from maple are great for shelf organization.

Poplar. This material is distinguished by its whitish tint and is easy to process. For beginners, this is one of the best options, but products made from this wood are not strong enough. Therefore, it is recommended to use poplar for making decorative elements shelf.
Note! When choosing a material for a bath shelf, you must remember that the wood must meet the operational requirements.
Abashi (African oak). Often from of this material They make bath furniture. African oak is also suitable for a shelf in a sauna. This material is highly resistant to moisture and high temperatures. In addition, African oak boards have low thermal conductivity, which contributes to the ease of use of furniture.
The surface of products made from such wood is very smooth, and its structure favors quick drying. Many experts put this material first in the ratings of the most suitable tree species for shelving.

Alder. Durable and reliable material, which is highly resistant to deformation. The thermal conductivity of alder boards is one of the lowest, so this wood is an excellent solution for bath furniture.
The choice of a particular material depends on several factors. First of all, this is a financial component. In addition, it must tolerate high temperatures well and high humidity as well as being durable and comfortable. Individual preferences play a big role when choosing material for shelves and benches.
Information about the material and number of boards is recorded in a do-it-yourself diagram. How to make shelves in a bathhouse is a question that many people ask. The answer to this can be obtained by studying the types of bath benches, their features and assembly instructions.
Types of shelves in the steam room: common design options
There are several types of bath shelves, which differ from each other in their design features. The feasibility of one form or another, as well as the number of tiers, is determined depending on the size of the bathhouse and its features. This publication contains information about the most common types of canopies.

Stepped structures. Today, this option for arranging shelves is the most popular. In this case, they are installed along one of the walls (without a window) in two or three tiers. The convenience of this design lies in the increase in the degree of heating from the lower floor to the upper one.
It is important to remember that the upper tier of the stepped shelf in the steam room must be installed above the line of the boiler used to heat the room. In this case, the distance from the top floor to the ceiling must be at least 120 cm. This is necessary in order to ensure maximum comfort for a person while sitting on such a structure. The same rule applies when a traditional stove is installed in the steam room.
Corner (L-shaped) flats. A less popular option than the previous one, however, it is also very often used when organizing the interior of a steam room. It is understood that one side of the structure will be parallel to the boiler, and the second will be adjacent to one of the free walls.

The height of the corner structure may vary. This parameter is selected depending on individual characteristics premises. Experts advise installing corner shelves in the case when the room has small dimensions, since they are as functional as possible and are not very difficult to do with your own hands. The canopy for this type of bathhouse is best assembled from durable wood.
Coupe curtains. This design is quite rare, but the idea itself is interesting and original. It is suitable for small rooms where it is necessary to save internal space. In this case, two shelves are placed parallel to each other. This structure is very reminiscent of compartment rooms on trains (hence the name).
The upper shelves can be designed so that they recline. The frame structure for such a canopy is usually made of support posts. These elements, similar to the legs of a bench, are joined together by wooden bridges.
Helpful information! If necessary, the shelves can be fixed to the wall without using legs. However, such a device requires proper load distribution.

In order to choose a design suitable for your situation, it is recommended that you familiarize yourself with the photo of the shelves in the bathhouse. This will allow you to visually evaluate the advantages of one or another option.
To cover the frame, you need to select even and smooth boards from any suitable material. The main thing is that the wood is moisture-resistant, durable and can withstand high temperatures. The distance between the boards should not be less than one centimeter. The maximum recommended distance is 2 cm.
The first thing you need to do before installing the shelf is to calculate its dimensions. It is worth choosing the shape and number of floors of the wooden structure so that it fits into the interior of the steam room as competently and concisely as possible. It is also important to remember that the structure should not act to the detriment of the overall functionality of the room.
The classic option for a Russian bath is a one-story shelf located along one of the walls. Multi-level structures are more often used in foreign saunas, as this allows you to steam while sitting. In any case, each of the above options has its own advantages and disadvantages.

Before you make shelves in the bathhouse with your own hands, you will need to calculate their height, width and length. The choice of structure height is influenced by several factors. First of all, you should think about convenience. The height of the shelf should be such that a person feels comfortable. The standard for this indicator is 70 cm. It is not recommended to place the structure at a distance exceeding 90 cm from the floor.
Related article:

The correct choice of material for the log house. Types of log house. Foundation for construction. Features of constructing a bathhouse from a log. Log projects.
The location of the shelf should be such that it is convenient for the steamer to take water procedures both sitting and lying down. The distance from the canopy to the ceiling should be no less than 120 and no more than 150 cm. The dimensions of the shelf in the bathhouse may differ from the standard ones only if this is a justified decision. For example, often in small steam rooms there is simply not enough space to organize a classic design.

One more important indicator, which requires careful calculation, is the length of the structure. To ensure comfort during bath procedures, you need to assemble shelves on which you can lie at full height. This design promotes maximum relaxation for the steamer. The most common size of a shelf in a steam room is 2.2 m (in length). As for the width, traditionally it should not exceed 1 m.
If the bath area is large, then it becomes possible to expand the structure by 2 times. As a result, such a canopy can be intended for two people. However, before increasing the width, it is still recommended to make sure that such a structure will not interfere with people taking water procedures.
Baths that have small dimensions are most often equipped with compartment curtains. When choosing dimensions for this design, it is necessary to take into account not only the anthropometric data of a person, but also the number of people.
Shelf in the bathhouse: design features
Assembling and installing a canopy is a serious task that requires not only calculation, but also compliance with some nuances and rules. For example, the best option is the construction of a shelf open at the bottom. This ensures wood ventilation and faster drying. The practicality of this design is that when cleaning the room, nothing will interfere with washing the floors.

Another nuance of installing the shelf is that it is better to place it at a slight angle. This measure does not allow water to linger and promotes rapid drying of the surface. wooden planks. The sizes of shelves in a bathhouse may vary, but it is recommended to adhere to accepted standards.
One of the most common problems associated with the use of bath furniture is the appearance of fungus on it. In order to protect the structure from rotting, special rubber pads should be installed. These elements can be made from polymer material. They are mounted in the space between the floor and vertical support bars.
A design of this type should not only be comfortable and functional, but also have a presentable appearance. All corners must be rounded to avoid injury. It is also very important that the surface of the wood is smooth, without knots or cracks. All individual structural elements must be mounted in such a way as to eliminate gaps between them, due to which the canopy will creak and wobble. The height of the shelf in the bathhouse must meet the general standards and needs of the owners.

Helpful information! When choosing boards, you need to take into account one important rule: their width should be 4 times the thickness. A board corresponding to such geometric parameters is optimal solution for a bath. It dries very quickly, which prevents the formation of fungus.
Before you begin assembling the shelf, you must choose one of several methods for fixing the boards to the frame. It's important to remember that metal elements in the design, in no case should they be located in places with which the body may come into contact. Therefore, it is best to screw in the screws so that their heads are located on the inside of the canopy. Otherwise, you may get a painful burn.
If necessary, you can buy shelves for the bath and pay a specialist who will install it. However, financial costs in this case will increase significantly. The design of the canopy itself is quite simple, if you consider standard model, so it’s better to assemble and fix it on the wall yourself.
To achieve maximum comfort, you can complement the design with a comfortable backrest. For these purposes, you should prepare several smooth boards and fix them on slats attached to the wall. The distance between them must be at least 5 cm to ensure normal ventilation. In addition to the backrest, you can make your own leg supports. All additional structural elements are usually made from the same wood from which the shelves are made.

Multi-stage bath shelves: is it worth making them?
The feasibility of organizing a structure that includes two or three tiers is primarily determined by physical laws. When the room warms up, the hot air rises, and in the floor area the temperature rises, but not so much. In the case of installing a multi-stage structure, it becomes possible to select the required temperature regime.
Making a shelf in a bathhouse with your own hands is not so difficult, but constructing a multi-stage canopy takes more time. Of course, everyone independently determines the need for a two-tier or three-tier structure. If the bathhouse will be used only by household members, then you can make simple one-story curtains, supplementing them with benches.
In small baths that suffer from a lack of usable space, the lower floor may be located slightly above floor level. But in this case there are some advantages. For example, this design is well ventilated, which helps the boards dry quickly.

Experts recommend that when drawing up a drawing of a bathhouse shelf, you should take into account that the upper floor should be wider than the lower tier. If the dimensions are properly distributed, it becomes possible to use the second floor as a bed.
How to make shelves in a bathhouse with your own hands: choosing a place
After choosing the type of structure, as well as calculating its dimensions, you need to correctly select the place in which it will be located. This decision is influenced by the type of bath. For example, water procedures in a Russian steam room are usually performed while lying down. In turn, the Finnish sauna requires the presence of places that are made as comfortable as possible for a sitting position.
The preliminary drawing must indicate the dimensions of the room, as well as its features. The diagram must include door and window openings, and also indicate the location of the boiler and any other equipment. Based on this drawing, you can determine the most suitable space for installing a shelf in a bathhouse with your own hands. Photo finished premises will help to visually evaluate the advantages of one or another option for the location of this structure.
Note! Canopies are not recommended to be installed under window openings. This is due to safety regulations, since the glass may not withstand high temperatures and may burst. As a result, the fragments can cause harm to people relaxing inside the steam room.

Depending on the individual conditions in the bathhouse and the preferences of the owners, the canopy is installed on the base (legs) or fixed directly to the wall. It is worth noting that the shelves should not be adjacent to the walls, as this negatively affects the circulation of air flow. The recommended distance between the logs and the wall is 10 cm. Slats are fixed to the surface, which will serve as the basis for vertical elements designs.
To make a bathhouse shelf with your own hands, you should purchase material suitable for this purpose in advance, as well as prepare the tools. When fixing individual structural elements with self-tapping screws, it is necessary to screw them into the wood in such a way that you cannot be injured by them in the future.
When positioning the canopy, it is also necessary to take into account the distance to the doorway so that it does not interfere with free entry and exit. This design should be located at a distance from the boiler and not interfere with free movement around the room. Guided by the rules described above, it will not be difficult to correctly choose a place for a bath shelf.

DIY bathhouse shelf: methods of fastening boards
The strength of the structure, as well as its durability, depends on the method of fastening the boards. Today, there are three main options for fixing these products, each of which has its own advantages and disadvantages:
- using self-tapping screws that are embedded in the wood;
- self-tapping screws from the outside;
- oak wedges.
The first method is the most common. This option is most often used when building a bathhouse bench with your own hands. In order to sheathe the frame with boards, self-tapping screws are used, which must be driven as deep into the wood as possible. They can also be used to fasten boards from the outside, but this method is not as popular as the first.
And finally, the third method is to use oak wedges. This method is recommended by experts as it is the most environmentally friendly. The technology of this method involves the organization of special holes into which oak wedges are driven.

The boards for the back are fixed in the same way as the sheathing for the shelf. The only difference in this case is the wider gap between the individual elements. Photos of shelves for a bathhouse will help you quickly figure out how to attach the casing to the frame. It would be a good idea to watch several videos on this topic, which clearly explain all the nuances of the installation.
How to make shelves in a bathhouse with your own hands: a step-by-step guide
In order to make shelves, you need to make a drawing. If necessary, you can use ready-made circuit, but it must fit your conditions. Therefore, you need to be very careful when choosing a scheme. Further work is carried out in accordance with the step-by-step instructions. You can assemble shelves in a bathhouse with your own hands only if you have the appropriate material. To install the canopy in the steam room, you will need the following tools:
- regular hammer;
- construction mallet;
- screwdriver;
- hacksaw (for metal);
- chisel;
- yardstick;
- self-tapping screws

Helpful information! The sheathing can be fixed to the frame in a non-standard way which involves the use of wooden wedges. However, in this case, some carpentry skills and the ability to make accurate calculations are required.
In order to answer the question of how to make a canopy in a bathhouse, you need to carefully follow the instructions. Any deviations from the general algorithm of actions may lead to installation errors. First you need to determine the location of the supporting elements. This parameter is calculated taking into account their thickness. For example, products with a thickness of 22 cm must be installed at a distance of 60 cm from each other. This will allow you to optimally distribute the load.
A drawing of a shelf in a bathhouse with your own hands, drawn up earlier, should contain information about the geometric parameters of the parts and their quantity. All of them must meet certain standards, namely: have no signs of rotting, be smooth, and free of cracks and knots.
The thickness of the boards that will be used to cover the frame may vary. When choosing this indicator, you should pay attention to the width of the product. The larger it is, the thicker the board will be required, since wide and thin boards may not support human weight. The optimal ratio of width to thickness is 4:1.

How to properly make a shelf in a bathhouse: making the frame and fixing it
The frame is the basis of the entire structure, so before assembling it it is worth carrying out careful calculations. During its installation, you must be careful and try to avoid mistakes. From the outside, the frame resembles the supporting structure of a regular bench.
To install the base you need to purchase wooden blocks, corresponding to the future dimensions of the shelf in the bathhouse. Photos of this design can be easily found on the Internet. The most common bars are those with dimensions of 50 by 70 mm. The number of such elements is usually 10 pcs. To give the structure the required rigidity, you will need to prepare 5 boards that will be used as racks.
The support posts are connected to each other by means of transverse wooden products. They are called lintels and are used to give the structure sufficient strength. If all the work is done correctly, the result will be a reliable supporting structure that will last for many years.
When fixing the shelves to the wall, it is necessary to ensure air flow, leaving a small gap of 10 cm between them. It is worth noting that the frame for the upper tier should be assembled first (if a two-story structure is assumed). Then the supporting posts are fixed to the wall. The step between them varies depending on the dimensions of the structure and can range from 60 to 85 cm.

Thus, the initial stage of attaching the bench in the bathhouse is carried out. It is not so difficult to perform the above operation with your own hands, but you need to calculate everything in advance and from time to time check the work with the diagram prepared before installation.
At the next stage, it is necessary to make a recess (step) in the block, which will be needed to organize the fastening. In this case, fixation is performed using the “lock” technique. Then, on the side opposite the supports, the second row of racks is mounted. After this, you need to combine their upper ends using a transverse beam. In order to enhance the strength of the structure, it is recommended to use metal corners.
Helpful information! It is advisable to prepare building level to make even shelves in the bathhouse with your own hands. A step-by-step guide, drawings and dimensions, as well as expert advice will help you assemble a reliable and durable design made of wood.
Next, the supporting supports are covered with wooden boards. All subsequent levels are mounted according to the same scheme. Experts recommend using thin and narrow logs as flooring. A structure made from such elements will be well ventilated and dry quickly, which will increase its service life and protect the shelves from rotting.

How to make a shelf in a bathhouse: covering the frame with boards
To make your home-made bath structure more stable, it is recommended to use rubber gaskets. These elements are located at the bottom of each bar. The next stage is very important, as it involves covering the base of the structure with wooden boards.
How to make a shelf in a bathhouse? For cladding, you will need to prepare boards from moisture-resistant material. The lags are fixed first on the first floor, and only then on the second. If the structure is single-tiered, then the work is greatly simplified. The gap between individual boards must be at least 1 cm. The maximum distance between joists is 2 cm.
The most preferred method for securing individual boards to the skeleton of the structure is to use only wooden instruments. However, such an installation is not always possible, so most often the logs are fixed using ordinary self-tapping screws. Since they are made of metal, it is necessary to exclude the possibility of their contact with the skin of the steamer. Therefore, they are either recessed deep into the board or screwed in from the inside.

In the photo, the shelves in the bathhouse can also be covered from below. In this case, the boards are fixed so as to close the gap between the seat and the floor. The need for such a solution is determined depending on the individual preferences of the bathhouse owners. This cladding looks presentable, but makes it difficult to clean the room and prevents the free movement of air masses. And also in this case it will not be possible to put your feet under the bench.
How to make shelves in a bathhouse: treatment with a protective composition
On last stage You will need to treat the shelf with a protective compound. This procedure is aimed at improving the technical characteristics of wood, which will extend the service life of the structure as a whole. Most people believe that traditional bath furniture does not need additional processing, since it itself is very reliable. In principle, this statement is true, but only if the structure is well ventilated.
If you're not sure what's coming to the shelves sufficient quantity air, then it is best to play it safe and use a special composition. First, you need to apply an antiseptic to the benches, which should penetrate the structure of the wood. It is worth noting that this procedure can be done before installing the canopy. It is recommended to process bath shelves purchased at retail outlets. You can buy a protective composition at any specialized store or order it online.

Note! An antiseptic will protect the wood from the growth of fungus or mold. Rotting bath furniture is a problem faced by most steam room owners. In addition to special drugs, there are budget options impregnation For example, the most affordable of them is regular flaxseed oil.
Today, compositions are common that have antiseptic properties and at the same time protect the wood from moisture, soaking it through. Bleaching agents, which are used when wood darkens, also have certain protective properties and increase the resistance of the board to temperature. Some compounds are made specifically for saunas, so it is recommended to check their purpose before purchasing.
The task of choosing an impregnation is no less important than the answer to the question of how to make a shelf in a bathhouse. It is important to remember that in no case should you use varnish or other chemicals, which are not suitable for steam rooms.

Painting the canopy with paint is also strictly prohibited. This is due to the fact that the above substances are not resistant to high temperatures and humidity. When exposed to them, paint or varnish will begin to emit substances that are hazardous to human health. chemical compounds.
Before applying a protective composition to the boards in the flooring, they must be prepared. The preliminary stage consists of processing the wood sandpaper. After this, you need to remove the dust remaining after grinding and apply the desired composition to the cleaned surface.
In order for your bath furniture to last for many years, you need to study some recommendations for caring for it. The basic rule to remember: after each session in the steam room, the room must be ventilated. This procedure will allow you to quickly remove excess moisture from the room. Sometimes a sauna stove is used for drying, which is turned on for some time after the sauna procedures.
A bathhouse is a room in which sanitary and hygienic procedures are carried out. Therefore, cleanliness in the steam room should be monitored as carefully as in the bathroom. Regular cleaning helps prevent the accumulation of dirt and the development of bacteria on the shelves in the steam room.
Note! When drying the room, you must leave all the windows open, and the containers located inside the steam room, on the contrary, must be closed.

After each procedure, it is recommended to wipe all surfaces using a dry towel. This measure will significantly speed up the drying process of wooden boards. It's worth remembering that natural materials Do not treat with cleaning agents containing active chemical compounds. The best option in this case is to use laundry soap.
Self-assembly of bath furniture requires careful preparation. Before starting work, you will need to complete a drawing that includes all the necessary dimensions and data about the room and the structure of the shelf itself. If you are not confident in your own abilities, you can always use the services of specialists. After installation, do not forget that bath furniture needs special care.
Bath procedures relax, heal the body, have a beneficial effect on nervous system, promote healthy sleep. With time coupled with necessary knowledge, you can build a bathhouse on your summer cottage. This article will help the owner make shelves in a sauna, bathhouse, and arrange the room from the inside.
Do-it-yourself interior finishing of a bathhouse

The design of a shelf for a bath in a steam room depends on the size of the area and the height of the room
Polok represents wood flooring on a rectangular timber frame. The material is carefully prepared for work - it is sanded, the corners are ground down, and treated with a special impregnation. The conditions for using wooden structures in a bathhouse can hardly be called favorable. Conducted on time preventative treatment guarantees the boards an increase in service life.

It is recommended to use hardwood for the manufacture of shelves and benches.
The frame is assembled from vertical support posts and jumper boards. For additional reliability, the frame is attached to the wall. A flooring made of narrow planks is installed on the base. Leave small gaps between the boards for water to drain. A suitable step is 1 cm. For natural ventilation a gap of 8-10 cm is maintained between the wall and the shelf. The flooring can be designed as a composite. This type is quite convenient - the structural elements can be easily disassembled for washing and then drying outside.

Types of shelf coverings
Make calculations, diagrams, drawings of a shelf in a bathhouse or sauna, take into account all the design features, select materials for work, prepare tools. Let's look at each stage in more detail.

Drawing bath shelves for Russian steam room
Having decided on the size and number of shelves in the steam room, proceed to the drawings. A simple way - take a pencil, a ruler and schematically draw the steam room room on a sheet or graph paper to the required scale. Indicate on the diagram the location of the windows, if any, the stove, the doorway. Experts insist: windows in a steam room are an optional element due to large heat losses and the risk of injury.

The sequence of construction of the simplest bath shelf
Recommended sizes for bath shelves in a steam room
Shelf sizes may vary significantly in two different baths. The dimensions directly depend on the total area of the steam room. These sizes are considered convenient.
- Length - from 150 cm or more (so that you can sit and lie on the shelf comfortably, its length is 180 cm). If you are taller than average, the length of the shelf can be increased to 2 meters or more.
- Height - the lower shelf-step should be more than 25-30 cm away from the floor. Hot air is lighter than cold air, the greater the distance from the floor to the shelves, the better. Depending on the height of the ceilings in the steam room, the number and dimensions of the shelves are calculated. The distance from the top tier to the ceiling should be more than 1 m.
- Width – for comfortable sitting – at least 60cm. Do you like to steam while lying down? The minimum shelf width is 90 cm.

Calculation of the size of bath seats, sun loungers, beds
Decide on the choice of oven. If the size of the room allows you to install a brick one, opt for it. Such a stove retains heat for a long time, almost eliminating the possibility of accidental burns on its surface, therefore, shelves can be placed in close proximity.
Choose the shape of the shelves, sketch out sketches. Take into account the significant design features - the ratio of length, height, width of the shelf. This way you will get the most complete idea of what your personal steam room will look like after the work is completed.

Calculation of the height of the shelves for the steam room in the Finnish sauna and Russian bath
Types of bath shelves.


Shelf with pull-out bench-lounger
Tools
To assemble the shelf you will need the following tools:
- Roulette
- Screwdriver, drill
- Wood hacksaw, Sander, chisel
- Wooden hammer (mallet), ordinary hammer

A set of tools for assembling a shelf with your own hands
Material selection
Basic criteria.
- Thermal conductivity. Wood must have low thermal conductivity, otherwise it will be impossible to sit on the shelf.
- Durability, practicality.
- High resistance to moisture, high temperatures, no flaws.
- Splitting, splitting.

Transverse fastening of the skin of the beds

Option for longitudinal fastening of boards covering bath loungers
Some rocks crack more often than others in high humidity conditions. To avoid cracking of bath shelves when driving nails, use screws or pre-drill holes. Give preference to wooden pins.

Frame of bath shelves (one of the options)
Eliminate hangnails and splinters that appeared during the work process, otherwise those who like to steam are guaranteed splinters. Do not use soft woods that are particularly susceptible to splintering.

DIY shelf installation diagram
Smell
Use hardwood. Having made a choice in favor of coniferous species, buy timber prepared in winter and brought from the northern regions of the country. This is a material with higher density. Fir wood has a beautiful texture, color and no resin pockets, which cannot be said about all types of pine trees. A tree with a strong aroma, such as some types of fir have, will negate efforts to improve the steam room. Resinous types will create a wonderful “woody” smell in the sauna, which will promote relaxation. Please note that if the pine wood has not undergone special treatment (resin removal), under the influence of hot air the resin will come out. When work on the steam room is completed, heat the steam room harder for an hour, scrape off the resin released from the resin pockets from the shelves. Repeat the action several times.

After completing the construction of the bath beds, they need to be impregnated with a protective solution.
Brief overview of lumber for saunas and baths
Aspen - affordable material cost; does not crack when drying; becomes lighter over time; not afraid of moisture; does not emit resin. The disadvantages of the material are low resistance to rotting, it darkens with constant contact with water, and releases a bitter aroma when heated.

Aspen - used for making bath shelves, as it does not release resin when heated
Larch - the wood contains gum, so it is very durable. The material is highly resistant to high temperatures and moisture. It has valuable medicinal properties: it will release phytoncides throughout the entire period of use. Beautiful texture, wide range of colors. Disadvantages - high density, many resin pockets, difficult to process, price.

Larch is very strong and durable and great for shelves
Oak is the best choice of deciduous trees. If your financial situation allows, consider African abashi oak - it has very low thermal conductivity, and it is difficult to get burned while sitting on such a shelf. Attracts appearance, porous structure, choice of color, high adaptation of wood for use in a steam room. There is only one drawback - the high price.

Abash is the most expensive and beautiful material for making bath loungers
Linden – has a wonderful smell and low thermal conductivity. The material contains healing essential oils, which helps prevent colds. Easy to process. Occupies an average price niche. Disadvantages - average strength, quickly darkens, easily rots. Linden shelves must be dried thoroughly.

Linden is an excellent material for making bath loungers
Canadian cedar (not to be confused with Siberian cedar) is unique in its properties. Cedar flooring does not tar or burn; the wood is easy to work with and is highly resistant to rotting and cracking. The therapeutic effect of cedar resins is very useful for the upper respiratory tract. If the boards are not selected by color, you will end up with shelves with an amazing play of shades. The disadvantages of the material are the price.

Canadian cedar - great for shelves, meets all requirements, but expensive material
When purchasing material, you should include an additional 15 percent in the estimate for unforeseen expenses - damage, defects, etc.

Combination of several types of wood at the same time
The listed breeds have long become favorites among those who build baths and saunas. This wood is used to make counters, backrests for sunbeds, the shelves themselves, and many other things that are impossible to do without in a bathhouse. Don’t forget - all the interior decoration of the steam room (as recommended experienced craftsmen) should be made from one type of wood. Then the bathhouse will have a pleasant appearance and will delight its owner for many years.

Luxurious bathhouse made of Canadian cedar
Video: Unique installation of two-tier shelves in a steam room
For residents of Russia, Belarus or Ukraine, a bathhouse is not just a place for taking water procedures, but a real structure for relaxation of soul and body. The main part of the bath structure is the steam room. There are many important factors here, including the style of the interior, the quality of the materials used and the convenience of the shelves.
Also, a steam room can become a reason for pride if you do everything in it yourself. At first glance, it seems that there is nothing complicated about this, you just need to make a regular wooden flooring and you're done. In fact, there are many nuances to this process that need to be taken into account. First you need to select materials, find suitable scheme, determine the shape of the shelves and the number of tiers. If everything is done correctly, then you will be able to enjoy steaming in a new sauna within a couple of days after all the work has been completed.
What does the shelf structure consist of?
Perhaps you only recently heard such names as “shelves”, but before you called this part of the bath room a bench. And this is not strange, because these are special bath shops, but they sometimes have different heights, and they are located according to a special pattern. The entire structure consists of two main elements:
- Frame. It serves as the basis for installing stationary flooring boards, and the frame can also be the basis for a collapsible version of the flooring. Usually for the construction of this part of the shelves they use support posts, which in appearance are similar to the legs of a bench, jumper boards are used to connect the elements. Also, some craftsmen build the frame using the stair stringer method, and the steps of the bath shelves are attached to this structure. The Finns are also famous for their love of saunas, and when building Finnish-type structures, a frame without supports is used; for this, a railway shelf is simply attached to the wall of the steam room.

- Flooring. This is the second part of the bath shelves; small planks are used for it, which are installed with a gap of 1-2 centimeters. Most often, aspen or linden is used, and the wood is carefully sanded before installation. As already mentioned, the flooring is attached to a special frame; it is also possible to make a separate structure such as a floor ladder. This option is more convenient because, if necessary, it can be removed, washed and ventilated outside. The flooring is used both as a seat and even as a bed. Using the same principle, you can build seat backs, sides, and even pillows. Some masters do special devices for taking water procedures in a supine position, when the legs are at head level or even higher.

Steam rooms are usually small in area, because the smaller the square footage, the easier it is to bring the temperature to the required level, and this also allows you to save money. Due to the small size of the building, bath furniture usually has a simple, rectangular geometry. If the area of the steam room allows, then you can make a kind of staircase with several large steps, which will also serve as sun loungers.

If at your dacha there is absolutely small sauna, and it is not possible to make a rectangular bottom shelf, then you can build a rectangular structure. According to the diagram, such a design will be right triangles, and one of the legs of this geometric figure will be loosely adjacent to the wall, and the second to the adjacent shelf.
Selecting materials
To make shelves and benches in bathhouses yourself, it is best to use hardwood, and there are reasons for this. In particular, at high temperatures such materials do not release resin, as happens with coniferous plants. And it's very important factor, because hot resin can cause burns.
Also, when choosing a material, you need to pay attention to its resistance to high temperatures and high humidity levels. If you choose high-quality material, it will serve for a long time.

And the main characteristic will be the thermal conductivity of wood. A material with low thermal conductivity will be the best option, because such wood will not heat up and burn the skin. As a result, you will be able to be in the bathhouse and lie directly on the boards, rather than using a sheet or towel. Many years of experience in building bathhouses have made it possible to create a unique rating of the best types of wood for building shelves; each material has its own pros and cons.
Aspen - low price and good characteristics
The main advantage of such a tree is its low cost, and in addition, aspen is known for its healing properties. Aspen also has a positive reputation in mythology; it is generally believed that it absorbs negative energy.

As for bath furniture made from this type of wood, it will last a very long time and will be practical to use. True, you need to be very careful when choosing aspen; it is important that there is no internal rot in it.
Linden - affordable cost and high quality
Many experts say that linden is the best option for constructing bath shelves and benches, and this is confirmed by the following factors:
- This type of wood is very easy to process, it looks beautiful and at high temperatures emits a pleasant aroma.
With the help of linden you can create pleasant conditions for health;
- Even with very strong heating, which happens in a bathhouse, the linden will not burn, and sweat stains will not remain on the surface of the wood;

- Shelves made of this type of wood for the steam room will serve you for decades. During use, the wood does not crack or begin to rot. The only negative is that linden may darken a little over time.
African oak (Abash) - an option for an elite bath
This tree is highly resistant to water and high humidity levels. African oak is not afraid of heavy loads either. Important property This wood has low thermal conductivity, so the wood does not heat up and there will be no risk of burns.

There are both light and dark abasha options on the market. Even with for many years operation, the wood retains its original condition, but for this, the wood must be treated with special materials. In terms of properties, African oak is the best option, but it is quite expensive, and not everyone can afford to buy such wood for a bath.
Why do the shelves have several steps?
The design of the steam room was made for a reason; everything here is based on the laws of physics, according to which steam and warm air constantly move upward. After the hot force is released and the air cools a little, it partially goes into the ventilation system, and partially goes down to the lower part of the bath. This is why the temperature at the top is much higher than at the bottom step of the shelf.
This design with several “floors” will allow you to choose the best steam mode with the required temperature. If you decide to make the shelves in the steam room yourself, then you should stick to the standard “ladder” design, and you will be able to enjoy both the hottest steam and the gentle conditions at the bottom of the “pyramid”.

Most often, two shelves are made in a Russian bathhouse, but if the space of the room allows, then three can be made at once, as long as there is enough space. It is important that the structures are safe to use, because if there is too little space, you can fall and get injured.
Scheme and arrangement options
If your bathhouse has windows, then there is only one option. They should be located along the wall where there are no windows or glazed elements. ventilation system. In all other respects, the scheme differs little from each other, except perhaps in appearance. The shelves can be installed this way:
- A whole linear structure along one of the walls. In this case, the shelves are made in 2-3 rows;
- An object in the shape of the letter L with a certain number of degrees. Here it all depends on the size of the room and your wishes, you can put 2-3 steps near each wall, or you can install the upper and lower bench near one wall, and the middle one near the other;
- Two parallel structures that are installed opposite each other. This layout is a little reminiscent of the arrangement of lying seats in a compartment car; by the way, you can also make two benches, just like on a train.
To make the design convenient, functional and reliable, you should familiarize yourself with different schematic options and choose the best one. To purchase materials and calculate approximate costs, it is also worth determining the dimensions of the future structure.
Dimensions
First, you should familiarize yourself with the standard sizes of seats in the steam room for a sitting and lying position of a person:
- A length of 1.5 meters is required for a lying position with bent knees;
- A 1.8 meter shelf will allow a person of average height to lie down with straight legs. But this parameter is individual, and if you are tall enough, then you can make a step with a length of 2 meters;

- The width of the structure should be at least 40 centimeters, and this is only for the lower step, which is mainly used as a footrest. On such a wide shelf it will be comfortable to both stand and sit;
- 60 centimeters should be the middle or top shelf on which it will be comfortable to sit;

- If you like to steam in a bathhouse in a lying position, then you need to make shelves with a width of 90 centimeters; they will be comfortable and practical.
You can choose the sizes taking into account the individual characteristics of the users and taking into account the design of the room itself, but experts do not recommend making shelves with sizes smaller than the standard values.


Height
The shelf in the steam room should be installed at such a level that it is comfortable to sit on it and, when using a broom, treat the back of another person. That is why all calculations begin with determining the height of the upper degree. It is also necessary to focus on the level of the steam door of the oven.

Typically, the height of shelves in a bathhouse ranges from 40 to 60 centimeters. This margin of 20 centimeters allows you to optimally select the dimensions and, if necessary, slightly raise or lower the steps in the drawings. Important Requirement to the lower bench, it should be at a distance of at least 30 centimeters from the floor.
Experts advise making the lower stage of the structure not stationary, but portable. This will allow the bench to be taken outside for washing and airing, and when dismantling it, it will be possible to wash the floor under the “pyramid”.
Step by step guide
The first step is purchasing and preparing materials
First you need to familiarize yourself with the design diagram, calculate the approximate amount of materials and purchase them. It is important to take into account all the nuances, because if you buy too little wood, you will have to go to the store again, and if you buy too much, it will a waste money.

Before installation, all beams and boards must be sanded and sharp edges smoothed. In order for the material to serve for a long time, not rot and not suffer from pests, it must be treated with a natural antiseptic. At the same time, the use of synthetic products is unacceptable, because toxic fumes may appear under the influence of high temperatures.
The second step is assembling the frame
As we remember, the shelves consist of a frame made of flooring, and first it is necessary to assemble the first part of the structure. To do this, racks are installed from durable timber with a cross-section of 50x70 millimeters, the elements are mounted in a vertical position and secured with strapping. To make the frame strong and stable, the racks can be attached to the wall. Vertical supports are mounted in increments of 60 centimeters; with this design, the flooring will not sag.

The third step is the construction of steps
You can make and install both stationary and removable benches; they are made from thin boards using padding on the frame. This leaves a small gap of 1.5-2 centimeters, and the boards are mounted at an angle so that the water drains smoothly. It is necessary to select boards taking into account their thickness and width in a ratio of 1:4, in which case the shelves will be reliable and will dry out soon. If you plan to use a prefabricated structure, then you need to think about this when preparing for installation. This option has the advantage that the seats can be removed, washed thoroughly and dried in the sun.

To connect the parts of the shelves, it is necessary to use oak wedges; they are driven into pre-made holes at the joints. It is better not to use metal nails or screws in the bathhouse, especially on the steps, because the metal gets very hot and you can get burned. If you cannot do without such fasteners, then they should be recessed deeply into the tree or screwed in from the wrong side.
Fourth step - attaching the shelves
Average and top part the structures are attached to the wall with a ventilation gap of 9-10 centimeters. The lower part is usually made movable; special skids are used for this, and cleaning the room will be much simpler and easier. At the junction of the structure frame and the floor, rubber gaskets must be installed for waterproofing. When the bathhouse is not too large in area, the bottom shelf can be made in the shape of a triangle.

Rules for the construction of regiments
- There should be 10 centimeters of ventilation space between the walls and furniture. If you use a stationary fastening method, then this gap can be created using pieces of timber;
- For shelves, it is best to use 50x70 millimeter timber. The ratio of the thickness and width of the board should be in proportions 1:4;
- How many supports are needed can be determined by the thickness of the planks. If 22 centimeter boards are used, then there should be a distance of 60 centimeters between the supports;

- The top and bottom of the board must be tied. Such a simple solution will significantly strengthen the structure and extend its service life;
- Rubber pads should be attached to the legs of the lower bench. This will maintain the integrity of the floor and provide waterproofing.
Steam room accessories
When arranging a bathhouse on your site, you should also pay attention to optional, but quite convenient additions that will create comfortable conditions adoption of water procedures. So, today special stands for the head and feet are popular, and they are made of wood. So that you can lie comfortably and raise your legs above head level, you should use portable stand. The design of such an accessory is quite simple, and everything can be done with your own hands; to do this, you need to take two wooden surfaces and connect them at an angle of 30-45 degrees. There is also a special “pillow” for the head; it can be either stationary or removable.

Between the two stages the shelf structure should be open for ventilation, but this is not entirely convenient. The solution to the problem is very simple: you need to make a backrest out of wooden planks, but with holes that will provide the necessary ventilation. An excellent solution would be to use fragrant wood to create accessories, then these elements will also perform the function of aromatherapy.