Decorative plaster: preparation and application with your own hands. Decorating a house with your own hands: applying decorative plaster Technology for applying decorative plaster with a roller
Repairing and decorating the walls of an apartment or house is often an unpredictable thing. Sometimes, during a DIY renovation, a lot of new ideas are introduced into the original plan that can change designer style home furnishings. This happens when, after applying decorative plaster on most of the walls with your own hands, new wall design ideas appear.
Wide possibilities of decorative plaster - good and bad
Especially if you are lucky enough to see interesting and recent photos or videos about what is best to use and how to properly apply decorative plaster to a flat wall.
Before entering into the temptation to change the original idea in the design of the walls with your own hands and apply a new design, it is worth soberly assessing several main points:
- The cost of repairs, even if you do the basic wall decoration work yourself and strictly follow the original idea and estimate, always increases by at least 10-15%;
- Applying a new design to one room is not difficult, but such a move may require redoing much of the plaster finish. Apply it yourself in other rooms to preserve the style of wall decoration;
- The cost of repairs can double and lead to significant loss of time and effort.
Thanks to new materials and techniques for applying decorative plaster, you can achieve impressive results even with your own hands.
Advice ! With all the desire to make the most of the expressive possibilities of decorative plaster, it is worth stopping at one initial idea for decorating the walls and completing the renovation with minimal costs.
All interesting thoughts about decorating walls with your own hands can be collected and put aside until next time. Perhaps new money, new premises and new ideas will appear.
When and how to apply decorative plaster correctly
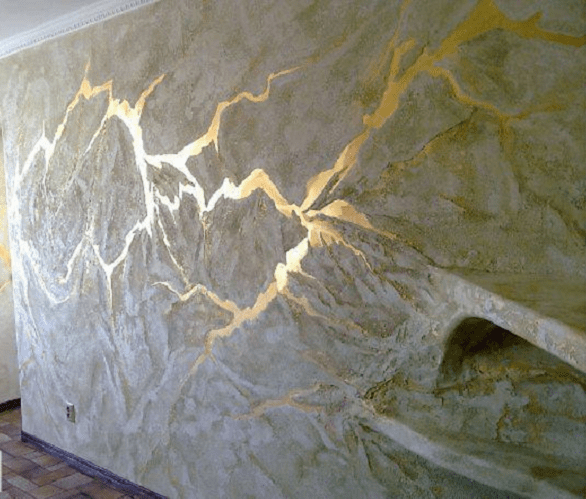
Modern wall design options allow you to create the most realistic simulations of various decorative surface, from stone fracture to bas-relief images. But the main advantage of decorative plaster is the incredible flexibility in choosing the surface texture with your own hands. In fact, the use of plaster decor made it possible to apply real artistic images and entire paintings to the walls. Just 15 years ago, individual painting of walls with one’s own hands was within the power of artist-designers, and such a pleasure would cost a lot of money.

Using the possibilities of decorative plaster
New decorative materials Finishing a wall with plaster can be called more of a decoration method than a means of leveling and protecting the masonry walls. Polymer binders, water-soluble paints and various fillers are used as components and bases of plastering materials, which, in fact, determine the appearance of the decorative component of the walls.
Among the many approaches to the process of applying decorative plaster, several main directions can be distinguished:
- If you have a steady hand and good skills in decorative modeling or drawing, perhaps with a little practice you will be able to apply ornaments or abstract designs to the surface in a theme that matches the style and purpose of the room. This is expensive in practical implementation, and it is even more expensive to then remake what has been done into something new;
- With good taste and sufficient financial resources you can use a combination of specific shades and colors with a monotonous relief applied to the plane. This is easier than the previous option decorative finishing, but will require serious design skills to coordinate and combine all the rooms of the apartment into a single plan;
- Simpler and more practical compositions make it possible to apply plaster decors that are simple in structure with a restrained relief or even a simple imitation natural stone, brick or classic options decor.
Advice ! If your time and finances do not allow you to apply decorative plaster in all rooms, you can, as an experiment, select the most crooked and inconspicuous plane in an apartment or house and try applying different types of plaster. This will allow you to understand and see with your own eyes the advantages of different techniques before general repairs.
Works with decorative plaster
The first two areas of working with decorative plaster will require you to accurately understand all the nuances of the colors and textures of the walls, so before applying a complex decorative pattern with relief images, it makes sense to first make sketches or select photos of the corresponding design solutions.

The more intricate the design, the more difficult it is to apply it to the walls. For example, without practice, not everyone can perform decorative plaster with a moire effect, as in the video
A decorative composition in the panel style will require good knowledge about the properties of plaster and considerable patience in working with it, but the resulting effect is worth it. The beauty and accuracy of the work can be appreciated in the video
In such cases, it is better to apply the decor by the hands of specialists; it is very difficult to achieve such quality on your own.
Important ! In addition to artistic taste and knowledge of the technological intricacies of working with decorative plaster, you should understand that applying the material to the surface is physically difficult, and the process will require considerable effort and endurance.
In your first experience of using decorative plaster, it is better to choose the simplest version of the design and try to apply it yourself.
The easiest way to apply decorative plaster
One of the most popular options for decorative plaster are lime composite compositions that imitate natural materials. Most often they use plasters that have been proven by practice and many years of use:
- “Venetian composition”, giving the texture of the wall in the form of an incredible number of intertwined relief elements;
- “Marmorino” and “Marseille”, similar to the surface of marble calcite, with a network of inclusions and cracks and polished surface transitions;
- Imitation of the surface of natural limestone using an uneven, deliberately rough and scratched surface, known as “Travertino”.
Important ! All of the above decorative plastering compositions are very easy to apply to the wall with your own hands, obtaining almost 100% surface quality.
Venetian pattern of decorative plaster
The secret of the recipe is to use ordinary ready-made plaster mixtures - starting and finishing - to produce decorative plaster. This reduces the cost by approximately half. The initial plaster mass is prepared by mixing both mixtures in a 50/50 ratio in the amount required to apply the composition to 1-1.5 m2 of surface.
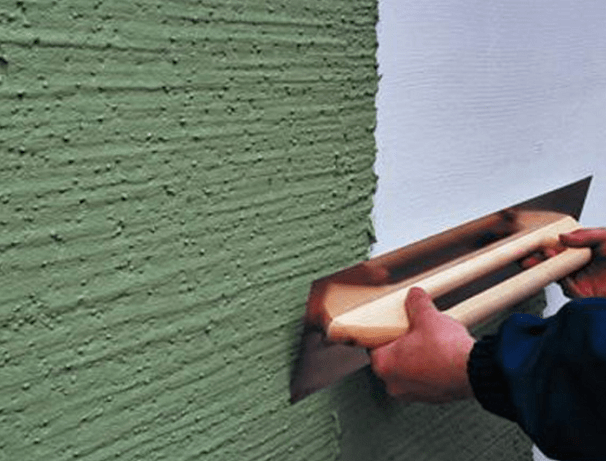
Before applying the composition, the walls are primed acrylic primer, and the composition is carefully applied with a spatula and a trowel onto a slightly dried surface. The thickness of the layer of decorative plaster is on average from 3 to 6 mm. As you apply the decorative base with a trowel, a relief pattern must be applied to the wet material. Specifics similar work well understood from the video
Important ! Sometimes there is a problem correct connection two sections of the wall on which a solution of decorative plaster was applied with a gap in time.
Most often this happens due to the need to prepare a new portion of the plaster mass. Therefore, the boundaries of the plots have to be “passed” by the tool several times.
After drying a little, the relief pattern is rolled with a special tool, making the pattern flatter and more expressive. As a finishing operation, which is the “highlight” of Venetian plaster, tinting paint is applied to the surface of the wall with a roller, giving the plaster the color of “old silver.” For this purpose in 250 gr. primers add approximately 50 grams of dye.
After the drawing has dried, it is necessary to apply acrylic varnish with a small addition of glitter. Decorative plaster takes quite a long time to dry - up to two days; after final drying it acquires a slightly lighter shade.
Travertino, what could be simpler?
This plaster composition based on lime and calibrated quartz sand. If it is important for you to combine a beautiful surface texture with the benefits of lime plaster, then the choice is obvious. Among the advantages of the Italian recipe is the possibility of applying plaster even on cement soil of concrete or brickwork, provided that the surface is first cleaned of dirt and deposits and a special primer mixture based on sandy quartz dust is applied.

This primer will allow you to level and hide the “flaws” of the wall and improve adhesion to the decorative layer. On a prepared surface, for example, sheets of plasterboard or plastered walls, decorative plaster can be applied in one layer, but with pre-treatment with an acrylic primer.
The decorative composition is applied with a spatula and a wide trowel, achieving a uniform layer 3-4 mm thick. The plaster pattern must be applied with a roller with a porous surface; the process of forming the surface is well understood from the video

If you like “brick” patterns on the surface of the walls, with the help of Travertino you can get a brickwork pattern. To do this, strips of construction tape are glued onto the previously prepared wall surface, imitating the seams between brick blocks. Next, you need to apply plaster and separate the strips from the main layer, thereby creating a texture that imitates silicate or ceramic brick.
Conclusion
Simple compositions of decorative plasters do not mean that they are primitive in beauty or design. Most often, such options are used to apply a base for hand painting, painting or applying bas-reliefs from putty.
Decorating a house with decorative plaster is becoming increasingly popular. Decorative plaster of walls is done not only in private houses, but also in apartments. In this regard, many are interested in what kind of material this is and what it is intended for.
What is decorative plaster? This is a special, plastic mixture, often with the addition of various kinds of stones, mica, etc. It is intended for decorating and finishing walls, less often ceilings. How is it different from ordinary plaster? Let's read its composition.
Decorative plaster is made from:
- Lime, cement, gypsum, acrylic, silicate and others - as a binding component. They ensure that the plaster adheres to the surface. Gypsum is used very rarely due to the fact that such a mixture will harden quickly. And there will be difficulties with applying a drawing or pattern.
- Fillers - most types of decorative plaster contain fillers such as sand, mica, marble chips, pebbles, etc. They serve to give the plaster that same decorative effect.
- Additives - these can be agents that prevent the formation of foam, plasticizers, etc.
- Water is, finally, the solvent for this whole mixture.
Simply put, decorative plaster differs from ordinary plaster only in the filler. But it is these components that make it unique. What distinguishes decorative plaster from traditional types of finishing materials, such as wallpaper.
Wallpaper or decorative plaster
If you are faced with a difficult choice of material for wall decoration, choosing between decorative plaster and wallpaper that imitates it, we suggest you compare them to make the right decision.
Firstly, the price of the material. The simplest wallpaper for decorative plaster is cheaper than the plaster itself. However, not all so simple. If we add up preparatory work for wallpapering, puttying, stripping, glue, etc., then the benefit will not be so striking. The only exception is Venetian decorative plaster. Here, “Venetian” wallpaper will cost much less than the original.
Secondly, the service life. Decorative plaster has a clear advantage here. It will serve you for at least 30 years. And some of its species are up to 50-60 years old. Wallpaper will have to be changed after a maximum of 15 years. And in most cases, within 5-10 years. By the way, do the math and include changing the wallpaper in the paragraph above about comparing prices for materials.
Thirdly, maintenance of the finish. Decorative plaster is easy to wash and clean. Not all types of wallpaper can boast of this.
Fourthly, this is the uniqueness of the resulting decorative plaster pattern. Wallpaper has a finite number of types of patterns.
We could go on and on about the advantages and disadvantages of both decorative plaster and wallpaper for decorative plaster, but the conclusions are already clear. If you want simplicity and cheapness, wallpaper is your choice. If you have the opportunity to spend money, if you want uniqueness in decor and durability, finish it with decorative plaster.
Types of decorative plaster
All decorative plaster is divided into two large groups.
Types of decorative plaster.
- decorative plaster for interior work
- decorative plaster for exterior use
These two types of plasters differ in that external decorative plaster is more resistant to ultraviolet radiation, i.e. fades less in the sun. And facade decorative plaster tolerates “wet” weather conditions much better. It is resistant to rain, snow, etc.
Due to its properties, decorative plaster for the facade of a house exists in fewer types. Therefore, we will consider options for decorative plaster for interior decoration. Because they also include options for the facade of the house.
Types of interior decorative plasters
1. Relief - so called because the pattern they create turns out to be in relief. Divided into subspecies:
- Structural decorative plaster - the pattern is obtained mainly due to the composition of the decorative plaster. Pebbles, quartz sand and the like in the mixture give the pattern a certain structure when applied. Typical representatives are decorative plasters “Bark beetle”, “Fur coat”, “Lamb”.
- Textured decorative plaster – this type of decorative plaster is distinguished by its fine grain and plasticity. Here the pattern is obtained through a special technique of applying plaster. To do this, they use both improvised means - brushes, film, sponges, etc., and industrial special products - rollers with a specific stencil design.
2. Smooth - accordingly, the pattern turns out smooth. A representative is “Venetian” decorative plaster imitating marble or onyx finishing.
Decorative plaster for interior wall decoration and facade decoration also differs in its composition. Depending on the main connecting element, decorative plasters are divided into the following types:
- Acrylic decorative plaster – contains acrylic resins. It has good protection against water and moisture, but has poor breathability. Weak abrasion resistance compared to other types of decorative plaster. Low fire safety.
- Mineral decorative plaster - consists mainly of cement, lime and gypsum. Good, natural plaster, suitable for finishing rooms with normal humidity. On the facade, in the bathroom and kitchen, it requires additional protection in the form of painting, varnishing, etc. Good air permeability makes the indoor microclimate healthy and pleasant.
- Silicone decorative plaster is a universal mixture for any premises and building facade. Good vapor permeability, moisture resistance and abrasion resistance make this type of decorative plaster suitable for any finishing work.
- Silicate decorative plaster is another universal mixture for decorating indoors and outdoors. Not afraid of water sun rays, antistatic. But application requires skill, as the plaster hardens quickly.

We hope you understand the types and types of decorative plaster. Let's look at a photo of decorative plaster in the interior.
Decorative plaster in the interior
Using different types of decorative plaster and methods of applying it, you can achieve very different design effects. Here everyone will find the pattern that they like. However, keep in mind: often the samples of decorative plaster in the store and what you end up with on the wall may not match. After all, each application of decorative material is different from the previous one. But despite this, the resulting effects can be generalized.
Effects of decorative plaster
- Venetian plaster. It looks like a polished stone or marble surface. Apply on any surface prepared for its application.

- Travertine effect. A complete imitation of stone called travertine. The porous surface and light pale color make it an excellent room decoration.

- Concrete effect. With the help of this type of plaster, an absolute imitation and creation of the effect of a concrete wall occurs.

- Skin effect. For lovers of discreet luxury, this look is ideal. Thanks to its texture, it conveys well and creates the effect of a wall covered in leather. At the same time, thanks to the variety of tools, with the help of decorative plaster in the interior of the room it is possible to create an imitation different types skin.

- Wood effect. Incredibly accurately imitates the appearance of wood covering, thanks to the accuracy of the reproduction of small details and patterns of the plant.

- Silk effect. To create it, a mother-of-pearl coating is used, which, smoothly shimmering, creates the feeling that the wall is covered with silk.

- Brickwork effect. It is popular due to its low cost compared to real brick and its accurate imitation of the presence of brick in the interior.

- The "bark beetle" effect. Using this technique, you can get a pattern that imitates the effect of a surface damaged by a bark beetle.

- Orange peel effect. It will be an ideal option for painting under oriental design.

- Wave effect. Simulates the look sea wave. At correct selection The paint looks very nice on the surface.

- "Flowers" effect. Decorative plaster “flowers” is used in frequent cases and stands out among the general variety of styles of decorative plaster. When creating a pattern, the shape and appearance of the flower depends solely on the spatula used and its movements. In this case, there is no connection to color and shape. You can decorate and paint the finished wall either in one color or using different techniques.

Types of finishing with decorative plaster are very diverse. Some use ready-made, template forms, while others can create their own art and create patterns that are pleasing to their soul.
The use of decorative plaster in the interior of rooms
Decorative plaster in an apartment performs one of the main functions of room decoration. A correctly selected design of decorative plaster will make the interior even more beautiful and perfectly complement the style taken as a basis. Also, each room of the apartment requires an individual approach due to the peculiarities of its location and external characteristics.
The use of this type of finishing material in the kitchen will excellent choice, since it washes well and looks quite decent on the wall surface. Types of plaster used for decoration: Venetian, with imitation of marble or stone surface; imitation silk, plaster with small or large crumbs, etc.

The main thing that is worth emphasizing is that decorative plaster should be applied only to one wall of the room, so as not to make the kitchen too “heavy” and not spoil the design of the room.

Often, when finishing with decorative plaster, Venetian plaster or various textured types that are easy to clean are used for the bathroom.
Decorative plaster in the hallway, as well as in the corridor, forms the main impression of the apartment’s design. Speaking about the types of decorative plaster in rooms of this type, we can name the main ones that best meet the requirements (resistance to cold, moisture and good operation): velvet and silk effect, “bark beetle” effect and Venetian plaster.

Finishing the balcony with decorative plaster allows you to maintain the harmony of the design with all rooms of the apartment. Also, it performs an excellent heat-retaining function, is quite easy to operate and maintain, insulates sound and, at the same time, allows the walls to breathe. To decorate walls, various types of plasters are used, from textured plasters, with imitations of various plants and reliefs, to, for example, imitations of stone or brick.

DIY decorative plaster
If store-bought decorative plaster options are not suitable for you for some reason, you may be thinking about how to make decorative plaster with your own hands. Well, everyone can do this. In addition, you can save a lot on materials. Let’s make a reservation right away: decorative plaster made independently will not be as high quality and durable as factory-made material. But the service life of such decor of 10-15 years is quite suitable for most people. Especially considering the relative cheapness of such finishing.
So, how to make decorative plaster? It all depends on what kind of room you want to decorate with homemade decorative plaster. Or maybe you want to finish the facade? In these cases, the material used will be different.
Do-it-yourself decorative plaster for interior decoration is made from either gypsum or cement putty or plaster.
For finishing residential premises with normal humidity, do-it-yourself decorative plaster from ordinary putty. It is made like this:
- We take the same amount of starting and finishing gypsum putty. Instead of starting putty, you can use gypsum plaster. Then you will get the so-called decorative plaster from ordinary plaster. They usually mean gypsum plaster.
- Pour the mixture of putties into a bucket of water at room temperature or add them alternately.
- You can add a little diluted wallpaper glue. This will improve resistance to mold and mildew. And it will slightly increase the time you use the mixture.
- Mix everything thoroughly with a mixer or a drill with an attachment.
- The resulting mixture should have the consistency of regular sour cream.
- DIY decorative plaster using ordinary putty is ready!
Important! Decorative plaster prepared in this way dries quite quickly. Prepare the amount of solution that you can apply in 10-15 minutes. It will be even better if two people apply the plaster: one applies the base layer, the second immediately completes the drawing.
This decorative plaster can also be used in rooms with high humidity such as the kitchen and bathroom. But it will definitely need to be protected with water-repellent varnish.
This type of plaster is not suitable for finishing the facade. But you can replace gypsum putty with regular tile adhesive. Any cement-based adhesive mortar will be suitable for gluing ceramic tiles. For greater flexibility and increased adhesion, add a little primer to the water.
From such a mixture, for example, you can make decorative bark beetle plaster with your own hands if you add a small stone of a fraction of about 2 mm to it.
Important! Do not forget that the decorative plaster that you have made will need to be protected from moisture with façade paint.
How to apply decorative plaster
Regardless of whether you made the decorative plaster yourself or bought it ready-made in a store, applying decorative plaster is the same.
First, you need to learn how to properly apply decorative plaster. This knowledge will help you understand the process better and supervise the workers. And they will be even more useful if you do the finishing with decorative plaster yourself.
Let's prepare the necessary tools for decorative plaster:
- Construction bucket
- Trowel for decorative plaster
- Spatulas
- ironer
- Rollers for decorative plaster
- Masking tape (tape)
- Wax for decorative plaster
- Mixer or drill with attachment
- Varnish for decorative plaster
- Stencils for decorative plaster
It is possible that you do not need everything on the list. It depends on the type of plaster you have and what technique of applying decorative plaster will be used. For example, if decorative plaster is expected to be applied with a roller, then you need one. If decoration will be done using improvised means, then add them to the appropriate list.
So, how to apply decorative plaster on walls? Or maybe you need decorative plaster on the ceiling? Let's try to summarize the processes that need to be performed regardless of the type of plaster and the place where it is applied.
- Preparation for decorative plaster - includes preparing walls or ceilings, preparing tools, sealing contours for decorative tape with masking tape.
- preparing decorative plaster - be sure to read the manufacturer’s instructions, if available. It contains such useful information as the consumption of decorative plaster per m2, the required amount of water and other proportions, the time of working with the mixture, the drying time of decorative plaster and much more.
Let's take a closer look at some of the nuances. Do-it-yourself decoration of walls with decorative plaster begins with preparing the base. Whether it's walls or ceilings, they should be free of large potholes, cracks or sagging. The old finish must be cleaned and the surface primed. If you want to apply decorative plaster on drywall yourself, then putty the joints and screw caps. Walls for decorative plaster are not prepared as carefully as the ceiling. The thing is that a slightly larger layer of decorative plaster is usually applied to the walls than to the ceiling. And it perfectly hides minor imperfections: scratches, peeling putty, etc.
The exception is the application of Venetian plaster. In this case, the walls, like the ceiling, should be as smooth and clean as possible.
Methods of applying decorative plaster
Decorative is applied interior plaster with your own hands on the prepared surface with a spatula and trowel. You can use a smoothing iron. In some cases, a spray bottle is used if spray application is intended. In any case, the technology for applying decorative plaster at the initial stage is the same. First, apply the base layer, the foundation. This layer is made continuous. Then it is decorated until it dries. The method of decoration depends on the type of your plaster and your imagination.
If you are doing decorative wall plaster with your own hands for the first time, practice on a piece of drywall or on that part of the wall that will be covered by furniture. As you gain experience, move on to other areas.
The technology for applying Venetian decorative plaster is somewhat different. It is applied in thin layers rubber spatula with neat multidirectional strokes. There can be 5-8 such layers. Before applying the next layer, allow the previous one to dry thoroughly.
Decorative plaster of the facade
Finishing the facade with decorative plaster yourself is not a difficult task. The main challenge is working at height if your home is more than one story high. The very decorative plaster of a house outside is practically no different from the technology of applying decor inside a room. Let's look at decorative plastering of the facade of a house using the example of the most popular type: applying decorative bark beetle plaster.
How to apply decorative bark beetle plaster
To begin, prepare the surface as described above: level big differences heights and clean. Then apply primer. It is better if it is soil with quartz sand. Prepare a mixture of decorative plaster. Apply a small layer of plaster with a trowel. Let the “bark beetle” dry a little and start decorating.
Move the trowel along the plaster using a rotating motion. Or you can only make vertical or horizontal movements. It all depends on what kind of drawing you ultimately want to get. Movements should be without strong pressure.
Painting decorative plaster
There are no special secrets in painting decorative plaster. We think everyone can cope with this task. Just choose the right paint for facade or interior work, as well as the hairiness of the roller. A solid background is made with a long-haired roller. If you want to paint only the top protruding layer, use a foam roller and paint without pressing the roller too hard against the wall.
Repair of decorative plaster
Decorative plaster periodically requires repair or restoration. Cracks, swellings, peelings and chips appear on it. It is not difficult to repair the damaged area with your own hands.
If you notice swelling of the plaster, go over the entire surface of the wall with a wooden hammer and listen to how it sounds. A dull sound will tell you which area has peeled off. This area of damaged plaster should be removed using a hammer drill, chisel, hatchet, etc. Then clean the wall with metal brush and prime. Before applying a new composition of decorative plaster, wet it well warm water not only the cleaned area, but also the adjacent plaster for better adhesion of the materials to each other.
Try to apply decorative paint and repeat the pattern that was there earlier. To ensure that the difference in the pattern is not so noticeable, repair the plaster by knocking out a rectangular area.
After the plaster has completely dried, it must be repainted. This way you will mask the joints and heterogeneity of the layers.
Cracks in decorative plaster can be repaired in a similar way. The crack should be widened and all the measures described above should be carried out.
How much does decorative plaster cost?
The price of decorative plaster varies greatly depending on the manufacturer, country of origin and the type of plaster itself. The cheapest decorative plaster costs about 2 US dollars per kg/l. The best decorative plaster known Italian manufacturers can reach up to a hundred or more dollars per kilogram or liter.
On average, you can voice the following prices: simple relief plaster will cost about 5 dollars, and Venetian plaster about 15 per kg/liter.
Prices for work with decorative plaster vary less and depend on the type of plaster and the qualifications of the craftsman. The average price for work with decorative plaster is $10-30 per square meter. “Venetian” costs more than working with textured plaster. However, take into account the surface preparation work and subsequent protection of decorative plaster with wax, varnish, paint, etc.
Decorative plaster reviews
Our description of decorative plaster should have helped you decide whether you need such a finish and whether it suits your home. And if you answered “Yes” to these questions, then you most likely asked yourself: decorative plaster, which is better?
Reviews from real buyers and users play an important role in choosing decorative plaster. Those who have lived with decorative plaster finishing for several years and can tell you what nuances should be taken into account. Or warn against purchasing this or that type of decorative plaster, or purchasing from a specific manufacturer or retail chain.
Here are some typical reviews about decorative plaster:
We made ourselves a Venetian in green tones in our bathroom. Looks great. It wouldn't be the same with tiles. And the decoration without seams changes color depending on the lighting, it’s a sight to behold. True, the cost was considerable. But they were willing to pay for beauty.
I decorated my toilet with textured plaster. I did it myself after reading articles on the Internet and watching master classes. It fit perfectly on plastered walls, but there was no way to finish the LSU box. The glass-magnesium sheets had to be plastered on the floor, because streaks from the decorative plaster remain.
I made the plaster itself and applied it myself. The whole family decorated it and are very pleased with the result. No one else has or will have such patterns. And it turned out to be very budget-friendly, I didn’t expect it.
The thing is certainly remarkable, but the price is exorbitant. I'll put up some decorative wallpaper for myself. Cheaper and more practical.
We did decorative plaster in the kitchen. The walls look very interesting. But it would be better if the apron was made of tiles. I'm tired of washing off grease near the stove. Don't repeat my mistakes.
In this article we will talk about ways to apply decorative plaster with your own hands. The process itself is not complicated, but it will require your attention and accuracy. Well, first things first...
Method 1
Applying decorative plaster to walls with your own hands. Sequence of work
To date, a great variety of the most different options wall decoration, however, decorative plaster has earned particular popularity and love due to its combination of aesthetics and ease of application. Applying decorative plaster with your own hands will not require enormous effort or special experience (although you may have to practice). In addition, when you finish finishing the walls, you can clean them with detergents without fear of water or these substances damaging the finish.
Thus, plaster is one of the most practical options for wall decoration. If you do everything right, the plaster will serve you well. long years, without requiring repair or restoration.
How to choose decorative plaster
Choosing plaster is a very important stage, but it is not particularly difficult. Plaster can be classified in different ways. For example, depending on what kind of surface you get at the end of the work, or on the method of applying the coating. And if with the second characteristic everything is more or less clear (having heard “roller” in relation to finishing, you will understand that the plaster is applied with a roller), then let’s dwell on the types of surfaces in a little more detail.
So, decorative plaster can be:
1. Structural. If you are offered “structural plaster” in a store, this means that special granules have been added to the paste, which, in fact, is any plaster. For example, pebbles or wood fiber - depending on what surface this finish imitates.
2. Flock. This type implies that tiny multi-colored grains will be placed on top of the glue.
3. Venetian. This is one of the most luxurious views plaster, which is made using marble flour. As a result, your wall will look like marble.
4. "Semi-antique." Realistic imitation of “scuff marks”.
In most cases, decorative plaster is a homogeneous paste with the addition of a certain pigment, which gives it color. However, when choosing plaster, think about whether you want to get flat wall or prefer an unusual texture. In principle, you can create a spectacular relief using ordinary plaster, but it is much easier to initially buy so-called textured plaster. If in the first case you will need to create the relief manually, then in the second you simply apply the plaster to the wall in an even layer.
The base of the plaster is also important. Based on what is included in the base, all decorative plasters can be divided into the following types:
- Mineral. This is a very fireproof material, which is usually used for exterior finishing.
- Acrylic. This is one of the most common types of plaster, which is most often used for finishing residential premises.
- Silicate. There is an opinion that this type of plaster can be harmful to health, so it is better not to purchase silicate plaster for your own home, even though silicate material is the easiest to apply.
How to prepare a surface for decorative plaster
Like any other finishing work, the application of plaster begins with the surface of the walls being prepared for further processing. This is done as follows.
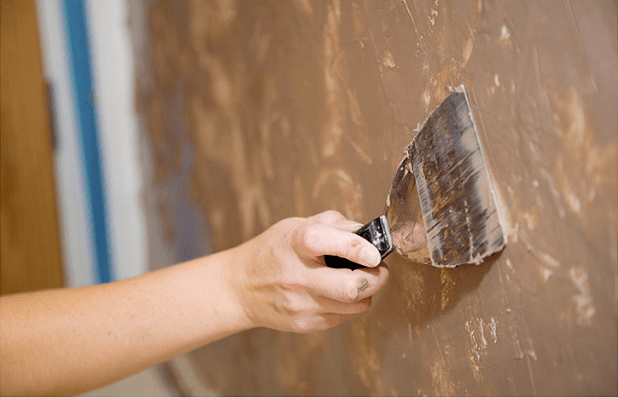
If there is old finish on the wall, it must be removed, and then the surface must be thoroughly washed to make the wall as clean as possible. When the surface is dry, take sandpaper and carefully level the wall: there should be no irregularities left on it. Please note that both the application of plaster and the preparation of the surface should take place at a moderate room temperature: it should not be too cold or too hot.
After cleaning and leveling the wall, the surface must be coated with a primer, which will provide better adhesion between the wall and the decorative plaster. If there are any elements on the wall that could cause rust, such as dowels, they should be insulated - otherwise the rust will penetrate into the wall covering
How to apply decorative plaster
Once you have prepared the surface, you can proceed directly to applying the plaster. Applying decorative plaster to walls with your own hands requires following the instructions that come with the material. Carefully read the manufacturer's recommendations before starting work.
You need to dilute the plaster correctly (only if it is not silicate - this plaster is sold ready-made, but, as we have already said, it is better not to apply it in residential premises).
Plaster is applied to the walls using a stainless steel spatula or a plastic trowel. The choice of application tool depends on what the material manufacturer recommends.
Please note: when working with decorative plaster, you cannot use steel tools, otherwise rusty marks will inevitably appear on the surface of the wall.
Approximate list of tools required for applying plaster:
- Container in which the mixture is diluted .
- Spatulas (trowels).
- Ironing iron.
- Painting tape - you can use it to protect surrounding surfaces.
- Roller or mitten for application.
- A damp cloth - you will use it to clean your instruments
- Wax - they need to coat the plaster after finishing the job to make the coating more durable.
- Gloves.
Before you start applying plaster, turn off everything heating devices. If the room is very hot, the plaster will harden too quickly, which means it will be difficult for you to work with it.
Do not leave the can of material open throughout the entire work. This is necessary so that the material does not lose its properties, and also in order to protect the plaster from debris or excess moisture getting into it. The correct method for applying plaster will be indicated on the packaging - a lot depends on what kind of plaster you have chosen.
The packaging with the material should also indicate the drying time of the plaster. The work can be corrected, but only until the plaster hardens. As soon as this happens, any attempts to change something will cease to produce results, on the contrary: by running a tool over a dried surface, you risk damaging the plaster and completely ruining your own work.
Most often, decorative plaster is applied using a trowel or spatula, and then leveled using a roller.
If you chose textured plaster with fine grains, you will need a spray gun to apply the material to the wall. Don't forget to cover nearby surfaces with masking tape, otherwise you'll get them dirty. In addition, make sure that the plaster is applied in an even layer. The thickness of the layer can be a couple of millimeters, or even more. Apply the material continuously, without pauses.
There is another way. The prepared solution can be sprayed onto the wall using a stick and a broom. However, don’t be discouraged if you fail to apply the plaster correctly the first time using this method. You can either practice spraying it on another surface, or use the easier first method.
How to give plaster texture
If you initially chose the so-called textured plaster, then the relief on the wall surface will appear by itself, without additional effort. But you can form a spectacular relief of the wall surface without any help special materials. So, if you apply the material with infrequent, broad strokes, the wall will turn out visually smooth, but small “strokes” using a spatula will give the wall a more original and interesting look.
To get an unusual grooved surface, you can use special grater, or you can give it relief with the same spatula. It is better to do this together with an assistant: one applies quite thick layer plaster, and the second immediately forms the texture, before the material has time to harden.
Plaster is very plastic: it can be given almost any shape - the main thing is to practice first, because this procedure requires experience. Please note that if this is your first time working with this material, or if you have no experience and have undertaken to do not the usual smooth finish, but a textured one, then you most likely will not be able to achieve the desired effect the first time. So you need to practice on cardboard first to get a beautiful relief.
Drying speed of decorative plaster
The drying time for this finish is several days. The more precise time depends on the type of mixture, its composition and manufacturer. The time required for the material to dry completely must be indicated on the packaging.
In a couple of days the plaster will dry and you can touch the walls without any problems, but complete drying will only occur after a week or so.
Method 2
Is it possible to make decorative plaster with your own hands without experience and without knowing what materials are used for finishing? U ordinary person who has decided to make renovations in his own apartment with his own hands, the answer will be unequivocal. Of course, it’s difficult to make such decoration as in the photo (I’m not talking about the masters), but if you really want, for example, to make an unusual decoration of the walls in the kitchen or in the hallway, but you’re pretty tired of the wallpaper, what should you do?Most often, the person who started the renovation is not a specialist in decorative plaster, and even more so does not know what materials are needed, for example, to apply Venetian plaster, or in what sequence to carry out all the operations.
So, let's begin. What materials are needed: putty (Turkish “satengips”), fugenfüller (for sealing seams in drywall), primer (in principle, you can use any), paint (for example, triora No. 7, or choose one suitable for painting decorative plaster), color for paints (what color is needed here, choose that color), glaze (Trior company with the “silver” effect). Everything according to the materials.
By tool: drill with a mixer (for stirring the putty), a pair of spatulas large and small (for applying the mixture), a trowel with rounded corners (for forming the structure of the decorative coating), a grater with sandpaper(for leveling the plaster), two rollers with large and fine pile (for painting), a sponge (for applying glaze), well, that’s all, more details on the tool for painting work.
On the walls: in principle, with this method of applying decorative plaster there is no need to particularly prepare the walls, since the decorative layer will be relatively large and can hide all small unevenness. But, of course, if the walls are very uneven, then it is better to level them. The main preparation is priming, that is, before applying decorative plaster, we prime the walls.
So, we have prepared the materials and tools, let’s begin: mix the putty and fugenfüller in a bucket in a ratio of approximately 1:1. Instead of fugenfüller, you can use rodband or isogypsum plaster, but in this case the structure will be a little rougher than when using a mixture with fugenfüller.
Next, apply a layer of putty approximately 2-4 millimeters thick to the wall with a regular spatula. By quadrature, let’s say, as much as you stir the mixture, apply that much at a time, well, usually with such a layer it turns out from 4 to 6 square meters, that is, half of a small wall can be immediately sealed.
The next stage is the formation of the structure. There are many ways and it is not necessary to use a trowel; you can go over the applied layer of plaster with a regular sponge or sponge roller, for example, you can buy a special roller to form the structure of decorative plaster. There are many ways, but if you want to do something unusual, you can simply try, for example, on a piece of drywall, creating your own method of decorative plaster, especially since you can find many samples of ready-made decorative plaster on the Internet.
So, we form a structure with a trowel, doing it this way: we lightly press the trowel to the plaster, and as if we are trying to “tear” it from the wall. With such movements we go over the entire layer of putty, slightly short of the end of the layer, about 2-3 centimeters - this is necessary so that after applying the next layer of putty, when forming the structure, there are no visible seams at the joint of the plaster.
We smooth the resulting structure with circular movements of the trowel - try it experimentally: if you don’t like the design in some place, we make the structure as described above and smooth it. At least 20-30 minutes before the plaster begins to dry, so there is time.

We applied the structure, corrected it in some places (as without this, after all, for the first time), we wait until it dries. Usually, at normal summer temperatures, it will dry the next day, after which further processing can begin.

Unpainted wall decoration with decorative plaster looks approximately the same as in the photo. I repeat once again - this is one of the methods of decorative plaster that can be done with your own hands without large material costs.

When painting, we immediately apply the background with a long-haired roller to paint over the structure. A beige background was used in the photo.

Next, use a short-haired roller to apply the main layer of paint, that is, the short hair prevents the paint from covering the main background. It turns out that the background paints over the recesses of the plaster, and the main paint paints over the top.

We wait for the paint to dry for about 30-40 minutes and proceed to the final processing of the decorative plaster with glaze.
A few words about glaze. In the photo, glaze with a “silver” effect was used, slightly tinted in beige color.
The glaze is applied with a sponge. There is nothing complicated here, the main thing is not to make omissions.

Well, your DIY decorative plaster is ready. Try it: there are a lot of options and ways to decorate walls, the main thing is to use your imagination, and, we hope, this article was able to help you with the difficult repair.
The general concept of “decorative plaster” unites the most diverse materials in their composition - this is flock, and liquid wallpaper, and “Venetian”, and textured, and imitation of various materials - wood, stone, leather, fabric and many others. Decorative plaster forms original style premises and often becomes its basis. Decorating walls with this material combines artistic and painting work.
We offer you some tips on how to properly apply decorative plaster yourself.
Preparing the walls
Before applying decorative plaster, you must thoroughly clean the wall of old wallpaper or loose pieces of old plaster. Then the surface of the walls is rubbed with emery cloth, bulges and unevenness of the walls are removed. All dust that settles on the walls during work is carefully swept away with a brush.
It is necessary to apply primer under decorative plaster. A regular primer is applied with a spatula, and an impregnation primer is applied with a roller. After the wall has completely dried, you can begin working with decorative plaster.
Stages of work

Preparation of decorative plaster is carried out in accordance with the instructions printed on the packaging, which is a plastic bucket of various capacities. Usually it all comes down to thoroughly mixing the composition with a special attachment inserted into a drill. If you don’t have a drill, mix the contents of the bucket manually with a narrow board or piece of reinforcement.
A subtle point in the simple work of applying plaster is the addition of dye. You have several options:
- add the dye immediately to the bucket with the composition in a ratio of 1:10;
- add colorant to the finishing composition
- At the end of the work, dilute the dye in equal parts with the plaster composition and apply it to the wall with uneven, chaotic strokes with a regular sponge or roller.
The third option, of course, is the most labor-intensive, but plaster done this way looks very impressive.
Once you have decided on the colorant, you can begin applying the plaster. Using a spatula or trowel, apply a layer of the composition to the primed surface of the wall. Layer thickness 2-5 mm.
Now, of course, you will already notice and understand why it was necessary to apply a primer:
- the composition lies on the surface of the walls very easily;
- not absorbed by the pores of the wall;
- The surface of the walls is quite smooth and has good adhesion.
The composition is applied to the wall with a tool in one direction - either from bottom to top and vice versa, or in a circular motion.


Right now is the right moment to show your artistic imagination. The applied layer of plaster can be given a striped structure with a brush.

You can make a relief. To do this, toothed trowels or figured rollers are used. Very convenient to work wide instrument, which immediately covers a large area.

A very interesting relief, reminiscent lunar surface, it turns out if you take a crumpled plastic bag and lightly press it on the wall.

In addition to the listed tools, various applicators and stamps are used to create relief patterns; with their help, repeating reliefs are obtained.
Decorative plaster dries from 8 to 48 hours, depending on the thickness of the layer. By dry wall You definitely need to lightly go over it with a medium-sized emery cloth in order to remove the sharp raised edges. All dust must be swept away again.
Finally, the plastered surface is covered with a finishing solution, which must be selected according to its compatibility with the composition of the plaster. Instead of a finishing coating, builders often use a special wax that makes the wall highly waterproof. It can also be coated with a coloring compound.

A good and justified reason for pride is decorative plaster with your own hands. This is also an opportunity to emphasize the individuality of a home or room interior. There are a variety of materials on the market with which you can realize your wildest, most incredible fantasies. The great advantage of this method of decorating a house or apartment is the ability to create a unique pattern. Even with similar materials it is difficult to create the same finish on different walls, and given the wide selection of options offered, it is quite easy to achieve the uniqueness of your home.
Types of decorative plaster
Before deciding on such a finish, you should find out what decorative plaster is? This decorative coating walls, creating a certain artistic effect. Depending on the method by which it is achieved, plaster is divided into two types:
- structural - the decorative layer is formed due to the composition of the mixture, various additives (granules, fibers, etc.), used for finishing facades and interior decoration;
- textured - is the result of the work and artistic imagination of the master.
Of course, such a division is conditional. You should not think that it is enough to simply apply and smear structural plaster on the wall and you can get a masterpiece. The same is true with a textured look; by spraying a cement “coat” with a broom onto the wall of the barn, in essence, they create texture. But the aesthetic value of such “art” is extremely low.
To create a high-quality, beautiful covering on the walls, you need appropriate materials, tools, and knowledge of the basic basics of work. To apply decorative plaster with your own hands, a steady hand and good taste will also help. .
Mineral plaster
This is the most common plaster, the binding element of which is cement (gray or white) or gypsum. Basically, mineral plaster consists of natural components. However, in recent years, more and more different additives (polymers, fibers, etc.) have been used. Widely used for both exterior decoration of buildings and interior work.
One of the advantages of mineral plaster is vapor permeability. Due to its high alkalinity, it is characterized by high resistance to the formation of fungus and mold. However, it has low elasticity, which can cause cracks to form on the surface. As a rule, mineral plaster is white or gray. However, it can be painted according to personal preferences.
To protect yourself from unaesthetic stains on the façade or interior wall, if suddenly the paint is damaged and a different color appears underneath, you should use paint-painted plaster (colored). At the same time, it is worth considering that the range of colors of plaster is limited.
Acrylic plaster
The most popular type of plaster, which combines high quality with a reasonable price. Acrylic plaster is also highly resistant to mechanical damage. The color lasts for a long time without the need for touch-ups. This decorative plaster is used for walls inside and outside buildings.
The disadvantage of this type of plaster is that the acrylic dispersion is a breeding ground for microorganisms, as a result of which, after a few years, pigment spots in colors ranging from green and blue to black may appear on the surface of the plaster.
To prevent this, manufacturers offer immunization packages for decorative plaster against mold and mildew (biocides). Contaminated acrylic plaster can be saved. However, this comes with additional costs.
The facades of houses located in places of high humidity (near seas, lakes, rivers, ponds), near large concentrations of trees (forests, parks), in rural areas and interior rooms with high humidity. In such places, other types of plasters, painted in the paste, are recommended. It is worth adding that decorative acrylic plaster, given its low vapor permeability, should not be used for plastering mineral wool.
Silicate plaster
Silicate plasters are produced on the basis of potash liquid glass. Due to this, their resistance to the formation of fungus or mold is very high - it is ideal in places where decorative acrylic plaster will be subject to intense corrosion and biological effects. The cost of this type of plaster is slightly higher compared to acrylic counterparts.
With appropriate flexibility, silicate plaster has a significantly lower coefficient of diffusion resistance against moisture vapor. It follows that it works well in a thermal insulation system using mineral wool.
In addition, it is more impervious to dirt and has high color fastness (provided that the manufacturer used exclusively high-quality mineral pigments during the painting process). The disadvantages of this type of plaster include a small palette of colors for ready-made plasters, as well as its application during DIY repairs - it requires a significant level of skill.
Silicone plaster
Without a doubt, the best and most expensive type of plaster. Combines the advantages of high elasticity, hydrophobicity, with low diffusion resistance. In addition, it is extremely resistant to biological corrosion, mechanical damage and contamination. The price is high, but no matter how much it costs, it matches the quality.
Mosaic plasters

Mosaic plasters are often called “pebble” plasters because of the stone grain they contain (marble, granite, quartz chips). These are decorative thin-layer plasters, that is, those that are applied in layers with a thickness contained in the aggregate mass, usually from 1 to 3 mm. The basis of mosaic plasters is transparent acrylic resin. Compared to other decorative mixtures used in construction, they are more flexible and more resistant to damage.
They withstand cleaning without problems - you can wash them frequently without the risk of damage. They can be used to cover areas subject to mechanical stress and pollution, both for interior wall decoration and outside buildings.
Currently, manufacturers of insulation systems offer, in addition to the four types listed, hybrid plasters, for example, acrylic-silicone or silicate-silicone. It is a mixture of different types of plasters, created to combine their different properties.
A separate group can be divided into plasters, which, due to historical prerequisites or technological (geographical) features, fall somewhat out of the general range and even have their own names.
- Venetian - decorative plaster for interior decoration is made on the basis of lime or lime-gypsum mortar with the addition of marble, granite dust or other stones. It can be made on the basis of various synthetic binders. As a rule, ready-made mixtures are sold (diluted and prepared for use), and can also be purchased in the form of ready-made dry mixtures. Its surface is perfectly smooth and slightly glossy. To achieve a good effect, it is necessary to apply up to five (sometimes ten) layers to the wall, which is a labor-intensive process that requires special skills and patience. It is difficult to do such artistic plaster with your own hands without sufficient experience.
- Japanese plaster - decorative finishing material, which can be applied to the surfaces of walls and ceilings. Something between plaster and wallpaper. Do-it-yourself decorative plaster of walls made with this material is the easiest to work with. Contains cotton, silk, cellulose fibers, mineral fibers, dyes and various decorative additions. The coating made from it hides all wall defects well. This plaster is suitable for almost any type of walls and ceilings: concrete, wet plaster or paint, walls covered with gypsum plasterboard, wood, polystyrene foam and much more.
- Travertine is an exclusive material for finishing works, created on the basis of natural binders and marble powder, is used both in interiors and exteriors. Most often for decoration: walls, ceilings, fireplaces, columns, etc. Due to the resistance of this coating to fungus and mold, as well as its ability to diffuse moisture from the base, it can be used in kitchens and bathrooms. The finishing made by him successfully imitates natural travertine, along with its original structure and patterns. This material consists of natural lime binders, aggregates, marble and dolomite chips. After finishing the walls with decorative travertine plaster, they are coated with special wax or varnish. To protect surfaces located on outdoors, appropriate soils are used to protect them from the effects of adverse weather conditions.
- Tadelakt is an exotic plaster of “Moroccan origin”. This is a waterproof plaster surface used for finishing bathtubs, sinks, ponds, interior and exterior walls, and ceilings. It is made from a lime plaster base that is compacted, polished and treated with soap to make it waterproof and water-repellent. Tadelakt is a labor-intensive material to work with, but very remarkable - it has a “living”, wavy structure. Pigment can be added to give it any color, but dark red is considered traditional. It can be shiny or matte, but looks best when it resembles a stone with a velvety sheen.
French plasters from various manufacturers are widely known. With their help, you can create various structures - from the effect of an adobe wall to surfaces that accurately imitate polished stone.
Finishing with decorative plaster
Artistic plastering of walls can be done independently. To do this, you need to prepare the tools and be patient.
Tool
When applying structural plasters, you need to use several basic tools, which are usually used for plastering work, and special devices to create the desired texture on the surface. The tool set looks like this:
- container for plaster mass;
- a set of spatulas from the smallest to the widest;
- graters - metal (Venetian), wooden, plastic;
- metal grater;
- electric drill with mixer attachment;
- trowel (trowel);
- masking tape.

You should also prepare rollers of different widths and with different piles, sponges, wide brushes, and templates with patterns.
To apply decorative plaster with your own hands, you can use many other somewhat less professional accessories available in the house. For example, an ordinary comb or brush can be used to create the texture of denim or corduroy. Striped patterns are obtained through the use of children's (toy) rakes. Even with your own palm, “armed” only with a glove, you can create original patterns on walls covered with decorative plaster. Also sometimes used various devices for automatic application of structural plasters.
You should finish finishing a section of the wall that can be completed in one day, preferably from corner to corner. If you leave half the wall unfinished and continue the next day, you will create a joint that is impossible to get rid of. If this is not feasible (too big wall), then the joint is sealed masking tape- this will disguise it a little.
Preparation
The base for thin-layer structural plaster must be strong, free of grease and dry; free from stains and efflorescence of biological and chemical origin. All loose layers not connected to the base (for example, peeling plaster) must be removed. If the surface unevenness is significant (from 5 to 15 mm), the wall should first be leveled. Wet plaster can be used for this.

For small unevenness (up to 5 mm), the base can be leveled and smoothed with a layer of putty. Absorbent substrates should be primed with a suitable preparation before applying leveling solutions and/or putty. The application of mortars, putties and/or compensatory measures must be carried out in accordance with the technical data sheets of these products. In the case of applying the mass to newly completed mineral substrates (for example, concrete, cement and cement-lime wet plaster), an appropriate curing period must be observed (for acrylic and mineral plasters at least 3-4 weeks, and for silicate plaster at least 2 weeks). Before applying the solution, the base should be primed with a preparation appropriate for this type of plaster. To limit the possibility of the color of the base showing through the texture of the plaster, it is recommended to use a primer that matches the color of the plaster.
The final result of the completed plaster may be affected by the type of base, therefore, in the case of a non-uniform base, it is recommended to cover the entire surface with a layer of putty. To avoid color differences, it is necessary to complete the surface in one working cycle, using the “wet on wet” method. During application and drying of the solution, the temperature should be kept between 5°C and 25°C.
Application
How to apply decorative plaster with your own hands? The process does not cause any particular difficulties, but some subtleties are worth taking into account. Using a drill with a mixer installed, the solution is mixed exactly in the appropriate proportions (specified by the manufacturer) with water or other additives, dyes, for example, pigments.
If a ready-made (diluted) mass is used, it is simply mixed. When the primer has dried, the prepared plaster is applied to the wall. You should try to do this evenly, keeping the layer thickness from 2 to 5 mm. The easiest way to do this is with a metal trowel.
To obtain an imitation of some natural surfaces, for example, marble, granite, travertine, concrete or velvet, you need to be patient. To achieve the desired effect, at least two layers of decorative plaster should often be applied. After applying each layer, the surface must also be subjected to additional processing. The technology for performing the work is different for each type.
When creating a surface for travertine, characteristic samples of this stone are purposefully formed, imitating pits and depressions. It is best to do them with the edge of a Venetian grater applied to the wall at an angle of 90 degrees. Then the surface should be leveled by sanding with sandpaper. Finally, the wall is covered with decorative varnish to secure and protect it.
To create a surface that imitates concrete, after applying the solution twice, it is successively “torn” and rubbed with a Venetian grater. The surface is moistened immediately before grouting, which makes it easier to give the desired structure.

The most difficult decorative plaster to do with your own hands is probably Venetian. After the wall is prepared and the soil has dried, the solution is painted, since after purchase it has a natural white color. Pour the dye into it and mix thoroughly. Then they begin to apply it to the wall. The plaster is applied in stages, layer by layer, using a trowel.
Level, pressing tightly, thin layer over the entire surface of the wall, then wait the time indicated on the package. The dried layer is sanded, smoothing out irregularities. Then you need to clean the wall from dust, and then apply another layer. At this stage it is necessary to distribute the product so as to obtain a smooth, shiny surface. Wait until it dries again. Apply a third layer. The first layer is the base layer, the rest form a pattern, so they are applied in chaotic strokes and then smoothed out.
Each layer (there can be 5 or more) is sanded. Then you need to wait until it dries last layer, and apply wax. The wax is applied to a small fragment of the wall, after which it must be distributed over the remaining part.
The Japanese one can simply be leveled with a regular paint roller. In more detail, the contents of the package are filled with the required amount of water (according to the instructions indicated on the package) and mixed until a homogeneous mass is obtained. The prepared plaster is left for an hour to be completely saturated with water.
No special tools are required to apply Japanese plaster. Just a grater, a roller and a spatula, which is used to apply the mass to the wall, stretching it evenly with a grater. The applied layer of material should be as thin as possible. Using a roller, compact the plaster, smooth it with a spatula and level the edges. The applied mass dries in about 48 hours.
Japanese plaster can be used several times. To do this, clean the applied layer of plaster after thoroughly moistening it first. Mix the skimmed mixture well, adding enough water to get the correct consistency. Apply again using a trowel and roller.
“Bark beetle” is essentially an ordinary wet plaster, the texture of which is formed by the granules it contains. The applied solution (preferably with a metal float) is leveled with a plastic float, forming a pattern. The most common - “rain” is obtained by moving the grater up and down. The type of wall depends solely on the imagination of the master; there are many options (right-left, “snowflake”, etc.). If the wall has been previously leveled, it is impossible to spoil the “bark beetle”.
An interesting option for interior work is magnetic plaster - it creates magnetized walls with decorative plaster. The method of application and painting is no different from ordinary gypsum plaster.
The application of decorative plaster is interestingly shown in the video:
Painting works
Most mixtures come already painted, but if this coating is not there, then it’s okay; painting walls covered with decorative plaster is practically no different from ordinary painting work. Painting is done in two layers with a long-nap roller, and in hard-to-reach places - with a brush.
It is advisable to adapt the selection of shades to the interior design, but you can forget about conventions and paint the walls in contrasting or flashy expressive colors - this will be an interesting artistic decoration. To decorate this type of surface, metallic paints with shine have proven themselves well, which, by reflecting light, additionally emphasize the elaborate texture of the wall. Paints can be applied either with a roller or brush, or with a sponge or cloth - in each case, obtaining a completely different end result.
So what is decorative plaster? Besides aesthetic criteria Decorative plaster has high strength characteristics, it is easy to keep clean, so it is used almost everywhere. Ideal for high traffic areas, particularly stairwells, in hallways, kitchens, bathrooms.
In addition, it is used for finishing figured architectural elements, for example, fireplaces, cornices, columns, as well as decorating furniture. Prepared and decorated accordingly, it can successfully decorate any building or interior.