How to build a lean-to canopy: drawing, materials and sequence of work. Making a polycarbonate canopy attached to a house, photo instructions Do-it-yourself polycarbonate canopy frame
When refining country house it’s worth thinking through every detail so that as a result you have a good place for relax. For example, when organizing a recreation area, it is worth building a canopy. Polycarbonate can be used for this purpose. This material has sufficient strength, so it is worth finding out some details about making a building from it. In this article you can find step-by-step instructions on how to make a polycarbonate canopy. You can also view several drawings that offer options for arranging this structure. Therefore, even if you are new to construction, this article will help you get general idea about work, and also try your hand at it.
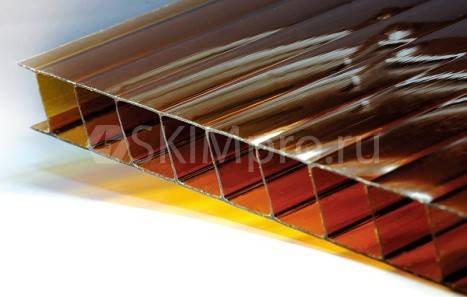
For the manufacture of transparent roofs, polycarbonate has proven itself with positive side. Unlike glass and plastic, this material is easy to use. The edges of the product are equipped with stiffening ribs, so the sheets can be bent without bad consequences. Therefore, it is possible to construct canopies of any plane, even semicircular. Another advantage of the material is its varied colors. Plus, the transparency of the material enhances the illumination of the covered area.
Sheets with one shade or another muffle the sun's rays. So even in the hottest weather it will be safe to be under a polycarbonate canopy.

First of all, it is worth considering the design of the future canopy over the porch or other place. To complete the project, you will need to think about the following parameters:
- Measuring the site and calculating the frame.
- Determining the type of material for the frame. It can be metal or wood.
- Determination of the type of polycarbonate - monolithic or cellular.
- Drawing up drawings.
As for the drawings, at the end of the article you can see some of the options. For example, you can take some as a basis and add something of your own.

To work with such material, you should have the following set of tools and material on hand:
- frame material - wood or metal;
- galvanized screws;
- polycarbonate;
- connecting end profile;
- press washers;
- necessary fasteners;
- sand and cement for installing frame supports;
- crushed stone;
- paint, respectively, for wood or metal;
- hacksaw;
- screwdriver;
- drill;
- level;
- roulette;
- welding machine for assembling a metal frame.
If all the material/tools have been collected, you can proceed to the first preparatory stage. To install the supports, you need to dig a hole up to 600 mm deep. This is in case you plan to build a large canopy. The support pillars should be located at a distance of 1–1.5 m. Having done this work, the further frame can be attached to the supports.
If the canopy is made small and is planned to be installed above the porch, then perhaps no supports will be required. A few anchors to the wall will be enough.

As mentioned above, the frame can be made from either wood or metal profile. The choice depends on the required strength of the final product. For example, if the canopy is made for a picnic and relaxation, then you can build a frame from timber. If you need a shelter for a car, then it is preferable to make reliable frame made of metal. In the latter case, there is no way to do without the skills of a welder. If you do not have any, then you will need the help of a qualified welder.

To save money, you can purchase a ready-made frame that is assembled with bolts. Such a design, of course, will not be as strong as a welded frame, but in some cases it is the only right solution.
So, to make such a frame you will need a metal profile with a cross-section of 60×60 mm or 100×100 mm. The choice of profile depends on the load. For example, for the purlin, you can choose a profile with a smaller cross-section - 40x40 or 60x60 mm. For sheathing it’s even smaller, you can use 20x20 mm.

Previously concreted posts must first be tied at the top. This will provide the structure with greater rigidity. Additionally, the strapping can be done from the bottom and in the middle. If the canopy is over the porch, then some of the supports will be on the wall, and the other on support posts (in case the size is large enough).
An arch is constructed for the upper part of the structure. To make bent elements, you will need a pipe bender. So, it will be possible to make an arch from a metal profile. The finished frame is coated with an anti-corrosion compound, and then covered with the desired color of paint.

It is worth noting some features of attaching polycarbonate to the frame. For the arch, you should purchase sheets 8 mm thick. The more the sheet should be bent, the smaller its thickness should be. If the roof of the canopy is straight, then the covering sheets can be 10 mm thick.
Individual pieces must be cut with a hacksaw or circular saw. But keep in mind when cutting, the length of the sheets should be such that they protrude 100–150 mm beyond the edges of the structure. During the cutting process, vibration of the product must not be allowed. This may cause cracks in the material.
Some specialists cut polycarbonate directly into protective film. Due to this, there is less risk of damage to the sheet during its preparation.

Moreover, when laying the sheet, do not mix up the sides. The side that has protective film should be directed upwards, as it has UV protection.
To connect the sheets, a joining profile is used. Before tightening the self-tapping screw, pre-drill holes in the polycarbonate. They should be a little larger diameter self-tapping screw The screws should be tightened through special washers with a rubber gasket. It is also important to create a small gap where the sheets join. It is enough to leave 3 mm for the material to expand when heated. As for the end part of the sheet, it is covered with an end profile.

We present to you a brief step by step instructions for the manufacture of a polycarbonate canopy over the porch and with support posts based on a wooden frame:
- First, the supports are concreted into the ground.
- All wooden workpieces must be treated with an anti-corrosion compound. Especially those that will be concreted.
- Attach brackets to the wall of the house, which will support two cross beams 120x60 mm. For greater reliability, the timber can be secured to the wall horizontally.
- Now you need to install the cross beams on the posts and on the supports mounted on the wall.
- Where the cross member meets the post, use metal corners.
- Next you need to build the sheathing.
- When the frame is ready, you need to fasten the polycarbonate with self-tapping screws and thermal washers.

This simple instructions confirms the words spoken at the beginning of this article. Even without special construction skills, if you wish, you can do all the work of making a canopy yourself. if you have personal experience in such construction, then leave your comments at the end of this article.
Video
Photo
Several variations of polycarbonate canopies:


Scheme
The provided diagrams will help you choose the project option that is suitable for your case:


The presence of canopies on personal plots indicates not only the good taste of the owners, but also their desire to improve the comfort of rest and living. made with your own hands looks very original, gives the space an exclusive look, lasts a long time, and can be used to create closed areas for various purposes. Appearance among building materials polycarbonate made it possible to create original designs with minimal loss of time and money, while actual performance indicators far exceed previously used materials.
Construction work can be carried out in two ways:
- Installation of a polycarbonate canopy can be done with the help of specialized construction companies. Advantages: proper quality and speed of installation are guaranteed. Professional specialists provide assistance in design and calculations, provide advice on optimal option canopy taking into account physical characteristics soils, architectural features of the structure and climatic zone of residence. The disadvantage is that all services must be paid for; in some cases, the price may be equal to the cost of materials for making canopies. The technology can be seen in the video below.
- On one's own. If you have a little construction and installation experience, you can complete the work without involving third-party contractors. Advantages - the total estimated cost of construction is significantly reduced. Disadvantages - you need to have free time and have certain knowledge on how to build it yourself.
Physical and operational characteristics of polycarbonate
The use of modern equipment and innovative additives allows us to create materials with unique properties.
1. The light transmittance of transparent polycarbonate reaches 90%. The value may vary depending on the availability of mineral dyes of different shades. Thanks to greater transparency, it is possible to save electrical energy for lighting. Canopies can be used to arrange flower beds, greenhouses, etc. The development of plants under canopies is no different from development in open areas.

Light transmittance of polycarbonate 90%
2. High performance mechanical strength. The material is plastic, which allows it to absorb sudden dynamic loads without cracks. It does not have the effect of residual deformation; after removing the load, it completely restores its linear dimensions and geometric shape.
3. Excellent mechanical strength in relation to specific gravity. Polycarbonate has special stiffening ribs, which increases bending resistance. The impact resistance is an order of magnitude higher than glass. It can be standard one- or two-chamber, reinforced, four-chamber.
 Single chamber polycarbonate sheet
  Double chamber polycarbonate sheet
 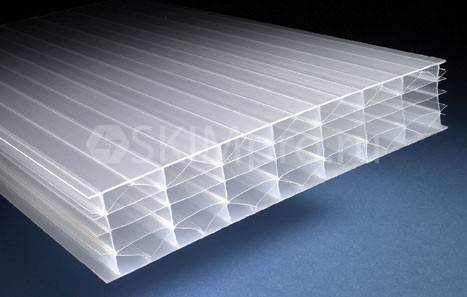 Four chamber polycarbonate sheet
4. Low specific gravity makes it possible to achieve noticeable savings on foundations and load-bearing structures.
5. Innovative additives make it immune to harsh ultraviolet radiation. The strength of intermolecular bonds remains unchanged throughout the entire period of operation - microcracks do not appear, and the values of strength and stability do not deteriorate.
6. High ductility allows the use of materials at temperatures down to -50°C, strength indicators do not deteriorate at temperatures up to +115°C.
7. Wide range of thicknesses, slab sizes and color solutions. Enables designers to correctly implement their most daring projects.

8. Service life exceeds 25 years. Polycarbonate has excellent technological characteristics; it is easy to cut and process with ordinary tools. During use, the amount of unproductive waste is minimized.
The following canopies can be made using polycarbonate:
- A canopy over a balcony, loggia or entrance door. Prevents the ingress of precipitation, reliably protects from wind and direct sun rays.
- Carport for one or more cars. By using a canopy, you can avoid construction capital garage, the car is protected from rust, the interior trim does not fade.
- Canopy for a patio or outdoor gazebo. The comfort of rest increases, and the labor costs for maintaining cleanliness in the building are reduced.
- Canopy over the pool. The time for taking water procedures increases.
Balcony canopy Multi-car canopy Patio canopy Pool canopy
Rules for choosing material for canopies From the right choice The thickness of the material depends on the reliability of the structure. The thicker the sheets, the more load they can withstand, the simpler the metal supporting structure can be. Which polycarbonate is best for a canopy?
The length of the panels is 6 and 12 m. To connect individual panels together, a special aluminum profile is used, standard length 6 meters. The profile can be one-piece (the panels are inserted into technological grooves on both sides) or detachable. Detachable has a universal purpose, can be used on various types designs. It consists of upper and lower clamping parts, tightened together with special screws. Used on panels of various thicknesses, it is possible to manually adjust the compression force. If the panels have been reduced in thickness for some reason, the profile can be screwed tighter and leaks in the connections can be eliminated.

The ends must be covered with an end profile; before closing, the honeycombs are sealed with silicone. This prevents the growth of microorganisms, moss and mold in the cavities. Such microorganisms significantly worsen appearance structures. In some cases they may provide Negative influence on the amount of light transmitted, which is one of the disadvantages of polycarbonate canopies.
 Canopy not covered with profile
 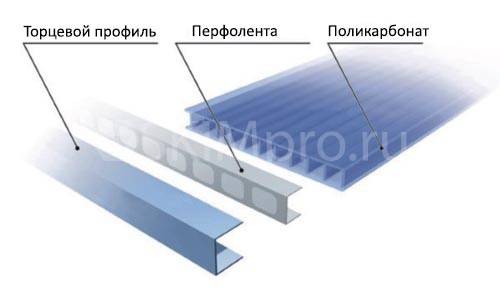 End profile for polycarbonate
For fixing polycarbonate sheets to metal or wooden frames special screws with rubber gaskets are used. How to make a canopy is shown in the video. The heads of the screws can be covered with decorative caps. Support frame for a canopy can be made from square and round pipes, angles, I-beams, channels or wooden beams, the dimensions are selected taking into account the maximum loads, area and type of canopy roof.
Which is better – polycarbonate or corrugated sheeting for a canopy? There is no clear answer. The corrugated sheet is made of sheet steel and can withstand increased loads. But polycarbonate has universal application, installation of a polycarbonate canopy is more economical.
Stages of canopy design Sketch design You need to start building canopies with your own hands by drawing up a sketch design load-bearing structures. To do this you must have theoretical knowledge By calculating the maximum loads in the structural units, calculate each element for bending and compression. The maximum wind and snow loads are taken into account, the types of roof and the angle of inclination of the slopes are determined.
Types of truss system for canopies Depending on the engineering features and specific operating conditions, the canopy can be:
- Single slope inclined. The slope angle is at least 12°, the structures are used for the construction of structures small sizes, the simplest canopy. Model No. 3
- Dome. Round or elongated. It can withstand significant snow loads and has an original design look. During the manufacture of the frame, all dimensions must be accurately maintained; complex options. Model No. 6
- Arched. The length is selected individually and is used to cover small heights. Model No. 4
- Gable. Universal purpose, structures are used for the construction of large-sized canopies. Model No. 2


After determining the roof types, you need to start designing the foundations
Types of foundations The low weight of the structures allows the use of the simplest and cheapest foundations. Due to this, construction time is significantly reduced and its cost is reduced. Taking into account the physical characteristics of the soil and the possible load for canopies, the following foundations can be used:
Screw piles. Metal piles are screwed into the ground according to the plan of the pile field (watch the video). The depth and diameter are selected individually. The ends of the piles are leveled horizontally, metal platforms for fastening are welded to them vertical supports awnings The advantage is that foundations can be completely prepared within one day; they can be used in any climatic zones and on any soil, including swampy ones. They have positive user reviews. It is not necessary to make grillages for awnings.

Greenhouse on screw piles
Columnar. The depth is approximately 60 cm; a sand cushion is poured to compensate for swelling forces. Dimensions around the perimeter are no more than 40x40 cm. They can be made of concrete (reinforced or unreinforced), cement blocks or ready-made factory structures. Advantages - lowest cost, no need to level the site. Manufacturing time, taking into account concrete hardening, is no more than 14 days.

Load-bearing support buried 60cm in the ground
Shallow-depth tape. They are used for large, heavy structures; they allow you to install side walls for canopies to protect them from wind, snow and rain. In terms of cost, they belong to the expensive category; production time is at least three weeks.

Shallow foundation
The choice of foundation can have a significant impact on the cost of the structure; when making a decision, the maximum number of factors should be taken into account.
Load-bearing vertical supports Made from round and square pipes, long products or wooden beams. With their help you can build a wooden canopy. They are installed on foundations and serve to fix the canopy rafter system. During manufacturing, height and possible forces are taken into account. The distance between trusses and supports must take into account total area canopy
Technology of assembly and installation of the structure The assembly of the structure begins with the installation of vertical supports on ready-made foundations. When pouring concrete, anchor bolts are installed in them; the distance between them must correspond to the distance between the holes in the lower platform of the supports. The vertical position of each pore is constantly monitored; deviation of the vertices in any direction is prohibited. The distance between the supports corresponds to the length of the roof elements. Assembly can be done using welded seams (non-dismountable version) or using hardware (dismountable version). A dismountable polycarbonate canopy with your own hands allows you, if necessary, to dismantle the structure and install it in a new place. After dismantling, all structures retain their original performance and are ready for re-installation without prior preparation.
 Concreting racks
  Attaching the racks anchor bolts
 Fastening arches
If the canopy is manufactured at an industrial enterprise, then it has working drawings for installation, each part is numbered, its position in the assembly and the method of fixation are indicated. Self-production metal structures canopy installation requires care and compliance with existing industry requirements and building codes.
After installation, the canopy elements are checked for compliance with their position; the assembly stages involve gradual fastening of the structures. If deformations occur, the cause is determined and eliminated. Before screwing the polycarbonate onto the canopy, stability tests should be performed. During testing, structures are loaded with forces twice as high as designed. Due to this, a safety factor is achieved, long-term and safe operation canopy
How to attach polycarbonate to metal frame canopy The sheets are cut with an eclectic jigsaw, a grinder with a thin cutting disc or a mounting knife. The specific tool is selected depending on the thickness of the material. Installation of polycarbonate begins on one side; only after the previous sheet has been completely fixed can the next one begin to be fixed. For fastening, special self-tapping screws with rubber washers are used. The washers seal the coating, compensate for differences in changes in the linear dimensions of materials due to thermal expansion, and prevent the appearance of microcracks. The screws should be tightened carefully to avoid damaging the surfaces. If desired, the heads of the screws can be covered with decorative caps.

The voids at the ends of polycarbonate sheets must be sealed. Otherwise, in a few years moss and mold will begin to grow in them, not only the appearance will deteriorate, but also performance characteristics. When attaching sheets, pay attention to the front and back sides. Laying polycarbonate on a canopy is done only with the front side, it has special protection from the harmful effects of ultraviolet rays, the correct installation is indicated on the packaging of each sheet. During production, it is covered with a protective polyethylene film, which contains instructions and drawings. It is recommended to remove it before installing the sheet on seat. Otherwise, the screws will hold the film, and in these places it will not come off, but will tear. There will be pieces left that are very difficult to remove. In addition, the protective film is much easier to remove when the sheet is on the ground. If it is installed on a canopy, then the work becomes much more complicated.
Practical advice
- It is strictly forbidden to bend the polycarbonate sheet across the honeycomb. Adhere to this rule not only during installation of the canopy, but also during transportation or storage of materials.
- There is no need to specially drill holes for self-tapping screws; this operation is performed simultaneously on the sheet and frame.
- Always consider the safety factor during design. Do not use the thinnest sheets. As practice shows, premature repairs are much more expensive than purchasing durable polycarbonate.
- Don't work alone. This is not only difficult and dangerous, but also has a negative impact on the quality of installation.
- Strictly follow safety rules, do not rush, work carefully. Take special care when working with power tools.
Compliance with the recommended rules ensures that the installation will be carried out taking into account building codes, the canopy will be reliable and last a long period of time.
Video instructions for installing a polycarbonate canopy with your own hands
Courtyard of a private residential or country house Over time, it becomes overgrown with outbuildings that make life easier for the owners, the construction of which, as a rule, is done with their own hands. Single-pitch canopy with polycarbonate coating – simplest design, which can serve as a gazebo, a place to store firewood, maintain a car and other household needs. Polycarbonate gives buildings a modern, attractive appearance, without requiring financial investments and complex care. This article will tell you how to calculate and make drawings of a lean-to canopy from this inexpensive material.
Polycarbonate is a modern high-tech material based on polymer plastic, which has a cellular structure. This material transmits light; colorless, colored and patterned products are produced. It will also be excellent for a garage attached to the house or a separate structure. This material has gained popularity due to the following qualities:
Note! Experienced craftsmen They note the excellent soundproofing ability of this material, thanks to which even in the heaviest rain the sound of drops does not interfere with the conversation and sounds quiet. High-quality polycarbonate has a service life of up to 25 years.
Design
The design of a lean-to canopy is quite simple for DIY installation. It consists of support posts, trusses, sheathing and the polycarbonate coating itself. They sell it in construction stores ready-made kits for self-assembly, however, it is not much more difficult to calculate and make drawings yourself. During the project creation process, the following factors are taken into account:


Important! Roof trusses A lean-to canopy is a triangular structure, the base of which is equal to the width of the canopy, and the hypotenuse corresponds to the length of the slope. To protect the polycarbonate sheet from damage and deflection, a lathing is constructed, the pitch of which does not exceed 40-50 cm.
Installation process
Installing a polycarbonate lean-to canopy with your own hands takes no more than 1 day, it can be done by one worker, however, help in this matter will not hurt. For assembly you will need a standard set of tools, which includes welding machine, screwdriver, hacksaw or grinder. The construction process is as follows:


Important! All seams on the canopy frame remaining after welding are cleaned with your own hands and then primed. Metal parts are coated with durable paint for additional protection from corrosion. The edges of the carbonate are glued with reinforced tape.
Video instruction
Polycarbonate canopies – street structures, universal for economic purposes. Lightweight material, flexible, translucent in large color scheme, convenient format, are presented in different thicknesses, which allows you to design canopies of simple and complex curved shapes. The buildings look light, elegant, do not overload the landscape, and fit into any stylistic decision architectural ensemble on the site.
In the article we will give step by step instructions, how to make a polycarbonate canopy with your own hands, how to choose the right shape, calculate and design the structure.


What you need to know about polycarbonate canopies - general criteria
The manufacture of polycarbonate canopies has become popular due to the ease of installation, practicality of the material, and aesthetics of buildings. There are:
- independent, free-standing - canopies over the pool, greenhouses, car parking, gazebos, outbuildings for various purposes;
- attached to the building: bathhouse, garage - verandas, terraces, canopies over the porch and gate;
- mobile - easily move around the site, usually over barbecues and small gazebos.

Sheds attached to a polycarbonate house, photos of large curved extensions
These are simple rectangular or complex, curvilinear structures, sometimes two-story, for example, above a garage or summer kitchen. Open and closed type, for this purpose, the side walls are glassed, covered with panels, beautiful lattice, clapboard, blockhouse, or covered with thick curtains.

Indoor polycarbonate canopy
Advice: Soft transparent windows, sliding aluminum systems are the most universal option: do not block the view, open easily, and when closed they retain heat well.
Polycarbonate support canopy attached to the house, photo of a curved roof
Canopies consist of supporting vertical posts and a roof. The frame is made of wood, metal, less often of concrete, stone, brick.

Typical drawing of a freestanding polycarbonate canopy
Wooden sheds with polycarbonate roofing
Production of canopies and canopies from polycarbonate wooden base- the most budget-friendly and easiest way to independently make a small architectural form on the site. The work does not require professional equipment; household hand tools are sufficient. To build a wooden canopy from polycarbonate with your own hands, you use glued and profiled beams 100*100 or 150*150 mm, rounded logs ∅150-200 mm, tree trunks, strapping and mauerlat made from the same material. For the rafter system of outbuildings, according to SNiP, it is necessary edged board 40*100 mm.

Sketch wooden canopy polycarbonate
The main disadvantages are flammability, poor moisture resistance resulting in rotting, fungal infections, loss of strength and aesthetics. Rodents and small bugs can cause significant damage to load-bearing elements. Wooden canopies and polycarbonate canopies must be treated with fire-resistant compounds, an antiseptic, and a durable finish protective layer from oil or varnish.

A polycarbonate canopy attached to the house, in the photo there is a structure with a sloping roof
Metal canopies
Before making a polycarbonate canopy on a metal frame, you should choose the type of construction:
- Welded from profiled or round pipe– the most popular polycarbonate canopies. For vertical racks they use pipes ∅50-150 mm, depending on the size of the building; for piping - a profile with an edge of 40-80 mm, for a farm -25-50 mm.
- Forged ones are beautiful, elegant, but quite expensive from a financial point of view. On the construction market you can buy stamped forged parts and create an exclusive product yourself.
- Prefabricated aluminum.

Canopy for the house made of polycarbonate, in the photo there is a hanging forged canopy of a cantilever type
For polycarbonate canopies up to 5 m, use a profile with a wall thickness of 2 mm, a cross-section of 40*20 mm, for buildings over 5.5 m, you will need a 3*40*40 or 2*30*60 mm rental.

An example of how to make a polycarbonate canopy with your own hands, drawings of an arched structure
An iron canopy will last for decades, although its main enemy is corrosion. It is necessary to clean the parts with a stiff brush from rust, scale, oil stains, go over the entire surface with an abrasive, then rinse with a solvent. Next, cover with primer and paint, preferably with hammer paint; it copes well with chemical, biological and mechanical loads.

Sketch of a suspended polycarbonate canopy over the entrance
Good to know: Hardware they heat up from fire, sunlight, and quickly cool down in cold weather, so for comfort in gazebos, porches, and terraces, it is better to provide wooden railings on the parapet.Brick, stone and concrete
Brick, concrete, stone polycarbonate canopies in the yard look impressive, but light and not bulky, thanks to the translucency of polycarbonate. They do not require maintenance during operation, are fire resistant, and tolerate harmful atmospheric influences and physical and mechanical influences well, although they require significant time and financial costs. While canopies made from other materials can be disassembled and moved, such structures are stationary and cannot be dismantled.
Roof
Polycarbonate canopies, photo interesting ideas are presented in the gallery, there are also quite a lot of pictures and projects on the network, there are single and double slopes, arched, cascading, less common are conical, domed, wavy.

Typical options for polycarbonate canopies
Making the base is not difficult; it is enough to take into account wind and snow loads in the region, but rafter system requires serious calculations.

Farm classification:
- According to the characteristic outlines of the contour - polygonal, triangular, broken parallel belts.
- By type of lattice - rhombic, triangular, semi-diagonal, diagonal.
- According to the method of support - cantilever, beam, arched, beam-cantilever.

Cascade support-cantilever canopy made of polycarbonate
The simplest option is lean-to canopy made of polycarbonate, optimal roof angle 22-30 o. The rafters are made of wood or it is a truss - a horizontal, curved or triangular frame with supporting braces, angled posts inside the main structure.

Scheme for a lean-to building
To create a project you need:
- Diagram of the canopy with the type of roof; the type of lower and upper belts depends on this.
- Drawings of polycarbonate canopies must include the dimensions of the structure, since the load changes in direct proportion to the dimensions. It is important to determine the upper as well as the lower point of the slope; the lower the slope, the more snow will accumulate on the roof.
- Take into account the size of the panels; the distance between the rafters depends on this, so that the edge does not fall into the void.
- Wind and snow loads in the region can be found using special tables.

Gable polycarbonate canopy - project with forged elements
Trusses are calculated according to the SNiP regulations in section 2.01.07-85, this is difficult for independent calculations, engineering education is required, also special software. To avoid errors it is recommended to use online calculator or take finished project. Loads and impacts are specified in SNiP standards in part 2.01.07-85, rules for the manufacture of metal structures - P-23-81 SNiP.

Arched canopies made of polycarbonate, in the photo there are sketches for small buildings
Good to know: The greater the distance from the bottom to the top point of the roof, the more load bearing capacity higher.To avoid getting confused in complex calculations, use the following recommendations:
- With a slope of 22-30 o in a building 6-12 m wide, the height and length of the triangular truss should have a proportion of 1:5;
- If the slope is 15-22 o, the dimensions are in the proportion 1:5, but the braces must be low-sloping, an even number of belts must be made, optimally 8.
- A smaller slope is suitable for larger industrial buildings, engineering calculations are required here; the length and height of the run should be in the proportions of 1:7, 1:9.

Simple diagrams on how to make rafters for a polycarbonate canopy
Calculation of a polycarbonate canopy from a profile pipe
Let's take a canopy as a basis, size 6000*4000 mm, this is an ergonomic solution: a comfortable gazebo or covered parking for a car.
Standard dimensions of polycarbonate in width and length:
- cast 2.050*2, 3, 6.12 m;
- cell phone 2,100*3,6,12 m.
For private buildings, a sheet thickness of 6-12 mm is suitable.

Polycarbonate performance table
Trusses must be placed under each edge and in the middle of the sheets, so the distance between them will be 1 m.
For the racks we will take a pipe ∅80-100 mm, the pitch is 2.0 m along the long side of the canopy. For the roof:
- main elements - profile pipe 30*30 mm, length of the lower ones - 3.1 m, remember the Pythagorean theorem: the square of the hypotenuse is equal to the sum of the squares of the legs, calculate the length of the upper ones, in our case - 3.9 m;
- inclined spacers - profile pipe 20*20 mm, location - at an angle of 25 degrees.
We will install perpendicular jumpers every 0.5 m from each other.

Standard diagram of a small farm
Step-by-step instructions on how to build a polycarbonate canopy for your house yourself
To cook metal awnings For a polycarbonate dacha, a number of conditions must be met:
- Details as well load-bearing elements should not be cracked.
- The roughness of the end of the supporting rib is determined by GOST 2789-73 - Ra £ 12.5 microns.
- It is unacceptable to use steel with an internal layer and coarse slag inclusions for the lower chord of the truss.
- According to GOST 14771-76, connections are best made by welding mechanical type, in a carbon dioxide environment or its mixture with argon.
- According to GOST 2246-70 and 26271-84, it is recommended to use PP-AN-8 welding wire.
- To fasten rafters to sub-rafter elements and vertical columns, class 5.8 bolts are used according to GOST clause 7798-70.

Drawing of an asymmetric arched canopy
Practical construction
We mark a place for the pillars, dig holes 700 mm deep, make a cushion of 100 mm sandstone, 100 mm crushed stone, and tamp it. We pour 100-200 mm of concrete into the bottom, install a pillar in it, insert it with force, in a circular motion, so that it goes deep. We fill the hole with concrete, check the plumb line, correct it if necessary, and also strengthen it with supporting slopes.
Important: Professionals recommend placing supports along the house, but if this is not possible, then load-bearing wall a beam of 60, 80*80 mm should be placed on the anchors, the trusses should be supported on it, connected by welding, this will allow the load to be distributed over the entire surface.
A way to secure vertical supports
When the solution has completely risen, we tie the pillars together at their heads, check the geometry, the diagonals must be equal.
It is better to cook farms on the ground, according to the chosen scheme; the most common ones are shown in the photo above. The finished parts are lifted and distributed evenly along the harness, in our case, every meter. The fastening points of the longitudinal strips and rafters are made using steel gussets, as well as welding or bolting.
The next stage is the sheathing (perpendicular purlins), from a 20*40 mm pipe, with a pitch of 400-600 mm, and sheets will be attached to it. The finished metal structure is cleaned and then painted.

The purlins will strengthen the frame, this will allow the polycarbonate to be fixed more securely
Watch video tips on how to properly attach a polycarbonate canopy to your house, this will help you avoid major mistakes when building with your own hands.
How to work with polycarbonate correctly
It is better to cut polycarbonate with a circular saw equipped with a carbide blade with undetected fine teeth. Holes should be made using a drill with a metal drill, between the stiffening ribs. At the upper ends of the honeycomb panels, strips and self-adhesive tape should be installed for sealing; the lower ends should not be covered.
There are 2 ways in total:
- Thermal washers - the holes are made 2 mm larger than the mounting leg; the part should fit tightly until it clicks. The length of the washer is equal to the thickness of the polycarbonate; it is necessarily equipped with an elastic band that seals the connection, which prevents precipitation and dust from getting inside. This type of fastening is called a point fastening; the washer tightly holds the polycarbonate and prevents it from deforming when heated.

How to secure polycarbonate to a canopy using a thermal washer
- A special profile is a strip with grooves on both sides into which polycarbonate is inserted. The method is preferable if the sheets have to be joined. The edges are screwed with thermal washers. Profiles are provided for different connection: corner, docking, one-piece, wall, detachable and special for docking, if you need to change the roof configuration.

Photo instructions on how to attach polycarbonate to a metal canopy frame using a profile
Is there some more wet method, the panels are attached with putty, but if you are making a canopy with your own hands, it is better to limit yourself to the previous 2 tips.

Types of fastening polycarbonate to the sheathing
Modern personal plot, it doesn’t matter whether it belongs to a cottage or a simple country house, it’s hard to imagine without a canopy, for example, over the owner’s car. This design now performs not only a practical function, but also an aesthetic one. The most common material used for canopies is polycarbonate. You can make a structure from it yourself.
Advantages and disadvantages of polycarbonate
The choice of such sheet blanks when installing suspended structures is justified by many advantages.
- polycarbonate transmits light, but at the same time protects from the harmful effects of ultraviolet radiation;
- it is non-flammable, which eliminates the risk of fire;
- the sheets have different colors, you can choose the color to your taste;
- designs made from these blanks look aesthetically pleasing;
- polycarbonate is lightweight;
- it is flexible, but at the same time impact-resistant;
- retains heat well inside the overall structure;
- it is easy and pleasant to work with (it is cut with a stationery knife and screwed to the frame with self-tapping screws).
True, polycarbonate also has disadvantages. They may appear during installation and operation of the suspended structure. Namely:
- with time similar material can crack, which will require replacing individual sheets;
- if you violate the installation rules, the polycarbonate will also collapse;
- thin sheets may not withstand layers of snow if the frame is poorly designed.
So, the described material clearly has more advantages, so its use in sheds is logical. But before you start building such a structure, you need to decide on the dimensions and draw up a sketch.
Preparatory work: what thickness of material to use
Before choosing the dimensions of the structure, it is recommended to decide on the type of sheets for installation. That is, you first need to choose the color and thickness of the blanks. Cellular polycarbonate is sold in sheets different thicknesses(from 4 mm to 12 mm). When purchasing for country house construction the material can be cut (depending on the size of the building).
The thickness of the part for making a canopy is selected according to the following principle - the structure must withstand snow. But this is largely influenced not so much by the quality of the polycarbonate as by the reliability of the frame. Therefore, even the thinnest sheets can be used. This will also significantly reduce the cost of the canopy.
How to choose the size of a structure: drawing up a drawing
The most difficult thing is to decide on the size of the planned structure. There are several options:
- If the canopy is made over the porch, the width of the structure should be such that the last one to the left and right of front door protruded 30 cm. In this case, raindrops will not fall on the floor and the person entering. The length of the product is taken to be equal to the distance from the wall of the house to the edge of the first step of the porch.
- If the canopy is located above the car, then its dimensions must correspond to the size of the car, and an additional minimum of 30 cm must be added to each parameter.
- The same goes for the pool. The canopy over it needs to be a little larger.
After determining the dimensions, you need to draw a drawing.
On the facade side, the canopy is often made arched. In this case, the bend radius cellular polycarbonate it should be equal to height extension.
How to calculate the material
Quantity calculation necessary materials can be done using the constructed drawing. Let's assume we create a structure without arched elements. Let it be a canopy over the porch. In this case, the width of the entrance door is 80 cm. According to the recommendations of experts, we take the width of the canopy equal to H = 80 + 30 + 30 = 140 cm or 1.4 m.
Let's say the distance from the edge of the first step of the porch to the wall of the house is 1 m. This means that the length of the canopy is the same.
A profile square pipe with a cross section of 25 x 25 mm is ideal for the frame. It is enough to install three pieces of polycarbonate support, each 1 m long, and connect them transversely at the edge of the canopy.
The supports of the structure can be made from ordinary steel pipe diameter 32 mm. It is enough to install two pillars in the ground up to the level of the upper edge of the front door (at least 2 m). Don't forget to add 0.5 m to the digging into the ground.
Required Tools
To work with polycarbonate you need:
- stationery knife;
- screwdriver;
- Bulgarian;
- roulette.
Step-by-step instructions for installing a polycarbonate canopy
The process of making a canopy depends on many parameters, in particular on its location relative to the walls of the house.
How to properly attach a canopy to a private house over the porch
The first option is a structure attached to a private house. All work is done in several steps:
- For the main frame elements it is better to use metal profile pipe with a square section made of plain steel measuring 25 x 25 mm. It needs to be cut with a grinder. According to the calculation, it is necessary to cut 3 profiles of 1 m each and a piece 1.4 m long. It is also necessary to prepare two pipes of 2.5 m each.
- In the corners of the porch, that is, along the edges of the rib of the first step, two pipes are buried 0.5 m into the ground strictly vertically. It is advisable to concrete the bases of these pillars. Why in equal parts combine cement, sand, crushed stone, mix with water and fill the holes into which the pipes are inserted with the solution.
- The ends of 3 m long square profile sections are attached at equal distances to the wall of the house 20 cm above the front door. Metal corners, large screws and a screwdriver are used for fastening. If the house is brick, you will have to take a hammer drill, drill holes for self-tapping screws and first insert plastic dowels into the holes. You need to try to ensure that the two outer segments rest with their front ends on the tubular pillars.
- The transverse profile is laid. Its ends should also rest on the tubular pillars. To connect it perpendicularly to sections 1 m long, metal corners and self-tapping screws are used. As a result, the frame should have a slight slope.
- A sheet of cellular polycarbonate of the required size is cut from a single piece. Suitable for this operation stationery knife. The sheet is cut along the honeycomb easily. In the transverse direction you will have to apply a little effort.
- The polycarbonate is attached with self-tapping screws to the profiles using a screwdriver. In this case, the honeycomb lines must be laid parallel to the wall of the house, otherwise the sheet will sag from the snow and break.
Installation of an arched canopy around a pool in a country house
The second option is to place a canopy over the pool. This has its own characteristics, since it will not rest on the wall of the house. The sequence of work is as follows:
- First, pillars are installed at the corners of the pool using the previously described technology. Material - pipe with a diameter of 32 mm. But in this case, you need to retreat from the corners in each case by 30 cm along the imaginary diagonal of the pool.
- Next, a profile frame is mounted on these pillars. Here it is advisable to use arched elements. To manufacture them, it is better to use the services of a construction organization, since self-assembly such a frame is very difficult.
- It is better to weld the ends of the roof skeleton to the posts using electrodes and a welding machine.
- Sheets of cellular polycarbonate must be laid one at a time until the entire space is filled, carefully joining each other.
In a similar way, a canopy is installed over a patio, barbecue, open seating area and any other element of the architecture of the local area.
Video: DIY polycarbonate carport
A polycarbonate canopy will last a long time if you take care of it regularly. It is necessary to examine the condition of the fastenings, as well as the safety of the cellular polycarbonate sheets. Minor repairs include replacing screws or part of the coating.