How to make a garden table with your own hands. We make an original table for a summer house on the street with our own hands
In modern conditions small apartments It’s quite difficult to give free rein to your imagination and purchase pieces of furniture that would suit everything. Among other things, it is quite difficult to find interior elements that would be attractive not only in design, but also in price. These two problems can be solved using the method self-made wooden furniture. This could be, for example, a table. You can do it by preparing everything necessary materials and tools. This piece of furniture can be used both in the kitchen and in the living room.
Preparatory work
In order to make a wooden table with your own hands, you will need to prepare some materials. Will need furniture board, the thickness of which is 19 millimeters. This material is different high strength and looks very attractive. Shields on preparatory stage It will be necessary to mark, and then cut out blanks from them. It is important to stock up on the necessary fasteners for assembly. Thus, you will need to prepare 6 boards that will make up the lower support. Their size is 19 x 100 x 965 millimeters. There will be 4 legs, their dimensions are 19 x 215 x 680 mm. The same amount of leg molding will also come in handy, but the dimensions of these elements should be 1938 x 470 mm. The tabletop supports will be blanks with dimensions of 19 x 125 x 610 mm. Wooden table for a gazebo with your own hands you can make it to the same dimensions. The master must prepare two dowels for the legs with dimensions of 10 x 32 mm. Two lintels with dimensions of 19 x 140 x 1100 mm should also be highlighted.
Additional items

You will need a steel tie in the amount of two pieces, its size should be 150 mm. The tabletop will be limited to the following dimensions - 19 x 1020 x 1900 mm. The tabletop plank must be cut in two pieces and have dimensions of 19 x 19 x 1750 mm. Screws, washers, ties, and dowels will be used as fasteners.
Preparing tools

It will be impossible to make a wooden table with your own hands if you don’t stock up electric jigsaw, circular saw, hacksaw, drill with drills, plane, milling machine, file, clamps, brush. To attach the parts you will need wood glue; you can process the wood sandpaper. The table will look good if you treat it with polyurethane varnish, which can be glossy or matte.
Manufacturing technology

If you decide to make a wooden table with your own hands, then you need to know that each supporting structure consists of 3 blanks glued together. An opening should be formed in the central part. Immediately you need to cut out 6 elements for two supports. Next, the master must make straight cuts using a circular saw. Corners should be rounded. Two blanks need to be cut central part so that the groove falls on the central part of the support. The width of the groove should be slightly smaller compared to the thickness of the tenon in the leg. This will prevent the structure from loosening during swelling and drying.
On next stage you can glue the supports. After applying glue to the surface of the parts, they must be folded so that the upper edges are flush. Reliability of fastening will be ensured by clamps. After the supports have dried, you need to get rid of excess glue. After the clamps are removed, you need to plan the lower and upper edges.
Working on the legs

When making a wooden table with your own hands, you need to prepare four legs. Afterwards, the vertical edges must be planed and rounded using a milling machine. At the ends of long workpieces, it is necessary to mark and then cut out tenons, placing them at the bottom and top. This can be done using a circular saw, which must be equipped with a combination blade. After the moldings are cut and brought to the required dimensions, you can round all 4 ribs. It is necessary to make grooves for glue on the back surface of the moldings.
Work on supports

If you decide to make a wooden table with your own hands, photos of the design will help you decide what features this piece of furniture will have.
The next step is to cut out blanks for the supports. For gluing, select a 10 mm groove in each workpiece. It is preferable to perform these manipulations immediately. In order to simplify the task, you need to prepare a cardboard template, marking the location of the grooves on it. Next, you can perform pairwise gluing so that the cut is located in the central part. Everything needs to be tightened with clamps. Once the glue has dried, you need to clean the cuts using emery cloth.
Installation of legs

If you are making a wooden table with your own hands, you must first review the photos. It is important to initially adjust all connections without using glue. At the wide edges, the connections should be tight. A gap of 1.5 millimeters must be provided on the side to compensate for changes in the size of the wood. When edging, these elements will be decorated.
The walls and spikes must be treated with glue, after which you can begin pairing the legs with vertical supports. Without waiting for the glue to dry, you need to make holes and reinforce the connection using dowels. If you decide that you will make a wooden table with your own hands, it is recommended to prepare the drawings at initial stage. For the legs, cut the moldings to the required length. They need to be glued and tightened using clamps. The glue is applied and then left until it dries.
If you decide to make a wooden table with your own hands, you can borrow the drawings from the article. The jumper should be installed high, so that those sitting at the table do not touch it with their feet. It is necessary to make gluing using two strips, which are previously edged with molding.
After the glue has dried, you need to remove the clamps and then chamfer. Holes must be made on the short sides to install fasteners. The tabletop can be made independently; its dimensions may differ from those presented above. At the ends you need to select tenons using a jigsaw.
Next, the cut areas are cleaned with a file. Along the long edges of the workpiece, it is necessary to install strips, which are pulled together with clamps and dried. By using edge cutter you need to align the edges of the moldings. They should be fixed to the planks, and then dried and the joints cleaned using a grinding machine.
When you make a wooden table for your garden with your own hands, the drawings will allow you to understand how the tabletop and legs are connected. To do this, use U-shaped brackets. On the long sides of the base, quarters should be selected to secure the sides. The ends of the last elements need to be rounded and cleaned. Afterwards everything is glued and compressed with clamps, and then left until dry.
Final works
Before you make a wooden table with your own hands, you need to familiarize yourself with the technology of the work. At the next stage, with a deviation of 100 millimeters from the edges of the base, it is necessary to make holes, the diameter of which should be equal to 20 millimeters. A through groove should be placed between them. The holes are required to prevent the base from splitting. If you are making a wooden table for your garden with your own hands, the drawings should help you carry out the work.
Now the master can assemble the table; to do this, it is necessary to fix the jumper to the legs. Using a pencil, you need to mark the position of the legs so that they are perpendicular to the ends of the lid. The brackets should be installed according to the markings. You need to make 10 holes in the tabletop to install screws. Next, you can strengthen the brackets. It is necessary to place a washer under each screw; this will compensate for shrinkage; this is the only way to make a folding wooden table with your own hands.
You can change the technology and dimensions of the table at your own discretion. However, it must be remembered that the design should be as strong and reliable as possible. It's important to protect wooden elements from negative impact external environment, this is especially true for those pieces of furniture that are supposed to be used in the kitchen or outdoors.
At the dacha there are very important items, but which you can do yourself, so as not to overpay, so our topic today is DIY garden table. You are free to make it any size you want to get a small table set, and a large one so that the whole family and guests can fit behind it, as well as folding models, functional, original, which are used as decoration, and so on. Below we will give you examples of each of the above groups, and also see how difficult or easy it is to make this important item.
Do-it-yourself wooden table for a summer house
Wood is relatively accessible and inexpensive, depending on what type of material you want to use to create DIY wooden table for the garden. In the vast majority of examples we are talking about wooden boards of one thickness or another, which make up the tabletop, and for the legs and supporting elements of the structure it is used wooden beam, perfect suitable material for this task.
We can talk about the advantages of boards for a very long time, but, first of all, this is the availability of the material, its low cost, and, what is very important for home craftsmen and those for whom even simple tasks are an important task - working with wood does not require many complex, expensive tools and no knowledge of operating techniques is required. In principle, assembling a stool is a compulsory program for boys since school days, and we assure you that assembling DIY garden table made of wood not much more difficult.

But before you choose among the models DIY garden table, drawings and schemes, you will need to decide which one you need and for what purposes. The degree of success of the design may greatly depend on this, since the table itself will be good, but will not be suitable for the task at hand. So, if you need a portable model, then you should not make it using logs or the like heavy material, since moving such a colossus will not be easy. Round varieties look very interesting, but they are better used for filling the same round shapes. After all, although the circle allows you to seat guests, there will still be significantly less space on the surface of such a tabletop than on a round one. It is also important what the legs will stand on; if it is a completely flat concreted area, then you can choose models with four level legs. They look very elegant and are quite simple to make. But if you want to arrange a feast on the lawn or you are not confident in the absolute flatness of the floor surface, then it is better to choose more stable leg options, for example, oblique ones, which will allow you to maintain the stability of the structure in this situation.
DIY outdoor garden table
Is it the tree ideal material DIY outdoor garden table? Many doubt this, because in this case it wooden surface Water will constantly drip, both from rain and, for example, from watering, and this can negatively affect the wood. But since everything positive points Since there are already very many designs of this type, it is worth thinking about special compounds that are used to paint wood. They do not change its structure, on the contrary, they can emphasize it, make it even brighter, even “more expensive”, but at the same time, they prevent the absorption of water into the surface and the appearance of all negative phenomena that are related to this. Therefore, just after finishing production, don’t be lazy and don’t save money - cover ready product high-quality paint and varnish composition.

There may be several areas on the street where it would be appropriate DIY wooden table for a summer house, drawings which you could see above. First of all, this is a summer terrace or a place for eating, located near summer kitchen. There you will need a large, wide tabletop, which, ideally, is equipped with benches or chairs of exactly the same design, so that it all looks like one set. But not only for eating we may need a table, but also for carrying out gardening work. For example, in a garden it is best to install it in some picturesque clearing, fit it into landscape design. It is also needed on the finished one, because with it you can draw, sculpt, and play board games.
We would like to talk a little about special tables that are gaining more and more popularity among owners summer cottages. The fact is that a new variety has been added to the traditional set - a bar counter. This is a table top unusual shape– it is located on very high legs so that the person who sits behind it and who stands behind it are the same height. Such entertainment as a country bar, decorated, for example, in a beach style, greatly decorates the site. In the photo you can see what this might look like DIY wooden outdoor garden table.

There are no particular difficulties in the bar counter format; you will only need to understand what its size, height and width will be most comfortable for you. Another mandatory design element will be the presence of a large number of shelves and drawers where you can put dishes and all other accessories for creating cocktails. The material for the construction can be either boards or pallets - boxes, which are in great demand today, although you will have to work with it no less than when knocking down table with boards for the garden with your own hands. The fact is that in these boxes there is not only their shelf life, but also the initially good or bad quality of the wood, therefore, in pursuit of ease of assembly, you can end up with a product of poor quality, crooked and with an uneven tabletop. And all because after one season of use the board begins to “lead” in different sides, so it’s worth not only buying high-quality pallets initially, but also letting them sit for some time before work.

Continuing the theme of the bar counter, we want to show you a few more tall varieties. These are also auxiliary tables-trolleys, mobile and convenient for moving within the entire site. They come with small wheels that make them easy to carry, but also think about the material you use to make them as light as possible. In addition, developing the idea of a bar counter, you can do something much larger by making a circular tabletop, for example, on a fence framing a barbecue area. And the idea with the design of the stand round shape, which goes around the tree - it is not only practical, but also very beautiful. Previously, we could only see benches that were placed in a similar way, but it turned out that they would cope with this task just as well.
How to make a garden table with your own hands
To develop the theme of useful furniture, we will briefly show you the process of creating an auxiliary table. In this case, when solving the problem, how to make a garden table with your own hands, two main stages are used - creating a frame and designing a tabletop.

To create a frame, an appropriate drawing is selected, the length of all the boards and timber that are part of it is marked, and then they are sequentially knocked together. You see it is already ready, assembled frame, decorated with a pergola element on the high back. This will not only decorate the craft, but such a perforated plane can be used for storage kitchen utensils. On top, on the recess, you need to lay a tabletop made of smooth material, for example, a laminated wide board, so that there are no gaps in the surface between the boards, since dirt will easily get clogged there. A technical hole is cut for a metal sink purchased at a plumbing store, as well as all the holes for communications, taps, and pipes that you will need. When installing a sink, carefully seal the edges of the hole; this will secure the element in the countertop and prevent water from penetrating inside. All that remains is to connect the structure to dacha system water supply, and drain the drain into a septic tank or cesspool.

If you want to DIY a traditionally shaped table, this will give you some advantages as you will be able to outfit the tabletop with very useful features. For example, make a small hole inside, in the center, where you can, if necessary, insert a large umbrella, protecting everyone who sits around it from the scorching rays of the sun.

And in the case when there is special requirements towards functionality, you can go even further towards creativity. For example, make a recess in the middle of the table, inside of which there is a cooler bag. Ice is poured inside it and bottles of beer are placed - for a long summer feast. For those who don’t like beer creativity, they can place moss or unpretentious garden plants, which will simply decorate the appearance with their presence.
DIY garden table photo
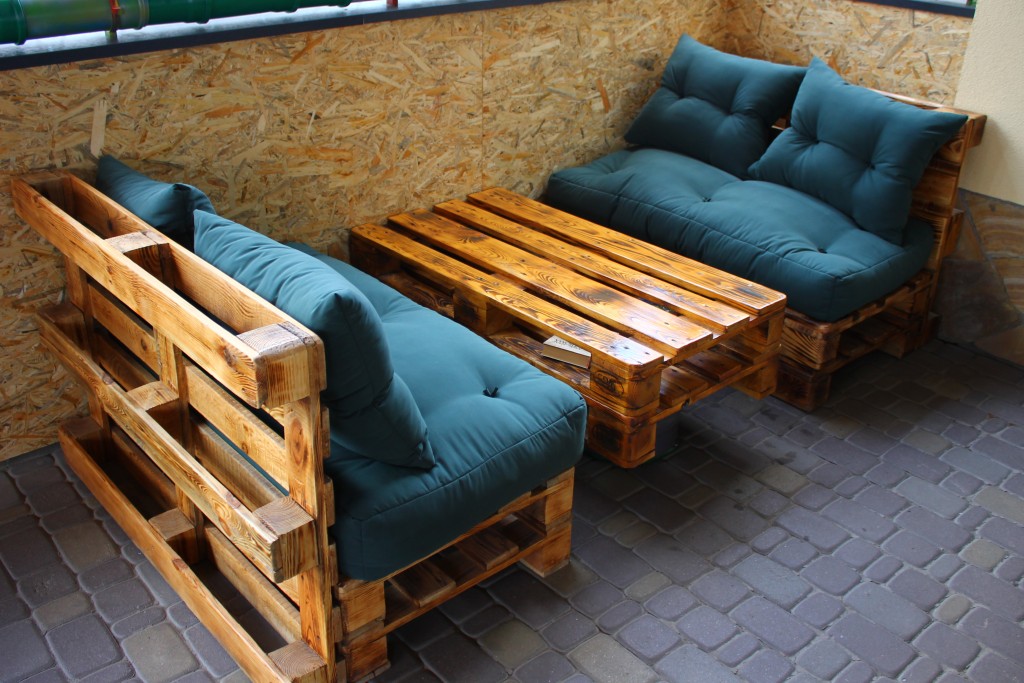
When we use pallets, as we have already talked about, it is best to use a combination of them with other materials, or non-standard shape for the finished product. You can see how beautiful this can look to improve your country life by looking at the example of creating DIY garden table, photo which is located below.

And also examples of more traditional tables with a “zest” - a folding element that makes such furniture extremely convenient to use. If you don't need them, you can easily reduce them by half overall size or, in general, put them away until the need arises.

DIY table and bench for your garden
The ideal option, if you feel a sufficient degree of skill, is a whole set consisting of DIY tables and benches for your garden.


The examples above show that these kits can be different forms and sizes, but at the same time they look very stylish and expensive, precisely because they are made in the same style and their designs echo each other.
Even if furniture production is far from your area of expertise, make country table with your own hands to gather with family and friends on warm summer evenings is a completely feasible task.
Its main advantage, as opposed to a purchased one, is its undoubted savings. It is not necessary to make a table from scratch: simply by assembling purchased parts, you will save 30-50% of the cost. If you manage to use materials left over from construction or renovation, the costs will be limited to the purchase of fittings.
To choose a design, you need to decide where the product will be used.
By using cheap, substandard boards for your country or kitchen table, you will get benefits that are not available for mass production. Sounds dubious? But it’s true: the knots that cause boards to be rejected have the most interesting decorative properties. If you manage to highlight them successfully, you will become the author of a completely unique design product that would be a shame to leave in the garden in the rain.

Making a country table with your own hands to gather with family and friends on warm summer evenings is quite a feasible task.
To choose a design, you need to decide where the product will be used: on grass lawn under a tree, complement a gazebo, stand in a workshop or in the house.
The simplest country table can be assembled in a few hours with a minimum of materials, but it will not last long. To get a product that will be truly pleasant to use, you need to carefully prepare the boards and perform all technical operations at each stage with high quality.

Its main advantage, as opposed to a purchased one, is its undoubted savings.
If you find a large stump in the forest, it can be easy to make garden table ik. All you need to do is remove the bark from the stump, make an even cut along the top, sand it, treat it with an antiseptic and varnish it. It is enough to nail or screw the finished furniture panel to the “leg” of the stump - and you’re done.
Tabletops made from boards fastened at the bottom with transverse slats look good. If you prefer a glued tabletop, you can make it yourself, but it will require a lot of effort.

If you manage to highlight them successfully, you will become the author of a completely unique design product that would be a shame to leave in the garden in the rain.
It is difficult for a novice master to fasten the legs securely, so try to choose a design, correctly assessing your skills and taking into account the cost of labor and time. The easiest way to make cross-shaped and L-shaped legs. To attach straight legs, you need to carefully connect the parts.
One of the most cozy options for garden - collapsible table with benches, which can be installed in a gazebo or on the veranda. It’s not difficult to do, the main thing is to choose quality materials and properly prepare them for work.

The simplest country table can be assembled in a few hours with a minimum of materials, but it will not last long.
How to choose a tree?
For garden or kitchen table wood will do many species, both soft (pine, spruce, cedar, fir) and hard (oak, birch, ash, walnut, maple, apple, pear, acacia, etc.) The exception is too soft rocks wood (poplar, alder, aspen, willow).
One of the main parameters of the suitability of wood for making furniture is resistance to rotting: the species listed above meet this requirement.
If you do not plan to do furniture work on a regular basis or are just starting to practice, give preference to the most common types of wood - pine and birch.

Tabletops made from boards fastened at the bottom with transverse slats look good.
Wood can be used for the tabletop, frame and legs different breeds. At the assembly stage you will need dowels: they are usually made of acacia or boxwood. Birch wood has an inexpressive pattern and can be significantly warped due to spilled liquid - it is better not to use it as a tabletop material, but due to the hardness of this species, it can be used to make legs.
It is better to make the tabletop from oak or pine. If you know how to brush wood, the surface of your kitchen table can become a real work of art. Wood can be brushed soft species: wood is burned gas burner, and soft fibers are removed with a wire brush. It is better to carry out work in the yard due to the large amount of dust. If you managed to burn the wood evenly, you will be pleased with the result. Brush can be tinted with stains, stains, artistic paint diluted with water acrylic paint. Of course, brushing the wood is not necessary: it is only a finishing option.

If you prefer a glued tabletop, you can make it yourself, but it will require a lot of effort.
Selection of paints and adhesives
Before installation begins, the boards must be protected from rotting. The tree must be impregnated with water-polymer emulsion (WPE): treatment is carried out twice with an interval of 3-5 days. This is enough for the product to last a long time.
Some models will require glue. Along with special carpentry adhesives (BF-2, etc.), you can use construction PVA: it is applied to both surfaces to be glued, dried until tack-free, then the parts are connected and kept under pressure for up to three days.

It is difficult for a novice master to fasten the legs securely, so try to choose a design, correctly assessing your skills and taking into account the cost of labor and time.
Choice paint and varnish materials determined by where the product is planned to be used: in the yard or indoors. For a garden table that is inevitably exposed to precipitation, alkyd, alkyd-urethane, nitrocellulose varnishes and oil paints are suitable. For a kitchen table, as for any furniture that is constantly located indoors, it is better to use acrylic paints and varnishes: they are more environmentally friendly and do not have strong odor. Varnishes marked with the “blue angel” sign are recommended for children's furniture and toys.
If you decide to cover the wood with stain, paint or simply tinted varnish, this must be done before assembly. Material compatibility must be taken into account. The varnish is tinted with a paint of a suitable composition: if the varnish is alkyd, the paint should be oil-based; if you use acrylic varnish, it can only be tinted with acrylic paint. At first not a large number of The varnish is thoroughly mixed in a separate container with paint, and then the resulting mixture is added to a larger volume of varnish.

One of the most comfortable options for the garden is a collapsible table with benches, which can be installed in a gazebo or on the veranda.
What tools are needed
To work you will need:
- hacksaw,
- circular saw or jigsaw;
- drill;
- screwdriver;
- hammer (if you decide to use nails).

Many species of wood are suitable for a garden or kitchen table.
IN this list only the most necessary tools, but to make the work more comfortable and the finished product to look aesthetically pleasing, it is advisable to buy or rent a rotary miter box, an eccentric sander and milling machine.
The rotating miter box makes it possible to make cuts at exactly the right angle. An eccentric sander will allow you to prepare parts simply, quickly and efficiently: you will sand the boards in an hour, instead of doing it all day by hand with sandpaper. For high-quality processing A belt sander is useful for the ends, and a milling machine allows you to select wood for the required grooves and process the edges.

If you do not plan to do furniture work permanently or are just starting to practice.
Homemade table from pallets
A spectacular table in a rustic style can be constructed from pallets ( wooden pallets). If you are the happy owner of such a container, especially a double-deck pallet, just disassemble it: there is no problem purchasing boards!
Do you think that buying new boards is always better? You probably haven’t worked with wood before: you can’t use raw wood (the product will become deformed after a few months), and dry boards are much more expensive. To dry raw wood boards, they are stacked in a well-ventilated area: this necessary process will delay your project by 4-6 months! Not a bad option The already mentioned rejected boards, also dry, can be used for the kitchen table.

It is possible to use different types of wood for the table top, frame and legs.
Let's return to the pallets: they are disassembled. Now you have at your disposal strong boards with different patterns and colors, it is possible that they are from trees of different species. These features should not be considered as disadvantages: they will add zest to the product: you just need to create an interesting composition from them, alternating boards of a similar shade.
From the side parts of the pallet you will get excellent frame, and the remaining strips will be used to assemble the tabletop.

It is better to carry out work in the yard due to the large amount of dust.
To make the legs, you will need a beam at least 5 cm thick. All parts must be prepared: sand strictly along the grain with sandpaper, first coarse (No120-150), then finer grain (No400-600), carefully removing dust.
Some boards can be painted with acrylic or oil paint. Fans of the loft style can use stencils in the form of numbers or simple graphic symbols. We stain boards with a beautiful natural pattern or simply varnish them. After staining or first layer acrylic varnish soft fibers rise; They need to be sanded with medium-grit sandpaper and a new coat of varnish applied.

A spectacular table in a rustic style can be constructed from pallets (wooden pallets).
If a non-aqueous varnish is used, it is enough to apply 2-3 layers, and if acrylic, the number of layers can reach up to ten.
Rejected boards, also dry, can be a good option for a kitchen table.
We fasten the tabletop boards with strips, which we place at the joints of the boards. Using a drill, screwdriver and self-tapping screws, we fasten the boards to the planks (we use two self-tapping screws at the joints, and one on solid boards). The use of a drill is necessary so that when screwing in the screws the wood does not crack. We assemble the frame from the prepared pallet sides. Using a drill of a diameter suitable for self-tapping screws, we drill holes at the joints. We coat the joints with glue and fix them with self-tapping screws. We install the legs: simply screw the boards to the frame, screwing in the screws diagonally. To strengthen the structure, we make jumpers at the bottom in a similar way.

To make the legs, you will need a beam at least 5 cm thick.
Wooden table with glued top
For a glued tabletop, you need to select boards of the same width. If the table is intended for a workshop and its appearance does not have of great importance, you can use old floorboards: there are already grooves there. To make the grooves yourself, you will need a milling machine.
A flat surface is required to assemble the tabletop. We simply coat the sides with glue, join the boards together without gaps and tighten the resulting structure with clamps. Depending on the glue used, the tabletop should dry from 1 to 3 days. If everything is done correctly, you will get a tabletop with a completely flat surface without cracks. All that remains is to work on the ends - first trim them with a jigsaw and then sand them. If you do not have a belt sander, this must be done manually - with sandpaper, first coarse, then medium-grit.

After varnishing the parts, you can proceed to installation, which consists of several stages.
If you don’t want to bother with glue and clamps, you can use ready-made furniture board from a hardware store. Then the tabletop remains to be covered with transparent or tinted varnish.
For good result you need to apply 5-7 (for acrylic varnish up to 10) layers. After every third layer, the working surface of the tabletop should be sanded with fine-grained sandpaper, carefully removing dust with a damp cloth. At the varnishing stage, it is important not to rush: each layer of varnish must dry thoroughly.
All that remains is to make the legs of the garden or kitchen table: let’s focus on the option with L-shaped legs. You will need boards with a thickness of at least 22-25 mm.

For a glued tabletop, you need to select boards of the same width.
L-shaped legs consist of two parts connected at an angle of 90. It is necessary to make a sample on the boards to be joined, coat the joint with wood glue, and then install self-tapping screws.
When the glue has dried, we coat the legs with varnish and, after drying, simply fasten them to the tabletop with self-tapping screws.

There are several options for connecting the legs to the tabletop.
Table with straight legs
To make straight legs, just cut a thick beam into pieces of equal length. There are several options for connecting such legs to the tabletop.
To ensure that straight legs are installed securely, you can use a dowel connection at home. You can make them yourself from acacia wood or buy ready-made ones. To assemble dowel joints you need quick-drying wood glue (BF-2).

To make straight legs, just cut a thick beam into pieces of equal length.
Table with X-shaped legs
Sequence of work.
- On inner side We fasten the tabletops with self-tapping screws, two strips on each side.
- To make the table look good, the edges of the planks must first be cut at an angle of 52.
- We attach paired planks so that the legs fit, making overlaps of 2-3 mm on each side.
- Place the boards on a flat surface, crossing them at the desired angle. We measure the distance between the ends of the boards: it should correspond to the width of the table.
- We outline the intersection with chalk: here you need to select half the thickness of the boards so that after assembly they lie in the same plane.
- We coat the recesses with glue and place the parts under the press for 1-3 days. For greater reliability, the connection can be strengthened with self-tapping screws.
- We varnish the legs.
- All that remains is to attach them to the tabletop, placing them in the grooves formed by the slats - and the table for your garden with your own hands is ready.

X-shaped legs are made from beams or boards with a thickness of at least 50 mm.
Table with benches
The optimal solution for a gazebo is a dining table with benches attached to it. It is better to make this design collapsible so that it can be stored indoors for the winter.
The table will require thick boards (from 32 mm), which need to be cut into pieces according to the drawing. IN this option Two benches are attached to the table. When all the parts are cut, they need to be sanded, paying particular attention to Special attention ends. We varnish each board separately.

The optimal solution for a gazebo is a dining table with benches attached to it.
To connect the parts of the structure, we will prepare studs (length 160 mm), nuts and washers - 24 pcs. For other connections we use screws or nails of suitable length. Using a drill, you need to prepare all the holes for fastenings.
According to the drawing, we assemble the tabletop and the upper parts of the benches. We cut off the transverse slats along the edges, the angle should be 45. This is convenient to do with the help of a rotary miter box.
We make and fasten all the legs with self-tapping screws. We fasten the parts cut at an angle.

We varnish each board separately.
We tighten the product with studs and bolts. The holes for the studs must be pre-drilled with a drill. When installing the stud, you need to put washers on both sides and tighten the nuts using a wrench.

We tighten the product with studs and bolts.
We fasten the seat boards with gaps of 5 mm. When the seats are connected to the sawed-off supports, we attach them to the assembled base with 160 cm boards: you will need 4 boards.
Install the remaining studs and enjoy the result.

Using a drill, you need to prepare all the holes for fastenings.
VIDEO: Do-it-yourself wooden table for a gazebo
50 photo ideas: how to make this table with your own hands


Of course, today everyone has the opportunity to buy any furniture in the store, including a table. But why not make it yourself, with your own hands?
It's not as difficult as it might seem at first glance. In addition, you have the opportunity to make a table that will fit perfectly in size and appearance to the interior of your kitchen or other room.
In addition, hand-made furniture is not only saving money, but also a reason for pride, since not every man knows how to make something these days.
What types of tables are there?
If you decide to make boards yourself, then you need to figure out what types of tables there are and decide what exactly you need.
The simplest is a regular table with four legs, a tabletop and a frame. Making it will not be difficult even for those who are not experienced in woodworking.
If you are experienced enough in this matter, you can make the dining table round or oval, decorate it with carvings, paintings, or burn designs and patterns onto the surface.
More difficult option is made of boards. In essence, this is the same ordinary table, but quite thick and long crossbars are attached to its legs, on which seat boards are laid on top. This is how we get a table with benches on both sides. Such furniture is well suited both for the kitchen and for installation in the courtyard of a private house or cottage.
If there is only free space in the room in the corner, make corner table, which will fit perfectly into this unoccupied space. It may not be as convenient to dine at it as at classic table, but you can put a TV, microwave or kettle on it - there will be enough space there.
 One more interesting option can become a window sill table.
In essence, this is the same window sill, but significantly expanded and adapted, for example, for a comfortable workplace for a schoolchild.
The advantage of this solution is that the table will be well lit most day.
There is also a downside: sitting at such a table in winter, your feet will have to rest against very warm, even hot battery heating, which is not very convenient.
Materials and tools
 Buying everything you need to make a table with your own hands is quite simple and will not be difficult or costly. The main material for dining table is a tree, or rather:
- Boards from 25 to 50 millimeters thick, 100–150 millimeters wide, quite long.
The thicker the material for the tabletop, frame and legs, the heavier, but at the same time the more durable they will be.
Choose boards from good wood, without any defects. - Beam. It is necessary for making table legs, so choose fairly thick and strong samples. The timber can be replaced with the same boards, if you arrange them in the letter “L”, or use purchased aluminum table legs. You can also use balusters (curly carved wooden posts that support the railings on some stairs) as legs.
- Sheets of chipboard or plywood, which can be used as countertop materials. Choose samples that are thick and strong enough to withstand daily abuse.
 As with materials, And Do-it-yourself tools and fasteners are easy to obtain; most homes have them. If something is missing, you can buy it at the nearest hardware store.
- pencil, corner, roulette and ruler;
- jigsaw or hacksaw on wood;
- screwdriver with a set of attachments and drill;
- plane, if it is necessary to pre-treat the boards from unevenness and defects;
- kit self-tapping screws, furniture bolts and nuts;
- sandpaper or Sander;
- varnish or stain, roller or tassel for processing the finished table.
Attention! When working with a jigsaw, always remember the safety rules and keep small children or pets away!
Simple kitchen table made of planks
 First we need to make a tabletop.
There are several options here:
- Cut out the required size piece from a sheet of chipboard or plywood using a jigsaw;
- Lay several fairly wide boards and subsequently secure them to the frame;
- Take a large number of relatively narrow boards, place them side up and glue them together using wood glue.
The result is a fairly thick, heavy and durable tabletop.
Stages of work
Step 1. Assembling from boards table top.


Step 2. We make a frame from boards or their wooden bars. It can be made equal in size to the tabletop or with a slight indentation, approximately 2–2.5 centimeters on each side of the table. Having fastened the parts of the frame with screws, use them to connect the frame to the tabletop.
Step 3. After we With We put the frame and tabletop together, half of the table is already ready. All that remains is to make his legs. If you use timber for this, drill two holes in it for furniture bolts. Moreover, they can be made either on one side, one above the other, or on two different ones for more secure fastening to the frame.
Important! Carefully check the length of the table legs; they should not differ from each other. Otherwise, the table will not stand level and wobble. If you do not want it to spoil the floor material, attach rubber “boots” to the bottom of the legs.
Then make similar holes in the table frame and fasten the legs and frame with bolts and nuts. The legs can also be secured from above using screws, but over time this fastening may become loose.
 If you want to make table legs from boards, fold two boards in an "L" shape on the outer or internal corner frames and secure them using the same furniture bolts or screws.
To prevent the legs from becoming loose, connect the folded boards together in the lower and middle parts using screws or nails.
That's all, simple and reliable, made by yourself, ready!
Advice: Before you start, do simple drawing, preferably from several sides. Constantly check the dimensions of the parts. Some parts of the same size can be cut out at the same time if you secure the boards or beams with clamps.
Pallet table
 Wooden pallets widely used in shops and warehouses as pallets for cargo.
If you wish, you can get a few pieces for free and use them as a basis for making an original and unusual kitchen table.
If at least on one side the surface of the pallet is solid, then you no longer need to make a tabletop, it is ready.
You just need to process it and, if desired, round the corners.
Note! Since the pallets were originally intended for warehouses, no one sands and cleans them. Therefore, before making a table out of them, carefully sand them and remove all burrs. Irregularities and defects in the boards can be hidden using putty.
Stages of work
Step 1. Most pallets are open and there is quite a lot of space between the boards. distance, due to which the surface of the pallet can be used as table top not very convenient. There are two ways to solve this problem: either make boards appropriate size and secure with their screws between the pallet boards, or install a sheet on top plywood or chipboard.


Step 2. As for ordinary table, table legs from pallets can be made from timber or boards. The best thing fasten them with quite thick and strong pallet timber using nails, screws or furniture bolts.


To prevent the legs from becoming loose, connect them together with crossbars.
In order to organize a place in the country for outdoor recreation, it is not necessary to buy an expensive wooden furniture or spoil the area with inexpensive plastic fittings. So, you can make a table for a summer house with your own hands, having detailed drawing and a minimum of skills. Even so, this process will take a little time and will bring a lot of pleasure, both during the assembly of such a structure and in subsequent operation.
The drawing of a table for a summer house with your own hands is presented below.
Drawing of a table for a summer cottage made of wood
Drawing of a table for a summer cottage made of wood


In order to independently master drawing of a table for a summer cottage made of wood, you will need the following tools:
- plane,
- screwdriver,
- jigsaw or hacksaw,
- roulette.
We list the main materials for a DIY table:
- 10x4 block (although the thickness can be any),
- board 15x4,
- furniture bolts,
- wood impregnation or paint.
Overall dimensions of the table
Our garden table has an approximate width of 1.4 m. This optimal width so that 4-6 people can sit behind it. The height of the product will ultimately be about 0.7 m. In order to make assembling a table for a summer house as simple as possible, you can use the following patterns.

DIY table assembly process
First, the main parts are prepared. So, it is necessary to cut the timber and boards into the following components:
- Bar: 1.4 m – 2 pcs., 0.8 m – 4 pcs., 0.65 m – 2 pcs.,
- Board: 1.4 m - 8 pcs.
Base
The basis for the future table is two rigid frames made in the form of a trapezoid. Such a frame is assembled from two legs 0.8 m long and two horizontal bars (0.65 m and 1.4 m, respectively).
The legs themselves in the side section have the shape of a parallelogram with an acute angle of 60 degrees. The ends of horizontal bars are cut at 45 degrees. To rigidly fasten legs with bars, it is better to use furniture bolts with a length equal to twice the width of the bar, plus the thickness of the washer and nut.
Tabletop
After the two base frames are assembled, they must be installed vertically at a distance of a meter from each other for the subsequent installation of the tabletop of our garden table. As such, four boards 15 cm wide are used. They are fastened with wood screws, leaving a gap of 2 cm between the boards. This way, moisture will not accumulate on the surface of the table, even if most of the time it will stand in the open air.
In order to maintain equal gaps, you can use pre-prepared wedge templates, which are temporarily installed between the boards of the countertop.
Seats
Fastening the seat boards is done in the same way (see previous paragraph).
Painting
In order to DIY garden table served long time, after assembly it should be coated with special wood paint. The most common option is regular Oil paint. But you can also find other compositions that are more suitable in terms of environmental and aesthetic properties. The color is chosen from personal preferences, funds and the environment where the table will be installed.