Windows on a gable roof. Do-it-yourself attic window: types of designs characteristics Window from roof to wall
For many centuries, the attic of a residential building has served its owners as an indispensable storage facility for all necessary and unnecessary things. In addition to its main purpose, the attic provides wonderful libraries, living rooms and comfortable dressing rooms. But if you leave such premises under a roof without sunlight And natural ventilation, all things stored here will simply deteriorate from mold and the smell of dampness.
After all, three factors are needed for mold to attack everything it can - warmth, darkness and lack of fresh air. Why, in any attic, regardless of its purpose and insulation, it is mandatory to building regulations and according to the rules, an attic window is made - in all its diversity. And now we will tell you how to choose the desired form, understand the main functions and install the window yourself.
Attic windows have been around for a very long time, and they have rich story. In Rus', all house owners tried to decorate such an element, paying no less attention to it than to a standard window frame on the ground floor.
You will also be interested to know why an attic window is sometimes called a dormer window. It’s just that “hearing” has long in Rus' meant “hole”, “wiretapping”, “vent”, an opening for hearing; that is, a dormer window is a “hearing” in the roof. Such windows were always needed in order to properly dry the hay in the attic and prevent the wind from tearing off the roof. How? Now we will reveal all the secrets.
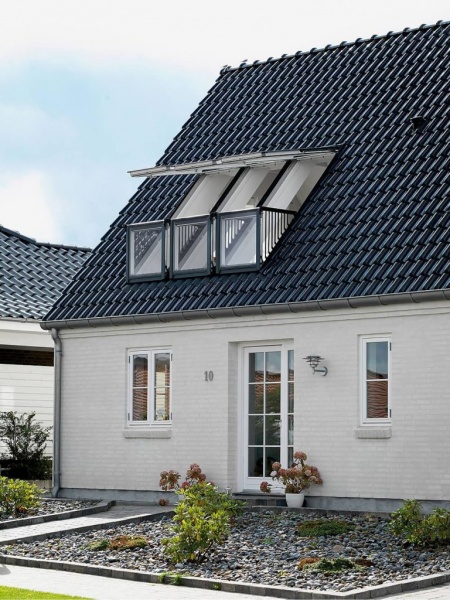
Here short review namely dormer attic windows:
And a little about attics:
First, let's figure out what functions modern attic windows already have and which of them are important, first of all, for you.
Types of attic spaces and their requirements for windows
So, there are two main types of attics: cold and warm. And they are quite different from each other in matters such as ventilation, internal temperature and insulation.
In a cold attic, there is usually natural ventilation, which allows you to maintain a temperature at which condensation and frost do not form, and the free movement of air, in turn, relatively reduces heat loss from the lower rooms of the house. Those. cold attic- This is a thermal cushion between the living rooms of the house and the roof. Such an attic is great for storing household and household items, and two windows for ventilation and a threshold amount of light are sufficient.
But in a warm attic, inclined walls are usually insulated. The residential attic is heated through an uninsulated ceiling warm air from the bottom living rooms, and only occasionally are the attic floors specially insulated - if there is a bathhouse or sauna underneath it, and at night it is impossible to live in such an under-roof dwelling due to the heat.
Also, in addition to the windows themselves, special ventilation units are usually installed here. And therefore, there are much more requirements for an attic window: light, design, ease of opening and closing. And all these efforts make sense: it is quite difficult to do without a warm attic when there is not enough space in a residential building. And it’s already a matter of time.
Therefore, let's figure out which specific type of attic requires which windows.
Functions and purposes of attic windows
The main and primary function of an attic window is ventilation. It doesn’t matter whether the attic is residential, like an attic, or whether we are talking about a technical room. In principle, in this all types of attic windows are very similar, the only difference is how convenient it is to open them and whether they will close at all.
Let us immediately highlight another important purpose of windows for a cold attic: not so much ventilation, but equalizing the pressure inside with the street during periods of strong winds.
After all, when the wind flows around the roof, the air pressure in the attic will always be lower than outside, and according to the law of physics, the wind will have a lifting force. It is she who tears the roofs off houses during hurricanes. But properly organized dormer windows prevent the formation of such a nuisance.

The next purpose is attic lighting. Moreover, it is important not only the fact that valuable sunlight penetrates under the roof, but also that it is not gloomy in such a room. For a residential attic this is important from an aesthetic point of view, and for a cold attic - from a practical point of view, because the same mold feels quite good in semi-darkness, not only in darkness.
There is already a huge difference in what shape of window you install: some give a little light, others are rich in straight lines. Sun rays, from which you have to protect yourself, and still others, like a panorama or a skylight, are indispensable for creating a cozy, bright attic without a single dark corner.

An attic window sometimes also serves as a way to access the roof if it is additionally installed as an inspection or technical window. But a stylish roof window has more than once saved someone’s life in the event of a fire. Therefore, it is always better to make an opening through which you can get out yourself.
So what should you choose?
Our verdict: if you are now faced with the question of whether it is worth installing small windows in the attic, or whether it is better to give preference to beautiful attic products, choose the second option. The fact is that, as shown modern life, more and more often simple attics in residential buildings converted into residential premises.
It’s just that sooner or later the owners of the house come to the idea that it would be nice to set up a personal office under the roof, put exercise equipment there, or make a creative mini-library. Or even place a billiard room there or convert the attic into a guest room with a home theater.
Finally, under the roof you get a wonderful children’s playroom, where you can throw toys around to your heart’s content, play noisily with the neighbors’ kids, and not bother anyone at home. This is when the problem arises: there seems to be a window, but there is very little light under the roof. And no one wants to climb to break walls and dismantle the rafter system, and this is often fraught with new roofing problems. Therefore, if you are currently building a house, but expect that for another five to ten years there will be only old things in the attic, let them gather dust in good light.


Shapes and types of attic windows
Have you decided on the functions? Now is the time to choose the right shape and design.
Attic windows can be of various shapes, and even perform important decorative functions for the exterior of the house. In total they are divided into the following types:
- auditory, or technical window on a flat roof;
- attic window. A standard attic window gives in a little less light than a dormer window due to its more compact size.
- semicircular window. The semicircular shape looks quite attractive on absolutely any home and serves as a designer decoration in itself.
- quadrangular window with pitched roof;
- window with hip roof;
- attic window with flat roof. The attic window with a flat roof has a special design: it has additional gutters, thanks to which water does not linger on the top cover.
- with trapezoidal roof or panoramic;
- oval window;
- window rectangular shape. A rectangular attic window is similar to a regular window complex with a flat roof. The only point: this roof needs to have a slope of 15 degrees.
- triangular window. A triangular dormer window for an attic is most often built in country houses and dachas. This design does not have walls or a canopy - these functions are performed by the roof slopes themselves. As a result, such a window has much fewer joints, which is valuable in itself: there are fewer problems with waterproofing. But, if the top of such a window is the vertex of the triangle, then the lighting functions will be slightly lower. But the most popular today is the design of an attic window with a semicircular shape, which is also funny called “bat” or “frog”.
- window with panoramic view;
- clerestory. If the attic window is designed to provide more lighting, then a so-called skylight is installed.
Look how simple an arched attic window is to make and how beautiful it is in practice:

And now a little about the pros and cons of each type.
Standard windows: simple and unpretentious
One of the most simple options- install the most ordinary windows in gable walls. But this option is possible only if the roof itself is pitched or gable. But if it has many facets and is of complex architecture, then nothing will work out. In addition, just one window may not be enough for a residential attic, especially if the view from this window is not so great.
See how simple it is in practice:

Panoramic windows: a lot of light and a beautiful view
Today, panoramic skylights are especially popular, providing uniform illumination throughout the attic. The intensity of their lighting directly depends on the angle of the roof and the cardinal directions - south or north. In general, in modern houses in Russia it is fashionable to install larger attic windows so that more light enters the attic.
Dormer windows: a universal option
The dormer window also differs from many other types in that it has more simple design and you can place it directly on the slope of the roof - and at the same angle as the roof itself. Installation is so simple that there is no need to redo the entire roof structure, and this type of window is most often preferred when an attic space is being reconstructed.
Lucarnes: for a special aesthetic effect
Separately, we note this type of attic windows, such as lucarnes. Lucarnes are dormers that are decorated in a Renaissance or Gothic style. Lucarnes are especially popular in Poland, and thanks to the famous construction magazine of this country, there is a certain fashion for lucarnes in Russia.
The lucarne itself is one of the most important architectural elements of the house, the shape and design of which influences the style of the entire building (decorating it or making it tasteless). Whereas a roof window is less noticeable on the roof, and its style decisions are not so important.
Lukarna is also different in that it forms a niche in the attic, and most of the light is right next to it. And the further away from such a window, the darker it gets. And already at a distance of 4-5 meters the light is not enough. What can we say about the slopes of the roof, under which there is even partial shade. Therefore, the uniformity of lighting in the attic when using this type of window directly depends on the width of the hatch and the method of constructing the side walls. Of course, such a room, on the other hand, seems more comfortable, and some modern interior designers prefer this type of lighting rather than the bright light of an operating room.
At its core, a lucarne is an additional extension on the roof with vertical window. Thus, a narrow hatch is often installed when restoring old houses, or when purposefully stylizing them as antique. But it is worth remembering that such an attic window has a specific shape, which entails some changes in the roof structure.
The simplest type of lucarne-type attic windows is the “beaver tail”, which is covered with flat tiles. A little more complicated is the “bull’s eye”, but it looks so impressive that it is difficult not to notice it when passing by such a house. And you will be surprised to learn that this type of window itself still has great functionality. Although at the same time, their implementation is a very difficult task, even for an experienced roofer:

So, for a beavertail window, more flat tiles are used. A roof with a “bull’s eye” will, of course, cost you more, although it will stand out favorably among all other typical buildings. In addition, you will have to hire a roofer with the appropriate qualifications, and the window itself will be made of laminated wood - this material is expensive, not to mention the fact that you will have to make a special order.
According to the rules, the “bull’s eye” must be designed at the development stage of the architectural project. First, a project is made, then modified rafter frame, the base is made and waterproofing is laid. After this, the roofing covering is laid and the aprons are installed. L
Any mistakes at this stage will result in the doors locking incorrectly or getting stuck. Result: freezing of the walls along the entire perimeter of the window. Therefore, in the case of such a window, it makes sense to trust only a professional. Therefore, in most cases it is better to equip the attic window in a simpler manner, but with a clearer geometry. And the choice today is huge.
Criteria for choosing an attic window
Now you should pay attention to the narrower parameters of attic windows: how much light they let in, whether it will be convenient to open them and what are the advantages of individual market offers.
Practicality parameter
When it comes to choosing the material for making attic windows, there are many nuances. Thus, wood is a wonderful material that absorbs noise well, retains heat and gives irreplaceable comfort to the entire interior. But wood is also sensitive to precipitation, and therefore it is better to give preference to plastic structures.
For the rest, focus on whether additional elements and insulation will be supplied with the window itself. This determines how easily you can solve waterproofing and repair problems in the future.
Lighting parameter
A dormer window illuminates the attic more evenly than a dormer window, although here too much depends on the angle of inclination. Standard roof windows are good because, unlike skylights, they are located at an angle, so more light comes through them.
Their surface area may be smaller than that of standard conventional attic gable windows. Therefore, their area most often ranges from 1/8 of the floor surface, and at the same time, the lower edge of the window should still be at a distance of 90-110 centimeters, and the top - 185-205 above the floor.
And this is also the main drawback of modern roof windows: a lot of direct sunlight gets into the attic, and the things in it simply burn out and overheat. Therefore, it is customary to install special Roman blinds and awnings on roof windows, which means a slightly different design and other costs.
That is why skylights are most often placed on the north side, where more soft, diffused light enters. Again, there is a minus here: on the northern slopes the snow lies longer, and therefore such leaks are more likely, not to mention the seasonal lack of opportunity to properly ventilate the room. But this does not mean that everything is bad on any side, just weigh the pros and cons.
Therefore, in terms of illumination great importance has the shape of an attic window: if it is horizontal, there will be more light, if vertical - a little less. But most of all, of course, light enters the attic through panoramas, especially direct sunlight, which can lead to overheating of objects.

There are certain studies that show that sloping attic windows transmit 30-40% more sunlight than vertical ones. Therefore, if you are going to make a relaxation room, SPA corner or bathroom out of the attic, then it is better to install more windows.
Constructability parameter
There is also a difference in at what stage of construction attic windows can be installed from different materials. Thus, metal-plastic ones are allowed to be installed even before finishing work has been carried out, especially wet ones. After all, plastic is resistant to moisture, but wooden ones can dry out after this.
Moreover, with wooden windows, if you already had to install them before such work, you will have to constantly tinker: ventilate, close and open, make sure that inside condensation did not fall out. And all this is a waste of valuable working time.
Comfort parameter
Now let's come close to the issue of opening attic windows. So, the most popular option is a design with a middle rotary opening. Such windows are good because they can be left slightly open or the sash can be rotated around its axis. This is very convenient when you need to clean windows. Also make sure that the handle is placed on top of the frame, then you can also put something under the window.
If you are planning to install attic windows and someday make an attic there, then choose ones that are installed high enough and controlled using a remote control: they open and close. For example, today attic windows are popular, which close themselves at the first drop of rain - all thanks to a special sensor. Amazing, isn't it? And they are easy to install:

Staffing parameter
Modern manufacturers are also working hard on the many disadvantages of attic windows. For example, roof windows are always at an angle and look directly at the sky, and therefore in hot weather the sun's rays penetrate in large quantities. Therefore, manufacturers produce a whole set of sun protection accessories, such as blinds and interior curtains, and also create new glass that partially reflects the sun's rays.
The finished attic window kit usually includes an external insulating flashing, which will protect the window from rainwater and snow, forming an airtight connection with any roof covering. This should also include mounting elements: corners, plates and brackets. In addition, each of us has the opportunity to purchase an additional kit for high-quality installation, which will help installation without damaging the waterproofing layer of the roofing pie:
- Often the kit may include aluminum corner profiles, internal corners and a special moisture-resistant adhesive tape for the membrane.
- Other manufacturers also offer an insulating belt made of sheep wool, which is characterized by special elasticity and thermal insulation qualities. And some modern windows are equipped with a special film for connection with a vapor barrier.
- The most large manufacturers To insulate their product, they also offer an additional contour made of foamed polyethylene and a special waterproofing apron made of polypropylene. It also includes sealant and special tape.
As a result, when using all these additional kits, you can increase the lifespan of such windows by 5-10 years more. Here good example how all this goodness is used in practice:


Subtleties of installing attic windows
And now we have come close to the question of how to properly install this roofing element. All attic windows do not have to be placed on the same line - this can be done in a semicircle, in a checkerboard pattern, or in any other way free form. Just keep in mind: the higher you install them, the lighter it will be in the attic, which, of course, is only a plus.
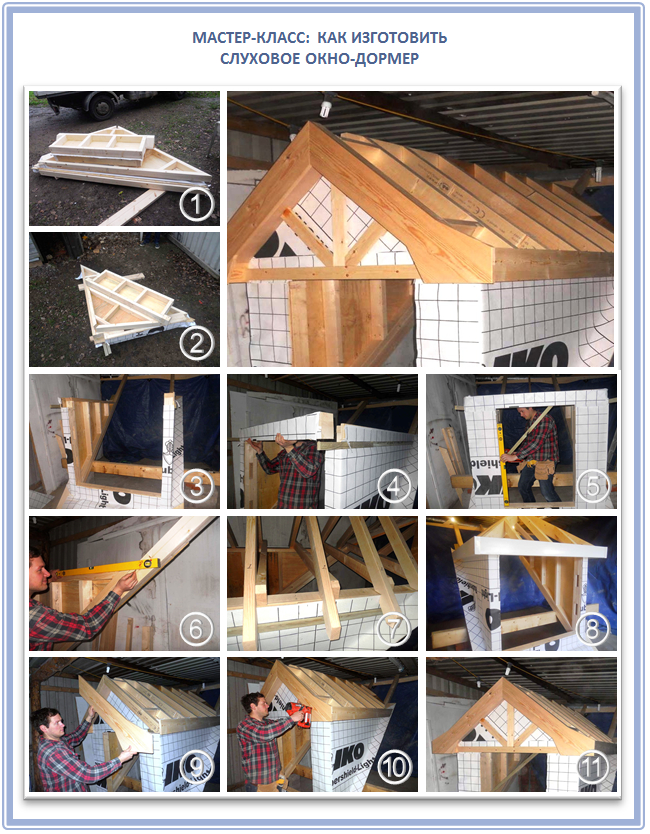
According to all the rules, it is necessary to equip the attic window in the process of creating the rafter system roof, because it itself is the same roof, only in miniature. Although, after the completion of construction work, the window is also installed, albeit with many difficulties. But we will tell you how to cope with all these difficulties. Note that some construction works you will need to do this on the ground before installing the window in the rafter system. For example, you can’t do without this in the case of a dormer window:
Stage I. Calculation and design
The first thing you need to know when installing attic windows is the distance between the rafters that is already there. Moreover, this parameter does not depend on the opinion or whim of the developer, but is determined during the design process depending on future loads and the shape of the roof itself.
For example, the smaller the roof slope, the more often rafters will have to be installed. Moreover, you cannot change the pitch of the rafters at your own request, so initially count on the fact that it is better to select windows according to the existing distance between the structural elements.
The calculation criteria for roof and attic windows are the same:
- The surface of the window itself should be in the area of 1/6 to 1/8 of the floor surface, and if the roof slope is very small, then 1/5.
- The window sill should be above the floor level at a height of 85-90 centimeters, and optimal height window opening - 120-150 centimeters.
- Hatch width or dormer window should be more than half the width of the room - this is the only way to properly illuminate all the rooms, without dark corners. This is how the volume of the room visually increases. The important thing is that you can get to the window without hitting the roof.
The rule here is simple: the smaller the angle of inclination of the roof, the higher the attic window should be located.


Now let’s figure out how to calculate the number of attic windows. If we are talking about a residential attic, then all the windows together should make up a little more than half the wall. If you leave the attic cold, then have at least one window at opposite ends of the roof, for natural ventilation and to reduce the lifting force of the outside wind.
Sometimes it makes sense to install two windows side by side or one above the other for more lighting. But keep in mind that heat escapes through any window. And be careful when designing a future attic with a continuous row of windows.
Very often in practice it turns out that upon completion of the work the roof structure is slightly shifted, there are certain errors, and it will be impossible to make an even row of windows in such a roof. Therefore, in this case, it is easier to install vertical groups by placing additional windows in one line and using special elements along the entire length of the slope.
If skylights are too close together, snow and ice will accumulate between them. And this is another additional load on the supporting structures of the roof, and it is important to take it into account. In addition, the walls of such windows must be additionally protected from moisture penetration, because snow and ice suspended on them will always thaw a little.
And lastly: when insulating roof windows, many people easily make mistakes, which result in the formation of cold bridges - and all because complex design. Look how many different moments there are:

Stage II. Preparation of the rafter system
So, during the construction of the rafter system, gaps between the rafters are deliberately left in place of future attic windows. Taking into account the fact that around the attic windows the rafters themselves must be reinforced, because they will be subject to additional load.
The main thing when installing an attic window is the waterproofing between the roof itself and the window, namely the need to protect the window from drips. Please note that only one type of attic window is mounted directly in the plane roofing material These are skylights. And in terms of waterproofing, you will have to tinker with them the most.
In modern houses, the standard distance between the rafters usually ranges from 60 centimeters to 1 meter, and therefore windows are now most often produced from 55 to 134 centimeters wide. And the easiest installation is when the window itself fits perfectly with the distance between the rafters. If the sizes of the windows and the distance between the rafters differ too much, special connecting structures will help you.
Therefore, we will call the ideal situation when the distance between the rafters exceeds the width of the window frame by only 2-5 centimeters. Thanks to this, you can leave a gap of 1 to 2 centimeters wide between the rafters of the window frame, which you will fill later heat-insulating material. If the window fits too tightly to the rafters, insulation will be difficult to install.

But most of all, developers do not like to face the situation when the attic window turns out to be wider than the opening. After all, for correct installation you will have to cut out parts of the rafters and insert auxiliary beams. They are attached at a distance of 3-5 centimeters from the top and bottom of the window. Vertical beam should be secured to the window frame at a distance of 2-5 centimeters for the same insulation.
So, what to do if the attic window is smaller in width than the distance between the rafters? In this case, no preparation is needed for the window itself, but between the rafters you will have to build additional side walls and the roof of the future window. After this, lay down the roof covering with insulation.

Most often, attic windows, which less distance between the rafters, inserted already on finished roof, and sometimes not alone. But what to do if the width of the attic window is much greater than the distance between the building legs? This is not uncommon when building new homes. And therefore, it is better to design such windows even before the construction of the rafter system, specifically for a specific niche. Otherwise, you will have to risk the strength of the future roof, because you cannot do without cutting out part of the rafter legs.
True, for this purpose you can use crossbars and additional attachments, which will take on all the necessary load that should have gone to the cut off parts of the rafters. But there is one thing: such work should only be carried out by an experienced builder.
Stage III. Selection of fasteners
If you are installing attic windows yourself, know that there is a required fastening for each type of window and you cannot select it by eye. So, most often used anchor bolts, anchor plates and frame dowels with metal wheels. But usually all this fastening is supplied complete with the window itself and is calculated by the manufacturer.
After all, the same colored PVC windows cannot be installed with too rigid a fixation, as a result they will quickly deform and very soon the sashes will no longer fit tightly enough to each other.
But dowels are not used for installing wooden windows, since they cause unnecessary stress in the frames, which is why modern manufacturers do not replace the window if it is deformed, if the mounting method has been changed by the owner.
Stage IV. Window frame installation
Next, after you have secured the window, fill the shutter with sealing tape around the entire perimeter of the frame. This is the only way you can achieve the required level of sound insulation and wind protection. Be sure to cover your wooden windows with self-adhesive tape during the process to keep them clean. And remember that ordinary tape is not suitable here - the tape must be stable, with acrylic varnish.
Two more important rules: PVC attic windows are not sealed with materials with bitumen components (heated in the sun), and they are not sealed with construction foam, which can greatly increase in volume and thus deform the profile. Also remember that when installing PVC windows, the fastening is required to be more rigid, and more mounting plates will be required.
As for cutting out a window on inclined slopes, you can easily cope with this task yourself:


In fact, you only have to tinker with the attic window located directly under the ridge:

If you are working with frame dowels, be aware that there are strict guidelines regarding their diameter and hole depth. So, you need to make a hole even before placing the window formwork, and for this you will need an elongated drill so as not to damage the surface of the frame.
Problems can arise primarily with PVC windows that have been reinforced with special steel profiles. The dowel head cannot rest on these - only on the wall PVC profile. Otherwise the window will crack. The correct way to do this is to push the mount completely into window frame and close the hole above it with a plug.

Stage V. Finishing work
After removal dried foam you need to close all the fittings to keep it clean. Last but not least, remove the protective film from the windows.
Most often, attic windows, which have a smaller width than the distance between the rafters, are inserted into the finished roof, and sometimes not in any quantity. But what to do if the width of the attic window is much greater than the distance between the rafters? But this is not uncommon when building new houses. That is why it is better to design such windows before constructing the rafter system, planning to leave special niches for them.
Otherwise, you will have to risk the strength of the future roof, because it will no longer be possible to do without cutting out part of the rafter legs. True, for this purpose you can use crossbars and additional attachments, which will take on all the necessary load that should have gone to the cut off parts of the rafters. But there is one thing: such work can only be done by an experienced builder.


The main advantage of modern attic windows is that they are able to withstand quite heavy rainfalls, gusts of wind and snow pressure no worse than roofing. Plus their proper installation, and your attic will be truly bright, dry and cozy.
Main types of skylights
Before you make a skylight, you need to understand what kind of skylight you need. The auditory ones are those located in the roof and are necessary to illuminate and ventilate the attic. Due to their vertical location, the construction of a separate truss structure, built into the roof. This is their main difference from a dormer window, which is built into the roof at an angle. The invention of dormer windows dates back to the first half of the 19th century, and attic windows appeared after the Second World War.
IN last years The use of roof windows is becoming more and more widespread. In addition, occupying the same roof area, they provide more light due to the slope, in addition, they are much easier to install.
And yet, a dilemma often arises: what to choose? If the house was built a long time ago and it is necessary to adhere to certain architectural frameworks, then a dormer window will most likely be suitable. If the house was built relatively recently and you simply decided to make a residential attic for your house, then an attic may be suitable.
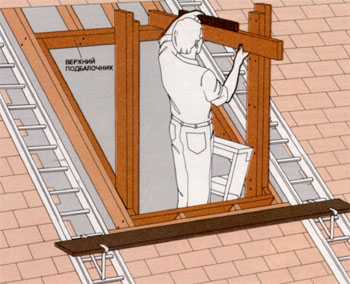
First, let's look at the auditory variety. To install it, you need special niches that the roof must have. The frame of the roof truss and side walls requires large quantity connections with the main roof, it is quite difficult to do it “by eye”. Therefore, we need a drawing created good specialist. The pediment and side walls are sheathed with construction plywood and sheathed with façade material. Roofing materials are laid on the roof at the same level as the main roof. The connection between the dormer window and the roof is waterproofed and insulated.

The roof window is mounted between two rafters. Attic roofs serve as a barrier to water flow, which is why such a structure is usually installed mainly on roofs with a slope of 15-20 degrees. Modern roof windows are quite complex structures that have good protection from leaks and cold. It will be very difficult to make it yourself, so that it turns out to be of high quality and reliable. Therefore, you will make your life easier by simply purchasing it from a reliable manufacturer. Fastening to the roof is carried out using a support plate. To drain water, the frame has a special flashing, represented by a metal frame, which is located around the perimeter. In order to open it, the design has friction hinges that are located just above the center of the window. They open the window frame so that all the water that gets into it flows onto the roof and does not get inside.
Window opening in finished roof
In private homes there is often a need for window opening in the roof. Completely redoing a roof is a rather long and expensive task, so it is possible to construct a dormer opening using several techniques.
Determining where the window will be
Window parameters should occupy no more than 10% of the space underneath them. Large windows on the roof cause greater heat loss. In addition, their glass is not strong enough and is not as resistant to external influences as necessary. The best option– positioning the window clearly centered between two load-bearing beams roofs.

We mount the window frame
Cut the required hole for the window opening in the slate and begin installing the window frame. It is installed on the load-bearing roof rafters using a special wooden frame 40x50 mm. It is better to attach it to the rafters using stainless material. The frame is mounted with wood screws with tight fixation to the rafters. You can also mount a frame dormer window that will be parallel to the roof of the house, but such complex structures are best left to professionals.
Sealing and finishing the window opening
Sealants that are suitable for this:
- vapor-tight sealed self-expanding tape;
- acrylic;
- bituminous;
- silicone.
Self-expanding tape, laid in a layer around the perimeter, is best suited. The cracks at the top can be sealed acrylic material. It is better to perform such actions in warm and dry weather. If you decide to build a dormer window with your own hands, then let’s talk about it in a little more detail.
Types of dormer windows

A flat roof dormer is usually installed with gutters, so the roof should have a slope of 5 to 15 degrees. A quadrangular design with a pitched or gable roof It is similar to a window with a flat roof, but it must have a slightly larger slope of the slopes, at least 15 degrees.
A triangular dormer window is most often found on cottages. This design does not have side walls; their place is taken by roof slopes. This leads to a reduction in the amount of waterproofing work, but at the same time reduces the illumination of the attic if the front part of such a window is not directed towards the facade of the house. IN Lately appeared interesting solution in a round shape. Popularly, such structures are called “frog mouth” or “bat”.
The most functional is the window in the form of a skylight. Visually this lightweight design, does not weigh down the roof, and illuminates the attic perfectly. Specialists usually adhere to the following figures when drawing up drawings, determining the number and size of dormer windows: the total width must not exceed half the width of the attic, the lower edges of the dormer windows must be at a height of 0.9 m from the floor; The higher the dormer window is located, the better the lighting.
Frame
The dormer window frame is installed at the same time that the roof rafter system is being installed. If the roof is gable, the frame has its own sheathing and rafters. It's basically a separate mini-roof. When a rafter system is being erected, in those places where dormer windows are planned, it is necessary to provide openings that protect the rafter legs with increased strength, because they will have to take on the weight of the dormer window structure.

Then transverse beams are laid on the rafter legs: the upper one - according to the size of the window, and the lower one - at the level external wall Houses. Vertical posts are installed on the lower beam, which are connected at the top by a transverse bar. We get a frame, which we fasten with longitudinal beams to the upper beam, which is laid on. So we get a frame, but so far without the rafter system of the window itself. The rafter system in the attic is made following the image of the main roof structure.
Triangular window frame
When installing lintel beams, it is not advisable to make cuts into the rafters of the main roof structure in order to prevent weakening bearing capacity. All frame elements are fastened using metal fasteners. After checking the frame horizontally and vertically, you can install the ridge beam and small rafters of the dormer roof. Cut the rafters according to the template - this simplifies the work quite well. The side walls are covered with moisture-resistant material. The window roof is installed simultaneously with the installation of roofing material on the main roof.
Properly waterproof the joints between the dormer and the main roof to prevent leaks.
It is believed that the arrangement of a residential attic is more difficult and more expensive than the construction of a conventional non-insulated roof with a cold attic. There are reasons for this:
- It is necessary to properly insulate the attic.
- It is necessary to properly install a vapor barrier and a superdiffusion moisture and windproof membrane.
- It is necessary to install skylights as required by the manufacturer.
Problems often arise with the last point. Errors when installing windows on the attic floor negate all the advantages of this room. As a result of the mistakes of illiterate builders, attic windows leak in the rain, and condensation drips from the ceiling, damaging the finish. It is not surprising that many developers are distrustful of attics, believing that it is better to build a cottage the old fashioned way. Our video and photo instructions, which tell you:
- How to calculate the size of a dormer window depending on the area of the room.
- How to choose a place in the attic roof to install a window.
- How to prepare a window opening for installing a roof window.
- How to install the frame and frame of a roof window.
- How to install a condensate drain.
- How to make waterproofing at junction points.
- How to install a roof window frame and make a heat and vapor barrier.
Installation of a roof window: planning
A roof window can be installed either at the stage of attic construction or on a finished insulated roof with the finishing coating and layers of vapor barrier and hydro- and wind protection already laid. In the first option, work is carried out sequentially, step by step and, usually, does not cause difficulties. In the second case, you need to rack your brains on how to install a window in accordance with the manufacturer’s recommendations, going through the entire pie of the attic roof with flexible tiles.
The main difficulties of installing a roof window left “for later” - you will have to carefully dismantle or cut through it, moving from the inside to the outside:
- internal sheathing for finishing the attic;
- vapor barrier;
- insulation;
- superdiffusion membrane (moisture and wind protection);
- sheathing and counter-lattice;
- cut OSB boards for the opening;
- partially remove around the window opening flexible tiles.

The width of the attic window is determined by the pitch of the rafters. If the developer does not want to install a narrow window, fitting it to the rafters mounted at a distance of, for example, 60 cm from each other, then he will have to cut out one rafter leg, strengthen the structure, etc. This increases the likelihood of errors among installers, the deadlines and estimates for work. From here:
The installation of roof windows must be planned at the stage of designing a house and calculating the rafter system.

As a guide, we are guided by the following figures:
- It is recommended to install roof windows into roofs with a slope angle of 15 degrees or more.
- The window area is selected according to the formula: per 10 sq. m of attic floor should be 1 sq. m of glazing.
- Top part the attic window (from the floor) is located at a height of about 2 m, and the lower part is approximately 1.2 m.
- The opening for the attic window should be at least 4 cm wider than it, optimally 6 cm.
- The length of the opening is approximately 4.5-5 cm longer than the length of the attic window.
Stages of installation of a roof window

alexnrg FORUMHOUSE Member
I decided to install a roof window in my house myself. Roofing pie: rafters - board with a section of 15x5 cm, vapor-permeable to moisture windproof membrane, horizontal and vertical lathing, OSB, underlay carpet, flexible tiles. Questions have arisen:
- How to install a roof window correctly?
- How to prepare the opening?
- How to fix a window in the attic?
- How to drain condensate?
- What is the salary for and how to install it?
The flashing (metal frame) is a system of gutters for hermetically sealing the roof window with the roofing. The flashing removes rainwater and moisture from the attic window when the snow melts.

All work on installing windows in the attic is divided into a number of sequential steps:
- Preparing the opening.
- Assembly and installation of the thermal insulation circuit.
- Installing a roof window frame into a thermal frame.
- Installation of the sash (glass unit).
- Adjusting the side gap and window shutter.
- Installation of a condensate drain.
- Installation of a waterproofing apron.
- Salary setting.
- Insulation of slopes around the window and restoration of the vapor barrier contour from the inside of the room.
We'll tell you about the key stages of installing a roof window and how to avoid mistakes.
Preparing a window opening for installing a roof window
In the video instructions, a specialist explains how to prepare a window opening for installing a roof window if the roof has been built and the roofing has been laid.
When installing vapor and waterproofing, the films are cut with an envelope (crosswise) and wrapped inside the room (vapor barrier) and outside (wind protection).

The upper and lower parts of the opening are reinforced with lintels (between the rafters).

And with sheathing bars, so that the edge of the OSB sheet does not hang in the air.

The lower support beam of the sheathing must be leveled in order to accurately align the frame of the attic window and avoid a noticeable difference in height on the side slope.

Important! If OSB has not yet been laid on the roof– base for flexible tiles, then the opening is edged with a frame on top, made from sawn into strips OSB sheet or plywood.

Assembling thermal insulation and installing a roof window frame
The thermal insulation circuit is mounted on a steel frame, which is easily assembled with latches.

The thermal insulation contour is installed in the prepared opening.

Then disconnect the rotating part of the sash with the double-glazed window from the frame of the attic window.

Mount the mounting plates and install the box in the opening.

Important! Mounting plates(4 things.) are installed in the corners of the roof window, in places prepared at the factory in the frame, into holes pre-drilled by the manufacturer for self-tapping screws.

With a large length of the attic window (more than 1.4 m), in place rotary mechanism(hinges), additional intermediate mounting plates (corners) are installed.
The roof window frame is installed in the finished opening. How to do this correctly, as well as adjust the side gaps and the rebate, is shown in the video.
Secrets of installing a condensate drain
The most important element of the roof window waterproofing system is a metal gutter for draining condensate.

The gutter is installed at a distance of up to 50 cm (optimally 20-30 cm) above the window in the same plane with the hydro- and windproof membrane.

To allow condensate to flow down the gutter, it is installed at an angle ( slope minimum 3 degrees). Then the moisture will be removed to one of the sides ( ventilation duct, formed by the sheathing).

Difficulties with installing a gutter arise if it needs to be mounted on a finished roof. In this case, you will have to manually cut out the openings in the sheathing, and do this carefully so as not to damage the wind protection film.

The easiest way to install a gutter is if the roof has not yet had sheathing installed, there is no base for flexible tiles and a soft roof has not been laid.
Preparing the site for gutter installation consists of the following steps:
- In the middle of the rafter leg (on both sides of the prepared opening) a vertical cut is made on the film of the superdiffusion membrane.

- On seat the gutter is laid.
 I lower the gutters, using it as a ruler, and make a horizontal cut in the film so as to align the vertical cuts.
The result is a windbreak valve that fits into the gutter and catches all the condensation.

Steam and waterproofing at the junction of the attic window
At the end of the work, a waterproofing apron is installed, which protects the junction areas from moisture.

The waterproofing apron is glued to the frame from bottom to top. Installation is simple - removable protective film from the adhesive layer (strip) and the apron material is carefully smoothed over the top of the frame. The waterproofing flashing is then secured around the window with staples.
Important! The upper part of the apron is placed under a gutter, which removes condensation, and the valve, cut from the windbreak, is placed on the waterproofing apron. To prevent moisture from getting into the places where they are made vertical cuts in rafters, their waterproof in advance with butyl sealant.
In this article, we will consider the question of what advantages a gable roof with windows has, why we need windows on the roof, what types of dormer windows exist, and whether it is necessary to violate the integrity of the roofing at all when installing the described element.
Is it necessary to install roof windows? If the house has large area, if the space under the roof is being developed for housing, yes. The described element helps to arrange attic ventilation; if done correctly, it easily becomes an effective design move that allows you to complete the overall stylistic concept. Simple dormers are doors to the roof; they allow, in case of emergency, to repair the roof and help evacuate in case of fire.
The roof window can be of different shapes, different designs. The next section of the article will help you understand how one type differs from another.
Types of dormer windows

A roof window is a glazed frame built into the roof plane. The shape of this frame may vary. Experts distinguish four main types of structures. They are clearly shown in the published photo.
Frame in gable wall

A window in a gable wall is the simplest option for installing a glazing frame. Located between two slopes, it can be of any shape: triangular, round, oval, trapezoidal.
The most popular option is the rectangular dormer window. It is easy to assemble and install such a frame with your own hands, without the help of specialists. Semicircular frames have an unusual name. People called them "bull's eye". A frame of this shape looks very impressive on tiled roofs. This type of dormer windows has one advantage - the absence of sharp corners prevents the accumulation of snow, rainwater it flows off such a frame immediately, without lingering on its protrusions.

Triangular dormer windows often decorate the roofs of country mansions. The side walls of this design are replaced by slopes located at an angle of 60 degrees to each other. The triangular design of the frame has certain features: their main purpose is to ensure a flow of fresh air into the attic. The triangular design does not facilitate the penetration of sunlight, so such structures are not used to illuminate the attic. The side walls of a triangular window do not need to be carefully sealed. And all because they are connected to the roof using a valley or valley irregular shape. The front part of the triangular frame is not recessed into the roof; it is flush with the rest of the walls. For special effect, the triangular dormer window must be located closer to the lower tier of the roof.
Installing such a design is quite simple. There is no need to build additional roofing elements. Most often, those who are going to make an auditory opening on their own choose this particular option for its installation.
Dormer

Dormer - a frame design that is located above roof slope. It is quite difficult for non-professionals to do it themselves. And all because before installation it is necessary to carry out complex calculations. The main installation condition is the need to strengthen load-bearing structure on a gable roof and waterproof the frame well before glazing. The photo shows all types of dormer, you can make it gable, arched, built-in, panoramic, triangular.
Note! The selected version of the dormer window must be combined with architectural style Houses.
Antidormer
Antidormer, its design is directly opposite to the design of the dormer. It also settles on the slope of the roof, but does not come out of the roof, but, on the contrary, goes deep into the roof of the roof. Designing this type of frame is easier than drawing up a drawing of a dormer, but despite this, the anti-dormer has taken root poorly in Russia. And all because the described design reduces the usable area attic space.
Dormer windows

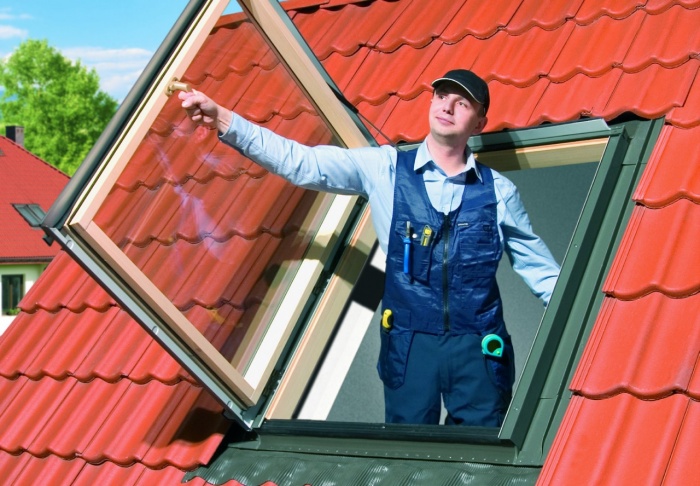
A slanted window (also known as a dormer window) is in line with the slope of the roof. The use of metal-plastic allows you to perform attic option any configuration. Similar element It doesn’t help much to decorate the roof, but without it it’s impossible to arrange natural lighting in the attic space. The choice of this option is justified when the attic is converted into living space.
Installation of dormer windows is carried out between two rafters located adjacent to each other. Such window frames can only be installed where the roof slope is at least 20 degrees. Otherwise, the attic window will become an obstacle to water flows. In this case, no amount of waterproofing will save the roof from leaking.
There is no point in making frames for skylights yourself. It is better to buy ready-made glass units produced in a factory. Its design is carefully designed and developed in such a way as to eliminate the very possibility of flooding of the roof space. Installing a ready-made window is not particularly difficult. The support frames are attached directly to the roof. The attic double-glazed window can be opened for ventilation even during rain.
Design Features
Many years of experience in installing frames in roofs allowed us to formulate basic rules for their placement. You should definitely familiarize yourself with them in advance.
- Firstly, any dormer window should not be located close to the ridge of the roof, or to the eaves of the roof. Window frames should not be installed close to the front parts of the roof.
- Secondly, when installing two elements located adjacent to each other, the distance between the two elements should not be less than 80 cm. If the location is closer, it will be impossible to lay the roofing. The closer location of the dormer windows provokes some difficulties during the operation of the roof. For example, this will certainly complicate the implementation of preventive measures; the close location of dormer windows will provoke the accumulation of snow on the roof in winter. And this is also not good from an operational point of view.
- Thirdly, dormer windows can be installed only on those roofs whose slope angle is at least 35 degrees.
Note! Cuts and tie-ins into the general frame system Roofs cannot be built.
Installation features
We will describe the features of installing a dormer frame using the example of installing a dormer.
It is necessary to install dormer windows on the roof immediately after installing the general rafter system. To do this, it is necessary to assemble the fronts, rafters and ridge beam. Then a drawing of the dormer is drawn up in advance. It should look something like the one shown in the photo.
As you can see in the photo, the frame of the dormer is assembled from beams. The walls of the dormer window rest on the roof guides, and the beams are attached to them at right angles. If the window width exceeds the standard dimensions, the load on the rafters will be increased. To prevent the roof from collapsing, where the dormer will be installed on the rafters, another one is placed next to one beam, increasing the stability of the rafters.
Note! It is better to fasten the dormer wall posts to the double rafters with special fasteners metal corners. Jumpers should not be used for these purposes. They will help weaken the entire structure of the dormer.

The next stage is the construction of the window frame frame. In essence, it is a miniature roof, which is why it is so important to carry out preliminary correct calculations the structure being described. First, the window openings are fencing using durable wooden beams, which roofers call legs. The photo shows this stage. They will take on the load of the entire frame.
The cross beams are laid in such a way that the lower one lies parallel to the wall of the house, the upper one - where the height of the future window ends. Longitudinal bars are installed. They help secure the frame to the top beam of the rafter guide. At this stage it is necessary to arm yourself building level and check their location assembled frame vertically and horizontally. It is important to “cut out” all the elements of the dormer in advance, according to the drawing made; the assembly of the dormer frame is carried out according to the photo, which shows the schematic structure of the dormer window.

Note! The roofing on a gable roof is installed simultaneously with the roofing of the dormer window. Only in this case is it possible to construct a solid coating that is durable and of high quality, capable of withstanding the effects of precipitation.
The front sides of the dormer are pre-sheathed with either moisture-resistant plywood or sheets of OSB boards. Roofing material is laid on top of them. In order for the slopes of the dormer windows to be connected to the slope of the roof, valleys are used.
Generalization on the topic
If you want to install a dormer window on your roof, you must contact specialists. Their help will help you choose the desired design frame that will best fit into stylistic decision Houses. It is important to begin installation work by drawing up a drawing of the frame structure. As a rule, modern window manufacturers produce ready-made double-glazed windows standard sizes. The easiest way is to take them as a basis and, starting from such decisions, make calculations of the structure of the dormer window frame. If you study the topic in advance, watch a training video, you can try to install it yourself decorative element on the roof. The main thing in this matter is not to rush, carefully think through all stages of work in advance and strictly follow the planned plan. When working on a roof, you must follow safety rules, always wear insurance, and never work on top alone.
The question of how to make a window in the roof of a house arises when constructing new or reconstructing old buildings. In this case, the owner of the house seeks to make maximum use of the available space. An attic floor is a good way to increase usable space, provided there is adequate natural lighting.
There are two groups of roof windows: dormer and dormer. Each has design differences and requires its own approach to installation.
Dormer windows (also called lucarnes) have been used for centuries to ventilate non-residential attic spaces, and subsequently found their use in attic floors. They are always located vertically. A competent designer, choosing one of the various forms of lucarenes, in addition to the utilitarian purpose, will be able to give appearance the buildings are sophistication and originality.
Dormer windows are:
- with a flat roof with a slope of up to 15 degrees;
- quadrangular under a pitched or gable roof;
- with a hip roof;
- triangular;
- panoramic with a trapezoidal roof;
- skylight - completely glass surface of original shape;
- semicircular.

Since these roof windows are mounted in a structure with side walls, less light passes through them than through a similar-sized opening with a dormer window. Dormer windows are installed on a roof of any shape: single-pitch, gable or more complex. When installing a skylight in a new house, the design of its elements is developed and installed simultaneously with the main load-bearing elements of the roof. When reconstructing old houses, for stability, it is recommended to place the dormer window between the load-bearing beams.
Vertical posts are attached to the bottom of the box, which are connected between the cross beams (when arranging a triangular window, they converge at the desired angle). As a result, another, now vertical, box of the front part of the frame comes out. The upper element of the dormer roof - the ridge beam - is attached to load-bearing elements roofs through a lintel beam. The latter cannot be embedded into the roof rafters (so as not to weaken the section); the connection is made only with metal fasteners.
The final stage of frame installation is the installation of rafters. Their number depends on the length of the ridge beam, and the pitch should ensure the reliability of the structure. A sheathing is made on top of the rafters, on which the roof is attached, usually the same as on the main roof. Layers of hydro- and thermal insulation are laid on the side walls. A variety of materials can be used for the final cladding: from lining to iron.
Design
Before work begins, a project is carried out, in which all the nuances of the design and fasteners are taken into account. When making a window with your own hands, you need to remember:

- hatches are mounted on roofs with an angle of inclination of 35°;
- superstructures are placed at a limited distance from the walls of the house, for triangular windows— in one plane;
- the minimum size of the window opening is 1.2 x 0.8 m (windows, respectively, 0.6 x 0.8 m);
- the total width of the dormer windows should be at least half the width of the attic;
- dormer windows are located strictly in line with the window openings underneath them;
- the lower edge is made at a height of 90 cm from the floor, the upper edge is limited by the height of the ceiling (the larger the window, the more light).
Unlike dormer windows, roof windows do not require a complex structure. They are mounted directly into the roof plane.
Return to contents
Installation steps
The first step is to create an opening of the required size in the roof. Its parameters are calculated based on the location of the bottom of the window and its height. The opening is limited by rafter legs of increased strength, capable of supporting the weight of the future structure. The transverse beams connecting the rafter legs to each other form a horizontal box along the contour of the opening.
A frame and a window of the selected type are mounted in the opening of the front part: plastic or wooden. Gaps are carefully insulated. The connection points between the structure and the main roof must also be sealed. Interior finishing can be done in different styles and made from various materials - this is a full-fledged part of the attic, harmoniously complementing and decorating the main space of the room.
Return to contents
Dormer window

Windows can be opened:
- along the lower axis, which helps protect against precipitation, but the disadvantage is inconvenience in washing;
- along the top axis - moving the window does not interfere with the access of fresh air and sunlight;
- along the side axis: convenient where access to the roof may be required.
- along the central axis of the window: capable of rotating 180 °, which allows convenient maintenance of the window;
- using combined opening mechanisms.
When selecting a roof window, you need to remember that for normal lighting of 10 m² of area, 1 m² of glazing is required. The height of installation on an inclined plane should ensure ease of use: opening windows, washing them, etc. (usually, depending on the location of the handle - 80-130 cm). The height adjustment is also determined by the type of roofing material. Some shingles cannot be cut into pieces, so you have to adapt them to the boundaries of the roof covering. The designs of roof windows from different manufacturers may vary. Each set contains detailed instructions for installation.
The general steps are:
- preparing the opening;
- assembly of window assembly;
- dismantling the window sash;
- waterproofing device;
- salary setting;
- installation of the window sash in place;
- activation of window springs and hinges.
Markings are made on the waterproofing layer fixed inside. The dimensions of the opening will be larger than the dimensions of the window: about 50-90 mm are allowed at the bottom for the installation of profile roofing materials, a margin of 30 mm is made on the sides, and 100-150 mm at the top. IN waterproofing film a neat cut is made with a margin of 200 mm around the perimeter (it is folded inward). The required part of the roofing material is removed and the sheathing is cut out.
For ease of installation, the window sash is removed and one frame is first attached. A roof window kit always includes a waterproofing apron and fasteners. The latter are installed on the window frame. The edges of the insulation, which was cut out at the beginning of the work, and the insulation are attached to it using a stapler. The frame installed in the window opening will press down the insulation. A lower waterproofing apron is placed on top of the structure, and then its side and upper parts are installed.
The flashing is mounted on the insulated and insulated opening with the frame. It is selected depending on the type of roof and can be smooth or with a wave of different heights. After this, the sash is attached. The lower fastening elements of the frame are fixed tightly immediately, the upper ones are not completely fixed: so that you can check the evenness of the gap and adjust the distortion.
Adjustment is mandatory for all window elements: moving parts need to be activated, checked for functionality and adjusted. After the window has been installed and checked, it is time to start finishing work - installing slopes. The trick for a structure located at an angle to a horizontal surface is that the plane of the floor, rather than the frame, is taken as the reference point. The lower slope is oriented perpendicular to it, the upper slope is parallel. To ensure ventilation, the side slopes are made at an angle of 120 °.