Patterns for cashing windows. Templates of carved window frames
ABOUT old tradition making and installing carved frames on windows in a wooden house was remembered relatively recently, when the first boom in the construction of log houses from rounded logs and timber passed. Having lived for several years in a new wooden house, the owners almost always begin to treat it as a living being, so it is not surprising that on the windows and entrance doors Amazingly beautiful carved patterns began to appear from wood, serving as both decoration and protection.
Functions and purpose of carved platbands
Most experts involved in the culture and history of wooden architectural monuments note that carved window frames, photo, are almost a status item. A house without carved patterns looks like a wooden hut, even if it is very large and beautifully decorated, with platbands - it turns into a tower.
Traditionally, carved window frames are installed for two purposes:
- Protection of cracks around the perimeter of the window frame from the penetration of rain, snow and wind;
- Additions and decorations to a window opening and the facade of a wooden house as a whole.
For a wooden house, builders traditionally offer wooden or metal-plastic window frames complete with double-glazed windows. window profiles. Regular plastic trims made of PVC can also be ordered in a carved version. It’s just that you most likely won’t be able to choose a design or pattern; carved plastic window frames are made according to traditional templates by stamping and only give the appearance of handmade work.

Advice! Today, many restoration workshops and companies have at their disposal three-axis milling machines that can automatically cut a pattern of any complexity from polycarbonate, foam plastic and epoxy plastics.
Such work will not be cheap, but the quality carved frames for plastic windows it will be even higher than manual cutting. All that remains is to choose the design and pattern.

Rarely any home owner can speak more or less clearly and reliably about the third task of window casing. This is about protective functions, protecting a wooden house from the “evil eye”, diseases and uninvited guests. You can have different attitudes towards beliefs and traditions, but it will obviously not be amiss to take into account the specifics of choosing a pattern for the trim in your home.
Patterns and figures on carved wooden frames
It is clear that any self-respecting owner will not hang the first available frames on the windows of a wooden house; the process of selecting a theme and design can take a long time, so you should not overuse the use of symbols whose meaning is unclear or unknown. If the mystical and cultural part of the carved frames creates psychological discomfort, you can treat carving as a way decorative design window openings wooden house.
It was no coincidence that they were invented to decorate carved frames, and were carefully stored and passed on practically unchanged. Most wood carvers cut simply as copyers, so you will have to plan and decipher the design on your own.
Advice! In any case, before using carved wooden frames on windows with patterns and pictures of incomprehensible content, it makes sense to try to understand the meanings of the carving elements, patterns and figures.
For example, figurines and images of animals have always symbolized positive wishes for prosperity and prosperity to the home:
- The snake or dragon has always signified wisdom and strength to protect the home;
- Birds in flight mean cordiality and friendliness; birds sitting in the corners mean attention to guests and news;
- Fish, deer, bunches of wheat and grapes mean a wish for prosperity.
It was not customary to depict domestic animals and human figures, especially in the same canvas with climbing plants and flowers.

More modern designs on carved wooden frames usually have a traditional regular pattern.

These can be intertwining flowers, vine leaves arranged in a regular pattern. In the carved compositions of the 18th-19th centuries, more modern images of columns, porticos and chapels used in the wooden architecture of that era have already appeared.

Most of the carved frames are ordered from master carvers. If desired, it is not difficult to make carved window frames with your own hands using templates or ready-made diagrams. The simplest lines and drawings can be transferred to a workpiece and cut out with an engraving nozzle, with more complex circuits you'll have to tinker and remember your drawing lessons at school.

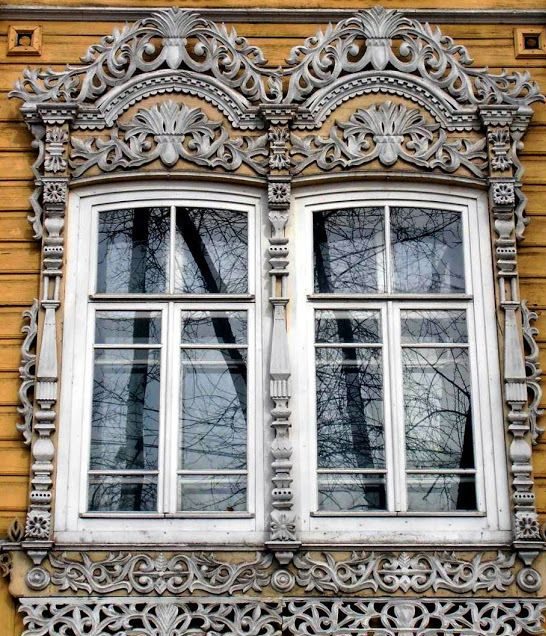
The upper part of the frames was called the ochele, this is the most complex and beautiful part of the decor. On the one hand, the ochele set the general tone of the carved composition, on the other, it served as a canopy over the window opening. At the top of the composition there was a diadem, symbolizing the rising sun, and in the center there was always a medallion or crown of plants. The lower part of the window was covered with a carved apron, usually in the form of an open fan.
If the mystical and cultural part of the carved frames creates psychological discomfort, you can treat the carving simply as a way of decorating the window openings of a wooden house.
An ordinary interwoven pattern of vines or flowers will be far from any mystical content, while the beauty of the trim and carvings of the window frame of a wooden house will only intensify. Carved frames with a regular pattern have a serious advantage over a complex multi-tiered composition:
- Firstly, patterns of carved window frames are transferred to a wooden or plastic blank much easier and faster than a drawing with a complex multi-tiered composition;
- Secondly, even if you cut out an intertwining vine or edging with your own hands and make small mistakes, it will be almost impossible to see them in a patterned field, this is how human psychology works.
Therefore, before making carved window frames, choose a simple pattern for yourself, with minimum quantity individual details. Even the most uncomplicated pattern on the facing strips can transform the appearance of a window in a wooden house beyond recognition.

Options for making carved platbands with your own hands
Wood carving has always been and remains quite an expensive undertaking, so instead of buying ready-made trims, cut or stamped on furniture equipment, you can try to make decorative strips with simple patterns with your own hands. At home or in a carpentry workshop, you can use one of three methods:
- Transfer the template to the prepared board and cut out patterns using an engraving set;
- Cast patterns under the carved platband from polyester or epoxy resin followed by painting or finishing with wood-look laminate film;
- Cut out the overlay pattern of the platband using a jigsaw.
Before you try your hand at making carved frames, you need to select suitable material. For carving and engraving, you will need hard types of wood; beech or oak are good, pine or spruce are a little worse, poplar and aspen are not suitable. To cut out the overlay pattern, you can use a regular floorboard, but the material must not have knots, defects or complex interweaving of fibers.
Templates for cutting out an overlay pattern
For making the most simple patterns You can use the simplest drawings of intertwining plants, flowers, grapes. Essentially, this is a flat tracing paper from more complex carved reliefs. This pattern can be used to decorate the vertical side trims of the casing.

To decorate a window frame, you need to look not for regular, but for single patterns, for example, a composition of symmetrically arranged figures or interlacing plant stems.

The same pattern can be translated into contour line and turn it into a flat ornament, which is quite simply cut out of plywood, boards or even MDF boards.
The most complex relief or three-dimensional patterns are made using the typesetting method. Initially, ordinary wooden frames are made from slats; individual cladding elements are carefully adjusted to the size of the window and assembled into a finished frame.
All other decorative elements are sequentially cut out of wood, cast from casting polymer or cut from MDF boards, after which they are sanded, primed and glued to the prepared frame.

Making carved platbands with your own hands
Most often, patterns for window decoration are cut out of waterproof OSB boards in the form of overhead decorative elements. Initially, on tracing paper, a piece of graph paper and using a program, the necessary template for the drawing is developed.


Next, you need to make a working template with which you can transfer the pattern to wooden backing unlimited number of times, photo. To do this, the drawing printed on the printer is pasted onto fiberboard sheet and cut out with a perforated attachment for a drill or ordinary metal scissors.
After marking the wooden blank, you can begin cutting out the casing. The easiest way to make cuts is with a jigsaw on a carpentry bench.

Along the line of the made cuts, you need to carefully remove the chamfer with sandpaper so that during further processing the front surface of the carved pattern does not chip. If a sufficiently thin strip was chosen as a blank, then the cut out carved part of the decor can be glued onto a fabric base.
In the same way, small overhead elements in the form of rhombuses, squares, rings, and braids are cut out. After sanding, the cut out elements are ground on an electric grinder with a wood polishing stone. With the help of a circle you can simply create a rhombus or any other geometric figure the required shape, forming edges or transitional curved planes.
After gluing the decor, the carved trims are primed hydrophobic impregnations and subjected to aging. This is done in order to remove the whiteness of freshly sanded wood. For this purpose, solutions of iron, copper, and chromium salts are used. As a result, it is possible to match the color and shade of the carved platband to match the wooden window frame. All that remains is to open the wood with varnish or oil impregnation and install carved decor on the window.

Conclusion
Very often the owners wooden houses Instead of making new decorative elements, they prefer to buy old carved frames that have been preserved in villages, abandoned houses and buildings. Often the cost of a set of carved frames for three windows on the facade of a building is cheaper than hand-carving one frame modern master. In some cases, among the old decor, you can find real works of art made by hand by craftsmen of the last century. Such carved frames are usually subjected to deep restoration and are installed not on the outer parts of the windows, but indoors.
Carved platbands framing window openings organically fit into the architectural styles of wooden cottages. They emphasize the originality of the log houses, frame buildings, timber houses. Light patterns, ornate patterns, and interesting designs add originality to the elements of façade decor. They are applied to the surface of the wood using convenient stencils.


Functions of window frames
Maintaining the traditions of wooden architecture, carved details enrich the noble appearance of the estate and add expressiveness to simple buildings. They save home warmth and comfort, they delight when viewed from the outside. Window trim stencils, selected in accordance with the preferences of the home’s inhabitants, help create a harmonious appearance of a new home and enliven the façade of an old building.
When used on shutter windows, decorative trims can serve as a frame. Playing a decisive role in design window openings, they solve a number of important problems:
- reduction of heat loss by eliminating “cold bridges” along the perimeter of the window frame;
- reducing noise levels in rooms;
- reducing the amount of moisture and dust particles penetrating from the street;
- giving facades uniqueness and style orientation;
- creation of a single architectural ensemble of residential and commercial objects on the development site.
Regardless of shape, size, appearance, wooden platbands must be strong enough and meet operational requirements. Manufacturing using stencils with calculated geometric parameters allows them to be securely attached to the walls. It provides resistance to wind loads and temperature fluctuations. To increase service life, effective protective coatings are used.
Traditional and original ornaments
The choice of design elements for window openings should be approached with an understanding of styles and design techniques. With their help, you can give the window an elegant or strict shape, make its outline more expressive, and achieve a delightful visual effect. By choosing life-size stencils as templates for window trims, the buyer receives the most advantageous decor option. Convenient dimensions allow you to proceed directly to the manufacture of products.
The attitude towards wood as a material of art is traditional for the culture of Russian architecture. With the repetition of individual structural and decorative details, it provides for the creation of a unique architectural image. Carved platbands have long been considered not only a means of decoration, but also a kind of amulets for the home. Based on the study of surviving ancient buildings, unique images of symbols, animals, birds, and plants were recreated.
Samples of stencils for platbands were developed in different styles and for every taste. They help express certain traditions and personal preferences. The use of ready-made ornaments allows buildings to be decorated in accordance with ethnic and classical trends in art. Clear geometric patterns are more consistent modern trends in architecture.
Ornaments for slotted and applied platbands may contain a solid pattern or repeating elements of a general motif. To create a complete outline when marking parts, you need to take into account the dimensions of the window opening, the diagram and sequence of patterns. High-quality stencils make it possible to accurately apply cutting lines to the workpiece and determine the boundaries of further processing of the material.

Marble tree (Diospyros marmorata) Family: Ebony Other names: zebrawood (UK) Distribution: Andaman Islands and Guyana Marble tree - description of wood The color of the core is gray-brown with dark brown or black stripes. The wood is smooth, has an even grain and straight grain. Weighs 1030 kg/m3. Marble wood requires care when drying. During slow drying, the material does not deform. Mechanical properties Although wood...

Maracaibo box (Gossypiospermum praecox) Family: Flacourtiaceae Other names: Venezuelan box, Colombian box, West Indian box, Zapatero (United Kingdom); Palo Blanco (Dominican Republic); Pau Branco, Castelo, Zapateiro (Brazil) Distribution: Venezuela, Colombia and the West Indies Wood Description Maracaibo Boxwood There is a slight difference between the sapwood and the heartwood, which varies from almost white to lemon yellow. The grain is straight. The texture is uniform and shiny...

Soft Maple (Acer rubrum) Family: Sapindaceae Commercial names: maple tree (Canada and USA); silver maple (Canada and USA); Manitoba maple (Canada); Pacific maple (UK); Oregon maple (USA) Distribution: Canada and Eastern USA Soft maple - wood description The color of the wood is creamy white. The grain is straight. Soft maple is less shiny than rock maple and the growth rings are relatively indistinct. Weight…

Stone Maple (Acer saccharum) Family: Sapindoraceae Commercial names: maple (UK, Canada and USA); white maple (USA); sugar maple (A. saccharum) or black maple (A. nigrum) (USA) Distribution: Canada and Eastern USA Stone maple - wood description The color of the wood is creamy white with a reddish tint. Old trees may have dark brown heartwood. The grain is straight. The texture is smooth. Average weight...

Japanese Maple (Acer mono) Family: Sapindaceae Distribution: Japan Japanese Maple - wood description The wood is creamy brown to pinkish brown in color. Growth rings in the form of thin brown lines. The grain is straight. The texture is smooth. Weight depends on growth conditions. 610-710 kg/m3. Mechanical properties Japanese maple has a good bending classification and average performance in all strength categories. Wood dries slowly...
Carved window frames- it's simple and inexpensive option decorating your home and giving it individuality since the times of old Rus'. Several decades ago, each region of our country knew craftsmen with an individual style of decorative execution of elements of platbands.
This way you could express your character. For example, in ancient times, a stranger could determine by the platbands whose house it was - an official, a craftsman, or just a hot spot.
Nowadays they are only decorative. Today even built according to standard project the building can be highlighted and made unique. I am glad that interest in the origins and carved frames is being revived.
Everyone can make their home individual, and besides, remember the origins of this art direction, which originated in the times of the ancient Celts.
You can design and come up with a composition for framing yourself, and then begin to implement the idea, armed with the right tools and patience. Platbands have received a second life in our time, and are becoming increasingly popular decor.
A little history
The word “platband” indicates its location, that is, on the face. Among different nations, platbands were practiced during the times of wooden architecture. They appeared simultaneously with windows that were glazed with fish bladder or mica. Initially, platbands were created to cover the insulation and to insulate from wind and precipitation.
Patterned elements were originally seen among the ancient Celts, but their significance came to them during the Renaissance of Rus' after Mongol yoke. Masters in Rus' were the best in wood carving.
When the time came for Bolshevism, the carved platbands were recognized as philistinism and war was declared on them. The destruction has begun. Nowadays, carved elements have received a second life.
It is interesting that in the old days they believed that platbands could protect against the evil eye and served as a talisman, so often in the patterns one could see various figures and plants that had meaning.
The importance of platband in construction
Platbands are essentially finishing elements and the correct name is cashing, which has many functions:

Design
There are several types of carved platbands.
Invoices
Materials and shape
To make platbands, you can use natural or artificial materials. Previously, elements were cut from wood, which has resistant qualities to atmospheric factors.

Important! Platbands should be regularly treated with waterproof paint or varnish to extend their service life.
Other materials used include:
- — laminated MDF, thanks to which you can accurately replicate the color of any type of wood. But, such a thread is only suitable for internal use;
- - ideally combined with plastic windows. It doesn't rot, with the rich color palette, light resistant;
- — polyurethane– light and unpretentious. Recommended for rounded windows;
- — metal– mainly used to protect the assembly seam.
Before getting into the hands of a craftsman, the wood must rest for at least 3 years until it is dry. If possible, the board should not contain knots, chips, or resin pockets. It is almost impossible to buy wood of this quality on the market. It is better to contact construction stores or sawmills. It is also interesting that today you can buy ready-made platbands.
For self-made perfect chamber drying, after processing in a special chamber. It will definitely not warp or crack. Its humidity is only 10-12%.
Types of thread
Let's talk about three framing methods:

DIY platbands
Drawing templates
To create beauty for windows, you first need design templates that are transferred to the wooden surface.
The template is created based on a selection of drawings, which can be found in large quantities on the Internet or simply in a photo.
To enlarge a drawing, there are several options:

Once the drawing is enlarged, it is transferred to cardboard to be cut out and used as a template. There is a template for each pattern. Then the finished template is applied to the board and outlined with a pencil. If the windows various sizes, then it is better to make a drawing with repeating rapport. To do this, select one or two elements in turn.
The upper part of the casing is called a kokoshnik, and the lower part is called a towel. It should be taken into account that small threads are complex and quickly become unusable, which in the future will require replacement of parts. When working with drawings, you can come across the concepts of the bottom strip, also known as the window sill, vertical strip, top strip, hangers, flowerpots, tiara, eyelet, panel, valance, crackers, sandrik, necklace, etc.
Important! It is necessary to take into account the slope at the top of the carved platband in order to prevent the accumulation of snow and water during operation.
Design
The basis of any process is the developed project. To do this, you need to make a drawing of the building facade with detailed drawing of the elements. This will help you understand what the exterior of the building will look like. If you have a visualization program, you can complete the project in volume.
If we turn to traditions, then in ancient times the elements on the platbands carried the following meanings:
- The sun is carved on the kokoshnik and is a symbol of life and energy.
- Snake - reminds of wisdom and fertility.
- The cross is a symbol of harmony between two worlds - material and spiritual.
- Plants are the personification of unity with nature.
- Earrings mean hospitality.
- The bird on the window is a connecting symbol of all times.
Job
The work process begins with the preparation of materials and tools. It is better to use pine boards without knots.
Materials needed:
- jigsaw with a smooth descent and files;
- feather drill with a diameter of 12 mm;
- chisels;
- sandpaper;
- Sander.
Measurements are taken from the window and stencils are drawn. Once the stencils are outlined, sawing begins. First of all, work is carried out with the internal openwork parts. To do this, you need to drill holes along the contour of the pattern.
Important! The drill should be perpendicular to the board.
Then the jigsaw comes into play. You need to start working with the holes and then follow the contour of the picture. When the patterns on the inside are done, you can start working on the outside. The tool should work from one end of the casing to the other. To make the work easier, you can make cuts.
 The result is a finished part on one side. For the other side you need mirror reflection pattern.
Be sure to use a sanding machine or paper to give an aesthetic appearance. An 80-grit sanding wheel is used. The fastest option is a grinder; the slowest way to do this is with a drill with an emery wheel, and it takes a very long time to do it with sandpaper.
After the work has been done, the casing can be primed to protect it from bugs, mushrooms, rain, sun and painted.
Painting
It should be understood that wood is a very sensitive material and can rot or be damaged as a result of insect attacks, so the part is often processed. The better the processing, the longer the decoration will last. The parts must be thoroughly dried. Then you can paint the surface. Water-based emulsion is ideal for wood. The color can be chosen as desired; in this case, white and cherry are most often used.
You can buy oils for wood that soak into it. It’s easy to renew such a coating – just brush off the dust and paint it on top. Among the disadvantages are the high price and a small selection of colors.
To paint, you need to prepare two brushes - a wide one for the outer surface and a narrow one for the sides and hard-to-reach places.
Painting is carried out in two stages. The second layer can be applied after the first has dried.
The final stage is varnishing; it is better to buy a water-based acrylic composition. The varnish is applied in one layer so that no smudges form. Drying of platbands is carried out in the open air.
How to assemble
 Before installation, the parts are assembled on the window to make it easier to work in the future. It is recommended to use scaffolding to make the process safer and more convenient.
The classic option for installing platbands is to mount them to a wall or slopes. Today this is done using self-tapping screws 4.2-6x80x150. If the wall is not wooden, then propylene dowels are used. As a rule, there is one attachment point per 5 square decimeters of platband.
When connecting to slopes, a step of 150-300 mm is used. The figure varies depending on the mass of the casing, which depends primarily on the thread. The heads of the fasteners are hidden in the upper-level ligature, or putty and painting are used.
With applied threads, the finished elements are attached to a wide casing with nails without heads. For strength, the joints are lubricated with glue. Self-tapping screws can damage the carved area.
Telescopes
Modern buildings are already insulated and often covered with siding. Windows are usually placed flush with the main wall so that it does not sink into it. Fastenings are carried out on the frame without options. Of course, unless telescopic models are provided. However, they can only be supported in reinforced frames used in places with harsh climates. The frame material itself is more durable or modified wood.
Telescopic elements are installed on trimmed additional elements associated with the rigidity of the frame. Fastening is provided by groove extensions. Such telescopes are not intended for installation outside; even a gust of wind can break not only the casing, but the entire frame.
On wooden frame or PVC with a groove for the key, telescopes can be installed without removing it. If the base surface of the window is inaccessible, you will have to pull out the entire window.
Nuances of carved finishing
- compatibility with the house - often difficulties arise when combined with plastic frames. It is better if the plastic in this case imitates a wooden structure;
- your experience, if the platbands are made for the first time, then you need to choose a lighter pattern;
- Each region of the country had its own traditions and design
Putting platbands on windows with your own hands is the easiest and most cheap way to give the exterior appearance of the house individuality and express its character, which has survived from antiquity to the present day, see fig. In the old days, an illiterate stranger, guided by the platbands, could find a home the right master, specialist, official, official or hot place. Nowadays, the functions of window frames are mainly decorative, but the patterns on them have not lost their meaning, see below.

Story
The platbands on the windows of the dwellings of peoples who practiced mass wooden architecture appeared simultaneously with windows “glazed” with fish bladder and mica. Initially, their purpose was purely functional: to cover the insulation and windproofing - to caulk - in the gap between the window and the frame.
Platbands with sacred patterns were first noted among the ancient Celts, but the true flowering of the art of creating carved platbands is associated with the unification of the resurgent Rus' under the leadership of Moscow and the overthrow of the Mongol yoke; Russian masters in wood carving had no equal. The Bolsheviks wrote down the platbands as relics of philistinism and declared a war of extermination on them, but now artistically decorated window casings experiencing a rebirth.
This article is intended, as far as possible, to satisfy the reader’s demand for how to make beautiful window frames with your own hands, how to give them artistic expression and install them in place.
Design
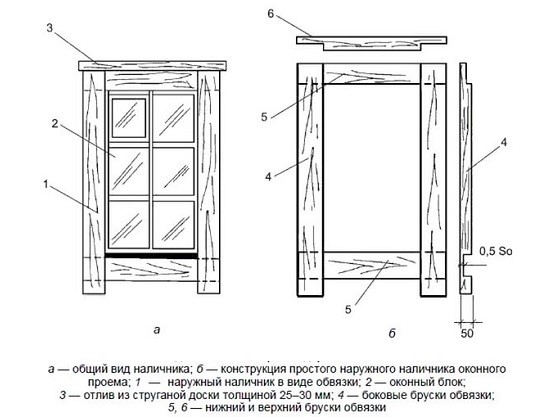
Types of design of window casings are shown in the photo. Overhead trims (item 1) are attached to the wall; plug-in or box-shaped (item 2) - to the slopes of the window opening (this is better) or in the window frame (worse). Overhead trims are placed on windows flush with the wall; insert - on windows in niches.

Based on the capabilities of insulation and protection of the window insulation, the platbands are divided into a frame (item 3) and a portal, item. 5. The portal frame is often complemented by a visor. The frame frame practically does not protect the window insulation/seal from getting wet and is placed on windows from the inside or on windows facing under a canopy, for example, onto a veranda.
Installation
Traditionally, the installation of platbands is carried out by fastening them to the wall or window slopes. Now for this it is best to use self-tapping screws (4.2-6)x(80x150), if the wall is not wooden, use propylene dowels. The attachment points are placed as evenly as possible at the rate of 1 point per 5-7 square meters. dm of the surface of the clypeus, outlined by its outer contour. When attaching to slopes, the attachment points are placed in a row with a pitch of 150-300 mm (depending on the mass of the casing, which, in turn, depends on its artistic execution, see below) according to center line the part of the load-bearing (base) wall protruding outward. The holes with fastener heads are either hidden in the ligature of the upper levels (see below), or they are puttied and painted over with the main tone.
Platbands-"telescopes"
IN modern houses, externally insulated and covered with siding/lining, the windows are often placed flush with the base wall, otherwise the window will completely sink into the wall. In this case, there is nothing left to attach the platband except the window frame. For such a case, the so-called. telescopic trims, but they will stay quite securely only on windows in reinforced frames intended for regions with harsh climates; frame material – reinforced PVC or modified wood (see below), special significance does not have.

The entire “telescoping” nature of the platbands comes down to installing them on locally cut additional elements that are rigidly connected to the window frame. The most reliable platbands are on grooved extensions, on the left in Fig. Telescopic platband systems with a groove in the frame (e.g. on the right in the figure) are not intended for outdoor installation: a gust of wind can break the casing, breaking the frame at the same time.
If the window frame is modern, wooden or PVC with a groove for a key, telescopic platbands can be installed on such a window without removing it. If a PVC window on a wall with an inaccessible base surface is not intended for installing a casing, then there is no other option but to remove the window, place a box under the casing in the opening, attaching it to the base wall, and reinstall the window. In this case, the platband box must have grooves that fit into the places where the window anchors are attached.
Wood for platbands
Painted, carved and slotted wooden platbands (see below) are made from high-quality straight-grain pine or larch without knots. The thickness of the boards is from 30 mm. A knotted spruce is not suitable: the outside knots will soon appear under any covering, and then they will begin to fall out.Carved frames require wood suitable for carving - fine-grained, viscous, fairly dense - and resistant to external conditions. The best species for this are oak and beech, but they are quite expensive. Linden, alder and aspen are suitable after 2-fold impregnation (the first impregnation is until it penetrates through) with a water-polymer emulsion; oil, silicone and mineral (borax solution) impregnation against rotting does not increase the viscosity and surface strength of wood. Birch is absolutely unsuitable: no amount of impregnation on the outside will save it from being damaged by fungi.
Note: a magnificent carved frame is very easily obtained from the cheapest plywood, twice impregnated with a water-polymer emulsion. For more information about plywood trims, see the end.
Shield for platband
Sometimes one board is not enough for the desired width of the platband, but fastening 2-3 boards into a shield with steel fasteners in this case is a gross mistake. Wooden shield on the outside of the steel it will soon crack, then the fasteners in the gap between the casing and the wall will rust and crumble. But it’s also impossible to assemble boards into a panel for a furniture frame without additional reinforcement, because a cabinet or table is not designed to withstand strong winds, rain and snow. Shields are made from boards for the casing. Thus, see also Fig. below:
- On a table or workbench, spread a plastic film with a 3-fold margin along the width of the future shield;
- The boards are placed in a bag on film and glued with PVA or waterproof wood glue;
- When the glue sets, the package of boards is wrapped in film;
- Plywood cheeks are placed under the bag in film and placed on it;
- The package with the cheeks is tightly wrapped with linen cord;
- Pairs of wooden wedges are placed under the turns of the cord so that the cord is stretched as tightly as possible;
- After 2-3 hours of complete drying of the glue, the cord, cheeks and film are removed;
- From underneath ( back side) the shield is further reinforced by stuffing 40x20 bars, laid flat across the boards.

Note: boards are assembled into a package, observing the rules of alternating orientation of layers of wood, just like furniture panels, see on the left in Fig.
Not a tree
Wooden unpainted trim does not look good on any wooden wall, even if its material imitates the color of wood well. In such cases, it is better to either install simple PVC trims complete with the window (on the left in the figure), or more expensive polyurethane trims, the rest pos. in Fig. Polyurethane trims can imitate external stucco molding and painted multi-level cut-out trims (on the right in the figure); the latter option can be assembled using glue from elements purchased separately.

Various arts
Artistically designed window frames can be made, firstly, framed (item 1 in the figure below) or in a frame, pos. 2; functionality, i.e. window seal protection, both are the same. Platbands in salaries are the most informative and sacredly significant, which we will discuss below. In addition to functionality, frame trims are mainly decorative.

From the point of view of woodworking, frame trims, in order of increasing complexity, are divided into:
- Cut-out - boards or panels are cut along a figured contour, pos. 3.
- Slotted, pos. 4 – a pattern is cut into the boards/board. They are relatively rare, because fragile.
- Multi-level slotted, pos. 5, up to 5 or more levels - sawn patterned modules are attached to a strong simple or cut-out base. In addition to strength, multi-level platbands are good because powerful fasteners to the wall are hidden in the ligature of the upper levels, and the upper levels themselves can be fastened with small, inconspicuous fasteners.
- With applied relief details, pos. 6. Nowadays, technologically they may turn out to be simpler than cut-out ones, because looks quite appropriate on a tree, respectively. painted purchased polyurethane relief.
- With low convex thread, pos. 7 – they look great, but are very labor-intensive, you need to choose a lot of wood.
- With low pressed thread, pos. 8 – less labor intensity, but the work is more difficult, because It is very difficult to correct visible flaws.
Note: on pos. 8 shows a casing with the so-called. pillow carving - the corners of the protruding fragments are smoothed. Platbands with cushion carvings look almost as luxurious as those with convex carvings, but they are almost as labor-intensive.
As for the colorful decor, the platbands can be painted, pos. 3, unpainted varnished, pos. 4, or natural look, pos. 7, painted in different colors by level, pos. 5, 6, and painted entirely, pos. 8. Painted frames are almost exclusively made from carved frames, while natural frames are made from particularly resistant wood species ( bog oak and so on.)
About the sculpture of platbands
In general, platbands with sculptural carvings, high (round, semicircular) and low, see Fig., could not be mentioned in an article with the tag “do-it-yourself”. Anyone who knows how to carve wood like that doesn’t need an explanation on how to make and install a frame on a window. But there is one point that is little known to experienced craftsmen.

MDF - have you heard? In fact, this is tracing paper with MDF, medium density fiberboard, medium density wood board. The well-known fiberboard is low density fiberboard, low-density wood board. And there is also HDF, high density fibreboard, which is little known in our country due to its relative high cost. All these materials are completely environmentally friendly, because... are obtained by hot pressing of wood pulp without a synthetic binder, the only difference is in the temperature and pressure of the press.
So, HDF, firstly, subject to 2-fold impregnation with a water-polymer emulsion, is resistant in outdoor conditions. And in terms of viscosity and density, it is suitable for fine wood carving, but is much cheaper than wood species for artistic carving and is produced in large, absolutely homogeneous slabs. HDF does not cut as well as walnut, but quite similar to oak and beech.
Salary
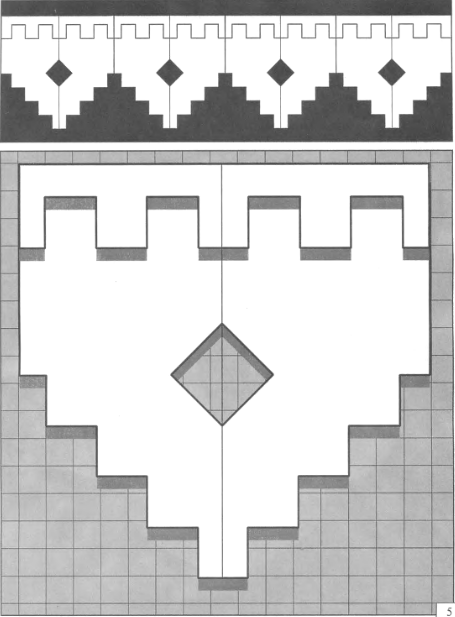
The full set of elements of the Russian frame frame is shown on the left in Fig. The names of its parts are also given there. Certain modules may be missing in specific products, because they duplicate each other in significance.
The main sacred significance is the teremets with a kokoshnik and an apron; As a rule, the heads and overhangs carry the informational and functional load. A tympanum with an apron is usually amulets against evil, and a kokoshnik with a frill, chasuble and a window sill are talismans that attract goodness. In old Rus' there were specific figures for both, not only in every village, but in almost every house. What is common to good is a circle with radii, rays or wings (the Sun), a bird (the firebird is the heir of either the phoenix or the simurgh), the horse is a symbol of prosperity and social status, and the fish is the original positive symbol of Christianity. Universal amulets from evil – stylized floral ornament based on useful plants.

Note: the wing, as the part of the bird that carries it in the sky, has the same sacred meaning as the bird. The Winged Sun is a good messenger. The Christian six-winged seraph is nothing more than a pagan winged Sun with an angelic face.
In the European-Eastern tradition, universal symbols of goodness are the cartouche and the medallion. The medallion, of course, is the Sun, and the cartouche is either a stylized tree of life, or there is a phoenix bird on it. Both of these in no way contradict Christianity or ancient Slavic beliefs. In Rus' they even undertook to combine the cartouche with the medallion, for which the casing chamber was made split, on the right in Fig.
Charms
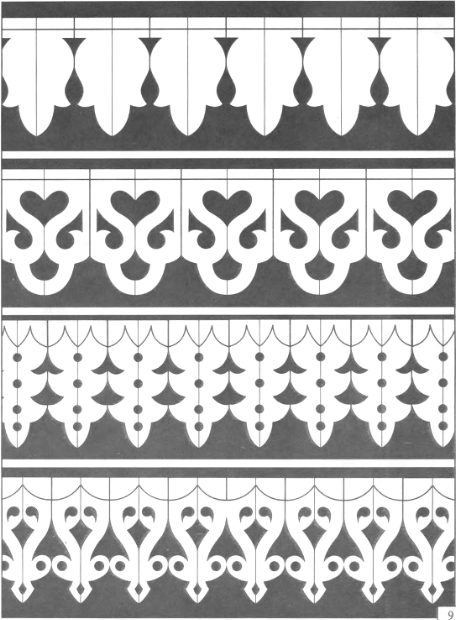
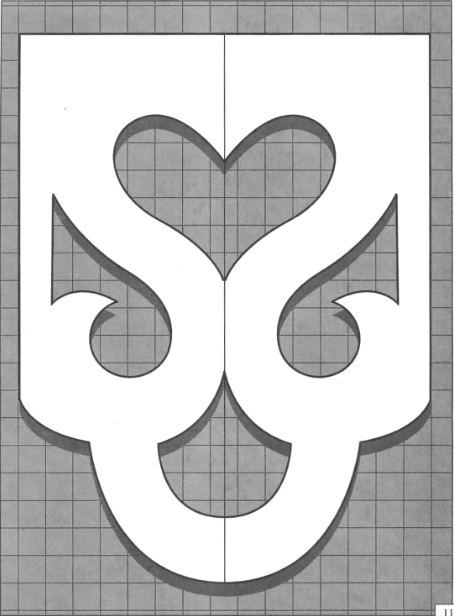
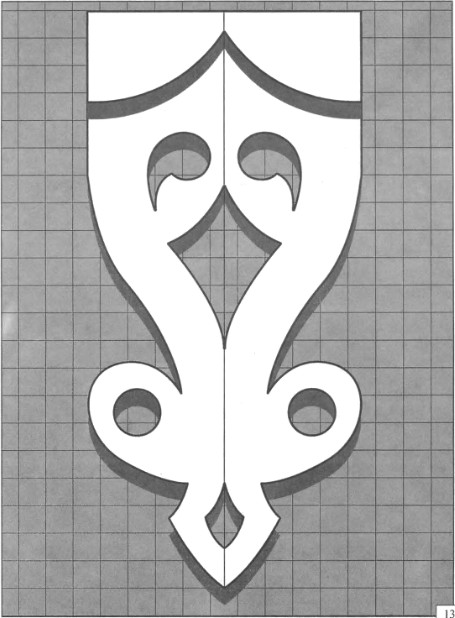
In the city, the amulet on the tympanum and the kokoshnik were of greatest importance; they protected against damage, the evil eye, etc. Templates for the upper amulets of the casing of a city house window are shown in Fig. The top one has a cartouche, stylized birds, fish (the tails are clearly visible) and no less than 12 other positive elements noticeable to a knowledgeable person.

The lower one is more for adherents of primordial beliefs. There, in a stylized solar circle, there is some ancient Slavic deity. Which one is not entirely clear, but it is definitely good. Good tramples evil in the form of a serpent: note that the lower elements of this board are asymmetrical.
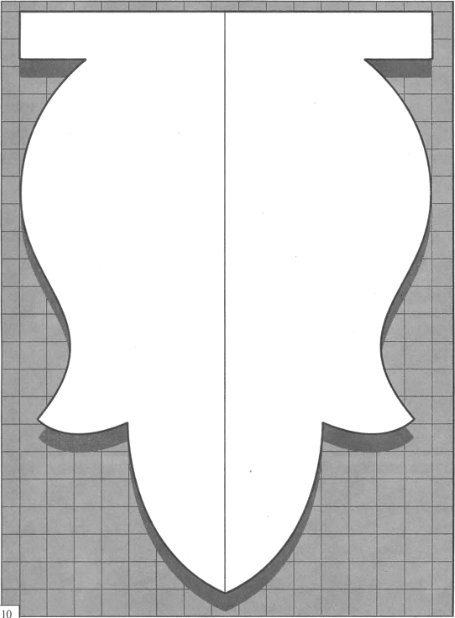
In the countryside, and even more so in the forest, it was considered necessary to protect oneself equally from the upper (evil eye, slander, etc.) and lower evil: creeping reptiles and forest evil spirits. Platbands with a weighted or heavy apron, equal in height to or greater than the top amulet, were called upon to help with this. An example of the upper and lower boards of the platband-bereginya with a weighted apron of a village house is given in Fig. You can try to decipher it yourself.

Ornament
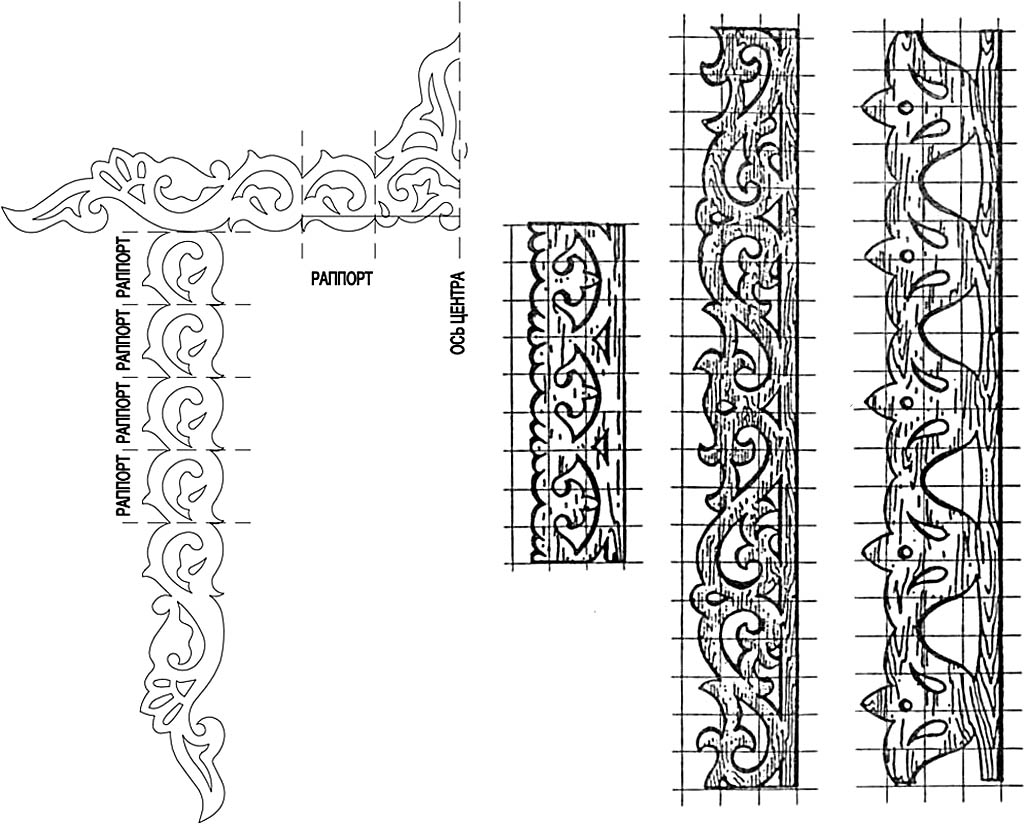
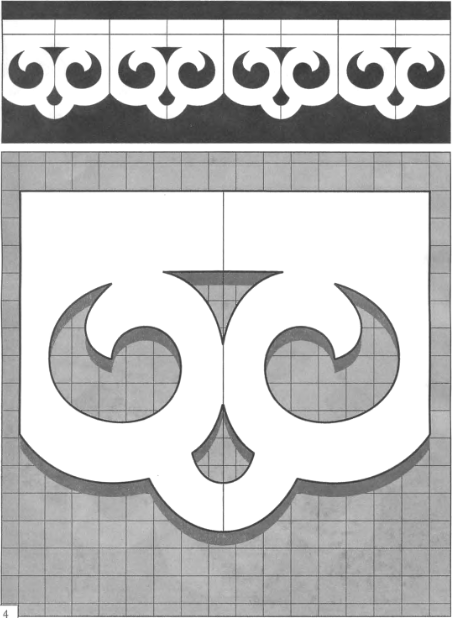
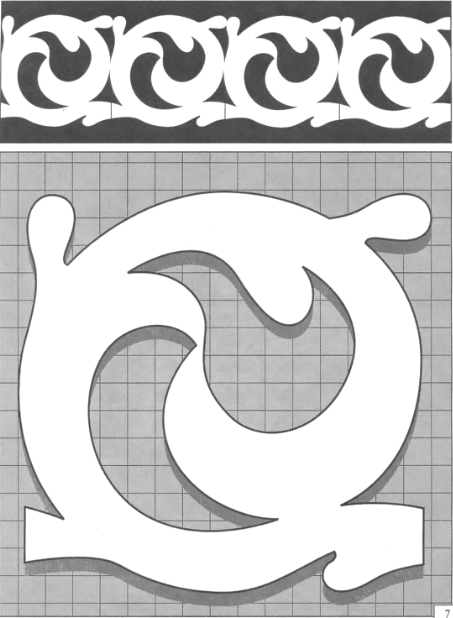
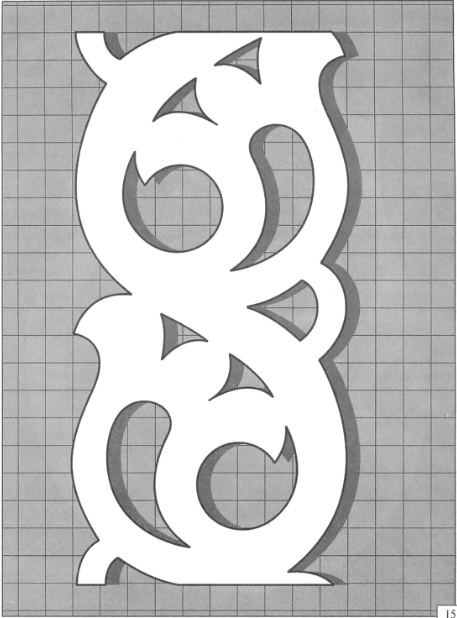
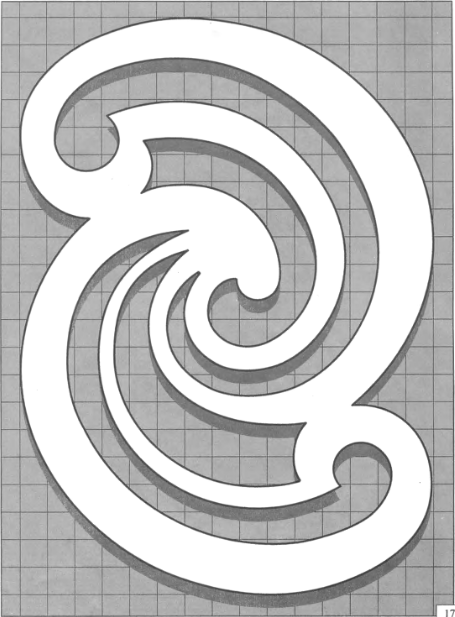
Window trim patterns are usually built on the basis of the so-called. repeats - elements self-conjugate in one direction, forming a linear seamless pattern, on the left in Fig. By changing the size and number of repeats, you can quickly develop a slotted casing for any window. By combining only 2-3 repeats, it is possible to obtain a wide variety of patterns; stencils of several types of fully conjugated repeats are given on the right in Fig.

The repeats of the pattern do not have to completely match each other; this will make the pattern visually more complex and effective. For example, the pattern of the top row on the next. rice. is constructed by turning each subsequent fragment “upside down” relative to the previous one. Rapports of other ornaments in Fig. are conjugated either along broken or curved lines (marked in red).

Note 5: decorating the corners of frame trims with the usual end elements for rapport lines often turns out to be difficult, there is simply not enough space at the corner. In such a case, next. rice. Templates for isolateral ends of the ornament are given. By rotating them 45 degrees, you can also use them to create linear patterns. These parts are best cut out of plywood, see at the end.

Thread
If you want to make yourself unique carved platbands, then the main difficulty on this path is the selection of tools. In addition to flat chisels of 5, 10, 16/18 and 24 mm (pos. A in the figure), you will need oblique chisels of the same widths, but always in pairs - right and left, pos. B. Corner chisels will be sufficient 6, 12 and 18/24 mm at an angle of 90 degrees, pos. IN.
Much more semicircular chisels will be required, pos. G: for starters, 4, 8, 13 and 16 mm normal, with a gutter depth equal to its width. 4 and 8 mm chisels will also need deep, so-called. U-shapes, and 13 and 16 mm are also sloping.

For fine artistic carving you will also need curved chisels, normal, sloping and 60 degree angled, pos. D1, D2, D3. For cushion carving, you can’t do without reverse crimpers for smoothing corners, pos. D2a. The minimum required standard sizes are marked in pos. D red.
You need to look for chisels for wood carving in art stores, but buying everything initially needed randomly will be very expensive. It’s better to immediately take a set for wood carving, but not for a fine sculptural set of 40-60 items (item E), it won’t cost any less, and at first you simply won’t understand what to do with most of these tools. You need to take a beginner's set of 12-15 items, pos. Well, for it you will only need to buy jamb knives at 90 and 60 degrees (shown by arrows in position E). With the tools from such a set it will be possible to refine cut-out overlay elements and perform rather fine geometric carvings, see fig.:

Note: If you have the opportunity to use a manual wood milling machine, then the cut-out or slotted platbands can be significantly improved visually by running a shaped chamfer - molding - along its edge with a shaped cutter, see fig. on right.

Plywood
The worst packing plywood after 2-fold impregnation with a water-polymer emulsion becomes suitable for medium-level artistic carving, and after painting with water-dispersion paint and varnishing acrylic varnish turns out to be as durable as an oak tree from the outside. But what’s even more important is that the strength of plywood, unlike boards, is almost equal in all directions. Required for platband minimum thickness in 30 mm this is 5 layers of plywood and 5 levels of decorative trim. In this way, you can make plywood trims that are visually almost as good as the masterpieces of the masters of the past; compare left and center in fig.

Antique carved trims, modern plywood trim and a jigsaw for cutting out plywood
However with a hand jigsaw sawing so much plywood will take a long time and be inaccurate, and a carpenter's jigsaw is unacceptably rough for such thin lace. You need a jigsaw machine, also known as a stationary jigsaw, on the right in Fig. Branded jigsaw machines are expensive, but they can be made with your own hands from a manual jigsaw (which does not deteriorate and remains suitable for basic work), an old sewing machine, and other methods, see for example. track. video.
Video: homemade jigsaw for wood carving
Note: Sewing machine machines are the safest and may not be electrified if the machine is foot driven. In this case, the frequency of the saw strokes is regulated simply without any electronics: you just need to jerk your legs more often or less often.