Everything you need to know about painting old furniture. How to paint a window with a wooden frame? Primer and putty
We all often find ourselves wanting something new in the familiar interior of the house. Usually on the surface simplest way- rearrangement of furniture. But it does not always give the desired result. And then an idea comes to mind: you need to change the furniture itself, and not its location in the room.
But how often can we afford to throw away old things and buy new ones? Moreover, many pieces of furniture may not be able to afford the family budget.
We know a much more economical and easier way to change and refresh the interior of your home. This is paint old furniture.
Necessary materials and tools
The often beloved Soviet-style furniture is made so high quality that it can last even longer. long years what can not be said about modern models. Moreover, old vintage items interiors are in fashion now more than ever. Therefore, by painting it is the best solution.
How to paint furniture without noise and dust, and not turn an apartment into a painting facility smelling of toxic products? To do this, we need to stock up the right tools and materials.
For painting work you need:
- A piece of furniture that needs to be painted;
- masking tape;
- Gloves;
- Dye;
- Roller and brushes;
- Tray for paint.
Before you start painting, the surface of the furniture must be prepared. This requires:
- Putty;
- Roller and brushes;
- Paint tray;
- Gloves;
- Protective glasses;
- Fine sandpaper;
- Rubber spatula;
- Sander or wooden block.
Having previously prepared everything you need, you can get to work. Before you paint the furniture, you need to prepare it to avoid further mistakes.
How to prepare furniture for painting
Proper surface preparation will ensure high-quality painting that will shine in the sun and delight the eye.
- First, carefully inspect the furniture you are going to restore for minor damage. If necessary, repair or replace installed mechanisms: . Exfoliated particles of old varnish must be removed. Remove the doors, take out the drawers and unscrew the handles and locks from the outside.
- Sand the surface (both glossy and matte) with fine-grained sandpaper. It is this skin that will not leave deep scratches which will be difficult to cover with a primer or paint. For more convenience, you can use a grinder.
- First you need to cover the surface of the furniture with a primer, and after, with the help of putty, close up problem areas. This will ensure good adhesion of materials. Degrease the surface with vodka or alcohol - they do not leave a slippery film.
- Apply so that it soaks well any minor damage, scratches, cracks. For this, it is better to use a brush. Wait for complete drying.
- Using rubber spatula, put putty on furniture defects and carefully cover.
- After the putty dries, sand the places where you applied it. This should be done with a grinder or fine-grained sandpaper stretched over a bar. Depending on how deep the defects were and what layer of putty you applied, this operation may need to be repeated several times.
- When these works are finished, get rid of dust on the surface and prime.
Tip: when buying a primer, try to choose a shade that is as close as possible to the color in which you want to see your furniture. This will not only ensure an even color, but also save on paint.
What paint to paint the furniture?
Varnishes, which are now used for painting, are of the following types:
- Alcoholic;
- Epoxy;
- Alkyd;
- Nitrocellulose;
- Oily;
- Polyurethane.
Lacquer, unlike paint, creates a surface with higher hardness and durability. But if you decide what paint to paint the furniture, then make a choice from the range below.
- Among the paints for furniture processing, acrylics are traditionally used. They are more stable than others, dry quickly, are easy to apply, and are well suited for the kitchen or children's room. In addition, acrylic paints have a less pronounced odor and are easily diluted with water, which saves material.
- Acrylic paints in spray cans will greatly simplify and facilitate your work. Such paint falls on the surface easily and evenly, and dries faster than conventional paint applied with a brush or roller.
- Enamel lacquer paints applied to wood give the surface shine and gloss. If you want a matte effect, then oil paints will help you with this.
- Transparent paints will help you preserve the natural. The range of the range is very large, and the consistency allows you to mix different shades with each other, so that you always have a choice in which color to paint the furniture.
Do-it-yourself furniture painting (for example, a wooden kitchen cabinet)
You probably have furniture in your home that you would like to update. Most often this is kitchen cabinets, since they are especially affected by moisture and mechanical stress.
Let's try painting on the example of such a kitchen cabinet with my own hands and you will see that it is actually quite easy to paint old furniture at home.
Please note: if you buy kitchen cabinets without finishing, then most likely it will be birch furniture. Such wood has a fine-grained structure, and stain looks great on it. For example, by applying cherry stain, you can easily achieve cherry color.
Step 1: Sand the wood. It - milestone preparation. Take 120 grit sandpaper and lightly sand the wood in the direction of the texture so as not to scratch the surface. Use 220 grit sanding again to remove any small scratches and make the surface smooth.
Stage 2: we apply impregnation to the wood. Before doing this, carefully wipe the dust from the surface. The applied impregnation layer acts as a sealant and contributes to a more uniform staining. Let the primer dry completely.
Step 3: Apply stain. It is better to apply it with a brush, in circular motions, so that the product is rubbed into the texture of the wood. Make the final pass in the direction of the grain of the wood so that the final coat is even.
How to paint old furniture?
You probably have a lot of old furniture left, which is a pity to throw away and nowhere to put it. She collects dust in the country, in the garage, in the barn. And many pieces of such furniture are very comfortable, light and inexpensive material. give them new life you can simply paint it in a different color and refresh the coating. In addition, reconstruction by painting will significantly strengthen the surface, which is subject to various damages due to its technical characteristics.
Before you paint furniture made of chipboard, it must be carefully prepared. There are two ways to clean the surface:
- Chemical way. It involves the use of special chemicals to remove the old coating. You need to choose such a tool depending on the type of past coverage. Be sure to use gloves when working.
- Thermal way. In this case, the treatment is carried out with hot air or steam. This will require building hair dryer. Point it at the surface and hold until the layer of paint or varnish softens so that it can be easily removed with a scraper.
After cleaning, the surface must be puttied and rubbed with sandpaper.
For painting old furniture Chipboard is easier just use in cans. You will cope faster, and the layer on the surface will turn out even and smooth. Same way great option can be oil or alkyd paints.
Tip: if you use brushes when painting furniture, it is better to buy new ones. Pay attention to how firmly the bristles hold. If the hairs begin to fall out during operation, this will have a very bad effect on the quality of the coating.
Interesting interior solutions (what color to paint the furniture)
As you know, old furniture is painted not only to update, but also to match the interior. Fashion trends in housing design can go well even with the old Soviet wall if you work on it a little.
It is enough to repaint such a wall, using the guide in our article, and play with the arrangement of its elements.
The most important thing is to decide in advance in what style it will be sustained. And even the classic Romanian wall of the 80s, long bored and unfashionable, can be turned into a multi-level, fully functional part of the room, and not just a piece of furniture.
In the photos below you can see examples of how to arrange old wall to match the new fashion trends in design. Notice how new color furniture and its accessories are in harmony with the color of the walls in the room.
Here you see an old wall that has been repainted in a different color:
And here are the solutions for how to rearrange the elements of the walls:
These photos will help you decide what you want to see your updated furniture.
In painting furniture, as in any work, there are secrets. They will not only help you get through the process faster, but will also save you money and ensure perfect execution.
- Choose materials (primer, putty, varnish, paint) from one manufacturer. In this case, they will be guaranteed to be compatible with each other. Most often, the manufacturer develops, in accordance with the operating conditions. So it will be easier for you to choose the optimal material.
- Don't be afraid to play with colors. Properly selected colors will help to visually enlarge the space. The contrast between the colors of the furniture and the walls will create a unique style in the room in any direction.
- Before starting work, be sure to stock up on a roller and several brushes different thickness. Using a roller, it is more convenient to paint wide surfaces, and brushes will be needed to paint the ends of furniture parts and finishing fittings.
- Use . It will help you protect already painted and dried surfaces from paint ingress. It is not very convenient to use a solvent in such cases - it will damage the paint layer. Masking tape will save you from such mistakes.
- At painting work use a respirator mask or ventilate the room thoroughly! Although most modern paintwork materials non-toxic and do not emit pungent odors, precaution is never superfluous.
Furniture painting video
We hope you find this article helpful when you decide to update your furniture with something as simple as painting. As you can see, in this way you can completely transform the whole house, and not just a closet or wall.
If you have any questions during the acquaintance, please ask them in the comments. We will gladly answer you. Surely many of our readers have experience in such work. Share it with us, tell us about the features of the process, what difficulties you encountered and how you solved them. Good luck in your work and comfort in your home!
In any living room we can find a lot of furniture, which is the most important component of any interior. Depending on the purpose of the room, here we can find a variety of chairs, tables, sofas, armchairs and wardrobes. This furniture is always in sight and therefore, in addition to its main functions, it must also have an attractive appearance that will decorate the interior of your room. Any thing wears out over time, which is why it is necessary to constantly repair and update your furniture. To update appearance furniture, sometimes it is enough to paint it. This option is the most cost-effective and simple. At the same time, everyone who thought about painting the same cabinet made of chipboard with their own hands had a reasonable question: how to paint the cabinet?
 Cabinet painting great way give him back his youth
 First of all, it is important to note that do-it-yourself cabinet painting is the most profitable and good decision. So, you can update and embellish your interior without special costs. This may be the case if your old wardrobe It has good build quality and durable materials.
Preparing the cabinet for painting
We assure you, any old and shabby chipboard cabinet can shine again. Therefore, you do not need to immediately throw it away, it just needs to be repainted. This is due to the fact that, as a rule, old furniture has more high quality. It uses natural materials, and therefore such a cabinet has high reliability and durability. The same can be said about another element of the interior, like a chest of drawers or a cabinet. The painting of these elements is carried out following the example of the cabinet, and is also separately described in the article about.
It should be noted that it does not special significance and the material from which the cabinet is made. Of course, here we will find some features, but you can update as wooden cabinet, and a cabinet made of chipboard. If we talk about the differences, then a chipboard cabinet absorbs less moisture than a wooden cabinet. That is why chipboard will dry longer. On chipboard it is much easier to bring out the color you need, you also need to use a smaller layer of primer than for wooden products.
During the preparation of the cabinet for painting, we need to remove all removable elements, which are presented in the form of handles, hinges, drawers and doors. We need to get a clean cabinet frame.
We should carry out all preparation and painting work in a well-ventilated place, and best of all, do it on the street.
For preparatory phase painting, you will need the following:
- sandpaper with different grain sizes;
- flat brush;
- sponge or rag.
First of all, we take a sponge or a rag and remove all dust and dirt from the surface of the cabinet. Then we proceed to remove the remains old paint and varnish. We remove the old layer of paint using sandpaper. This is done with sweeping circular movements. Cleaning is done first with a coarse-grained sandpaper. It is necessary to completely clean the cabinet from all irregularities of varnishes and paints. This will allow the new paint to lie on it in a smooth and even layer.
 For stripping old layers of paint, coarse sandpaper is perfect
 It is important that when you rub the surface, you do not erase the layer of veneer. Otherwise, you will have to more, and wipe the surface from bumps and holes. Therefore, do not overdo it with the grout.
After the surface of the cabinet has been treated with coarse sandpaper, you should sweep the surface from dust using a flat brush. In no case do not clean the cabinet or chest of drawers from dust with a rag. So, you will not be able to get rid of all the dust, and you also run the risk of hammering its remnants into the surface, which will further affect the quality of the cabinet painting.
Then, those places that were not treated with coarse-grained sandpaper, we begin to process using paper with finer grains. After that, we brush the cabinet or chest of drawers again with a brush to remove dust.
After the cleaning stage of the cabinet is completed, you should definitely thoroughly wash the room in which you work, so that at the time of painting, the room is clean and dust-free. A dusty environment can adversely affect the quality of the painting.
What kind of paint should be used
If we talk about the type of paint, it is best to give preference to acrylic paints. Such a paint has a bright color, practically does not smell and it is quite easy to dilute it with water to get desired color. Plus, this paint is quite easy to wash off, which allows you to correct errors in painting. After the paint dries, the water evaporates and the paint becomes stronger. This point should be considered during the application of several layers.
It is not necessary to paint your wardrobe or chest of drawers the same color. Here you can experiment a little. Take, for example, two colors. For example, take beige color for the base and a brighter color for the details. If you cannot find the color or shade you need, you can also buy plain white acrylic paint, then add color to it. So, you can get the desired color and shade. When choosing a shade, you can check how it looks by applying it to small plot closet. So, you will determine which color suits you best, and determine its saturation.
 Acrylic paint is best for painting cabinets.
 Priming process
Many people ask about the need for a primer, and we can say with full confidence that if you want to paint a cabinet or chest of drawers with your own hands, then you should definitely prime the surface. This is due to the fact that the primer will not allow the surface of the cabinet to absorb moisture. This will promote better drying. Also, with a primer, you will not lose the color you need, since when applying paint to an unprimed surface, it does not matter whether it is chipboard or ordinary wood. During drying, the color changes slightly, as part of it will be absorbed into the material.
If we talk about the most suitable primer, then it is best to use a primer on acrylic base. This is due to the fact that the components of such a primer will interact remarkably with the acrylic paint of your choice.
Surface treatment acrylic primer pretty simple. You should first read the instructions for use this material. An important point is to take into account the drying time of the soil. Allow the primer to dry completely before applying paint to a chest of drawers or cabinets. It is also important to make clear calculations of the surface that you decide to process. So, you can purchase the amount of material you need.
It is necessary to prime a chest of drawers or a cabinet with a roller, in a relatively thin layer. Then leave our chest of drawers or wardrobe for a while to dry completely.
 Before painting, the surface must be primed
 Painting accessories
Tools - this is another important question that arises for everyone who decides to paint a dresser or cabinet with their own hands. What is better to paint the cabinet, brush or roller? Of course, here you should take into account your preferences and skills, but we still recommend using a brush. This tool is more reliable and practical. With a brush, you can apply the paint in an even, even layer over the entire surface. Plus, the brush will great helpers in painting hard-to-reach places.
When you go to the hardware store, you can find a huge selection of different brushes and rollers. The choice of instrumentation is the same important point, as well as the choice of paint. You should buy only high-quality brushes and rollers. Otherwise, fluff may remain on the surface to be painted, which will fall out of the brush with low quality.
We paint the cabinet
We need to carry out the painting process in a well-ventilated, clean room or on the street.
We should apply the first layer with paint, the color of which is lighter than the selected tone. The paint should be liquid, if it starts to harden, dilute it with water.
Surface color may vary depending on how many coats have been applied. When applying one thin layer, we will get a gap in the structure of the tree, which is very suitable for the Provence style.
To get more thick layer, paint should be applied several times. Each layer must be applied after the previous one is completely dry. Strokes should be applied in only one direction, so you get a uniform color and a pleasant structure.
If you use two or more colors, then we recommend sealing the borders between them. masking tape. This will help you not to mix colors.
A few days later, after complete drying, it is applied to the cabinet or chest of drawers. thin layer transparent matte varnish. It is designed to protect the painted surface from damage. After the varnish has dried, you can reattach to it all the parts that were previously removed.
As you can see, painting a wardrobe with your own hands is not so difficult. This way you can transform an old wardrobe or chest of drawers into a trendy and original item interior, turning on your imagination and making a little effort.
I continue to furnish my room and in this post I wanted to talk about how I repainted furniture. If you remember, I started by deciding on the general mood of the room, color palette and created a moodboard. I wrote about this stage in detail.
The second step was painting the furniture. The furniture in my room is very old. She's probably about the same age as me (yes, she's also thirty-flirty-and-fabulous). Of course, there was an option to sell it for a penny on Avito, or even just take it to the trash. But I thought that I had a great chance to experiment with painting furniture. In the end, if nothing happens at all, then I will always have time to throw it out.
For painting lacquered furniture I used:
- the cheapest brushes (a set of three pieces);
- two liter cans of Dulux Aqua paint (white and coral, I chose the color in the palette store - about 1000 rubles per can);
- white spirit and countless newspapers.
I had in stock bedside table, wardrobe and cabinet with trellis. I chose a rather complicated method of painting (for a start, of course, it would be better to choose something simpler - paint everything in one color). In my case, the main color was white, coral inserts on the facades and gold accents. So here's mine step-by-step instruction repainting old laminated furniture.
When the question arises of painting any element or detail, then stories of unsuccessful painting over old paint, as well as the fact that before the next painting, the old paintwork must be removed. Let's try to figure out whether this is so and how, as well as in what sequence it will be performed removing old paint.
To calculate paint consumption, you can use the paint consumption calculator.
You can of course take the easy way and paint the surface without pre-cleaning, and perhaps you will find this optimal, fast and correct in this moment time solution, but it's not! It should be said right away that painting over the old paint will bring a short-term effect and after a while the new paintwork will begin to swell, peel off and most likely disappear. Below we will talk more about painting over old paint because it still exists. In order to avoid such unpleasant consequences, you must do the following:
- Remove all layers of old paint;
- Degrease the surface;
- Treat with a primer.
Only after following this sequence can you start applying a new paintwork.
There are the following options for removing old paint:
- Paint annealing;
- Sandblast;
- Chemical washing of old paint (from special formulations)
The best way to clean metal surfaces from paint to date is a special liquid.
Tools that come in handy for removing old paint and painting the surface.
- The paint remover itself or a special chemical composition for this;
- Protective gloves;
- Respirator to protect the respiratory tract;
- Sandpaper;
- Putty knife.
When choosing chemical reagents for removing old paint must choose quality formulations, such materials are certainly not cheap, but the result from their use will be an order of magnitude higher than from the use of cheaper analogues.
Protective gloves must be worn before surface treatment. In addition, it is necessary to protect the upper respiratory tract from harmful vapors and toxic toxins that are released when the liquid interacts with old paint.
It is important to remember that after applying a layer of special liquid to the old paint, it takes a certain time for the peeling process to begin. The time that must be endured is often indicated in the instructions.

After the exposure is completed, you can safely proceed to removing old paint. To do this, you can use a spatula, prying off the exfoliated layers of old paint with it and removing it from the surface. It should be noted that if the old paint has several layers, then re-treatment of the surface will be required.

For better cleaning of the surface, after processing and removing the old paintwork, it is recommended to clean it also with sandpaper (it is necessary to remove the smallest particles of old paint and level the surface).

Last cleaning of old paint performed with a solvent (White spirit).
Next, we will consider painting the walls with old paint and talk about the stages of such painting. Before starting to paint the walls with old paint, it is necessary, as in the case of metal, to treat the surface to be painted well, remove the old layer of paint, rust, mold,
If you do decide to apply a layer of paint over the old coating, then there is a possibility of incompatibility of paint materials, discoloration, and upon drying, bubbles, cracks, paint may peel or peel off.
It is possible to remove it without it, only in cases where the compositions of the paints do not differ, but it should be noted that the original color may not differ significantly as a result. In order not to make a mistake with the colors, you can conduct a small test before painting: a small section of the wall you will need new paint let dry for 30-40 minutes. If the result suits you, then you can safely start painting on the old paint.

Old paintwork, rust, small bumps, you can remove with metal brushes or special scrapers. Large defects on concrete, stone, brick walls they are removed with grinding stones, such as pumice, and wooden ones with planers, chisels. If mold is present on the wall, then such an area must be treated with a bactericidal solution against mold. After applying such a solution, after 12 hours, fungal infections are easily removed with a spatula or a stiff brush.
For residential areas, the most suitable option are water-dispersion paints, or water-based.

Conclusion A: Basic requirement before painting the walls with old paint- these are carefully protected, leveled, dried surfaces, only after all these procedures, you can start applying the paintwork.
There are many ways to apply paint to walls and ceilings: brushes, rollers, sprayers, foam tools. The final result, as well as the life of the paintwork, will depend on the chosen method of painting. Painting with a roller is the most popular and inexpensive method, since it is convenient to apply paint with it and distribute it over the surface. But for such hard-to-reach places as wall corners, skirting edges, etc. it is more convenient to use a brush. For large surfaces, a spray gun is more convenient, faster and more uniform, and the surface to be painted will look better than when applied with a roller or brush.
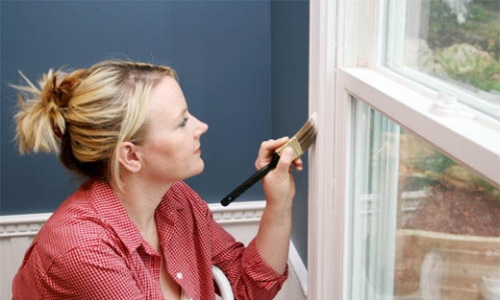
Although many people today put PVC windows in their homes, but most people, especially in wooden house and in old apartments, leave wooden windows. Wooden frames require periodic painting. In order not to repeat this process annually, you should take it responsibly, prepare all materials and tools in advance.
In home repairs, wooden frames are the most labor-intensive section. From the street they are affected sunlight, rain and snow, and from the room - a higher temperature, compared to the street, dry air, water condensate. In addition, bugs often start in a wooden frame, fungus and mold develop. To avoid any trouble, you need to keep the order of wood processing and paint according to the rules.
Materials and tools for painting a wooden window
Repair of a wooden frame begins with an inspection of their current condition and the preparation of materials and tools. To paint old windows, we will need the following items at different stages of work:

- Scraper
- Grinder or drill with a special nozzle
- Roller
- brushes
- Putty knife
- Sandpaper with coarse and fine grit
- metal sieve
- masking tape
- Newspapers and film under the window
- Dust cleaning cloth
- Trays for paint
- Primer
- Putty
- White Spirit
- Dye
- Solvent
- Step ladder or stable chair, stool
- Hammer, chisel, screwdriver, nails
Don't forget about necessary ways impact protection harmful substances: mask, goggles, gloves, headgear.
For painting wooden frames from the inside, alkyd paint is usually used on oil based, and from the street - acrylic, for outdoor work. However, you can use paint for outdoor work on both sides of the frame, but what kind of paint to paint the windows - domestic or imported - depends on the cost of repairs and the owner's preferences.
Preparing for painting
In order for the frames to last longer, you need to choose the right time. Neither the scorching sun nor the rain and snow should interfere with us, because ideal conditions for repairs - a warm spring day without bright sun, when there is little moisture, and ultraviolet is not able to destroy the paint structure. Frames dry well at temperatures above five degrees Celsius and humidity below 80%. If you apply paint on a wet surface, bubbles will appear on it later, and the work will have to be done again. The paint also peels off due to dampness, poor cleaning or an unsuitable primer.

We will prepare wooden frames for painting in several stages.
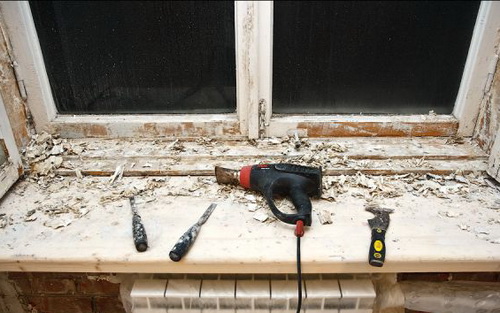
We remove the old paint. For this work, we use a scraper and sandpaper with a large grain. Let's check how easily the frame closes, if there are problems, use grinder or a drill with a special nozzle. BUT you have to be careful! Can't be damaged wooden base frames!

Today there are special liquids for removing old paint. This greatly speeds up the process of preparing frames for repair. There is Finnish Tikkurila Maalinpoisto, Ukrainian Shostka, Svema. You can find it in car dealerships (it is used for cars). We apply, wait until the paint wrinkles and turns into a curdled substance, clean it with a spatula, and process it with coarse-grained sandpaper.
It is better to remove window fittings (and window sashes too) before painting at all, so that later the window looks neat, if there is something that needs repair, it must be replaced and corrected in advance. If it is problematic to remove handles or locks, you can paste over them with masking tape, protecting them from accidentally getting paint.

We also carefully prepare the glass. If earlier the question of how to paint wooden windows was not before you, seal all the glass with newspapers and masking tape on the sides, stepping back 2 mm from the edge so that the paint gets into these narrow cracks and does not allow water to accumulate here. Experienced craftsmen usually use only adhesive tape around the edge of the glass.
Throw away the old glazing beads holding the glass, if possible. New ones are painted separately from the frames (also cleaned, sanded, primed) and ready-made ones are nailed with carnations.
Putty and primer of a wooden window
Let's take a closer look at the wooden frame. We pre-treat all parts that can rust and ruin our repair with an iron primer (these can be stud caps, hinges, etc.).
antiseptic (eg. linseed oil) - obligatory part preparatory work before painting. This treatment prevents the wood from rotting, the development of fungus and does not allow insects to settle in your home.

Got rid of the old paint and treated the frame with an antiseptic? Now let's take a closer look at the surface of the window. All cracks, pits and potholes must be filled. This should be done gradually, because a thick layer of putty will simply fall off along with fresh paint, and the repair will have to be started all over again.

The putty should be special, for wood, on an acrylic basis, usually it comes in jars of 200 gr. Good alkyd putty Lakkakitti. If we paint the frames, we simply put the putty on the surface, if instead of paint we use a stain, all the putty places will be visible through it, therefore, first we tint the putty with a color scheme to match the color of the wood. You can make this finishing material yourself from wood flour (superfine sawdust) and glue or epoxy.
After the first application of putty, we clean the surface with sandpaper, grind and remove dust with a damp cloth. After an hour or two, after it dries, we level the surface with fine-grained sandpaper, remove the dust with a rag, once again carefully examine the frame and, if necessary, again apply a thin layer of putty where necessary. The process is repeated until a perfectly flat surface.
The next stage of preparation for painting is a primer. This process provides reliable coverage tree paint. By the way, a modern high-quality primer is also an antiseptic. So, Pinotex is good for these purposes. It forms a transparent protective film, which is very important for preserving the natural pattern of the tree. In addition, it perfectly protects against mold and fungus, does not allow the processes of decay to develop on outside frame, even in high humidity.
Primers are made up of many components: oils and resins, adhesives and pigments. The recipe of each primer is somewhat different, however, the common among wood primers is their ability to preserve the structure of wood, therefore, a metal primer for wooden surfaces not used.

Before priming, the surfaces are again thoroughly cleaned and degreased with white spirit. It is better to prime with a brush, not a roller. If you do not let the putty dry well or skip the area when priming, after painting a dark spot will appear in this place. Then you will have to clean it again with sandpaper, then prime and paint, so you should not rush before painting.
Several coats of paint on a wooden window
Our window is now smooth and even. Before direct painting, we carefully clean the room, clean the space near the window from dust so that it cannot get on the freshly painted surface.

Paints for wooden frame choose water-acrylate or alkyd enamels. Their main advantages are moisture resistance, elasticity, resistance to fading under sunbeams. There are several global brands that produce paint specifically for wooden surfaces. In our country, with changeable weather, rains and frosts, on window frames Dulux, Remmers, Caparol keep well, however, while the question of how much it costs to paint a window is solved by a pretty decent amount. Domestic paint is cheaper. In general, window repair can cost from 500 rubles. up to 10,000 (the last cost includes the services of a hired master finisher).

The paint is thoroughly mixed in a jar, filtered on a metal sieve into a bath. You can do without a sieve, but then small lumps of paint from a can that ended up on smooth surface frames.
The first coat of paint will be much waterier than the next, because its purpose is to soak all the bumps and pores of the wood. To dilute, use a solvent. Allow the paint to dry after brush or roller application. And only after the first layer has completely dried, you can proceed to the second.
Usually the third coat of paint is the finishing one, although sometimes two are already enough if all the preliminary work was carried out in compliance with all the rules. The second and third coats of paint should be thicker than the first to avoid streaks. If they appear, immediately, before drying, remove with a rag with a solvent. If you look at this defect, you will later have to clean the surface again and paint again.

We do not dip the brush into the paint entirely, only half, leave the excess paint in the bath, brushing along the edge with a brush. Starting to paint with outer side window. It is advisable to have several brushes: small ones for hard-to-reach places, large ones for flat surfaces. The width of the brush can be 3cm - flute, and wider - 4-5cm. In shape, a flat brush is much preferable to a round one.
The paint lays down well along the wood fibers. We paint over the corners with light, short brush strokes.
Tape and newsprint should be removed from the glass before the paint dries, because the paint layer can be damaged later.
Accessories, if removed in advance, are installed after the frame has completely dried.
If you have been thinking about how to paint a window - on your own or hire a master - after our instructions, all questions and doubts will disappear. Good luck with your repair!