How to paint walls in relief with your own hands. Do-it-yourself textured wall painting technology
Textured coloring compositions allow you to simulate indoor interiors to suit every taste. Such colors open up to a person ample opportunities on creating original decorative solutions in houses and apartments. This is why consumers love them.
Textured compositions are a guarantee of unusual and beautiful wall decoration
Tastefully finished wall surfaces are considered one of the main elements of sophisticated design. living rooms and other premises. Many modern products, used for decoration, cannot boast of environmental friendliness and safety of use. Manufacturers are constantly trying to solve this problem by regularly releasing new Decoration Materials. One of them is textured wall paint. It quickly gained popularity among craftsmen who love to repair and decorate their homes on their own, focusing on their own taste and ideas about beauty.
The material we are interested in is ideal for home creativity. With its help, many self-taught craftsmen manage to create luxurious interiors. Textured finishing compositions, also called relief or structural, visually represent a homogeneous thick mass. It consists of artificially manufactured or natural elements. Among them are particles of various polymers, quartz sand, marble and granite chips, small components of gas silicate. All of these minerals are strictly calibrated (have approximately the same geometric parameters) and are characterized by some special shape (scaly, drop-shaped, etc.). Thanks to this, the special texture of the paint is formed.
An important element of structural compositions is the binder used to create them. It serves as a base and is usually made of silicate, silicone or acrylic. The sizes of mineral particles vary. Some paints use large grains of filler (1–2 mm in size), others use medium grains (0.5–1 mm), and others use very small grains (no more than 0.5 mm).
Let us add that relief finishing mixtures are considered different types depending on the work for which they are used. There are compositions for indoor use and paints for decorating facades and basements of buildings. Moreover, any type of composition is presented in a wide range of colors and textures. It's really easy to choose the right shade of paint.
Relief paints - are they all advantages or is everything not so smooth?
Textured compositions, as noted, are created on the basis of aqueous dispersions. In this case, no solvents are used. This makes the finishing compositions highly environmentally friendly. They do not harm human health. And here one nuance immediately arises. When applied to the surfaces being treated, structural paint forms a film on it that interferes with the process of moisture exchange.
On the one hand, this is good. But in the absence of moisture exchange, the walls simply stop breathing, which causes a disruption in the balanced microclimate in the living room. This, you will agree, is unacceptable. In fact, the moisture resistance of the relief composition is its real advantage only in cases where it is used for finishing bathrooms and kitchens. In other situations, this paint feature can be called a disadvantage rather than an advantage.

Now let’s look at the real (and not disputed by anyone) advantages of the paints described:
- 1. Durability, unique reliability, operational attractiveness. The structural coating is characterized by resistance to mechanical stress, ultraviolet radiation, and abrasion loads. It has high fire-fighting qualities and is completely antistatic. This coating is used for decades, practically without changing its initial properties.
- 2. Easy to care for. Durable and smooth surface paints do not need to be washed with special compounds. Microorganisms do not multiply on the coating, since it is absolutely insensitive to dampness; it is enough to wipe it with a damp cloth from time to time. This cleaning allows you to remove any dirt from the finish and even erase drawings made with colored pencils.
- 3. Easy to apply with your own hands. relief compositions is such a simple operation that any self-taught craftsman who has never previously carried out any finishing activities on his own can handle it. The paints in question can easily be applied to any surface, from wood to concrete and brick.
The main advantage of structural finishing is the opportunity to show your imagination on full blast in the process of decorating the walls yourself. No other artist can provide such space for creativity. modern material.
Types of structural compositions - what texture can be obtained?
There are not many types of relief paints. On different groups they are divided depending on the texture obtained after finishing activities:
- 1. Marseille wax. A composition that makes it possible to obtain an imitated structure of cork or natural stone cladding. This type of paint is especially in demand when creating an uncluttered design in office premises, public swimming pools, entertainment venues - bars, restaurants. After painting, it is imperative to apply a special wax with special decorative properties. For finishing homes, such compositions are used relatively rarely.
- 2. Mizuri. Allows you to obtain both smooth and textured coating. Mizuri always contains a modified type of starch, created on the basis of acrylic compounds.
- 3. Atacama. Very popular look relief paint. It imitates (very realistically, we note) a velvet covering. The second feature of the paint is its high light reflection effect. Atacama includes rare metal pigments and small particles of quartz sand.
- 4. Relief. This is the easiest one for self-use paint option based on acrylic polymers. Such paints may contain a variety of additives (only fine quartz chips are required) in varying proportions. It is relief compositions different color Most often used by home craftsmen.

There are also lesser known varieties of the described finishing compounds. Some of them are made strictly on a mineral basis. In most cases, such paints are produced in the form of dry compositions, which are diluted with water before use. Mineral compositions, as a rule, are intended for finishing work on facades. Silicone paints have not become popular due to the fact that they are not able to protect the coating from mold and mildew. And silicate compositions from any manufacturer have an objectively high cost.
Preparing walls and choosing tools - how to start correctly?
Spectacular textured walls can only be achieved if they are competent preparation to coloring. Everything is simple here. We need to clear the wall of old decoration, remove dust and dirt from the surface, cover large cracks and similar defects with putty. After this, we level the base and, if necessary, plaster it. Nuance. If the unevenness on the walls does not exceed 2 mm, there is no need to use plaster. The paint itself will hide such minor surface imperfections. But priming the bases is a mandatory operation.
Any soil can be used. The main thing is that it matches the material from which the walls in the room are built. For example, for brick and concrete surfaces a primer is usually used Concrete contact. Primer compositions not only protect the base from excess moisture, but also give textured patterns special expressiveness. Applying relief material to walls is done using different tools. Can be used:
- 1. trowel;
- 2. roller;
- 3. spatula;
- 4. sprayer;
- 5. a regular sponge.
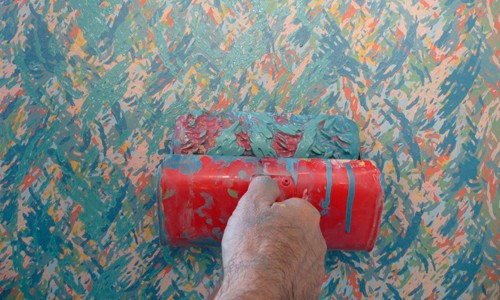
Professional finishers most often use a trowel. Using this tool, entire paintings and artistic panels on the walls are created. Using a trowel requires a person to theoretical knowledge in painting and a lot practical experience. If you have neither the first nor the second, it is better to apply structural compounds with a roller. This is the simplest and most self-taught technology. It is recommended to apply compositions of the category with a roller Relief. You just need to dip the tool in a container of paint, roll it out well, and then start creating creative wall designs.

The spatula is optimal for creating heterogeneous and complex textures. Experts use serrated tools. Such spatulas add volume to the coating. To obtain emphatically “rough” structures, special rigid devices are used. And the coating can be made soft and light with a soft spatula.
Beginners should not use sprayers. It is very difficult for an inexperienced person to determine the power of the jet, which will be sufficient to create a coating of the required thickness. If you still plan to use a sprayer, we strongly advise you to practice with it first. Try painting a small sheet of drywall evenly, for example. If everything works out, start decorating the walls. If the test result is disappointing, it is better to arm yourself with a roller or sponge. The latter, by the way, is very popular among self-taught craftsmen. Sponge and various stencils - great way textured decor of wall surfaces.
The fastest stage is working with paint itself.
The technology of textured coloring is elementary. The scheme for applying the structural composition of the selected color to the walls is as follows:
- 1. We cure the paint indoors. It should be at room temperature.
- 2. Add fillers to the composition if we plan to achieve a certain decorative effect.
- 3. Mix the composition with a construction mixer.
- 4. Select the area from which we will begin work. It should be no more than 2 square meters. m.
- 5. Apply paint to the intended area. The layer of material must be thick. Otherwise, we will not be able to create the specified invoice.
Then we use the selected tool to form the required finishing structure. Note! The fixation of relief compositions on wall surfaces is observed within 15–20 minutes after applying the composition (therefore, large pieces of bases cannot be processed immediately). But complete hardening of the paint will occur only after 24 hours. Take these features into account textured material. And you will not have any difficulties creating chic coverings on the walls of your home!
This is boring and characteristic only of the last century, but when they see textured paints for walls, they instantly change their minds. This is because they create incredible effects on the walls before our eyes, which are impossible to achieve using other means, or are so difficult that they completely lose any meaning as part of the renovation.
Basic concepts and features of classification
Not everyone understands what textured wall paint is. In essence, this is a finishing decorative coating, reminiscent in most respects. Its distinctive feature is its composition, consistency and structure. The last distinguishing factor allows us to distinguish among such paints structural ones, which contain large particles or microgranules.
In their consistency, such compositions are more reminiscent of putties, but unlike them, no matter how fun it may sound, the paints do not need to be additionally colored after application.
The basic components of such decorative compositions are the following natural and polymer ingredients:
- Acrylic;
- Silicone;
- Silicate (sand).
Fillers in such paints can be a variety of additives, including:
- Marble chips;
- Microcapsules with dye;
- Ground gas silicate.
In addition, additionally such ready-made compositions divided according to the size of the largest inclusion - with small, medium and large fractions.
Textured wall paint is not suitable for every apartment. To fully appreciate the created effect not by touch, but with your own eyes, you will need a room large enough. It must have at least one or . But this does not prevent the use of such paints for, and not just the interior parts of the room.
Advantages of decorative material
The photo reflects the decorative properties that textured wall paint provides especially clearly. It can be figuratively compared to clay, which the sculptor turns into a real masterpiece. But in addition to good external qualities, such paint has many side effects, but no less useful characteristics that can be used effectively.
One of the most important among them is protective function. It implies multilateral protection from negative factors. The property of vapor permeability of such paints allows you to create. Water resistance, if specified by the manufacturer, allows you to preserve it for a long time appearance surfaces under the influence of dust and other pollutants, and some of these paints even perform a function that does not allow the room to lose temperature in the autumn-winter period.
However, decorating walls with textured paint requires some preparatory activities which are carried out in several stages. The first stage is not always required and its implementation is implied only in the case when repeated repairs of the walls of the room are carried out after a long period of operation.
At the first stage, the walls are cleaned of old layers of decorative coatings and swollen layers of plaster, since their presence will contribute to the peeling of paint.
On next stage walls are treated with primers. For most of these decorative compositions, it is sufficient to use only concrete contact primers, which improve the quality of the base and increase its adhesive properties. Some require the additional use of other primers, for example, with silicate fractions, which allow achieving a more vibrant effect using the selected type of decor. Each subsequent layer of primer is applied after the previous one has dried. The primer is applied using a paint roller, and after it dries, proceed to.
Application technology
Painting walls with textured paint is not done with brushes, but with other tools that allow the thick consistency of the decorative solution to be retained. These are spatulas and trowels. In addition, professionals can use means of mechanizing the process, for example, spray guns and similar pneumatic tools, provided that this is permitted by the paint manufacturer.
The decorative composition is supplied ready-made in tinted or white version. If desired, you can additionally add another dye in liquid form.
Tip: be sure to follow the dosage of the dye. Otherwise, your walls or parts of the same wall may end up with completely different shades and will require repainting.
Some manufacturers distribute tinting agents in convenient dosage packaging. If it is not provided, use a regular pharmacy syringe of the largest commercially available volume. Do not forget also that most dyes significantly lose color when the base being tinted dries.
The thickness of the textured paint layer can vary from 7 to 15 mm. If the layer is smaller, the texture will not appear, and if the thickness is greater, it will be more difficult to work with the composition. It is important to remember that working with such a composition will require good physical training. This is especially true in cases where the area or height does not allow it to be completely covered in one pass.
Application technique
After the composition has dried, if desired, the surface can be immediately sanded and the remaining paint dust can be removed, or the surface can first be subjected to post-processing using additional decor.
Post-processing
After the paint has completely dried, it can be further processed by special means. They are tinters and protective compounds. The first are the same paints of a similar color, but of a different shade, varnishes and other tinting agents. They are applied to the surface in order to highlight or fully reveal an inconspicuous texture.
The greatest effect can be achieved using tinting unusual shades. These are metallic, golden and similar tones, as well as chameleon compositions. The latter change color depending on the type of lighting in the room. In daylight they can have one shade, but in artificial light they can have a completely different shade that is not at all similar.
Advice: use your own imagination to the maximum. Don't be afraid to experiment, add sparkles if it's appropriate for the style of the room.
Re-tinting is applied using absolutely different instruments– paint rollers, brushes, sponges, natural sponges and even rags, depending on the degree of coloring you want to achieve. Still fresh tinting can be washed off if it is water-based, creating decorative stains.
The final result can be fixed simply by drying the surface of the walls, or after drying it can be further processed protective equipment, for example, liquid wax.
Price category and purchasing features
Whatever type of textured wall paint it is, buying it will not be difficult. There are many similar products and they are produced not only by European, for example, Italian, Polish and German manufacturers, but also by domestic companies. They are not so popular, however, their assortment has many high-quality analogues.
The emergence of such an interesting finishing material as textured paint has created a real sensation in the construction market due to its bright color and unique structure created on the surface. Such a simple and technologically sophisticated coating immediately gained popularity.
But the question remains about how factory-made and hand-made textured paint differs from the usual types paint coatings?
What is texture paint?

Do-it-yourself or factory-made textured paint for walls is a material that allows you to create a non-uniform relief coating. The scope of application of this type of finishing is very diverse. Such surfaces can decorate the facade, as well as rooms.
The application instructions provide the possibility of creating decorative covering on the following types of grounds:
- Concrete;
- Plaster;
- Brickwork;
- Tree.
Note!
If any finishing is required metal elements interior, it is more advisable to use products such as fire-retardant paints for metal Polistil or electrically conductive paint Zinga, which creates a coating that protects the surface from rust.
In fact, textured paint is a homogeneous mass of snow-white color, which contains a thick filler. It is this very filler that allows, with the help of this material create surfaces that imitate various reliefs. It is these properties that distinguish structural finishing masses from acrylic or latex-type compositions.
Classification of textured material

Large range of relief paint coatings on modern market presupposes the existence of a classification.
Conventionally, compositions of this type last depending on the size of the filler present in the composition:
- Fine-grained (0.5 mm or less);
- Medium grain (0.5-1 mm);
- Coarse-grained (1-2 mm).

Structural paint products may contain the following products as fillers:
- Stone chips;
- Quartz dust:
- Synthetic fibers;
- Gas silicate crushed or crushed;
Self-prepared textured paint
The material prepared by hand deserves special attention. But how to make textured paint with your own hands?
To prepare you will need acrylic paint for interior or exterior work, depending on which surfaces need to be painted. It is mixed with granite crystals, which can be purchased at any hardware store and are inexpensive.
You can also mix paint with sand to create relief. This coating will create a surface resembling colored sand.
Advice. You should not experiment and use sea or river sand, this will not lead to anything good.

Textured painting technology
What kind of relief will be created on the final coating directly depends on what application technique was used in the work.
Do-it-yourself textured painting of walls can be done using the following tools:
- Metal combs;
- Natural sponges;
- Structural rollers;
Advice. Before you begin applying the relief coating, it is necessary to apply a deep penetration primer to the surface.
In addition to the tool used for application, important role The lineup also plays.
To give the coating greater relief, quartz sand or wood sawdust is added to the mixture.

- Painting with a brush.
For this would be better suited wide brush. With this tool, the composition is applied to the prepared walls with broad strokes in any direction; - Roller processing.
You will need three rollers, two large, the same size, and one small. The mass is applied to the surface with a large roller, hard-to-reach places are treated with a small one, and uneven spots or too large stains of paint are removed using a clean large roller; (See also article.)

- Spray finish.
There are formulations that are sold directly in a spray bottle. When applying the material using this method, you must be very careful, because it is quite difficult to control the thickness of the layer; - Working with a sponge.
The sponge opens up enormous creative possibilities, as it allows you to use various stencils in your work. You can literally draw on the surface with sponges, creating a relief.

The main pros and cons of textured paints
If we compare this type of paint with others paint and varnish materials, then the following advantages can be highlighted:
- The textured coating can be applied to the surface immediately, eliminating the long and expensive leveling procedure. The relief coating makes the walls uniform and hides cracks, dents and unevenness of the base;
- The textured layer is resistant to various kinds mechanical damage, which expands the scope of application of compositions of this type;
- Low price combined with a huge variety of textures and color options;
- This type of paint is applied quite easily and quickly.

The disadvantages of textured coating include the following points:
- To create relief coatings, they require 15-30% more material than conventional painting;
- The surface can be repainted only after the first layer of coating has been completely removed.

Do-it-yourself textured paint for walls is great opportunity make high-quality and beautiful finish rooms without leveling the walls. You can create an original and bright design of a facade or room, spending a minimum of effort and time. And the variety of colors, shades and various sizes Filler grains will allow you to bring to life even the craziest design idea.
You can get even more important information on how to do this correctly from the video in this article.
Exquisitely and tastefully decorated walls are very important element decor for any room. Almost all existing finishing materials have some disadvantages that limit their use, especially in interior spaces, which require not only beauty, but also safety and environmental friendliness. That's why optimal material for internal, and exterior finishing The walls are textured paint. Only it allows you to create incredibly chic, mesmerizing surfaces on the walls, allowing for any manifestation of your own, even the richest and most irrepressible imagination.
The process of working with textured paint is incredibly simple and easy, so it can be used by people with a complete lack of experience in construction and finishing work. A distinctive feature of the painting work carried out can be considered the ability to create your own textures, as well as sufficient time to correct what you did not like or did not work out. To hone your “skill,” you can practice on a piece of plywood or small area walls (in this case, before the main painting, the “training” composition of the textured paint should be completely removed with a steel spatula, and the wall should be dried and primed).
Textured wall paint has undeniable advantages over other materials, and the main ones include:
- frost resistance;
- resistance to constant exposure to UV rays;
- the plasticity of the resulting coating, which does not allow the wall to become covered with small cracks (with natural shrinkage buildings);
- insensitivity to dampness, preventing the formation and proliferation of fungus;
- the finished surface does not absorb odors at all;
- dust- and dirt-repellent properties, facilitating subsequent maintenance;
- high environmental friendliness, making it possible to use in children's rooms;
- Possibility of use on any basis - from brickwork to the tree;
- There is a huge scope for creativity when applying it yourself.
In addition, it is worth noting its hypoallergenicity and minimum requirements for the quality of the surface used for applying textured paints for interior work.
Applying textured paint
Applying textured paint for walls, according to reviews, is extremely easy, and the use of any complex special tool not required. Do-it-yourself textured wall paint can be slightly modified, which will allow you to create your own, unusual textures. So, to get a rough relief surface you can add clean ones to the paint sawdust, and to obtain a structure with sharp edges, quartz sand is added. The paint is applied in a fairly thick layer, so it perfectly covers all the cracks, chips and small irregularities on the wall.
The choice of application tool is devoid of any standards, and depending on what effect you want to achieve, you can use:
- natural sponge;
- textured (structural) roller of various lengths and diameters;
- comb;
- putty knife.
In general, applying textured paint is possible even by hand, since it is absolutely safe, and decor created “by hand” can become quite unexpected, interesting and unique.
A little about applying textured paint with a roller is shown in the video
Options for possible reliefs
Textured wall painting water-based paint allows you to get several basic textures.

Stages of work
Applying textured paint with a roller, of course, is neither particularly difficult nor labor-intensive surface preparation - and this is its huge advantage. However, a minimum amount of work will still need to be completed:
- it is advisable to tap the wall with a hammer, which will reveal areas where the old plaster is about to fall out (this must be eliminated);
- large cracks need to be repaired;
- the entire surface intended for painting walls in an apartment with textured paint should be primed with an acrylic primer, preferably marked “deep penetration”.
Advice ! Best results are achieved when the applied compound and base are at room temperature.
Before working with such paint, it requires very thorough mixing, and it is better if a drill with a mixer attachment is used for this. Repeated mixing is necessary after adding the selected filler and color. There are several mandatory rules, otherwise the effect may differ from what was intended:
- the application of textured paint should be carried out in a thick enough layer to create the intended texture;
- It is advisable to work immediately on the entire surface where the texture will be created, since during breaks in work, places of “joints” may be noticeable, which will visually worsen the impression of the entire work;
- the tool that you plan to use must be prepared in advance;
- After drying, textured compositions for walls with effects can be additionally painted with acrylic compositions.
Choosing the optimal textured paint
Painting walls with textured paint allows you to get a unique, exquisite interior. Nowadays no one argues with this. But in a number of cases, people complain that instead of unprecedented beauty, the result is completely different from what they expected. Almost every such fact is the fault of the buyers themselves, who did not have a clear idea of what they ultimately wanted to receive. While almost everyone is more or less clear on how to work with textured paint, few know about the intricacies of choosing it.
Each coloring composition to give the wall texture and relief has its own grain size. The more pronounced and deep the texture is required, the larger the grain size should be chosen, and since this parameter is marked differently by each manufacturer, you should not neglect the consultation of the seller when purchasing. Another important parameter of textured coatings is the base.
- Mineral. Most a budget option, consisting of cement and lime, and produced in the form of a dry powder. Most often using mineral composition add texture to the outer walls of buildings.
- Silicone. The most common option that can be used both inside and outside buildings. Creates a vapor-permeable coating that is resistant to moisture, temperature changes and aggressive environments.
- Silicate. The most expensive, but very practical option. This coating is not afraid of any atmospheric influences, the treated surface does not absorb dirt and dust, and is easy to clean. Use is allowed only in combination with a primer on a similar basis.
- Acrylic. The most convenient, ready-to-use composition that allows tinting and the introduction of the required fillers.

Passionate about creating something new, creative interior own home, do not forget that in any business you need, if not experience, then at least dexterity, so training is necessary before work. In addition, you must first have a very clear idea of what kind of surface you want to obtain. To do this, you can not only look at online photo galleries, but also try to draw your future interior.
You can apply textured paint to a separate area, and using various instruments or use improvised means to see what texture is obtained. It is important to understand that a pattern that looks good on a small area may not be appropriate on the entire wall. In addition, do not forget that all tools used to work with textured paint must be clean. Naturally, one cannot neglect basic safety requirements - funds will not hurt personal protection and adequate ventilation of the room.
The process of working with this material is not complicated, but it is somewhat different from the technology of applying conventional paint. Before you start using textured paint, let us remind you about proper pre-treatment of the surface.
Textured paint is applied in a thicker layer than regular paint, so the requirements for surface strength are higher. It should be dry (no more than 2% humidity), not dusty, without foreign deposits.
All areas that impair adhesion, such as old cracked, crumbling layers of finishes, whitewash and other painted surfaces, should be removed. If the main covering is Oil paint, the wall should be examined for peeling and swelling. Where the paint is well preserved, its surface needs to be sanded: for better adhesion, it should become matte.
If, after removing the base coat, you are left with an ugly wall with rough differences, you should lightly putty it to level out the unevenness to at least a level of 2 mm. It is recommended to reinforce large cracks with mesh.
The finished surface must be clean, dry, not chalked and without signs of mold.
Tools you will need:
- Drill with mixer attachment.
- Spatula or trowel.
- Rollers to choose from: smooth, structural rubber, foam, porous.
- Decorative brushes.
- The brush is flat.
- Masking tape.
Wall putty
The quality of the work should be determined, however, according to the situation: depending on the desired relief, paint is selected and the thickness of its layer is set. The thinner it is, the more carefully the surface should be prepared.
Primer of walls

Its purpose is to improve adhesion between the wall and the paint. Refer to materials at acrylic base, for example, Galamix-53 and Galamix-51 or “Universal”. If the coating crumbles easily, you can use a special strengthening primer “Profi” or apply 2 layers of a regular mixture. Areas affected by mold and mildew are pre-dried and treated with an antifungal primer, for example Accurate 115.
After drying, the primer creates a thin film on the surface, filling and leveling the pores at the base of the wall, which facilitates the application of the topcoat, increases its durability and allows you to save on material.
Depending on the manufacturer, temperature and humidity in the room, the primer dries for about 6 hours, after which you can proceed to the finishing stage.
Painting walls with textured paint
Before use, mix the textured paint thoroughly, diluting it with water if necessary. Part of the water should be no more than 5-10% of the total mass, otherwise the beauty will become fluid and will not hold its shape. Mix the paint manually or with a drill with a mixing attachment at low speed for no more than 2 minutes.
Note: material consumption depends on the manner of work, the chosen tool, and the degree of wall preparation. To get an idea of the flow rate, make a test patch on your work surface.
How to apply textured paint:
- The first step is to determine clear design boundaries of the top, bottom and width of the finish using masking tape. Also pay attention to protecting surfaces that are not to be decorated.

- Lighting – important factor successful completion of the work. It should be sufficient and as close as possible to future constant lighting in intensity and angle of incidence. The fact is that the relief of the paint is “readable” precisely thanks to the direction of light, and correct lighting will help create desired effect on the wall. Both daylight and electric light should be considered.
- If you take technological breaks during work, the containers with paint should be tightly closed at this moment.
- The paint is applied with a spatula, roller or spray. If you use a roller, it should be smooth or with hard short bristles up to 1 cm long. The spray nozzle should be at least 3 mm in diameter. During the entire application stage, it is recommended to keep the roller in one direction in order to form a sequence of relief.

- If you use a spatula, the design will be applied in the next step, and not simultaneously, as is the case with a roller. Apply enough to the spatula a large number of mixture, which is applied in a layer of 3 mm, and then, for an hour and a half, you have the opportunity to experiment with the texture, correct and add, change rollers and other tools to create relief.
- It is correct to start working from the corner of the plane to the opposite corner.
- If necessary, painting with textured paint is carried out in two layers, and the second layer should be applied after the first has completely dried, that is, after 3-10 hours.
- To avoid the formation of joints, work within one plane should be carried out in one approach using the “wet on wet” principle.
- After use, the tool must be rinsed immediately with water.
- The time for complete drying of the paint under normal conditions is 24 hours. It acquires final hardness and uniform polymerization only after 14 days.
Remember: the pattern and resulting texture depend on the material of the roller and the speed at which it moves along the wall.
Getting a drawing
Method 1. Textured paint is applied to the wall, as in the photo, using a trowel or spatula in a layer of 2-3 mm. Then the surface is processed with the selected texture roller by rolling it from bottom to top.


Method 2. The paint is applied in the same way as the first, take a glue spatula with teeth and create a relief using wave-like movements. You can describe semicircles, waves, layer them and change direction.
Method 3. “Bark beetle” relief. Texture paint is applied thin layer 1 mm using a wide spatula. Then, pressing it tightly against the wall, excess mixture is removed, as a result of which the large components of the fractions leave a path behind them.

Method 4. The wall is pre-painted with paint to match the textured one, or, conversely, with a contrasting color. In this case, when scratched, the bottom layer will appear. For example, lilac texture paint is applied to a yellow base. It is also worth experimenting with shades of the same color: light gray and darker, powdery and rich beige.
You can further decorate the finished textured wall by mixing regular clear varnish with a special creative paste. Using this technique, you will be able to notice how the shade of the wall changes depending on the angle and intensity of the lighting.
Technical features of the paint:
- It is forbidden to mix or add anything to the paint yourself.
- Do not apply the material to the façade in particularly hot or rainy weather, or under direct sunlight.
- When doing street work, you need to check the serviceability of stormwater and drainage structures.
- No condensation should form on the working surface.
- The ambient temperature should be from +5°C to +30°C.
- At internal works Good ventilation should be ensured.
Advice: when painting a facade, it is better to choose pastel shades of textured paint: firstly, it is in harmony with environment, and secondly, any bright color fades from prolonged exposure to light.

Prepare exactly the amount of material that is guaranteed to be enough for one layer. If you have more than one container, make sure the color of the mixture is the same in all of them. Applying textured paint is an important step: use training videos and consult with those who already have experience in this.