How to lay tiles on a plank floor. Is it possible to put tiles on a wooden floor? Video – Adjustable floor
For a long time, tiles have been used as a facing material. This one is natural finishing material gained wide popularity thanks to such important properties such as strength, wear resistance, moisture resistance and fire resistance. If earlier the scope of tiles did not extend beyond the bathroom and kitchen, today many want to see tiles as flooring and in other areas of the house or apartment. Often during the renovation process the question arises: is it possible to lay tiles on wooden floor?
According to technology, it is not recommended to lay tiles on a wooden floor. It is believed that such a structure does not have rigidity and is not hard enough, so it will be movable. As a result, the cement screed laid on a wooden floor will quickly collapse, and the tiles will crack or fall off. In addition, the wooden base under the tiles can quickly rot. But do not rush to despair: today new technologies and modern materials have appeared that make it easy to solve the problem of laying ceramic tiles on a wooden floor. The most important point In this matter, quality preparation of the foundation is important.
Preliminary preparation of the wooden base
Where to start this work? The primary task is to correct the imperfections of the wooden floor, as a result of which it will acquire rigidity, hardness and strength.
Preparing a wooden base for tiles
A reliable base will be the key to the durability of the ceramic tile coating. Checking the condition of the wooden floor:
- We remove the existing coating. If the boards do not creak or sag, we leave them as a base. But it’s still better to go through them, because it’s possible that the logs were not laid often enough or not to the level.
- We check the horizontality of the logs using a level, and if necessary, level them. It is important to obtain an absolutely flat surface. Do not forget to leave a gap of 1 cm between the walls and the subfloor, which we then waterproof polyurethane foam. We pour expanded clay between the joists, which will additionally serve as heat and sound insulation. We lay previously removed boards (provided they are in satisfactory condition) or moisture-resistant plywood 12 mm thick on the leveled joists. Plywood is suitable as a base under the tiles: it will not bend under its weight.
- To protect joists and subfloors from mold and rot, we treat them with special protective impregnations.
- We fasten boards or sheets of plywood to the joists with self-tapping screws, leaving 5 mm wide gaps between them for ventilation from below, so that the wood “breathes.”
- To prevent moisture from getting from the earthen, concrete or wooden base onto the substrate, we lay vapor or waterproofing (polyethylene or parchment or bitumen paper) on the subfloor. We can also use special mastics.
Methods for installing a base for tiles
First way. We make a traditional screed, only thinner and lighter. We lay it on waterproofing metal mesh, which we attach to the subfloor with self-tapping screws. We set the beacons according to the level, pour a cement screed 3 mm thick. You can use a self-leveling mortar instead of a screed.

Second way. We strengthen the base with two-component polyurethane glue or KS glue (its base is liquid glass). When the glue dries, a waterproofing film forms on the top of the subfloor. Manufacturers claim that these compounds protect the tiles from cracking if the wooden base is deformed. Since this method is not yet so widespread, it is difficult to judge its reliability. Of course, it's better to do something tough, solid foundation. But if this is not possible, you can get out of the situation with the help of polyurethane compounds.
Third way . We lay CSP (cement particle boards), GKLV (sheets of moisture-resistant plasterboard) or GVL (gypsum fiber sheets) on the waterproofing. GVL sheets are more preferable, since they are more plastic and stronger than plasterboard, and also lighter and cheaper than CBPB boards. In addition, GVL are distinguished by increased sound and heat insulating characteristics, and a special hydrophobic impregnation makes them moisture resistant.
We attach the sheets to the subfloor with self-tapping screws. It is necessary to ensure that the joints between the sheets fall above the boards, and not above the cracks, otherwise the base will be unstable. We glue the seams with special glue for gypsum fiber board or gypsum board. If the floor does not seem rigid enough, lay a second layer, making sure that the seams of the second layer are located in the middle of the sheets of the first layer.

Laying plywood sheets on a wooden base
The sheets were laid and secured. Now we cover them with deep penetration soil. We wait for it to dry and begin laying the tiles.
Laying tiles on a wood floor step by step
Tiles are laid on a wooden floor only after checking the surface level. We do this using building level. If the surface is perfectly flat, there are no deviations, then you can proceed directly, which consists of the steps listed below:
- Preparing the tiles
- Floor marking
- Preparation of the adhesive composition
- Laying tiles
- Sealing seams
For installation you will need the following tools:
- notched spatula for applying glue;
- rubber spatula for sealing seams;
- tile cutter or glass cutter;
- containers for glue and grout;
- rubber hammer for tapping tiles;
- tape measure, level and marking cord.
When working with glue, you definitely need gloves to protect your finger pads.
Preparing the tiles

Before laying, lay out the tiles, check their quality and appearance
- We calculate how many tiles are needed. To do this, divide the floor area of the room where we will lay the tiles by the area of 1 tile. We add 10% to the result obtained for a possible fight and for pruning. When purchasing tiles, it is important not to confuse wall and floor tiles. Although they look similar, floor tiles are still more durable, and their surface undergoes a special treatment to give it an anti-slip effect.
- We lay out the tiles over the entire area and inspect them appearance and quality. We make holes in the tiles that will be laid near the pipes in accordance with the diameter of these pipes.
- You need to make sure that the pre-laid tiles do not interfere with the doors opening. Otherwise, remove the door from its hinges and trim it along the bottom.
- To displace air from the tile, lower it into water for 15-20 minutes. Sometimes stains form on its front side under the influence of water. We do not soak such tiles in water, but simply wipe them with inside with a damp brush.
Floor marking
Using a coated cord, we draw a line connecting the middles of the long walls. We connect the middles of the short walls with the same line. The lines intersect in the center of the floor. Focusing on them, we lay out the tiles in such a way that there are a minimum of cut tiles near the walls.

Floor marking diagram for laying tiles
If we lay tiles diagonally, it will be impossible to avoid cutting the tiles. When laying entire tiles along the walls, we begin work from the end of the floor opposite to the entrance to the room. The window line should be parallel to the tile line. We can also arrange rows perpendicular to each other along the axes. By inserting crosses between the tiles, we determine the distance of the seams.
Preparation of the adhesive composition
It is recommended to lay tiles on a wooden base using a special cement adhesive. Mix the dry mixture with water (take the amount of water in accordance with the manufacturer’s recommendations). To increase the adhesion of the tiles to the adhesive solution, add 10-15% plasticizers to it. We prepare small portions of the adhesive composition, since the mixture dries in 3-4 hours. To obtain a homogeneous composition, stir it using a construction mixer.
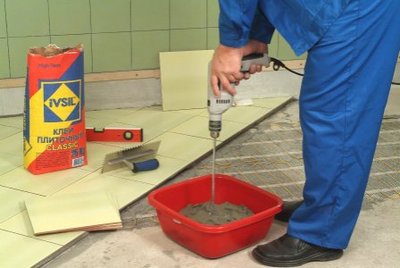
The adhesive solution is mixed using a construction mixer
Important! When choosing tile adhesive, you need to pay attention to whether it is suitable for
works on gypsum fiber boards or gypsum boards.
Apply the adhesive composition with a notched trowel onto the primed, dry floor surface. Apply the glue in even stripes, starting from any corner in the center of the room. The size of the trowel teeth depends on the size of the tile (for example, for tiles measuring 30x30 cm, you will need a trowel with teeth ranging from 8 mm to one centimeter). The finished adhesive solution dries in 10-15 minutes, so we apply it to a small area (no more than 1 m2) and quickly carry out corrective actions.
Attention! In the process of laying tiles, it is extremely important to adhere to the recommendations of manufacturers not only of ceramic tiles, but also of the materials used - adhesive mixtures, grouts, mastics, primers.
Laying tiles
We applied the adhesive solution, formed the structure of the floor using crosses evenly spaced over the entire surface, and then we can move on to directly laying the tiles on the wooden base. We apply the tile to the surface, press it, and tap it lightly with a rubber hammer to improve the fit. In this way, we cover the entire surface, which was previously treated with glue, with tiles, and only then move on to the next section. To ensure that the distances between the tiles are the same, we use plastic spacers.

Laying tiles on a wooden floor - checking the surface level
During the work, we constantly monitor the level of the laid tiles using a rule or a building level, since after 10 minutes, when the glue dries, the position of the tiles that were laid incorrectly can no longer be corrected. If necessary, add or reduce the adhesive solution under the tiles.
After all the intact tiles have been laid out, we begin to fill the free spaces between the floor and walls. We cut pieces of tiles to the required sizes using a special tile cutter.
Important! At thresholds, walls and around pipes, the edge cut tiles should fit snugly into place, but do not require any force when laying them.
When we have finished laying the tiles over the entire surface of the floor, we clean it with a rag from excess glue. After two days, the tiles will hold as firmly as possible. Then we proceed to the final stage - sealing the seams.
Sealing seams
Correctly sealing the seams of floor tiles gives the finish an aesthetic appearance and effectively hides possible installation flaws.

The gaps formed during the laying process between the tiles are filled with special grouts (grouts). Most grouts are designed for joints up to 6 mm wide. First, we moisten the seams with a brush, and then apply the grout with diagonal movements with a special rubber spatula.
Attention! Instead of traditional grout, experts recommend using a new product for sealing joints - elastic colored silicone.
We fill all the gaps between the tiles in this way, removing excess fugue. The seams dry in 20 to 30 minutes. When this time has expired, carefully wipe the tiles with a damp cloth, and after an hour - with a dry flannel cloth. The work is done.

If you show interest in this matter, you can make sure that laying tiles on a wooden floor covered with chipboard, plywood, gypsum fiber board or gypsum fiber board is possible and it is not so difficult.
Tiles are widely used as a material for laying in the bathroom and kitchen. Therefore, its installation is one of the most common types of installation work. Most often, tiles are installed on a concrete base, but there are unusual situations in life and it becomes necessary to lay tiles on wooden surfaces. How to lay tiles on a wooden floor and whether it is possible will be discussed in the article.
Wood and ceramics are practically incompatible with each other. Their operating conditions and characteristics are too different. Therefore, if you want to combine these two materials, you will have to take on additional work to create comfortable conditions for each material.  Wood reacts sharply to changes in temperature and humidity. In cold weather it swells. In summer, on the contrary, it dries out. Those. it turns out that the floor is constantly “moving”. Such movements can affect the tiles. The glue will begin to loosen, and so will it, which will lead to the fact that it may rise or even crack.
The weight of the tiles is quite heavy. The tree may simply not withstand it.
In addition, the facing coating does not allow air permeability, which is so necessary for a wooden base; this will lead to the formation of microflora and, as a result, rotting, which will also result in movement of the tiles and loss of appearance.
Another criterion in favor of installation is the service life. Tiles will live much longer than wood, and the latter needs constant updating.
If, despite all the difficulties, you are still tormented by the question of whether it is possible to lay tiles on a wooden floor, then the answer is yes. But careful preparation of the wooden base will be required, and this will cost you time, effort and money.  Therefore, think carefully before starting work whether you need this. The only option when this option is not possible is that the wooden covering is no more than three years old. In this case, she has not yet had time to fully adapt to all conditions, and in addition, she can still sit down. In this case, any renovation work with flooring are not possible.
Tile laying technology
If you still stand your ground and want to lay the tiles, then get to work. The installation process will consist of several stages, the largest of which is preparing the base.  Laying tiles not an easy process, requiring careful measurements and some knowledge. In principle, anyone can handle the preparation of the foundation, but due to the labor intensity, this process takes much more time.
Required tools and materials
Before you start working directly, it would be a good idea to stock up on everything you need. First of all, take care of purchasing tiles. Depending on the traffic flow of the room, its wear resistance class is selected. The hallway has the highest traffic volume, so the most durable class is needed - 4. For other rooms, smaller ones are possible.  The tiles are laid with glue, which means you need to purchase it as well. The modern market offers many different options, but the most important criterion is dry and ready-made mixtures. If you have repeatedly dealt with kneading, then you can save money and buy a dry one, but if this is your first time dealing with this type of work, then we advise you to buy a ready-made mixture.
A lot depends on the glue, and if the dosage is incorrect, you can ruin everything.
What else will you need during the installation process?

Floor preparation
It was said above that how the facing coating will lay depends on the preparation of the base. Therefore, you should not neglect any of the points at this stage. 
Remember that installation is only possible if the wooden base is three years old. First you need to inspect the base for defects. It is necessary to inspect not only the boards themselves, but also the logs under them. This means the floor will have to be opened.  After you have lifted the boards, carefully inspect the joists and beams. If there are places of rot somewhere, then these elements must be removed and replaced with new ones. Rotting must not be allowed. This will make the floor even less durable and there is a risk that after laying the tiles the entire floor will simply collapse.
  The logs must be installed in increments of no more than 50 cm. If the distance is greater, then you will have to install additional elements. The distance between the lags affects the strength of the structure. The wooden covering may simply not support the weight of the tiles.
  Check the evenness of the structure using a level; all logs should be at the same height. If there are discrepancies somewhere, you can place a wedge or a piece of plywood.
When everything is in order, process wooden elements antiseptic composition against the formation of rot and mold, which will increase the service life.
The free space must be filled with expanded clay. If you already have one, then you can leave it. Previously, they liked to lay glass wool. In any case, you need to get rid of it and replace it with expanded clay. The expanded clay layer is leveled by the rule: it should be two centimeters below the lag level.  After this, proceed to inspect the boards. If they have been painted, then the paint must be removed without fail; you can heat the paint construction hairdryer or remove with a special solvent. Inspect the boards for rot. If the lesion is small, then the rot can be gotten rid of using sandpaper, and then treat with a primer. If the percentage of damage is very large, then the board needs to be replaced.
  After this, all boards are covered with primer on both sides. After the composition has dried, you need to secure the boards to the joists. This can be done using self-tapping screws. The hat should sink a little, and not protrude on the surface. After this, the wood is treated with drying oil or latex impregnation.
Leveling the flooring
Before laying ceramic tiles on a wooden floor, you need to level the base. This can be done in two ways: dry and wet. The dry method is a more common solution. Sheets of moisture-resistant plywood are simply laid on the flooring. The lightness of the structure does not put pressure on the base. Sheets of plywood can be laid on joists or secured with self-tapping screws. Then the joints between the sheets are treated with sealant and the entire area is primed.  The wet method involves pouring a cement screed. The thickness of the layer should be significantly less than when pouring onto a concrete base. No more than 3 cm. Wooden flooring may simply not support the weight. At the same time, there is no point in making the thickness smaller, since then the screed will not be strong. After the screed has been poured and dried, the surface is treated with a primer.
Laying tiles on a wooden floor
After everything preparatory activities completed, you can finally begin installing the tiles themselves. How to lay tiles on a wooden floor? First the marking is done. Even an experienced specialist will not dare to lay tiles “by eye”. Find the center point of the room and draw two lines through it: horizontal and vertical.  Then try on the tiles. Lay it out in exactly the same order as the drawing. The layout goes from the center to the edges. At this stage you need to cut the tiles for the required areas. If everything comes together, then the tiles can be removed.
Mix the glue if you have a dry mixture or open a ready-made one.
The composition must be mixed strictly according to the instructions. A lot depends on its quality: no lumps or bubbles.
The glue sets quickly enough, so don’t spread too much at once. Rinse the nozzle every time, otherwise you won’t be able to remove the glue from it. The glue is applied to the base using a notched trowel and leveled. The tile is laid on the glue; press it lightly, but not too much. Keep a sponge handy to immediately remove excess glue. Check the level of the first tile so that it is level, and level the rest according to it.
This fills the whole room. Insert crosses at the joints between the tiles so that the seams are even. It is not necessary to recess them completely; you can insert only one end. This will make them easier to get out.
After the entire perimeter of the floor is covered with tiles, it must be left until completely dry. You cannot walk on the surface. When the glue has dried, the crosses are taken out and the seams are filled with putty. Then the tiles are cleaned of excess putty.
Things to remember
- Laying tiles on a wooden base that is less than three years old is impossible;
- If you are pouring a concrete screed, its thickness should be exactly 3 mm;
- Repair of wood flooring is required. If you don't check the joists and beams, this can lead to the destruction of the floor;
- The primer is needed not only for better adhesion, but also as an antiseptic. Processing boards, joists, beams, concrete base, sheets of plywood are required.
Questions regarding laying ceramic tiles on a wooden floor can puzzle even an experienced craftsman. Are these materials compatible, because wood tends to expand and contract under the influence of moisture and temperature, and tiles do not tolerate any “movement”.
Consumers are concerned about the potential for cracks, seams to peel, and trim to come loose. If you try to do the work without knowing these subtleties in advance, then all of the above may well happen. Carefully studying the technology of laying tiles on a wooden floor will help you avoid disappointments and mistakes.


Is it possible to put it?
Of course, it is possible to lay tiles on a wooden floor. But before you decide to take this step, it is worth reflecting on the rationality of such a choice. The idea of replacing a natural wooden floor with a tiled covering can be prompted only by one advantage of the latter - ease of hygienic care.
It is worth considering the following problematic nuances:
- Under tile adhesive, the wood will not “breathe”, which can cause the process of its destruction to begin.
- The service life of any boards is significantly shorter than the service life of floor ceramics; their integrity can be damaged by rotting or, conversely, drying out, so after 5-6 years you can end up with a cracking floor covering.
- Tile flooring requires a stable and static base.
- Laying tiles on wood in a new house is strictly prohibited. Over the course of 2-3 years, the building will shrink and the floors will move.


If you have definitely decided that you need the option of a ceramic floor on a wooden base, then you should choose the most suitable technology and purchase necessary materials. When choosing tiles, pay attention to the characteristics of the flooring, since not every room can accommodate standard tiles.
Choose a material for the floor that can withstand heavy loads, but also contains minimal amount chemical additives in the form of plasticizers or stabilizers. An excellent option would be quartz-vinyl tiles.
This is a modern floor covering containing up to 80% quartz. Durable natural the material is moisture resistant and does not conduct electricity.
PVC tiles (polyvinyl chloride) – a budget option tiled floor. It contains wood flour or talc (the main filler), a plasticizer and polyvinyl chloride. The advantages of this finish are not only economical, but also that it is practically not susceptible to any chemical influences and is waterproof.


Installing a floor on a wooden floor
In order to choose a installation technology that is suitable specifically for your room, you need to understand how most wooden floors. There are many options for installing wooden floors. It is simply impossible to consider them all at once, so it is logical to dwell on the most common variations.
Any wooden floor has many layers, so craftsmen have to deal with different “layers”. But the choice of technology for laying ceramics does not depend on whether you inherited only logs, chipboard flooring or a high-quality floor made of boards. The process of laying tiles is always performed according to a standard algorithm, and the differences are only in preparation.


Installation technology
Regardless of which floor will be used as a base, you must try to create as level and durable a base as possible for laying the tiles. In this section, we will introduce you to the main steps of installing tiles on a wooden floor.
The installation technology includes three main stages:
- preparing the base for laying tiles;
- alignment;
- waterproofing.


A level base guarantees easy and quick styling tiles The glue will lie unevenly on a non-uniform base, which means that over time, voids will appear under the adhesive solution, and the tile will simply break off or burst. Even experienced master without the right tools will not be able to conclude that the floor or walls are even.
If the house does not have a laser or water level, you should not spend money on buying one for a single floor repair; a water level can be made from two syringes connected by any transparent tube (for example, from a dropper).


Only after completing all the stages - from preparatory to screed - can you begin laying the tiles.
Preparing the base
Preparation of the base in most cases consists of leveling it. In some cases, it is necessary to replace some wooden elements, such as joists, with similar ones. Main principle work with the base - to prevent the subfloor made of wood from destroying the tile floor due to movement and temperature changes.
The master is given the task of constructing a specific “tray” installed above a moving wooden base. There are many options for making such a “tray”, so it is recommended to get acquainted with at least the basic ones.


Waterproofing
As a rule, there is already some kind of insulating layer between the joists in the wooden floor. This could be the most different material– clay, sawdust, expanded clay. There is no need to remove it - install the screed on top of heat and sound insulating materials. If there is nothing, then lay new lightweight insulation, for example, polystyrene foam or mineral wool . These materials will not put much strain on wooden structures.
Waterproofing can also be done using special mastics or any rolled waterproofing materials. Plain polyethylene film - affordable option waterproofing. Construction stapler will help attach it to the walls of the room.


After laying the waterproofing material You can make reinforcement that gives the floor greater reliability during operation. To do this you need to purchase any fittings. The best option would be reinforced meshØ10mm – Ø12mm, and you can lay a chain-link mesh on top. Place supports 2-3 centimeters high under the rods (you can make them from scraps plastic pipes) so that the reinforcement does not come into direct contact with the insulating material.
Today in construction stores you can buy special fiber fiber that is added to the screed solution. Thanks to fiber fiber, you can do without reinforcing mesh.


Alignment methods
There are several technologies for leveling floor coverings. Let's look at them in more detail.
Dry leveling method
It is the most common, since it allows, simultaneously with leveling, to prepare a subfloor suitable for laying tiles from various moisture-resistant materials.
This technology uses several methods:
- Application ready-made sets from the “adjustable floor” category. They are screw plastic supports, thanks to which you can quickly install logs and place plywood or other sheets.
- If you have an initial strong plank flooring, you will need to make your own system of joists or point supports with the subsequent installation of plywood flooring.
- It is possible to lay another layer of plywood on an existing layer with the fastening of a new layer of gypsum boards OSB self-tapping screws.


Once the leveling sheets are installed, the coating should be sanded along the seams. If the joints between plywood sheets are more than 3 mm, then carefully fill the gaps silicone sealant. Don’t forget to impregnate the plywood sheets with primer. compatible with special glue. After impregnation, you can apply tile adhesive (two-component polyurethane is suitable).
The obvious disadvantage of dry leveling is that the height of the floor will increase, which means the height of the room itself will decrease. In addition, a “step” will be formed between the area of the floor with tiled flooring and the area of the floor without finishing, which will have to be decorated accordingly. If dry leveling is carried out in the bathroom or part of the bath rooms, then the level of the tiled floor must be made lower than the level of the wooden floor, otherwise water will flood the adjacent rooms.


If this option is not suitable for you, when the tiled floor will rise above the rest of the surface, then it is better to refuse dry leveling.
"Wet screed"
It is used when complete dry leveling is impossible due to the characteristics of wooden floors.
The difficulties of performing a “wet screed” on a wooden floor are that it is done, observing the mandatory presence of a special deformation gap between the walls, base and new floor. This filling pattern is called “floating”; it allows the wooden floor elements to move without disturbing the ceramic coating.


The screed to be poured should not be more than 3 centimeters, otherwise the floor structure will become too heavy. It is also not worth making the fill thinner, as there is a risk of increasing the fragility of the floor.
Step by step process The screed filling looks like this:
- If necessary, we disassemble the floor and assess the condition of the beams, beams, and flooring. If any element is in doubt, we replace it with a similar one.
- We install new logs (if they are not already installed) or strengthen existing ones with the help of additional structures, while the step between the logs should not be more than 0.5 meters.
- Leave a gap of approximately 1 centimeter between the ends of the joists and the walls of the room.
- We saturate all the details antiseptic for wood.


- We make wooden flooring, and even old building materials are suitable good condition.
- We leave gaps of about 1 centimeter between the boards - they are necessary for ventilation. If the boards are wide, you can make additional ventilation holes.
- We attach plywood to the boards across their direction. Moisture-resistant plywood at least 1.2 centimeters thick is suitable, and any other pressed particle boards are also suitable. We place the plywood as for brickwork (there should be no cross-shaped joints of the plywood sheets), and we secure the elements with galvanized self-tapping screws every 20 centimeters.


- Leave 2-3 mm ventilation gaps between the plywood sheets.
- We cover waterproofing materials prepared flooring. Thick polyethylene, bitumen paper, glassine, and paraffin paper can be used as waterproofing. We roll out the insulation rolls with overlaps and sides, and secure them with construction tape.
- Along the perimeter of the walls between the sides we lay a damper tape at least 10 centimeters wide and about a centimeter thick.
- We put sleeves on all pipes.


- Fill the finished screed purchased mixture or a solution made by yourself (use liquid glass (2 parts) and clean coarse sand (2 parts)). The homemade mixture must be mixed with clean water (1 part).
- After hardening, you can lay the tiles.
- The “quick version” of the screed is a simple fastening of moisture-resistant plasterboard slabs with special glue (two-component polyurethane). The glue is so elastic that wood movements will not destroy its integrity. It is permissible to lay gypsum fiber boards in two layers to give the base additional strength, but you need to make sure that the seams of the 1st and 2nd layers do not coincide.


GVL-base, like the previous version " liquid screed", requires maintaining the technological gap between the gypsum fiber boards and the walls of the room, priming the entire surface with a primer, and also filling the joints with sealant.
A popular material that allows do quality basis for tile floors are cement bonded particle boards(DSP). If you carefully consider the choice of products (make sure you have a manufacturer’s certificate and a product passport, which indicates the composition of the CBPB in accordance with GOST), then you can be sure that you will receive an environmentally friendly construction material, characterized by reliability and high quality. Many professionals are confident that the quality of DSP is higher than that of most modern materials and is relatively economical.


Laying
The following rules will help you correctly lay ceramic floor tiles:
- Apply the adhesive solution with a “comb” - a special spatula with two edges - flat and serrated. The flat edge will help distribute the glue correctly, and the “teeth” will make the surface even. The spatula must be worked in one direction (marks from the teeth should be directed in one direction).

- Excess glue removed with a “comb” is returned to the glue bucket, mixed and used further.
- Explore back side ceramic products, most often there is an arrow that allows you to determine the direction of installation relative to the direction of the applied adhesive solution. The grooves in the adhesive mortar and the stripes on the tiles should be perpendicular, which will ensure the most reliable adhesion of the adhesive and finishing material.
- In order not to worry about the same width of the seams (even a millimeter shift in the first row of tiles will lead to a shift of several centimeters in the future), use plastic crosses - special parts of different thicknesses. The most common option is flexible cross-shaped parts with a thickness of 5 mm. The plastic from which the crosses are made must be of high quality, otherwise when removed they will break and remain in the seams.

- After laying the tiles, allow the adhesive solution to dry for 2-3 days, and then you can begin grouting.
- The grouting solution is prepared from a special dry mixture; its consistency should be similar to the consistency of thick sour cream.
- Grouting is carried out with an elastic rubber spatula (it should not bend under pressure) and corrected if necessary with your fingers. If after 3-4 hours you see holes or depressions in the seams, then feel free to put on rubber gloves and “rework” what you missed.
- Remove excess grout from the tiles with a dry cloth or sponge.
- After 1-2 days, the tiles can be washed.


Installation troubles
If you are just mastering the technology of laying tiles on the floor, then some defects in the process of decorating the floor cannot be avoided. But it’s not scary if you have time to fix them before the solution dries. Let's look at the most common possible errors:
- We correct the lopsided row immediately, before the adhesive solution has hardened. Therefore, it is necessary to check the “horizontal” of the entire row immediately after installation. If the “horizontal” is broken, the row will have to be removed.
- “Steps” is a defect that usually occurs on walls. But floor tiles can also begin to shift in steps if the angle of the walls in the house is not straight. Trim the tiles if necessary, this will allow you to lay the covering correctly and maintain the angle.

- If one of the tiles in the row lies askew, it means that there is no cross in the seam and it needs to be inserted urgently, and the tile should be secured with masking tape.
- If you do not notice a defect on the tile, then this may also be the reason for its displacement. There is only one way out - remove the product and re-glue it.
- If the tiles are too recessed into the adhesive solution, then you have applied the adhesive unevenly. This often happens if you are gluing for the first time and apply the adhesive solution before gluing each tile.
The ardor of those who want to cover a wooden floor with ceramic tiles is usually cooled by the “ice shower” of incompatibility between the base and cladding materials. Wood tends to expand and contract, changing size due to the instability of the humidity and temperature background. Floor ceramics that are too sensitive to linear movements will be rendered unusable by the zealous movement of lumber. Cracks, chips will appear, seams will crumble, elements will become detached from the base if the independent contractor does not learn how to carry out the work correctly. The listed troubles will not threaten craftsmen who have studied the secrets and rules of ceramic flooring.
Why it is undesirable to combine ceramics and wood
Covering wood floors with ceramic coating is rightfully considered not a very smart idea, because:
- There is no particular point in covering “warm” wood with “cold” tiles;
- under moisture-repellent floor ceramics, mounted on tile adhesive, the wood hardly breathes, which is why it begins to rot and collapse;
- the service life of building ceramics significantly exceeds the service life of timber and rough boards;
- durable, low-abrasion ceramics easily chip with linear expansion of adjacent elements;
- a wooden floor does not have the static quality required for laying ceramic products.
Wood may be inferior to tiles in terms of aesthetic parameters, but this is not a very convincing argument. After all, tiles are mainly used not because of the beauty of the design, but because of its sanitary and hygienic advantages. Its use as a protection for wooden floors from moisture is a controversial issue, although it may be the reason for laying ceramics in a wooden bathhouse, shower room, kitchen or combined bathroom. In general, where constant wet cleaning is needed.
Let's assume there is a reason, there is material and a desire to lay a ceramic coating on a wooden base. It remains to find out how and in what ways this can be done, and choose a rational technology.
Laying floor tiles in a new home should be completely avoided, just like installing floors with new wooden floors in any other building. It is necessary to wait until the end of intensive shrinkage. This is 2-3 years at least.
How to lay ceramic tiles on a wood floor
A wood floor is a multi-layer sandwich created partially or entirely from lumber. Listing all the variations on its theme would be unnecessarily lengthy; we will consider only the most common types. To carry out work on arranging a wooden floor, home craftsmen mainly get:
- only the logs remaining after dismantling the worn out floorboards and damaged substrate;
- flooring made of moisture-resistant plywood, OSB or chipboard sheets, of course, with joists underneath;
- The plank floor is in good condition, i.e. not new (!), but slightly worn construction with floor covering.
The number of repair operations, and not the choice of arrangement scheme, depends on the condition of the “inherited” floor. Because the process of attaching ceramic components to any type of surface is carried out according to a standard algorithm; all differences lie in preparation.
In any case, you will need to create a flat, strong and relatively static base suitable for laying ceramics. Let's look at how.

A wooden floor must be prepared for laying tiles. In the next article we will tell you several ways: .
First method: dry leveling
The most common and technologically sound method of leveling floors. At the same time, a relatively stable sublayer of moisture-resistant plywood or similar is formed sheet material, suitable for laying flooring. There are many different methods for implementing dry leveling, such as:
- ready-made sets of adjustable floors with screw plastic supports, thanks to which you can install logs or immediately plywood sheets in a matter of hours;
- independent construction of a system of logs or point supports on top of a “strong” boardwalk with subsequent laying of sheet material;
- laying a duplicate layer of plywood on the existing plywood base;
- fastening plywood, gypsum board, OSB cut into quarters with self-tapping screws directly to the leveled floorboards.
It is clear that the final touch of dry preparation will be particle board, plywood or an analogue, thanks to which it can be installed on a wooden floor.
Sheet products of veneer pressing or wood waste cannot be considered absolutely immune to linear movements. True, they do not show the same agility as wood. However, to attach tiles over leveling sheets, you need to purchase a two-component polyurethane adhesive that is flexible, rather than regular tile adhesive.

Before fastening ceramic elements The created plywood covering is sanded along the seams. Then the joints between the elements are filled with sealant or glue purchased for the upcoming work, and the surface is treated with a primer impregnation compatible with it.
The advantages of dry methods of creating a substrate:
- the ability to improve insulating qualities by: polystyrene foam, mineral wool, filling expanded clay between the joists;
- minimum load on wooden floors, not characterized by reinforced concrete strength;
- speed of execution, absence of technological interruptions that significantly “delay” repairs.
There are some disadvantages. Dry leveling will definitely “eat up” part of the ceiling height. There will be a difference between the finished and unfinished part of the floor, which will have to be decorated as a step or small threshold.

Please note that according to building regulations, the floor in hygienic rooms must be lowered by at least a couple of cm, so that in case of emergency or accidental leaks, water does not flood the floors in adjacent rooms. So, if after dry leveling, to which the thickness of the ceramic coating should be added, the surface will rise significantly above the surrounding floor, the use of dry technology is undesirable.
Video: adjustable floor system
Method two: “wet” screed
Or a lightweight version of the traditional type of alignment. Filling the screed in an easy-to-use form is required because the load-bearing capacity of wooden floors is not enough to install a full leveling layer. There is also a specific feature: the screed on wooden floors must be cut off both from the underlying base and from the walls. Those. it should be arranged like a floating floor with a deformation gap around the perimeter and around the communications crossing the ceiling.
Thanks to the use of a floating scheme, wooden floor elements will be able to move as much as they please, and ceramics with monolithic preparation will lie motionless.

The standard thickness of the screed poured onto a wooden floor is considered to be 3 cm. It is not advisable to increase the power, because at the same time the weight will increase. It’s also not worth shortening, otherwise it will be quite reliable. Minor deviations in both directions are allowed.
The process of pouring screed on a wooden floor step by step:
- We disassemble the floor down to the timber for detailed diagnostics. All wooden components of the floor that raise the slightest doubt about reliability are dismantled and replaced with analogues. If the step between the logs is more than 50 cm, we strengthen the system by installing additional timber. There should be a gap of 1 cm between the ends of the joists and the walls of the building. All floor parts must be treated with antiseptic impregnations before reassembly.
- We are constructing a flooring for future pouring. Old boards 4 cm thick will do if they are suitable for further use. The tongue and groove material does not need to be bonded. Approximately 1 cm should be left between the boards for ventilation. We do the same with unedged boards when replacing worn floorboards. If the boards are laid tightly, ventilation holes will have to be drilled in the flooring.
- We attach quartered moisture-resistant plywood to the boards across their direction thickness of at least 12 mm or other boards made from pressed wood waste. The elements are arranged according to the principle of bricklaying, fastened with galvanized screws every 20 cm. There should be no cross-shaped joints. Gaps of approximately 3 mm must be left between the sheets.
- We cover the constructed flooring with waterproofing. It is better to use bitumen or paraffin paper, parchment or glassine. Thick polyethylene is not prohibited. To form a monolithic insulating carpet, roll materials are laid with overlaps and secured with tape. Along the perimeter you need to create something like sides with a min. 10 cm approach to the walls. For convenience, we also attach them to the walls with pieces of tape.
- We lay damper tape along the walls, 0.8-1.0 cm thick, 10 cm wide, we put sleeves on the pipes.
- Fill the screed with the factory leveling mixture or homemade leveling compound. To prepare it you will need 2 parts of sifted and washed coarse sand, liquid glass in the same quantity. You need to mix the homemade mixture with one part of water without biogenic and man-made contaminants.
As soon as the poured layer has hardened, the tiles can be laid on the wooden floor with a preparation created on top of it, independent of the ceiling.

When carrying out tiling work on any premises using tiles, it is necessary to lay not only whole tiles, but also parts of them. This raises the question of how to cut the tiles so that the edges are smooth. We will tell you about the special tools with which you can do this in the material: .
Method three: express option
Consists of attaching to plank floor sheets of moisture-resistant drywall using two-component polyurethane glue, the elastic structure of which is not disturbed by wood movements.
First, the master needs to carry out an inspection of the structure and repairs, if necessary. In order to increase the rigidity of the floor, gypsum fiber board can be laid in two layers so that the seams of the top row do not coincide with the seams of the bottom.
It is constructed by analogy with previous schemes using the type of floating floor, according to which a technological gap should be left around the perimeter of the room. The joints are filled with sealant, then the entire area is primed with a universal primer.


Left around the perimeter expansion joint After laying the flooring and trimming the excess insulation, it is recommended to fill it with sealant and cover it with a plinth on top. This is necessary so that the water when performing wet cleaning did not leak, did not accumulate there and did not spoil the building materials.
Expert opinion
Victor Kaploukhiy
Thanks to my varied hobbies, I write on various topics, but my favorites are engineering, technology and construction.
The best way to lay ceramic tiles on a wooden floor is considered to be a two-layer construction made of gypsum fiber boards, which are installed with overlapping seams and mounted to the base using wood screws. In this case, you should pay attention to some important points:
- The subfloor must be waterproofed. For protection against moisture in this case, it is best suited bitumen waterproofing. Unlike various polymer films This type of water-repellent composition is applied in liquid form and penetrates into the upper layers of the wood. Thanks to this processing method, it is possible not only to protect the wooden base from various types of leaks, but also to prevent the appearance of fungi.
- If glue in the form of a dry mixture is used to lay tiles, then the gypsum fiber sheets must be impregnated with deep penetration soil (for example, Primer No. 6 from Artisan). Since cement-containing adhesives are diluted to the desired consistency with water, we have one negative factor: when introduced into the structure of the gypsum fiber board, moisture changes the linear GVL characteristics– due to the swelling of the material, its dimensions increase, and after evaporation of the liquid they decrease. These movements can lead to cracking of the tile joints, and in some cases, damage to the ceramic tiles. A thin layer of primer will serve as a barrier that will prevent moisture from being absorbed into the gypsum plasterboard. If you decide to use a ready-made two-component epoxy-polyurethane composition, then no additional processing is required.
- Improve specifications Even the most inexpensive tile adhesive can be made using a latex additive, for example, the Latexcol brand from the manufacturer Litokol. The plasticizer is suitable for any cement-based compositions and increases their elasticity, strength and water resistance.
Many questions from our readers concern the installation of heated floors. If you need to mount it on top of a wooden one and cover it with ceramic tiles on top, proceed as follows. GVL is protected with a waterproof film, on top of which a construction mesh with a cell of 100×100 mm is laid. Pipes are attached to the latter underfloor heating, perform a wet screed with a thickness of at least 3 cm and lay ceramic tiles. During installation electrical system For heated floors, you can dispense with the concrete screed - in this case, the cable is embedded in the layer of tile adhesive. As for the requirement that the floor in sanitary and hygienic premises should be lower than the level of other rooms, in our time it can be considered irrelevant. By using a leak warning system that automatically shuts off the water supply when sensors placed on the floor get wet, you can reduce the risk of flooding to a minimum.
The above three preparation methods are just a hint that requires improvement taking into account the technical specifics of the object. There are many more variations on the theme of constructing a kind of stationary “tray” over a freely moving wooden base. It is important to take into account the principle: the rigid substrate should not destroy the floor and, conversely, the subfloor should not destroy the screed with the tiles attached to it.
If you are deciding whether it is possible to lay tiles on a wooden floor in a bathroom, kitchen or other home, you should take into account the properties of the materials and their compatibility. In order for the tiling to serve for a long time, it is necessary to prepare a solid base that will not deform. For this reason the best way A concrete floor screed is suitable for this purpose.
However, this is not a hard limitation. If desired, it is permissible to use other materials (plank structure as a base or particle boards). However, in this case, you need to follow the technology for laying tiles and porcelain stoneware.
Is it possible to lay tiles on a wooden floor?
When combining ceramics and wood, moisture-resistant plywood or other wood-containing materials, a number of problems arise, in particular:
- various indicators of thermal conductivity are noted, for example, wood retains heat better than tiles;
- laying tiles on a wooden floor can cause rotting of the base, which is due to the ability of wood to “breathe” (pass air), while ceramics, on the contrary, do not exhibit such properties, which means that over time the process of destruction of the wood may begin, as a result the tile covering is also deformed, since the floor will lose its static nature;
- duration of operation wooden structure much smaller than tiles, which reduces the service life of the floor covering;
- wood is subject to linear expansion, which is another factor contributing to the destruction of the base, since if the rough boards change in size, lose their shape, along with them the integrity of the floor tiles is compromised, since this type of material is more prone to cracks under the influence of tensile force;
- Another factor that indicates the incompatibility of ceramics and wood is the need to arrange a static rough foundation, which makes it possible to avoid all of the above consequences.
![]()
If for some reason only wood is considered as a material for flooring and tiles for cladding, such a combination can be used. However, in this case, it is necessary to provide suitable conditions to avoid the appearance of defects and pay attention to Special attention foundation strength.
So, when choosing a material (wood or particle boards), its quality is checked. There should be no rot or knots on the boards. Only beams of equal size are selected. As a result, tile distortion can be avoided. At correct installation the foundation should be provided with a sufficient level of staticity.

In addition, it is possible to reduce the intensity of the negative manifestation of the difference in the linear expansion of materials. The desired result is achieved by using an adhesive composition that has suitable properties.
If you lay the tiles correctly using an adhesive containing polymer additives, you can do without a screed.
In a private home, ventilation is important, allowing air flow to circulate without delay. Violation of this process entails the appearance of dampness. If the waterproofing is not done well enough, the tree will soon be destroyed due to the developing process of rotting. Helps reduce the risk of this phenomenon high-quality protection from moisture. If all these recommendations are taken into account, the cladding will last a long time.

Preparing the base
A wooden floor in a private house is characterized by complex design. Considering the difficulties described above that arise when installing the cladding, it is necessary to more carefully prepare the base. Before making a screed or taking on the final flooring, it is necessary to assess the condition of the boards and joists.
An external inspection will not provide the required result, since major defects (cracks, mold, rot, etc.) may be hidden inside the structure.
Checking the condition of the coating
It is recommended to remove the boards covering the base. This measure will provide the desired result, provided that you plan to lay tiles on an old wooden floor. If the base is new, and the cladding is installed immediately after completing the work on the rough structure, there is no need to additionally check the condition of the boards.

It is a mistake to believe that the absence of extraneous sounds when walking (creaks, etc.), as well as the strong fastening of the boards, is a sign of the reliability of the base. Some problems can only be identified after opening the upper floorboards, for example: the presence of mold, non-compliance with the technology for laying joists (increasing the distance between the beams). When the logs are installed in violation of the standards (there should be 50 cm between them), the entire structure is shifted. This rule should be followed, since the surface of the finished floor should be smooth.
Antiseptic treatment
Preparing a wooden floor involves the need to process the material. For this purpose, special compounds are used to prevent rotting and destruction of wood, for example, antiseptics and fire retardants. It is advisable to assemble the base for the tiles from pre-treated lumber. At the same time, a special composition penetrates into any cracks, covers the boards on all sides, reducing the risk of damage to the wood due to developing mold.

Leveling the surface
To lay tiles, you need to make sure that the design meets the requirements. For example, when installing joists, as well as during the process of laying a finished floor (plank flooring), it is recommended to constantly check the position of the boards using a building level.
The slightest distortion will lead to a reduction in the service life of the cladding.
Moreover, during the installation of the logs, it is permissible to place wedges to level the structure, since in this case problems may arise. significant shortcomings subfloor, which is soil cover or concrete screed. And the boardwalk is leveled after fixing it on the joists. In this case, improvement of the surface quality of the finished floor is carried out by grinding. A special tool is used to trim off areas that protrude above the surface of the boards (knots, waves).

Sealing cracks and joints
If general state The wood is normal, but there are several defects (cracks, crevices), additional expenses can be avoided and leaks can be eliminated. This solution is used only when the design flaws are minor. This is done to prevent the gap from growing. Significant defects are eliminated by replacing a separate (deformed) beam/board. Other shortcomings of the subfloor are hidden in different ways:
- the use of sealant, in this case, provides not only a cosmetic, but also a waterproofing effect, since thanks to this composition, the likelihood of moisture penetration through joints or between the wall and the base is reduced;
- construction foam, sometimes foam fractions are added to the gap, but this measure is effective only in cases where the defect is large, then the first step is to fill the leak with foam, the next step is sealing with foam;
- Helps remove minor blemishes paint material on oil based, it is pre-mixed with fine wood shavings, resulting in a composition of dense consistency that can not only fill cracks, but also provides reliable protection from moisture;
- slats and wedges are used to eliminate large defects, this measure allows you to reduce the consumption of associated materials, strengthen the structure without the need to replace its element, and this method can be used in combination with others (putty, sealant), with the help of wedges a significant part of the leak is filled, the remaining the space is filled with any suitable composition (usually putty);
- using cord or tow: this method does not provide protection from moisture and does not increase the strength of the structure, however, it can be used to seal the board covering (cord is more often used to fill joints);
- wood putty: it is permissible to use only a special composition that matches the properties of wood, otherwise adhesion will be low and the material will not show waterproofing properties.

Replacing the coating
The old boardwalk is removed. At this stage, the position of the joists is checked; if there are irregularities, they are eliminated using wedges and additional boards with smaller dimensions. The new flooring is laid only after the gaps between the joists are filled with expanded clay. This measure helps strengthen the structure. In addition, expanded clay fractions intensively retain heat in the room.
A gap of at least 5 cm thick is left between the bulk material and the boardwalk.

Paul in wooden house It is mounted with leaks, due to which air circulation inside the structure is normalized. However, in cases where it is planned to lay tiles, the gaps between the boards can be minimal.
Leveling the surface
If the methods discussed above (grinding, replacing boards or beams) are impractical to use for some reason (there is no special equipment for removing a layer of wood, there is no possibility of installing new boards), you can consider other options based on the use of sheets of moisture-resistant gypsum fiber board (plasterboard), particle boards (plywood, chipboard). You can also fill the screed with your own hands. This is the most suitable method, as it ensures static, reliable coverage.

Plywood or chipboard
This option allows you to level and strengthen the surface of the subfloor. However, porcelain tiles or porcelain tiles are not laid over untreated plywood sheets. It should be protected from moisture contained in the adhesive. It is also impossible to lay ceramic tiles on fiberboard/chipboard without a special coating.
Step-by-step instructions for finishing wood-based material before installing the cladding:
- Latex is applied to the impregnated sheet (but only on one side).
- Without waiting for the composition to dry, lay the painting mesh.
- When the latex is completely dry, the mesh along with a sheet of plywood/fibreboard/chipboard is fixed to the subfloor using self-tapping screws.
- A mixture of several components is prepared: liquid glass, sand, water (ratio 2:2:1).
- The resulting composition is applied over the mesh, after which the installation of the tiles can begin.

CSP board (cement-bonded particle board) withstands exposure to water better than others. This option is advisable to use when arranging a bathroom floor in a wooden house. It is suitable for the toilet, kitchen and other rooms where the air humidity level is often increased.
Before laying drywall over wooden joists, it must rest in the room for at least 24 hours before starting work.

A multilayer structure will allow you to strengthen the structure and provide a static base. When installing the second layer, you need to take into account the need to bandage the seams. This means that there should not be less than 20 cm between the edges of the sheets of the first and second layer. In order to lay the floor tiles, 3 layers of plasterboard are laid. They are attached with glue. Additionally, the sheets are fixed with self-tapping screws of sufficient length. After puttying, the tiles are laid on the DSP.

Dry screed
This method has the advantage of no contact of wood with moisture, which negatively affects the properties of such a material. In this case, ready-made plasterboard blocks (GVL) are used. They are made in the form of a multilayer structure. Moreover, such blocks take into account the dressing of seams.

The principle of laying products of this type is similar to how plywood is laid on a wooden floor, but there is no need to seal the joints.
Wet screed
Instructions for performing the screed:
- The condition of the logs and planks is assessed, and it is important to leave a gap of at least 1 cm between the base beams and the wall, which compensates for the linear expansion of the wood under the influence of moisture.
- The distance between the flooring boards is 1 cm, the thickness of the lumber is 4 cm, it is pre-treated with an antiseptic.
- Performed laying CBPB, the distance between the plates is up to 3 mm; self-tapping screws are used to fix them.
- Waterproofing material is laid on top.
- A damper tape is laid around the perimeter of the room.
- Concrete is being poured.
- On last stage you can lay tiles.
Waterproofing
If you plan to install the cladding in a bathhouse or other room with high humidity, it is prohibited to use coloring compounds. Under the influence of moisture and temperature changes, the paint will crack and lose its properties. Available and effective options:
- A mixture of liquid glass, sand and water. However, this option is used when laying tiles on chipboard/fibreboard or plywood (the method was described above).
- Deep penetration impregnation. Due to its properties, this composition provides reliable protection from a humid environment, but the cost of implementing this method is the highest. The advantage is the ability to immediately proceed to the installation of tiles.
- Rolled insulating materials. Thick polyethylene, bitumen paper. These are short-lived options. Over time, the integrity of the coatings is compromised and they lose their properties.
- Sheet materials. Materials used to level the floor are also used as waterproofing: moisture resistant drywall, concrete solution. However, it is still necessary to lay dense polyethylene under the screed, which reduces reliability this method: due to regular linear expansion, the film is deformed, and moisture penetrates through the leaks that appear.


Choosing the right adhesive
To lay porcelain stoneware or tiles on the floor, consider mixtures suitable for installing these materials. When choosing, it is important to consider the ability of the mixture to withstand the expansion of the boards. If you miss this moment, cracks will soon appear in the cladding.
To compensate for the linear expansion of wood, special tile adhesive is used. It must contain polymer additives. A high elasticity index is the second most important criterion after compliance with the type decorative covering. You can stick tiles onto a concrete floor (screed over a wooden structure) using a cement-based compound.
- and others.


Preparation of tools and materials
To carry out work on wood, with cement (if it is planned to fill the wooden structure with concrete), preparation is carried out with waterproofing. You will need:
- roulette;
- building level;
- stationery knife;
- hacksaw;
- screwdriver;
- self-tapping screws of the required length and in sufficient quantity(calculation is carried out taking into account the pitch when the fasteners are located at least 20 cm);
- notched spatula;
- crosses (limiters);
- electric drill;
- sealant is used to protect the joints;
- roll, coating or impregnation waterproofing (the choice is made taking into account the type of material to be coated);
- wood in sufficient quantities;
- antiseptic composition;
- if required, damper tape (when screeding is planned);
- ingredients for preparing concrete: cement, sand;
- rule;
- adhesive composition;
- grout for seams.
Laying technology
Assess the room for the presence of free zones where the cladding is best visible. It is recommended to start work from one of these areas, since here you will not have to cut the tiles. After pre-layout cladding, the room is divided into zones; for clarity, they are separated from each other by a coated cord. This will make your work easier. The adhesive composition is prepared immediately before laying the tiles.

The glue is applied either to the floor or to the back of the porcelain tiles/tiles. Then the tiles are laid in accordance with the previously drawn up sketch. Cross-shaped stops are installed between adjacent products. During the process, the position of the products is regularly checked using a level. When the glue dries, it is recommended to grout the seams.
Installation of heated floors in a wooden house under tiles
Electric cables and water heating systems are installed according to slightly different schemes. A warm electric floor is installed according to the following instructions:
- The subfloor is being installed.
- Waterproofing is being laid.
- Thermal insulation material is laid between the joists.
- Fix the reinforcing mesh.
- The cable is laid out on top and secured with clamps.
- After this, the finished floor is installed, for which particle boards can be used. In this case, it is better to glue the tiles to the plywood using heat-resistant glue.
- After this you can lay out the tiles.

Water systems are connected to centralized heating, which is associated with a number of difficulties, so this option is used less often. Installation features:
- use a special type of gypsum fiber board or gypsum board (with protrusions);
- lay polymer flexible pipes, forming turns;
- Tiles are installed on top of the heated floor.
- You can extend the service life of the coating if you proceed to laying tiles after the sealant, screed and other materials used in flooring have completely dried;
- if applicable roll waterproofing, its edge is fixed with construction tape;