Pasting walls with simple wallpaper. Available information about the process of wallpapering yourself
In our next article we will talk about what the technology of gluing wallpaper on your own looks like, including on your own. After studying the proposed material, you should figure out how to hang wallpaper alone, without involving third-party craftsmen.
To begin with, here is a list of available tools and tools that will be needed during the work process:
- Brush;
- Round brush. It will be needed to smooth out the wallpaper and remove trapped air from under the already pasted wallpaper;
- Roller;
- Metal (aluminum) profile – approximately 1 meter;
- Syringe;
- Stationery knife;
- Holders;
- Roulette;
- Level;
- Pencil;
- Spatulas;
- Scissors;
- Ladder;
- The table where you will cut the wallpaper and apply glue.

Technology for preparing walls for gluing
Before you stick wallpaper on the wall, you should prepare it. Below we will analyze the technology proper preparation for subsequent gluing. It starts with the fact that you need to remove the old wallpaper. If there are unevenness or damage on the surface of the wall (for example, holes), then they must be repaired cement mortar(can be used gypsum plaster) and puttied. Apply plaster or mortar if the cracks are significant., but if they are not large, then you can immediately treat them with putty. If you are more interested detailed technology, then look at the article "".

It happens that there is no desire to putty and people stick wallpaper directly onto the plaster or concrete surfaces. We strongly recommend that you do not do this and still carry out puttying, because... the wallpaper will lag. After applying the putty, the surface must be sanded with a float. When grinding, you should try to press the grater with the same force to prevent significant differences. It is advisable to go through the same place several times. Sanding will be necessary because even after puttying, bulges and irregularities will remain on the surface.
After sanding is complete, you need to take a brush, about 20-30 cm wide, and walk it along the wall to remove dust. During the process, you must try to remove all visible grains of sand and particles, because otherwise, after wallpapering, they will begin to appear and will be visible in the light.

Once you have cleaned the surfaces with a brush, you can begin priming. It will be necessary to prime, because... the primer will improve the adhesion of the wallpaper to the wall and wallpapering will be easier. The technology will be as follows. Pour the finished primer into a suitable container (a bath for a roller is best), wet the roller in it and begin to process the entire surface. You should start working from the edge of the wall, moving from top to bottom. You should roll the roller several times, because... this is necessary for best impregnation chemical composition. You can find out more details by following the link.

This completes the preparation of the walls for wallpapering. You can begin to consider the gluing technology itself.
Wallpaper gluing technology
First, you should figure out the total area of the walls in the room that should be covered with wallpaper. To do this, you need to take a tape measure and estimate their height and length in the room. Understand total area necessary in order to know exactly and buy in advance required amount rolls However, we will advise you to purchase one roll more than your count, because... Always in the process of work, nuances arise that make adjustments to the calculations.
That’s it, we’ll assume that you’ve already calculated and purchased the wallpaper. Now we move on to the technology of cutting rolls for gluing. Please note that cutting should be carried out with a margin of length. For example, the height of the wall is 2.4 meters. The cut strip should be 2.5 or 2.55 meters. The remaining reserve is necessary for bending at the ceiling and floor, as well as for subsequent cutting off excess. In addition, you may need extra length to match the pattern if it is on your wallpaper.

Let's say a few words about the desktop. It is advisable that the work take place on it. Its length should also be approximately 2.4 meters and the edges should not hang from it. But usually a table of this size is not available, especially in apartments. Therefore, all cutting operations and applying glue to wallpaper take place directly on the floor.
Let's move on. You have already cut the strips and you can start preparing the glue for gluing. Here we will say a few words about one rule that you need to know and follow. It is as follows, how denser wallpaper, the less water is needed to dilute the glue. It is advisable to prepare the glue in a clean bucket, taking into account the proportions recommended by the manufacturer.
After preparing the glue, it is applied with a brush to a strip approximately 1 mm thick. You can also work with a roller, whatever suits you. Then the wallpaper needs to be folded as follows: the top part is folded by 2/3, and the bottom by 1/3 of the total length. Next, roll the resulting length into a roll. It is necessary to apply glue to 4-5 pieces one by one. Roll them up in this manner and wait about 10 minutes for the glue to penetrate into the wallpaper structure.

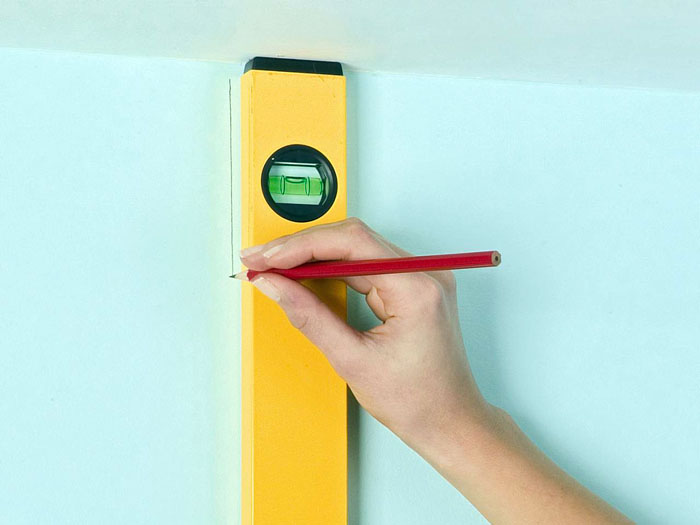
While the strips are drying, select the angle from which you will begin gluing the wallpaper. Using a building level or plumb line, draw a vertical line along the wall. It will allow you to align the wallpaper vertically and will not allow the next canvases to go to the side. When you glue, the edge of the first strip should be clearly aligned with this vertical strip.
After 10 minutes, you can start gluing the wallpaper. To do this, you take the first strip in the middle, unfold it, lay it on left hand. Please note here that you are unrolling the rolled roll itself. You do not separate the upper and lower parts from the middle. They will still be in a connected state.
Now, while the glued canvas is still on your left hand, you right hand begin to disconnect the top edge from the middle. The upper part will go under the ceiling, taking into account the bend. You lift the edge of the strip, glue it with a bend, and at this time the lower part will straighten towards the floor.

You align the attached canvas along the broken vertical line. You initially decided to find out how to glue wallpaper correctly. Therefore, it is necessary to accurately combine the strip on the wall with the canvas. Next, using a small brush, you finally expel the remaining air. You can move the brush either horizontally or in a herringbone pattern from top to bottom. Keep in mind that if you do not remove the air immediately, bubbles may form. In such cases, you either have to hope that they will retract, but if not, then you will need to re-glue them. This fact proves that it is not worth gluing new wallpaper onto old ones, because... When applying glue to old wallpaper, it may swell and form bubbles.

When gluing the second sheet, you must butt the sides of the strips together. Here we will draw attention to the fact that it is necessary to combine end-to-end, and not overlapping. If, after completing pasting one surface in the room, you are left with an unsealed short period to the beginning of the corner of the other wall, then it must be sealed with the cut part of the roll. The strip is cut into 2 parts. One of them, which will be glued to the remaining gap, should have a bend on the other wall from an angle of 1-1.5 cm. You will join the edge of the next glued sheet to this small outlet. Approximately this technology is used to glue wallpaper in the corners.
How to hang wallpaper yourself - important points
Now let's discuss how to trim the protruding edge of the wallpaper after gluing? There are two options here. The first is that you carefully peel off the part that should be cut off, holding it with scissors, and then cut it off. The second is using a utility knife and spatula. Everything is simple here. Apply a spatula along the cutting line and draw stationery knife. From practice, we can say that working with a knife and a spatula will be more convenient than peeling off the top edge, cutting it off and gluing it back in place.

Now let's say a few words about working with problem areas problems that arise when you decide to glue wallpaper yourself. Here we mean how to bypass switches and sockets.
Here's some advice you can give:. Before gluing begins paper wallpaper completely turn off electricity in the apartment. After disconnecting, remove the top panels from sockets and switches. Once you've removed all the panels, you can start gluing wallpaper directly over the switches and outlets. And then you should cut a hole required diameter as follows: first cut the strip crosswise, and then trim the edges, making the hole round. You will subsequently install the covers over these cut edges and if there are any unevenness, they will be hidden under the trim. The whole technology of cutting out holes for sockets is not complicated.
Above doorways to glue it is necessary to glue it with a small reserve on the jamb, but close. It is necessary to make a small (about 5 mm) overlap on the casing, and then cut off all excess parts and wrap them under the door jamb.
That's the whole technology of gluing wallpaper yourself. Below watch the video in which all the nuances are clearly shown.
First, before renovation, you need to carefully think through everything, decide on the design and interior, for example, it is important to choose the right new wallpaper and produce preparatory work. The most important thing is to be patient. If you have a budget limit, then it is possible to hang wallpaper yourself without additional costs. How to do this correctly, you can find out by studying this presented to your attention detailed method. All you need is patience, accuracy, a minimum set of tools and knowledge of some points that will be described below. We will try to answer in detail how to properly hang wallpaper with your own hands and without bubbles :-)
Preparing the walls
In many ways, the quality of wallpapering depends on the original purpose of the room and the customer’s requirements, if the repair is not being done for one’s own use. So, if the room will be used for auxiliary purposes, and there are no quality requirements at all, then old technologies can be used here. Having partially torn off the old wallpaper, I anointed the wall and the sheet, and glued it on. But if the renovation is being done in a cultural space or for yourself, then your own conscience will not allow you to hang wallpaper anyhow. Then you need to resort to the help of professionals, hire workers, etc. But if not extra money, then it is completely possible to do wallpapering yourself. The first step is to prepare the grounds.
The quality depends on the initial surface finishing works. If the wall is uneven, then these unevenness will be clearly visible on the wallpaper. This should be taken into account.
To properly hang vinyl wallpaper, the first thing you need to do is: This can be done with plaster, putty, etc. After leveling, the surface is recommended. You don’t have to do this if the wallpaper is light. For example, paper ones. But today fiberglass, non-woven or vinyl are increasingly used. They, as a rule, belong to the class of heavy wallpaper, so they require reliable and very solid foundation. Plus, during subsequent repairs there will be no problems such as chipping of the putty in layers when removing old wallpaper.

If the wallpaper is light, then instead of primer you can use the same wallpaper glue. Simply by first smearing it on the wall and drying it.
In order to hang high-quality wallpaper for painting with your own hands, especially for fiberglass, fiberglass or non-woven wallpaper, you need a clean and smooth surface without stains or protrusions. After all, even after applying several layers of paint, these spots will still appear. Therefore, the surface must be 100% putty. At the same time, she acquires ideal White color, becoming an excellent springboard for further work.
So, the surface is prepared and soaked with plenty of soil. We will further understand how to hang high-quality wallpaper with your own hands.
Self-gluing methods
Throughout the history of mankind, various options wallpapering. The choice, of course, of a specific method depends on the availability of a particular tool. Consider the most effective method, when even one master can handle this work. But for him successful work The following tools will be required:

- A stationery or mounting knife with sets of blades. They must be purchased at the rate of 1 package per 1 room.
- A ruler, it is better to use a flexible one in a plastic casing. They were specially designed to perform such work.
- Level. One of the most important tools in the arsenal of any master. In early technologies, a plumb line was often used, but due to the inconvenience of using it, it was no longer used. The level was still used for horizontal elements, so why not use it for vertical ones as well.
- Pencil.
- A sponge or a piece of clean gauze or any other non-dyeable fabric.
- Bucket for glue.
- Medium pile glue roller.
- A smooth, narrow rubber roller for rolling joints.
- A wide, smooth roller for leveling wallpaper and releasing air from under it.
- A wallpaper brush if you are pasting delicate materials.
- Roulette.
- Often experienced craftsmen A cone-shaped roller is used for more efficient leveling of wallpaper.
So, having found all the necessary tools and purchased the required amount of wallpaper, you can get down to business. To hang wallpaper beautifully, you need to correctly calculate the number of wallpapers. This can be done using special tables based on the fact that with a ceiling height of 2.5 m, one roll produces 4 sheets of canvas without selecting a pattern. Correctly calculating the amount of wallpaper will help.
This moment plays a big role, since there may be a shortage of 1 roll at the end of the entire work. And the remaining pieces for gluing sections of walls above windows and doors will be unsuitable.
How to calculate the required amount of wallpaper?
It's actually quite simple. It is necessary to measure the parameters of the walls of the room being repaired to determine their area. Next, subtract from it the area occupied by doors and windows. Plus add some extra. And if the wallpaper has a pattern, then it is better to conventionally consider 1 tube – 3 sheets. The width of the tubes may vary and is indicated on the packaging, as well as the length.
 Counting the number of wallpapers
 To ensure that the technology for gluing wallpaper is followed, and the canvases do not come off after a year, you need to read in the instructions what kind of glue to use. At the same time, on its packaging it will also be written what types of wallpaper it is intended for and how it is applied. This is important and decisive moment, so you should read the recommendations and instructions.
It is necessary to remember, if you are too lazy to read the instructions, that 1 package of glue is diluted in 1 bucket of water (10 l). At the same time, it must be cold, and when adding glue, it must be stirred continuously and intensively. This will allow it to swell well and prevent lumps from forming.
Wallpapering procedure
Wallpapering is not something complicated, but you still need to follow certain recommendations. Wallpapering stages:
How to cover corners
 3D Wallpaper
Wall decoration with wallpaper different types Today it is one of the most popular design moves. This technology for decorating a room makes it possible to combine ornaments, colors, textures, and also place material on the walls in various variations. Everyone wants their home to be as comfortable and unique as possible. To create a pleasant atmosphere in a room, many design tricks are used. This also includes wallpapering of two types. Before you do, you should decide exactly what you want the room to look like after the renovation is completed, visually or on paper by combining the textures and colors of the wallpaper. In addition to this, you need to decide on the functions and characteristics of the room, think through in detail the options for gluing two types of wallpaper, taking into account the dimensions of the room and the features of its layout. There are many ways to combine wall finishes. Today we will look at several universal variations. But, before that, we advise you to familiarize yourself with the rules for an effective and competent combination of wallpaper.
Rules for proper combination
Neutral, muted colors go perfectly with rich, “concentrated” colors.
- Pasting walls with wallpaper of two types implies a successful combination of abstraction with geometric shapes and textured surfaces with floral designs.
- Wallpapers of the same quality, which differ in shades and textures, look very good.
- There will be no problems with the choice of edging and beautiful joining of the canvases if the wallpaper strips have the same thickness.
- The combination of different wallpapers should speak about functional purpose premises, look with the general style of the living space and have “echoes” in the interior.
- If you plan to decorate a room with a panel of wallpaper with a rich color scheme, then you should “dilute” it with material of the same tone.
 Pasting walls with two types of wallpaper
 So, how to glue two types of wallpaper? What is the best way to place them on the walls? Let's look at a few universal options:
- Vertical placement of two types of wallpaper. This combination will look great in the living room or hallway. Usually, for this technique, canvases of different colors and with different patterns are used, but they are identical in thickness and texture. Two most are allowed optimal solutions for interior: contrast – different colors wallpaper and monochrome - wallpaper similar in shades;
- Horizontal gluing allows you to combine materials different thicknesses. For example, the lower part can be decorated with wallpaper in a deep, dark color, and the upper part with textiles light colors. The “border” between the canvases is decorated with a border. The interior of the bedroom and wallpaper of two types in a horizontal combination is what you need;
- Also different wallpapers can be glued with inserts, thus focusing on a specific area of the room. For example, work zone in the kitchen it is decorated in one color, and the rest of the space in another; · Patchwork technique - a strict combination of wallpaper. Decorative work begins with gluing “flaps”, then follows the adjustment of the rest of the wall background.
Video on the topic
We will send the material to you by e-mail
Rarely does an apartment renovation complete without wallpapering. This universal look decorative covering suitable for any interior, it is loved for its ease of installation and perfect appearance.. In this article we will tell you how to correctly build an algorithm for working with wallpaper: from preparing walls and choosing tools to final finishing of the seams.
Wallpaper is a covering that is found in every second modern apartment
Doing it yourself is not a difficult task, especially if you have everyone necessary tools. People with experience make do with a brush and roller, but for a beginner, other devices may be useful:
- paint tray and roller for applying glue. It is better to select a roller with medium-length pile, and the dimensions of the bath should correspond to the roller. You can replace it with a wide brush with a comfortable handle. In addition, keep a small brush on hand for taping seams;
- rubber roller for smoothing streaks on the wall and removing air bubbles on thin wallpaper. For thick people, instead of a roller, you can use ;
- roller with a roller for pressing the canvas in the inner corners;
- container for diluting glue: it is better to use a large saucepan or bucket with a lid. Sealed containers will keep the glue ready for use for several days;
- drill or construction mixer for mixing glue. If we are talking about a small amount of work, you can do it manually;
- pencil, long ruler, tape measure and scissors for marking and cutting fabrics. You can use a construction knife for cutting - the edges will be smoother;
- plumb line or building level to mark the vertical line from which you will glue the wallpaper;
- a sponge to remove excess glue and a dry rag to remove debris.
In addition to the wallpaper itself, you need to prepare glue. The composition is selected according to the type of coating. You can buy glue at the store and dilute it according to the instructions.
Note! Instructions for preparing the glue are located on the packaging. It indicates the proportions of water and powder, glue consumption per square meter surfaces and application specifics.

The preparatory stage before sticking wallpaper on the wall with your own hands
Don’t rush to start wallpapering right away. It’s not enough just to purchase tools and materials, you also need to carry out preparatory work. Examine the condition of the walls, remove the old coating and carefully prime the surface.
How to remove old coating from walls
If the walls were previously decorated with wallpaper, they need to be removed. In most cases, the material comes off easily, but if you have pieces or entire strips left that cannot be torn off, you will have to use special tools. Compositions for removing old wallpaper can be bought in the store, but it is cheaper and easier to make such a mixture yourself. The recipe is simple: in warm water add dishwashing detergent and a little wallpaper glue. Using a sponge, apply the product to the wallpaper and leave for half an hour until the coating softens.
Ask a Question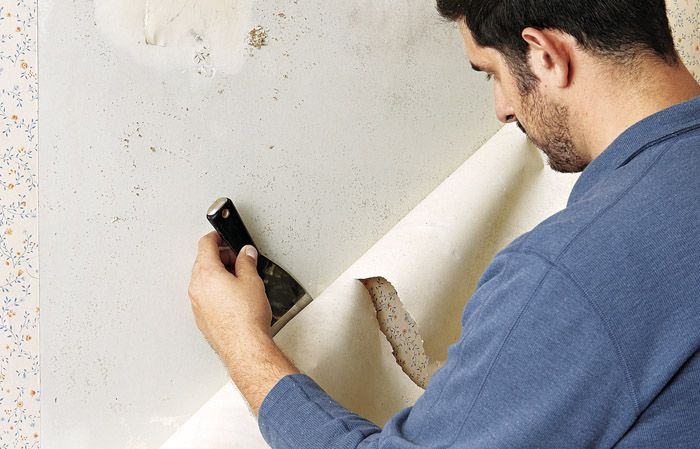
“Any leveling of walls is accompanied by the formation large quantity garbage and dust. Remember to use a respirator for protection respiratory tract and close the doors to other rooms.”
Primer of walls
Don't neglect priming the walls. If you skip this preparation stage, you risk getting an extremely unpleasant result - the wallpaper will simply peel off. In addition, the primer will even out the color of the wall, and the gray concrete will not show through under the thin coating. The primer mixture will fill the voids in the porous surface, you will use less glue.

For walls made of concrete and wood, use a universal acrylic primer. It is easy to apply and spread plain water and dries quite quickly.
For your information! Unscrupulous sellers may offer you instead acrylic primer, PVA glue solution. Be careful, the compositions are very similar in appearance, but the glue has a specific smell.
For walls made of wood, plywood or can be used alkyd primer. It takes a long time to dry - almost a day, but provides excellent adhesion even for heavy wallpaper. Metal walls are treated with glyphthalic primer, similar to enamel. Only she guarantees you high-quality coating. The same primer can also be used for plastic. This coating will dry overnight. Another option for a mixture for metal is perchlorovinyl primer, but it is not recommended for use in residential premises due to its high toxicity.

How to glue wallpaper correctly - basic techniques
After you have well prepared the walls before the main stage of work, you need to solve several important issues: where to start gluing, how to properly cut the wallpaper and paste it in complex and hard-to-reach places.
Related article:
interesting solutions for the living room, bedroom, children's room, kitchen and corridor. Read our review for the basic rules for selecting canvases and designers’ recommendations.
Where to start gluing wallpaper and how to adjust the pattern
Wise own experience older relatives will tell you that you need to glue wallpaper from the window. Indeed, old paper panels were glued this way for one simple reason: the joints were made overlapping, and so that in natural light the seams were not noticeable, they had to be directed away from the window. Modern manufacturers offer panels that are glued end-to-end. Such seams are less noticeable, but they require a perfectly flat base. So the question of where to start work becomes less relevant: start from any side on which it is convenient for you to draw a vertical line, and glue in a circle.

Please pay attention to several important nuances:
- what the wallpaper will look like in the opening between the windows. It is not always good if a seam is placed in a narrow opening;
- where the furniture will be located. If you plan to install wallpaper and not place it behind it in order to save money, you need to decide on a starting point;
- if you plan to place it on one of the walls, you need to accurately measure the location of the picture and continue pasting from this place.
The first canvas is the most difficult task. It is important to place it strictly vertically so that the slightest distortion does not later ruin the entire work.

Expert's point of view
Dmitry Kholodok
Technical director of the repair and construction company "ILASSTROY"
Ask a Question“If you use a plumb line, rub the rope with chalk or paint. Secure the upper end of the plumb line and slightly pull the lower one - the paint will remain on the wall and indicate the desired line.”
Most often, rooms in apartments have imperfect angles. Therefore, it is better to mark the vertical on each wall. Wallpaper gluing technology requires adjusting the pattern. Fashionable finishing It is distinguished by complex ornaments and bright images. You should know that on the wallpaper packaging, manufacturers indicate the offset distance to adjust the pattern. But in practice, it is easier to do the adjustment manually, visually matching the pattern. And this should be done not only at the stage of cutting the canvases, but also during the process of gluing them.
Video: wallpapering with a large pattern
Glue on wallpaper or on a wall - how to apply it correctly
The answer to this question depends on what type of wallpaper you chose for your renovation. If you have paper wallpaper, the glue is applied directly to the canvas. For secure adhesion of thick vinyl or non-woven coverings adhesive composition applied both to wallpaper and to the wall. Non-woven wallpaper can be glued without applying the composition to the canvas, limiting itself only to wall treatment.
How to properly glue wallpaper in the corners of a room
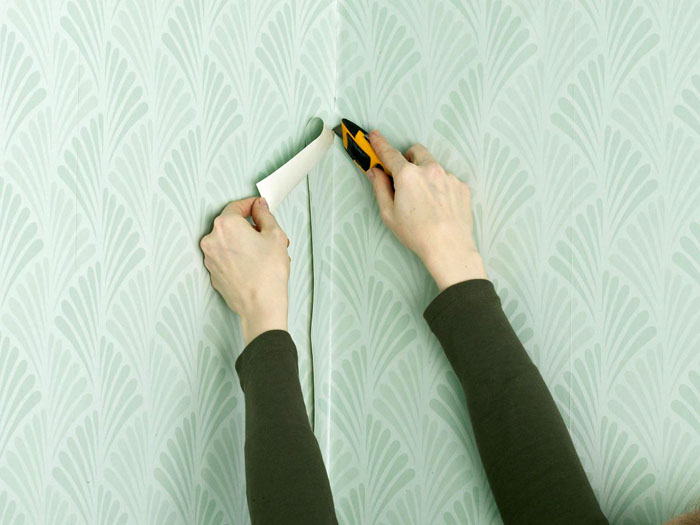
Most often in the process of work you have to deal with internal corners. Here you should make sure that the strip covers the corner and a few centimeters beyond it. Even if the canvases are glued end-to-end, you need to overlap in the corners. This is the only way you will get an even angle. Use a level or plumb line as a guide. To prevent the overlap from being noticeable on thick wallpaper, after gluing, cut both layers along a ruler with a sharp knife, and while the wallpaper is still wet, remove excess stripes from one side and the other. If necessary, add glue using a small brush.
You will also have to tinker with the outer corners. They are rarely perfectly even, so here you also need to use an overlap of 3 centimeters. After the first canvas has been glued, you need to trim it, leaving a thin edge at the corner. The second strip is aligned vertically on the other wall and secured so that there is minimal overlap on the first strip. How to properly glue wallpaper in corners in a short video course.
How to glue wallpaper near windows, doors and behind the radiator
So, you are gluing wallpaper with your own hands, and you have reached. Feel free to fasten the new canvas so that it forms an overhang on the window. If you need to seal the slopes, make two horizontal cuts and fold the panel over. If it does not reach the frame, you will have to make another cut, preferably joining it at the corner (see gluing technology external corners, described above).

- a serious obstacle. You won't be able to place wallpaper behind them, so you'll have to cut them off. This must be done so that it is not noticeable that there is a bare wall behind the battery. To do this, leave a part of the canvas so that it extends 10 centimeters onto the radiator, and then tuck it behind the device, pressing and smoothing it with a spatula. How to properly hang wallpaper behind the battery yourself in the video.
How to make joints invisible
Why can seams between panels remain noticeable? There are several reasons for this effect:
- defective coloring of the edge of the wallpaper. A minimum strip of tenths of a millimeter without paint can cause the seams to be visible;
- an error in gluing the canvas - skewed to one side leads to minimal overlap or the appearance of a gap;
- poor adhesion of the material to the base; part of the strip may fall behind due to an air bubble.

It happens that you noticed a marriage too late, what to do? There are several ways to disguise a seam so that it becomes invisible. If there is an unplanned overlap, you just need to cut through both sheets as when working with internal corners and remove the excess strips.
Important! To ensure that the edges of the wallpaper stick tightly to the base, additionally coat them with glue and roll them with a rubber roller.
Noticed uneven edge paint? It is best to return such wallpaper to the store, it is a defective product. If for some reason this is not possible, for example, you bought the material in another city, then try cutting off the unpainted edge. It's complicated, and new joint problems will inevitably arise. It is best to do this during the gluing process, deliberately making an overlap and cutting off the edge already on the wall. An alternative to this method is to use paint that matches the color. It is better to take a color half a tone darker.
How to properly apply different types of wallpaper
The wide range of wallpaper in modern stores includes products not only for every taste, but also for every budget. You can limit yourself to buying cheap paper-based wallpaper or purchase more expensive non-woven or vinyl options. Is there a difference in the application of different types of wallpaper?
How to properly glue paper wallpaper
Paper is an inexpensive and environmentally friendly coating. Experts advise applying glue to the panels when gluing paper trim. Keep in mind: the paper quickly absorbs the glue, so you will have to work very quickly, otherwise the strip will get wet and tear when gluing.

Do not be alarmed if, even after careful leveling, unevenness appears on the surface after a few minutes - after drying, the canvas will “tighten up” and will be smooth again.
How to properly glue vinyl wallpaper
For vinyl wallpaper You definitely need to buy special glue. This material is thick and should only be placed end-to-end. On the packaging of vinyl wallpaper it is usually written where the glue should be applied: on the panel or on the wall. Unlike paper strips, vinyl strips must be saturated with glue within 10-15 minutes. The video below gives recommendations on how to glue vinyl wallpaper with your own hands:
Article
Knowing how to hang wallpaper with one person, you can avoid conflicts and complete the entire amount of work in a short time.
Most often, it is two people who are engaged in wallpapering a room. One stands on a raised platform (stepladder, stool) and waits for the second to cut the required strip and spread it with glue.
Then the wallpaper is applied to the wall and combined with the previous strip. Next, one smoothes it out, removes unevenness, and the other watches the process.
Helpful information:
And everything would be fine, but in most cases such work is accompanied by disputes and often ends in a quarrel. Moreover, all stages of the process can be performed alone.
Preparatory stage
First you need to prepare the following set of tools:
- ladder;
- large container for diluting glue;
- cuvette for prepared glue;
- wallpaper ruler, tape measure, pencil, level;
- brush from 50 mm wide;
- paint roller (width 250 mm);
- rubber roller for smoothing wallpaper;
- rubber roller for smoothing joints;
- sponge, napkin for cleaning surfaces from excess glue;
- pliers, screwdriver, electrical tape.
You will also need material to cover the floor. This can be cardboard or wide film. If the wallpaper is too heavy, you will need a cone-shaped roller with ribs. They smooth out the joints. When wallpaper requires particularly careful handling, the roller is replaced with a special wallpaper brush. You can purchase a plastic wallpaper spatula. It is used to form geometrically correct angles. If the wallpaper has a nasty texture, you can smooth it out with this spatula, replacing a regular roller.
How to prepare the surface?
On preparatory stage it is necessary to carry out a certain set of works with the surface. No matter how fashionable and attractive the wallpaper is, the overall appearance will not be perfect until it is finishing materials there is an uneven surface, replete with potholes and protrusions. That's why . Moreover, each layer requires a good primer. Such walls will last for many years, the wallpaper on them can be changed many times.
Photo 2 shows how to make marks using scissors. The alignment of the strip in the area where there is a cut is shown in photo 3. The bend is smoothed out by hand.
Next, cut off a strip of wallpaper using scissors. How to do this is shown in photo 4. The edge will be a little uneven. There is nothing wrong with this, because an allowance of 10 cm is left. It allows for more accurate and even cutting on the spot.
The strip that was previously used for marking must be put aside, but first you need to make a mark indicating the upper part. And put a number on it. How this can be done is shown in photo 5. Then the strip is folded as shown in photo 6.
It is more convenient to place the prepared strips near the wall for which they are intended. The vertical position will help save space. See photo 7.
Do the same with the next canvas. See photos 8, 9. This method preparing the wallpaper allows you to subsequently correctly join the pattern, quickly straighten the canvases, and save space and time.
At standard way Before preparation, strips cut to size are laid flat on top of each other. Next, the upper strip is smeared with glue, while the edges of the lower ones get damaged, get dirty, and then the overall picture deteriorates.
How can you mark the surface of the walls?
Marking the walls is an important stage. Usually the instructions say that you need to use a plumb line. But today the use of a plumb line is becoming a thing of the past. Use it. In this case, both a water level and a laser level are taken. Using this tool, mark where the first stripe from the corner should go. To do this, draw vertical lines. The level determines the direction of the position of the curb, which is attached horizontally, and coordinates the joining zones.
In photo 10 you can see how to use a water level. You need to pay attention to where the bubble should be. Experts recommend that when applying markings with a pencil, make light strokes without pressing on it. A clear bright line will appear through non-woven wallpaper and ruin appearance. Even if you take a different type of wallpaper, it can also become dirty with graphite particles.
It is necessary to leave a width tolerance. If after measurements it turns out that the strip of wallpaper is 53 cm wide, you need to step back from the corner by 54 cm. In this case, the mark will be constantly visible. This way, the person who is pasting the wallpaper will be able to constantly see the landmark and will not allow any failures or distortions.
How to apply glue and stick canvases?
If the preparation was successful, you need to begin the pasting process. While work was being done on the last stripes, the first ones were already well straightened out. The glue is diluted according to the instructions on the package. Regardless of the type of glue, prepare a clean cold water. The glue should be poured little by little, in a small stream. In this case, the composition must be constantly stirred.
There is no need to rush and pour 2 packs of glue into the bucket at once. The mixture will gradually begin to thicken, and the resulting lumps will interfere with your work. When choosing glue, you need to take into account the characteristics of the wallpaper. Each variety needs its own type of glue. Wide cardboard or prepared film is spread on the floor. Wallpaper is laid on it, base side up. For more convenient use, pour a small amount of glue into a cuvette, into which the roller is then dipped. The most common application method is shown in photo 11.
When applying glue Special attention given to the edge part. Today they produce glue with an indicator. After dilution, it has a certain color shade, which allows you to know exactly where the glue has already been applied and where it has not yet been applied. If glue gets on the surface under the wallpaper, there is no need to panic. It can be easily removed later. When working, you need to make sure that the layer of glue is not too thick, and that the application itself is even.
When the glue is applied, the wallpaper is folded in half. You can see how to do this correctly in photo 12. The wallpaper should remain in this position for at least 3 minutes. This time is enough for the glue to be absorbed. You can increase the time to 5 minutes when the wallpaper is too thick. If the next section of the wall is smooth, without protrusions and various parts, you can immediately prepare the 2nd strip. But you shouldn’t get carried away with this. The number of prepared strips should not be more than 3. Otherwise they will begin to dry out and stick together.
When the strip is ready, it is unrolled, gradually ascending the stepladder. You need to hold the strip by the part on which there is a mark indicating that this is the top. When applying wallpaper to the wall, you need to take into account that you need to make an overlap on top. Its size is individual, depending on the characteristics of the room.
In photo 13 you can see where the pasting and fitting begin. First they work with top part. When everything is ready there, they come down from the stepladder and straighten it, applying the lower part. When everything is joined, you can start working with a smoothing roller, spatula or brush. Movements come from the top, from the middle. Then they go down. How to squeeze out the air can be seen in photo 14.
When the wallpaper is smoothed and the air has been removed, you need to roll the joints with a special rubber roller. However, seams do not like too active exposure. Therefore, you should not rub them or put pressure on this area. When excess glue appears, it is carefully removed with a sponge or napkin, and they are subsequently rinsed in water.
If not applied to the seams unnecessary impact, they will look almost perfect after drying.
How to cover areas with sockets and switches?
All sockets, switches, and other parts that violate the geometry of the walls must be removed before wallpapering. Firstly, this will allow you to later easily change them to smaller models. Secondly, the appearance of the switch installed on top of the wallpaper is more aesthetic and modern.
Some people advise cutting the part of the wallpaper that remains under the socket or switch crosswise and then bending the paper to the sides. This is unsafe in case of fire. It is better to make a cutout that matches the shape of the device, only smaller. This can be seen in photos 16, 17.
The slots are made immediately after gluing the corresponding strip. Firstly, you can later make a mistake with the place. Secondly, after drying the wallpaper will stretch, so making cuts will be more difficult. Before removing sockets and switches, you must turn off the current, and carefully insulate all contacts and put them inside the installation box.
How to trim off excess?
Here you will need a flexible ruler plastic tool 60 cm long, a strip is built into its body of stainless steel. It is flexible, so the ruler can be pressed firmly even on an uneven surface. What such a tool looks like and how to use it can be seen in photo 18.
The peculiarity of using a wallpaper knife is that after each cut you need to break off a small fragment of its blade. In this case, it will always maintain good cutting abilities. When the excess is cut off, the surface is wiped. Photo 19 shows exactly this moment.
From photo 19 you can see that despite the wet state of the wallpaper, the cut surface is smooth and does not have any lint or fibers. Such accuracy can only be achieved through the use of a flexible ruler.
How to cover the area where heating radiators are installed?
The installation location of heating radiators is considered the most difficult for the wallpapering process. To complete all the work efficiently, you will have to make every effort. In new buildings there are fewer problems; there you can find radiators that can be dismantled and, after pasting, installed in their original place. Photo 20 shows how radiators are dismantled. After its removal, wall fasteners and floor outlets equipped with American-type connections remain.
In this case, the pasting will not be big problems. However, the process of removing the battery and then installing it will take time. Before disconnecting, you need to turn off the water supply, then the return line, and drain everything that is inside the radiator. At the same time, we must not forget about pressure. It is reduced by unscrewing the shut-off screw located on the drain valve.
If the situation is such that it is impossible to remove the radiator, you will have to insert strips about 15 cm under it. If the battery is working, you need to additionally coat the surface under it with glue.
Video of wallpapering alone
- A stepladder is better than scaffolding and “goats”, which often damage the surface of the walls.
- or with fiberglass, glue must be applied directly to the wall. Therefore, there is no need to cut the wallpaper into separate strips in advance.
- A small allowance (1 - 2 cm) on the slopes will allow you to get a neat edge. You just need to wait until the wallpaper is dry, and then trim off the excess evenly.
- Joining the panels at the corners is impractical. Most often, a transition is made from one wall to another, leaving a large allowance equal to the vertical deviation of the wall. The second canvas is glued onto the first one with an overlap, guided by the level indication. Then both sheets are cut through and the excess is removed.
- It is better to lay the flooring after pasting the walls. The exception is tile and parquet.
- The parquet is covered with cardboard before pasting. You cannot put film on cardboard.
- While working, you need to keep your hands clean. They are periodically wiped with a napkin, which is rinsed thoroughly from time to time.
Tweet
Stammer
Like
Number of repairs carried out on our own, behind last years increased significantly. This is due to the desire of people to save time and money. Very often the question of saving arises when gluing new wallpaper, since many apartment owners do not know whether such a saving option is possible, and how to properly glue wallpaper in this case.
We will try to give answers to these and other questions about this wallpapering in this article.
When is wallpapering acceptable?
Why do many people try to leave the old cladding? There are several situations in which people decide to glue wallpaper onto old ones:
- Some people try not to remove the old cladding, mistakenly believing that the wallpaper will hold up better.
- In some cases, it is very difficult to peel off old wallpaper, and then the apartment owner decides to simply paste the wallpaper onto the wallpaper.
- Another reason is ordinary human laziness. It takes a long time to fiddle with old decoration Not many people want it, especially when the repairs are done with their own hands.
- Trying to save money. For some reason it is believed that dismantling old cladding and it takes a lot of money. When hanging new wallpaper, you only waste your time, warm water, putty and primer. But if you don’t want to incur even such minor costs, then you don’t have to remove the old wallpaper.
The advantages of such gluing include:
- you do not need to level the walls;
- saving time on stripping wallpaper.
The disadvantages of this idea are that:
- the walls will not be level;
- bubbles may appear;
- the service life of glued wallpaper is reduced;
- new wallpaper may simply not stick;
- new wallpaper may come off along with the old ones.
Features of the work
If you still decide to glue wallpaper onto wallpaper, then keep in mind that although this process is not considered too complicated, there are some nuances to which you must pay special attention.

There are a couple of very important points to consider:
The wall must be strong and very smooth, without any defects. If such defects are discovered, then there is no need to risk it; it is better to get rid of the old wallpaper. Therefore, you will have to carefully examine the walls before gluing in order to detect hidden and obvious defects:
- obvious defects - changes in plane, tears and peeling of part of the wallpaper, as well as abrasions;
- hidden defects - cracks and voids in the walls, which are easily detected by tapping the walls with a hammer.
- Before gluing wallpaper onto old wallpaper, certain manipulations should be done, such as gluing up loose seams and sealing gaps and cracks using putty and primer.

Advice. You can wash the wall with an ammonia solution and then let it dry thoroughly.
If major defects have not been identified, and minor ones have been eliminated, then you can safely begin gluing new wallpaper onto the old ones. However, for this you need to first. New wallpaper will have to be installed in compliance with all technological rules, based on the requirements and standards of the repair process.
Tools and materials
Before gluing the wallpaper onto the wallpaper, we will carry out preparatory work so as not to be distracted by it later.

You will need the following tools:
- A tray and a roller with which we will apply glue to the back of new wallpaper or to walls with old wallpaper;
- Wallpaper or ordinary household scissors;
- A sharp knife for cutting corner joints;
- Rubber spatula for leveling wallpaper;
- Clean cloths for wiping off glue;
- Wallpaper table with a horizontal, flat surface. If such a table is not available, the floor can perform its function.
Important: Pasting wallpaper onto wallpaper is allowed only in the case of paper wallpaper.
Stages of gluing
- In order to paste wallpaper onto wallpaper correctly, first prime the surface of the walls. For the primer, you can use the same glue that is intended for the gluing process itself. We prepare the glue in a slightly thinner version than for gluing, and then apply it with a paint roller in one layer.
Once this primer has completely dried, you can prepare new wallpaper:
- if you have a standard roll, then you can simply cut it into 3 sheets;
- if your new wallpaper has a pattern, then you will have to trim the canvases so that the pattern on 2 adjacent canvases matches.
-
- when laying vinyl wallpaper, glue is applied to the wall;
- When laying paper wallpaper, the glue is evenly distributed over back side canvases
The further process is completely similar to the process of conventional wallpapering:
- Finishing can begin from any corner of the room;
- Installation of canvases starts from the ceiling;
- The wallpaper must be applied to the wall and then smoothed with a rubber spatula.
- We lay the second canvas according to the same pattern.


The installation of different types of wallpaper differs significantly:
- paper wallpapers are usually laid overlapping;
- - butt.
How to glue wallpaper in corners
The most difficult moment of the whole process is pasting the corners of the room. Here's how to do it right:
- One of the canvases is trimmed with an allowance of approximately 5-6 cm.
- The allowance is not processed with glue.
- The second canvas on the other wall is laid with the same allowance.
- Using a sharp knife in the corner, a vertical cut is made between these two canvases from ceiling to floor.
- The allowances are removed from them, and the joints are treated with glue with inside and smoothed with a spatula.


Advice: When gluing wallpaper onto wallpaper, the spatula is always carried out from the center to the joints.