Rock garden in a pot. Video: Miniature garden - interesting ideas! Within a harmonious framework
The landscape of a summer cottage provides great opportunities for creative individuals and those who seek to somehow distinguish it from the rest. You can use techniques and methods already known to everyone, or you can come up with your own original solution. In this article we will tell you how to make a mini garden with your own hands and fit it into your summer cottage area.
Composition
Any project begins with an idea in which you can describe everything that you would like to see on your site, and then settle on reality.
We can offer you to create:
- miniature alpine slide, which will be based on small stones and tiny plants;
- an intriguing oasis in the desert or a wonderful little garden, which will be planted with dwarf trees.
Tip: your favorite corner in your garden can also become a thematic composition, complemented by a pond.
| The basis | By creating a mini garden with your own hands, you can use plants in your garden small sizes, already growing on the site or a container that harmoniously combines with the built objects on the territory. |
| Usage | We recommend you:
Its small size allows you to place this decorative element almost anywhere on the site:
|
| Selecting a location | This issue needs to be resolved at the stage of thinking through the design. decorative composition. You should consider not only the placement of the miniature garden, but also from which side it will be best viewed, and whether it will be visible at all. When choosing a location, you should take into account the conditions for growing the main landscaping elements that you will use to fill the miniature garden. |
Tip: choose a place that is protected from wind and drafts, but open to sunlight.
We recommend Western or eastern part summer cottage plot.
The main advantage of a mini-garden in a pot will be its mobility. For example, if you get bored in one place, you can quickly move it to a new one. In winter, it is enough to put it in a windless place and cover it non-woven material or a layer of snow.

How to choose a container for a mini-garden
Most often, a wide container with a height of approximately 150 mm is used to create a composition. Due to the large horizontal area, you have the opportunity to create a more interesting “landscape”.
For example, this would be great:
- pallet;
- an enamel basin, the price of which does not have to be high;
- flowerpot;
- and even an old sink.
A pot for a mini-garden can be round, square, or of an original shape, which allows you to create unusual multi-level compositions. There is only one condition - the container must have drainage holes at the bottom of the container to allow excess water to drain through.
Tip: put a layer of pebbles or crushed stone on the bottom of the pot, this will prevent the holes from becoming clogged and will provide additional drainage.
Sometimes the outer walls of the container are lined to make them attractive.
For this:
- prepare crushed peat, sifted sand and cement in equal proportions;
- dilute the mixture with water to a paste-like consistency;
- coat the walls of the container with it;
- decorate the surface with decor from small pebbles, colored tiles, glass or shells without waiting for it to harden.

Selection of plants and decor
If you have a stone with a porous structure that can absorb enough water, you can also use it to place flowers and plants.
Suitable for this:
- limestone;
- shell rock
For creativity, these materials offer many possibilities as they are easy to process. You can make small pockets or drill holes for plants. We recommend adding a little sphagnum moss to the composition, which will not only retain moisture, but also create beautiful “islands.”
Tip: choose plants for the composition based on the theme of the mini-garden.
For example, cacti are well suited for a rock garden or rocky area.

Please also note that plants can grow over time. Because of this, we recommend choosing slow-growing varieties.
Ground covers
When deciding to design a mini-garden in the style of a park landscape, for landscaping it is better to use:
- Money Tree;
- myrtle;
- dwarf ficus.
Their decorative crown shape looks attractive, but it requires regular care– trimming and pinching. Ideal for mini-gardens in open areas dwarf varieties conifers - if, junipers and cypresses.
Among the small-leaved, slow-growing plants, we highlight fittonia, sedum and peperomia. A good addition The garden features ivy, which frames the composition with its flexible stems and entwines the container.

Arrangement of the kindergarten
Below instructions will help you cope with these:
- Create a fertile base by adding pebbles or expanded clay to the bottom with a layer of 30-40 mm for drainage. Fill the top of the container with soil, in which you mix coarse sand, sod land and peat in a ratio of 2:1:1
- You can add vermiculite to the soil, making it loose.
- Provide pockets in advance for several types of plants, filling them with the necessary soil.
- Delimit “pockets” with “paths” of stones.
- When filling the container with soil, do not add 15-20 mm to the edge, compacting the soil a little and pouring water on it.
- You can plant plants in one container or dig pots into the ground, and then plant them in them. In the first case, the composition looks more holistic, in the second - mobile.
- Be sure to consider the distance between shoots when considering growth prospects. Bring it to the foreground low-growing varieties, on the back - taller plants.
- You should also take into account the agrotechnical characteristics of crops - sun love, shade tolerance, amount of moisture.

Conclusion
Creating a miniature garden summer cottage will add attractiveness to it and also help make it even more original. You can come up with different compositions for each individual place in the country house, further emphasizing its significance or character. The video in this article will help you find Additional information on this topic.

Miniature garden compositions instantly won the hearts of gardeners, some are keen on building compact “antique” castles or fairy houses, while others are keen on creating incredibly cute and attractive gardens in pots. Such a mini garden in a pot captivates with its visual fragility and compactness, while simultaneously immersing its creator in memories of childhood, toys, sandboxes, etc. But how are such miniature gardens created, how to choose suitable plants, and decorative elements, all of this will be discussed in this review. At the end of the article there will be two videos on creating two different types tiny gardens in pots, we recommend checking them out.
We decide on the design style of the pot.
Before drawing up a miniature composition, you need to decide on its future stylistic direction. Moreover, we are talking not only about the choice of plants, but also about the selection of suitable elements and their future location. Therefore, we take a sheet of paper and with a pencil draw a plan for the placement of all elements (plants, stairs, benches, houses, garden paths, pond, etc.). To make it easier for you to navigate, we will briefly go over the most popular full-fledged garden styles and tell you what you will need to implement them in miniature.
To create such a garden, you need to prepare a small dark-colored wooden bench, varnished, a garden arch (you can make wires), varnish tiles, sawn into small tiles, polymer clay sculpt a fountain (looks like a bowl on a leg).

To implement this idea, you can use bamboo mats, create a miniature bridge from skewers, fashion garden lanterns from polymer clay, create a gazebo with a roof from wooden planks and cones, let a “stream” of carefully laid out river stones. You can complement your garden with blooming Sakura made from beads or polymer clay.

Simply put, this is an ordinary rural style that attracts with its simplicity and use natural materials. Tiny wells made of skewers or small twigs, clay pots, rough-looking benches, stairs and woodpiles would be appropriate here.

In miniature, this style looks even more cute and attractive. White forged benches (made from metal wire), garden arches, as well as a table with mugs and a teapot made of polymer clay are suitable here.

This style is characterized by the visual aging of objects, with intentionally created abrasions. Small ones will fit here wooden benches(painted in White color and lightly sanded sandpaper), table and chairs, house with stairs.

Tiny ones will fit here wooden houses, figurines of horses, cowboys, a tumbleweed ball made of twigs, as well as many cacti

Suitable plants.
A mini garden in a pot should be complemented exclusively by compact plants, and ideally also by slow-growing ones. Suitable here:
- Cyclamen;


- Haworthy


- Stone rose

- Sedum


- Saintpaulia

- Soleirolia


- Rejuvenated

- cacti


- Crassula


- Tillandsia jellyfish

What can serve as decoration.
In fact, absolutely any miniature objects made from wire, matches, skewers, clay, plasticine, stones, shells, bottle caps, cut from plastic bottles, and all kinds of toys are also suitable. The most visually attractive, and therefore the most popular for decorating a pot, are:
- Round, oval, square or rectangular tables; Ladders and stepladders
- Wheelbarrows and carts;
- Teapots, mugs, plates;

- Vases and pots;
- Toy household appliances;
- Tiny fire with pot;
- Barbecue or outdoor fireplace;
- Street lights;
- Candles;

- Small light bulbs buried in the ground;
- Beds and bedside tables;
- Figurines;
- Ponds and fountains without water (water is simulated with blue pebbles);
- Sun loungers and surfboards;
- Boots, slates and shoes;

- Skis and sleds;
- Bird nests with chicks or eggs;
- Gazebos and garden arches;
- Animals, birds, insects;

- Straw baskets and hats;
- A fence made of wire or wood;
- Spatulas, rakes, buckets, watering cans;
- Houses and other “buildings”.

Of course, everything will depend on your imagination, but today four main ideas for creating a mini garden are considered the most relevant, the first of which involves the arrangement of all elements directly on a single plane of a large flowerpot, the second - a split small pot with the elements arranged not only horizontally, but also vertically (we’ll talk about this in more detail below), the third is a multi-tiered flowerpot, the fourth is a pot filled with water.
- The first method is a flowerpot.
It is necessary to pour small pebbles or expanded clay into the flowerpot (the stones will act as drainage). Then add soil and vermiculite (will provide additional looseness to the soil). We plant branched plants that imitate trees. Plants should be removed from pots carefully so as not to damage them. root system. Using a garden spatula with a pointed end, we dig holes in the flowerpot and plant the plants in them. We take blue glass balls (decorative soil) and lay out an impromptu pond with them. Then we install a ladder of skewers, as well as a tiny swing made of twigs and a chain. We lay out the path with light crushed stones. With the same stones we carefully fill the gaps of the flowerpot, wherever soil is visible. The result is an interesting planter with wonderful tiny elements.

- The second method is a broken pot.
We carefully hit the side of the clay pot with a hammer, and break off another small piece from the broken part, which we crush into small tiles. Initially, we dig the broken wall into the soil of the pot, and lay out steps from crushed tiles. We plant rock rose, moss and other small plants.

- The third method is a multi-tiered flowerpot.
To create such a composition you will need four different sized clay pots. Pour stones for drainage, as well as prepared soil and vermouth into the largest pot, take the next largest pot and hammer one of the walls from it, dig the resulting pot into the ground, also knock off part of the wall from the next pot, and bury it in the previous pot , and then we dig into it one of the broken walls, as well as the smallest clay container. We split the remaining wall into small tiles, from which we lay out the steps. All that remains is to plant the appropriate plants and admire the magnificent result.

- The fourth method is a small pond.
We take a lawn border, install it in a curved form in a prepared flowerpot, add soil, not forgetting to add soil to the bottom of the flowerpot. We pour water into the large section, plant small moisture-loving plants into the small section, all that remains is to wait until the water settles and acquires its original transparency.

Such a mini garden in a pot can be placed on a pedestal near the gazebo so that guests can view its tiny details, the flowerpot can also be placed near the threshold, or you can create two similar gardens and place flowerpots on the sides of the entrance to the house. Be that as it may, there will definitely be a place for such beauty!

For many, a garden is a large area planted various plants for rest and fruits. But to achieve a harmonious arrangement of the site, the entire area is divided into zones, so you can’t count on the breadth of space.
Then the optimal solution is miniature compositions in pots. They do not take up much space, and at the same time they perfectly decorate not only open areas, but also rooms; the main thing is to know how to make them yourself and provide proper care.
Original solution
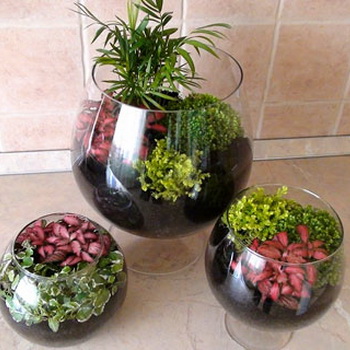
Miniature garden V flower pot is a landscape composition united by a specific theme. This can be the embodiment of fairy-tale ideas or a representation of a corner of nature, only everything is done in a reduced form.
To create such compositions, a spacious container is selected free form, but no more than 15 cm in height. The main condition remains sufficient space to realize the original idea. At the same time, ideas are limited only by space, and it is quite possible to build a house, arrange a pond and plant trees on a small piece of land.
A relatively new trend is the arrangement of multi-level gardens, which are created through the use of miniature steps, paths or climbing plants. To obtain a multi-level platform, ordinary broken pots are used, which make it possible to embody all creative ideas.
Implementation process

Creating a mini garden in a pot consists of the following steps:
- Design, which is carried out taking into account the chosen location. It is important to pay attention to the illumination of the surrounding space for a favorable presentation of the finished composition.
- Selection of plants to be used. They try to use a small number of slow-growing species, because the main emphasis is on the beauty of the landscape.
- Selecting decorative elements that will decorate the embodied idea.
Pot, basket or box?

The main condition when choosing a container for a mini garden is a consistent style with the surroundings, which favorably emphasizes appearance ready flower arrangement. Many unsightly objects from household: buckets, pots, watering cans, old sinks, kitchenware, various boxes. Using the most non-standard items, you can achieve originality, emphasizing the owner’s taste and individuality.
From store-bought stone or wooden pots you can think of an overall picture united by a single element, for example a pattern. However, they should not be absolutely identical; such sets look too simple.
In addition to aesthetic functions, containers have functional functions - providing suitable conditions for the growth of flowers. Pots must be stable and retain moisture well.
Plants suitable for arranging a garden in a pot

Creating a harmonious composition involves using plants that complement each other. This applies not only to size, texture and color, an important condition There remains time for growing and flowering. There are species that are popular due to their attractiveness and ease of care, these include: fuchsia, begonia, petunia, nasturtium, lobelia and heliotrope. These are so-called annuals, the lifespan of which is convenient for growing, because it is possible to regularly change the appearance of the garden.
Experts recommend for suspended structures use curly representatives, they unravel over time, forming a beautiful floral train. Then, within a few weeks after planting, the containers will turn into colorful cascades.
When choosing seasonal flowering representatives from composite containers, individual species can be replanted in pots, and after the end of the period, returned back to the garden. It is advisable to plant ready-made seedlings; you can buy them in the store or grow them yourself. Because not all seeds germinate, and the overall picture may turn out to be blurry.
As for the size of the specimens, any plants are chosen. Because even if you choose a large representative, you will end up with a rather compact tree due to the limited space for the root system. Moreover, if you take proper care of your trees, you can achieve the desired shape and size.
Making a garden in a pot with your own hands
There is a certain algorithm of actions for creating a composition:
- When laying drainage, first be sure to check the bottom of the flowerpot for holes. Drainage material is selected depending on the further location of the garden. If the pot will stand on the floor, it must be weighted to withstand the wind. In this case, fragments of terracotta or gravel are covered. For hanging baskets, jute or coconut shells are used - these materials are lightweight, but perform the task perfectly.
- Filling the container with soil. For this you can purchase ready mixture or prepare it from sand, leaf humus and peat.
- Slow-release fertilizers feed the plants over a long period of time. Typically, such substances provide recharge for six months. You should also not forget about hydrogel granules, which take part of the moisture during watering and then gradually release it to the root system.
- The placement of plants is carried out in accordance with a pre-thought-out design. Seedlings or young specimens are carefully laid out around the site, avoiding disruption of the root system. As a rule, the tallest representatives are located in the center of the pot, and the middle and creeping ones are located at the edges.
- Adding soil and compacting it is done on top and around the roots.
- Watering is carried out abundantly.
- Mulching is necessary to prevent the germination of weeds and to retain heat and moisture in the soil. Tree bark, gravel, shavings or moss are used as mulch material. In this case, about 2 cm should remain to the top of the edges.
- To decorate the garden they use various ideas, make miniature stairs, swings or benches, in general, everything that fits into the created structure.
Caring for potted flowers in the garden

To ensure normal growth and development, plants need:
- Watering, in the hot season, should be done abundantly and regularly. Due to the limited space in the pot, the soil dries out very quickly and the moisture evaporates greatly. It all depends on the size of the container - the smaller it is and the thinner the walls, the more often you will have to water the garden. Watering twice a day helps prevent drying out in the heat, only in the absence of scorching rays. To nourish the root system, the soil must be filled so that water comes out through the drainage holes. If the soil is dry, you will have to supply water first through the bottom of the flowerpot, and only then water the plants from above.
- Fertilizing is required if slow-release fertilizer is not available.
- Removing dried parts and cutting. To prolong the blooming period, wilted inflorescences are torn off. To create the direction of climbing representatives or the shape of plants, it is important to trim.
- On winter time provide warm conditions for lush color for next season.
If you choose annual flowers in pots in the garden, replanting will be required. Ideas for a future composition can be gleaned from the Internet or thematic publications. Photos of gardens in pots are offered in master classes with step by step description all actions.
Beautiful, neat, well-groomed personal plot is the dream of any homeowner, although it takes a lot of effort and time to make such a dream come true. Of course, the result is worth it, but when the site seems to have already been put in order, you can catch yourself thinking that you want to add something unusual to it: install a decorative castle, put up a house for fairies, develop a rose garden, a small pond or create a garden in a pot . By the way, the idea of a garden in a pot is also suitable for apartment balconies, where the space simply does not allow for the development of a full-fledged garden. Visually, miniature garden looks like a doll garden plot, With flowering plants, tiny houses, benches, chairs and tables. The result is a stunning tiny garden, the pot of which can be placed near the entrance to the house, next to the gazebo or garden benches.
DIY garden in a pot.
Decorative elements.
Actually a choice similar elements will depend on the imagination of the owner of the future kindergarten, as well as on the thematic focus of the design of the pot. Let's say a pot decorated in Country style will take a miniature well, garden wheelbarrow, rough-looking chairs and table. A miniature garden in the Provence style can be decorated with white openwork and elegant tables, benches, and arches.
Suitable decorative elements.
Let us remind you that all parts must be tiny in size, this could be:
- House;
- Pot;
- Kettle;
- Bench;
- Table and chairs;
- Arch;
- Alcove;
- Chaise longue;
- Fountain;
- Pond;
- Statues;
- Nest;
- Animals;
- Birds;
- Insects;
- Snakes, lizards;
- Fence;
- Lamps;
- Candles;
- Baskets;
- Shovels, rakes;
- Garden watering can, etc.
Where to find decorative elements.
You can make tiny elements yourself, benches, tables and chairs from wire, pots from polymer clay, baskets and nests made from straw or willow vines, stairs from skewers or toothpicks, a house made from cement mortar and stones, and look for more complex items in souvenir shops, children's stores, art departments or garden departments.


Suitable plants for a mini garden.
It is necessary to select only slowly growing dwarf plants (in garden stores there is an unlimited number of similar ones). We recommend taking a closer look at:
- Miniature ivy;
- Graceful Fittonia;
- Dwarf Pilea Cadieux;
- Fat man;
- Low growing Saintpaulia;
- Selaginella;
- Tradescantia;
- Succulent;
- Varieties of moss;
- Cacti;
- Stone Rose;
- Diamondmaker;
- Sedumu;
- Haworthia;
- Gelksine;
- Gasteria;
- Pachyphytum;
- Saxifraga;
- Money tree;
- Myrtle;
- Dwarf ficus;
- Sinpoliam;
- Cyclamen;
- Mini roses;
- Streptocarpus;
- Nertere;
- Soleirolie.


How to make a crumb garden in a flowerpot or pot.
Method number 1. Large flowerpot or tub.
What you will need:
- Flower pot or tub;
- Stones, sand, soil;
- Tiny decorative elements (mini pots, stairs, arches, bowl for a pond, etc.);
Let's plan the area of the pot (it is better to first sketch all the details on a piece of paper, namely, where and in what places certain plants and decorative elements will be located).
- We pour stones into the tub for drainage, then soil.
- We compact the soil and plant suitable plants.
- Install decorative arch and a pond.
- We plant the remaining plants.
- We install a bench and a fence. Sprinkle the paths with small stones.
- We place the figurines and miniature pots. At the end of the article there is a video on how to make such a fashionable garden.
- We are delighted with the result!


Mini garden in a pot photo
Method number 2. Broken terracotta pot.
What you will need:
- Flower pot;
- Hammer;
- Stones, sand, soil;
- Tiny decorative elements (mini pots, fairy figurines, houses, etc.);
- Slow-growing plants (the list of suitable plants is presented above).
- We lightly hit the side of the pot with a hammer, part of the wall breaks off.
- From the broken part we break off another small part with a hammer (put it aside). We dig the rest into the soil (as in the photo below).
- From the part that was previously put aside, we construct improvised steps. To do this, use a hammer to break this part of the pot into small pieces. We dig them in on one side of the pot in the form of steps (see photo).
- We plant suitable plants and distribute fairy figures, houses, and miniature pots.


Mini garden in a pot photo
Video: How to make a garden in a pot.
Video: Miniature garden with sand.
Such a garden in a pot will become a real decoration of any site; it is only important to choose the appropriate style direction, and then it will look truly impeccable.
The Decorol website invites its readers to subscribe to receive news; to do this, you just need to fill out the form in the sidebar.