Door frame: do-it-yourself door jamb, how to make it with video, making a wooden frame and a frame with a frame. Assembling the frame and installing an interior door from MDF Assembling the frame of a door frame of any size
To replace or install an interior door, it is not necessary to seek the help of a specialist, since even with basic construction skills and the ability to use tools, you can do this work yourself.
Installing an interior door
First you need to dismantle old door. This is done using a hacksaw and a pry bar. Saw one of the side beams with a hacksaw, then split it with a pry bar.


If you have standard door openings, then you can easily buy finished door the required sizes. However, it happens that in old private houses the openings may not be standard. Of course, you can buy a door to order, the size you need, but it will cost an order of magnitude more, and if you want to change the door again in the future, you will have to order again right size. It’s easier to adjust the doorway to the standard size you need, 70 or 80 cm. If the opening is wider, it can be shortened brickwork.

When purchasing a door, you can immediately purchase fittings (lock and awnings). The door will be supplied with a door and platbands. The installation of a door begins with the installation of a door or door frame. Loot items tend to be larger in size, so you will need to trim off the excess. Along the edges of the long elements of the loot, you need to break off the strip in order to top part The boxes fit into the groove at the bottom.


Next, measure the width of the door and add 4-6 mm to it so that there is clearance between the frame and the door.

Then cut the desired length of the top of the loot. When measuring, use a tape measure and a square with a pencil to cut exactly 90 degrees. Can be cut hand saw, or a jigsaw with a thin file.
After this, connect the piece, securing it with self-tapping screws. Before tightening the screw, drill a hole to avoid chips and cracks, especially if the door is wooden.


Once you have assembled the door frame, cut off the excess from the bottom pieces along the length of the door.
Next, you can begin installing the awnings. Here it is important to decide which way the door will open and attach the awnings accordingly. First, screw the awnings to the door frame, leaving approximately 25 - 30 cm from the edges.

Then place the door in this frame, installing special distributors between the frame and the door. They usually come complete with the door. Thanks to them, the gap between the door and the hatch will be uniform on all sides.


After this, you can screw the awnings to the door. Before tightening the screws to secure the canopies, be sure to drill a hole exactly in the middle of the canopy holes.
Once the door is assembled, unscrew the door hinges to install the door into the doorway. The door frame is installed on polyurethane foam. However, before you start blowing out the foam, secure the loot with wooden wedges. You can additionally secure the box with a profile by screwing one screw into the box and the other into the wall.


When door frame stands exactly level, both horizontally and vertically, you can install the door by screwing the awnings to the door.
Next you need to install the lock. As a rule, the lock should come with instructions for installing it. If you do not need the door to be locked with a key, then you can use a regular lock with a handle, thanks to which the door will open by pressing the handle down. To do this, drill feather drill a hole whose diameter must correspond to the width of the mechanism that is wound inside.

Here you immediately need to decide what level of handle height will be so that you are comfortable. Then insert the lock inside. After this, measure the distance to the rotating mechanism on the lock, and transfer this measurement to the door. Now you can drill a hole into which the handle will be inserted. In the door frame, using a feather drill, you need to drill holes into which the lock will fit.
The strength of the entire structure, as well as the duration of its operation, depends on the quality of the boat. Usually the door frame and door leaf are made from the same material. The main load of the opening sash falls on the frame, and you cannot save on purchasing a cheap window, otherwise the design will be short-lived.
The box is part door block. It is used in models of the type, the sash is suspended from hinges. Install the entrance or interior door frame into the opening on the wall. Most popular material for making boxes is considered array. Cheaper option - MDF and other combinations of wood waste. Lutki may have threaded grooves on the end intended for fixing and.
The hidden door frame is hidden when installed in the wall; it is made of aluminum. Even the hinges remain invisible.

The door frame design involves the use of three or four elements. U-shaped boats without a threshold consist of two posts connected at the top by a crossbar. In a full-fledged boat, the fourth element is the threshold. Such frames are required when installing a door block in a bathroom or at the entrance to a room.
Boxes are usually sold as a set with and. Additional items help to refine doorway. Device Ludki differ according to the following characteristics:
- with or without extras;
- With telescopic platbands or planks without grooves;
- with or without a seal;
- with overhead or mortise fittings.

A box with telescopic handles and also equipped with a seal is considered convenient to install and use.
Box sizes
The consumer is offered different sizes door frames, which is determined by the location of their installation. Dimensions are maintained according to the standard. From manufacturers from different countries it is different. The most common standard door frame size interior doors domestic manufacturer coincides with products from Finland, Italy and a number of other European countries.
By standard size is:
- sash width – 55, 60, 70, 80 and 90 cm;
- sash height – 190, 200 and 210 cm;
- box thickness – from 2 to 7.5 cm.
This thickness of the interior door frame was determined for good reason. The size variation is due to different wall parameters.
Considered optimal depth door frame of an interior door - 7.5 cm. The frame is suitable for walls made of plasterboard or brick. For thick partitions made of other materials, boxes 10 cm wide are produced. There are imported boxes with a depth of up to 20.5 cm.
The total height and width of the door frame of the interior door is determined taking into account the size of the leaf. The thickness of the onion is added to the dimensions. It will be clearer with an example. Let's take a canvas 60*200 cm and a frame 7.5 cm thick. As a result of the calculations, the total width of the door with the frame will be 67.5 cm, and the height will be 207.5 cm.
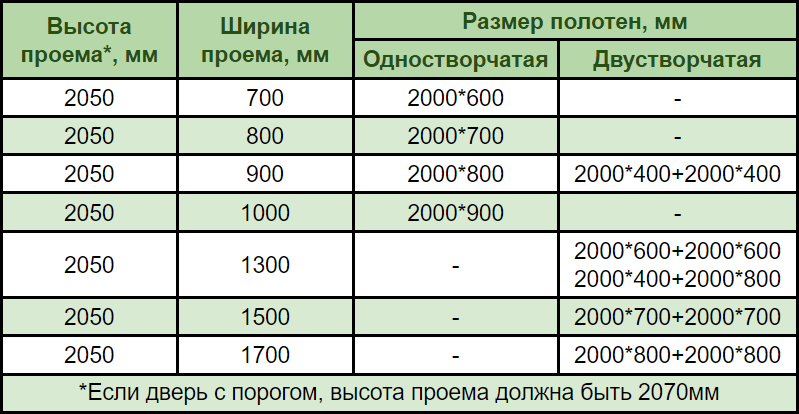
The size table will help you determine the dimensions of the interior door frame.
Types of boxes
There are different types of door frames based on design, material and other parameters. A boat consisting of three or four elements has the following connection methods racks with crossbar:
- Spiked. The door frame timber is joined using a tongue-and-groove lock. The method is complex, but reliable.

- Baguette. The edges of the timber are cut at an angle of 45º. The elements are connected using hardware.

- Right angle. Before joining at an angle of 90°, grooves are cut at the end of the beam, removing part of the quarter.

Of all the options, the design of a door frame with a right angle is considered simple.
The structure of the bows varies according to the type of fastening of extensions and platbands:
- Simple goes without grooves. Extensions and trims are fixed with glue, nails or self-tapping screws.

- Telescopic The door frame is equipped with special grooves into which the extensions and trims are attached.

- Monoblock. Innovative design. The box and platbands are one whole.

The advantage of a telescopic monoblock box is that fully equipped. You don’t have to buy additional trims and platbands separately.
By design There are three types of onion:
- Encompassing. The structure consists of a frame, extensions and platbands. The door frame is supplied with a seal. Cheap options may not have extras. The planks will have to be purchased separately.
- End The boat is designed for mounting on a special metal carcass. Used in arranging openings thin walls from plasterboard.
- Corner. Ludka is considered universal. The frame with the platband is connected into a single structure. During installation, a seal must be installed.
Separately, it is worth considering the hidden door frame, which is completely hidden along with the hinges in the wall during installation. The entire block is made of aluminum and comes in two types:
- Ready box. The door has a laminated, enameled or other coating. Installation of mirrors is allowed.
- Boat for finishing. The canvas is covered with a layer of primer. After installing the block, it is subject to further finishing with wallpaper, painting or cladding with other materials.
The handles on the sash are also made hidden. Usually it is a slot on the canvas or a magnetic device.
Materials
The pots differ according to the material they are made of:
- The most common, inexpensive and durable are considered wooden door frames. During installation, products made from untreated timber are impregnated with an antiseptic and opened with varnish or paint. For budget option boxes use solid pine. Manufacturing technology from spliced timber allows you to get rid of wood defects. The frame elements are glued together from small blanks.

- Door frames are made by pressing wood waste MDF, fiberboard and HDF. Frames are covered with laminate, veneer and other materials that protect the product from moisture and also make it attractive. Excellent characteristics layered composites have. The material alternates layers of wood waste with plastic.

- Special aluminum box for glass door comes with a seal and a set of corners. Ludka is installed in glass openings of offices and other organizations. Fixation occurs with pressure plates on the goujons.

Metal door blocks usually come with a seal, trim and fittings. The products are installed at the entrance to the building or individual offices of the organization.
How many components are needed for the opening?
When installing the door block, you will definitely need components. The aluminum door frame goes on sale with mounting plates, a seal, and a set of corners.
When purchasing a door frame for an interior door, a design is selected taking into account the installation location. Frames with a threshold are placed in the bathroom, at the entrance, or, if the height of the opening requires (3 blanks are required for one door). The U-shaped bowl is mounted in ordinary interior partitions(for one door you need 2.5 blanks).

If the door frame is narrow, the projections of a thick wall are hidden with extensions. The number of boards is calculated based on the size of the protrusion.

You will need hinges from the fittings. For a light sash, 2 elements are enough, and for a heavy sash you can put 3 pieces. Invoices or hidden hinges. By design they are one-piece.

On front door install a lock and a peephole. Although, the last element is optional. Any door is equipped with two handles, and a latch is attached to the interior door leaf.
Way of life... Brief dictionary anagrams
Ludka- R. see Lodz... Toponymic dictionary
Stomach- In the upper left part of the peritoneum there is the stomach (gaster, s. ventriculus) (Fig. 151, 158, 159, 160), an organ that processes food using digestive juices. The shape and size of the stomach can change depending on the amount of... Atlas of Human Anatomy
Women shiny pillowcase, thin layer on what, shell, half, glaze, enamel; dullness on the eye, whitish darkening of the transparent membrane of the eye. | old the headband is probably light and shiny. | old outerwear, cloak, mantle. Luda... ... Dictionary Dahl
Portal:Arctic/Projects/Islands of the Novaya Zemlya archipelago This project was created to coordinate work on the creation of articles about the islands of the Novaya Zemlya archipelago. Based on the project, a list of islands of the Novaya Zemlya archipelago was created. Contents 1 Maps 1.1 Scale ... Wikipedia
Alphabetical list of islands of the Novaya Zemlya archipelago. Abankiny Stones Alexandra Island (Arkhangelsk region) Artyukhov (island) Afanasiev Island Babushkin Island Bazarny (island) Bashmachny Bezvodny (island) Bezymyanny (island, Tsivolki Bay) ... ... Wikipedia
PSG Zlín ... Wikipedia
Female, Greek bloody diarrhea. Dyspepsia, indigestion. Dysuria, urinary retention. Dahl's Explanatory Dictionary. IN AND. Dahl. 1863 1866 … Dahl's Explanatory Dictionary
City, adm. c. military, Poland. Mentioned in 1332 as Lodza, in the 17th century. Lodzya, modern Lodz. The city is located on the river Ludka (Lodka) boat, and its name is from the Old Polish todzia fishing boat. Apparently, the primary hydronym is associated with... ... Geographical encyclopedia
This term has other meanings, see New Earth (meanings). New Earth ... Wikipedia
Books
- Stomach ulcers. Pathology and therapy from the therapist's point of view, Enelle Harald. Moscow-Leningrad, 1929. State publishing house. Typographic binding. The condition is good. Enel's small book gives in a condensed form full review current state pathologies...
Modern interior doors made of MDF have a lot of advantages - attractive appearance, low price and practicality. MDF provides unlimited space for implementation design ideas, and an extensive range of sizes allows you to choose best option for interior openings of any depth and width.
It’s not difficult and self installation MDF doors, which makes it possible to save on the services of repair specialists.
Door selection rules
If you decide to install the door yourself, the first thing you need to do is take accurate measurements of the doorway, preferably without old box. The main parameters are its depth, width and height.
- The depth of the opening is the thickness of the wall according to which the door frame (frame) is selected;
- The width of the opening is the width of the door + approximately 8-9 cm for installing the door.
The standard size of doors for a bathroom is 60 cm, for a kitchen – 70 cm and for interior doors – 80 cm. Thus, for installation, for example, kitchen door, the opening width should be about 80 cm.

The MDF box itself has standard thickness 2.5 cm, multiply by 2, it turns out 5 cm. Add the necessary allowance for free movement of the door - approximately 3 mm on each side. The remaining distance of 3-4 cm will be needed to adjust the correct position of the loot in space and its additional fixation using polyurethane foam;
- Opening height. This parameter plays a role not so much when choosing the height of the doors (the standard height of modern door leaves is 2 meters), but when choosing the design of the frame. It can be with or without a threshold. Calculation of the height of the door with a threshold is carried out according to the same scheme as the calculation of the width of the door. And if the door is installed without a threshold, then another 1-2 cm is added to the 3 mm margin for free movement of the door at the top (depending on the thickness flooring).
Based on the data obtained, the door and fittings for it are selected. The final set should look like this:
- Door leaf;
- box (2 vertical beams and one or two (if a threshold is provided) horizontal beams;
- vestibule slats (vertical and horizontal);
- additional trim strips (in case of non-standard opening width);
- fittings (handle, hinges, lock (if necessary).
A set of necessary tools
Installing interior doors with your own hands is not particularly difficult, but it is responsible and painstaking process, which will be very difficult to carry out without the appropriate tools. To carry out all work accurately and quickly you will need:
- electric drill or hammer drill (depending on the material from which the walls are made);
- drills or drills 4 and 6 mm;
- hand saw with fine teeth;
- wood drill with a diameter of 4 mm;
- chisel;
- screwdriver or screwdriver with a Phillips head;
- tape measure and building level;
- miter box;
- dowels quick installation length of at least 75 mm and wood screws 3.5x60mm;
- polyurethane foam.
Do-it-yourself door installation: step-by-step instructions
The complexity of the process of installing a door with your own hands will depend on the initially selected model. More expensive options already come with hinges and a handle and have parts sizes ready for installation. Their assembly resembles a construction set, because the structural elements do not require adjustment, you just need to fasten them in a certain sequence, install the box in the opening, put the door on the hinges and decorate it finished design platbands.

We will consider more difficult option, When door leaf It is equipped only with blanks for the future loot and has neither loops nor handles. The first thing you need to do is dismantle the old door and door frame.
Assembling a new loot
This process is performed on a flat horizontal surface, i.e. on the floor (to avoid damage to the elements of the box, it is recommended to first lay a soft substrate).
First of all, the top crossbar of the frame is sawn off, taking into account the width of the door, allowances for freedom of its movement (in total ≈ 6 mm) and the thickness of the door (2.5 x 2 = 5 cm). Next, the vertical elements of the tray are mounted. They are laid out on the floor perpendicular to the top crossbar. All elements are in the “edge” position. When joining horizontal and vertical parts it should be a right angle.
The door strips are temporarily inserted into the mounting grooves and the door is placed on them. Gaskets ≈ 3 mm thick (for example, even strips of cardboard) are inserted between the door leaf and the frame around the perimeter.

Taking into account the possibility of splitting MDF elements, it is strongly recommended to pre-drill the places for future screwing in of self-tapping screws with a wood drill of a slightly smaller diameter.
The attachment points should be located closer to the center of the parts. Two screws are enough to connect each side of the box.
Having received a U-shaped base, you need to cut off the excess vertical elements by lenght. In this case, we must not forget about the threshold (if it is planned) or the required distance from the floor (taking into account the thickness of the floor covering). Having measured the required length and trimmed off the excess, the lower part of the box is fastened with a threshold piece of the same width and according to a similar pattern with the installation of the upper crossbar, or mounting plate for temporary fixation of the correct contour of the tray (attached to the lower end sections vertical racks). The assembly of the box is now complete.
Insertion of loops
This process requires maximum precision and accuracy in work. The easiest way to do this is with a hand-held milling machine, but if you don’t have one, then you’ll have to use a hammer and a carpenter’s chisel.
Having inserted the folded hinges into the gap between the door and the frame, and placing them at a height of ≈ 250 mm from the upper and lower edges of the door, it is necessary to make appropriate markings on the door and the end of the door on the side where the hinges will be placed (taking into account the right or left opening of the door) .

Taking the door out assembled structure, using available tools, it is necessary to cut recesses in the hatch and end of the door that correspond to the thickness and contour of the hinge plates. Next, the hinges are installed in the prepared “sockets” using self-tapping screws (usually they are included in the kit with the hinges).
Do-it-yourself loot installation
The assembled structure must be inserted into the doorway, controlling its correct horizontal and vertical position using building level. The box is fixed using wooden wedges and self-tapping screws.

Door leaf installation
The next step is to install the door leaf with embedded hinges on the inserted frame. At the same time, the correctness of the vertical and horizontal gaps is checked. If the door opens and closes without interference, and all gaps are the same, then the installation was done correctly.
Final fixation of the box
Gaskets (for example, strips of cardboard of appropriate thickness (≈ 3 mm) must be inserted into the gap between the door and the frame along the entire perimeter of the structure. The next procedure is to fill the remaining space between the doorway and the frame with foam.
 We recommend purchasing a special gun for working with foam - this will make the process of installing the box easier and simpler
 After the foam has completely dried (≈ 12 hours), the protruding excess foam is cut off and the lower fastening strip is dismantled.
Installation of platbands
The easiest and best way to carry out this procedure is with a miter box and a saw with fine teeth. Having measured required dimensions horizontal and vertical trims, they must be carefully sawed off at an angle of 45º.

Installation is carried out using thin self-tapping screws, followed by decorating their heads with special overlays in color with cash, nails without heads or mounting glue.
 To all visitors and readers of the site “”, my respects!
We continue to move forward in the repair of our small kitchen, i.e. This article will be a continuation of a series of publications on this topic.
We will be replacing the old door block with a new one.
On the Internet, the topic of installing interior doors is, of course, not new and there is more than enough information about it.
I would not like to repeat myself, and therefore I will not talk about installing hinges and locks, and also talk in detail about dismantling the old and installing new door blocks.
I would like to talk in detail about such a little-known topic of calculation and assembly of a wooden door frame. Moreover, I have not raised the door issue on the pages of my site for a long time.
At first glance, there is nothing complicated about this, but I assure you that this is only at first glance. As with any other work, there are nuances, without taking into account which the result may not be what you wanted, or the whole work may end up down the drain. I'm not even talking about wasted time and nerves.
So, in order for everything to work out quickly and beautifully, nothing special is required from you - just read the entire article.
Calculation of a wooden box based on external factors
In order to make a calculation, several factors must be taken into account.
Factor 1.
Opening dimensions.
The standard opening size is 10 cm more sizes the door itself.
Let's say if the door 700×2000 mm, then the size of the opening should be 800×2100 mm.
Advice.
In order to accurately take measurements without dismantling the old door, you just need to remove the trim on at least one side.
Which is exactly what I did.
My opening turned out to be non-standard in height ( 2020 mm), and in width too, but not by much ( 810 mm).
Factor 2.
Choice of door leaf.
As is known, standard sizes interior doors according to make up.
Since the door is intended for the kitchen, its dimensions should be: 700×2000 mm.
The full name is a door laminated with glass with elements.
Advice.
Door blocks made from solid wood are better than laminated or MDF, but they are more expensive.
Therefore, everyone decides for themselves.
Factor 3.
Choosing a door frame (lutki).
The width of the box must correspond to the thickness of the opening wall.
Advice.
✔ It is better when the width of the box is 5 mm greater than the thickness of the wall, and not vice versa.
✔ If the box is wider than the wall, then the difference can be scattered equally on both sides and the missing layer of putty can be applied, thereby aligning the wall with the box.
✔ If the wall is thicker than the door frame, then the platband will not lie flat against the wall, i.e. it will simply turn out, which is not good.
You can read more about working with platband in this.
Typically, laminated doors come with an MDF frame, covered with a special decorative film.
But we decided that a wooden box would be better because... The doorway was initially too wide, which in turn would have complicated the process of installing the MDF door.
After all, it’s no secret that a box made from a thick wooden block (40-50 mm) is much easier to install than a thin (22-30 mm) MDF box.
Factor 4.
Door blocks are available with a threshold (lower crossbar) or without a threshold.
In our case, the box will have a threshold.
In short, we bought 4 wooden blanks for the future loot with the following dimensions:
- 2100 mm – length of two bars.
- 1000 mm – the length of two transverse bars.
- 120 mm – width of all bars.
- 45 mm – thickness of all bars.
We will use them to make a door frame.
Calculation and preparation of wooden blanks for the box.
I already said that the doorway is not standard height 2020 mm.
We will start from this size.
☛ We immediately give the minimum gap for the mounting foam - this is 10 mm, which turns out to be already 2010 mm.
2020-10=2010 mm
☛ We also minus the size of the thickness of the cross bars of the door frame.
Advice.
In order to maintain the height of the installed door as much as possible, it is necessary to reduce the thickness of the transverse bars as much as possible, but within reason.
note
that I did it on a carpentry machine.
Example.
The initial thickness is 45 mm.
We can safely reduce the bottom bar by 20 mm.
And 10 mm - the top one.
45-20=25 mm- thickness of the bottom bar.
45-10=35 mm- thickness of the top.
☛ Let's sum up the thickness of the bars.
25+35=60 mm- the thickness of two bars.
☛ We subtract the depth of two rebates (20 mm) - the size of the recess (rebate) in the bars for the door stop.
20 mm, because we have two bars (top/bottom)
60-20=40 mm. And it was 70 mm!

Ultimately we get:
2010-40=1970 mm.
1970 mm– this is the ready-made length of the right and left pillars of the door frame.
note , if the door leaf is not planned to be shortened, i.e. the factory size remains (2000 mm), then the racks are cut to length with these dimensions.
- 2005 mm– for door blocks with a threshold.
- 2013 mm- no threshold.
Let's continue.
☛ Now, the transverse bars, already reduced in thickness, must be cut to length, but taking into account the width of the door (700 mm).
☛ We measure from any edge (as convenient as possible) 45 mm (stand thickness).
☛ Make a slot 10 mm deep.
 ☛ We measure from the resulting slot 685 mm and make another slot, but so that the marking line remains.
 A logical question: “Where did the size 685 mm come from?”
This is the width of the door (700 mm) minus the depth of two folds (20 mm) and the gap for closing and opening the door (5 mm).
(700-20)+5=685 mm. Advice.
In order to accurately measure the depth of two folds, you need to join the two posts of the box.
 There are not large discrepancies +/- 1.5-2 mm, so that’s how I measure.
☛ Add 45 mm to the second slot and finally cut it off.
 With simple calculations, we obtain the length of the transverse bars:
45+685+45= 775 mm.
☛ We process the slots for joining the risers with the transverse ones.
☛ Use a chisel to chop off a fragment.
 ☛ We finalize it with a milling cutter.

Advice.
If there are a lot of workpieces, then it is better to cut them with a stationary circular saw against a stop - it’s faster.
Note, that I didn’t get the slots all the way through, so I cut them with a wood hand saw with a straight, fine tooth.
 In order not to scratch the product, I place a piece of fiberboard for protection.
 ☛ I drill ø5 mm holes for fastening.

Assembling a wooden box
☛ I assemble the entire structure by twisting screws together.
 Note,
To strengthen it, I additionally screw self-tapping screws into the end.
Note,
To strengthen it, I additionally screw self-tapping screws into the end. 
 That's it, the door frame is ready, you can paint it to match the color of the door (alder).