DIY crib - drawings and secrets of building a cabinet crib (70 photo ideas). Making a baby crib at home Simple baby bed with your own hands
What kind of bed did you dream of for yourself as a child? Obviously not about those masterpieces of furniture craftsmanship that enthusiasts create today. The only thing that separates you from giving your child the crib of his dreams is your own desire.
Often, it all comes down to the sky-high prices of furniture manufacturers. It is much more rational to buy for a child new clothes or a set of books for the future academic year. Moms and dads, abstract yourself a little from the world of adults and plunge at least for a moment into the world of children.
Go into the nursery and try to look at it through your child's eyes. Every baby perceives the surrounding space as a game and this is how he learns about the world. He will need your help with this.
For example, there is no more effective way to wean a child from sleeping in his parents’ bed than to prepare for him the best place in the world to sleep. Remember how you built houses from scrap materials as a child. Why not an idea for a bed?
The author showed remarkable imagination, and so this project of creating a crib in the form of an impromptu house was born. By the standards of US residents, very little money was spent on its production - only $200. IN furniture showroom like this original bed would have cost its owner at least three to four times more.

To make a baby crib in the shape of a house you will need:
Materials:
- pine boards, bars and slats;
- glue for woodworking;
- persistent Oil paint at least two shades;
- durable furniture varnish;
- furniture screws or wood screws;
- bolts and nuts for assembling the frame;
- nails.
Tools:
- miter saw or any other suitable tool for sawing lumber;
- electric drill;
- sander;
- screwdriver;
- carpenter's hammer;
- fine-grained sandpaper;
- construction tape and square;
- paint brushes and a roller with a paint tray.
Step one: choosing materials
Let's say you have two main tasks. Firstly, since you have decided to make a bed yourself, most likely you are trying to save some money from family budget. Secondly, given that the furniture is intended to be used by a child, all materials should be as safe as possible.
In order to cope with the first task, choose your base material wisely. Do not rush to buy first-grade lumber in the supermarket. The bed will have to be painted, so no one will have the opportunity to judge the extent of your generosity - the paint will hide all the details.
Of course, the most economical option is self-processing of wood and manufacturing of bed parts. But for this you will need a surface planer. Processing and adjustment of the material on a surface planer can also be ordered in the workshop.
Finally, another affordable option is to buy second-grade materials or use used wood. Supermarkets often offer short pieces of boards for sale, which are perfect for making furniture at home.
But how to choose paint for products that are intended for children? This advice may seem trivial, but pay attention to high-quality compositions famous manufacturers. Whatever type of paint it is, even if it is solvent-based, in its hardened state it is of high quality paints and varnishes do not pose a danger.
Step two: detailing the bed design
Collect all the photos from the master class and on a piece of paper list all the parts that you will need to make the bed. Dimensions shown in photographs and diagrams are in inches. When converting to centimeters, multiply the value by a factor of 2.5.
Please note that the bed frame is assembled from a back, a front and two side panels, so you will need eight posts rather than four.
The front panel has openings for entry and windows and you will need four additional cross partitions.
One of the side panels is completely covered with boards, while the second is almost open and also serves as a second window facing the sun.
The base of the bed is covered with boards with a small gap. Instead of boards, you can use slats or a solid sheet of plywood, depending on the task at hand.
The back wall, turned towards the wall of the room, remains as it is, and the front wall is also covered with planks. In addition, you will need slats for the roof frame and parts for the roof.
Prepare the staircase elements as well. It will be permanently fixed at the entrance.
Calculate and indicate the exact dimensions of each part of the bed. You will need a lot of them, and it’s easy to get confused in a heap of goodness. A clear plan will help you coordinate your work and act in a coordinated manner.

Step three: making parts and polishing them
Mark the frame and trim parts. Don't forget the stairs. Cut boards, bars and slats into pieces of the required length using miter saw or any available tool.
If you use a belt sander for sanding, now is the time to start working on the wood. After assembly, you can use an orbital sander, but a belt sander will be out of work here.
Pay special attention to the edges along which you cut. When preparing for painting, any surface must be flat and smooth.


Step four: assembling the crib
Assemble each of the four frame panels using diagonal pocket holes and reliable wood glue. By the way, this time you can’t do without glue. Such a large and heavy structure must be assembled using glue, otherwise it will regularly require repairs.
The panels are ready and you have to connect them to each other. For this, use either furniture screws or bolts with nuts - your choice. Where the side posts meet the front ones, apply glue to the joint surface. Drill holes for screws or bolts, joining both parts together as shown in the photo.
You can also use metal fasteners. Extra strength has never hurt any bed.
Secure transverse partitions for the entrance and window. Screw the slats from the inside to the longitudinal parts of the bed frame, on which the base sheathing will later lie. Sew up the front and side panels of the bed, as well as the base under the mattress, with boards.
Start building the roof. A special load on the roof structure is not expected, so for the manufacture you most likely used slats or bars of a small cross-section. Cover the front side of the roof with planks, imitating a roof. Install a cross-shaped partition on the window.
Securely fix the ladder at an angle to make it easier for the child to climb to the second tier. Use special metal fittings or bolts and nuts for this.


Step five: painting
The author used White color, as the main. For the roof, he chose a dark gray shade. The crib turned out to be universal and in this color scheme could be used with equal success for both girls and boys.
Choose durable paints and no less reliable varnish. It is better if it is a specialized furniture varnish - nitro varnish or alcohol varnish.
Apply two or three layers of paint and at least two layers of varnish. You may want to apply intercoat sanding during the varnishing process in order to obtain the most durable coating possible.
From the first days, you want to surround your child with everything that is best, safe, reliable, and most importantly, something that will serve faithfully for many years until the baby grows up.For this purpose, as a rule, they choose natural materials that are not capable of laying a “mine” for future oncological diseases, thereby protecting the child from the first days.
Parents always want their children to grow up in a healthy atmosphere.
A crib is a baby's first fortress. It is there that he sleeps, enjoys life, begins to explore the world, studying everything that surrounds him.But how can you be sure that the coating and materials of the baby bed are safe? Only by making it with your own hands.

It is very important to protect the fragile body from the harmful influences of the external environment.
Smart dads who have their hands in place know very well- You can only be confident in something when you have tried it and done it yourself. This is the main advantage of the product. Why is that? Let's do a little comparison.
| Factory | Homemade | ||
| Advantages | Flaws | Advantages | Flaws |
| Don’t waste time - go, buy or order | Not always high quality material | Do you know what it's made of? | Manufacturing is labor-intensive and time-consuming |
| No guarantee of design reliability | Reliable design - tested it myself | ||
| The coating is not always of high quality | High-quality coating - I selected it myself | ||
| Often the surface of the product is not treated | The surface is thoroughly cleaned - after all, the child will “crawl” on it | ||

If you have certain skills, you can make a bed with your own hands.
Design and construction of a baby crib
The appearance of a child’s bed determines the comfort of the room, how the child will like it, its comfort and rational distribution of living space.

Thus, design and construction are interrelated.
We all want something original and unusual, unusual for everyday life. But let's be realistic. Why complicate life with an elaborate design of a children's bed in the shape of a car, airplane, baby elephant or steamship, if they are difficult to make? In addition, if there is no specialized tool, such as a thickness planer, milling machine with CNC, band saw and another? By choosing such a design, you can ruin all the wood without achieving what you want.

Let's focus on a classic crib without frills and tricks, which, although difficult, is quite possible to make from solid wood with your own hands.
The best material for a children's bed is solid wood
Wood most preferred material, has no contraindications, absolutely inert. While chipboard, fibreboard, OSB, MDF and plywood contain fillers that have a detrimental effect on the body and also do not tolerate mechanical stress well.

Wooden furniture is always a noble, natural and cozy accent in the interior.
The main feature of all the listed materials that negatively affect use is the presence of formaldehyde in the composition, chemical compound, used in medicine for disinfection.As you can see, it’s not without reason that we recommend choosing solid wood. Required condition– well dried. Do not use damp boards; if you look back, you won’t have time: the structure will fall apart, the material will crack and twist. It is optimal if the wood dried on racks for three to four years, in a shaded place, protected from moisture.

But if there is no such thing, then wood will do machine drying.
In addition to the boards you will need:
- Self-tapping screws, bolts (for fastening parts);
- Metal corners (will give additional rigidity to corner joints);
- Beams, slats (for a mattress stand);
- Lamels are flexible planks 15-20 mm thick, made of hard wood (oak, acacia).

Before you begin a crib making project, you need to purchase materials.
Tools - a reliable assistant to the master
The complexity of the work depends not only on the design of the product and materials, but also on the availability of tools. Having a real carpentry workshop in your arsenal, you can easily make any product. But what if there is nothing except a garage and a workbench? Can I start working?
No problem! Every man has everything he needs. And we need:
- Drill, with a set of wood drills;
- Planer for cleaning wooden blanks;
- Hacksaw for cutting;
- Set of files for grooves.

A necessary set of tools, without which the entire work project would be impossible.
Having a manual milling machine will greatly facilitate the work of assembling a crib, but if you don’t have one, we’ll make do with the above.

Application hand router makes work easier.
Some features of joinery
To make the furniture reliable, special joinery joints are used in its manufacture. Unlike conventional nail or self-tapping fasteners, such fasteners are more resistant to loosening, do not “fall apart,” and are resistant to mechanical damage.

The main task of choosing a connection method is decorativeness, the desire to make it beautiful and invisible.
Such a connection consists of a blind or through groove and a shank that fits freely into the groove. They are fastened with wood glue. The size of each groove and shank is selected individually, based on the thickness wooden blank(slats, beams, boards).

When such a connection is made taking into account the arrangement of wood fibers and its texture, it gives the impression that the product is made from whole piece tree.
First, mark the boundaries of the groove or shank with a pencil. Then an incision of the required depth for the shank is made with a hacksaw, and the groove is drilled out with a drill. Use a chisel to remove excess wood. The edges of the product are smoothed with needle files.If you have a router, set the cutting depth and mill the necessary parts. In addition, using the copying ring that comes with the machine, you can easily make grooves the right size.
Making a baby crib with your own hands
- We decide on the dimensions of the product. You need to start from the dimensions of the mattress on which the child will sleep. We take standard size– 1200x600 mm.

The frame of the crib consists of the backrests and the base itself, on which the mattress will later be laid.
- The lower part of the crib is determined so as not to interfere with the child getting onto the bed. For children from 4 to 6 years old it is 35 cm.

Bed foot board diagram.
- Surface treatment. It is necessary to manufacture the parts of the product, bringing them to the same size. The supporting frame will be a beam cut into 6 identical pieces with 25 mm grooves attached to secure the lamellas.

The base of the bed will be 4 boards 35 mm thick and 7 mm wide.
- We calculate the calculation of the backrest. To do this, add the thickness of the board to the width of the bed. If there are railings, we make an allowance of 25 mm, taking into account their volume.

Children's bed headboard diagram.
- The rods for the backrest are made from 20x20 mm slats. For fastening at the ends we make a spiked connection.

Decorative headboard with legs for a children's bed.
- We assemble the frame. Boards and bed bases are connected to each other using shanks and grooves. For reliability, we strengthen the corners with metal corners, screwing them with bolts or self-tapping screws.

The holes should have the same depth, which is equal to half the length of this piece of wood.
- We attach the base of the mattress to the bed frame using spiked joints.

Before assembling the bed, you need to check the parts for chips and various defects.
- We insert the slats into the prepared grooves on the base of the mattress.
You should not save money if there are few of them, in the future they will quickly break.
- We attach the sides and back to the frame.

After assembly, we clean the surface and varnish it at least three times.
Note! All tenon joints are secured using wood glue. Under its influence, the tree not only holds together, but also swells, securely fixing inside the groove.
Crib house - a cozy fairy tale
We all remember the unique feeling and mystery of huts made from blankets. So why not pamper your baby and improve his crib by “building” his own house for him, in which he can sleep so comfortably?

To do this, during the manufacture of the back of the crib, we will make some adjustments.
Namely, by making the railing a little larger, first using a hacksaw or miter saw cutting off their tops at an angle of 75 0.We attach the bases of the “roof” of our house to them. It is better to secure the connection with tenons, but given the complexity of such a product, self-tapping screws are also suitable, the main thing is- don't forget to glue it.

The last step will be to attach the ridge beam, which will connect the base of the frame of our “house”.
Thus, the baby will receive a personal “fairy tale” made by the caring hands of his father, and reliable roof a blanket thrown by mom will serve.

Put maximum effort, care and love into your product, and such a bed will give your child good dreams, and you - joy and satisfaction from the work done.
Of course, what we have described does not reflect all the subtleties of the process of making a children’s bed with your own hands. During your work, you will encounter many obstacles, and you will have to figure out the nuances more than once. However, we hope that the instructions for making simple furniture that can increase paternal authority to a new level will be useful as to the young dad, and the head of a family with many children.
VIDEO: DIY bed-house.
For a newborn baby, the main place of stay is the crib. Parents try to choose only the best and safest for their children. However, quality items are quite expensive. The price of some imported cribs is prohibitively high. But what to do in such a difficult situation? Buy a cheaper model whose quality leaves much to be desired?
Remember important rule: saving on the health and well-being of your children is unacceptable!If you don’t have the opportunity to buy a good-quality crib for your child, then a DIY crib for a newborn is exactly what you need. It may be inferior in design to its store-bought counterpart, but you can be absolutely sure of the quality of this furniture. A do-it-yourself crib for a newborn, made with love, will become your child’s favorite resting place and a source of pride for the whole family. skillful hands dads.
DIY crib for a newborn - manufacturing technology
This article provides all the necessary information on how to make a crib for a newborn with your own hands: drawings, photos and detailed description process. The choice of material is not an easy question. The table below describes the most common types of materials for making a DIY crib.
| Type of material | advantages | Flaws |
| Tree | Environmentally friendly and completely safe material, pleasant to the touch, with excellent aesthetic qualities | High price |
| MDF | Eco-friendly and safe; affordable; easy to use; covered with safe paint, looks aesthetically pleasing |
Requires coating with paints and varnishes |
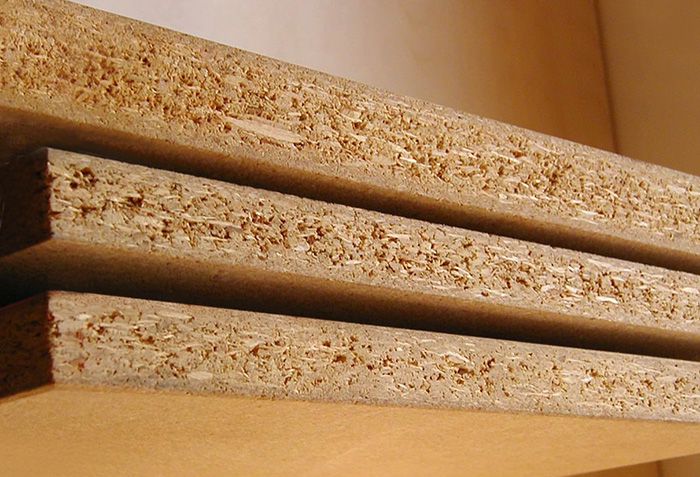
| Chipboard | Affordable material; practical and aesthetic (coated with laminate or melamine); easy to use; light in weight |
Contains formaldehyde, which is hazardous to children's health |

MDF crib
Crib made of chipboard
Wooden crib
To begin with, you need to prepare all the necessary tools, materials for the crib and its decoration, components and be patient.
Materials for work
The most the best material wood is used to make a crib for a newborn. This natural resource environmentally friendly, safe, does not cause allergies and is pleasant to the touch. The best wood recognized for children's furniture beech: It is very durable and aesthetic. Also not a bad option may serve oak, birch, ash and alder. Pine wood is quite soft and may not withstand the active pressure of children. So, You will need the following supplies:
Tools for work
In addition to materials, you will need to prepare a set of tools in advance:
- Level gauge and tape measure for measurements;
- Rasp;
- Manual milling machine;
- Hammer;
- Drill and suitable drill bits;
- Varima;
- Woodworking machine;
- Electric jigsaw.
Now, in more detail about how to make a crib for a newborn with your own hands: drawings, photos and instructions will help you understand this matter.
We determine the overall dimensions and draw up a drawing
The starting point is the crib mattress, or rather its dimensions. Spare no expense and buy your baby a high-quality mattress with a “complex filling” made of coconut fiber with layers of latex. Regular size children's mattress 1200 x 600 mm. You will find out what other children's mattresses there are from the table below.

|
Type of children's mattress |
Advantages |
Flaws |
|
With spring frame |
||
| With dependent spring block | Affordable; good orthopedic properties; reliable and durable |
Over time it begins to creak; Accumulates dust and insects; springs are susceptible to corrosion and accumulate electromagnetic waves |
| With independent spring block | Increased wear resistance and strength; Hypoallergenic |
High price |
|
Springless mattresses (by type of filler) |
||
| Coconut fiber | Moisture resistant; Hypoallergenic; Does not accumulate insects and pests; Has medium hardness; Affordable |
|
| Latex | Moisture resistant; Eco-friendly and safe; Excellent orthopedic properties; Wear-resistant |
High price |
| Cotton wool and foam rubber | The most affordable | Accumulate dust, moisture, pests and bacteria; Low wear resistance; Short service life; Do not have orthopedic properties |
| Polyurethane foam | Non-toxic and harmless; Excellent orthopedic properties; Hypoallergenic and resistant to pests and bacteria; Wear-resistant; Relatively affordable |
|

Spring mattress

Springless mattress
Cotton wool mattress
The dimensions of the mattress are fundamental to determining the size of the crib. The height of the bed from the floor should be such that an older baby can climb into the crib on his own. It is recommended to make it equal to 350 mm.
The distance between the lattice and the solid wall of the crib is 12 mm, and between the rods - no more than 9 mm. Such indicators guarantee the safety of the baby. Based on these points, you can prepare a schematic drawing, which will make it much easier to work with.
How to proceed?
Now you have all the necessary components to make an excellent do-it-yourself crib for a newborn: drawings, photos of the model you like, and it’s time to start the manufacturing process. First, let's prepare everything necessary for assembly.
We produce materials and make crib parts
Need to do the following types works:
- Process using a machine wooden boards, which should be 70 x 35 mm in size;
- To construct the bottom you will need timber from which the frame is made. You will also need 6 transverse bars, in which you will need to make nests measuring 25mm;
- These notches can be made either on a machine or with a straight cutter;
- To calculate the back frame, you need to add to 600 mm the thickness of the side walls, multiplied by two and another 25 mm;
- For the bars of the lattice walls of the crib, 20 x 20 mm slats are needed, which are rounded on a milling machine.
Do not forget that this crib is made for a child, so all sharp corners and edges should be rounded and sanded.
Assembly of parts and finishing
When all the parts are ready, it's time to put them together:
- We assemble the back frame using a 35 mm tenon;
- We connect the side wall blanks with poles and two backrests using blind tenons;
- Use glue to connect the back to the side walls. After the glue has dried, you can connect the parts with self-tapping screws;
- After all the parts are assembled, the crib can be covered finishing material. Remember that at this stage the child's safety comes first. Therefore, all finishing materials must be absolutely harmless to the baby. Choose primer and paint based on water based. The varnish layer must always be sanded.
If you choose varnishes, then buy those with the NC marking. Only such materials are allowed for use on children's furniture.
How to assemble a crib yourself?
If you decide that a do-it-yourself crib for a newborn is too much for you and you bought a ready-made one in a store, then, for sure, upon arriving home you will have a lot of questions about assembling this piece of furniture.
If you are sitting at a loss in front of a pile of parts and cannot figure out how to assemble a crib, instructions, photos and recommendations will help you in this matter. In order to correctly assemble all the parts, you need to follow these steps::
- All parts must be moved to the children's room. This will save you from moving the already assembled crib. Moreover, in this case the question will not arise: how to squeeze the bed into the doorway;
- Unpack the box. There must be some inside detailed information on how to assemble a crib, instructions, photos and list necessary tools. As a rule, this is a screwdriver, a reversible wrench and a hammer;
- Check the availability of all crib spare parts according to the list. If something is missing, then immediately contact the seller for a replacement or return of the product;
- If suddenly there are no instructions, then you can check the complete set of all parts without it. Know that all cribs typically consist of the following elements: upper and lower parts, rubber furniture wheels, a support structure for the mattress and the mattress itself, two side thin boards. Inspect all parts carefully for defects.;
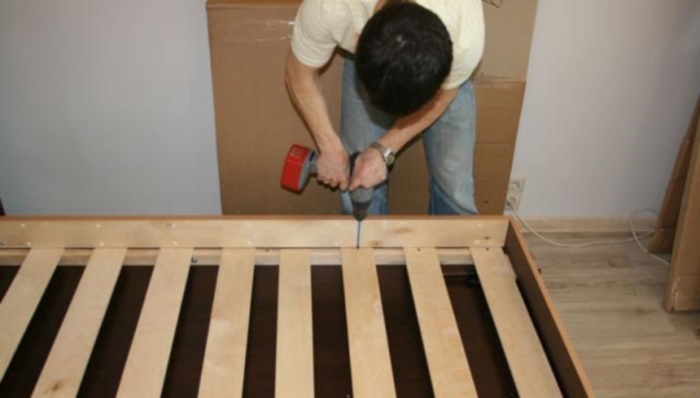
- Now let's proceed directly to assembling the crib. Screwing the screws should start from the bottom and side backs. The screws must be loosely tightened. Next, we connect the back wall using 2 screws to the side backrests;
- The next stage is the front side of the crib. Most models have this part solid and movable. This element must be inserted into the grooves on the side parts. Next, firmly holding all the fasteners, we check how freely the facade moves;
- For rocking a baby, arc-shaped components that are located at the bottom of the side walls will be useful. When the baby grows up, they will need to be secured in metal grooves in the sides;
- Critically evaluate the strength and stability of the entire structure, the strength of the bottom, the absence sharp corners and material defects ;
- Next, we place the mattress in the crib and decorate the baby's sleeping area according to your own taste.
These simple instructions will help you assemble a new crib purchased in a store yourself without the involvement of a specialist.


Assembling a pendulum crib
The pendulum crib differs from all other analogues by the presence of a baby rocking system. This function is very convenient for the first months of the baby’s life. However, difficulties may arise with the configuration of this model. But further description of how to assemble a crib - pendulum: instructions, photos and step by step guide will help resolve this issue.
This type of crib consists of a frame, bottom, sides, legs and a pendulum mechanism. Also, such models can be equipped with special drawers for baby clothes and linen. The mechanism itself can swing up and down. When the need for it disappears, the structure is fixed.
Assembly is carried out according to the following scheme:
- You will need all the elements of the crib, a work plan, screws, damping devices and a screwdriver;
- The work area on the floor should be covered with a light cloth to prevent loss of elements;
- We fasten the static back wall with screws to the side backrests. To avoid confusing the top and bottom of the back wall, use the legs as a guide;
- The next stage is the installation of the bed. It can be either solid or slatted. The slats are inserted into special holes in the bar of the rear wall. At first, the stock is secured lightly with screws. Movable front component attaches to recesses on the side backs of the crib, which serve as guides. Next, the screw connection should be tightened more firmly;
- Next, the finished body can be turned over and the pendulum system can be assembled. If the model has linen drawers, they are placed in the internal space of the pendulum. Next, its side panel is secured with screws. The housing is mounted on the pendulum using bearings. Make sure that the notches of the clamps line up exactly. Caps cover screws for an aesthetic appearance.
A do-it-yourself crib for a newborn, carefully prepared for the baby, or purchased in a store that meets all safety requirements, will become best place rest and sleep of your child and will deservedly take a central place in the interior of the children's room. To carry out these manipulations, it is not necessary to call a specialist. Thanks to this guide on how to assemble a crib - pendulum (instructions, photos and recommendations), you yourself will cope with this task perfectly.
The modern market offers a sufficient selection of children's furniture, including cribs.
A child will be able to sleep in his crib for a maximum of four years, then he will have to change it to a more adult-sized version. And the price of furniture is not cheap at all, so there is an option to make a comfortable crib with your own hands. It's not as difficult as it seems at first glance!

It is not at all necessary to be a professional in this field and spend a lot of time on assembly.

The first step is to purchase only high-quality environmentally friendly materials and take this issue seriously, considering the entire upcoming process.
The photo of a do-it-yourself crib shows how to make one for a five-year-old child, but all of the specified parameters can be increased to a larger size.

The benefits of a self-made bed
When you go to a furniture store, you can find a lot of options for children's beds from various materials(plastic, fiberboard, chipboard, wood). The best material, of course, wood, which provides safety, durability and is the most durable option.

Ready wooden crib is quite expensive. Not every family can afford such costs, especially since it will only last a few years.

The cost of a hand-made design will be several times less and has the following positive aspects:

- reliability in use of the design. Children often love to play and jump on the bed, and you won’t have to worry that it will break under the load;
- can be made strictly individual bed. Which will suit the style and interior of the children's room and has individual sizes;
- The creation process will help you spend time with interest with your child, who will probably not refuse to help his parents.
Purchasing the necessary material and preparing tools
To begin with, you should carefully prepare the room in which the planned process will take place. If it will take place directly in the room, it is wise to cover the floor and furniture with film, since a lot of dust and sawdust will appear during the work.

Then you need to competently prepare an exact drawing of a crib for a newborn with your own hands, or find a suitable sketch on the Internet.

You will need a number of materials:
- self-tapping screws of different diameters;
- wooden panels for furniture;
- special wheels with which the drawers will be pulled out;
- a sheet of plywood or a metal grid for the base of the bed;
- sandpaper for processing cuts.
The set of tools is absolutely minimal: electric jigsaw, grinder and regular drill.

It is important to first, before drawing up the drawing, measure the mattress that will be placed in the crib, since later it will be more difficult to choose the right size!

Step-by-step making of a baby crib with your own hands
Having decided on the size and design of the children's bed, you can begin the actual work:

- All necessary markings are carefully applied with a pencil, not forgetting about the edges.
- Then, using a jigsaw, you need to carefully cut out all the parts.
- Needs to be cut metal corners the required size, immediately drilling holes in them (maximum five), into which self-tapping screws will be mounted in the future.
- To make the base of the mattress, you need to screw the corners to the bottom of the sides.
- Having conveniently placed the crib on its side, you need to assemble all the necessary parts.
- Use sandpaper to smooth out possible irregularities and sharp corners.
- There are spacious drawers at the bottom of the furniture.
- It is wise to coat the crib with varnish or a similar coating, which will give it an aesthetic appearance.
- The final stage: place the mattress on the bottom of the bed and spread the bed linen.
Accessories for baby's bed
A crib for a small family member must be equipped with sides that will serve as protection for the baby. It’s very easy and fun to sew the sides of a crib with your own hands.

Their most popular type is the option that protects all four sides and is secured with regular ties.

Note!

When choosing fabric for children's bumpers, you should opt for lightweight materials with not too “pretentious” patterns, since the baby will have to study the patterns around him for quite a long time.
A cape over the crib protects the child from insects and possible drafts. It is also possible to make an original canopy for the crib with your own hands by choosing the right fabric.

It is better to buy two different cuts (quite wide for the allowance) natural material: weightless, light, summer fabric and denser fabric for winter. First, you need to purchase a frame that attaches to the bed. Then draw a pattern according to size, cut out the parts and sew them in the right places.

With imagination and minimal skills, you can make an original, unique crib that will serve and delight both you and your baby for several years!

DIY crib photo


Note!


Note!


Is there not enough space in the children's room for separate cots? Assemble a children's wooden bunk bed with your own hands. We have prepared design options for you, accompanied them with diagrams and drawings, and will show you the algorithm for making such a bed with your own hands, illustrating with photo and video materials.
A bunk bed for children or teenagers can also be made from metal, but not everyone will have a neat welded structure, and appearance Such sleeping places are not too childish. Therefore, we will consider making beds from wood and lumber, since these are inexpensive and easy-to-work materials, warm, beautiful and homely.
Bed frame materials
Scroll wood materials, from which you can make a bed, is quite long. Let's highlight the most common ones.
1. Array. Expensive material and quite difficult to prepare and manufacture if you do not have experience working with it. Experience is important here. Although products made from solid wood are the most beautiful and durable, they still don’t use a children’s bed for very long - children grow up and begin to need other sleeping places.

2. Lumber - edged or planed boards, timber - the most common and easy-to-work materials, provided that you are confident in proper drying, otherwise load-bearing structure can "lead".

3. MDF - fibreboard. The formaldehyde emission of the material is at the same level as that of ordinary wood. When drilling, it generates dust without forming chips. Laminated MDF looks very attractive. An uncoated slab requires additional finishing, such as varnishing. You can order individual bed elements at furniture workshop or a sawing shop: they will carefully cut everything out and glue the edges.

4. Chipboard - particle board. Formaldehyde emissions are increased without a sealed coating, excluding class E1 slabs. Easy to saw, but does not hold screws well. Suitable for unloaded parts, such as drawers mounted under the bottom of the bed. Backrests can be made from laminated chipboard (laminated chipboard), decorative panels — film coating prevents formaldehyde from evaporating, but it is important that the ends of the slabs are covered with film.

5. Furniture board- a slab glued together from individual blocks natural wood. Beautiful, durable, even allows you to carve, but requires skill in operation, as it has internal stresses, which need to be taken into account.

When purchasing fittings, you should give preference to steel hardware. Aluminum ones are much less durable and rigid.
Methods for connecting wooden knots
When making a bed, you may need various connections horizontally, vertically, and the formation of corners. This can be done different ways. We present some of them for your reference.
 1 - half-tree connection; 2 - “claw” connection
 1 - complete cutting; 2—cutting is not complete; 3 - steel corner
 1 - connection with rectangular keys; 2 - connection with keys " dovetail"; 3 - connection to the main tenon
Design options (drawings and decor)
Bunk beds can have different designs and be decorated in a variety of ways. So, the upper tier can be located exactly above the lower one, offset, leaving space for a cabinet, or perpendicular to it. The staircase may consist of drawers. Another option is steps, which are hinged lids on drawers. The bed frame can also be supplemented with drawers located under the lower mattress. To do this you will need guides - runners. Sometimes something else is added to the bed: a table, shelves, a pencil case or sports equipment.
Below are drawings of some beds with basic dimensions.


 And now a few design ideas that can inspire you to create an original one. bunk bed. Please note how some models use absolutely “waste” materials - slabs, branches, trunks, driftwood.
 Bed for real Mowgli and Robinson Crusoe
 Man-made fairy tale
 Bed - sports corner
 Bed - playground
 Bed - house
 Coupe bed
 Bed for teenagers. Material: laminated MDF
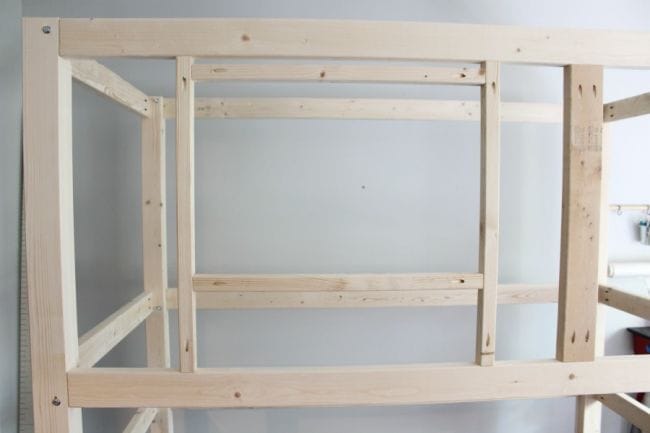
Method for making a bunk bed
Some of the most inexpensive materials- boards and beams made of pine. It is from these that we will make a two-story bed.
Material calculation
When making a bed, you need to keep in mind that not only a child can sit on the lower bed, so the distance to the bottom of the upper bed should not be less than 85 cm. The size of sleeping places in the case of purchased mattresses is determined by their width and length. If you make your own mattresses from two layers of foam rubber in a cover made of thick fabric, then the sizes are taken based on personal preferences.
The figure below shows the individual elements of the bed, and the table shows the purpose, dimensions and number of pieces.
 1 — vertical racks(legs); 2 — external linings for the racks; 3 - boards of the supporting frame; 4 - upper and lower headboard strips; 5 — central headboard bar; 6 — side guards; 7 — staircase railing; 8 - steps of the stairs
| Qty | Size, mm | Name |
| 4 | 38x76x1730 | Vertical racks |
| 4 | 38x76x1730 | Blanks for external linings for vertical posts |
| 4 | 38x140x2030 | Bed support frame boards |
| 4 | 32x44x1850 | Longitudinal mattress support bars (not shown in the picture) |
| 24 | 20x76x1000 | Transverse mattress support slats (not shown in the picture), cut in place |
| 8 | 20x140x914 | Upper and lower headboard/footboard slats |
| 4 | 20x90x914 | Headboard/footboard center slats |
| 1 | 20x90x1510 | Stair railing |
| 3 | 20x64x482 | Stair steps |
| 2 | 20x90x1800 | Fence railings, cut to the required size during installation |
Assembly units
A bed is furniture consisting of several assembly units, which are then assembled into a single whole. Identical parts can be cut by holding them together with a vice or clamp, so they will turn out absolutely identical. Before assembly, you need to make sure that everything wooden parts cleaned, smooth and free of burrs. It is better to work with a special wood sander or grinder.
1. Headboard and footboard
These are two almost mirror-like elements. The difference is that the fence rails are built into the footboard as shown in the pictures below.
 Headboard and footboard
 Detailed layout with dimensions of headboard and footboard
 Installation order: 1 - dowel 8 mm; 2 - the stand and backrest slats are drilled simultaneously; 3 - this part is attached after assembling all other parts of the headboard
2. Elements of the supporting frame
To assemble two supporting frames, you will need four prepared boards - the longitudinal components of the frame. To ensure the reliability of the structure, the longitudinal strip must be glued to the board and additionally screwed with screws to the middle of the thickness of the board. Between the bars glued to the longitudinal support strip of the mattress, transverse slats will be laid - the base for the mattress.
 Design and dimensions of the supporting frame board
3. Details of stairs and railings
The railing of the fence is simply a processed board, the railing of the stairs is a board with a cut for mounting on the frame. Places for fastening the steps must be marked in advance, and make sure that the screws for fixing them do not fall on the frame screws.
 1 — cutouts 38 mm; 2 — places of fastening of steps; 3 — stair steps, 3 pcs.; 4 - fence
4. Frame assembly
The footboard and headboard are connected at the bottom to the boards of the supporting frame using screws. After this, the transverse slats and mattress holders are laid, and the outermost ones are filed in the corners for tight installation. There is no need to secure them. The second tier is assembled in the same way.

5. Assembling stairs and railings
The stairs and railing are simply fixed to the frame with screws. If desired, the fence can be made on the side of the wall - for the lower and upper beds. Then you will need four more planks.

Now the wood can be painted and varnished, mattresses can be laid - and the bed is ready!
In conclusion, we suggest watching a video about making a bunk crib for real princesses.
Video. Part one
Video. Part two