DIY roller blinds - detailed instructions. How to make roller blinds with your own hands Sew roller blinds on plastic windows yourself
Pursuing the goal of refreshing the interior, sewing new curtains will simultaneously demonstrate the creative abilities of the housewife. A successful experiment would be replacing classic curtains with a current roller model. Afraid complex mechanism not worth raising.
The proposed master class will help you create original roller blinds with your own hands. There are options for attaching textiles to windows without drilling. Further information will reveal the secrets of mastery.

Characteristics of roller blinds
Laconism and practicality - distinctive features roller blinds. This model is especially appreciated in the kitchen interior. Roller curtains in small rooms are designed to preserve space and not visually clutter up the space. Finished goods during assembly they are wound onto the shaft. There are three options for the location of the structure:

The advantages of interior design with roller blinds are as follows:
Price ready-made models, especially with a cassette design, is quite high. It is much cheaper to design roller blinds yourself. The principle of their operation is as follows:
- The role of the cornice is played by a shaft, which is fixed above the window opening or directly on the frame. There is a canvas on it.
- The material itself is held in place by ribbons or cords that are located at the top of the curtains. They allow you to adjust the degree of opening or closing of the roller blinds.
- There are sewing options when several transverse “bars” limit the height of the product’s opening.

The mechanism for installing curtains without drilling is presented in the following video:
Preparatory stage: measurements, choice of fabric, related materials
Before you start taking measurements, you should decide where the curtains will be fixed and the model itself, whether it will cover the entire window opening or just the glass. The procedure consists of simple steps:
- First, all window sizes are recorded.
- The length of the product is determined by the height of the window with the addition of 15 cm for pockets and 2 cm for seam processing.
- The width is equal to the dimensions of the window, which are increased by 2 cm.
An approximate measurement diagram is shown in the photo below:

The choice of fabric takes into account the desired degree of shading of the room.

Important! When mounted on window sashes, roller blinds are clearly visible from the street. Therefore, the material is selected with a double-sided pattern, or a cut is purchased whose length is twice the required size.
If roller blinds are intended for the kitchen, it is recommended to find an antistatic fabric that can repel dust. It is less susceptible to contamination, making textile care easier.

In addition to the material, for original curtains you will need:
- Two slats, the length of which corresponds to the size of the window.
- Furniture stapler.
- Hook screws – 3 pieces.
- Ring screws – 5 copies.
- Strong tape or cord.

Self-production
Options self-made There are several curtains, let’s look at the most popular ones.
Method 1
To create roller blinds with hooks, you need:

To place a finished curtain on a plastic window without drilling, hook screws are screwed into the frame, which are placed in accordance with the location of the upper rings on the roller curtain strip. You will need to fix another hook on the frame, which will serve for winding the rope when the roller blind is rolled up.
Today, the selection of curtains for decoration window openings is not difficult. Now you can purchase not only any model, but also choose the most suitable shade and fabric texture for your interior, the combination of which will help in zoning the space.
DIY curtains
So why not try to save a little and make your own roller curtains? Roller blinds They are very easy to sew, and also help in zoning space and add coziness to any room.
What are the differences between roller blinds and how to choose the right fabric?

Roller blinds for windows
According to interior design experts, blinds are not very suitable for decorating residential premises; they are a more office option. Roller blinds are considered a worthy replacement. They are very easy to use, add coziness to the room, look homely, and sewing and installing them yourself is as easy as shelling pears.
Very often, Roman curtains are confused with roller curtains, and they think that they are the same class. Of course, Roman curtains are very similar to roller curtains, both in appearance and in fastening, but still, there is a big difference between them:
- Roman blinds can be folded using established bar like an accordion;
- roll - turns into a roll and does not have slats along its length, which ensure its rigidity.
The curtains can be installed in 3 variations:
- on the wall;
- above the window opening;
- on the frame itself.
You can sew roller curtains with your own hands from almost any fabric, but it is better to buy a special fabric that is impregnated with an antistatic agent or an antibacterial mixture. This is especially important if the curtains will be installed in the kitchen or bathroom.
Master class on sewing roller blinds

The step-by-step instructions have the following sequence:
- Take measurements of the window opening using a meter, cut out 2 pieces of fabric with required sizes(to create a seam, make a margin of 10 cm in length and 3 cm in width).
- Sew 2 pieces of fabric from the inside out. Do not sew up one end completely, but turn the entire product through it. Sew this area and iron the curtain.
- Turn the future curtain face down and sew pockets for the trim.
- The wooden top strip serves as a curtain holder on the wall. Try to carefully screw a ring-screw into it through the fabric, and also fix 2 screws on the front side. Make a 5 cm indentation on one side of the bar and screw another ring there.
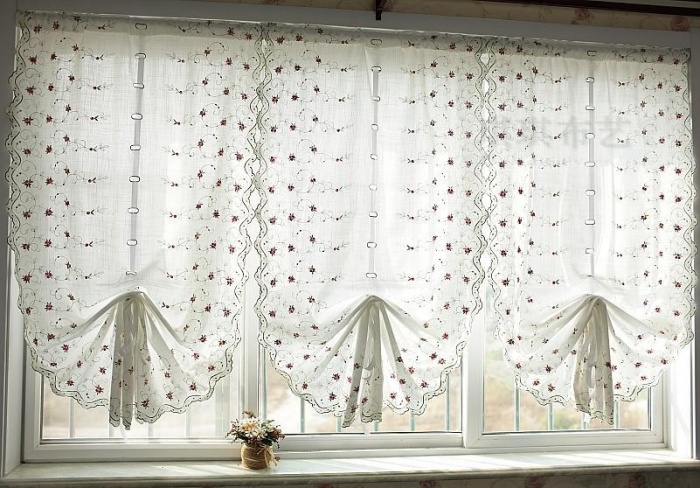
- So that roller curtain could be twisted, it is necessary to attach a lace. To do this, you will need 2 laces: the length of the first should be 3 times the length of the curtain, and the length of the second lace should be the same, but with the addition of half the length of the curtain.
- The laces need to be threaded through the rings onto the fastening bar.
- Then pull the lace from the inside out and thread it through the rings. After this, bring it out through the common side loop and connect the 2 cords together.
An approximate fabric calculation is given in the table.
As you can see from the table, to sew “blinds” you need about 7 m of fabric.
Master class on sewing paper curtains

Curtains for the kitchen
Paper curtains are an excellent combination of price and quality for those who cannot yet afford more expensive purchases to decorate the interior of their room. Curtains made from paper look quite impressive, and with their help you can protect the room from the sun's rays.
Visual online instructions can help you make them yourself.
Any thick paper is suitable for sewing. Its length should be a quarter longer than the window itself, and the width of the curtain will correspond to the width of the window opening.
In order for paper curtains to rise easily, you need to choose a ribbon for them, preferably one that matches the color of the fabric. You need to measure the paper with allowance for knots and bows.
Please note that if the paper is not plain, but with some kind of pattern, make sure during cutting that the pattern is selected correctly.
The cut sheet of paper is folded like an accordion with a fold width of 3-5 cm. Try to keep the folds the same in width. If your eye is not very accurate, do not be lazy and mark the canvas with a pencil and ruler.
Fold all the folds into 1 strip, find the middle and make a hole with a hole punch. Thread a ribbon through these holes and straighten the sheet.
Paper curtains can also help in zoning the space - they can not be a straight linen, but in the form of a “peacock tail”, for which it will be enough to glue both lower corners of the sheet together. So the easy way You can also perform zoning of space.
To make the cord for opening the curtains more interesting, you can decorate it with bows, beads or a tassel.
Color solutions for the living room

DIY roller blinds
Well, we hope that the master class on sewing curtains was interesting and now you are wondering what curtains are suitable for your room and what combination of colors is acceptable for zoning? With our help, you can easily choose the right color and learn how to choose curtains to match the wallpaper.
According to the designers, if all the walls of the room are made in one calm color, you can use floral curtains or a combination of other bright prints to add color to the interior.
Checkered curtains also look harmonious in the interior. Using vertical and horizontal stripes, you can visually adjust the size of the room and perform zoning yourself.
If you like classics and don’t like bright shades, you are probably interested in the question of which curtains will suit beige wallpaper? As a rule, curtains that match the wallpaper look very dull, so it is better to choose a color that harmonizes with cream or beige tones. For example, dark chocolate-colored curtains or olive curtains will very harmoniously complement your elegant interior.
If your room's windows face sunny side, will help make the room cooler lilac curtains or pink curtains. Pink curtains and lilac curtains are perfect for decorating a nursery. girl's room. You can also use a combination of these shades, both on the walls and on the windows. Zoning the space will help to beat lilac curtains with a bright pattern or purple or pink curtains made of translucent material. Lilac and lilac curtains can also strengthen nervous system, fill a person with peace of mind. As practice shows, it is purple and lilac curtains that are harmonious in combination with high-tech style.

If the windows of your apartment face north, orange curtains will help give the room warmth and comfort. Orange curtains look harmonious in combination with brown, yellow and red shades. Orange curtains can fill a person with enthusiasm and charge with energy. Also, bright orange curtains will give a boost of energy and interest in life. Therefore, if some difficulties arise in your life, you should choose orange curtains.
Roller blinds have become very popular for window decoration in different rooms, and when you come to the store your eyes just run wide from the abundance of goods different colors and from different materials. How to sew roller blinds with your own hands? - Here main question housewives who love to do handicrafts or those who have a limited budget. We answer - of course it is possible, and even necessary! And this doesn’t require much effort, just patience and the necessary materials.
There are a number of advantages why many people choose roller blinds. Firstly, it is practical and economical in terms of finances and space occupied. Secondly, they are suitable for any room in any design style. Thirdly, thanks to the lifting mechanism, you can adjust the level of illumination in the room. Fourthly, they are very easy to care for and you will have to do this extremely rarely, unlike classic long curtains. Fifthly, roller blinds plastic windows Very easy to install using self-tapping screws or adhesive tape.
Which fabric to choose
The most best fabric for any lifting curtains, including roller blinds, this is polyester. This material has a special impregnation that protects against water, dust and dirt. Polyester curtains do not have to be completely removed and washed for minor stains; simply treating stains with a damp cloth is sufficient. Although polyester has such positive qualities, this does not mean at all that other fabrics are not suitable for roller blinds. You can use thick cotton, linen, cambric, and even burlap.
The color and pattern on the fabric should correspond to the main idea of the interior. Horizontal stripes They expand the window opening, but can significantly lower the ceilings. It is better for bright floral designs to be small, because a large, splashy pattern can unfavorably focus attention on a modest window. If the room is exposed to too much daylight during the day, you can hang roller blinds from thick fabric dark shades. White and beige fabrics make the room bright and cheerful, and allow the sun's rays to pass through well.


Required materials and tools
The materials that may be needed when making Roman blinds with your own hands are very simple and uncomplicated.
- Piece of fabric
- Centimeter flyer for measuring and cutting fabric
- Sewing machine
- Two wooden blocks
- Screwdriver and screws
- Furniture stapler
- Ribbons and laces for fastening

Step-by-step instructions for making roller blinds
You will learn how to make roller blinds with your own hands from our article using detailed description process. First, let's discuss how to measure the height and width of the window before cutting the product. If a curtain made by yourself will be installed inside the window to the upper frame, then measure the height and width of the opening. And if you decide that the canvas should be fixed on the wall above the window, then we measure like this: we step back 10-15 cm from the top edge of the window, and the cornice will be fixed there. Next, we measure the length of the planned curtains; it will be 10-15 cm below the window sill, and the width will protrude on the sides by 10 cm.

Before taking measurements, you need to decide in which part of the window the roller blind will hang - inside the opening or outside
With side cord
Homemade roller blinds with this type of rise are more convenient to use, but may take more time and effort to manufacture and install.
- Cut the fabric curtains according to the window measurements, you should end up with two identical pieces, don’t forget to leave seam allowances.
- We make a pocket for the weight strip at the bottom of the curtain and insert it. At the top the product will be attached to wooden block using Velcro.
- Next, we sew plastic rings on ribbons, departing from the top edge approximately 5 cm, and from the sides 15 cm. C reverse side screw in the hooks of the installation bar.
- The curtains will be raised using two cords threaded into the rings. The length of the first is equal to three lengths of the curtains, and the length of the second is the same plus half the length of the canvas.
- Tie the cords to the hooks and pass them around the curtains and thread them into the rings. Pay attention to the photo: cord longer length must pass through two rings.
- The cords are fixed on the wall from the side of the longest cord. If you need to raise the roller blind, you just need to pull the threads and fix them at the desired level.


With garter ribbon
- The first step is the same as for curtains with a side cord: transfer the measurements taken to the fabric and cut out the parts, they are sewn together in the same way as in the first case, leaving one side unsewn.
- Fold the fabric face to face and sew along the edge on three sides, leaving the top edge without a seam.
- Turn the product inside out and iron all seams. You have a so-called bag.
- We fold the bottom edge so that we get a pocket for the weighting material. We stitch and insert the weighting strip.
- Second wooden plank must be secured to the frame or above the window, and then we attach tapes to this bar to secure the raised curtains.
- We attach the finished curtain to the improvised cornice using a furniture stapler.

Important! With this installation method, it will be problematic to remove the entire fabric for replacement or washing. Therefore we offer the best option- this is Velcro. Glue one part of it onto the block, and sew the second along the edge of the curtain. This way you can easily replace your tired curtain with a new one.

As you can see, such unusual fabric blinds It’s not very difficult to do it yourself. Stock up on creative inspiration and patience and then everything will work out!
Below is a video on making roller blinds with a factory lifting mechanism
First of all, let's look at the question of what it is - roller blinds. What are their advantages and disadvantages. Roller blinds are different types structures to limit the penetration of light. May consist of different numbers elements and materials. They must have a mechanism for lowering and raising. Installation and operation of roller blinds is very simple.
Designers often include them in their projects due to the high variety of colors and textures. Roller blinds are also ideal for plastic windows, which gives them an advantage in modern urban interiors.

Pros and cons of operation
The advantages of roller blinds are: big choice materials and textures suitable can be found for any style and room, including rooms with high humidity. They are easy to use on a daily basis due to their mechanical component.

In addition, this approach saves space - the window sill remains free. Also, a special approach to insolation of the room helps to save on expensive curtain fabric.

The mechanism is ideal when installing the system " Smart House» — roller blinds can be installed electrically controlled. Big plus - lightweight self installation. To maintain health and order, there are special solutions and impregnations of materials.


Another advantage is the huge variety of manufacturers of this product. Nowadays, competition is very high: in addition to going to the store, you can create roller blinds yourself or order from an online store according to the sizes and components you need.

Besides maximum size canvas up to 3 meters is already a minus, since the height of the window also matters; the more material is used, the more difficult the operation of the mechanism itself. If the width of the window does not allow it to be covered with one panel, gaps are inevitable. Low wear-resistant, cheap materials quickly fail due to constant friction.

Step-by-step instructions for creating fabric roller blinds
An excellent option for window decoration is handmade roller blinds. Easy replacement of the fabric base allows for numerous variations of interior transformation. What’s even more interesting is that you rely solely on your imagination.

We suggest considering three options for creating curtains yourself: with a rod - a shaft made of wood, with a roller located along the lower edge of the curtains, and making roller blinds from ready-made industrial parts.

Before starting work, it is better to wet and dry the fabric, decorate and stitch it so that it does not deform during the work. The width of the fabric is selected according to the width of the opening plus or minus allowances.

It is enough just to take the required footage of fabric for alteration: its length will be equal to the height of the window opening with the addition of 30 cm to hide the fastening, the width is selected according to the width of the window. It may take twice as much fabric; in the case of a one-sided print - two window widths plus a few centimeters for allowances.


The first option is with a bar shaft
A very simple method to make, we need: fabric, a couple of bars (shaft and weighting agent), garters, measuring tape, screws (hooks and rings), cutting tools. A detailed photos An example of roller blinds can be found on the Internet.

The sequence of actions is as follows. It is better to wash and iron pre-purchased fabric based on calculations and exact measurements before starting work. We sew from the wrong side along the width and on both sides of the length of the curtain, so we get a bag, which we then turn inside out.

Carefully sew the raw edge and iron it. We sew pockets by folding three centimeters per edge at the top, one and a half at the bottom. The slats will then go there.

Roller Curtains for the Kitchen: Types, Sizes, Prices, Installation (Photo) regarding DIY Roller Blinds – Goosengz
We screw in two rings on the screws from the inside of the curtain. We retreat 6 cm on the front part of the product and screw in another screw with a ring fastening. We take prepared garters, one of the elements is equal to the length of the curtain multiplied by three, the second is equal to three and a half lengths.

We tie the fastenings with rings, fasten the long garter to the fastening that was screwed in at the end. We pass them along the wrong side and again pass them through the ring-screws. We bring it out through the side loop and tie it off. Our roller blind is ready!

To hang it, screw more hooks and screws into window frame opposite the hooks already on the curtain. Now the curtain can be hung! And to wind the cord we use another hook. The whole job takes a couple of hours!


The second option is a roller at the bottom of the roller blinds
We process the fabric on both sides. We form a pocket for the weighting material at the bottom of the canvas. If the fabric is not double-sided, then we sew a bag according to the previous sample and iron it. The weight will serve as the shaft mechanism.

If the fabric is printed on one side, then we sew a bag, turn it inside out and iron it. We hide the block in the lower edge of the curtain. We spend a couple of millimeters on the top edge with the hem on the wrong side. Next we work with Velcro/adhesive tape.

We sew one part of the fastening element to the curtain, and fasten the second to the block near the stream with a stapler. We wrap the block in fabric, attaching the canvas to it. Making ties 25 cm plus length equal to height windows multiplied by two.

We fasten the ties to the top bar with the same tool, symmetrically relative to the center of the product and in half relative to the total length. Secure the top block with a screwdriver and self-tapping screws.

The third option is creation with a base in the form of a finished structure
It happens that it is not possible to choose curtains according to your wishes or the materials you need cannot be found in stock. Then your imagination comes into play; by choosing the desired pattern or ornament, you can easily change the finished product.


For alterations, natural fabrics are often chosen: cotton, rattan, possibly canvas. You need to be careful when attaching the fabric, a lot depends on how the winding will take place.

Then we remove the weighting material from the cylinder and remove the original canvas. We add 2-3 cm to the length of the roll and get value A. To get value B, we take a value equal to the distance from the fastening to the window sill plus 2-3 cm. Next, we cut out a piece of width A and length B on the canvas. We process the edges on the side - we bend them one and a half cm Using an iron, we stitch.

We make a pocket along the bottom edge of the curtain, where the weighting material will hide. We also bend one and a half cm, then five cm. We attach the curtain to the mechanism with a layer of glue; you can use double-sided tape.

When fixed evenly, the curtain can be wound and unrolled without any problems. We place the curtain in the finished mechanism, insert the weighting agent, the curtain is ready!


It’s probably really not easy to make just a variety of day-night roller blinds, since their functionality involves two canvases shifting relative to each other when twisted. The idea of such curtains allows for insolation through strips of translucent fabric, but on the technical side, when altering, this is quite difficult to implement.

Maintenance of roller blinds
Making or choosing roller blinds is only the beginning of their service. Fortunately, there are a great many examples and photographs of roller shutters on the Internet. It is also important to properly handle and care for them. However, it is very easy!


If cleaning is necessary, the installation mechanism can be removed for almost any model. Thus, the structure can be disassembled and easily cleaned.

If necessary, the fabric can be steamed using a weighting agent to make it easier to remove. Then, according to the recommendations for a certain type of fabric, the fabric is cleaned, washed, ironed and placed back on the window frame. Roller blinds are unpretentious and always pleasing to the eye.

Photo of do-it-yourself roller blinds


It’s difficult to say when blinds burst into our lives, but every year, more and more more people install them in their offices. Just a few years ago, blinds were widely purchased for a house or apartment, but over time they were replaced by roller blinds.
However, not only them. Many people also refuse ordinary curtains, but of course it all depends on the interior. If the design of the room is classic or aristocratic, then such a product will not suit, so it is better to give preference to thick curtains made of good fabric that hang to the floor.
And if you like something simple and at the same time beautiful, then roller blinds installed on windows The best decision. In addition, they can be washed if they are not paper, but made of fabric.
But today we will not talk about how to choose them, but how to make roller blinds with your own hands.
Advantages of roller blinds
- They can be used as an addition to tulle or installed independently.
- Suitable for any windows.
- They fit tightly to the window, so nothing will be visible.
- They are easy to care for.
- Protect from the sun.
- A huge selection of options, plus you can do it yourself.
Important! Do not confuse Roman blinds with roller blinds. Although both products are similar, they have distinctive feature, namely the collection mechanism. Rolled ones are wound on a special rod attached to the top of the window, and Roman ones are assembled with an accordion.
Roller blinds can be made in two ways. The first is to purchase a barbell, a lifting cord and other fastening elements. But sew the curtain itself from the fabric you like. Such a product will come out much cheaper, because it is the sewn curtain that costs the most.

The second option is to make a simplified version of roller blinds. It certainly has its drawbacks, but the costs will be minimal. Let's consider both.
Step-by-step instructions - DIY roller blinds
First of all, we take measurements. If you are installing curtains on a frame, measure the window. If in the opening, then accordingly the window opening.
Important! When sewing curtains into an opening, do not forget about an allowance of 2-4 cm in width and about 5-10 cm in length.
So, after taking measurements, we cut out two strips of the same size. Regarding the drawing, you can take fabric from two different colors. From the street there will be one drawing, and indoors there will be another.
For headbands, you can take a beautiful ribbon or decorative cord. The length of the tape (cord) should be equal to the lengths of two curtain panels, plus 20-25 cm on top.
For fastening you need :
- The beam is of the required length, 3-4 cm wide.
- A beam 2 cm wide for weighting at the bottom.
- Paper clips and stapler for furniture.
- Sewing accessories.
- Screwdriver.
- Screws.
If you have all this, then let’s return to the choice of fabric, because this determines how long the curtain will last. It is important that the fabric is impregnated with something if you do not intend to change it in 3-6 months. Impregnation will not allow dust and dirt to settle, and also has antistatic properties.

So, if you have chosen the fabric, then you can start sewing:
- Cut the fabric based on your measurements.
- Sew the fabric on one side in width and on both sides in length. The result should be a rectangular bag that needs to be turned out.
- Then, attach a weighting agent (beam or rod) to the pocket created in advance at the bottom. And then sew up the bag completely.
- After installing the weighting material, the curtain must be ironed and wrapped around the beam, secured with a stapler. In the same way, the tapes need to be attached at the same distance. Remember, they must be longer than the curtain itself so that it can be tied beautifully when assembling.
- Once installation is complete, attach the timber to the top base of the window. This completes the installation.
Now we have looked at how to do roller blinds with your own hands. Creation of roller blinds upon purchase already finished design occurs in a similar way, only you do not need tape for fastening. Instead, a ready-made mechanism will work. All you have to do is glue two centimeters of fabric to the bar.

- You should not sew or buy plain dark or black roller blinds for the dining room or kitchen. It is better to give preference to fabric with abstraction.
- Curtains should not be selected according to the pattern on the wallpaper and should not repeat it.
- Lightweight, translucent roller blinds will make a small room appear larger.
- The most successful color solutions are: silver and white, gold and cream, beige and chocolate, gold (yellow) and blue, red and white, red and gold.
- If you want to visually increase the width of the walls, choose a fabric with a transverse stripe. And if you increase the height of the ceiling, then from horizontal.
- Blackout fabric will darken the room if that is your goal.
Now you know how to make and install roller blinds on plastic and other windows.
Additional Information in the video below.