What is the shape of the domed house from the outside. DIY dome frame house
In recent years, domed houses in our country have moved from the category of exotic to the category of unusual buildings. Their owners are no longer perceived as developers who simply decided to stand out from the background of standard cottages, but as people who made a conscious choice of such a design.
But the mass distribution of domed houses, as usual, is hampered by stereotypes and a lack of practical information on the design of such structures. Therefore, in this article we will cover:
- What is the difference between a stratodesic domed house and a geodesic one?
- How to build a domed house yourself.
- How to build a dome house without using connectors.
- How much does it cost to build a domed house?
The difference between a stratodesic domed house and a geodesic one
As practice shows, people who first saw or learned about domed houses are most often divided into two categories. These are those who unconditionally accept this form of home and, let us note, way of life, and those who consider such buildings to be a fad or, as an option, a house not for permanent residence, but a summer dacha “not like everyone else’s.”
We will not go into details discussing the advantages and disadvantages of domed houses (and, like any construction technology, there are some) and will concentrate on practice. So, there is a developer who wants to build a domed house. Where to begin? An excellent example of a competent and thorough approach is the story of a portal user with the nickname Rustad.

Rustad User FORUMHOUSE
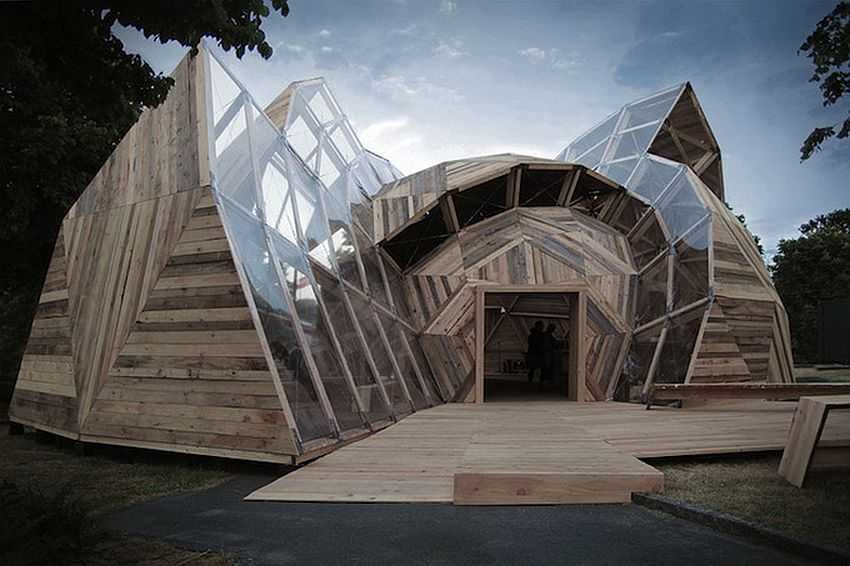
I decided to build a domed house with a relatively small area, about 100 square meters. m, near St. Petersburg. The site is sloping. The house will be used primarily in the summer with infrequent visits in the winter. I will build a geodesic dome house using connectorless technology. Such a structure is an accurate mathematical model. It is impossible to build it without calculations and design, because The error when assembling the frame and during the manufacture of parts should not exceed 1 mm. If you do not follow this rule, then when the jambs accumulate, the frame will “go away”.
Before we talk about the nuances of designing and building the house shown in the photo below, we will answer the question that is one of the first to arise before any person who plans to build a domed house.

What is the difference between a stratodesic domed house and a geodesic one? Without going into a detailed description of the technology, let's say that the key difference lies in the method of constructing the frame.
Stratodesic dome is erected from racks, for example, made from bent-laminated wooden beams, and the stages of its assembly are in many ways reminiscent of conventional frame-building technology.

The peculiarity of this technology is its resistance to vertical loads and the possibility of use in the construction of standard windows and doors.
Geodesic dome is built a little differently. First, individual sections are made, for example in the form of triangles, which are then connected to each other step by step.

When assembling the ribs (sections) of a geodesic dome, connector connection technology can be used (for example, using a metal connector).

Or (less common in Russia) connectorless technology.

Rustad I settled on the last option and, as we said above, started with the development of the project.

Rustad
Building a domed house without a design or by scribbling something with a pencil on a piece of paper is a futile endeavor. From the experience of my friends, I can say that this always leads to only one thing - rework and endless restructuring of what happened. It’s also not a panacea to hand over the project to a designer.
A designer can draw beautifully, but from a practical point of view, what he created is often simply impossible to bring to life. A house should be designed by a person with a specialized education, but even a design engineer may not take into account the position of the building on the site relative to the cardinal points, the wind rose, and the dimensions of finishing materials. That's why Rustad, Having two free months at his disposal, he sat down to design a domed house, and this is what he ended up with.


It should be noted that the project was modified several times during this time, taking into account the recommendations of experienced builders, the availability of materials, the peculiarities of furniture arrangement and the introduction of wishes from household members.


Stages of construction of a geodesic domed house
Having completed the stage of designing a domed house, Rustad proceeded to its construction. Let us immediately present several user recommendations regarding the organization of construction.

Rustad
I wanted to build the house as quickly as possible, so I hired help - one person well versed in the peculiarities of frame construction and a helper. I’ll say right away, yes, this is an extra expense, but if I were building a house alone, it would take me 3 summer seasons. At the same time, it would most likely not be possible to achieve high-quality work. Because purely physically, it is impossible for one to hold the nodes (frame edges) suspended and at the same time fasten them to each other. When assembling, you always have to tighten or bend something. A second and third pair of hands are vital. Otherwise, there will be an accumulation of errors from row to row and, as a result, a “jamb” with the upper contour.
According to the user, he supervised the construction, and his personal - physical contribution - was about 30%. The experience of a frame builder (to avoid mistakes) was also useful. The speed of circuit assembly has also increased significantly, because 2 people do the work 4 times faster than 1, and 3 people “crank out” the same amount of work 8 times faster.
Therefore, the entire construction is divided into a number of successive stages, each of which requires careful control.
1. Construction of a foundation for a domed house.
The site is located on a slope. The tilt angle is about 12 degrees. As a foundation Rustad I chose a pile-screw one. The pile field consists of 24 piles of size:
- pile diameter – 108 mm;
- pile length – 2.5 m.

The piles were tightened in 2 days, working until the night. The user notes that, having trusted the work foreman, he himself did not mark out the pile field.

As a result: several piles were not located where the components of the house were located. To correct the error, we had to weld on the “16th” channel.

2. Making the frame: ribs, posts and rafters.
We purchased winter timber for the frame and pre-cut all the pieces to size on a miter saw, in accordance with the project.


This took the user 4 days off.


3. Assembling a domed house.
Construction of the house began in April. The weather was, to put it mildly, “unflyable”: rain, snow, wind.

The construction of the domed house began with the installation of the riser (cylindrical base).

The riser was made up of triangles to make the house look like a single whole.

At this stage, the question arose of how to make an extension under the terrace. The user did not want to rotate the piles under each joist - it would have turned out to be one continuous pile field. This is not economically viable, and besides, the terrace would look ugly.
Rustad I decided to make a terrace in the form of a “balcony” - an overhang that is a continuation of the floor of the first floor. It remains to choose a material that will withstand such a load.

Rustad
When I took up this issue and contacted companies, they recommended that I make a stem from I-beams made of laminated wood. Comparing these beams (18 mm thick OSB wall) withLVL timber, section 51x300 mm, I did not see any particular economic benefit in purchasing an I-beam, but I doubt the strength and load-bearing capacityThere is no need for LVL timber. I installed it.

Having installed the logs, a temporary floor made of boards was laid on them, because... weather conditions did not allow us to do a normal one.


It took 2 days to assemble the dome (in snow, strong wind and rain).


Important nuance: to fasten the ribs and beams together, the user used 6x140 mm structural screws.

Unlike ordinary self-tapping screws (especially the so-called hardened “black” ones, which cannot withstand dynamic loads and break), a structural self-tapping screw can be bent into an arc, and it will not burst. A special notch cuts through rather than pushes apart the wood fibers, so the self-tapping screw can be screwed into a knot or into the edge of the board, and it will not crack.
Also, the self-tapping screw is stronger than regular ones, and the star head prevents the bit from breaking off and cutting off the edges, which makes screwing easier.
To assemble one unit of six ribs, 12 pieces are required. self-tapping screws
Engineering communications - water pipes, electrical cables were laid in the floor.

The box with electrical automation was also assembled in accordance with the project at home and placed in the “plinth”.

The next stage is covering the assembled dome with a moisture- and windproof membrane, with obligatory gluing of overlaps special tape. Stuffing the sheathing under the ventilation gap. Installation of OSB (base for flexible tiles).

The “pie” of the dome practically repeats the “pie” of the roof for the installation of a soft roof.
Important nuance: the covering of the dome was made from patterns (triangles) from OSB-3 sheets, 18 mm thick, dimensions 1220x2440 mm.


The sheathing was nailed with 6x60 mm rough nails.


Rustad
This nail holds very well. You can only pull it out with “meat”, and it gets clogged faster than turning screws.

Having made the outer contour, the builders began to insulate the floor. They blew ecowool into the floor in a layer of 30 cm, using a homemade installation based on a garden vacuum cleaner and a plastic barrel.


After insulation, the floor was covered with sheets of moisture-resistant GSP (gypsum particle boards) 12 mm thick, laid in 2 layers.

Having installed the base, we moved on to insulating the walls. For this purpose, we used synthetic non-woven material (insulation) 5 cm thick, laying it in 3 layers.


Rustad
It is pleasant to work with this type of insulation. It does not prick, is not afraid of moisture, and is lightweight. It’s just difficult to cut with a knife; it’s better to use scissors or a special electric carpet cutter. And I’ll add: it’s better not to place heavy objects on the insulation, and also not to stack rolls high. The insulation may not regain its shape after removing the load. It’s better to follow this algorithm - we bring it and put it away right away.

Having insulated the walls, they stretched a vapor barrier over the frame and also covered everything with gypsum particle boards, but only 10 mm thick.

At this stage, the house has already acquired a finished look. After the construction of the partitions, the installation of engineering systems and finishing processes began.

This included the following works.
Spherical, domed dwellings have been known for a long time - yarangas, tents, wigwams, etc. - built on this principle. They are distinguished by their high stability and ease of construction, which is what earned them the popularity of our ancestors. But domed houses in their pure form, as a phenomenon of modern construction, appeared not so long ago - approximately in the second half of the last century. When the American scientist Fuller decomposed the dome structure into simple figures - triangles, from which the entire structure is often assembled. It is on this principle that many spherical houses are built today.
Domed houses: technologies and their features
Dome or spherical house are the names of one construction technology. Actually, the name reflects the peculiarity of this type of housing construction - the house is not rectangular, but is made in the form of a hemisphere. More precisely, in the form of a polyhedron, approaching a sphere in appearance.
This shape better withstands wind and snow loads, with an equal building area to a rectangular one, and has more usable area. But in such a house there is unlikely to be at least one rectangular or square room. At least one side will be uneven. This complicates the planning, finishing, selection and installation of furniture. Most likely, all or most of the furnishings will have to be made “to order”, according to your own dimensions and sketches.
Dome houses are built mainly using frame technology, so the construction is lightweight. The frame is assembled from timber or metal pipes, sheathed with sheet building material (plywood, OSB). Insulation (expanded polystyrene, mineral wool, foam glass, environmental materials such as jute, dried seaweed, etc.) is laid between the frame posts. That is, apart from the unusual shape, there is no news; the materials are selected as for an ordinary frame house.
There are domed houses made of monolithic reinforced concrete. But this technology is used infrequently, especially in our country, where lumber is sometimes cheaper. If we also take into account the need for good thermal insulation of a concrete dome, its unpopularity becomes clear.
With the frames of domed houses, not everything is so simple. There are two technologies by which they are assembled: geodesic and stratodesic domes. They have their own characteristics that can influence your choice.
Geodesic dome
The dome is divided into triangles, from which the polyhedron is assembled. The peculiarity of this technology is that a large number of beams converge at one point. To ensure their reliable fixation, connectors are used - special steel devices that allow you to reliably connect the elements of the supporting structure. Each connector costs from 600 to 1500 rubles ($10-25).

A geodesic dome for a spherical house is built on the basis of triangles
Given that the number of connectors amounts to tens or even hundreds, their availability greatly affects the cost of construction. Those who plan to build a domed house with their own hands try to do without connectors or make them themselves. The reasons are clear, but if the connection strength is insufficient, the building may collapse under load. So you have to be very, very careful when saving on this unit.

By the way, when using wooden beams there is a connectorless technology, but the assembly of such units requires a high level of carpentry skill and precise execution. And one more thing: they are not as reliable as connections with metal connectors.
The advantage of this type of frame is its stable design. If 35% of the elements are destroyed, the dome does not collapse. This has been tested in seismically active regions, during hurricanes. This stability allows you to easily remove a certain number of jumpers. That is, the opening for doors and windows can be made anywhere, of almost any size. The only thing that needs to be taken into account is that the windows will be triangular. There is no escape from this in this design. For many this is a critical flaw.

Another feature is that when assembling the frame, without cladding, it has good resistance to torsional loads, but does not take horizontal loads very well. Therefore, the frame is first assembled completely and only then it is sheathed.
Stratodesic dome
Dome houses of this design are assembled from trapezoidal sections. That is, its fragments are more like rectangles or squares. This structure allows the use of doors and windows of a standard design. For many this is a big plus.
The disadvantage of the statodesian dome is that structural elements can only be removed after careful calculation and strengthening of adjacent structures. So moving a door or window or changing dimensions is possible only after the change in the load-bearing capacity of this area or even the dome as a whole has been calculated.

This technology also has its own assembly feature. The frame must be sheathed as the racks are installed. That is, the second row of racks is assembled only after the first is sheathed, the third row - after the second is sheathed with sheet material, etc. This is due to the fact that in its unfinished form - without cladding - the frame has a high load-bearing capacity for vertical loads and is not very resistant to torsional loads. Once the edges are sheathed, it becomes very stable and reliable.
Unlike a geodesic dome, a stratodesic connector is not required for assembly. The vertical parts of the frame are connected using specially shaped locks. Horizontal jumpers are attached using a plate, which is fixed with bolts, under which a metal plate is placed.

There is one more nuance that affects the cost of a domed house. When cutting sheet material for a stratodesic dome, more scraps remain than when constructing a geodesic one. This increases material costs to some extent. But they are compensated by the fact that windows and doors are of a standard design, and they are cheaper than triangular ones. As a result, the cost of a dome of different technologies differs little.
Advantages and disadvantages
No one will argue with the fact that domed houses look unusual. If you want to have a house or dacha “not like everyone else” and have nothing against frame house construction, take a closer look at this technology. The solution is truly non-standard. In addition, they say it is economical. The cost per square meter starts from $200. But as you understand, this is the minimum price. This is an economical option.

Pros of domed houses
In addition to the unusual appearance, the advantages of spherical houses are as follows:

Based on the totality of their characteristics, domed houses look very attractive. In addition, many say that construction requires much less money - due to the smaller surface of the walls, material is saved. According to mathematical calculations, the area of the walls is almost a third less. But if there are any savings, they will not be that big - the construction is specific, using specific components that increase the cost of construction. In fact, the cost per square meter is approximately the same as with a conventional form.
Minuses
There are also disadvantages and they are also quite serious. In any case, it is worth knowing about them and taking them into account.

There is also an unusual layout, but it cannot be definitely classified as a disadvantage. I like domed houses precisely because of their originality. So the non-standard shape of the premises is, rather, a feature that must be taken into account when selecting/ordering furniture and choosing finishing materials.
Projects and planning features
It is far from easy to plan a round building in such a way that it is rational, beautiful, and even convenient. There are a few basic techniques that most people follow. The first thing that catches your eye is that there simply cannot be corridors in such a house. They simply have nowhere to lead. This is not bad, but it makes the layout of the house more complicated. Let's start with something simple - how to decorate the entrance to the house.
Entry group
For our climate, it is desirable that the entrance doors open into a small room, and not into a large room. In this case, a small vestibule helps. O can be allocated from the general area or attached. A covered veranda performs approximately the same tasks. This is a more “civil” way to solve the problem.
Not everyone likes this approach. Today there are other trends in the world - from the front door you enter into a large spacious hall/living room. Such a layout is also possible, but additional measures are needed to cut off cold air - a thermal curtain near the entrance. This is done using convectors built into the floor or by installing several powerful radiators near the door. The first method is more effective, the second is easier to implement. All these nuances are typical for domed houses. The only difference is that you will have to rack your brains to figure out how to fit in the built-in vestibule. The other two methods are easier to solve.

Let's look at the options for setting up an entrance group using examples. In the picture above, the project on the right, the entrance doors open into the living/dining room. This solution is typical for Europe and America. It is gradually gaining popularity in our country, but due to the harsher climate it often brings inconvenience - each opening of the doors in winter brings a significant portion of cold air, which reduces comfort.
The option on the left is with an attached vestibule. There are two exits from the vestibule - one to the winter garden, the other to the kitchen/dining room. The solution is no less modern, but the problem of cold air entering living spaces has been solved. So this idea is worth adopting.
If you decide to make the vestibule built-in, you will obviously have to allocate some area of the house. The minimum is three squares (on the left project). It would be logical if there would be a living/dining room next.

Another way is to allocate a large area and use it as a hallway. Place a wardrobe here, a hanger for things “for now” (draft law). If space allows, you can install a small sofa. For a private home, having a hallway is practically a necessity. Dirt and sand are less dragged into the house. And this is another argument in favor of a dedicated entrance group. Attached or fenced off - it’s your choice. But the entrance area is convenient. At least in our realities.
Organization of space
Most often, the central part of the space of a domed house is allocated for common areas. From this central area you can access all the other rooms, which are arranged in a circle. In general, the central room turns out to be inconvenient, since it is “very walkable.”

You won’t be able to relax in it if it’s a living room, it’s not very convenient to cook in it, if you come up with the idea of using this room as a kitchen, or as a dining room, it’s also not the best option. Projects that use this space in this way are presented above. It looks great in the picture, but in real life you can’t count on an intimate atmosphere here. So the walk-through rooms are not the most habitable.

Not the worst way to use this passage area is to install a staircase. After all, most domed houses have two floors, but a screw one just begs to be built here. You just need to take into account that if you simply twist it around a pole, it will be inconvenient to use - the turns will be too sharp. If you design a staircase like a “well,” it will be difficult to build it yourself. So this part will have to be entrusted to someone.
Otherwise, domed houses are planned in the same way as ordinary ones. The basic rule to remember is: to ensure that engineering systems are not very expensive, all “wet” rooms are located close to each other. The location of bedrooms, offices and other “dry” rooms is up to your taste.
Video on the topic
No matter how detailed the technology, its pros and cons are described, it is so difficult to get an accurate picture. We receive a significant part of information and impressions visually. Pictures and photos help only partially give an overall idea. It is much better to see everything with your own eyes in video reviews.
Archwood is committed to protecting your confidential information.
The document entitled "Archwood Privacy Policy" contains detailed information about the collection, use and protection of personal data. The terms of this policy apply to all personal data collected on the archwood.ru website.
Consent to the collection of personal data
When visiting this site, some types of non-personal data, such as: the IP address of your computer, the IP address of your Internet provider, the date and time of access to the site, the address of the site from which you came to our site, browser type and language may be collected automatically.
We may also collect navigational information, including information about the pages you view, the links you click, and other actions you take on the site.
Demographic information (such as your occupation, hobbies, gender or interests) may also be collected and may be associated with your personal information.
By visiting the website archwood.ru, you voluntarily accept the terms of the Privacy Policy and agree to the collection and use of your personal data.
Personal data includes:
Information that will be collected at the time you place an order for the purchase of a product and includes your first and last name, billing address, email address, postal address and contact telephone number.
Please note that we do not collect credit cards or other payment instruments as payment gateways will be used to process your order without storing the information on our website.
You can refuse to provide us with personal information at any time, but in this case the products and services provided by Archwood will not be available to you.
Use of your personal data
Archwood collects and uses your personal data for: - processing transactions; - providing quality service; - conducting research and analysis aimed at improving our products, services and technologies; - further display of the site content taking into account your interests and preferences; - launching competitions, inviting people to participate in them and determining winners; - the possibility of contacting you for various information purposes.
We may send you transactional information such as welcome emails, payment reminders or purchase confirmations.
We may also send you research or marketing inquiries to inform you about new products or services or other information that may be of interest to you.
Disclosure of your personal information
Except as set forth in this Privacy Policy, Archwood does not disclose or transfer your personal information to third parties.
We may disclose your personal information to third party service providers who perform services on our behalf. For example, we may hire other companies to process payments, provide data storage, host websites, fulfill orders and deliveries, assist with marketing, perform audits, etc.
These third party service providers will be permitted to receive personal information necessary only to provide the services. Third party providers are committed to protecting personal information to the same extent as Archwood. Third party providers are also prohibited from using your personal information for any other purpose.
We reserve the right to disclose your personal data if necessary in accordance with the law, legal process and/or based on public requests or requests from government authorities.
Security of your personal information
The security of your personal data is extremely important to us. We follow generally accepted standards to protect your personal data, including:
Limiting access to personal information for those employees who are not directly related to the provision of services; - signing of a confidentiality agreement by employees to protect the client and his personal data; - ensuring that third party service providers sign confidentiality agreements and maintain the confidentiality of personal data and do not use it for any unauthorized purposes; - storing personal data in secure computer systems that are protected from unauthorized access or use.
No method of transmission of information over the Internet, or method of electronic storage is 100% secure. Therefore, while we strive to protect your personal information, we cannot guarantee its absolute security.
Changes to the Privacy Policy
The Privacy Policy is subject to change at any time without prior notice, and archwood.ru will not have any liability to you or any other person. The collection, use and transfer to third parties of your personal data will be governed by the version of the Privacy Policy currently in effect. New versions of this Privacy Policy will be published in this section.
The date of last modification is indicated at the top of this document. The fact that you use the services of the site after changes have been made to the Privacy Policy will indicate that you have given your consent to the collection, use and transfer to third parties of your personal data in accordance with the new edition of the Privacy Policy.
A dome house is a unique residential building in the shape of a hemisphere (cone). To make the walls of such a house, you can use a variety of materials. Wood is most often used, but there are also technologies that allow you to build walls from concrete and stone.
The main feature of a domed house is the ability to obtain the maximum amount of usable space with a minimum occupied space.
Relatively few materials are used to construct the structure, making the weight of the finished building relatively light. This allows you to further save on the construction of the foundation.

The technology for constructing a dome building is quite complex, however, if you wish, you can handle such an event yourself, spending a minimum of time, building materials and money.

- Original appearance.
- High speed of construction and arrangement.
- Possibility of free internal layout.
- Lack of strict requirements for the foundation. The finished structure, as already noted, is lightweight, which allows it to be built even on the most basic and shallow foundations.
- Possibility of arrangement in different climatic regions. Despite its apparent simplicity, with proper arrangement, a domed house has high thermal insulation properties.
- There is no need for significant financial investments in the construction and improvement of the house.
- High resistance to wind loads.
- Resistant to ground movements and earthquakes. The design features are such that incoming loads are evenly distributed throughout the house.
- Modern and aesthetically attractive appearance.
- High energy efficiency indicators.
- Good sound insulation performance.
What do you need to know before starting work?
Before you begin arranging your dome home, please read the following important information.
There are no specific requirements for the base of a domed house. The finished structure is lightweight, so it can be placed on almost any foundation. The best option is a shallow strip foundation.
Construction material
The structure is built from wooden beams. The section of the beam is selected individually, taking into account the expected loads on the dome of the building.
If it is planned to simultaneously use external and internal cladding, it is necessary to use timber with an increased cross-section.
Connectors
Connectors are used to connect wooden structural elements. There are five-beam and six-beam connectors.
These elements are used in the manufacture of large domed buildings. In the case of arranging a small domed house, you can resort to a connectorless assembly method.
Professional builders often abandon the use of connectors in favor of modern technology, according to which the ribs are made exactly to match each other, which allows them to be connected with a minimum of seams.
Roof
To arrange the roof of such a house, you can use the following materials:
- flexible tiles;
- roofing felt;
- aluminum-based sheet roofing materials.
Expenses
The technology for arranging the structure in question is quite complex. However, when compared with the construction of an ordinary house, the construction of a dome structure requires much less money and building materials. Time costs are also noticeably reduced.

Guide to building a house
Start arranging your dome house. Start by preparing the necessary tools and materials. It’s better to collect all the required elements in advance so as not to waste time searching for missing devices in the future.
Construction kit
- Wooden beam. Traditionally, material with a cross section of 50x50 mm is used. For the rest, focus on the specifics of your specific situation. If necessary, the cross-section of the beam can be increased.
- Screws.
- Sheet steel. Use galvanized material
- Fastening elements (nails, screws, etc.).
- Polyurethane foam.
- Finishing material for roofing. The most preferred materials in the case of the house in question are flexible tiles and more affordable roofing felt.
- Tape measure for measurements.
- Corner.
- Building level.
- Electric jigsaw.
- Electric drill.
- Hacksaw.
- Woodworking Machine. If you don’t have access to this unit, you can do without it, but you’ll have to spend more time.
- Bulgarian.
- Screwdrivers.
- Hammer.
- Protective gloves.
- Roofing shears.
- Brushes.
The construction set can be reduced and expanded depending on the characteristics of a particular situation. At this point you will be able to navigate on your own.
Preparatory stage

Having collected all the necessary equipment, proceed with the preparatory activities. At this stage, you have to manufacture the main elements of the future structure, process them and prepare them accordingly for further use.
Before starting work, draw up, order, or find in an open source a diagram of a domed house. Drawings will help you better navigate the process of construction activities.

First step. Choose a location to place your dome house. Mark the construction site in accordance with the dimensions of the future structure.
Second step. Decide on the model of the dome structure. To do this, select the appropriate shape and dimensions of the cells, the number of rafter elements, the number of connectors, etc. All these points should also be reflected in the drawings.
Third step. Make plywood and rafter elements for the future house. At the same stage, make the required number of connectors. In the process of manufacturing the mentioned products, be guided by the drawings you have.

Be sure to treat metal connectors with a special anti-corrosion agent.
Construction of the structure
Proceed directly to the construction of the structure.
First step. Clear the radius of the future building from the fertile soil layer and fill the depression with a layer of crushed stone. Compact the backfill. Place a layer of sand on top of the crushed stone and compact it thoroughly.
Second step. Pour the foundation. Instead of a foundation, you can use a decagonal support structure. Use boards to assemble it. Select the section of the boards individually, taking into account the upcoming loads.


Third step. Armed with an electric saw or jigsaw, make trapezoidal elements from the boards.
Fourth step. Place roofing material on a previously prepared base of crushed stone and sand, and on top of it - prepared trapezoids. Make sure that the elements are laid evenly and connect the trapezoidal products with screws. At this stage, be guided by the drawings you have; it is impossible to describe this item solely in words.


Fifth step. Proceed with the construction of internal vertical walls. To assemble these elements, use a wooden beam. Connect structural elements using screws. Focus, again, on your drawings.

Sixth step. Make a door frame of the desired dimensions. For assembly, use a pair of horizontal and the same number of vertical bars (boards). It is best to connect the elements using tongues and grooves, additionally strengthened with screws or other suitable fasteners.
At the same stage, make boxes for installing windows.
Seventh step. Cover the finished vertical walls with wooden boards. Nail the boards so that rainwater and snow cannot penetrate the house.
Eighth step. Make ribs for the construction of the main frame. To do this, use a wooden beam. To complete this activity you will need an electric plane.


Before installing the frame ribs, treat all wooden elements with an antiseptic.
Ninth step. Make connectors. For this you will need metal plates. Cut the sheet metal plates according to the drawings you have.
Use a grinder for cutting. Connectors must have a pentagonal or hexagonal shape. Select the shape of the products individually, taking into account the type of structure being built.
Tenth step. Proceed to pouring the finished connectors. To do this, use polyurethane foam or bakelite resin. Foam is preferable because... it contains no components harmful to others.


Eleventh step. Connect all elements of the outer dome in accordance with the project. Use screws to fasten parts together. To create an external dome, triangular elements made of timber or boards are traditionally used. Leave openings in the dome for doors and double-glazed windows.

Twelfth step. Complete the interior cladding of the house. Ordinary sheets of plywood are suitable for this. This material is absolutely environmentally friendly and helps create an optimal indoor microclimate.


Thirteenth step. Finish the exterior of the dome. For finishing, use roofing felt, tiles or other suitable roofing material. The easiest way is to use roofing felt - just carefully cut out triangular elements from it and sequentially fix them on the dome using special glue or ordinary melted resin.


In conclusion, all you have to do is complete the necessary measures for the final arrangement of the domed house, namely:
- lay the floor;
- arrange water supply;
- install windows and doors;
- install a ventilation system;
- insulate the structure.

If you plan to connect water supply and wastewater systems to your domed house, consider the order of their arrangement at the initial stages of construction. To connect the pipes you will have to dig a couple of additional trenches.
If your domed house will be used for permanent residence, be sure to install double-glazed windows with opening doors.
To thermally insulate the structure, use any materials that are easy to install and safe for others. For example, it is very convenient to use sawdust to insulate a structure of this shape.
The most preferred material for the construction of a dome building is white acacia wood. This wood is characterized by high strength, long service life and ease of processing.

If necessary, install electrical wiring to the dome house. If you do not have the skills to install such communications, invite a professional electrician. Plan in advance the placement of lighting fixtures, sockets and other elements.
The dome house is a very original and ergonomic building. Such a structure can be either completely independent or serve as a convenient extension, for example, to a country house. Determine the purpose and design of the house yourself.
Now that you are aware of the sequence of work, no problems will arise with arranging a domed house - you just need to follow the instructions, at the same time focusing on the drawings and diagrams, and the construction will definitely be crowned with success.
Good luck!
Video - Do-it-yourself dome house
A dome house is a living space that has the shape of a hemisphere. The construction of such buildings, which has long been common in Europe and the USA, is becoming popular in our country. Semicircular structures gained recognition and fame due to their attractive appearance, unique shape, environmental friendliness and ergonomics.
Craftsmen use a variety of materials to build walls. Wood is the most in demand. There are also projects made of concrete and stone. A distinctive feature of a hemispherical house is to obtain the most spacious room in a small area. These buildings are relevant for suburban areas, since their location takes up little space. Few materials are used for the arrangement, so the weight of the structure is relatively light. This allows you to save on foundation construction.
The technology for creating a hemisphere is quite complex, but with certain skills and knowledge, site owners can build such a house themselves.
Advantages and disadvantages of a domed house
To decide on the feasibility of using this technology, it is necessary to find out its pros and cons. Advantages:
- exclusive appearance;
- rapid construction and arrangement;
- possibility of free interior design;
- the light weight of the structure allows it to be placed on the simplest foundations;
- possibility of arrangement in any climatic regions;
- In a semicircular room, heat is distributed evenly. Therefore, such houses have high thermal insulation properties: they are cool in the summer and warm in the winter;
- good noise insulation performance;
- the rooms inside will be spacious and bright, so no increased lighting is needed;
- construction and arrangement does not require large financial investments;
- high resistance to wind loads;
- design features make it resistant to earthquakes;
- energy saving qualities.

The disadvantages include:
- a large amount of waste during production - all materials are produced for 4 coal projects;
- a round structure is more difficult to place in a small area than a rectangular one;
- it is difficult to place furniture inside;
- Manufacturing windows and doors of non-standard shape requires additional costs.
Projects of domed houses: photos
In order to start construction, you need to have the exact geometric dimensions of the frame and its components. As a rule, each project is individual, because the geodesic dome allows you to combine a variety of structural and design options. In addition, the developer can use different building materials, installation tools, and technologies. An important condition is compliance with all requirements for creating a power frame.
Spherical objects built from brick or stone have the same characteristics as a standard quadrangular building. Interesting and practical are structures made of expanded polystyrene and polystyrene foam using Japanese technology. In most cases, specialists improve such dwellings for people to live in them year-round.
The most popular technology for creating domed houses is considered to be a frame structure. The frame is constructed from any materials, its elements are connected using special devices - connectors.
To accurately plan future activities and expenses, you need to prepare carefully. In addition to the general requirements for housing, we take into account the following factors:
- The project is being developed taking into account current construction standards and fire safety regulations.
- To fill the foundation, you should take into account the composition of the soil and the level of groundwater.
- When choosing components, pay attention to modern products. Artificial materials are better in their characteristics and properties than their natural counterparts.
- To ensure that your property is energy efficient, use modern, high-quality heating, ventilation and air conditioning equipment.

The design of structures is carried out by specialized organizations. There you can see standard designs of hemispherical houses. It will be cheaper to use a ready-made project made by professionals, making personal amendments to it.
What is required for construction
When starting to arrange a spherical structure, it is necessary to prepare tools and materials. It is better to collect all the equipment in advance so that during work you do not waste time searching for missing devices.
The most popular structures are those made from wooden beams. The section is selected individually in accordance with the expected loads on the dome. Wooden elements are connected using connectors. They come in five-ray and six-ray types. These elements are used in the manufacture of large semicircular buildings.
If you are building a small house, you can use a connectorless assembly. Professional craftsmen often refuse to use the connector method of constructing a frame. In this case, the bars are adjusted exactly to each other, which allows them to be connected with screws with a minimum of seams.
For cladding the frame use:
- OSB sheets;
- plywood;
- Styrofoam;
- drywall;
- other sheet materials.

For the roof, flexible tiles, roofing felt, and aluminum-based sheet roofing materials are used.
The insulation layer is made from high-quality mineral wool. When laying it, it is necessary to prevent moisture from entering the raw material. A more practical option is polyurethane foam, which is not afraid of water. The material is created directly during construction from liquid components. Increasing in volume, it fills all available space, creating an effective insulating layer.
Interior decoration is not limited in any way. Use lining, wooden panels, drywall followed by painting or wallpaper. The following tools are suitable for construction and finishing work:
- roulette;
- level;
- electric corner;
- hacksaw;
- jigsaw;
- electric drill;
- woodworking Machine;
- roofing scissors;
- hammer;
- gloves;
- brushes;
- Bulgarian;
- crosshead screwdriver.
Step-by-step instructions for building a domed house with your own hands

Having prepared all the necessary materials and equipment, you need to carry out preparatory activities: manufacture the main parts of the structure, process them and prepare them for assembly.
Preparation for construction
First of all, you need to do the necessary preparatory work. These include marking the site where the house will be built. It needs to be cleared of soil and then covered with crushed stone and sand. Decide on a building model. Select the appropriate cell frequency. The sphericity of the structure depends on this parameter: the higher the indicator, the rounder the house will be. Usually 2v or 3v is selected.
Make plywood elements and rafters for the future structure. At the same stage, make the required number of connectors. In the process of manufacturing products, be guided by drawings prepared in advance. Treat connectors made of metal plates with an anti-corrosion agent. Pour the foundation. A decagonal structure made of boards can also serve instead. The cross-section of the workpieces is selected individually, taking into account future loads.
Installation of the structure
Using an electric saw or jigsaw, cut the boards into trapezoidal shapes. Lay roofing material on a base of crushed stone and sand, and trapezoidal blanks on top of it. Make sure that the elements are installed evenly and fasten the trapezoids with screws. Next, internal vertical walls are erected. To assemble these elements, use a wooden beam. Connect the parts with screws.
Make a door frame of the desired dimensions. To create it you need horizontal and vertical boards. Connect the parts using prepared grooves, securing them with screws, staples or other types of fasteners. At the same stage, make boxes for installing windows. To sheathe vertical walls, use boards that must be fastened in such a way as to prevent water from seeping into the house during slanting rain.

To make plate connectors, use metal plates. To do this, you will need a grinder, with which you should cut out pentagonal or hexagonal parts from a sheet of metal, depending on the type of structure.
After the connectors are ready, you should start filling them. Bakelite resin or polyurethane foam will do for this. The second option is more acceptable, as it contains components that are safe for human health. To build the dome frame, pay attention to the drawings and calculate the number of parts. Screws are used to connect elements.
Finishing
Heat-insulating material is placed in the internal triangular cells of the dome: mineral wool, polystyrene foam, glass wool. For interior cladding, use ordinary wooden plywood, which can regulate the humidity in the room, and is also an environmentally friendly and harmless material.
After completing the finishing work on the interior of the room, proceed to the exterior decoration of the walls using roofing felt and flexible tiles. The layers are laid sequentially, one after another. Triangles from roofing felt should be cut on a carpenter's table. To secure the roofing material, use resin or special glue.
After this, proceed to interior decoration, which includes:
- laying floors;
- installation of water supply, ventilation;
- wall decoration.
The created base is equipped with decorative and functional elements in accordance with personal wishes.
Price of a domed house

If you buy a domed house, you can eliminate many of the problems listed above. However, even in this case, personal thematic knowledge will come in handy. They will help you choose the right project and confidently control the actions of builders.
When exploring an alternative option, it is necessary to take into account not only direct, but also indirect costs. In some situations, it will be beneficial to purchase a ready-made kit to create a reliable frame with manufacturer warranties. The finishing of the facility and the installation of communications can be done independently, using standard construction technologies.
What you need to know when building a domed house
When building a spherical cottage, consider some nuances:
- If sewerage and water supply are planned, consider the construction of two pits.
- When planning a bedroom or second floor, you need to make skylights that will add light to the room and originality to the entire building.
- For insulation it is possible to use sawdust.
- The best tree for building a geodesic dome is black acacia, which has sufficient strength and elasticity. The wood is also weather resistant.
- Think in advance about the presence of sockets in the rooms, calculate power supply points.
A domed dwelling is a very original idea. Such a structure can be either completely independent or serve as a convenient extension.
