Dragon Age: Origins (Dragon Age: Beginning) Additional tasks. Dragon Age: Inquisition - crafting armor and weapons Legion armor dragon age
A child doesn't need a good father. He needs a good teacher. And a good friend to a person. And for a woman - a loved one. And in general, let’s talk better about track stitches.
Arkady and Boris Strugatsky, “Distant Rainbow”
It's not just the Blight that threatens the peace of Ferelden. Hundreds of scum of all stripes raised their heads, expecting the end of the world. We can either join them or punish the scoundrels. And so that you are sure not to miss a single opportunity, we have compiled a list of additional tasks that have not yet been discussed on our pages.
- Ostagar and the Wild Lands - the beginning of the story
- Lothering - the living dead city
- Circle of Magicians - magical secrets
- Redcliffe - universal appeal
- Vault - Classic Easter Egg
- Brecilian Forest - traces of corruption
- Orzammar - Thieves and Their Prey
- Denerim - quest series
- Guilds - find everything
- Sheila - rugged beauty
Let's start with the backstories of our heroes. In each case, we will be able to complete several additional tasks, but they are simple - training ones. You can even skip them and go straight to Ostagar. However, painstaking exploration of the initial territories will bring you not only money, experience and some equipment. At the very beginning, when the hero is very young and inexperienced, you can learn a lot of interesting things about the world that you won’t be able to find out later. So we advise you to look into all corners, at least at first.
Each background story will bring you something useful and make your path easier. A noble man will receive a dog, a Dalish man will receive a good bow... in a word, to each his own. But there is one hero who will have a much easier time at the start than the others. This is the noble dwarf - he leaves with Duncan, jingling more than twenty gold pieces in his pocket! Well, let's go after them.
Ostagar and the Wild Lands
Sick dog
Dwarven politics
Talk to the huntsman in the camp and he will tell you about a sick mabari who swallowed tainted blood. To cure him, you need a special flower that grows in the wild lands of Korcari. According to the plot, you will still have to visit there, so feel free to agree. Look in the ruins a couple of meters from the place where you will meet a wounded soldier. The cured dog will join you after the Battle of Ostagar, if you have not yet acquired a pet.
Hungry Prisoner
In the camp, an unfortunate soldier is hanging in a cage. Not only are they not letting him out, but they are also not feeding him. The poor guy will ask you to get him some food. Before giving consent and food, ask the prisoner why he was imprisoned. At the end of the story, you can demand the key to the magicians' chest from the prisoner. You can get food from the guard by convincing or bribing him. And the chest can be opened only after returning from the wild lands, when the pacified one leaves him.
Sword
You can trick the messenger Peak into getting a good sword. But first the boy must be caught - find him with the warriors of the ash, and then run after him.
Missionary Chest
Near the border of the wild lands you will find the body of the missionary Jogby. You can remove a letter from it with hints on where to find the treasure. Look for the chest in the south of the map.
Traces of chasing
In the west of the wild lands there is an abandoned parking lot and a chest containing a journal. Read it and follow the mark that appears. A chain of such traces will lead you to the treasure.
Last will
The dog plays the role of a psychoanalyst
The professor is sleeping - the students are happy
In the center of the wasteland you will come across the corpse of Rigby. The will describes where his belongings are hidden: in an abandoned camp west of the body. Having dug up the casket, you can either open it or take it to the widow Jetta. She is waiting for you at Redcliffe Church.
Demon from the Ashes
On the corpse of a soldier, not far from the Garlock emissary, lies a bag of ash and a piece of paper with a local legend. The legend is true, and by pouring the ashes onto the pile of stones northwest of the bridge, you will summon Gazarath, the “orange” demon of wrath. Good trophies await the winners.
Lothering
Create three poultices/traps/bottles of poison
The tasks are of the same type, taken from Miriam, Allison and Barlin, respectively. There is nothing complicated, you just need the appropriate skills and components, which are bought from Barlin and collected on the map.
Dead Templar
At the entrance to the location after the battle with the bandits, you will find the corpse of a templar. The things from it must be taken to Ser Donall in the church.
On a note: in the same church, you should reveal to Sir Brian that you are a gray guard and ask for help. He will give you the key to the poultice cabinet.
Preacher board
If you complete all four tasks from the local preacher board, you will receive a nice sword as a reward.
Circle of Mages
Call
On the first floor of the tower, in the library, you can perform several summoning exercises. To do this, find two halves of the book: in the library and next to the stairs to the next floor. Complete all three rituals and the task will be completed. But that is not all. Repeat the steps of all three rituals in a row and activate the fourth summoning flame - it is located in the room where the second half of the book was. A creature will appear and quickly disappear. You can steal it by getting the note. But that's not all! On the preacher's board, you can later take on a quest that talks about disappearing travelers. It turns out that the demon we summoned decided to profit. We kill him, take the trophies, inform the preacher and go to pour out the pangs of conscience with ale.
The main character makes it clear with all her appearance how much she wants to be a gray guardian and save the world
Apparently, this is the only way Ogren sees us all...
Guardian of the Limit
What dwelling of magicians is complete without secrets? We definitely have it in our tower. To solve the puzzle, you need to find several student notes: a couple in the students’ rooms, another in the library, two lie next to Owain and the blood mages, and finally, one will be in the main hall. Now activate three statues in the large hall - a statue with a bowl, with a raised sword, a lowered sword - and a statue with a spear (it is in another room, in the center of the floor). Go down to the first floor, go to the place where you met Wynn, and try to go into the basement. Kill the guard and pick up a great sword that will help you, for example, defeat Flemeth.
Chest Jenny
In the office of the main sorcerer you will find not only Flemeth's grimoire, but also a small chest. It can be delivered to a house in the Denerim Market District near Curiosities of Thedas. If, of course, you picked up the note about Red Jenny after meeting Zevran. As a reward, you will receive money, but not a drop of information about this mysterious box.
Enchanted Templar
On the fourth floor you will meet a templar possessed by the demon of desire. If you attack them, you will get some good trophies, but if you let them go... you will most likely not see them again, but there is a small chance of meeting them on the map above the mountain of corpses: the demons will satisfy their insatiable hunger. They can’t avoid reprisals here!
Redcliffe
Gathering troops
Bann Tegan gives us a plot task (which has several additional ones): prepare the village for a siege. To do this you need to talk to Pert and Murdoch. The first one will ask you to bring him amulets. We will receive them from mother in the local church. In addition, in the shop you can find a bunch of barrels of oil. Perth needs to be told about them too.
Murdoch will ask you to bring more warriors and get weapons for them. The ranks of “volunteers” can be joined by the gnome Dwinn, if you persuade him well. The local tavern will bring us several recruits at once. First of all, there is a suspicious elf at the table. Your robbers will help you discover his spy essence. The innkeeper himself, Lloyd, will go after the elf, and he will have to be threatened. But it’s better to first ask the waitress Bella and the men in the tavern about their lives. You can promise to help the waitress, and for the defenders you can bargain for free ale from Lloyd. You can beg a weapon from a blacksmith, promising him to save your daughter.
Pestilence came to one noble noble family
Spectacular lighting makes Stan even more convincing
Blacksmith's Daughter
You will find it in the castle, in a small storage room on the first floor.
Hidden boy
Caitlin is standing in the church, asking to find her missing brother. He hid at home, in the closet. After questioning the boy, we learn about the family sword, which can be either appropriated or returned.
Daemon
If you play as a magician, you are able to independently enter the shadows to free the son of Eamon. The demon will offer a deal. You can get an extra spell point, a blood mage specialization, a “forbidden pleasure” with a demon... Please note that the choice will affect the ending of the story.
Asylum
In the village itself, as well as in the temple, there are no additional tasks (except perhaps the delivery of scrolls to the church of Denerim), but there is a very funny “Easter egg”, which can already be considered a classic of role-playing games. After finishing the story quest, return to the village and go to the local cemetery. You will probably like the epitaphs. Here are just a few of them:
Cheryl isn't here. She was cremated.
“I can do an ax too” - Jim, the sword swallower.
Multiplayer with love.
Great-great-great-grandfather Gygax.
To play as Sheila, you need to download the separate Stone Guardian module. Let's get to know this dangerous girl better.
| Gifts for Sheila | |
| Present | Where to look |
| Magnificent amethyst | The dusty city of Orzammar, Alimara market |
| Magnificent diamond | Common Halls of Orzammar, Trader Garin |
| Magnificent emerald | Orzammar Community Halls, Figor's Shop |
| Magnificent sapphire | Common Halls of Orzammar, Trader Legnar |
| Magnificent malachite | Circle Tower, Quartermaster |
| Magnificent Garnet | Denerim Trade District, Wonders of Thedas Shop |
| Magnificent ruby | Elfinage, Alarita shop |
| Magnificent Jade | Cellar of a house in Honnlite |
| Magnificent topaz | Frost Mountains, Trader Farin |
Sheila is a former dwarf who became a golem. She manages to combine femininity (for example, she wants to sew red shoes) and feigned rudeness (“Let's go crush a couple of heads”). In general, jokes on the topic of the golem’s “hermaphroditism” are perhaps the most interesting in the entire game. By the way, she hates all birds without exception, which she constantly reminds of (“I don’t believe in the Creator. After all, an intelligent being would never create birds! What was he thinking?!”).
In combat, Sheila is a true all-rounder. She can be a hitter, a shooter, a controller, and even a support. In the last incarnation (the branch of stances) it is most effective. It is almost impossible to destroy a group consisting of a standing golem, a healer, a mage and a warrior with a two-handed weapon. There is only one inconvenience: moving our talisman takes some time.
As you can see from the table, there are no special gifts for her, but you can easily make her happy by dressing her in crystals for the first time.
Personal quest is associated with memory restoration. Sheila is curious about who she was before she became a golem. The quest can be obtained after talking with Perfect Caridin, according to the plot. To complete it, go to the Kadash teig that appears on the map of deep paths. Go through the teig all the way to the heroine’s statue.
Brecilian Forest
Bitten wife
In the Dalish camp, talk to Atras. His wife was bitten by werewolves and everyone says she's dead, but he doesn't believe it. Danaila will be waiting for you near the northern entrance to the eastern forest. Unfortunately, it will not be possible to save her.
Iron bark
The gunsmith Varathorn will ask you to bring him rare ironwood bark, from which local craftsmen create magnificent equipment. The bark can be stripped from a fallen tree near the northern passage to the eastern forest. As a reward from the master, you can receive a bow, armor (or both, if you insist) or an amulet, if you refuse everything.
Elf in love
Last family photo. Very soon, most of them will not be alive - traitors are worse than evil...
Apparently, not only female characters are copied from popular people... And Eddie Murphy not only voiced the donkey from Shrek
Sick gall
In the camp, the caretaker of the Gauls, Elora, had a problem: one of her charges was sick. You can use survival to find out what the reason is, or you can convince the caretaker that the animal is incurably ill.
Bitten Elf
In the center of the western part of the forest, not far from the ogres, lies the wounded Deigan. He can be taken to the camp, healed, robbed, abandoned or killed. A wealth of choice - isn't that what we want from a good role-playing game?
On a note: if you first rob the elf and then send him to the camp, then he can return his things and restore relations.
Deadly dream
To the south of the Great Oak lies an abandoned but very cozy camp, in which you are tempted to relax... Having woken up, one or more members of your squad will begin a battle with the shadow that created the illusion. Defeat the demon and re-inspect the “cozy” rest stop.
This is interesting: After completing the story mission in the forests, go to the camp and talk to Leliana. She will play you a song from the main menu of the game.
Orzammar
Lost Son
The story is over. The hero stands on the road and thoughtfully looks at the sunset... But it’s too early for him to retire!
In the Common Halls we will come across Filda. Her son went to the deep paths and did not return. We will find the hand in the Ortan tag, it is connected with the plot - don’t miss it.
Church
Berkel wants to open a church in Orzammar. You can help him with this by convincing the chronicler (in the hall of guardians) to give permission. The reward you will receive is meager, but this church will have a decisive influence on the fate of the world. And not the most favorable...
Dwarven magician
Dagna really wants to get into the circle of magicians. You can stop her by telling her father Jannar about his daughter’s plans, or you can help by talking to the first sorcerer, if, of course, he is alive. As a reward we will receive a good rune or lyrium. In addition, Dagna will become an outstanding scientist.
Search for Nagas
All his pets fled from the beater Bemor. You need to look for Nagas in the Community Halls, there are five of them in total. For each animal we get 25 silver coins. And if you talk to Leliana after this, she will admit that she really wants such an animal. You can get it in Dusty Town from an idle gnome for a modest fee. Now this “hedgehog” will live with you in the camp.
Racket
After receiving the first task from any of the contenders for the throne and leaving the Diamond Halls, you will see local bandits threatening the merchant Figor. If you follow them to the shop, you can help the merchant. If you settle the matter peacefully, he will thank you and stay to trade, but if you kill the robbers, then... he will scold you and run away.
Fights without rules
In the west of the Test Halls, in a small room there is a gunsmith who will offer to take part in the battles. The reward for each battle is trivial, but the ring that you receive after four victories is good for blood mages.
Unwanted child
In the Dusty City you can find an unfortunate dwarf who was kicked out of her family because she gave birth to a son from an untouchable. You can force her to get rid of her son, as her relatives want, or you can convince the latter that they are wrong and restore the family.
Dragon in the throne room
This is how you need to place two characters in the throne room to summon a dragon
If you run out of preparations and need to say something, it turns out like this
Dwarven architecture sometimes brings surprises. After studying the inscriptions on the throne, we will receive a note in the codex. Now you need to correctly position the squad members: one in the “dressing room” on a square in the center of the hall, and the other two in the throne room itself, in its southwestern part, on buttons that look like the end of an arrow. As the last character, we click on the throne again and get acquainted with the local prisoner.
The thieves
While running past the king's treasury, you will come across a group of thieves who were trying to dig a tunnel. Deal with them and receive a well-deserved reward from the guard who came running in response to the noise.
Poison
In one of the chambers for the nobility, you will meet the herbalist Vidron, standing by the bed of a dying lady. He will tell you that she was poisoned and ask her to make an antidote. After which he will give you a recipe, which will be the main reward.
Stolen book
The assistant chronicler in the Keeper's Halls wants us to find a valuable book that was recently stolen. The Dodger lives in Dusty City. Negotiations with the thief will reach a dead end... But a note picked up from the corpse will lead us to the bandits who are just carrying the tome to the buyer in the Test Halls. After the battle, the book can either be sold to the same buyer or returned to the custodians.
The Missing Bloodline
The gnome Orta believes that she comes from the noble house of Ortan, but bad luck: the records of her family tree disappeared in the teig of the same name. At least she didn’t find them in the Guardian Halls, which means nowhere else. The records really lie in the center of the teig, not far from the Ruka cave.
List of golems
In the room with the Void Anvil, there is a table that lists everyone who has become a golem. The names can be copied and taken to the chronicler.
Wanderers' treasure
Find four piles of stones in Caridin's Crossing:
At the western exit to the map.
Southwest of the bridge.
Near the intersection of three roads.
East of the Deep Hunter's Cave.
Our pet nag named Shmoples. They seemed to get along with the dog
After this, a mark with the tramp’s hiding place will appear on the map.
Legion's Honor
As soon as we collect all the pieces of the Dead Legion armor, we will be given the quest “Dead Castle”. Now we can get the emblem of the caste of the dead from the sarcophagus (in the legion room in the dead ditches) and take it to the chronicler. But before you leave the temple, dress someone in full armor and activate the Legion's Relic.
Overlander's Sword
In the deep paths you can get hold of one of the best one-handed swords - By the honor of the overlander. First, find a tomb in the Ortan taiga (southeast corner). Now we are looking for pieces:
The pommel lies in the Ortan teig in a vase in the Ruka cave.
The hilt can be removed from the corpse of the Genlock Emissary at the Caridina Crossroads (Genlock is waiting for you in the tunnel that goes from west to south).
The blade is removed from the corpse of an ancient creature of darkness in the Dead Moats (on the bridge in the center of the map).
Once you find everything, return to the tomb.
Cache
In the charter's hideout we will acquire Jammer's diary, which talks about the treasure. We need to find three chests: Jammer himself, Kanka and Pique. From them we take out a silver ring for a dress, an iron letter opener and a garnet decoration. You can't take anything else! All that remains is to find the cache near the tamed brontos and open it.
Life of the Guardian
To receive the task, touch the wall of memories in the Halls of the Guardians. Now find three rune stones:
Near the chief of miners in the Common Halls.
In the southeastern caves of Caridina Crossroads.
In the western of the central rooms in the Dead Moats.
We return to the wall of memories for the reward.
Torn Demon
Dwarves are thorough guys: if they destroy a demon, then they spread the pieces throughout all the lands: what if they grow together? You can collect these pieces on deep paths.
Limbs in the north-west of the Educanov taiga.
The body and head are at the Caridin Crossroads, in the southeast and northeast, respectively.
We take this to the altar in the Ortan taiga and revive the demon. We are faced with another choice - let him go for money or finish him off. This time it's final. What will you choose?
Denerim
Help the law
Sergeant Kilown stands next to Blacksmith Wade's house. He will complain to his superiors and ask for help in dealing with crime. You can act either by force of persuasion or simply by force. If you want a high reward, listen to what the customer prefers.
Dark Deeds
We are trying to explain the idiot-
to the gnome that it is impossible to “fall into the sky.” Winn and I are still trying to get through, and Sheila offers... basically the same thing, but in a much faster way
Eamon has a great sense of beauty. In all his mansions you can find
real works of art
On the other side of the house, the forge is worth the sneaky Couldry. Only robbers will be able to meet him. He has two lines of tasks: for thieves and for burglars. Stealth will come in handy in both lines.
It is important: Do not forget to leave too visible companions in the camp for the duration of the mission.
Before the land meeting, we will be able to complete three thefts and two break-ins. Another theft and two break-ins followed. If your stealth is not at a master level, then money, persuasion and fists will help you in some tasks.
Sect
In one of the alleys (you will visit there when you exterminate bandits ordered by the church) you will find the corpse of Ser Frieden, who died trying to destroy the sect of blood mages. You can finish this noble deed - go to the abandoned house (a new location on the Denerim map) and slaughter the villains.
Evil
Evil has settled in the shelter in the Elfinage, as the templar Otto will tell you about. Collect some clues, including asking the elven girl sitting on the doorstep. After clearing the shelter, do not forget to return her amulet to the elf.
Prisoners of Howe
In the cellars of Earl Howe's estate you can find several prisoners at once.
In the torture chamber, the son of Bann Sieghard is hanging on a rack, and as a reward he will stand up for you at the meeting.
In prison, the templar Irminrik went crazy. Take his ring to Ban Alfstanna.
Veteran Rexel also could not stand his captivity. You need to tell the preacher Rosamund about him.
Guild Quests
The tasks of most guilds (preacher boards, blackstone volunteers, assassins and “interested”) are mostly completed without problems: fortunately, the targets are marked on the map, or at least their approximate location is described. But there are a few exceptions.
If in the final task volunteers you choose the father's side, then in order to get to the son, you must not go to Lothering, which will be destroyed by this moment, but simply pass by the town. Taoran will come across you in a “random” encounter.
Love notes requested by one of interested(tasks are given by the innkeeper in “The Bitten Nobleman” of Denerim), scattered literally all over the world. Finding them is not easy. Here are all the places:
In the Dalish camp, behind the merchant.
Near the entrance to the ruins in the Brecilian Forest is a secret door on the left.
In the royal palace of Orzammar, in an inconspicuous room in the east of the palace.
In the Orzammar Charter Hideout, in the room to the right of the hall where Jarvia fell.
In another hideout, this time in a village, next to the entrance to a house with a bloody altar.
In the "Spoiled Princess" tavern near the magicians' tower.
In the tower itself, on the second floor, in the eastern room.
In the Redcliffe windmill (where the secret passage to the castle is).
In the basement of Redcliffe Castle, just before the exit to the courtyard.
At Wade's forge in Denerim.
In the brothel "Pearl" (location in Denerim) in the southeastern room.
In Eamon's estate in Denerim in the northwestern room.
In addition to these very persons, they will force you to run and mages from the community.
Bloody marks
We need to mark four doors in Denerim with blood: two in the Trade Quarter and one each in Gryazny and Dark Lanes.
Places of power
We need to activate four places of power.
Grave in western Brecilian.
Altar in the Ortan taiga.
Tree in the Elvenage of Denerim.
Stairs to the second floor of the magician's tower.
Scrolls of Banastor
You need to find five scrolls at the following addresses.
The southeastern destroyed room on the second floor of the mage tower.
The northwest room on the third floor of the Mage Tower.
The southeastern library in the abandoned temple with Andraste's ashes.
Western barracks (entrance from the center) in an abandoned temple with the ashes of Andraste.
The southeastern room in the werewolf lair.
The remaining tasks should not cause difficulties.
Dear guests and newcomers, welcome to our forum
Here you can find answers to almost all your questions about the Gothic series of games (including various mods for it), The Witcher, Risen, The Elder Scrolls, Age of the Dragon and many other games. You can also find out the latest news about the development of new projects, play exciting FRGs, admire the creativity of our forum members, or show yourself what you can do. And finally, you can discuss common hobbies or just have fun chatting with visitors to the Tavern.
To be able to write on the forum, leave a message at
Attention!
- Requires approximately 3-5 people for each OS version: - Windows® XP SP3, Windows® Vista SP2, Windows® 7 SP1, Windows® 8, Windows® 8.1, Windows® 10 (build 10 1607) and Windows® 10(build 10 1703). For desktop PCs and laptops. You can submit your application for participation
Friends, good day!
I would like to advise you to familiarize yourself with the work of our forum members dedicated to the “Gothic” series of games. If desired, read the competition entries and evaluate them. We hold this competition annually. We are waiting for you.
Dear friends, the year is coming to an end, and it’s time to sum it up and reward the worthy
JavaScript is disabled. To fully experience our site, please enable JavaScript in your browser.
Status New replies cannot be posted in this topic.
Main plot
As soon as we approach the gate to Orzammar at the pass, we will immediately witness how Tairn Loghain’s henchmen are trying to persuade the gatekeeper to let them into the city. The funny thing is that the gatekeeper, as soon as he heard that we are a gray guard, will immediately let us inside. Loghain's ambassador will not like this and he will get into a fight, you can kill him, for which you will receive verbal gratitude from the gatekeeper.
Life is even more fun inside Orzammar. We have only just crossed the threshold of their city, and representatives of two groups fighting for power have already managed to organize a bloody massacre right before our eyes. Having asked the first gnome we came across about what was happening here, we received practical advice: find out everything from Sergeant Major Bandelor in the council room.
Search for Chief Bandelore
Having run usefully through the communal halls (the part of the city where commoners live), we go to the nobility quarter (diamond halls) straight to the council building. There we will witness a brief debate between the deshirs (dwarf representatives of the nobility), after which we will be able to talk with Sergeant Major Bandelor.
He will tell you that the gnomes have no time for pestilence now, because... The king of Orzammar recently died, and only the ruler of the dwarven kingdom can fulfill the agreements of the gray guards. This warm place is claimed by: Prince Belen, the youngest son of the late king, and Lord Harrowmont, the latter’s cousin.
You can support any of them, because for us it is only important that the new elected king gives troops to confront the pestilence.
Quests for Belen
Vartag Gavorn
This is the representative of Prince Belen. He will meet you in the hallway of the council building immediately after talking with Bandelor and will tell you that in order to get an audience with Belen, we need to prove our loyalty to him. We agree.
The Prince's Respect: First Mission
We need to deliver two notes: one to Lord Helmy (in the Tavern Tavern in the Common Halls), the other to Lady Days (outside in the Diamond Halls). The essence of the matter is to expose Harrowmont as a swindler (he allegedly promised one mansion to two nobles at once). We go to Helmy, after reading the note he will immediately refuse to support Harrowmont. With Lady Days it will be a little more difficult. She will say that her father is engaged in such matters, but now he is on the deep paths in the Edukan taiga. We go there, find the old man and help him fight off the invasion of deep hunters. After the battle, we give Dace the papers and return to Gavorn in the council room. Now we can meet with Belen.
Quests for Harrowmont
Dulin Foringer
This is Lord Harrowmont's representative. He will meet you on the street immediately after talking with Bandelor and will tell you that in order to get an audience with Harrowmont, we need to prove our loyalty to him. We agree.
Lord's trust. First task.
We need to enter the testing arena as a Harrowmont fighter. At the same time, you need to find out why the lord’s best fighters refused to perform: Baizil and Guidon. We go to the arena and first talk with Bayzil. He will tell us one short love story, in the end of which it turns out that he is being blackmailed with certain letters. Behind the blackmail is the gladiator Miaji and her twin brother Lucian (they can be found here in the fighters’ training rooms). We open Miaji's chest with the help of Leliana and steal the letters, after which we give them to Bayzil. Now he will fight in the arena.
Let's go to Guidon. Here the situation is simpler: from the conversation it turns out that he was misinformed that supposedly Lord Harrowmont, after tests in the arena, would renounce his claims to the throne. And if so, then Guidon has no reason to shed his own or someone else’s blood. We convince him that he was vilely deceived and force him to return to duty. Now you can go to the manager and start participating in battles. Having won all of them, return to Dulin Foringer (at the Innkeepers' Tavern) with a report on the test you completed.
Lord's trust. Second task or Respect of the Prince: second task. Jarvia's Lair
We have received the right of audience with Harrowmont (Belen). The lord (prince) will say that he agrees to fulfill the terms of the agreements of the gray guards if we bring him to the throne. We have no choice, so we take the second task. We have to deal with a gang of a certain Jarvia, who controls the dusty city and regularly attacks citizens of community halls. We go to the dusty city and ask the beggar Nadezhda about Jarvia for a donation. She will tell us about the original keys that open the door to the gang's lair. Unfortunately, she won't have the key itself. It doesn’t matter, we go to the abandoned house nearby and deal with a handful of bandits. We take the key from their leader. Now another door has become active in the dusty city. We open it with the key and go in search of Jarvia. She will be in the depths of the caves. Having dealt with her, return to Harrowmont (Belen). He will have one last task for you.
Betrayal from within
Additional quest. You can get it if you fought in the arena for Harrowmont, and then returned to Gavorn and again offered your services, under the pretext that Harrowmont now trusts you and you can spy on him without hindrance. Having learned that Harrowmont sent you to kill Jarvia, Gavorn will give you papers indicating the connection of one of the lord's relatives with the charter. These papers will need to be placed in Jarvia's chest in her hideout after dealing with her. Once you do this you will be able to turn in quests for both Harrowmont and Gavorn. In addition, both contenders for the throne will give you a task to search for Branka (read the description below).
Perfect, Perfection itself
And Void Anvil
We have to go into the deep paths in search of the perfect Branca in order to convince her to vote for Harrowmont (for Belen) in the council. 2 years ago, she took her entire clan and went in search of the legendary anvil of the void. According to legend, it was invented by another perfect one - the blacksmith Karidin, and with its help it was possible to create golems. Let's go searching.
At the very entrance to the deep paths, Ogren, Branka’s husband, will join us. And although he is a drunkard who constantly stares at the beautiful Morrigan, he can help in the search for his wife, since he knows the deep paths well and is excellent with two-handed weapons. First, we have to find the Ortan tag. There we will find Branka's diary (for it we will have to fight with the spider queen), from which we learn that she went to the Dead Ditch - an area that is the border between the kingdom of the gnomes and the shelters of the creatures of darkness. Only the most desperate dwarves from the dead legion fight in this area. By the end of the passage of this location, it turns out that many gnomes died and became creatures of darkness, and one of them became a uterus (the creature that gives birth to all this abomination). We kill the queen, after which the path opens to us in the last location of the deep paths - the Anvil of the Void. As soon as we get into it, Branka comes out to meet us. She is alive and well, but... completely crazy. Having blocked the entrance so that we don’t run back, she wants to avoid the traps in the corridors leading to the anvil at our expense. There is no choice, so we agree. There will be three dangerous rooms in total. In the first one, you will need to turn off the gas by pulling 4 levers on the walls, and also kill the gradually reviving golems. In the second, you will need to disarm 2 floor traps with blades (Leliana does an excellent job with this) and get rid of several more golems. In the third room the test will be more serious. A strange setup will generate the souls of gnomes (very strong ones, by the way). This will go on forever if you don't do the following. As soon as you kill one of the souls, immediately click on the anvil (there are only 4 of them) that begins to glow. Then a fireball will shoot out of it, causing damage to the installation itself. About 6-7 such shots and the battle will be won. Now we go to the anvil hall. There we will meet Karidin himself in the guise of an iron golem. He will tell us about the second side of the coin of creating an army of golems on an anvil. It turns out that in order to breathe life into a stone, you need to take life from a living creature. Many dwarves were killed at one time to fill the army of golems to protect Orzammar. Caridin will ask us to destroy the anvil and free him from the thousand-year burden of responsibility. At this moment, the weak-willed Branka will come running and suggest that we not destroy the anvil, saying that this is the key to victory over the creatures of darkness. The choice is ours. Personally, I ultimately chose Caridin’s side and killed Branca. After the battle, Caridin forges a crown for the future king of Orzamar and commits suicide.
Note: if you choose Branka's side, the battle will be a little more difficult, because... Caridin is almost immune to magic, and hits much harder than Branka. In this case, Branka will forge the crown for the king of Orzammar, and in the final battle golems will fight for you, not ordinary gnomes.
Returning to Orzammar, at the next meeting of the council, we ourselves will name the future king and give him the crown forged by the Perfect One. If you choose Lord Harrowmont, Belen will start a fight right in the council chamber. We send him to a meeting with the stone, after which we speak with Harrowmont. He rewards you with a staff, fulfills his promise and begins to gather troops to fight the Pestilence.
Note: if you crown Belen, the first thing he will do is execute Harrowmont, then give you his brother’s hammer and send troops to fight the Blight.
In any case, Orzammar's support will be received.
Minor quests
Mother's Hope
Filda, a woman from the common halls, asked to find her son Rook, who disappeared 5 years ago in the deep paths. And although it’s almost incredible, the guy survived. You will find him in the Ortan tag according to the plot of the game. Whether you tell Filda the truth about Rook’s fate or not is up to you; it will not affect the completion of the quest or the reward.
Song of the Deep Paths
You need to put in a good word for Brother Burkem with the Chronicler of the Chronicles. A gnome priest wants to open Andraste's church in Orzammar, but this goes against the 2000-year-old canons of the gnome religion. So, let's go to the diamond halls and the house of the guardians. With his persuasion skill up to 3, he can be persuaded that opening a church will benefit the untouchables by providing them with medicine and work. You can also simply scare the great chronicler that soon an army of people will come and forcibly convert all the gnomes to their faith. One way or another, he will give Brother Burkem permission to open the church.
Unprecedented scientist
In the community halls you will meet the girl Dagna, the daughter of the gunsmith Janar. She is very interested in magic and although she has no ability for it, she still wants to study the theory in the tower on Lake Calenhad. We agree to help her. We go to the tower of magicians and talk with Irving (naturally after saving the circle from the possessed). He will be very happy about this desire for magic from a dwarf child and will give the owl his consent. Then it's up to you. You can persuade Dagna to stay to help her parents in the forge, or you can convey Irving’s words to her, after which she will leave Orzammar. One way or another, the quest will close.
Precious metals
The bandit Rogek in the dusty city will offer you a deal. You can, of course, be rude to him and kill him, but if your conviction level is up to level 3, or even better, level 4, then you still need to make a deal. So, we buy lyrium from him for 40 gold (don’t be afraid to lose such huge money, you will get 1.5 times more in the end). By the way, initially lyrium is sold for 50 gold, but we know how to convince.
Now we go to the tower of magicians to see Godwin (this is the eccentric who, during the invasion of the possessed, was holed up in a closet on the second floor). We sell him lyrium. He offers 50 gold, naturally we do not agree to this and again use eloquence. If you have a level 3 persuasion skill, then you will receive 60 gold for lyrium, if 4, then 75. After the deal, do not be lazy to ask Godwin about the details of why he needs so much Lyrium. Very interesting details will be revealed about the relationship between magicians and templars. We blackmail Godwin, threatening to tell everything to the chief templar Gregor, as a result of which we receive a ransom for silence of 8 gold. Now we return to Orzammar to Rogek and receive money for working as an intermediary. Initially, you agreed on 20 gold, but the dwarf will want to deceive you and offer only 10. We turn on persuasion or intimidation and get the promised money. Total: -40+60 (75)+8+20=48(63) gold in the black.
Note: The quest can only be taken if you have 50 gold in your wallet.
Zerlinda's grief
A poor woman from the dusty city of Zerlinda, after donating 5 silvers, will tell you her story. Her child is untouchable and her parents set a condition for her: either she gets rid of the child, and then she is left in the caste, or she is expelled along with her offspring. She chose the second option and is now forced to eat slop. We agree to help. You can try to convince her father, who drinks at the Tavern Tavern (this will require persuasion skill 3), or you can tell Zerlinda about life on the surface. In the first case, she will return home with the child, in the second, she will go to the surface with him. One way or another, the quest will be completed.
Lost records
In the archives of the chroniclers we will meet a girl named Orta, she is looking for records about the homeland of her ancestors - the Ortan teiga. We agree to help, especially since we still have to find this tag in the plot of the game. The documents will be in a chest in the middle of the desired location. Returning to Orzammar, give them to Ortha, then meet her in the council chamber to receive your reward.
Thief in the academic house
The chronicler's assistant will complain to you that a daring thief from among the untouchables has stolen an ancient book. We agree to help. We go to the dusty city and a little further from Rogek there will be a gnome similar to the description given to us by the chronicler's assistant (bald with a tattoo all over his face). We interrogate him, rip open his belly and find... no, not a stolen book, but evidence that will lead us to it - a receipt from the arena. Let's go to the testing arena. The gnome we need will be in the left wing. I don’t remember his name, but by the mark on the map you will understand that it is him. After a short conversation, the buyer of stolen goods will get into a fight. In vain. We take the book from his corpse. Now you have 2 options: you can sell the book yourself to the dwarf Jorthrin, standing next to the deceased, or you can honestly return it to the chroniclers. For returning the book to the chroniclers, you will receive nothing but gratitude, and you will receive several gold pieces from the gnome.
Lost Naga
There will be a naga beater standing near the entrance to the diamond halls. Talk to him, he will tell you that all his animals have fled and his business is closed. In order for him to get back into business, he needs to catch at least one naga. The nearest animal stands two steps away from the beater. We catch it and give it to him. Now he will buy all the captured nagas from us for a small amount of silver.
Glorious overlander
Traveling along the deep paths, you will find parts of a broken ancient elven sword:
Ephesus - at the crossroads of Karidina
pommel - in the Ortan teig
blade - in dead ditches
Having collected all three parts, the resting place of the owner of this sword will be revealed to you. It is located in the caves of the Ortan teig. You may have already been there in advance. It's no big deal, just go back to the sarcophagus and put all three parts of the sword in it. The weapon will become whole again and will serve you in the fight against enemies. The blade is quite powerful, with three sockets, so I highly recommend completing this quest.
In pieces!
While exploring the caves of the Karidina intersection, you will come across 3 bags with the remains of some kind of creature. Having collected all the bags, go to the Ortan teig location. There you will see an altar. Reunite all remains. The creature will come to life. Then you have two options: kill her again or demand a reward for saving her. The second option is preferable, because firstly, the creature is very strong and it is not so easy to kill it, and secondly, for killing you, alas, you will not receive anything except experience (the demon’s body cannot be searched). So take 25 gold as a reward and go get drunk at the nearest pub.
Wanderers' treasure
Traveling along the deep paths, you will find records of certain wanderers. Having collected all the records, you will find out the place where the treasure lies. Just find it by the mark that appears on the map at the Karidina intersection.
Dead Castle
As you travel through the Dead Moats location, you will find parts of the armor of the legion of the dead. Once you have collected all the pieces, you will learn the location of the unmarked grave. Just find it using the mark that appears on the map. In the grave you will find the emblem of the caste of the dead, with which you can give the Legion of the Dead a noble position (to do this, just read the right book in the guardian's house).
Golem records
As will become known from the plot, golems were either volunteer gnomes, criminals, or untouchables. So in the main hall of the Anvil of the Void location you will find a stone slab with a list of the names of all these unfortunate gnomes. Copy it onto a piece of paper and take it to the chroniclers in Orzammar. The chief chronicler will promise us an artifact as a reward.
Note: I had a bug here, they didn’t give me the artifact. However, the quest will be completed in any case.
Key to the city
Another task that becomes active only after you collect all the necessary records. In the city, look for information about the internal foundations and customs of Orzammar. When you have all of them, an entry will appear in your diary stating that you now know the location of the council members’ hiding place. We go to the council room, there will be a giant box in the left wing, we search it and take away a ring in the shape of a key with very, very strong parameters.
Outlandish means
In the royal palace you will find a sick dwarf woman. If you ask the doctor (he stands next to her bed) if we can help with anything, he will give a prescription and ask us to hurry up. The recipe will appear from your companion who knows the art of the herbalist (for example Morrigan):
you will need 4 elven roots, 2 concentration reagents, 2 life stones and one flask. We make a potion and give it to the patient. That's the whole quest.
Note: To complete the quest you need the maximum level of herbalist art.
Jammer's stash
Traveling through Jarvia's lair, you will find 3 chests (Kanka, Pike and Jammer himself), which seem to contain valuable items (rings, amulets, etc.). but when you try to pick them up, you will receive damage, and the trinkets themselves will not appear in your inventory. To avoid taking damage and injury from traps, take the cheapest item from each chest. As soon as you open the last chest, the location of Jammer's real treasure will be marked on the map. Go there and receive a reward for your efforts.
Encased in stone
Taken after reading the inscriptions on the throne of Orzammar in the palace (Diamond Halls). You need to switch to single mode and place your companions correctly: take one out of the hall and place it on the square in front of the entrance to the throne room. Two more need to be placed on such small arrows in the hall itself (they are located on the left on the floor near the wall with a window behind which lava flows). The latter approaches the throne and presses the "eye". The dragon comes running. We unite the party again and kill him, after which we take a good two-handed sword from the corpse.
Note: This quest can only be completed before choosing the Dwarf King, after which the throne stops lighting up and the task cannot be taken.
Like any self-respecting modern RPG, Dragon Age: Inquisition also includes crafting armor and weapons. Unlike the first part, here crafting is not limited to inserting runes - now we are given the opportunity to create a thing from scratch, choosing the appearance, type, material, which gives the necessary bonuses and improvements. Although the runes also remain, where would we be without them? In general, in my humble opinion, crafting is done dullly and not interesting, like everything else in this sad game, there are a lot of opportunities, but running around collecting all this junk is not very fun.
Sketches of weapons and armor
At the very beginning, to create items, upgrades or runes, you will need sketches of these same items, upgrades and runes. Where can I get them? In chests, from merchants, missions at headquarters, sometimes even from bosses. Sketches are displayed in the list of items available for crafting; they can be used as much as you like and, best of all, they do not take up space in your inventory.
There are only 3 levels of sketches in the game. The higher it is, the more cells there will be in the item, the better quality and with more bonuses it will be possible to create the item. Level 1 sketches require the presence of 2 cells, level 2 - 3 cells, level 3 sketches - 4 cells.
The crafting system here is logical - heavy armor will require a large amount of metal, a little less leather and rarely will you need fabric, but for a mage's robe it's the opposite. For swords and weapon hilts, you need a base, as well as a leather or fabric braid and the like.
There are 4 types of cells in total: the main one, which determines the basic parameters, and three additional ones, the set of which may vary depending on the sketch. Namely:
Damage— the main cell for weapons, determines damage per second depending on the material, as well as the type of elemental attack of the staff.
Attack— an additional slot for weapons and weapon upgrades. Depending on the material, it adds bonuses to attack types or the likelihood of imposing status effects on the enemy.
Armor— the main cell for armor, determines the level of armor depending on the material and protection from physical damage in melee.
Protection- additional slot for armor and armor upgrades. Depending on the material, it adds resistance bonuses from elemental, ranged and magical attacks, as well as the likelihood of retaliatory bleeding or additional health.
Support— an additional cell for all types of items. Depending on the material, it adds stat points (dexterity, magic, etc.).
For upgrades of any level, only two additional slots are always available; upgrades can only add bonuses and/or stat points, but not damage or armor level (the exception is Bianca).
Types of improvements and crafting
Armor
There are 3 types of armor available for crafting (light, medium and heavy), as well as helmets of each of the three types. For almost all types of armor, two upgrade slots are available: bracers and leggings (the exception is special armor like the Elven Guardian Robe or the armor of the Legion of the Dead). Improvements are created separately, but according to a similar principle.
Sometimes ready-made improvements can be found in chests or received as a reward for completing a mission at headquarters. Improvements can also be removed from dropped items and placed on others.
Weapon
In Dragon Age: Inquisition there are even more types of weapons than armor, and with improvements they are not so simple.
|
Weapon type |
Slots |
Name |
|
One-handed - swords |
Long sword hilt |
|
|
One-handed – maces, hammers, axes |
One-handed handle (shaft) |
|
|
Two-handed - great swords |
Great Sword Hilt Great Sword Head |
|
|
Two-handed – large axes and hammers |
Two-handed handle (shaft)Pommel |
|
|
Magic staves |
Staff tipStaff hilt |
|
|
Daggers/daggers |
Dagger hilt/Handles for dual blades |
|
|
Bow handle |
Separately, it is worth mentioning Bianca, since the weapon is unique. You can increase damage control and characteristics only with the help of improvements. Bianca has 3 upgrade slots available - Shoulders, Sight, Handle. The main cell is available for the shoulders, which increases damage control, there is also one support cell for the handle, and one attack cell is available for the sight. Although when I completed the game somewhere in the middle, Bianca was many times worse than mediocre bows...
Crafting materials
To create weapons and armor in the game there are 3 types of materials: metal, leather and fabric, in turn they are further divided into 3 levels. The higher the material level, the higher the armor level or bonus indicator. The type of armor also varies depending on the material.
Metal
Metal is found using the search button (or a keen eye) in caves and on mountain slopes in the form of small clusters of several types of each per location. In the Emerald Graves in the Argon Shack you can buy Perfect Chandelier, obsidian and pyrophyte, and Sero Colored Glass is sold in Skyhold from a merchant from Orlais.
Level 1 metals
Level 2 metals

Level 3 metals

Leather
Leather is obtained from killed animals of a certain species. You can buy almost all types of level 1 leather from the merchant in the Hinterlands (Crossroads), and in the Dalish camp in the Sacred Plains you can buy needleback leather, phoenix scales and ram leather.
Level 1 skins

Level 2 skins

Level 3 skins

Fabrics
Fabrics drop from slain enemies. Silk, semi-velvet and cotton can be bought in Val Royeaux.
Level 1 fabrics

Level 2 fabrics
Excellent things
You will have the opportunity to create excellent things in Skyhold after inviting the enchantress (mission at headquarters). When creating an item, a separate slot for an excellent item appears, right above the main one. Ordinary materials will not work here. For an excellent item, you need metals, leathers or fabrics touched by the Shadow that come across randomly during collection, as well as special finds like a dragon tooth or iron bark. Only one unit of such material can be inserted into a cell, but filling it is not required.
Special materials provide a short-term ability, such as Walking Fortress, Unbreakable or Shadow Cloak, a chance to gain a bonus to focus accumulation or heal up to 15% of health on a killing blow. Possible bonuses are generated randomly, and there are many of them.
Dragon Age: Inquisition - crafting armor and weapons was last modified: May 5, 2015 by admin
In this article, I would like to note the very existence and location of unique armor sets in the game.
Kits
Ancient elven armor (+5 defense per set)
Armor in ruins in the Bressilian Forest. The armor itself is in the sarcophagus.
Helmet in the Eastern Bressilian Forest. In order to get it, you need to exchange it with the hermit. If you kill the hermit before this, you can forget about the helmet.
Gloves in the destroyed temple, following the quest with the urn.


Boots boots can be found in Lotheringa, but due to a bug, unfortunately, they may not exist.

Juggernaut Set (+3 Strength and Constitution per set)
The entire set is located in the Bressilian forest gloves, helmet and boots in the graves (when the grave is activated, undead crawl out of it). The armor is in ruins behind a closed door, which is opened through a ritual.
Armor

Helmet

Gloves

Boots

Diligence Set (+5 willpower per set)
Armor in the temple of Andraste, according to the quest with the urn. Found on the corpse of the knight in the right passage.

Gloves in Orzammar, in the Guardians' library, in a closed chest.

Boots bought in Redcliffe from a blacksmith after saving his daughter.

Legion of the Dead Set (+3 damage and constitution per set)
In dead ditches on deep paths. The helmet is on the pedestal, in the same place as the key. The remaining parts lie in sarcophagi throughout the location.
Armor

Helmet
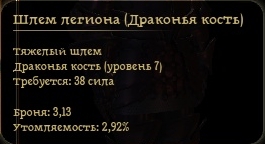
Gloves

Boots

Effort Set (-10% fatigue per set)
Armor according to the quest in the Deep Paths, it is removed from the Uterus.

Helmet in order to find this helmet, you need to go to Teig Educan with the dog. After talking to her and sending her on a quest, she will bring back the “winged helmet of the crusader.”

Gloves quest of free prospectors. Having collected all the stones, the location of their treasure will be marked on the map - in that chest there will be gloves.

Boots can be purchased in Dusty Town.

High Dragon Sets
After killing the High Dragon and receiving scales from its carcass, you can choose from Wade to make one of three types of kits:
Medium (-25% fatigue, +5 defense per set)
Armor

Gloves

Boots

Heavy (-20% fatigue, +5 defense per set)
Armor

Gloves

Boots
Massive (-15% fatigue, +5 defense per set)
Armor

Gloves

Boots

In addition, there is also a two-piece set that does not provide any bonus when worn at the same time. This:
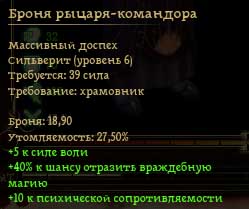
Knight Commander Helmet it can be found in three copies: during the quest “Evil” in the Denerim Elvenage (in the last room of the shelter); in the Vault on the second floor of Redcliffe Castle; can be purchased from Cesar after completing all the Ravens' missions.

Knight Commander Armor can be bought from the marauder in front of Orzammar.
Incomplete armor
Body
Templar Armor drops from the enchanted templar in the Tower of the Circle of Mages.

Shadow of the Empire from a merchant in the Common Halls of Orzammar.

Armor of Divine Will can be purchased from Ruka in the Ortan taiga.

Villain's Attire in Wade's store (Denerim).

Avon the Great's Chainmail same with Wade.

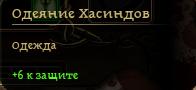
Hasind Robe given for the quest “Hasinda Way Sign”. It could also be in the Dalish store.
Witch's Robe can be purchased from Curiosities of Thedas (Denerim).

Robe of the First Sorcerer After completing the quests, Ravens can be purchased from Cesar.

Lord Master's Robe Drops from the leader of the slave traders in Denerim Elvenage.

Mantle of Possession on Morrigan's quest.

Reaper Clothes in Curiosities of Thedas.

Head
Templar Helmet drops from the enchanted templar in the Tower of the Circle of Magi.

Thick Qunari Helm Dropped by a bandit leader in Lothering.

Red's Helmet given for saving Redcliffe from the undead, if no one from the militia died.
Farsightedness Dropped by a High Dragon.

Very tight helmet Sold by Varathorn.

Helmet for two-wire drops from Jarvia. Also found in Jammer's stash.

Damage Dropped by a Garlock General during the Siege of Denerim.

Flagbearer's Helm chest in Fort Drakkon on the first floor during the siege of Denerim.

Kamenai's visor Sold by Gorim in Denerim.

Free Scout Helm dropped from Taoran in the final quest of the Blackstone Volunteers.

Griffin Helmet Gray Warden vault in Denerim.

Freedom Fighter Hood corpse on the 4th floor of the Circle of Mages Tower.

Hood with cameo drops during the quest “Five Pages Four Magicians.”

Sorcerer's Hood in a chest on the lower level of the ruins (Bressilian Forest).