How to restore a desk with your own hands. DIY coffee table update
An old table, loose and shriveled, and what’s more, creaky, like an ungreased cart, and your hands are itching to throw it in the fire or in a landfill. But if you work on it a little, you can get a very good furniture accessory, such as a coffee table (if you shorten the legs to a certain length), or a table for a TV. In my barn there was an ordinary kitchen table lying on a shelf, forgotten by everyone. In disassembled condition. Four bolted legs, a wooden base held together with metal brackets, and three tabletop pieces.

After examining this rarity, I initially decided to throw it in the trash car; from lying for a long time, the fragments of the tabletop made of chipboard swollen under the influence of moisture, and after drying, of course, they did not return to their original shape. Moreover, they became brittle and the sawdust, from which they were actually made, began to fall out...

The wooden base, on the contrary, had dried out to the point that it was shaking, as if alive, as soon as you picked it up! After thinking a little, I finally decided to try to “reanimate” him. One way or another, I won’t lose much if I fail.
Will need
- Hacksaw.
- Gas wrench or pliers.
- Universal glue (you can use “Moment”).
- Composite adhesive (cold welding).
- Cyan acrylate glue (super glue).
- Marker.
- Drill and drill bits for 4 and 9.
- Long ruler (or level with ruler markings).
- Four thick hexagon furniture screws.
- A small sheet of chipboard for a new countertop.
- Decorative self-adhesive film for covering the tabletop (with a pattern of your choice).
Restoring an old table
First you need to disassemble wooden base. Unscrew all existing screws and remove metal brackets.
Our table will be half the size of the previous one, which means those crossbars that used to be the width of the table will now become its length.

You can choose the width of the new table yourself, to suit your taste. You can even make it square! To do this, take the remaining long crossbars and shorten them to the desired width of the future table.

Just make sure that the width of the future table is at least half its length, otherwise it will be unstable! Now, on the sawn-off ends of the crossbars, we will use a hacksaw to make grooves for the metal staples, as before.


Next, we will deal with the holes left by the screws after disassembling the table. Most of these holes will again be in their original places, and to ensure that the screws holding the metal brackets hold them well, we will use matches and universal glue. Dip a match into glue (or drop glue into the hole), push it all the way into the hole, and break it off.


The result was a kind of cap. Now the screw will hold well in this hole, and the table will not wobble. Well, to prevent the “new” table from creaking, drop a drop of machine oil onto the contact points of all individual table fragments, both wooden and metal. Now let's take care of the legs. If these legs get twisted threaded connection, it is advisable to unscrew it from the leg. Coat the thread with composite or universal glue and screw it back in.

All the way. If the connection dangles, but does not unscrew (it also happens that a threaded pin has a “T”-shaped end inside the leg), then you will have to use cyanogen acrylate (super glue). We drip it into the gap between the joint and the wood until it stops going inside. Leave the glued legs to dry. For a couple of hours so that the composite glue has time to set. (By the way, the legs can also be shortened to the height you need, planed with a plane, narrowed downward if they are square, and covered with stain.) During this time, you can assemble the wooden base; We fasten the prepared crossbars using staples and screws.

After the time allotted for the composite glue to harden, we screw the legs to the base. As before to the old table.

Now we take the prepared sheet of chipboard (I took the end wall from an old cabinet for this purpose), cut out the tabletop to the required area and sand it sandpaper, or a wood file, sawed off edges.

Place the tabletop on a flat surface, with the front (smoothest!) side down. Place the base on top of the tabletop, legs up, and mark the corners of the legs with a marker.

We remove the base and drill 4 mm holes in each corner, so that the holes are in the centers of the legs. Now we put the base on the legs, place the tabletop on it, and look from below so that the marks made earlier with a marker line up. Now, using the holes available in the tabletop, we drill holes further - inside the leg, to the length of the screw.

Well, with an eight-millimeter drill, we’ll make small recesses on top of the holes for the screw heads and screw in the screws.


We cover the screw head with composite glue so that the tabletop has a smooth surface. You can pre-lubricate the surface of the recess and the screw head in it, machine oil, then it will be possible in the future to easily pick out these resulting plugs in order to dismantle the table, if necessary.

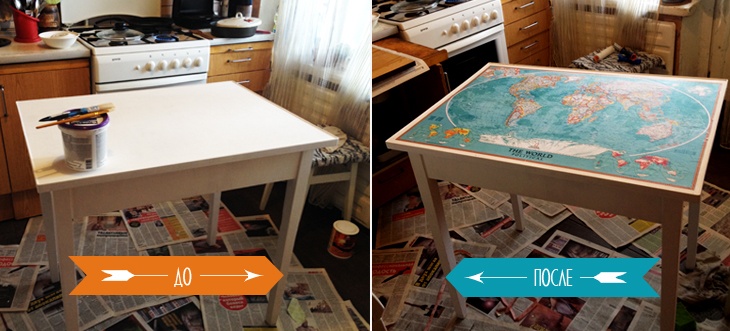
We wait for the composite glue to dry and, finally, cover the tabletop with adhesive decorative film.

Self-adhesive wallpaper should be applied as carefully as possible; there will be no second chance to re-glue it. To do this, I had to dismantle the table (fortunately, it didn’t take long to unscrew four screws and unscrew four nuts!). I humidified the air in the room using a sprayer so that dust particles would not fall on the surface to be pasted and would not form unevenness and bubbles after the work was done. I wiped the surface with alcohol and carefully, starting from one of the corners, smoothing the film into different sides from the corner with a dry cloth, on each part in turn, I pasted the film. If you still cannot avoid the bubbles, pierce them with a thin needle in several places, place a regular kitchen napkin on the bubble and place a flat-bottomed mug filled with boiling water in this place. For one or two minutes. After this procedure, the bubble will disappear. And one moment; Having covered the tabletop, I changed my mind about hiding the screw heads - I really liked the look of the shiny metal heads, recessed in the “stone” texture.

But this is an individual matter for each individual. If anyone doesn’t like it that way, you can hide the hats. Also cover them with glue and stick patches cut from the same film on top... This is what the table was like (in size!):

And this is how it became – small and compact:

It will fit well into any interior small room V country house. I think it turned out well. Even very good!
Many people still have old dining or kitchen tables at home; they are usually polished or wooden and no longer have a completely fashionable look. Do you want to throw it away? Not worth it! Why spend money on a new table, especially since older tables are much better quality than modern ones and can last for many more years
In this article we will show 4 universal methods how to update the old one dinner table with your own hands, without spending much of the family budget!
The main restaurant methods include the following:
- Painting the table (usually special paint is used for wooden surfaces, it can be either acrylic base so is enamel)
- Replacing the countertop (the tabletop can be ordered ready-made to size, or you can make it yourself, as shown in the master classes below)
They can be used individually or combined depending on the damage and condition of your furniture.
Updating the kitchen table top
Look at your dining table. If it general state more or less satisfies you with its appearance, but the tabletop is completely worn out or the tabletop simply cannot be removed without damaging the entire structure, this master class is definitely for you.

Materials:
- White enamel paint for wood;
- Deglosser;
- Polyurethane varnish on water based matte (you can use glossy at your discretion);
- Boards;
- Liquid Nails;
- Wood putty;
- Fine sandpaper;
- Brush, cloth, water.
Restoration instructions
Step 1: Remove old paint
- Treat table legs with deglosser.
- Thanks to this product, there is no need to sand and peel off the old paint, but simply apply it on top, wait for it to dry and paint it in the desired color.
- Apply 3 layers of enamel paint and wait until it dries completely.

Step 2
- Turn the table upside down. If you removed the legs for painting, then it will be more convenient for you to paint the bottom of the table top and the side wooden supports.
- Apply deglosser and paint in the same way as you would on the legs.

After drying, turn the table back over and paint the tabletop along the edges, taking 10 centimeters at a time; it is not necessary to paint the whole thing.
Step 3: Lay out a new countertop from boards
- After complete drying, measure the dimensions of the tabletop, its length and width. The boards should be slightly larger in size, centimeters 5 exceeding the future base e – tabletop.
- Take liquid nails and distribute them evenly in the middle of the table. Then go based on the number of boards you have.
- If there is an even number of them, for example 6, then they must dock exactly in the middle. In the case of an odd number, you should place the unpaired board in the middle. Again, see what works best based on the size of your particular table and boards.

After gluing the middle, glue the remaining boards on the sides. Leave the table to dry for 12 hours or a day, depending on the glue.
Step 4: Putty
- Be sure to fill the gaps between the boards with wood putty, otherwise bits of food will get stuck in them.
- You can smooth it out with your finger, and wipe off excess with a damp cloth.


TIP: Let the putty dry for a couple of hours, and then sand all the boards with fine sandpaper.

Step 5: Polish
- Wipe the boards well, leaving no dust or debris on them. Take the polyurethane varnish, stir it and start applying it to the boards in long strokes. Try to make the first layer thin.
- Leave the countertop to dry for a day, then carefully sand the surface with sandpaper, wipe off the dust and apply a second coat of varnish.
Step 6: Whitewash
As soon as the varnish dries after last painting, start preparing the paint. In this case, the whitewash effect is planned; to achieve it, mix 1 part paint with 4 parts water.

Use a brush to paint an area of the board, and then immediately wipe with a cloth. Paint the entire tabletop this way, then add a little more water to the paint and go over it again.

After complete drying, the table is ready for use.
How to update a polished table
If you have a small polished table gathering dust in the corner for a thousand years, which is long overdue for a landfill, but your hand does not rise, then you should pick up magic tools and become a fairy godmother for it.

Materials and tools:
- Sander;
- Sandpaper;
- Stain;
- Paint remover gel;
- Plastic scraper;
- Brush;
- Water-based polyurethane varnish;
- Dark enamel paint;
- Handles for the drawer.
Work order
Step 1: Remove old varnish

- Dress in closed clothing and shoes. If the legs are removable, separate them from the tabletop for ease of sanding.
- Sand all parts of the table well, getting rid of all dents and scratches.
- Small parts, as well as places where the table can be damaged, sand with sandpaper.


Step 2: Apply stain
Apply the stain you like to the prepared parts of the table, following the instructions. Depending on the stain you choose, wait the required drying time.

Step 3: Processing the table shelf
- To clean the table shelf, use paint remover gel.
- After applying it, wait about 4 minutes (depending on the gel) and carefully clean the shelf with a plastic scraper, being careful not to scrape the wood.
- Then apply stain.
Step 4: Lacquer the surface
- Wipe all parts of the table well, without leaving dust and debris on them. Take your polyurethane varnish, stir it and start applying it in long strokes.
- Try to make the first layer thin. Leave everything to dry for a day, then carefully sand the surface with sandpaper, wipe off the dust and apply a second coat of varnish.
- After drying, you can apply a third layer, but no more.

Step 5: Painting the Table
- Paint the table the color of your choice, wait for it to dry, and assemble it.
- Screw the handles into the table drawer.
Agree that the result of the work done is impressive!

How to paint a wooden table white
One evening, did you realize, looking around, that you were among monochromatic gloomy things? Want to freshen up your room and don't know where to start? White wooden furniture always looks very impressive and expands the space.
You can make a white table from absolutely any color. In this master class we will show you how to paint a black table white.

Prepare the following:
- Paint remover;
- Degreasing agent;
- Plastic scraper;
- Fine sandpaper;
- Brush;
- Polyurethane varnish;
- Enamel paint.
Work order:

Step 1: Remove old paint
- It is necessary to remove the old layer of varnish from the tables. To do this, we will use a paint remover. To protect yourself from harmful chemicals, wear protective gloves, a mask, and goggles.
- Apply the product to areas where paint has been removed. Depending on the instructions, wait the specified time and begin to carefully remove the paint layer, being careful not to scrape the wood.
- After removing all the paint, degrease the surface with a special solution.
Step 2: Sand and varnish
- Run sandpaper over the entire surface of the tables. Afterwards, wipe them well from dust.
- Take polyurethane varnish, stir it and start applying it in long strokes. Try to make the first layer thin.
- Leave everything to dry for a day, then carefully sand the surface with sandpaper, wipe off the dust and apply a second coat of varnish.
Step 3: Paint the table
Wait until the varnish is completely dry and begin applying paint. Paint in 3 layers and leave to dry for a day. Afterwards you can arrange tables and please the eye with new clothes.
Wooden dining table in Loft style
Now it's very fashionable countertops made of wood with legs in a contrasting color. Such tables came to us from the Loft style - it is distinguished by its simplicity and a little roughness. But such wooden tables really suit any interior.
Let's watch a master class on how to make a stylish Loft out of an old table.

Tools:
- Saw;
- Boards;
- Polyurethane varnish;
- Brush;
- Enamel paint;
- Liquid Nails;
Installation technology
Step 1: Cut the boards
Measure the dimensions of the tabletop, its length and width. The boards should be slightly larger in size, 5 centimeters larger than the future base - the tabletop


- Cover the prepared boards with polyurethane varnish. To do this, stir it and start applying it in long strokes. Try to make the first layer thin.
- Leave the boards to dry for a day, then carefully sand the surface with sandpaper, wipe off the dust and apply a second coat of varnish.
- After the varnish has dried, paint the boards with enamel paint in 2 layers and leave to dry for 12 hours.

Step 2: Installing the countertop
- Prepare the old tabletop by pouring some sand on it and wiping it with a cloth.
- Once the paint is dry, apply liquid nails to the old countertop and begin gluing the painted boards to it.
- To ensure that the boards stick well, place a weight on the tabletop and leave it for a day.


The result is a great little dining table in the Loft style!


You can refresh the interior, even by slightly updating old thing. You shouldn't spend a lot of money on buying a new dining or coffee table, when if it is possible to do everything with your own hands. By adding a little imagination, you can decorate the table simply amazingly with the help of stencils.
And if you are in company with a table , then you will plunge your guests into envy - after all, you will have an original, unique collection of furniture, which can even be called designer if you try and decorate it. Create to amaze!
From natural wood- perfectly amenable to restoration. Assessing her condition is quite simple. First of all, you need to inspect the product for the presence of rot and rotten elements. This is a common occurrence for furniture that has been stored in improper conditions. Moisture quickly destroys wood, making it beyond repair.
Pay attention also to the frame of the product. If the parts are intact and made of natural wood- great news for you. Old plywood sheet materials, covered with peeling veneer can be removed. But the frame will become reliable support the entire restoration process.
In addition, remember that paintwork is of great importance if you are evaluating the product as a subject for further restoration. Furniture varnish is difficult to remove, and even then, mainly on flat areas with a flat surface. Processing small shaped elements requires special equipment and large quantity consumables. It is better not to mess with such furniture if you do not have experience.
Finally, paint is not a death sentence for a restorer. Instead, be prepared to deal with several layers of old paint. There are several ways to get rid of it. Construction hair dryer and solvents are the most gentle of them. Next, the product is polished and after that it is ready for restoration.
Let's see what is needed to restore the old one desk from this master class:
Materials:
Wooden figured legs - 4 pcs;
- a small pine board to strengthen the frame;
- tabletop according to frame dimensions;
- thin wooden boards no more than 15 mm thick for decorating the side panel of the table;
- primer for wood;
- permanent paint light shade;
- paint with a loose coating for the decorative side panel - 2-3 shades;
- glue for woodworking;
- self-tapping screws and furniture screws;
- fittings for fastening reverse side table to the wall;
- plastic handles for drawers;
- wood putty.
Tools:
Sander;
- sandpaper;
- paint brushes and roller;
- screwdriver;
- screwdriver;
- electric drill;
- construction tape;
- hacksaw for metal;
- putty knife.
Step one: preparing the table for restoration work
The table for restoration was given to the author free of charge. By the way, as many as four tables. However, his tabletop turned out to be completely unusable, so he borrowed another one from a neighbor - with a tabletop suitable for the project. All this pleasure cost him $35. And part of the money went to purchase curly legs and paint and varnish materials. It still turned out quite economical.
The author cleared the dust from the table and began to re-equip it. To do this, he took out all the drawers. There are usually levers on the side that need to be pressed on both sides. Then the box is easily removed from the cell.
He also removed the side panel of the desk. It was attached to furniture screws and it turned out to be too difficult to unscrew them. Therefore, the author used a hacksaw and cut the screws along the line between the panel and the frame.
To keep the tabletop frame rigid, he reinforced it with a small wooden board, screwed on with screws and glued on. Always use glue when assembling furniture if you have the opportunity. This significantly extends the service life of the fastening joints.
The author removed the bottom panel of the table under the drawers. To prevent the plywood from cracking, he first glued tape along the cut line. A manual circular saw did the job perfectly. A jigsaw can be used for the same purpose.


Step two: refurbishment of the table
Since the table had lost its support and side panel, they had to be replaced with something. But the decision was ready in advance. The author purchased four curly legs. He sawed three of them on a machine. They will be located under the part of the table where the drawers are located. One leg will partially replace the removed side panel.
The short legs under the panel with drawers were secured with screws from the reverse side. Glue was also needed here. Remember that excess glue should be promptly removed, otherwise it will affect the quality of the product’s coloring. This is done using fine-grained sandpaper.


Step Three: Painting the Old Table
Before painting, the surface of the product should be thoroughly sanded. Small elements and hard to reach places as usual, they are sanded with sandpaper or in a disassembled state.
He then applied two coats of white paint. The author used acrylic paint. It is not particularly durable, but it has its advantages. For example, acrylic paint is non-toxic and has no unpleasant odor. Therefore, all work can be carried out in a residential area.
Often acrylic paint needs to be varnished. Alkyd, oil and nitro paints are more durable, but even when using the latter, furniture should be varnished. This will extend the life of the paintwork.

Step Four: Setting Up the Table
You probably noticed that the table is missing legs. That's right, you're right. The author used only four supports instead of six. This is because the table is designed to be used in one specific place - in the corner where the old desk was previously located.
And since the table was not planned to be moved from place to place, the author decided to save a little and fix the frame permanently to the wall. He began this work before installing the countertop.

Step Five: Installing the Countertop and Final Preparations
The author also replaced the plywood side panel piece with drawers. Instead, he used several tinted boards, which fit perfectly into the overall picture and turned into the highlight of the product. Such tinting is carried out using materials that have a loose coating. Their choice among acrylic paints huge. A similar effect can be achieved using some decorative oils.
Finally, the author attached handles made of black matte plastic to all the drawers and varnished the tabletop with a glossy varnish. When choosing a varnish for a tabletop, pay attention to the durability of the coating. If you have the opportunity to compare samples of materials, then a good furniture varnish should form a hard coating that is not scratched by a fingernail after drying. This way you will be sure that the countertop is still for a long time will have an excellent fresh look.
Over time, a wooden table loses its former attractive appearance. But this is not a reason to send it to the nearest landfill or dusty attic. If desired, all shortcomings can be corrected. To do this, the table is restored, after which it will look like new. By showing your imagination, you can completely change the design of the product. Self-updating furniture will save your budget, since restoration in specialized workshops is very expensive.
Repairing an old table at home - good way decorate the interior of your home, give it newness and comfort. After all, it is the little things that make up the overall impression of the house. Do-it-yourself restoration has the following advantages:
- Saving money. Repairing furniture yourself is much cheaper than buying new or ordering restoration from a specialized workshop.
- An opportunity to radically transform furniture and give it a second life.
- Decorate the table based on your own taste preferences. You can decorate your home with a unique designer item.
- If the furniture has high value and is made of good wood, then restoration will help save it from damage and preserve it for a long time.
Updating furniture yourself is a very painstaking task that requires some skills. However, before repairing old table with your own hands, it would be useful to study the algorithm for carrying out the work. After all, failure to follow the rules can negatively affect the result.
 Saving money
 Design based on your own taste preferences
 The ability to radically transform furniture
Features of restoration of a wooden table
Even the most quality furniture cannot last forever. Over time, the table surface loses its original appearance. appear on it small cracks, chips, the varnish begins to wear off, and the fastenings no longer withstand the load. Restoring an old table is a serious repair, which primarily involves updating damaged parts. It is very important to understand that chipboard is almost irreparable. Old surface It’s better to simply throw it away and put a new one in its place.
Before updating the countertop, it is imperative to remove the old finishing coating. If it's painted or lacquered table, That upper layer should be washed off with alcohol, acetone, and organic solvents. There are also many on sale special means for these purposes. They are available in the form of liquids, gels or powders.
If on wooden structure If there are minor scratches or other damage, they are carefully treated with sandpaper with a small grit. Repairing cracks when repairing wooden tables is carried out using:
- wood putties;
- mixtures of glue and wood shavings;
- epoxy resin or special wax correctors.
You can insert suitable-sized rectangular pieces or wedges of wood into wide and deep cracks and secure it all with universal glue. The resulting gaps need to be hidden; to do this, they are filled with resin or putty. When carrying out such repairs, it is worth remembering important rule– all surfaces must be dry. Wood is a very vulnerable material. It must be protected from moisture, bacteria, fungi, ultraviolet radiation. Therefore it is necessary to take care of protective layer(primer, paint, varnish or azure). Most often, varnish is used for these purposes. To change the shade of furniture, you need to cover it not with transparent, but with colored varnish. The result is a very stylish and presentable polished table.
The next step is to sand the entire area of the furniture with fine sandpaper. Here you need to try and sand the table to a perfectly smooth state. The level of smoothness will largely determine how the paint or varnish lays down. Before varnishing the product, the wood is primed. To preserve natural beauty and texture wooden products, they are often coated with a special tinting liquid (stain) or acrylic varnish water based.
When restoring a table with your own hands, the craftsman is required to be attentive and careful. You need to work with chemicals in a room with good ventilation; it is also advisable to do this in special clothing and a respirator.
 View all details
 Remove old finish
 Seal the cracks
 Prime surfaces
 Sand the table
 Treat with stain
 Varnish
Necessary tools and consumables
Before you update your table, you need to stock up necessary tools and consumables, the availability of which is better to take care of in advance. To carry out the work you may need the following equipment:
- sandpaper of varying degrees of grit (from 80 to 180 for initial processing, from 500 to 600 for polishing the final coating) or a sanding machine;
- set of brushes and roller;
- electric drill and several drills of different diameters;
- chisel;
- plane;
- hammer, supply of nails and nail puller;
- saw;
- marker;
- roulette;
- rubber spatula for removing old paint;
- putty, primer, varnish, paint;
- wood glue;
- protective equipment: masks, gloves, respirator;
- wood protection products (impregnation that protects against unfavorable factors, for example, wood rot or pests).
A set of screwdrivers is also useful for disassembling the product. Using a marker and tape measure, markings will be made, and paints and varnishes will help protect the furniture from negative impacts and change it appearance. Choosing paint and varnish composition, it is better to give preference to a well-known brand. Before you restore an old table with your own hands, you need to make sure that the tools are intact and in working order.


Stages of work
The restoration process consists of several important stages:
- Selection and purchase of all necessary Supplies. It's better to do all this in advance.
- Preliminary table repair. In the case of desk restoration, moving parts are lubricated and drawers and shelves are repaired.
- Identification and elimination of major defects for further restoration.
- Removing old varnish.
- Application of protective solutions.
- Surface decoration using various techniques.
The last stage is the most interesting. It gives you the opportunity to realize your creative potential and bring the most creative ideas to life.
Preliminary repair
On preliminary stage restoration involves restoring and repairing furniture. You should start by assessing her condition. You need to carefully inspect the wooden table, see if the legs are broken, and check the integrity of all parts. A stable structure should not tilt or creak under load. Repairing a table begins with searching for visible defects. Next you need to disassemble it into its component parts. If the plywood that serves as the bottom of the boxes has delaminated, it must be dismantled and these parts replaced with new ones.
Presence of small bubbles on chipboard surfaces or MDF indicates that the process of veneer peeling has begun.
Moving parts are lubricated with machine oil, and if necessary, the mechanism itself is repaired. If on metal parts Corrosion has appeared, they must be replaced with new ones. Outdated, unfashionable fittings can be replaced with more modern ones.
Poorly fastened elements are connected using glue. To make the table more stable, you need to replace its legs with wider ones. Not everyone knows how to restore a table if it becomes loose. The product can be strengthened using corner ties.
To repair a book-table, you need to lubricate all moving joints with machine oil.
 Assess the condition of the table
 Throw away the old countertop
 Disassemble the table frame
 Knock out the legs
 Mark with a pencil where the legs are attached
 Glue the broken parts together using self-tapping screws
Primary processing
Many people are interested in how to update an old coffee table if there is a long-cracked layer of varnish on its surface. In this case, it is necessary to remove the old coating and then apply a new one in its place. This work is carried out mechanically (manually using a spatula) or using special chemical compositions, which are also called washes. Mechanical method implies the use grinder. But if it’s not there, it’s okay. You can replace it with medium-grain sandpaper. The main thing during machining is not to damage the product. This is especially true for antique wood. To avoid this, movements should be directed along the wood fibers.
Remains of the old coating can also be removed using chemicals. They are applied with a small soft brush to the surface of the furniture. Active substances quickly dissolve all existing layers of varnish or paint. After 30 minutes, this solution can be easily removed using an ordinary sponge. After removing the varnish, the wood is impregnated with protective mixtures. This is extremely important stage restoration of a wooden table, which will subsequently protect the product from damage.
Choosing between mechanical and chemically, it is worth considering that if we are talking about rare and expensive furniture, then it is best to use a remover. It can be commercially presented in the form of liquid, gel or powder. All these mixtures are absolutely safe and will not damage the structure of the tree.
For removing small cracks, chips and scratches, the following operations must be performed:
- Sweep dust from all crevices.
- Seal the cracks with wood putty.
- Remove excess putty and level the surface.
- Wait until completely dry and clean the treated areas with fine sandpaper.
These operations will help remove all defects from the surface of the table.
During restoration coffee table With your own hands, sometimes you have to deal with the fact that there are depressions or even holes on its surface. In this case, you can use epoxy resin or fill the recesses with a mixture of fine sawdust and glue.
 Remove old coating
 Use sandpaper to go through the recesses and bulges.
 Glue all joints and tighten the structure
 Install legs
 Attach the new tabletop to the underframe
 Glue the legs
 Connect the frame to the tabletop
Coating with decorative composition
Before you begin the final finishing, you need to prime. The composition must be applied in stages - first on the tabletop, then on the frame of the product. You can use both acrylic and alkyd primers. Processing a wooden table consists of several stages:
- The selected composition is applied to a clean surface and spread with a spatula; the mixture should be distributed in an even layer.
- After the first layer has dried, you need to apply a second one.
- When all layers are dry, remove uneven surfaces by sanding.
This way you can cover not only tables. Any wooden surface(chairs, chests of drawers, cabinets) needs an additional primer coat before painting. After priming it is necessary to paint. This can be as simple as painting with a brush or decorative application paint through tulle or stencil. The last stage will be treated with varnish or wax. Varnish is often used during restoration kitchen table with your own hands. Wax is used mainly for furniture that is constantly under the influence of external factors. It perfectly protects from the sun, moisture and various damages.
When choosing tools for application, you need to remember that low-quality brushes can leave fluff that, after drying, will be impossible to remove.
The varnish is applied using a brush, drying time is from 18 to 36 hours. Wax can be solid or watery. The liquid is immediately ready for use, while the solid must first be melted. Before you renew your kitchen table with your own hands using a protective layer of wax, you need to prepare a thick brush or cotton swab. It is advisable to carry out all these manipulations on outdoors, since the formulations used contain toxic substances that are harmful to health.
Quite often there is a need to disguise minor visual defects or you just want to change the boring color of an old table. To do this, before applying the varnish composition, you can cover the desired areas with paint.
 Cover with stain
 Part by part, priming the products in several layers
 Remove irregularities by sanding
 Grind joints on convex and concave parts
 Remove dust from surfaces
 Apply varnish
 If desired, coat with matte varnish
 The table is ready
Creative ways to update
Many people are wondering how to update old desks that are looking dismal. There are many ways to decorate the top of a kitchen table or any other:
- Painting. A very simple restoration method. Are used different types paints, such as acrylic, alkyd or enamel.
- Artistic painting. Enough the hard way, requiring drawing skills. You can use a stencil, this makes the task much easier.
- Craquelure. This method is a decoration by applying a finish that imitates an old, cracked coating. This is done using special chemical mixtures.
- Mosaic. You can make it using smalt, but it is very expensive. It's better to use a bat tiles. For gluing, use universal glue.
- Decorative film. It is pasted after polishing and cleaning the surface. Using this technique, you can turn an old coffee table into a fashionable piece of furniture.
- Pasting with decorative tape. After polishing and treating with alcohol, adhesive tape is applied. Then the pasting area is rolled with a special roller.
- Processing with epoxy resin. This solution turns into plastic after application to the surface. With its help, decoration occurs with the addition of various patterns.
- Applying varnish or stain. This the simplest way decoration that even a beginner can handle. Moreover, it will preserve the natural texture wooden covering, and will also provide protection from moisture and fading. Most often, this method is used to update an old kitchen table.
- Painting through tulle. To do this you will need to find a piece of old tulle. Next you need to paint the table White color. After the paint has dried, apply tulle to the surface of the furniture so that the arrangement of the pattern looks as beautiful as possible. Secure the fabric so that it does not move during painting. Then you need to take a can and start painting. After 15 minutes, the tulle can be removed.
- Gilding. Using transfer gold, you can achieve a beautiful gilded effect. This operation is carried out in the same way as painting, using a stencil.
To get the effect of a pleasant dull shine, you can apply a matting solution on top of the varnish.
In order to restore a coffee table with your own hands, it is best to use mosaic decoration, painting, burning or varnishing. To “revive” a faded desk, you can choose staining or varnishing. There are quite a few ways to decorate a kitchen table: dyeing through lace or tulle, decorating ceramic tiles or using decoupage.
Garden tables are best decorated with tiles or mosaics, especially if they are under open air. If you need to decorate a table for children's creativity, you can be creative and paint each leg in a different color. different colour– you will get a bright and cheerful piece of furniture.
Summarizing all the recommendations, we can confidently say that you can carry out the restoration of outdated furniture yourself. Anyone who has ever held tools in their hands can turn an awkward, shabby table into a real work of art. Of course, this will take time and patience, but the result is worth it.
 Painting
 Craquelure
 Mosaic
 Decorative tape
 Decorative film
 Processing with epoxy resin
 Applying varnish or stain
 Painting through tulle
 Gilding
Video
Photo


Furniture pieces occupy a central place in the interior. So, in the kitchen or dining room the main attribute is the kitchen table. In order for the product to last for a long time, housewives cover the tabletop with a tablecloth or special napkins. But what to do if the furniture is damaged or deformed? In this case, you can restore the kitchen table with your own hands. Exist various ways and technologies to improve the appearance of the structure. Therefore, you should not throw away worn-out items because they are easy to repair, decorate and decorate.
Covering with self-adhesive film is the most economical option table updates.
Preparatory work
Before decorating the kitchen table with your own hands, you need to prepare the product. It must be cleaned of dust and dirt. To do this, all elements of the table must be wiped with a damp cloth. At heavy pollution products can be used special household chemicals. After wet processing of structural parts, everything must be thoroughly dried. Otherwise, accumulated moisture will contribute to the appearance of mold and fungal infections, which will negatively affect the quality of operation.

A wooden kitchen table needs to be carefully inspected. If cracks or gaps appear on its surface, they need to be treated with sandpaper. This will help strengthen the structure and make it easier to apply a new coating.
Very often, the kitchen countertop is equipped with a polishing coating. In order to update an old kitchen table, you need to remove the covering. Experts recommend doing most of the work in an open, well-ventilated room. The floor should be covered with unnecessary cloth or paper.
For finishing work You will need the following tools:
- dry rag;
- polish remover;
- putty knife;
- metal wool;
- alcohol solution;
- brushes;
- gloves;
- mask for the face;
- sandpaper.
The brush is moistened in a special solution used to remove the polishing coating. It can be liquid or thick. For ease of use, it is recommended to pour a small amount of the mixture into a separate container. This consistency is applied in a thick layer to a specific area. After this, you must wait until the surface absorbs the solution. For some areas, you can use a stiff brush. Thus, cleaning the kitchen counter with your own hands will not be difficult. To do this, you need to choose the right materials for processing.
Experts recommend that after removing the polishing layer, treat the surface of the table with sandpaper and steel wool, after which the base will become smooth. The resulting surface will become ideal place for decorating and creating new designs.
Tile update

Decorative tiles are one of the most popular materials for cladding kitchen units. To design a tabletop yourself, you need to measure it and select the appropriate material for it.
Tile of various textures is a durable and reliable means for covering the countertop. The good thing about tiles is that they are easy to clean and you can safely place hot dishes on them. To decorate the kitchen table, it is recommended to choose elements with matte finish. To work you will need:
- tile;
- grout for seams;
- plastic crosses;
- special glue;
- edge profile;
- brush;
- notched spatula;
- building level;
- dry rag (sponge).
A special tile adhesive is applied to the prepared and cleaned base of the countertop. This procedure should be done using a notched spatula. During fixation, the material will be firmly and securely fastened.

The tile is pressed tightly to the base of the table. The elements of the product are connected to each other in the desired composition. It is recommended to strengthen the seams between materials using plastic crosses. Thus, the products will be fixed to each other at an equal distance. By using building level you need to monitor the position of the parts.
After the main work is done, it is necessary to grout the seams between the tiles. To do this, use a special mixture, which can be purchased at any hardware store. The grout is applied to the base of the table after the glue has completely dried.
In order for the kitchen table to look beautiful and festive, it is recommended to decorate the side parts of the tabletop. This procedure can be carried out using special edge profiles. They can be selected to match the appearance of the tiles.
Restoration with paint
This method, which allows you to unusually update your kitchen table, is available to everyone. You can paint both the tabletop and the legs of the product. Color and design new design depend on the preferences of the owners. In order for the kitchen table to become the central attribute of the room, it can be painted with bright paint. Decorating an interior item allows you to show imagination and skill and create an original masterpiece at home.
For work, it is recommended to purchase quick drying paint and a brush. The work space should be spacious. It is recommended to cover the surface of the table. Some owners prefer to use plain paint, but combining different shades will help create unique design furniture. Some craftsmen use stencils for decoration: they paint the main part in one tone, and create an original design on the sides or in the center of the tabletop using a stencil.
Decoupage technique
Decoupage napkins are ideal for decorating any type of furniture.

Aerosol paint applies quickly and dries completely in 2 hours.
With their help you can decorate your kitchen table in an unusual way. The attribute should be decorated taking into account the theme and style of the room. Exists big choice applications that perfectly complement the appearance of the tabletop. In addition, the decoupage technique can be used for the side parts of the structure and can be used to frame the legs.
To work, you need to prepare the following tools:
- napkins for decoupage;
- PVA glue;
- capacity;
- brush.
Using glue, the design is transferred to the table surface. For work, you can use both special napkins and images from magazines and newspapers. If defects appear, they can be masked with paint. When completing the work, it is recommended to treat the surface with varnish. This will significantly increase the service life of the product.
Table decoration methods
The variety of decoration methods allows owners to radically change kitchen set. An affordable and practical decoration method is self-adhesive film, which helps you decorate your furniture yourself. Just choose desired shade material with increased density. Gluing the film to the base of the tabletop allows you to update the product in the shortest possible time.
Some owners use old pieces of wallpaper to decorate furniture. To work, you need to purchase special glue. Decorating with wallpaper will make the interior unusual and original. In addition, you can purchase wallpaper with imitation stone, brick or tile.
In reconstruction old furniture You can show your imagination, ideas and skill. You should not limit yourself to just decorating the tabletop. Replacing the legs will create new design in your own kitchen. Updating a table is accessible even to people who have never encountered such work. It is enough to use various decorative overlays and homemade decorations to radically transform this piece of furniture.