How to properly lay a drainage pipe in geotextiles. Correct laying of drainage pipes
Contrary to popular belief, moisture cannot always be best friend plants. Too much water is often harmful to most of them. Excess moisture is also not good for buildings. It has a destructive effect on various materials the buildings. Therefore, every owner of a country house or summer cottage (garden plots) it is important to divert excess water from your own territory.
Most effective method protecting the foundation of a private house from the destructive effects of storm and groundwater is concrete installation. What is especially important when water accumulates in the upper layers of the earth, since it can cause flooding of the basement or ground floor, moisture and further deformation of the walls, as well as the appearance of fungal formations.
Here we will talk about how to find out how to lay drainage pipes with your own hands.
Pipes for drainage systems, which are installed along the entire perimeter of the site at the dacha, make it possible to create quite high-quality drainage.
After all, the danger of flooding is borne not only by groundwater, but also by flood water. Damage can also be caused by various types of precipitation that exceed permissible standards.
Installation requirements:
- The flat location of the site (on a slope), which contributes to a large accumulation of water.
- Loamy and clay soil, which have very weak water-permeability properties.
- Increased level of location of drainage groundwater.
Types of drainage systems
What types of installation are there? Today there are two main installation options:
- Open or surface – used to remove excess moisture that occurs due to accumulation melt water or precipitation. Laying of this type is presented in the form of trenches and ditches (pipe in ditch).
- Closed or deep - round and flat drainage pipes with perforation (drainage pipes with perforation) are used in installation, which are laid to the required depth in a previously prepared trench (laying depth varies). The main function is retraction groundwater, as well as protecting the foundation of the house.
Materials required for laying a closed system
From bulk building materials you will need:
- Sand. In drainage work it is used river sand. His main function— creation of a special filtration pillow.
- Crushed stone. The purpose of crushed stone is to form a stable layer to prevent the penetration of large parts of soil and dirt.

Main materials:
- Pumps. They are used exclusively in cases of severe flooding of the area with groundwater.
- Drainage pipe.
- Geotextiles – protects against soil contamination.
- Connecting couplings are needed for fastening laid underground pipes to each other.
Basically, the in-ground system needs regular cleaning. To do this, inspection wells are installed along its perimeter. To collect deep water, a collector well is installed in the system.
Selection of drainage pipes
Before installing the system, great attention should be paid to selecting perforated drainage pipes for the job.
The first thing to consider is the use of perforated drainage pipes in the design of the drainage system. The second is the diameter and the presence of holes for moisture drainage, as well as air exchange.
An equally important nuance is the material from which round or flat drainage pipes are made. Currently on the market building materials The following types are presented:
- Asbestos-cement.
- Made of ceramics.
- Polymer.
The most popular drainage systems are polymer drainage pipes and their check valve. Their advantage is as follows.
- Quite a long period of use - up to seventy years.
- High strength indicators (check valve).
- Resistant to corrosion and aggressive environments.
- Reduced weight, simplifying the process of transportation and installation.
- Self-cleaning ability due to its smooth surface.
- Resistance to siltation.
- Value for money.
- Easy to maintain. Due to the geotextile filter, the system does not require flushing.
- Up to 150 mm - for a system that drains a small amount of water.
- Up to 300 mm – for systems with heavy loads.
For a branched system, pipes will be required for both small (for branches) and large diameter(for the main branch of the system).
Plastic pipes
Polymer types and their check valve, which are mainly used for laying drainage systems in the ground, are made of PVC, polyethylene or polypropylene and are available in the following varieties:

- Single-layer or double-layer. The choice of the number of layers depends on the density of the soil.
- Rigid and flexible drainage pipes (high flexibility). Large diameter rigid drainage pipes are used for simple circuits, while flexible ones allow you to create very complex branching throughout the entire area.
- Types with or without filter casing. Basically, they already have special holes along their entire length. However, if the purchased material does not have holes, then you can make them yourself using a thin drill or drill.
- Smooth and corrugated.
If we talk about geo-fabric, then the building materials market often offers samples already covered with filter textiles (high-quality fabric). When purchasing uncoated systems, you can easily wrap their surface yourself by securing the material with thin wire or rope around the perimeter.
Pipe laying design
Before starting work on installing a minimal system, you must first draw up a plan diagram for its location on the site.
- To install the system, you need to take into account the type of soil, as well as the height of the groundwater. The most often used is a branched scheme, at the joints of which inspection wells are installed.
- The distance between drainage branches depends on the type of soil. For clay soil it is 10 m, for loamy soil – 20 m, with sand type soil – 45 m.
Laying drainage pipes yourself
How to properly lay drainage pipes?
First you need to determine the location of the drainage pipes. There are two types of accommodation:
- “Wall” drainage - passes only near the foundation of the house, preventing moisture from entering the building itself.
- Drainage pipe laying, which is located along the entire perimeter of the site. It protects not only the base of the building, but also other outbuildings and plantings located on the territory.
Stages of work
- The first step will be to mark the area for placing ditches. To facilitate the process, you can use a laser rangefinder. Special attention should be given to areas where moisture accumulates after rain. This means that water exchange in this area is difficult due to the presence of barriers or soil density.
- Trench. The recess under the trench should be laid taking into account differences in height. The main task of the prepared ditch system is the unhindered and rapid outflow of water.
- Before installation, the bottom of the trench should be well compacted. After this, a special filter material is laid. Its ends must necessarily extend beyond the trench. Then river sand and crushed stone are poured to a thickness of no more than 20 cm.
- The drainage pipe is cut according to the dimensions of the diagram. When you have figured out the size, you can begin laying, connecting the joints using fittings.
- The pipes must be carefully wrapped in geotextile, securing the joints with rope or thin wire, and only then can they be laid. In addition to throughput, the functions of geotextiles include protecting the perforations of the perforated drainage pipe from clogging.
- Laying must be done at a slope, connecting the ends to inspection wells. Two types of wells can be used in the system: sealed, allowing the use of water for technical purposes, and absorption - the water will go back into the soil. The slope of the drainage pipe depends on its diameter; the larger it is, the less slope is required.
- The next installation step will be filling the surface with crushed stone and sand. After which the structure is wrapped with sheets of filter material located on the surface and covered with a layer of soil. How deep should I dig? Everything is individual.
System Maintenance
When arranging a site with a drainage system, it is extremely important not only its high-quality and thoughtful installation, but also compliance with all operating rules. This will extend the period of operation of the system for a sufficiently long period.
Once every two years it is necessary to measure , its significant change may indicate the following factors:
- Damage to the integrity of the operating system.
- Formation of a dense blockage.
- Accumulation of silt deposits on the surface.
To avoid such problems, you must not ignore the rules, promptly inspect the drainage system and clean it from any contaminants.
(Draining the area - do-it-yourself drainage pipe)
Common mistakes
Laying drainage pipes with your own hands must be done in accordance with all requirements. This also applies to the selection of installations that should be suitable for the type of soil. For example, if you have loamy soil on your site, you cannot use systems that do not have a filter.
So, among the most popular mistakes that are made when installing a system around a house with your own hands today are:
- Incorrect type of system.
- During installation, the angle of inclination that is accepted for laying the system is not observed.
- There is no water drainage from the collection well.
- Incorrect do-it-yourself installation technology, that is, the filter layer consisting of gravel and sand was not made.
Moisture, contrary to popular belief, cannot always be considered a plant's best friend. Too much water is harmful to most of them. Excess moisture is also not beneficial for buildings; it has a destructive effect on building materials. That is why every owner suburban area It is very important to remove excess water from your territory. The solution to the problem will be a drainage pipe: almost every home craftsman can install such a structure with his own hands.
What is drainage and why is it necessary?
The new owner of a country plot often has to work hard before he can fully enjoy his vacation in the lap of nature. Most land plots suffer from waterlogging.
Having built a house on such a site, you may encounter the problem of destruction of the foundation and difficulties in arranging a personal plot. To remove excess moisture, drainage is installed - an artificially constructed watercourse in the soil. It is a special system of underground channels or pipelines. The water that gets into them is collected in special storage tanks or discharged outside the site.
Drainage allows you to protect the foundation from destruction and create comfortable conditions for growing plants
Practice shows that the first warning signs that make you think about installing drainage are:
- a large number of moisture-loving plants on the site;
- the presence or periodic appearance of groundwater in basements and cellars of nearby buildings;
- the appearance after rain of a large number of poorly drying puddles.
However, the absence of these signs does not mean that problems with waterlogging will not arise. It is best to invite a specialist to accurately determine the level of moisture in the area and, if necessary, begin to arrange drainage.
Methods for arranging a drainage structure
When thinking about how to lay a drainage pipe, you need to understand that there are several ways to install drainage structures:
- Trenches with crushed stone and sand. Drainage closed type, which are grooves dug in the ground, filled with a layer of crushed stone, on top of which sand is laid. For better effect, they can be made in the shape of a “herringbone”, while the central trench, to which the secondary trenches approach, should be made with a slope directed towards the water discharge point. The distance between drains is selected depending on the composition of the soil. On clayey soils it should not exceed 10, loamy - 20 and sandy - 50 m.
- Open drainage. The simplest and cheapest option. It consists of grooves, half a meter wide and about 70 cm deep, dug along the perimeter of the site. The sides in the drains are made beveled, at an angle of about 30°. Water is discharged from the system into a common drainage ditch. The main drawback of the design is its unaesthetic appearance, which somewhat spoils the landscape of the site.
- Design using perforated pipeline. The most common technology for laying drainage pipes. Deep drainage designed to drain high-lying groundwater. Ceramic or asbestos-cement pipes with holes drilled in them are laid in the ground. More modern version- plastic with perforations or ready-to-install drainage systems that can be found on sale.
- Drainage trays. This is a surface drainage that allows you to remove moisture from the site that has fallen on it in the form of precipitation. To equip the structure, special trays are used, which can be made of modified concrete or plastic. Trenches are led from water intakes to the discharge point, while a slight slope of about 2-3° must be observed. The parts are installed in small grooves, their sides should be at ground level. The top of the trays must be covered with decorative grilles.
If the area is located on a hill, open drainage ditches are dug across the slope. This way it will be possible to “intercept” the water flowing from above.

The disadvantage of an open drainage system is the somewhat unaesthetic appearance of the structure.

This is the most popular drainage system for owners of private plots and country houses

Drainage trays are used to remove excess moisture that enters the area in the form of precipitation.
Installation instructions for perforated pipes
Before proceeding directly with installation, it is necessary to perform calculations and select the appropriate material.
For design work you will need a site layout and special data, which is best requested from local branch land resources:
- seasonal groundwater level;
- soil characteristics and soil structure;
- the volume of moisture falling in the form of precipitation and flood waters.
Using this data, experts will conduct necessary calculations and determine the required trench depth and pipe diameter.
The most affordable solution For the arrangement of the system there are plastic parts. An extremely simple design of a drainage pipe involves the presence of two layers of polyvinyl chloride or polyethylene, which allows them to serve for at least 50 years at a fairly significant depth. In addition, the double-layer design promotes self-cleaning, preventing blockages. To prevent clogging of the holes in the pipe body with soil particles and small debris, they are wrapped in coconut fiber cloth or geotextile before installation.
The order of work is as follows:
- Installation of the drainage system begins with marking the territory, which is carried out according to a pre-drawn diagram. Trenches are dug along the designated lines, the depth of which is determined by preliminary calculations. To determine the width of the structure, add 40 cm to the outer diameter of the prepared parts. When carrying out work, you need to remember the required slope of the drainage pipe, which is usually at least 3°.
- A crushed stone-sand cushion is installed at the bottom of the prepared trench. To do this, first fill in a layer of sand 10 cm thick. The material is well compacted. Then a layer of crushed stone 20 cm wide is laid on top of it.
- Geotextile-wrapped pipes are laid on the prepared base. You can cut the part to the required length with a regular mounting knife. Special couplings are used to connect the elements. In order to prevent freezing of the system, it is recommended to lay drainage pipes deeper than the freezing level of the soil.
- After laying the pipes, their slope is checked again. To do this, you can use a regular cord stretched along the pipeline.
- In places where trenches turn and in areas where the angle of slope changes, special inspection wells must be installed. They are equipped with lids to prevent littering of the structure. These structures are necessary for monitoring and periodically cleaning the drainage system.
- On last stage backfilling is carried out, that is, all actions are performed in reverse order. A layer of crushed stone is poured over the pipe, followed by sand, and last layer soil that was removed when digging a trench. You can lay turf on top.
The system is discharged into an open reservoir or rainwater drainage system. In any case, a check valve is installed at the end of the outlet pipe. If it is impossible to organize such a withdrawal, a so-called prefabricated well is installed. As it fills, it is necessary to pump out water.

Perforated drainage pipes are laid on a sand-crushed stone bed
During installation, you should try to avoid common mistakes that lead to disruption of the functionality of the drainage. These include:
- Insufficient depth of trenches, which can lead to disruption of the water balance of the site.
- Using pipes that are not suitable for the type, which leads to rapid failure of the system.
- Incorrect drainage angle, which disrupts the functioning of the structure and can lead to serious problems with the water regime on the site.
Practice shows that laying drainage pipes with your own hands is a completely doable undertaking. The only thing that must be entrusted to specialists is calculating the system and drawing up a pipe laying diagram. Everything else is enough simple work. When performing it, it is very important to follow the instructions, carefully monitoring key points: the slope of the system, the reliability of pipe connections, the organization of inspection wells, etc. Well equipped drainage system will serve for many years, preventing excess moisture from damaging the foundation of the house and ruining the site.
Building a house is a responsible and very expensive undertaking. Naturally, any owner wants the constructed building to last as long as possible. And to do this, it is necessary to protect the foundation of the house from the destructive effects of soil water, that is, build drainage. Let's look at how to lay drainage pipes with your own hands, what materials are used for this, and what nuances need to be taken into account when performing this work.
The construction of drainage seems to many to be an optional event. In fact, protection from soil water is very important. Properly constructed drainage helps avoid dampness in the basement and prevents the destruction of the materials from which the foundation of the house is built.
In addition, a drainage device may be necessary for personal plot or in the country, if high waters interfere with the growth of trees and shrubs. Let's consider the main points of constructing drainage systems.
What is drainage?
Before describing the construction technology, it is worth understanding what drainage is and in what cases its construction is necessary. So, drainage is a system of pipes that is used to drain soil water from the foundation of a building, as well as to drain the site. In what cases is it necessary to build drainage?
- If a building is being built that will have a basement.
- If the site is initially swampy, or the soil is heavy and poorly permeable to water.
- If you plan to make changes to the natural topography of the site - level the sites, build artificial hills, etc.
Where to begin?
First of all, it is necessary to find out how deep the soil waters lie. This can be done by studying the water level in nearby wells. The well, which is dug to a depth of 5-15 meters, is filled just to the groundwater level. In addition, from the marks on the concrete walls of the well you can understand how high the water rises during the flood period.
Advice! The perfect solution To determine the level of soil water, this means conducting a geodetic examination by a specialist.
Next you need to decide on the type of drainage. The easiest way, of course, is to build an open drainage, that is, simply dig trenches with a slope. However, such a solution will not decorate the site, so most owners choose a more labor-intensive construction option.

Selection of materials for construction
About 30 years ago there was no special choice of pipes for the construction of drainage systems. It was necessary to use asbestos-cement or ceramic pipes, before laying in the ditches, it was necessary to make many holes so that water could freely penetrate into them. Today there are more convenient and available materials– corrugated pipes from polymer materials, which already have ready-made perforation.
Advice! On sale you can find drainage pipes with geotextiles or coconut fiber. These materials provide additional filtration and prevent clogging of the drainage system.
The process of installing a drainage system requires serious labor and preliminary preparation material. For construction you will need:
- Sand. To create a drainage system, it is necessary to use river sand. It is used to create a cushion at the bottom of the ditch, this is necessary in order to prevent damage to structures due to soil movements.
- Crushed stone. To equip the system, you will need two types of crushed stone. Material of medium and large fractions is used. The main purpose of crushed stone is to create a filter layer and prevent various debris contained in the water from getting into the drains. In addition, crushed stone prevents damage to drainage pipes during soil movements.
- Geotextiles. This is a material made of synthetic threads, it is used to wrap a drainage layer of crushed stone. The use of this material additionally protects the laid pipes from silting.
- Fitting. Couplings are used to connect pipes, and angles are used to ensure turns.

Advantages of plastic pipes
- The pipes are characterized by increased strength; they are laid to a considerable depth - up to 10 meters.
- The service life of polymer pipes is at least 50 years.
- Connections are easy to make yourself using couplings
- They are easy to transport, unload and install, as they are quite lightweight.
- To cut plastic pipes, you do not need to use a special tool.
Advice! To prevent clogging of pipes with soil particles, additional filters are used - geotexile or coconut fiber material.
To install the system, pipes of different diameters are used, most often used:
- 150 mm – for systems that drain small amounts of water;
- 300 mm – for systems operating with increased load.
To install the system, two types of pipes are used: a larger cross-section is used for the main line, and a smaller cross-section is used for branches. Plastic pipes for installation of drainage systems can be:
- Single or double layer. The second option is more durable and is suitable for installation in heavy soils.
- Flexible and tough. The first option is ideal for installation simple systems. If a network with a large number of turns and branches is being installed, it is more profitable to use flexible pipes.

- Smooth and corrugated. The latter option is more durable.
- With or without shell. The choice depends on the quality of the soil. Pipes without casing can be laid in crushed stone soil. In sandy areas, it is better to lay them wrapped in geotextiles. If there is clay on the site, then perfect choice There will be pipes with a filter made of coir (coconut fiber).
Installation of drainage systems
Let's look at how drainage is installed and what are the nuances of pipe laying.
Planning
At the first stage, a scheme for laying drainage pipes should be drawn up. A preliminary geodetic examination of the site will be very helpful in carrying out this work, as a result of which the types of soil and the level of groundwater will be determined. Based on the results of the examination, the diameters of the pipes are selected, as well as the depth of their installation.
Advice! It is advisable to entrust drawing up a drainage diagram and performing calculations to specialists.
Laying
How should pipes be laid in a ditch correctly?
- A layer of sand 15 cm high is poured into trenches dug to the required depth.
- Geotextiles are laid over the sand so that the edges of the fabric cover the sides of the ditch.
- A layer of fine crushed stone is poured onto the geotextile.
- Pipes are laid on top of the crushed stone with the perforation down.
- When laying pipes, it is necessary to maintain a slope directed towards the collection well. The slope is at least 3 degrees.

- To be able to monitor the operation of the system and, if necessary, flush it, you need to plan the installation of inspection wells. Minimum distance between wells – 50 meters. In addition, wells must be placed at places where the pipeline turns or when its angle of inclination changes.
- The choice of filter is made depending on the type of soil. If it is light sandy loam or loam, then it is worth using pipes wrapped in geotextiles. In heavy soils, it is more profitable to use pipes wrapped in coconut fiber cloth.
- Crushed stone is poured over the laid pipes; as a rule, the thickness of the top filling is 40 cm.
- The top layer of crushed stone is covered with geotextile, which was previously secured to the sides of the trench.
- The trenches are covered with soil from above and covered with pre-cut turf.
Mistakes you shouldn't make
- Wrong selection. For example, pipes without a filter cannot be used in loamy soils.
- Unmaintained slope.
- Incorrect choice of location for installing a collection well or untimely removal of water from it.
So, the drainage system is necessary element to protect the house and site from excess soil moisture. When installing drainage, it is extremely important to correctly develop its design and carry out installation in strict accordance with the technology. Errors made during installation will lead to the fact that water from the foundation will not be drained in full, that is, the efficiency of the system will be reduced.
The problem of flooding and increased waterlogging of the soil is familiar to owners of plots located in central region Russia. Dampness and stagnation of water after snow melts do not allow proper preparation of the summer cottage for the summer season, and waterlogging of the soil with constant precipitation is detrimental to many plants. There are several ways to solve these problems, but the most effective is the arrangement of drainage.
In what cases is a drainage system necessary?
Drainage is a technology for collecting and discharging groundwater, melt and storm water from a site, technical and residential buildings. The drainage system prevents leaching, heaving and waterlogging of the soil, which occurs due to oversaturation with moisture.
Arrangement of a drainage system is not necessary at every site. In order to determine how much your area needs drainage, you will need to carry out visual inspection. Pay attention to whether the area is flooded after the snow melts, how quickly water is absorbed after watering the plants, whether there are puddles after heavy rain and downpour. If you have observed these signs more than once, then drainage is required.
The drainage system helps remove stagnant water from the site
If visual confirmation is not enough, then you can conduct a simple experiment - using hand drill or a regular shovel, you should dig a hole 70–100 cm deep. It is better to do this in several places on the site. If after 24–36 hours water accumulates at the bottom of the hole and does not leave, then this is direct evidence of oversaturation of the soil with moisture.
Soil drainage is carried out under the following conditions:
- high groundwater table;
- the site is located in an area with clay soil;
- the site is located in a lowland or vice versa - on a slope;
- The location of the site receives a large amount of precipitation.
The presence of drainage helps preserve finishing and facing materials, used for laying garden paths, finishing the basement and facade of the building.
Types of dehumidification systems
Dehumidification systems land plots there is a great variety. Moreover, in different sources their classification may differ greatly from each other. In the case of drainage systems for suburban and summer cottages It is recommended to use the simplest and most proven solutions.
Surface type drainage
Surface drainage is the simplest and most efficient system. The main task is to drain the soil by draining water formed as a result of rainfall and uneven melting of snow.
Grids protect the open drainage system from large debris
A surface drainage system is constructed across the area of the site, around the house and adjacent buildings, near garage structures, warehouses and the courtyard. Surface drainage is divided into two subtypes:
- Point - in some sources referred to as local drainage. Used to collect and drain water from a certain place on the site. The main area of application is drainage of areas under drains, approx. entrance doors and gates, in the area where containers and watering taps are located. Often used as an emergency system if another type of drainage is overloaded.
- Linear - used to drain the entire area. It is a system consisting of receiving trays and channels arranged at a certain angle, ensuring a constant flow of water. The drainage system is equipped with filter grids and sand traps. Trays and drains are made of PVC, polypropylene, HDPE or polymer concrete.
When installing a surface drainage system, it is recommended to combine point and linear drainage. This will provide the most effective work systems. If necessary, point and linear drainage can be combined with the system described below.
Deep drainage
Deep drainage is carried out in the form of a pipeline laid in places where constant drainage of the soil or lowering of the groundwater level is necessary. Drains are laid with a slope in the direction of water flow, which enters a collector, well or reservoir located outside the site.
The process of constructing deep drainage in a suburban area
To lower the groundwater level, pipes are laid along the perimeter of the site to a depth of 80–150 cm. In cases where it is necessary to drain water from the foundation of a building, pipes must be laid below its depth. And also drainage pipes can be laid over the entire area of the site with a certain pitch. The distance between drains depends on the depth of their placement and the mechanical composition of the soil.
For example, when installing a drainage system, when drains are laid to a depth of 0.9–1 m, the recommended distance between them is at least 9–11 m. loamy soil under the same conditions, the step between drains is reduced to 7–9 m, and on clay drains to 4–5.5 m. More detailed data for different laying depths can be seen in the table below. Information taken from the book “Draining land for gardens” by A.M. Dumblyauskas.
| Depth of drains, m | Distance between drains, m | ||
| Sandy soil | Loamy soil | Clay soil | |
| 0,45 | 4,5–5,5 | 4–5 | 2–3 |
| 0,6 | 6,5–7,5 | 5–6,5 | 3–4 |
| 0,9 | 9–11 | 7–9 | 4–5,5 |
| 1,2 | 12–15 | 10–12 | 4,5–7 |
| 1,5 | 15,5–18 | 12–15 | 6,5–9 |
| 1,8 | 18–22 | 15–18 | 7–11 |
When laying the pipe, the features of the terrain are observed. According to the technology, drains are laid from the highest to the lowest point on the site. If the area is relatively flat, then to impart a slope, a slope is formed along the bottom of the trench. The minimum slope level is 2 cm per 1 running meter of drainage pipe when constructing drainage in clay and loamy soil. For sandy soil, a slope of 3 cm per 1 meter is maintained.
When installing long drainage, you should follow minimum slope along the entire length of the drainage route. For example, for a drainage system 15 m long, the minimum level difference between the starting and ending points of the route will be at least 30 cm.
If possible, it is recommended to exceed the stated slope standards. This will ensure faster drainage and reduce the risk of silting and clogging of the drain. In addition, digging a trench with a large slope is much easier than measuring 1–2 cm.
Drainage in a summer cottage - the simplest methods with instructions
To carry out drying yourself land plot through the drainage system, you will need to familiarize yourself with the technology of work, calculate and purchase necessary materials, prepare tools and a place to perform work.
Surface drainage of a summer cottage
Open surface drainage is a universal solution for draining summer cottages without large area. For example, for typical plots of 6 acres. You can take the diagram below as a basis. It shows a herringbone-shaped drainage route. The distance between the drains, as stated above, is selected based on the type of soil (see table).
An example of the location of the drainage system in a summer cottage
To carry out the work you will need a shovel and a bayonet shovel, a tape measure, bubble level, hammer and sharp construction knife. The materials you will need to prepare are gravel of fraction 20–40, geotextiles, edged bars or boards 2–3 m long.
To construct surface drainage on a summer cottage, you will need to do the following:
Sometimes, the base of the trench is concreted along the entire length of the drainage route. This allows you not to worry that over time the earthen walls will begin to crumble, water flow will deteriorate, etc. But this approach is more labor-intensive and requires the ability to work with concrete mixture.
Draining the area using deep drainage
Deep drainage is a standard solution for draining suburban and suburban areas. A deep drainage system can be installed even when there is a protective blind area, concrete or slab paths around the building. If necessary, they can be partially dismantled, but the overall structure will not be damaged.
An example of a drainage system project in a suburban area
Work on the construction of deep drainage includes the following:
- According to the design plan of the site, it is necessary to draw up a diagram of the location of drainage pipes and determine the water discharge point, that is, the place from where the collected water will be drained into sewer pipes leading to the drainage well. The depth of the pipeline must be below the freezing level of the soil. For the North-Western region this value is about 60–80 cm.
Preparation of trenches for the construction of deep drainage
- Taking into account the plan, a trench is dug along the perimeter and area of the site with a depth of up to 1 m. The width of the trench is at least 30 cm. All horizontal sections of the trenches are combined into a single system, which is brought to the water discharge point. After this, trenches are dug maintaining a slope of 2–4 cm per 1 m of surface. To check the quality of the drainage, the trenches are spilled with a large volume of water. If necessary, the slope towards the drainage well increases.
The pit for the drainage well must be dug at the lowest point on the site
- At the lowest point of the site, a place is created for the installation of a water intake or filter drainage well. For large areas located on loamy and clayey soil types, it is better to install storage type wells with a volume of up to 1000 liters. For small areas, you can use both storage and filter wells. The type of tank is selected based on the type of soil.
A wide sheet of geotextile is laid on top of the gravel layer.
- Fine gravel is poured into the bottom of the trench. The thickness of the layer is 10 cm. A geofabric is laid on the gravel with an overlap on the walls of the trench. To fix the canvas to the walls, wooden or plastic pegs are used, which are driven into the ground. After this, a 10 cm layer of crushed stone with a fraction of 50–60 is poured onto the laid geotextile and carefully leveled in compliance with the slope. A drainage pipe from Ø 110 mm is laid on the crushed stone.
- Modular inspection wells are installed at the drain turning points. The diameter and height of the well depend on the expected volume waste water. To connect the pipe to the mounting hole, a coupling is used, which is coated with a waterproof sealant before joining. Similar actions are carried out to connect the drainage pipe to the well pipe.
An inspection drainage well is installed in places where the drainage pipe turns
- Before backfilling, the drainage system is checked for functionality. To do this, it is drained through drains large volume water. If the water quickly drains and enters the well, then everything is done correctly and you can move on to the final stage. In other cases, you need to find and fix the problem.
- A 20–30 cm layer of gravel of fraction 20–40 is poured over the drainage pipes and carefully leveled. After this, the drains with laid crushed stone are covered with geotextiles. A 10–15 cm layer of quarry sand is poured on top of the geofabric and thoroughly compacted. The remaining space in the trench can be filled with fertile soil or regular soil from the site.
Methods for drying an area without drainage
Excessive moisture in the soil and stagnation of water on the site are not always associated with high level groundwater. Sometimes this occurs due to abnormally low temperatures and heavy precipitation. The combination of these factors leads to the fact that moisture does not have time to evaporate, and puddles and mold form on the soil surface.
Sanding clay soil- one of the ways to drain an area without drainage
If, due to some circumstances, it is impossible to install a drainage system, then there are several effective ways to drain the land:
Of the above methods of draining a site, the most effective are adding a sufficient amount of fertile soil and constructing trenches around the perimeter. On average, 1 m 3 of soil will cost 550–600 rubles. For a plot of 6 acres, 10–12 m3 of soil is sufficient.
The easiest way to drain the soil on a site
Construction of shallow trenches filled with crushed stone is the most in a simple way drainage of a summer cottage. Despite its overall simplicity, this method is very effective and can cope with large amounts of water formed during snow melting.
Work on arrangement of trenches around the perimeter and area of the site includes the following:
If desired, the second layer of crushed stone can be reduced, and the remaining space can be covered with soil from the site. This will hide the drainage under a layer of turf. It is not recommended to plant flowers and greenery on top of the drainage trench. This is fraught with their death due to high humidity in this place.
How to clear a clogged drain pipe
Failure to comply with the technology for laying drainage pipes is the main reason for stagnation and poor drainage of water from distribution wells. In addition, very often stagnation of water is not associated with a blockage at all. Insufficient slope does not ensure constant and uniform drainage of accumulated water towards the drainage pit.
To clear small blockages, use a steel cable or a hose with strong water pressure.
The easiest way to unclog drain pipes is to use a steel cable drain cleaner. At one end of the cable there is a spiral-shaped nozzle, at the other there is a handle with which you can rotate the cable, creating a mechanical load at the site of the blockage.
To clean pipes Ø110 mm or more, it is recommended to use a cable with a steel brush of the appropriate size. During the cleaning process, it is necessary to lower the cable into the drainage pipe until its end reaches the blockage. Next, by rotating the cable clockwise, you need to try to break through the blockage or move it towards draining the water. Usually, small accumulations of silt and leaves can be pushed through without much difficulty.
If it was not possible to remove the blockage, then you will need to call specialists who, using a pneumatic installation and other equipment, will not only clear the blockage, but also carry out preventive cleaning of the entire surface of the drainage pipes.
Video: do-it-yourself site drainage
Oversaturation of the soil with moisture and stagnation of water on the site are a big problem, which affects not only the growth of fruit-bearing crops, but also reduces the service life of a residential building. But it is worth remembering that excess water can be dealt with using a drainage system. It's much worse if fresh water and it will pick up moisture, and constructing a well is impossible due to certain circumstances.
Drainage will protect the underground part of the house from inevitable destruction, protect plant roots from rotting, and get rid of stagnant puddles. Numerous advantages are somewhat offset by the price, the size of which is justified by a large amount of work. However, they can be fully or partially completed with your own hands, don’t you agree?
We will tell you how to install a drainage pipe with your own hands, and what system components still need to be installed. For those wishing to make their own drainage, we offer reliable information about the principles and rules of its construction. The information presented to you is based on regulatory requirements.
The article describes in detail the types of drainage systems. The organization technology is outlined, recommendations are given on the selection of pipes and related materials to ensure groundwater drainage. To help interested visitors, a selection of photos and video guides are included.
Drainage is an expensive system, even if you don’t have to pay for the services of specialists and the owner of the site is ready to do all the work himself. Therefore, you should figure out how much it is needed at all.
The need for a system cannot be determined by eye, because groundwater may lie close to the surface, which becomes a real problem only during floods or heavy rains.
Image gallery
Linear options become necessary if you need to drain areas around buildings, paths, entrances, or improve local area or remove excess moisture from the garden.
Such drains are shallow ditches into which water flows and then moves to special receiving tanks, storm drains, or to a discharge point off-site.

The choice and features of installation of elements of drainage systems depend on the expected load on the system: soil density, the amount of water that enters the drains. If the load is too great, you should choose structures made from the most durable materials
Point water collectors must also be accurately calculated and designed in advance. They serve for local water collection, but are connected to a similar linear system ditches or pipes.
Through the indicated drainage channels, the collected water is discharged in the same way into a collector well and then into a drainage ditch or pond. Therefore, work on installing systems with point water intakes is not much different from systems with linear options.
Open systems are very simple to implement and cheap, but they spoil the landscape with an unaesthetic appearance. Another disadvantage is that the walls of the ditches have to be constantly adjusted, because they crumble under the influence of moisture, and the system ceases to perform its functions (water stagnates at the bottom of the trenches and does not move to the discharge point).

When planning drainage, you should decide on the type of system. You need to consider whether it will be open or closed. In the first case, ditches with slanted walls are dug to facilitate water drainage. The width of such a trench is usually 0.5 m, and it is dug to a depth of 0.7 m (+)
To solve the problem of crumbling ditch walls, you can use the crushed stone filling method: coarse material is placed on the bottom, and fine material is placed on top, after which the entire drainage pad is covered with turf.
This option allows you not to trim or strengthen the walls of the trenches, but it is suitable for areas with relatively low humidity, because throughput the ditches are greatly reduced.
The use of polymer and concrete trays in the construction of open drainage greatly facilitates and speeds up the work. In order to improve the landscape and protect systems from clogging, such open systems covered with cast iron grates.
For the arrangement, special perforated pipes are used - drains, laid to the depth of the foundation. They are placed in pre-formed ditches and covered with material with excellent filtering properties, gravel, small crushed stone or GPS.
To monitor the operation of the system and carry out periodic cleaning, install. They are located at each turn and every 20-25 m of the linear route of the drainage pipeline.
Image gallery
Drainage systems are laid not only to drain groundwater, but also to distribute it evenly, for example, in areas with a slope
Systems designed to drain the soil are installed close to the surface. Their depth does not exceed 40 cm
Normalizing moisture in the soil-vegetative layer does not require laying the system to a depth below the standard growth of the root system of cultivated plants
Drainage of the area to drain the soil-vegetative layer is arranged if loam or sandy loam is opened under the PRS. Rocks with low filtration properties do not allow water to pass through and contribute to long-term stagnation in the soil
The simplest option for drainage designed to drain the soil-vegetative layer is to simply replace the soil with rock with high filtration (gravel, crushed stone). In such cases, laying a drain is not necessary.
A drainage pipe is laid much lower if it is necessary to protect underground structures from groundwater
The drainage system to protect the foundation is installed 20-30 cm below the foundation laying depth. So it is necessary that the drain completely collects groundwater and prevents capillary suction
When installing a drainage system designed to protect the foundation from groundwater, it should be remembered that in addition to it, the foundation of the house needs reliable waterproofing
Drainage system to stabilize soil moisture
Surface drainage system
Drainage for drying the cultivated area
Drainage circuit for arranging a lawn
The simplest option for surface drainage
Drainage to protect underground structures
Foundation drainage depth
Waterproofing in addition to drainage
When determining how to properly lay a drainage pipe to protect plants from excess moisture, you can use average values. As a rule, the optimal depth is 0.6-1.5 m.
Moreover, for flower beds, lawns, beds, it does not exceed 0.9 m, and to protect the rhizomes of trees, you need to dig the deepest trenches, especially if the site is located on peat soils.
Types and parameters for choosing drainage pipes
Of all the materials for making pipes, polymers are the most popular. Their undeniable advantages are durability, resistance to chemicals and smooth internal walls to which dirt does not stick. Stormwater and groundwater flow into the pipeline and move freely to the reservoirs by gravity.
Most often used in underground drainage plastic pipes with factory or homemade perforation. Less commonly used are ceramic or cast iron pipes, which are too heavy to install on your own.
Drainage system assembled from modern materials, can serve up to half a century. The main thing is to install it correctly, carry out technical inspections on time and not ignore the need for repairs.
Another advantage of polymers is their relatively low cost, because the finished drainage is inexpensive, practical and durable.
When choosing drainage pipes, it is better to give preference to two-layer products with stiffeners. Thanks to the even distribution of the load, the pipeline lasts longer and is more reliable. Plastic drainage pipes do not rust, do not rot and prevent the formation of sediment on the walls (+)
An excellent solution is a pipe covered in geotextile. External material filters water, trapping dirt. Thanks to this, the pipelines do not become silted.
An alternative to factory-made drainage pipes is conventional sewer pipes. You can easily make drainage components from them yourself. To do this, simply drill holes in the products and wrap them with geotextile fabric on top.
In addition to the perforated drainage pipe for the device closed system you will need inspection and rotary drainage wells, a collector well, geotextiles and crushed stone or similar backfill material with high filtering properties
If a local drainage system is required, you can get by with pipes with a diameter of 100-200 mm, and if you need to remove moisture from a large area or there is too much water, it is better to choose products with a diameter of 300-400 mm. Optimal choice– a special drainage pipe with a filter shell.
Pipeline laying technology
When arranging drainage, the topography of the site is of fundamental importance. The system must be built so that there are no problems with the outflow of liquid into the ditches. If there are no results of geodetic research, you should draw up a diagram yourself, marking on it the places where rainwater drains.
When creating a diagram, you need to be careful, because mistakes will result in ineffective drainage. Based on the finished drawing, they outline how to lay and tilt the drainage pipe and where to install the catch basins. After checking the data, they mark the area and begin work.
Image gallery
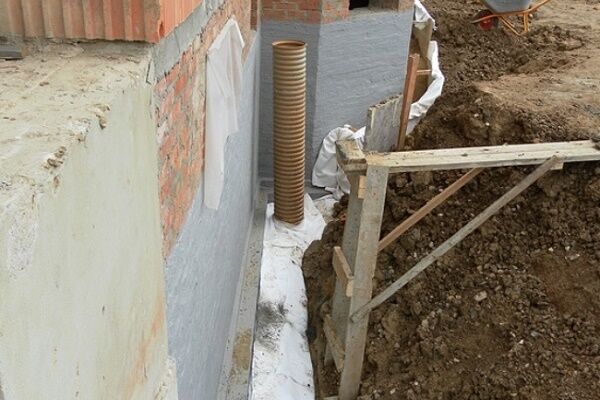
To lay the drainage pipe, we develop a trench. Its depth is 30-50 cm below the base of the base
After mechanical development of the trench, we modify the bottom taking into account the slope towards the drainage of the collected groundwater system: a collector or absorption well
Cover the bottom of the trench with a 10 cm layer of quarry sand and tamp it down until a dense base is obtained for the drainage pipe.
We wrap the drainage pipe with geotextile. Ideally, it is better to lay the non-woven fabric in a trench, cover it with gravel, lay the drain on it, and then wrap it with material
We lay the drainage pipe, maintaining a slope along the compacted bottom, to the installation site of the absorption well
From two concrete rings we assemble an absorption well - a discharge point without a sealed bottom, instead of which a soil filter is installed in it, allowing water to pass into the underlying soil layers