How to seal the ends of chipboard: PVC edging; furniture edge; plastic profile. Chipboard end tape
1. Main material: chipboard
Surprisingly, wood in its pure form is the preserve of expensive “elite” furniture. Wood is practically no longer found in cabinet furniture.
The main material from which cabinet furniture is made is laminated chipboard (LDSP). Typically these are 16 mm thick slabs. Chipboard sheets with a thickness of 10 mm and 22 mm are also available for sale. 10 mm laminated chipboards are used as filling for blind doors of sliding wardrobes, and 22 mm are used for shelves in bookcases, where greater resistance to loads is required, and ordinary 16 mm laminated chipboards can seriously sag under the weight of books.
Also sometimes 22 mm parts are used as design elements furniture products, introducing originality into the design (for example, on top of a regular 16 mm cabinet lid you can put a protruding cover with a thickness of 22 mm more dark color). Such delights are economically feasible only in mass production, since you always have to buy a whole sheet of laminated chipboard for cutting. Typically, all parts of cabinet furniture (except for doors and facades) are made from 16 mm laminated chipboard.
Laminated chipboard is sawn on special machines along guides. Of course, at home you can saw off something with a jigsaw - but in this case the edges of the seam will be “torn”, and the seam itself will probably wiggle from side to side. It is almost impossible to achieve a straight saw with a jigsaw.


2. Edges
The cut of laminated chipboard is the most ugliest and vulnerable place - moisture easily penetrates through it and the material swells and deforms. Therefore, it is recommended to cover all ends of laminated chipboard with special edges. Several types of edges are known:
. ABS edge
- an analogue of PVC edges made of another, more environmentally friendly plastic. In addition to environmental friendliness during disposal, the remaining differences are rather invented by marketers. It's not even sold in our city.
 |
. Wooden and veneered facades- will delight lovers of natural products. True, in the modern plastic world such facades are quite expensive. Yes, and evil tongues claim that there are so many varnishes and impregnations in this wood that there is only one name for the wood. At the very least, manufacturing companies strongly recommend regularly maintaining such facades with special chemicals.
. Enamel facades- painted facades. Their main drawback: the coating is very easily scratched, deformed, and is not resistant to chemicals. Previously, they were used only for their rich, vibrant colors. With the advent of acrylic plastics on the market, the demand for painted facades has decreased significantly.
. Aluminum and glass facades- made in high-tech style. They are beautiful and modern, but difficult to manufacture and require non-standard fasteners, often installed simultaneously with the production of the facade.
4. Back walls and bottom of drawers.
Typically, the back walls of furniture, as well as the bottoms of drawers, are made of LDVP. At the same time, its front laminated side looks inside the drawer or cabinet. The color of HDF is selected to match the color of the HDF used. The sheet thickness is usually 3-5 mm.

At one time it was fashionable to place such a wall on brackets using furniture stapler. This is wrong - the staples last for a limited time, and no matter how strong the structure may seem to you immediately after assembly, after a few years it may well break apart under pressure or deformation. It is especially incorrect to place the bottom of drawers on staples, which is constantly subject to pull-out loads. So what about furniture stapler forget - it is only applicable in upholstered furniture.
Sometimes fiberboard is inserted in the groove- but this technology requires milling this groove, and at the same time maintaining all dimensions of the product exactly down to the millimeter.
Sometimes the back walls and bottoms of drawers are made of chipboard. This is practiced to create " stiffening ribs"in tall cabinets, and in those drawers where there will be a very large load (20 kg and above). The rear wall of the cabinet can be equipped with one or more stiffeners made of laminated chipboard, and the rest of the space can be filled with LDVP.
5. Countertops
Tabletop- a horizontal work surface on which people constantly work (cook, eat, write).
Majority office desks and cheap dining options are limited to a tabletop of the same material as the table itself. This can be laminated chipboard 16 mm or better 22 mm, always edged with a 2 mm PVC edge.
Special countertops are used for kitchens. Usually they are a sheet of chipboard 28-38 mm thick, covered with plastic using postforming technology. This plastic is quite durable. If the cut of the tabletop is gray, it’s ordinary chipboard, if it’s blue-green, then moisture resistant. Correct kitchen countertops equipped with a strip of silicone - the so-called " drip tray", which does not allow spilled liquids to flow down and onto the kitchen furniture.

The weak point of such countertops is the edges of the cuts. They are usually edged with melamine to match the color of the tabletop when cutting it. But melamine is afraid of moisture, and often the edges become unusable after just a year of use. Therefore, for the ends of the tabletop it is recommended to use a special aluminum profile, having previously thoroughly coated the cut surface with silicone sealant. There is also a profile for joining tabletops at right angles - without sawing them and fitting them to each other - this profile is very convenient to use in corner kitchens.
It is not customary to make holes in the tabletop (they spoil the smooth surface of the table and then dirt gets clogged in them), so such a tabletop is usually screwed on from the inside screws to horizontal struts. In this case, the screws should not be too long so as not to pierce the lid through.

Countertops made from natural or artificial stone . Products from natural stone very heavy and require additional care due to the porosity of the material. Artificial stone is free of these disadvantages. In addition, artificial stone countertops can be given almost any size and profile. The only drawback of such countertops today is their price.
6. Location of parts
We have come to those sections that will form your final understanding of how to make cabinet furniture. So first let's talk about relative position details.
Detail- this is any element of cabinet furniture: bottom, lid, sidewall, back wall, facade, shelf. So, every detail can be nested, maybe overhead.
Let's consider this thesis using the example of two kitchen cabinets. One will stand on the floor (on legs), and the other will hang on the wall.
Base cabinet:
As can be seen from the figure, it is best when the operating voltage (and for a floor-standing cabinet it is directed from the lid down) naturally is transmitted through wooden parts to the point of contact of the product with the support - to the legs of the cabinet (see diagram “correctly”).
In the second, “wrong” option, the voltage is transmitted to confirmation(this is a special furniture screw, we’ll talk about them a little later) - and the force will constantly try to break it out of the wood.
Second example: wall cabinet.
Here everything is the other way around: the force is applied to the bottom shelf and the things on it, and the fastening point of the cabinet is higher than the point of application of the force. Naturally (at the junction wood boards) we will not transfer the force upward in any way. Therefore, voltage will necessarily be transmitted through the fittings.
If we make the same design here as in the floor cabinet (see the “wrong” diagram), all four confirmations will experience constant force to tear out made of wood. Therefore, we choose the worst of two evils: it is better to let the confirmees experience the effort for a break(see diagram "correctly").
At first glance, this seems difficult, but trust my experience: after the third designed and assembled product, you will begin to intuitively, without thinking, determine where this or that part should be located.
7. Furniture fasteners
Furniture fasteners are hardware, which are used to connect furniture parts. Most often, such a connection is made at a right angle of 90°. all modern types of furniture fasteners are very well described, with detailed description their advantages and disadvantages. Let's briefly go through those with which we will have the opportunity to work.
. Euroscrew (confirmed)- special furniture screw. The most common fastening of cabinet furniture. Confirmat is especially well suited for beginners - since it does not require precise addition of parts - you can drill a hole for it “on site”, during the process of assembling the product.
Have you noticed that self-tapping screws are almost never used to connect parts? That's right, in the furniture business they are replaced by confirmats. Due to their ideal shape for 16mm laminated chipboards, they have a significant large area threads and hold much stronger than self-tapping screws.
 |
 |
To drill holes for confirmations it is required special drill- finding something like this in our provincial town was not easy. In principle, if you don’t have such a drill, it’s not a big deal: you can get by with three drills of different diameters: for the thread, the neck and the confirmation head.
Confirmats come in several sizes. Typically 7x50 is used. When drilling for confirmation Special attention You should pay attention to the perpendicularity of the drilling - so that the drill does not “run away” and pierce the wall of the part being drilled.
Confirmations are being twisted screwdriver with hexagonal bit or manually with a special hex wrench. Confirmations made with a Phillips screwdriver are not correct confirmations! You will never be able to tighten these screws all the way.
The main aesthetic drawback of confirmations is that the caps, although remaining flush, are still noticeable. To hide them they use plastic plugs, inserted into the caps. The color of the plugs is matched to the color of the chipboard.
. Eccentric couplers- the most correct and modern look furniture fasteners. Does not leave marks on the front side of the product, only on the inside. The main disadvantage is that it requires very precise drilling, including aligning the holes on both sides and limiting the drilling depth (so as not to drill through).


To drill additives for eccentrics, a special drill is usually used. Forstner drill. It is possible to do it manually - but it is very difficult; it is better to have a drilling machine.
If you are assembling furniture, the ends of which will not be on public display, but will be hidden (for example, kitchen cabinet or a wardrobe in a niche) - then there is no point in bothering with eccentrics. Use confirmations.
8. Furniture fittings
The hinges can also be adjusted in height and planting depth. This allows you to more accurately align your cabinet door. There are also inset hinges - when when the door is closed, the facade is recessed inside the cabinet (rarely used). There is a range of loops for glass doors, in which you can firmly clamp the glass without drilling.
Buy only high-quality products from well-known manufacturers (for inexpensive ones, we recommend Chinese Boyard) - so as not to have problems with them in the future. Among the world's serious manufacturers - Austrian Bloom, but it is expensive and you still have to try to find it.
9. Drawers and their guides
There are many ways to make furniture boxes. The simplest one is to make the perimeter of the box (sides, front and back walls) from chipboard. This method is described in detail and with illustrations. The only thing I disagree with the author is that instead of nails to secure the bottom, I would use self-tapping screws.
If you want to beautiful facade, then it is screwed with self-tapping screws to one of the sides of the drawer into the lining, as shown in the diagram in section 5 (the role of the countertop in this case will be played by the front of the drawer).


But assembling the box is half the battle. The main thing is to make it open and close. That is, put it on the guides.
Drawer guides There are two types: roller and ball.
. Roller guides - usually white, attached to the bottom of the drawer. A box on such guides rides on two rubberized rollers, rumbles due to its unstable position, and at the point of maximum exit tends to fall out of the guides from any sharp push. Such guides are bad because a heavily loaded box will try to tip over from any position when it is extended more than halfway. The only advantage of such guides is the price: approx. 30 rub for a couple.
. Ball guides - or as they are usually called “full extension guides”. These guides are a telescopic structure that can increase its length exactly twice. Inside they contain several dozen balls (as in bearings), which ensures smooth movement of the box. The guides are rigidly fixed with self-tapping screws to both the cabinet and the drawer, which eliminates the possibility of tipping over and prevents the drawer from “going off the rails” regardless of the load and speed of jerking.
The process of installing a drawer on full extension ball slides is well described. The price of such guides is approx. 100 rub per set. It’s very disappointing to see when in a kitchen with a total cost of more than 40 rubles, the manufacturer squeezes and installs roller guides, saving 70 rubles. You know, you want to take it and strangle it for such a disgusting attitude towards the buyer. So if you order a kitchen, immediately specify what type of drawer guides will be.


. Metaboxes- a solution first proposed by an Austrian company Bloom. The idea is to save the craftsman from the need to attach guides to the drawer, and sell ready-made side walls, with built-in guides, holes for the front and grooves for the back wall. Having bought a metabox, all you have to do is hang a facade on it, put in a back wall and a bottom (by the way, many metaboxes are designed for a bottom made of chipboard and not fiberboard).
The guides in the metaboxes are roller. Accordingly, the metabox is not a full extension product. Cost of Blum metabox: from 300 before 500 rub. Now many companies, including Chinese ones, produce products with the name “metabox”, which has already become a household name. Here is a good article on calculating and assembling a metabox.
. Tandemboxes- a more technological solution from the same company. If the metabox rides on roller guides, then the tandembox rides on full extension ball guides. The number of balls in them is several hundred. Tandemboxes are usually equipped with an automatic closer and shock damper (BluMotion system) - which ensures surprisingly pleasant and soft closing of the box (always full closing) with one push.
For tall drawers tandem boxes can be equipped with one or two additional limiters. Tandem boxes are made in white and stainless steel. The latter, of course, are twice as expensive.
If you happen to be at a furniture show, stop by the Blum stand. You can’t even imagine how pleasant and high-quality the usual furniture fittings. But the tandembox costs accordingly: 1000-2000 rub. per set.
10. Doors for sliding wardrobes
The last thing worth talking about in our furniture educational program is wardrobes. In general, the kitchen and wardrobe are the most accessible and interesting areas of activity for a novice furniture maker. Well, not counting, of course, bedside tables and shelves. Furniture for the living room and bedrooms usually requires a serious design approach, the use of non-standard or difficult-to-process materials: natural wood, tempered glass. With kitchens and wardrobes, everything is simple and clear.
The sliding wardrobe comes in two versions: with walls (side and back) and without them. the latter option is simply a part of the room (usually a niche) fenced off with sliding doors, inside which you can do whatever you want: shelves, drawers, hangers, and a bunch of other interesting things. Here are listed and photographs of the most common elements filling sliding wardrobes.
The most interesting and attractive mechanism in a sliding wardrobe is its sliding doors. You can’t skimp here, and you need to buy only high-quality fittings - otherwise you’ll suffer with falling and jamming doors so much that you yourself won’t be happy. In our city, the only decent stuff they sell is sliding systems domestic company Aristo, however, according to reviews they are quite worthy.


A sliding wardrobe usually contains two or three doors. Each door is a canvas enclosed in a special frame made of decorated aluminum profile. In this case, the door does not have to be uniform - it can be created from two or more different panels, connected at any angle using a special profile.
Traditionally, the frame profile for sliding wardrobe doors is designed for a leaf thickness of 10 mm. For the manufacture of blind doors, 10 mm laminated chipboard sheets are usually used. Special sheets can serve as a design alternative. rattan(decorative wicker), bamboo, and even artificial leather(on a base made of chipboard or MDF).
Using special silicone seals, a 4-mm mirror. The main thing is that those who will cut your mirrors for the cabinet do not forget to apply a special elastic film on its back side, which will hold the fragments in the event of an impact. Even if a child breaks the mirror surface, this will significantly reduce the likelihood of injury.
In order for the doors to move, guides are attached to the bottom and top. The lower guides of the sliding wardrobe ensure the opening/closing of the door, the upper ones ensure the fixation of the door relative to the depth of the cabinet. The lower rollers are usually made of plastic, equipped with a shock-absorbing spring and a screw for height adjustment. The upper rollers have a rubberized surface.
To obtain Additional information By self-production cabinet furniture, I strongly recommend reading the following resources:
. http://mebelsoft.net/forum/- Forum of professional furniture makers. Perhaps the largest and most popular resource dedicated to this topic.
. http://www.mastercity.ru/forumdisplay.php?f=19- City of Craftsmen, section "furniture and interior design". Those who try to do everything with their own hands gather here.
. http://mebelsam.com- DIY furniture. There are many articles and examples of a wide variety of technologies, not just cabinet furniture.
. http://www.makuha.ru- Furniture directory. A beginner portal, but it already contains interesting articles.
Well, that’s the end of our little furniture educational program. I hope you are now full of strength and determination to make cabinet furniture with your own hands. Add here a little imagination in choosing colors, edges, fittings and curly cuts - and you will get the opportunity to make the furniture that exactly what you need.
And it's not even about what happens cheaper and often better quality than in the store. And it’s not that you no longer limit yourself to factory models. The fact is that the things you have made, the things in which you have invested your soul, your enthusiasm and skill, are stored the warmth of your hands. I think this is important.
Along with the usual ones, PVC edging is used to frame the ends of the chipboard. As a rule, it is used in places high humidity, high risk of mechanical damage or based on design decisions.
Distinctive feature of PVC edging is that it is made immediately to a specific thickness of the slab, where trimming of excess width is not allowed. The most common width sizes are 16.18 and 32 mm.
Also, the installation technology of this profile does not allow it to be joined at the corners. For example, in order to edge two adjacent ends, you need to round the corner (at least along the very minimum radius).
- Invoice (U-shaped)
- Hard
- Flexible
- Mortise (T-shaped)
- No girth
- With girth
U-shaped edging
Working with such PVC edging for furniture is not at all dusty, and you can even do it at home.

Hard “click and done”
Used for edging straight edges of chipboard. It is also possible to edge the ends of chipboard with a small rounding radius. The only tools needed are your hands and the edge itself. Just snap the profile onto the end and you're done. And the side ends are closed with special plugs.
It is precisely because of this installation method that people love it. But it also has its drawbacks, which manifest themselves in the inability to edge rounded (radius) parts.
Flexible
This edging can be used as furniture edging for lining the ends of chipboard, both straight and rounded. For installation you will need a sharp knife and good glue. If there are concerns about moisture penetration, use silicone sealant in excess instead of glue.
To improve adhesion between the edge and the end of the chipboard, the inner surface of the profile can be scratched in different directions with a sharp object (knife, screwdriver, scissors).
The rigidity of this profile is also affected by the room temperature. Therefore, it is recommended to stuff it in a warm room, where it becomes softer and more “obedient.”
Everything else is simple. Apply glue or sealant to inner part edging and glue it to the end of the chipboard. Iron it thoroughly and also remove excess glue. We trim the edges of the edging only after two hours of exposure, when the glue has set. Well, complete drying of the glue will occur only after one day.

You can trim the excess profile to length with a sharp knife or garden pruning shears.
PVC mortise T profile

T-shaped edging is quite often used in manufacturing modern furniture. This is not surprising, since it has a number of undeniable advantages:
- Chic appearance (structural, matte, glossy and reflective surfaces),
- Sturdy mount
- Hides chips and unevenness at the ends of the slab,
- Easy to install on complex parts with both outer and inner radius.
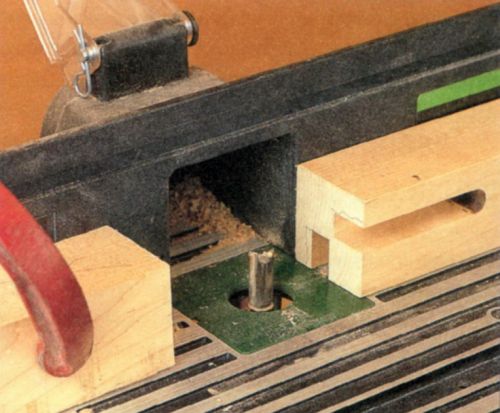
The only negative T-profile PVC You can call it the need to mill a groove. For milling, we will need a hand router with a 2.8-3 mm cutter, as well as a special room, since there will be a lot of dust, and we don’t need that at home.
But still, this minus is not so terrible as to completely abandon this type of edging of the ends of chipboard.
Types of T-profile
Mortise T-shaped profile can be:
- No girth
- With girth.
It can also be:
- Solid,
- Soft.
A mortise edging without a girth is used quite rarely, because it is not able to reliably hide the unevenness of the end and protect it from moisture and debris.
The mortise T-shaped profile with a girth (with antennae) is quite popular. It is especially popular when edging curved and radius parts that are being cut (in these cases it is simply irreplaceable).
Usually, after cutting a part with a jigsaw with a low-quality cutting blade, chips form across the entire surface of the end, which a regular furniture edge cannot hide. Therefore, only a T-shaped mortise edge with antennae should be used here, and the larger they are, the better.
When choosing a mortise edge, give preference to a rigid profile. Do not take a soft edging; you will suffer a lot with it both during installation and when using the part itself.
The fact is that the soft mortise edge is quite flimsy and when driven into the groove, its leg will bend and break very much. Even if you fill it properly, it will constantly bend back, thereby always getting debris under it. Also, all the potholes and unevenness of the end will be visible under it. And this will have a negative impact on general view products.
The ideal solution would be a mortise T-shaped hard edge with large antennae.

For installation we will need:
- Manual electric router,
- Edge cutter with a tooth thickness of 2.8-3 mm and a depth of at least 10 mm,
- Rubber hammer.
The first step is to make a high-quality groove at the end of the chipboard. It should be located strictly in the center (16 mm in the slab - exactly 8 mm from the edge).
We make the groove with a cutter with a tooth thickness of 2.8-3 mm. For reliable fastening, the width of the groove should be 0.5-0.7 mm less than the thickness of the tenon (T-leg) of the edge, and the depth should be at least 10 mm.
If suddenly the groove turns out to be very wide, you will need to use glue or liquid nails. But it will take additional time for it to dry.
Before stuffing the T-shaped PVC profile the end must be cleaned of chips and sanded sandpaper.
When driving the edge into the groove, bend the profile towards you. This is done so that the antennae do not rest against the edges of the end, but immediately wrap around it on both sides.
If you are putting edging on parts with a large outer radius, for example, on a rounded corner, then in order for the profile to fit normally and not form an “accordion” in the leg, you need to make a cutout in it.
When stuffing, use only a rubber mallet! With a regular hammer you will simply ruin the edge.
If you use PVC edging with a reflective surface, then protective film should be removed after all installation work, only on the finished product.
The video below shows the operation of the machine for milling the end for installation of a mortise T-shaped edge:
And here is a semi-automatic machine for driving in a T-shaped edge:
GROOTS CAN BE MADE EVERYWHERE
With a groove connection, the end of one part fits into a shallow groove cut across the grain of the other. This connection is an improvement on the simple butt connection. The groove shoulders provide decent strength. In fact, such a connection cannot be broken, for example, by pressing on a shelf. If it fits tightly, it can withstand oblique loads well, when the force is directed diagonally across the body. Installing back walls in cabinets or chests of drawers and bottoms in drawers further strengthens the entire structure. Finally, the groove makes assembly easier by defining the position of the parts and keeping them from slipping.Using just two types of groove connections, you can make almost any body part. The main joint, where the groove engages the full thickness of the adjacent piece, allows for the assembly of bookcases, toy chests, wall shelves, or any other cabinets in which the side walls extend beyond the adjacent pieces (Figure 1).


Rice. 1. Main groove connection.
Rice. 2. Modified groove/tenon connection.
If these "through" angles are unsuitable or unsightly, use a modified joint (Figure 2) called mortise/tenon.
Drawers are also boxes. They are easily made using a basic mortise joint and a mortise/tenon joint (Figure 3). Example ZA is the strongest of them; in examples ZV and ZS, you can weaken the front wall. If you want to hide the ends of the side walls drawer, shown at 30, cover them with a false front wall or use a quarter joint, as shown at 30, reinforced with nails or dowels.


Rice. 3. Grooves in drawers.
BASIC CONNECTION IN GROOVE
Cutting grooves on a tabletop circular saw with a set of groove discs is much faster than manually. But long or wide pieces are difficult to maneuver around the table. A pendulum saw solves this problem, but it has an inherent drawback - usually its console is not enough to cut across wide parts.A router helps solve this problem. But this also has its drawbacks.
First, if you are selecting more than one pair of grooves, setting the ruler for each side can be time consuming. Therefore, use an insert with a width equal to the distance from the rib of the router base to the cutter. To install the ruler, slide the insert along the marked shoulder line on the work piece (Figure 4).

Rice. 4. Insert for router.
Second, the thickness of the workpiece is almost never matched to the cutter to ensure a tight-fitting joint. You can plan or clean parts from solid wood, but plywood parts are difficult to trim. Cutting a groove to fit is more clear. But this requires two passes with a router - one for each shoulder.
Faced closely with the selection of grooves, you can make a simple device (photo A).
GROVING DEVICE
The device consists of two rulers (one for each groove shoulder) and two strips that rest on the edges of the workpiece. One ruler and one strip are T-shaped fastened at right angles. Gaps along the other strip and ruler allow you to install boards up to 300mm wide and select grooves up to 38mm wide. Two clamps in an adjustable bar rest against the workpiece and lock the fixture in place.To operate, you need a set of guide bushings for the router. With bushings, the rulers should be slightly offset to the side relative to the width of the groove itself.
The device is made of poplar, but Karelian birch plywood or MDF is also suitable. The T-nuts and MB screws are recessed, so the router can slide along the rules without hindrance.
Having finished manufacturing, you need to make inserts for installing the rulers. Plane a piece of cutting board approximately 450 mm long, 150 mm wide and 20 mm thick to the same thickness along the entire length. It all depends on the size of the sleeve and the cutter. Leave the jig in place while you make and fit four inserts, each approximately 50mm long, about 25mm wide and equal to the thickness of the gaps. Ideally, the thickness of the inserts should be equal to half the difference in the diameters of the cutter and sleeve.
Precise adjustment of the inserts is accomplished by using them with rulers installed when routing on a short piece that has been sawed off previously. Loosen the adjustable ruler, place the scrap between the rulers and two inserts on each side.
Tighten the screws. Remove the inserts and trim and mill the groove. If the trim does not fit into the groove, adjust the thickness of the inserts.
OPERATING THE DEVICE
Marking the grooves is very simple. Determine the shoulder line for each groove by making a pencil mark on the face of the piece to be worked. You can put the two side walls together and mark all the grooves at once, or mark the second side wall after routing the first.Once the jig is aligned and the cuts are marked, align the straight edge with the mark (photo C), lightly tighten the clamps and make a pass with the router, then move the jig to the next mark. A well-chosen groove should fit the tenon without gaps or backlash (photo D).
GROOVE/TENK CONNECTION
Like the main groove, the groove/tenon connection (Fig. 5) can be made in several ways: on a circular saw and by milling. Regardless of the method, the proportions of the connection are as follows: the tenon is about 1/4-1/3 of the thickness of the part on which it is cut, and approximately 1/4-1/3 of the thickness of the part with the groove. To ensure a tight and good connection, it is necessary to cut the grooves slightly deeper than the length of the tenons.SAWING A GROOVE/TENK CONNECTION ON A CIRCULAR
Since this is a very simple connection, it is easier and faster to combine marking and installation. Check the settings on the scrap boards (Fig. 6 and 7).It's easier to fit the tenon to the mortise, so make the mortise first. Set the depth of the cut by measuring or by eye, pressing the disc against the part in which the groove will be. Then set a ruler to cut out the inner shoulder of the groove (Fig. 6, step 2), make a cut in all parts with grooves, rearrange the ruler and cut out the second shoulders.


Narrow parts, such as the sides of bookcases, can be sawed down using dividing head, keeping the end of the workpiece in contact with the ruler while working. You can also attach a limiter to a ruler in front of the disk so that the end of the part rests against it.
The most accurate way to select a groove on a circular saw is to place the workpiece on the table and, pressing it against the ruler, cut out the shoulder. Then place the part on the end and cut out the thickness of the tenon. This method allows you to accurately control the thickness of the tenon, but it is inconvenient for long parts or those that are sawed across. It is better to make tenons on these parts using several horizontal cuts. After sawing the shoulder, press the piece against the ruler and use a dividing head to cut out the excess wood in several passes. Unlike the first method, here the thickness of the tenon depends on the thickness of the workpiece.
No matter how carefully the tenons are made, there is usually some variation in their size, especially when sawing through solid wood. Here we can advise you to cut the tenons a little thicker, and then, when fitting, trim them with a plane for the shoulders. The blade of a shoulder plane runs across its entire narrow sole, so you can cut right into the corner of a tenon shoulder.
MILLING THE GROOVE/TENK JOINT
For large and wide parts of housings or long and narrow parts, milling grooves is relatively simple and safe. Select a cutter of the correct diameter, attach a ruler to the base of the router and make passes with it, moving the ruler along the end of the part(Fig. 8). Many routers are sold with a ruler, but to improve the quality of work, it must be pressed to the base with a clamp or screws.


The most accurate way to mill a tenon is to clearly set its thickness between the ruler and the cutter (Fig. 9). To support the base of the router, use a clamp to press a piece of thick board flush with the end of the workpiece.
HOMEMADE DEVICE FOR SELECTING GROOTS
Although the device looks complicated, it is quite easy to make (Fig. 10). Cut the workpieces to size, and then carefully plan the planes and edges. Then select a groove in the fixed bar for the fixed ruler using a few cuts on a circular saw. Then, to ensure a tight fit and square edges, use a sharp chisel to trim its shoulders. The half-wood connection on the adjustable ruler is made so that its upper surface is in the same plane as the fixed ruler.Mill out all the cracks in the planks and rulers using a ruler pressed to the base of the router (Fig. 8). First, releasing the cutter approximately 3 mm in each pass, mill narrow through slots in several passes. Next, mill out pockets for the screw heads and T-nuts.
Small clamps are used as clamps. The pressure pad is a T-shaped nut at the end of the screw. The locknut prevents the pad from coming loose when it presses against the workpiece. Select the grooves in the adjustable bar so that the clamps can hide behind its edge.
Rice. 10. Device for making grooves.
(clickable picture)

When selecting grooves on circular saw use a guide bar. This method is best suited for long longitudinal grooves. In particular, this method is very convenient for making grooves for standard hollow holders. Once you have adjusted the guide bar and set the cutting depth, you can safely cut the grooves, confident that all longitudinal grooves will be the same distance from the edges of the workpieces.
On a wood cutting machine you can also select transverse grooves, but the longer the workpiece, the more inconvenient it is to work with. It is usually more convenient to select transverse grooves in long panels using a router. Procedure:
| Selecting grooves without a special cutting disc. Select longitudinal and transverse grooves can be done without special cutting disc. Install the standard cutting discwoodworkingmachine to the desired height and make the first cut. Turning off machine, move away guide 3.5 mm from the cutting blade, and then make a second cut. Carry on make successive cuts, each time moving the guide back 3.5 mm until you get the groove of the desired width. |
Selecting folds on a circular saw.
Selecting rebates on a circular saw is similar to selecting grooves, but you will need to provide the machine with an auxiliary wooden guide so that the cutting blade can move along it. Because a guide rail is used, this method is more suitable for selecting folds in long edges of workpieces than in short edges of long workpieces.Manufacturing and installation of auxiliary guide.
Use 19 mm thick plywood as the material for the guide. The auxiliary guide should be the same length as the standard guide bar, and 10 centimeters higher. Fasten both guides with screws (refer to the “Operating Instructions” for appropriate recommendations). Install the cutting head and lower it below the surface of the machine's work table.

Auxiliary cut.
To more accurately adjust the cutting blade for the grooves, make a cut in the auxiliary guide. With the cutting blade lowered under the table surface, move the guide so that it overhangs the head approximately 16 mm and lock the guide. On the left side of the auxiliary guide, make a pencil mark at a height of 25 mm above the surface of the workbench. Turn on the machine and slowly raise the cutting blade until it reaches the level of the pencil mark.

Installation and adjustment of the cutting disc.
With the groove cutting blade mounted on the machine spindle, set it to the desired height and adjust the rabbet guide to the required rebate width.

Selecting a fold.
Select a test seam on a scrap piece of plywood to ensure your settings are correct. If everything is in order, place the workpiece on the workbench and pass it over the cutting disc.

Selecting grooves using a manual router.
When, in the manufacture of cabinet furniture, you select a groove in a panel, sometimes you need to select the corresponding groove in the opposite panel. To ensure that the opposite grooves match each other exactly, the easiest way is to select them in one pass. This can be done with a simple rectangular guide, but it's worth taking the time to make your own custom T-guide for the router bit.
When selecting grooves with a milling cutter, it is very difficult to maintain the exact distance between the cutting edge and the rectangular guide. Using a T-rail, you first select a groove in the crossbar of the guide, and then simply line up that groove with a marking line on the workpiece. In this case, the angles between the grooves and the edges of the workpiece are completely straight. If you select two grooves on either side of the crossbar, the guide can be used to select grooves in workpieces of different widths.
Making a T-shaped guide.
To make the guide, you need two pieces of plywood 19 mm thick. Make a crossbar measuring 80 x 40 mm. The longitudinal guide should be 80mm wide and its length should be 80mm greater than the width of your workbench. Secure both parts with three screws as shown in the picture.

Once the glue has dried, insert a straight router bit of the same diameter as the desired groove width into the router. While driving the machine along the guide, select a groove on one side of the cross member. If you later need to select a different width groove, you can make a cut on the other side of the cross member.
Selection of grooves.
Align the groove in the guide cross member with the markings on the workpiece. Support the workpiece on a stable work surface. Press both ends of the guide onto the work surface. If the workpiece is narrower than the work surface, you can press only one end of the guide to the work surface, as shown in the figure.

When selecting a groove, move the router from left to right so that the machine is positioned between you and the guide.
Selecting folds using a manual router.
You can select folds using a hand router with a straight bit, using a guide. Another option is to purchase cutters that are specifically designed for cutting out folds. The best rebate cutters have bottom support rollers that roll easily over the workpiece and prevent the edges of the wood from charring. Milling cutters are available for sale different sizes, as well as sets that contain a cutter with a carbide cutting edge and replaceable inserts that allow you to select folds of different sizes.


Regardless of the technology you use, remember that when working, the router should always be moved in the direction opposite to the direction of rotation of the cutter. This will prevent the cutting edge from dangerously rolling off the workpiece.
Once you've mastered carpentry skills, it's great to show off your homemade furniture to family and friends. What could be more pleasant than touching something that has been polished to perfection? razor sharp blade, smell the wood, feel its texture, and then make a clean, fresh cut!
This article covers basic carpentry techniques. How to use carpentry tools to get various shapes, joints and textures of wood. If you're unsure of a technique or type of wood, it's worth experimenting with scrap wood. Put your workshop in order and maintain it. Some craftsmen sharpen hand tools, clean out their workshop, and clean all their tools and machines before starting a new project.
Wood preparation and marking
Once you've decided what you'll be doing, separate your carefully selected and planed lumber into groups. Mark each piece according to its future location in the product, marking the top, bottom, front surfaces and best edges. Using a pencil and tape measure, mark the sections of the required length, and use a square to mark the cut lines. Use a compass to draw arcs and circles. Using a dividing compass, transfer the dimensions from the drawing to the wood.
If you need to make the board narrower or mark a joint, set the thicknesser to the desired division and scratch the mark by moving the thicknesser along the edge of the workpiece. Use a small pencil to mark lines running at oblique angles. If you need paired parts, mark them at the same time and remember that one part should be a mirror image of the second. Use a knife to mark connections.
Curved cuts
Can be done with an electric hacksaw, jigsaw or band saw. The hacksaw is good for large radius cuts and thick wood, when the cutting line goes away from the edges.

Hacksaws are equipped with rotating bases that change the cutting angle, and depending on the type and thickness of the material, different ones should be used saw blades. For curved cuts of small radius and with wood thickness less than 50 mm, use a jigsaw or jigsaw.

Install the new file and tighten it until it rings when you click it with your finger. If you need to cut an opening, you can do two things: either start cutting from the edge, or, if you do not need to touch the edge, first drill a hole in the part to be removed, then release one end of the file, pass it through the hole made and clamp and tighten again.
For precise and accurate drilling large holes Use a drill press and Forstner drills. Mark the center of the hole, attach the corresponding drill bit and set the depth gauge. Then press the workpiece with clamps to the workbench (this will take some time, but it will be completely worth it). If the hole is deep, lift the drill bit several times as you work to remove waste and keep overheating to a minimum. If you have to drill a lot of holes in identical parts, it is useful to make a template from scraps of wood, which is attached with clamps to the work table of the machine.

To drill holes for screws and installation holes for nails, it is worth using a drill, and it is more convenient to use cordless drill. If you need to screw in a lot of screws, install the screwdriver included with this tool into the drill chuck.

Planing by hand
Planing is a lot of fun when the blade is sharp and you have enough time. The jointer is ideal for planing along the grain. Don't forget to secure the workpiece on the workbench. Make a test pass, make sure the blade is set to desired depth, and then get to work.

A face plane is good for finishing sharp edges and for cleaning up ends. Position the blade so that it cuts the finest chips. When processing the end sections, try not to stray to the side and avoid chipping.

Selecting grooves manually
Mark the groove using a pencil, ruler, square and possibly the tip of a knife, and transfer the workpiece to the workbench drilling machine and use a suitable size drill bit to drill out the bulk of the unwanted wood.

Remove the shavings, clamp the workpiece in a vice and remove the remaining unwanted wood with a chisel, holding the tool vertically. By the way, there is an excellent one.

The groove can be selected using a cutter, and the working technique depends on the size and location of the groove. The router can be held in your hands and guided along the workpiece, while selecting open groove Attach it to the work table and move the workpiece. In this case, the accuracy of the work will depend on the position of the guide bar (stop) and the height of the cutter. Always make a test pass using scrap wood. It is best to select a groove in stages and make several passes. After each pass, remove sawdust to avoid overheating the cutter.
Carving a tenon by hand
Mark the shoulder lines (the length of the tenon) with a square and a knife, then use a thicknesser to mark the height and width of the tenon. Remove any unwanted wood with a tenon saw. First, make cuts along the grain to the shoulder line on all four sides of the tenon. Then trim the tenon along the shoulder line across the grain. Clean the tenon with a chisel.
If you have a lot of tenons to cut (or if you just like to work with machines), then a router with a workbench will the perfect tool. If big size If the workpiece does not allow you to place it on the milling table, it is better to press it with clamps to the workbench and process it while holding the router in your hands. Set the fence to the length of the tenon and the router to the desired height, then, holding the workpiece firmly against the fence, remove the excess wood in several passes. When the end of the tenon rests against the stop, turn the workpiece over and repeat the procedure with reverse side. If you stop before the cutter reaches the shoulder line, trim the tenon with a chisel.

To select a groove 6mm wide and 4mm deep at a distance of 10mm from the edge of the board, do this. Attach the router to your workbench and install a 6mm router bit. Set the guide bar to 10mm. Adjust the height of the cutter so that it is 2mm above the table. Make a pass along the guide to create a 2mm deep groove. Turn off the router, raise the cutter another 2 mm and repeat the pass. You will get a groove 4 mm deep.

To select a rebate with a width of 10 mm and a depth of 4 mm, proceed as follows. You will need a straight cutter that is smaller than the width of the rebate (for example, 5mm in diameter). Set the stop at a distance of 5 mm from the rear edge of the cutter, and the cutter at a height of 2 mm. Place the board against the stop and select a 5 mm wide fold. Repeat the pass, still resting the board against the stopper, to obtain a 10mm wide fold. Switch off the router, set the bit to a height of 4 mm and repeat the procedures to complete the fold.

Press the workpiece with clamps to the workbench. Select a cutter that matches the width of the groove or a smaller size and set the depth stop. Using clamps, press a wooden strip parallel to the groove onto the workpiece, which will serve as a guide. Lower the router, press its base against the guide, turn it on, wait until the router reaches full speed, and make a pass. If the cutter is narrower than the groove, move the guide and repeat the procedure until you get the required width and depth of the groove.

Milling shaped edges
Cutting shaped edges with a router is very simple. Attach the router to its table and insert the cutter of your choice - round, radius or shaped. Use a cutter with a support roller.

Move the stop so that it is not in the way. Press the workpiece against the table and make several passes with the cutter from left to right. Continue milling until the workpiece begins to press against the support roller - at this point the cutter stops cutting. If the shaped edge looks burnt, it means either the cutter is dull or you were pulling the workpiece too slowly.

Milling according to template
Use a template if you need to make several parts with the same edges. First, cut out the approximate shapes with a saw, leaving no more than 4-5 mm of excess wood on the edges to be milled. Install the guide roller on the base of the router. Cut a template from plywood with an allowance for the edges and nail it directly to the surface of the workpiece. Turn on the router and guide it along the edge of the template.
As a template, you can take an already made part and use a straight-cut cylindrical cutter with a support roller (it can be on top or bottom of the cutter).
This saw makes it easy to make cuts at any angle. Place the cutting blade on the frame at the required angle (90, 45, 36, 22.5 or 15°) and fix it. Set the depth gauge to the desired mark. Place the workpiece on the saw table, press it against the fence, and then make the cut using smooth back and forth movements.

Inspect the workpiece and decide where exactly you need to drive the nail. If this area is near the edge and there is a danger of splitting the wood, use an electric drill to first drill an installation hole using a drill bit whose diameter is smaller than the diameter of the nail. Then use a suitable sized hammer to drive in the nail. If the nail is crooked, pull it out with a nail puller or pliers. If you are driving very small nails that are difficult to hold with your fingers, use pliers to hold them.

Driving screws
You have a choice of mild steel, stainless steel, brass or aluminum screws with straight or Phillips slots and countersunk or pan heads. Semicircular heads stand out clearly on the surface of the wood, countersunk heads are either flush with the surface, or edged with brass washers, or hidden by wooden plugs. The screws are screwed in with a hand screwdriver, a drill with an appropriate attachment, or a screwdriver.

When using a drill, install the locking mechanism so that the screw is screwed in to the required depth. If the wood is soft, the installation hole can be made with an awl; if it is hard, drill it with a drill of a smaller diameter.

To be able to hide the screws under the wooden plugs, you will have to drill a hole for the plug with a countersink drill and a corresponding cutter for the plug. Don't use steel screws on oak - they react with the wood and moisture and cause stains. Instead, choose plated steel, brass, or stainless steel screws.
If you want to make parts round section(chair legs, bowls, plates), you cannot do without a lathe. Buy the most powerful and heaviest machine your budget allows - with adjustable chuck and a set of faceplates. Spindle-shaped and cylindrical parts are turned by securing the workpiece between the front and rear centers of the machine, bowl or plate - on outside spindle.

The best lathes are equipped with a device that allows you to turn large workpieces on the outside of the spindle. You will need a variety of turning tools - a chisel, a cut-off cutter, an oblique chisel and a radius scraper.
To cut a door handle or latch, you won't need anything more than a good, sharp knife (not stainless steel). Hold the workpiece in one hand, the knife in the other and cut the wood, pressing on the back of the blade thumb. The rest is a matter of skill. To practice, first experiment with soft linden wood, for example.

Installing hinges
The two most common types of hinges are decorative brass overlay hinges (attached with countersunk screws that are screwed flush to the surface) and steel mortise hinges (attached into sockets with steel countersunk screws). In the latter case, outline the hinge flap with the point of a knife, cut the outline with a chisel, and then select the wood with a chisel to the desired depth. The sash should fit tightly in the socket. Always buy suitable screws along with the hinges.
Sanding wood
For getting smooth surfaces Numerous types of sandpaper (sandpaper) are used. The skin can be used either on its own or wrapped in it. wooden block. It is best to sand the wood several times - after sawing, after the glue has dried and after final finishing.

For the first sanding, use regular sandpaper, for finishing - fine sandpaper based on aluminum oxide (it is more expensive, but lasts much longer). For sanding large flat surfaces, use a cylindrical grinder. Work in a well-ventilated area and be sure to wear a dust mask.

Natural wood finish
Originally the term "natural finish" meant that the wood was sanded and left in its natural state, but now also includes oiling or waxing. Danish or teak oil is applied in a thin layer with a lint-free cotton cloth or brush.

Allow to dry and sand with the finest sandpaper to remove any ridges (the rough texture of raised wood fibers that occurs when the first coat is absorbed), then apply a second thin layer. If you want to make the surface less hard, rub it with wax mastic.
When finishing items that will come into contact with food, use a vegetable oil, such as olive oil, instead of teak or Danish oil. Rub it in with a cloth.
You have a choice between mineral spirits oil paint and waterborne acrylic paint. Both types of paint are applied with a brush. The visual difference between surfaces painted with one paint or another is very small, however, after working with oil paint, brushes should be washed with white spirit, and then acrylic paint- running water.

Couples oil paint may cause dizziness and nausea, and acrylic paint may cause dry throat. Regardless of the type of paint you use, wear a respirator and work outdoors if possible.
Special types of wood finishes
When working with American oak, you can get an interesting texture by wire brushing the wood. The texture is pleasant to the touch, and the resulting rough surface means you don't have to worry about damage from pets' claws.

The brush is moved along the fibers until there are no untreated areas left on the surface, after which it is rubbed with oil.

A candle flame finish helps hide the imperfections of low-quality wood. Apply to the painted surface with a brush oil varnish. After a while it dries out and becomes sticky, and then a burning candle is passed under the surface. Be sure to wait until the surface becomes sticky (it should show fingerprints) and keep the can of polish and brush away from the candle. It is better to do this work together somewhere away from the workshop. Practice on scraps before you get started with any serious work.