Threshold to the balcony: made of plastic and ceramic tiles. How to make a plastic threshold for a balcony Why is a threshold made at the balcony block
In many apartments, especially older ones, you can observe a situation where the floor between the balcony and the adjacent room is at a different level. In this case, there are two options for getting rid of this problem.
Firstly, you don’t have to think about it - and just remove the threshold to the balcony. You just need to further level the floor - and then the difference in height will disappear. However, in this case, there is a risk of noticeably worsening the thermal insulation of the room, because all the wind from the balcony, especially if it is of an open structure, will freely penetrate through the door into the room. IN winter period this can be a problem, making the room in your apartment or house much cooler. Despite all possible Negative consequences, it all depends on the decision of the owners.
The plastic threshold is beautiful and easy to install
The second option involves installing a special threshold. Built near the passage, it will serve as a kind of step through which you can get from the room to the balcony space. And most importantly, by maintaining the difference in levels, it will be more difficult for the wind to freeze the wall adjacent to the balcony.
Air flows will rest against the threshold, which, in fact, is part of the external load-bearing wall. It is thick enough to keep you warm in winter.
Of course, in the end it is much preferable to choose the latter option. Even if you have to use a threshold every time you enter and exit the balcony, its presence will still be of great benefit during cold weather. After all, even if the balcony is fully glazed and additionally insulated, it is still much more susceptible to freezing compared to external walls.
If you are at the final stage of repairing a balcony and don’t know how to make a built-in threshold for a balcony with your own hands, this article will answer all the questions that arise during the work.
What materials should I use?
There are many ways to install a threshold on a balcony. The difficulty is determined by its location. For example, making an angular threshold is somewhat more difficult than usual. The choice of finishing material directly depends on the amount allocated for repairs, as well as the wishes of the owners in terms of aesthetics, strength and durability. Whether to carry out the work with your own hands or invite specialists - here everyone decides for himself. Of course, with some skill, this is a good opportunity to save money, but it’s worth double-checking your strengths so as not to pay twice later.
When choosing a method for finishing the threshold on a balcony, especially if you do it yourself, opt for the following options:
- tree;
- ceramic tile;
- plastic;
- brick;
They are the most popular when installing balcony thresholds. Now let's talk about the advantages and disadvantages of each of the presented materials, and also discuss the procedures for direct finishing.

Tile is one of the alternative options to plastic
The most common option is to do plastic threshold to the balcony. The installation here is very similar to the installation of a window sill, only it is placed much lower than usual, turning into a real step.
Nothing complicated, everything can be easily done with your own hands - we knock it out external wall grooves at the level of the doorway, insert the canvas cut to size, fixing it with self-tapping screws, and secure it with polyurethane foam.
The surface must first be degreased for better adhesion. We leave the threshold untouched for 12-15 hours. We place a weight on its surface to prevent the expansion of the foam. After it hardens, we cut off the excess and seal the space under the threshold at our discretion - usually installing a plinth is enough.
The result is a completely decent built-in threshold that is in harmony with window block and fits well into the surroundings. Of course, due to use polyurethane foam its service life is somewhat lower when compared with other finishing methods - nevertheless, it tends to lose volume and density over time. On the other hand, the comparative ease of installation and its low cost mitigate this drawback.

The plastic threshold is not designed for heavy loads
Making a wooden threshold
So, a tree. Its main advantage is environmental friendliness and ease of installation. You can build a wooden threshold for a balcony with your own hands in just a few simple steps. First, a frame is prepared from dried wooden slats- it is desirable that they be treated with a special moisture-resistant composition. We lay it on the resulting base finishing boards. In addition to them, you can also use laminate or plywood.
It is worth noting here that it is better to cover the latter with linoleum or carpet, since by itself it will not last too long. And from an aesthetic point of view, it will be much more reasonable. This method of creating a threshold is recommended in cases where it is necessary corner option, due to the ease of creating a frame. In this way you can make not only a threshold, but even an entire cabinet for a loggia or balcony.
DIY ceramic threshold
Ceramic tiles require much great effort during installation. To make such a built-in threshold on the balcony, you need quite serious preparation. The first step is to install the formwork. The threshold itself will ultimately be created based on its shape; to do this, it is necessary to fill its cavity with a cement composition and wait for it to harden. Usually this takes 20-25 hours - after that we lay the tiles on the resulting base. In this case, according to the technology, the glue is applied not to ceramics, but to cement, this is also worth taking into account. As a result, tiled balcony threshold Due to its durability, it will last for many years.

Brick - cheap and cheerful
There is an option to make a threshold by laying it out with bricks. This unique option, although convenient from a practical point of view, is not available to everyone. Usually it is chosen when directly installing a window block or taking into account the interior of the balcony space. For example, brick texture fits perfectly into the design of the loft style, which has been gaining popularity in recent years.
Carrying out the work with your own hands will not be difficult - the main thing is to lay out the blocks evenly, applying the solution in an even layer. In the case where the threshold should form part of the masonry of the entire wall, if you lack qualifications, you should contact specialists.
After installing a new balcony door, the need arises to make a threshold. At first you might think that there is nothing complicated about this, but when you start to figure it out, you will realize that there are a lot of nuances. Accordingly, today we will talk about how to make a threshold on the balcony with your own hands. It will be difficult for an inexperienced person at first. We strongly recommend that you follow the advice exactly. experienced builders, and then everything will work out, the main thing is to do everything according to the instructions.
The threshold to the balcony has two functions. The first is aesthetic, that is, a door with a beautiful threshold looks much better. The second function is insulating. Thanks to it, less cold penetrates into the house in winter.
The threshold to the balcony can be made from:
- wood;
- plastic;
- bricks (it is better to use silicate);
- properly cooked cement-sand mortar.
Dismantling

Removing a threshold is much easier than building a new one, but there are some nuances here too. Wooden crafts dismantling it is not at all difficult, but if it was made of brick, then everything is much more complicated. You need to do everything as carefully as possible, since you will have to use a hammer and chisel. If these tools don’t help, then it’s time to use the hammer drill.
IMPORTANT!!! In places near the wall, it is better to work with a grinder with an attachment for working with stone. If the disk is missing in some places, then we try to work with the previously mentioned hammer and chisel. The work is quite dusty, so we recommend purchasing a respirator and construction glasses.
Brick threshold

Most often, a brick threshold on a balcony is used in cases where the level of the balcony block is much higher than the floor level. Thanks to the brick, namely its thickness, this difference can be easily and quickly eliminated, thereby saving money on sand-cement mortar. The cladding is made either of laminate or ceramic tiles. Make sure that the brick is not too high, otherwise the door will not open.
To build a brick threshold we need:
- Putty knife
- Roulette
- Hammer
- Gypsum mixture
- Metal lighthouse
- Perforated corner
- Drill
- Drill attachment “mixer”
- Sand
- Cement
- Sand-lime brick
To begin with, it is advisable to tidy up, ideally wash the floor. After cleaning, we begin to prime everything. The primer helps improve adhesion. We advise you to choose a soil mixture that, after drying, leaves a slight roughness.

High threshold in doorway with your own hands
Next, mix sand and cement in the proportion of 1 part cement + 3 parts sand. To make the solution set faster, add isogypsum or satengypsum to the resulting mixture. The mixer attachment in tandem with the drill will thoroughly mix all the ingredients.
Take a spatula and evenly apply the mixture to the primed area and the edges of the bricks. This way the bricks will adhere not only to the floor, but also to each other.
A perforated corner is placed on the corner of the bricks, and a beacon is placed on the door. They are fixed with the same mortar as bricks; there should be no void anywhere.
Plastic threshold

The plastic balcony threshold looks great, but has a relatively short service life. Installing a plastic threshold takes no more than one day. All the work consists of installing parts on the profile using self-tapping screws. We recommend using polyurethane foam for the layer.
The most the best material For the manufacture of plastic thresholds, PVC window sills are considered to be well-known and available in almost every hardware store. They are strong enough to support a person's weight. With a beautiful threshold, the door looks completely different.
Wooden threshold on the balcony

Biggest advantage wooden threshold the fact that it practically does not allow cold air to pass through. If it is additionally insulated with high-quality mineral wool, the effect will be even better.
To begin with, let's take wooden blocks and assemble the sheathing from them. It will have to be firmly screwed to the floor. For cladding, use a pressed board wood shavings. It can easily withstand heavy loads without deformation.
In the process of making a wooden threshold you will need:
- Self-tapping screws for wood
- Corners for connecting timber to the floor
- Drive-in screws with dowels
- Hacksaw
- Hammer
- Hammer drill
- Hardwood timber
To begin with, we take the prepared timber and make a frame comparable in size to the size of the future threshold. The self-tapping screws with which you will fasten the frame should be twice as long as the edge of the beam.

If the frame is completely ready, we place it in the place where the threshold should be, marking the internal edges with a construction pencil. By internal corners you need to drill holes for the dowels. Next, we put the finished frame in place and, using the previously made holes in the corner of the beams, fasten the frame to the floor. It should be strong and reliable.
Next, we cut out a sheet of particle board and carefully lay it and fasten it with self-tapping screws. If desired, the structure can be insulated with polystyrene foam or mineral wool. We recommend using as cladding good linoleum or laminate.
Threshold made of cement-sand mortar

If the threshold to the balcony is not high, we recommend making concrete option products made from good cement-sand mortar. This is the easiest and fastest of the above methods. First, we make formwork, the height of which corresponds to the height of the future threshold. To achieve maximum structural strength, it is necessary to use gravel or pieces of brick.
“Tip: Before pouring the mortar, be sure to putty the floor surface, install the formwork and mix cement, sand and water. The solution needed is the same as when laying bricks. Pour the finished mixture into the formwork and thoroughly level the surface.”
As soon as everything is dry, cover the surface of the dried concrete with whatever your heart desires: linoleum, laminate, tiles...
Technologically, there is a threshold under the balcony door at the exit to the balcony in all civilian houses. The question arises, why? It’s unlikely that the answer will be given, because that’s how it’s laid out in the projects. What role does the threshold play? balcony door and what dismantling it can lead to, how you can remove the threshold of a balcony door, we will answer in this article.
Balcony door threshold
It seems quite reasonable to think about removing the threshold of the balcony door when combining a kitchen, room and balcony or arranging a balcony, as functional room apartments. But you shouldn’t get excited and demolish the threshold on the advice of friends; if the threshold was made, does that mean it is needed for some reason?
Standard balcony threshold
Why do you need a threshold under the balcony door?
It all depends on the type of your house, or more precisely on the type of your balcony.
Note: We must understand that in houses there are balconies and loggias that are different from them.
A loggia, unlike a balcony, is a structure of a house, and the floor of the loggia is an external or built-in part of the ceiling. The balcony is separate cantilever design, connecting to the structure of the house and experiencing bending load.
- Rice. (c) and (d) we see that balcony slab external, but supported from below.
- In Fig. (b) we see that the balcony slab is a continuation of the floor slab.
- In Fig. (a), we see that the balcony slab is remote and is supported only by the top external slab house, next floor.
The threshold on the balcony is integral element interior of the room adjacent to the balcony. If the appearance of this element leaves much to be desired, then what beautiful room adjacent to the balcony or loggia was not old or a poorly finished threshold will be conspicuous and spoil the integrity of the picture. And if it still blows, then installation or replacement is simply necessary.
In this article we will look at how to make, replace and finish a threshold on a balcony step by step without involving specialists, since this type the work does not require additional skills there is an opportunity to save.
The first step is to make the base. There are two options for creating a base for the threshold: from brick or from cement-sand mortar. If you already have a level base that is suitable in height, then you can skip this step and immediately begin finishing.
Note!
The height of the base of the threshold is made taking into account the fact that a layer will be laid on top finishing material. The point is that the finished balcony threshold does not interfere with the opening and closing of the balcony door.
Instructions for creating a brick base:
The brick base is made when there is a large difference between the balcony frame and the floor (not less than the height of the brick).


After all these steps, the threshold will be smooth and you can proceed to finishing.
Instructions for creating a base from cement-sand mortar:
This method is suitable if the height of the base of the future threshold is less than the height of the brick.

The base is ready. Now you can start cladding with any material you like.
Threshold made of plastic window sill

The plastic threshold on the balcony is considered the most practical, not expensive and universal option. It looks most aesthetically pleasing if the whole thing is made of plastic.
Instructions for installing a plastic threshold from a window sill:
- The surface under the threshold is cleaned of dust, debris and primed. If there is an old threshold, it must be dismantled.
- Next, you need to lay out the beams on the base of the threshold. We do not recommend installing the threshold only on polyurethane foam - it is unreliable. The threshold will be laid on the bars. The size of the bars must be selected in such a way that the finished threshold does not interfere with the opening and closing of the balcony door.

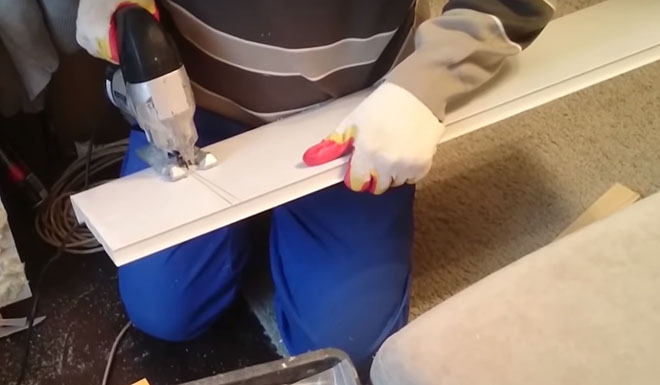
- The next step is to cut the plastic window sill to the size of the threshold.
- Next, we place the threshold and check whether everything fits and check the evenness of the surface with a level. If necessary, we trim the threshold. If the threshold is suitable, but the surface is not flat, it is necessary to install a base under the bars. Substrates can be any available materials (for example: pieces of drywall or plastic).

- After the threshold is adjusted to the level, we proceed to applying polyurethane foam. Carefully remove the threshold and apply an even layer of polyurethane foam between the bars, and liquid nails can be applied to the bars themselves.
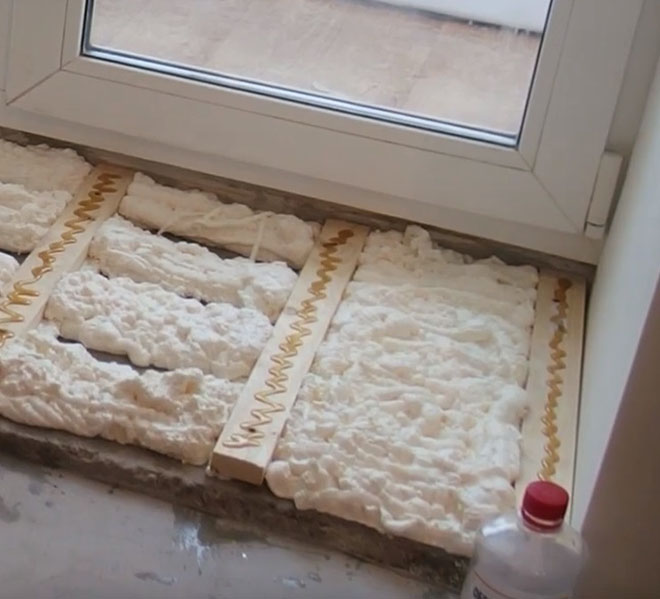
- Next, carefully glue the threshold. It should be noted that foam tends to expand, so after installing the threshold it is necessary to place a weight on its surface.


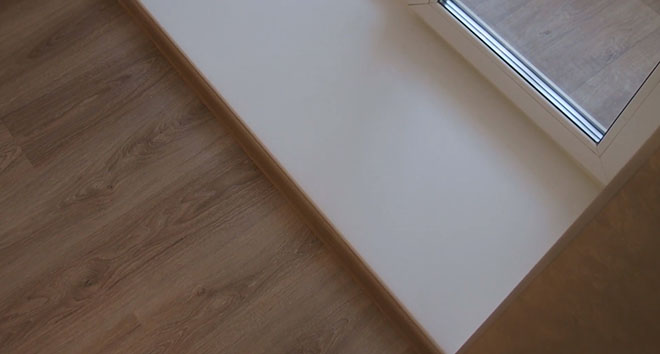
- Threshold from plastic window sill ready.
Tile threshold

Tiles are a durable, beautiful and practical option. A variety of sizes, textures, colors and patterns makes it possible to choose tiles to suit any design and interior.
Instructions for finishing the balcony door threshold:
You should not choose tiles with a glossy surface as they are slippery.

In addition to the text version of the instructions, we recommend that you read the instructions in video format, where the installation is shown in more detail with an explanation of the nuances.
Laminate threshold
How to make it yourself - instructions:
- The first step is to putty the threshold.
- Measurements are taken and cut necessary elements laminate In most cases, one strip may be enough, since laminate can be different widths and there is an opportunity to choose optimal solution. When cutting the material, use a wood saw with fine teeth, a hacksaw for metal or a jigsaw.


- For beautiful design Starting guides are used for joints between the wall and the laminate. We cut them to size and fix them around the perimeter.

- Apply to the base of the threshold silicone sealant or liquid nails and glue the laminate.

- The final stage is cutting to size and installing a decorative corner.

Linoleum threshold

Beautiful threshold for the balcony with your own hands. We offer for consideration 4 options for carrying out the work, and each of them was able to prove that all are reliable, and you only have to choose one, the one that is best suited for your design. The surrounding interior is also worth considering, and if you have wood trim, then making a threshold to the balcony from a window sill with your own hands will be at least awkward.
Read our article for details.
This option is used quite often, since in Soviet times simple solutions it wasn’t - if everyone used bricks, then it was considered correct. This is exactly what all the developers thought, and therefore they made the threshold for the balcony from this very material.
But also on this moment This solution is used most often, since it is optimal in such cases:

Note, that the use of this option for performing the work is possible if the front is at least a few cm larger than the height of the brick. Afterwards you will need to level the surface, and then do the finishing, and if suddenly the height is not enough, then the threshold may become even higher, than a door frame.
To complete the work you will need the following:
- Brick. Most often, a few pieces are enough, and most people recommend using just sand-lime bricks, but according to experts, other varieties building material no worse. The strength of any of the types is sufficient, and they will be able to withstand a load much greater than the weight of a person.
- Masonry mortar. Although you can do everything the old fashioned way and buy cement, find sand and mix the solution with your own hands, it will be much easier to buy a bag of professional and already ready-made composition, which will only need to be diluted with water in the required proportion and use it for your own purposes. The price for a bag that weighs 25 kg will be approximately 300 rubles, and this will be quite enough.
- Perforated corner. You will need a piece to level the corner, but such corners are sold only in pieces, 250-300 cm in size, so you will need to buy a whole one. The cost of the product is not that high, so you won’t lose much.
- Primer. Using this solution, you can pre-treat the surface if it is loose. Primer can also be applied to the finished surface after the masonry mortar has dried, and this is required to strengthen the surface, since thanks to this treatment, sand will no longer be taken from it, and absorbency will decrease significantly.
Note, that to quickly dry the solution, you can add about 10 to 15% gypsum to it, but more is not required. If you add more, you will have to work very quickly, and there is a huge chance that it will set faster than you can work it out.
Yes, masonry mortar really helps make life easier. You also cannot do without the following tools:
- To make the solution you will need a mixer attachment and a mixing container, but in extreme cases you can do everything without using electrical appliance, and then use a strong stick, which you need to vigorously stir the mixture.
- The mortar should be applied to the brick with a mason's trowel, or with a spatula, since there is not much work, you can use any tool. It will be more convenient to use a spatula to level the surfaces at the very end, and this is important.
- Surely in some places you will have to put pieces of brick, and it will be easier to beat it off right size using a mason's hammer. It is not necessary to make it perfect, the main thing is that there are no columns of dust, and this often occurs when cutting stone with an electric grinder.
Now let's look at the instructions for making a threshold on a balcony with your own hands:
- First, clean the surface of dust and debris, and if there are sagging from the solution, protrusions and protruding areas, then you should remove them. Try to prepare the surface perfectly, and the smoother it is, the easier the work will be. If there are sagging foam, you should carefully and evenly cut them off using a sharp construction knife.
- After this, start making masonry mortar, dilute ready mixture water in the required proportion, as indicated on the package. All the work is simple, and the main thing is to mix everything well so that there are no unmixed or uneven areas left in the mass.
- Now we apply the mortar under the base of the brick, and then spread it on end side so that the seams are filled with cement. The laying should be done in one layer, and therefore the work will not be difficult - lay an even layer and lightly press all the elements.
- If necessary, beat the brick to the required size, here we look at the situation. The surface should be covered with a layer of mortar, place a piece of metal corner on the corner, and level everything with a spatula to make best result. When the surface is dry, you can wet it a little and level it with a foam float, and the surface will become perfectly smooth.
Method No. 2 - filling the sill with solution
Constructions of this type differ in many ways from the first method. This is the case when you need to raise the level, but the height is less than the size of the brick. Perfect option to raise the plane, the simplest and fastest.
To work you will need:
- Sand-cement mixture, grade M-150, since it is most convenient for pouring screed, and the price is affordable - about 150 rubles for a bag of mixture weighing 50 kg.
- To make a screed, you need a board of the required height with a thickness of 2.5 cm, and its length should be slightly greater than the width of the opening into which the threshold will be poured.
From the tools you will need a container to mix the solution, as well as a grater for leveling at the end and a spatula for applying the mixture.
In more detail, the technology for creating a beautiful threshold on a balcony with your own hands is as follows:

We suggest considering the third method.
Method No. 3 – threshold made from a plastic window sill
This option is good because it is simple and cheap. But there is one nuance here - if the window sill for making the threshold is of poor quality, then soon it will break under someone’s weight, and all the work will need to be done anew. If you immediately buy good quality material, such problems will not arise. A plastic threshold on the balcony will look very beautiful and neat.
To work you will need the following:
- Plastic window sill with the width and length parameters you need.
- Polyurethane foam for gluing elements.
- Sealant for filling voids at joints.
- Blocks for support (if required).
- End plates for side face.
Do-it-yourself plastic threshold for a balcony:

At this point the work can be considered completed. There are often tips to screw the threshold onto self-tapping screws, but this is stupid, since there is nowhere to screw it in, and concrete is far from suitable for this. best base. In addition, the strength of the fastening without self-tapping screws will not be in doubt.
Method No. 4 - making a threshold from wood
This option is excellent if it matches the overall situation, i.e. you have wooden trim or the room is made in rustic style and other similar areas.
For work you will need:
- Boards or other wood elements to create a threshold.
- Several bars to make a base for the threshold.
We suggest you figure out how to install a wooden threshold on a balcony:

Yes, wood needs additional protection from moisture and abrasion, so the surface should be treated and then paint/varnish applied on top, what exactly is at your discretion. The compositions must be wear-resistant, so the threshold will have to be painted at least 2 times.
Finishing methods
Of the options you have considered, two give an excellent final result, and two remain the base on which the coating will still need to be laid. Let's figure out how to finish the threshold on the balcony. The first option would be to use ceramic tiles, since the material is different high strength and resistance to wear, which means it is ideal for achieving the goal.
The work is carried out as follows:
- Since the plane is already prepared and primed, you can immediately take measurements to calculate how the tiles will be positioned. It must lie symmetrically, and then the pattern will be beautiful and even.
- Cut ceramics using electric grinder with concrete discs or tile cutters. Take measurements carefully so that the elements lie evenly.
- The material must be laid using a special adhesive composition, which is applied with a notched trowel. To ensure that the seams are the same size, crosses should be inserted into them. Check the level of the plane using building level, since everything should lie perfectly flat.
- You can also tile the walls under the threshold, here only you decide what will happen and how. For strength, can be inserted into gusset a special element, but this is not necessary if the joints are already smooth. If you do everything carefully, the threshold will turn out perfect.
Note, that for the threshold you should choose a tile that has structural surface, since it is very easy to slip on smooth ceramics.
After the adhesive has hardened, remove the excess and fill the seams with fugue, which will make the threshold look much better and help protect the base from water. You can lay out the threshold from pieces of slabs, which also looks interesting.
Another finishing option is a threshold made of, and this method is quite simple to manufacture, which is why it has become very popular:
- Take measurements, cut out the required size piece of laminate, usually one strip is enough, especially since they come in different widths and you can always choose what suits you perfectly. You can cut the material with a hacksaw for wood, which has fine teeth, or with a hacksaw for metal, but if you have it in stock electric jigsaw, the process will become much easier.
- The finished piece should be tried on, and if everything fits, then apply a layer on the back side liquid nails, and then press the element more tightly to the surface. At correct use everything will work out.
- At the end you should attach a corner to a step, which is sold in a hardware store, and you only need to take a piece of the required width.
You can also install a corner on the threshold, which has an anti-slip strip. Another interesting solution– finishing the threshold on the balcony using. This material is distinguished by the fact that it is inexpensive, and buying a piece of material from waste will cost you a penny.
Do-it-yourself work on finishing the threshold on the balcony is carried out as follows:
- Place a piece of material on the surface, and then mark the lines along which the cut will be made, and try to cut the material as carefully as possible so that the joints do not turn out to be defective.
- After this, the base needs to be lubricated adhesive composition, designed specifically for linoleum, and press the material in place, level it and press it better for good adhesion to the surface, and also pay Special attention joints
- At the very end you should attach metal corner, which will strengthen the projection and prevent damage to the material in this mass.
Conclusion
The threshold should not only be safe and reliable, but also beautiful, so you should definitely use one of the methods described above to create the structure. The video in the article will give you the opportunity to understand all the nuances even better, and if something is not clear, you can always ask questions in the form under the article