Homemade hiller for a walk-behind tractor with your own hands. Disc hiller for planting potatoes: how to make it yourself
Anyone who uses walk-behind tractors knows that it is not always possible to purchase the necessary attachments for the unit. Many of them are expensive, and some are not very convenient to use in the country house or garden. An individual approach is often important here. Therefore, do-it-yourself disk hillers for a walk-behind tractor, drawings, videos of which are available in large quantities on the Internet, will help those who wish to implement individually, in their own way, the problem of mechanizing the hilling of their plantings.
To make it easier to understand how to make a mounted hiller on a unit, let’s first look at how to make manual hiller for potatoes.
As can be seen from the drawing, to make work easier without a motor, you also need to try. But not as much as it seems. First of all, you need tools for work:
- hammer;
- vice;
- welding machines, preferably electric type, and autogenous;
- calipers;
- taps for cutting internal threads;
- tap driver;
- grinding machine with replaceable discs;
- gas burner for heating the metal when it needs to be bent;
- Workbench;
- all kinds of auxiliary tools.
Disc hiller
Let's get started on how to make a potato hiller with your own hands. The drawing shows that the main tool is moldboard discs. They must be within 400 mm. This is optimal. Because we usually plant potatoes at a depth of 60-80 mm, and the roots then grow approximately 200 mm. It turns out that by walking between the rows with inclined disks of the specified size, we completely hill up the row of potatoes.
So, we make 2 disks from a steel sheet 2 mm thick, with a diameter of 400. Some are made from old pot lids. Let be. But it is advisable to make high-quality disks that will last a long time. Can be taken from scrapped agricultural machinery. But best of all is alloyed stainless steel. We sharpen the edges of the disks, where the cutting edges will be. Now we are making a bridge with racks on which the disks will be attached. We calculate the sizes. We put a connecting fastener for pipes on both sides of a strong steel pipe (sold everywhere). The free ends of the fasteners are directed downwards. From above we drill the pipe through the holes in the mount. We drill each fastener from both sides. Secure with bolts and nuts.
If you want to make grips of different widths, then drill two more holes on both sides. To change the grip width, simply move the posts further or closer to the ends of the bridge and secure them through the holes. Then we insert the tubes - racks - into the fastenings from below. We also drill and fasten in the joint. Two bolts with nuts for each rack. Then at the bottom of each rack we make a mechanism for inclined movable disks. First we attach the bracket for the disk. Moreover, we also do 2–3 pipe drilling positions. To be able to change the inclination of the disks.
On the other side of the bracket we weld a short thick steel rod. At its other end - in the bushing ring - press the sliding bearing closed type. Pre-weld a wide washer with holes for fastening the disk to the inside of the bushing. Weld the same wide washers with holes in the center of each disk. We secure the disks with bolts and nuts. We ended up with two movable disks tilted at a certain angle, attached to racks on one bridge. You can come up with an additional device for tilting the disks to the right - to the left. To do this, you need to select a hinged mounting mechanism for the bracket. These are also on sale. Yes, you can find it in old parts of agricultural machinery.
Attaching the hiller
Hiller for walk-behind tractor must be connected and hung to the unit in such a way as shown in this drawing:

From the drawing you can see that we need to connect the device to the walk-behind tractor to the bridge through brackets and strong steel tubes. Reinforce the connection with a crossbar. Turn on the engine. The wheels are moving. You hold on to the handles of the walk-behind tractor. Carried away by the movement, the created one comes into action with my own hands planting tool. The discs just need to be made at symmetrical angles so that they don’t lead in one direction when hilling. The considered tool option is not the only one. There are others too. Let's look at them one by one.
Lister model
This homemade hiller for a walk-behind tractor is interesting because in a hard, not sliding version it's easy to do. Here is a photo of such a hiller:

In order to do this, you need little time and material. Cut from 2
millimeter steel blank according to the drawing, a certain configuration. Let's sharpen the future bottom edge. Let's bend it in the middle. How to bend? Through a fixed pipe. Complete the fold by punching the leading edge with a hammer. Then we spread the wings of the hiller. We fix the width between the wings with a steel cross member welded between them at the back. We punch through the bottom of the product so that the wings turn out to be ploughshare-like. From the inside in front of the hiller, we weld a stand with several holes drilled so that you can adjust the depth (higher, lower) of the hiller’s immersion into the soil. We bolt the rod going to the walk-behind tractor to the stand. We attach the bar to the walk-behind tractor.
The same list model, made in a sliding version:

The hiller lies bottom up, so its structure is visible. Apparently, the hiller is factory-made. You can do exactly the same thing manually. Instead of a cross member tightly connecting the wings, three connection elements are used here: in the middle, welded in front, a rod with holes; two cross members from the wings, overlapping onto the middle rod. The connection point is secured with a bolt and nut. The diagonal cross members are attached to the fenders using a welded eye, so the cross members can be moved. By moving the bolt closer or further along the rod, you can adjust the width of the wings. Everything else with a sliding lister hiller is done in the same way as with a non-sliding one. Of course, a sliding one is better. It turns out that you can adjust not only the depth, but also the width of the hilling.
There is another option. For processing two rows at once. This improvement speeds up the work process. The walk-behind tractor saves time, effort and fuel. A dual device is made in this way. Two homemade hillers with stands are attached to a square horizontal rod. There are plenty of such metal products. You can always find the right thing. We attach the hiller stands to the rod like this. We cut out (or saw out) a strip of two-millimeter steel. At the ends of the strip we make long rectangular slits.
We bend the metal in the middle, so that the middle goes around the square bar at a right angle from behind. We thread the hiller stand into the resulting double eyelet at the front. A hole for the bolt is pre-drilled in the mount. We make holes on the rod on the right and left, at the same distance from each other. We manually cut the threads for the bolt in the holes using a tap with a crank. By screwing the bolt into the rear part of the mount through the thread in the rod, we tighten the hiller stand inserted into the lugs of the mount. Because the bolt will rest against the front of the bar and begin to move the bar forward, pulling on the bent mount, securing the rack.

Double lister hiller
The second most important tool for a walk-behind tractor or agricultural winch after a plow is, of course, a hiller. In the spring, I had a motorized winch for plowing and a plow; after planting the potatoes, hilling was approaching, but there was little time to make a hiller. The idea arose to buy a hiller in a store. Having visited all the places in the city of Smolensk where you can buy a hiller, I was once again convinced that it would seem that with a developed trading system, choosing something good is very difficult (or rather impossible).
That year I decided to use my neighbor's hand hiller. My neighbor has already offered me his tool several times, noting that everyone really praises the virtues of his hiller.
Time passed and I started making my own homemade hiller. I again had to take the template from my uncle. He bought his hiller in a store several years ago, on this moment It was not possible to find such a model for sale. The complex element is the front part of the hiller - a curved corner.
 Modern manufacturers, simplifying the design and trying to save on equipment, solved the problem of a curved corner simply - they made a break by welding two corners at a certain angle. You see such a hiller in the photo on the left. Since in a garage it is a difficult task to bend a corner along a radius, so it was decided to remove the template from the halves, bend them until the radii match, then weld them and process the resulting weld with a grinder, selectively weld if necessary and clean it again. I welded it twice and got an even, perfect layer of metal. With the remaining elements, everything is quite simple and clear. Everyone determines the assembly sequence for themselves.
The width of the hilling can be adjusted by turning the wings, and the depth can be changed by raising or lowering the children. 2. Plus, you can play along with everything during hilling due to manual control. The handle is made of water pipes, I bent them in the garage while warming them up blowtorch (gas burner) places of bends until red, while sand was poured into the pipe. It turns out to be a bend excellent quality, no fractures. Two handles are welded to a plate that has holes for attaching the hiller (the plow also has similar holes, because previously these same handles were used for the plow), at the moment they are not used to control the plow, the plow plows itself without the participation of a plowman. The first impression was excellent; after hilling my plot, my neighbor dragged my hiller and motorized winch to his garden.
Hiller drawings
The figure below shows a drawing of the front part of the hiller, which is welded from two identical halves. It is necessary to make a template according to this drawing, then the two resulting halves are bent until the radii match and are welded in 2-3 passes. Download the hiller drawing in PDF format

Below is a drawing of a hiller wing; it can be cut from metal 2mm thick.

The wing bends something like this.

Below are all the main dimensions of the hiller base, the thicknesses of the elements that make up my homemade hiller are indicated.

How to choose and make a potato hiller with your own hands?
One of the most popular agricultural crops is potatoes; they are grown here and in other countries. of Eastern Europe. In progress long-term cultivation Various agronomic technologies were created for potatoes.
They helped to facilitate crop processing and also increase yield. For industrial scale The crop is grown using a tractor with attachments - cultivators, and in garden plots, potato hillers are used on a walk-behind tractor, which you can make with your own hands.
1 What types of hillers are there?
After the winch and plow, the hiller is the second most important unit. He helps to cut furrows for planting, which he then fills with planting material. There are several options for this tool:

Measurements of a lister hiller for potatoes for a walk-behind tractor
1.1 Lister hiller
The lister unit is the simplest type of tool; it has a fixed working width. The design of this device consists of two connected and extended wings, which are fixed to each other.
The wings of the tool are stationary, so the grip width cannot be adjusted. It will not be possible to adjust the hiller to the row spacing. In this case, when working with the tool, the row spacing is adjusted.
The width of the lister hiller is 25 - 30 cm. This is not the most convenient option, because for growing potatoes, the recommended row spacing is 50 - 60 cm.
A special feature of this device is the presence of thin racks; in this case, the motor cultivator does not reload when the hiller is buried in dense soil. Some lister hillers have a streamlined shape, which is more practical.
to menu
1.2 Variable working width devices
The unit with variable working width is convenient to hill up, because it is equipped with an adjustment mechanism. It allows you to change the position of the wings.
It can be adjusted to the row spacing. The disadvantage of the device is its high energy consumption. This happens due to the work of the wings, which push the soil to the side; after the hiller passes, the soil crumbles back into the furrow. As a result, your arms and back get tired faster and the engine is wasted. Despite this, such hillers are among the most popular among gardeners.
to menu
1.3 Disk devices
Disk models have the following advantages:

Scheme of a disk hiller for potatoes
- easy to use (working with these tools requires a minimum of effort, they move forward themselves and do not require additional pushing from behind);
- universal (with their help you can do hilling after planting tubers during the period of active growth of the above-ground parts of the plants);
- are successfully combined with a walk-behind tractor (if you use a disk hiller at a reduced speed of the walk-behind cultivator, its power increases. This increases the efficiency of cultivation and improves the operation of the unit).
When choosing from a huge assortment, it is advisable to choose those models that are made of alloy steel, equipped with rolling bearings with a large thickness and disk diameter.
to menu
1.4 Propeller-type hillers
Propeller-type hillers are used for cultivators and walk-behind tractors that have two forward gears. This is necessary so that in second gear with a power of up to 180 rpm, it is possible not only to loosen, but also to transfer soil into the beds from between the rows. This DIY potato hiller will do the job perfectly.
to menu
2 How to make a hiller for a walk-behind tractor with your own hands?
You can make a hiller with your own hands using quite simple designs. There's nothing complicated about it. To create a traditional non-adjustable hiller, you need to cut out halves of the product from metal 2 millimeters thick according to a template.

Drawing of a plow-hiller for a walk-behind tractor
You can also make a disk hiller with your own hands. To do this, you need to select the type of wings. Ploughshares, or disks, are steel sheets 1.5 - 2 millimeters thick, whose lower edges are bent.
The main thing is that the disks are symmetrical. Otherwise, the structure will move to the side, which will significantly complicate the work. To create the unit, you can use shares that served as a seeder.
The plowshares must be installed at an angle, maintaining a distance between the lower points that corresponds to the width of the wheel track, equal to the width of the row spacing.
To connect elements to each other, bolted connections or welding are used. The discs are connected using adjustable adapters.
In addition to the disk, the main parts of the tool are: screw lanyards, stands and a T-shaped leash. Turnbuckles are needed to adjust the vertical axis of rotation of the disk. A homemade hiller is attached to a walk-behind tractor with your own hands using a beam with wings.
A manual disk hiller is made on the basis of a drawing, and it is very important to consider the relationship between the fastening design and dimensions.
The tool can be manufactured in two ways: with variable wing width and fixed. With the first method of arrangement, the distance between the disks can be changed due to the symmetrical rearrangement of the racks.
To make working with the tool easier, it is necessary to install sliding bearings. To increase the reliability of the product, you can install bearings rather than sliding bushings.

Hilling potatoes with a hiller for a mini tractor
Using a disc hiller for a walk-behind tractor with your own hands will make the work easier and help increase productivity.
To attach a homemade hiller to a walk-behind tractor, use a bracket to the hitch without a beam. The unit lead is attached to the bracket using a stopper and bolts with washers. A corkscrew is inserted inside the square pipe and pressed tightly against the outer surface.
After this, the do-it-yourself hiller for a walk-behind tractor is ready for work. The traction of the walk-behind tractor can be increased by working in first gear. If the wheels slip during the hilling process, they must be paired.
A hiller for a mini tractor is installed to hill up your potatoes. For the tool to be truly effective, the potatoes must be planted in the correct rows, with equal distances between plants.
To process crops mechanized way A high-performance hiller for the tractor is used. Its main purpose is inter-row treatment of potatoes from weeds and hilling of tubers to increase yield.
A manual hiller for potatoes or other plants will help make the work easier and increase the yield. A homemade tool made with your own hands is a profitable and necessary assistant in agriculture.
to menu
2.1 Making a manual hiller at home (video)
Potatoes have always been and are an important crop that many summer residents grow on their property. Of course, potatoes grown on our own, always very tasty and high quality.
However, do not forget that in order to get tubers of excellent quality, you need to hill them during the growing process. This is due to the fact that in loosened soil the roots of the plant grow, and due to this the formation a large number of potato tubers.
Hilling is usually done using hoes. If the area is large, then this process takes a lot of time and effort. Therefore, it is worth thinking about more convenient adaptation for hilling.
A manual potato hiller is the most optimal device for loosening the soil. In addition, with the help of this simple device you can loosen a large plot of land measuring almost 10 acres in a matter of time.
So what is this interesting tool and how can you make it yourself? In order to understand this issue, it is worth considering all the properties and advantages of this device.
Why is hilling necessary?

As you know, during the growing process, potatoes must be periodically hilled. But many people don’t know why this is needed and what it does for potatoes.
So, why do potatoes need to be hilled:
1. Loosening the soil ensures air flow to the roots, due to which they grow.
2. Due to the fact that air enters the soil, tubers quickly form.
3. In addition, hilling increases the yield by up to 20-30%.
It is worth noting: in regions with cool climates and high humidity, it is advisable to periodically carry out the specified agrotechnical technique. Due to this, excess water is removed from the ground, it warms up and is saturated with oxygen. But in the southern and southeastern regions, the moisture level is low, and this leads to irrigation problems. Sometimes hilling in these areas, on the contrary, harms the plants.
1. Loosening must be done on time. Typically, potatoes are loosened at least twice throughout the entire season. The first hilling should be done when the plant grows 5-10 cm out of the ground. The second loosening is done when the height of the stems reaches 14-20 cm. It is advisable that the bushes still have unopened flower buds.
2. Loosening should be carried out in cloudy weather, in the morning or evening. It is best to do this after rain, watering or after morning dew.
3. Do not hill up the soil in extreme heat. Because leaves and stems that are exposed to the open sun may burn and the plant will die.
 You might be interested in an article on how to make a screw log splitter yourself.
Read a useful article on how to sharpen a chainsaw chain at home here.
Of course, hilling should always be carried out using special equipment. Some people use choppers, hoes and rakes, but working with them is quite difficult and takes a long time. Therefore, it is best to use a manual hiller. Moreover, you can make it with your own hands.
2 types of manual hiller
Do-it-yourself hiller for walk-behind tractor
Hilling is one of the most common types of work, and is carried out everywhere there. Where proper care is needed different cultures, for example potatoes. This type work is not possible without such attachments as a hiller. In this material, we will tell you how to make a hiller for a walk-behind tractor with your own hands, provide the necessary drawings, as well as a selection of video clips.
Types of hillers
Hillers are divided into two types regular (lister, plow-shaped) And disc hiller. An ordinary hiller is increasingly losing its position compared to the disk hiller, with the help of which it is much easier and more convenient to hill up potatoes and other crops. Below, we will talk specifically about making a disk hiller with your own hands. By correct execution for this type of work, see the topic “ Hilling up with a walk-behind tractor”.

Making a hiller for a walk-behind tractor with your own hands
Today, there are a lot of disc hillers on sale from different manufacturers. But often their price scares away. Much more practical. He will make a hiller for the walk-behind tractor with his own hands.
The hiller consists of the following parts:
— 2 screw lanyards
— T-shaped leash
Before production. Need to find suitable material For disks, steel sheets 2-3 mm thick can be used, which are given a convex shape.
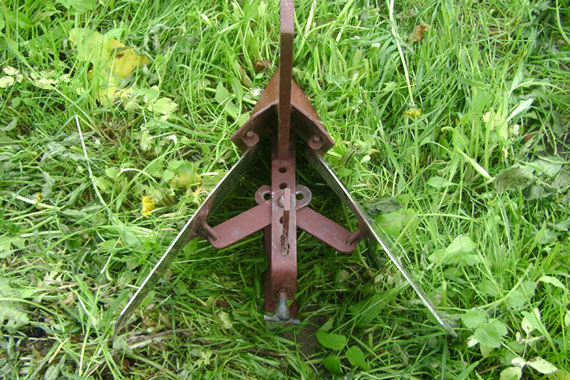
Screw lanyards perform the function of adjusting the angle of rotation of the disks along the vertical axis. Adjusting the discs to the required row spacing is quite simple; this is done by moving the vertical posts. These racks “C” are shown in the photo below, where you can also see how, using bolts “B”, the angle of attack of the disks relative to the movement of the walk-behind tractor is adjusted.

Important! To prevent the walk-behind tractor from being pulled to the side during operation, the hiller discs. Must be installed strictly symmetrically.
Hiller drawings for walk-behind tractor
When assembling manufactured parts, adhere to their dimensions indicated in the drawing. The drawings below describe quite clearly all the nuances of the hiller design, dimensions, and there should not be any difficulties in making the hiller with your own hands.


To attach the hiller to the walk-behind tractor, we use a hitch bracket without a beam. We attach the leash of the assembled hiller to the bracket with two bolts and a stopper. We insert the stopper inside the square pipe and press it from the outside. Using two bolts, you need to rotate the hitch bracket and align the leash along the longitudinal axis. We fix the position with nuts.
Do-it-yourself hiller for walk-behind tractor video
In the video clips below, craftsmen share their experience, not only in making the hiller, but also tips for working and setting up.
Do-it-yourself potato hillers for a walk-behind tractor - realizing your metalworking talents and saving money!
Proper cultivation of a personal plot significantly increases the yield of planted crops. IN modern conditions lack of time, summer residents often resort to small-scale mechanization of garden work. The walk-behind tractor has not been in short supply for a long time, and it can be found in almost every household.

Having spent a certain amount to purchase this useful device, I want to save as much as possible during operation. One way to save money is to make your own attachments.
Of course, no one suggests forging a plow in a forge, as was done many decades ago. However, you cannot do without basic plumbing equipment.
For the manufacture of homemade devices for the walk-behind tractor you will need:
- Welding machine, preferably for arc welding;
- Gas-burner. Not to replace electric welding, but to warm up the product during hardening;
- Corner Grinder(grinder) of medium power, with a set of cutting and roughing discs;
- Drilling machine or powerful drill. Of course - high-quality drills;
- Electric emery (sharpener);
- Qualitative metal workbench, vices, files and fastening tools.
The most popular in use are mechanized hillers for walk-behind tractors. We will talk about the culture for which summer residents are ready to stand in the field for hours, bent over. AND an indispensable assistant in the fight for the harvest, is the attachment.
How to make your own potato hiller
First of all, let's decide which tool is right for you. There are several types of devices for hilling:
Lister with fixed and adjustable angle

Fixed is the easiest device to use and manufacture. It is easy to make using the attached drawings:
The base is made from steel sheet with a thickness of at least 3 mm. This node is the first to encounter soil resistance.

For the bracket we use a 4 mm steel strip; it is advisable to harden the part after molding. The field board can be bent from 5 mm steel, for example from a spring sheet. Only the metal must first be “tempered” and then hardened again.
Advice! A crucible is not required for tempering and hardening. With such sizes of workpieces, a gas burner is quite sufficient.
A stand is a structural element that bears the entire load. Therefore, select a strip of at least 8 mm thick for it.
General view of the base in the illustration:

Welding must be done in two passes, on each side of the joint.
Wings can be made from thinner sheets. 2 mm is enough. It is important to maintain the dimensions, otherwise it will not be possible to properly connect the wings to the base.

Wings bend on any template - will do steel pipe suitable diameter.

Due to the concave geometry and the presence of welded seams, the structure is rigid.
An adjustable lister hiller is also easy to make yourself. The difference is that the wings are hinged to the base, and the tail section has rods for adjusting the angle.

The technology and thickness of the workpieces are the same as in the previous model. The versatility of the nozzle increases significantly.
The processing speed can be doubled if you make a two-row hiller for a walk-behind tractor.

K already finished design it is only necessary to modify the traction device. It makes sense to make the fastenings movable so that the width of the rows can be adjusted.
IMPORTANT! Any lister hillers require significant power from a walk-behind tractor. Therefore, during production it is necessary to study the instructions so that your work is not lost.
Disc hillers

The advantage of this type of attachment is that it is synchronized with the capabilities of the walk-behind tractor. You can adjust speed and power, which are mutually exclusive. Since the resistance in the soil is small, there is no need to use a more powerful walk-behind tractor.
Another advantage is that by choosing the right disc sizes, you can hill up potatoes at different growth phases.
The design principle is clear in the diagram:

You can make such a canopy yourself. The only difficulty is in forming the discs. Most often, used cutters from a collective farm seeder are used. After traveling around the villages, it is fashionable to find inexpensive, good specimens. It is better to mount it on bearings with seals installed. The sliding bushings will jam.

If one disk jams, the walk-behind tractor may turn to the side. Setting up a disk hiller involves selecting the angles of inclination and immersion depth. For this purpose, the bracket is equipped with movable elements with bolted fixation.
An interesting donor option for circular hillers is worn-out circular saws.

With their help, the soil is not so effectively lifted from the row spacing, but the tines additionally loosen the soil, and it is possible to install a different sharp corner between disks.
This compensates for the lack of a cup-shaped profile. Of course, the axles must be on bearings. Otherwise, there will be no rotation - you will simply rake the earth along the rows. If you couldn't get disk bowls, this is your option.
Propeller hillers
Two forces are used - translational motion and rotation. An active hiller for a walk-behind tractor requires the unit to have two gears and a power take-off shaft. The efficiency of processing increases significantly, and the cost of equipment increases accordingly. Therefore, just like previous models, propeller-type hillers can and should be made independently.

Again, nothing but high-quality iron, grinders and welding machine not required. The axles are adjusted to the walk-behind tractor, the remaining parts are simply welded arc welding.
Advantage of this device is that it performs two tasks in one walk-behind tractor pass.
The row spacing is loosened, and part of the soil is simultaneously transferred to the rows. That is, hilling with loosened soil occurs.
Adjustment of the propeller-type hiller is not required; only the distance between the nozzles is set. Different degrees of loosening and hilling heights are determined by the shape of the lugs and installation angles relative to the axis of rotation.
You can make a pair of bushings with brackets, and a set of blades for different types hilling. It will be enough to quickly change the holds, and you will have new tool, with virtually no additional costs.

Practical adjustment of the hiller on a walk-behind tractor
The theory of operation of the device for hilling is described in textbooks for summer residents in such detail - that even a person far from knowledgeable can understand the settings. Agriculture. However, in practice the saying “it was smooth on paper, but they forgot about the ravines!” works.
Features of the soil, current weather, quality of sharpening of hillers - this is not the entire list of factors affecting the quality of plowing. Not to mention the characteristics of the walk-behind tractor.
Therefore, before entering the garden bed, it is necessary to walk through the “virgin soil” with the equipment.
It is desirable that the soil characteristics be the same as on cultivated soil. During the “work”, firstly, you will feel how the attachment behaves, and secondly, you will set correct angles and processing depth.
It is equally important to choose the correct plowing (hilling) speed. The relationship between speed and power when using disk attachments was described above. The same applies to other devices. Sometimes a poor homemade hiller, with properly selected speed, works wonders. And expensive active baking powder simply scatters the earth around.
For a detailed story about the settings of the potato hiller and its installation on the KADVI walk-behind tractor, see this video material.
A walk-behind tractor is truly an indispensable unit when cultivating land before planting it. Hiller is a type of additional equipment used on walk-behind tractors, which will speed up and improve the process of planting potatoes and pre-planting work in general.
Types of hillers, their characteristics
With the help of this unit, the process of making furrows on the soil surface and filling them with planting material is carried out.
If you use a hiller, the rows of planted potatoes will be even and located at an equal distance from each other. Several main types of hillers can be listed.
To choose the right hiller for a walk-behind tractor, you need to note their main features and characteristics. There are many models of hillers, but the most common are the following:
- lister;
- disc hillers;
- propeller type;
- with varying working width.
Lister
 This type is the simplest. They differ in that they have a strictly set width of the furrow that will be covered by the device, and it cannot be changed; it does not depend on the distance between the rows. Typically, the reach of such a hiller is no more than thirty centimeters. A characteristic feature is that the hiller is equipped with installed racks that prevent the walk-behind tractor from being overloaded during operation.
 This type is more effective. The lower the operating speed of the cultivating unit, the greater the power of the hiller itself. This helps to significantly extend the service life. In addition, disk devices are easier to handle and require less effort when working with them. And the most important advantage of this type is its versatility. The unit can be used both before planting and at a time when the part located above the soil increases.
With variable working width
If we talk about hillers, the width of which can be changed, it should be noted that they are used to work with powerful units weighing more than thirty kilograms.
Propeller type
 Propeller hillers are used on those walk-behind tractors that are equipped with two forward gears.
When choosing potato hillers for a walk-behind tractor, you should consider a few more points. It is better to use streamlined equipment (a plow-shaped hiller works well) because they turn the soil up less intensely, which prevents it from losing moisture.
In addition, preference should be given to steel tools with a wider sheet and bearings. The dimensions of the hiller correspond to the size of the walk-behind tractor and the length of the cultivated strip of land.
How to make a hiller for a walk-behind tractor with your own hands? There are many drawings and diagrams for this. In general, there is no difficulty in making a hiller with your own hands. Having selected the right hiller, select a scheme and get to work.
Below is an example of a lister type hiller.

Take a metal layer two millimeters thick. Then cut out the halves of the part according to the proposed template (taking into account the dimensions). Important! The halves must be symmetrical, otherwise this will affect the operation of the device in the future. Then you bend both halves until the radii match, after which you weld them, making two or three passes. Next process welding seams.
It is very important to choose correct drawing for the future product, in order to avoid any discrepancies (during operation, the structure will begin to move to the side, etc.). With high quality and careful manufacturing homemade equipment does not create any difficulties or interference during hilling.
You can also easily design a disk hiller for a walk-behind tractor with your own hands.

To create such a device, you can take shares (disks) from a seeder that has already served its useful life. Or they can be made directly from sheets of metal (no more than 2 mm thick), then bend the edge of the lower edge. The distance maintained between the points of the lower supports corresponds to the width of the track itself. Then the disks are fastened to each other, but with the discretion that the connecting elements can be adjusted.
In addition, for disk hillers for a walk-behind tractor, screw lanyards, stands (which have already been mentioned) and a T-shaped leash are required. The lanyards are attached directly to the walk-behind tractor. For cutting furrows, the above type is better suited than others.
Do-it-yourself hillers on a walk-behind tractor are always pleasing to the eye, and working with them is much more pleasant and faster.
How to make a hiller for a walk-behind tractor with your own hands
Availability walk-behind tractor in personal farming you won’t surprise anyone. This is very valuable unit in operation allows for cultivation and plowing land plots of varying length.
However, if you use additional attachments, you can significantly expand the potential range of work of your walk-behind tractor.
It is not surprising that after spending a certain amount Money to purchase a walk-behind tractor, many want to make optional equipment with his own hands, thus wanting to save money on their purchase.
Of course, no one is talking about making an exact copy of the equipment that is sold in specialized stores, but the principle of operation and common features the designs will be the same.
Most people in our country use their own gardens to plant potatoes, which are no less popular in our country than in Belarus. Therefore, the requirements for the walk-behind tractor must be appropriate - it must plow the ground for planting, and also help plant and care for potato bushes.
By courting we mean hilling, which is why potato hillers have become very popular, the methods of making which we will talk about.
About the device of the hiller
The design features of the hiller directly depend on the type of device, of which there are several.
- Disc hiller. Already from the name itself it is clear that the design of this hiller uses disks, or rather two disks, located to each other at a certain angle. In addition, these discs are attached to a special frame, which is directly coupled to the walk-behind tractor via a hitch.
For more information about the disc hiller, watch the video:
- Active hiller. This type of hiller is also called a propeller hiller, because its operation uses translational and rotational motion. Such hillers are installed on walk-behind tractors that have two forward gears.
- This is necessary so that in second gear it is possible not only to loosen the surface, but also to transfer soil from the inter-row spaces.
- Lister hiller. This is the simplest type of hiller, which is gradually losing its popularity due to its lower efficiency compared to the two previous types of devices. Structurally, they are two sheets connected to each other; their shape is similar to something like wings.
 Lister hiller
Using these tools, you can form furrows, and then plant the potatoes themselves. In the future, when the bushes have formed to optimal sizes, you can perform hilling with the same tools.
Thus, the rows are very even and neat, which not only improves visual perception, but also helps the potato tubers form better and ripen faster in the bush.
Do-it-yourself hiller for the walk-behind tractor Cayman, Patriot, Texas, Foreman, Crosser, Viking, Forza, Sadko, drawings and videos of its production can be found in the public domain, represents the optimal way out of the situation when there is no extra money to purchase attachments.
In addition, independent production of this or that technical means will allow you to significantly save on the subsequent operation of the walk-behind tractor itself.
 DIY hiller
Necessary materials
Before proceeding with the analysis of this or that method self-made hiller, we need to list a minimum list of what we will definitely need during the work.
KamAZ 65115 belongs to one of the oldest series of this plant, production of which began back in 1998. Here are all its technical characteristics.
One of these oldest companies is Vogele, which produces a wide range of asphalt pavers models. Vogele asphalt pavers stand for German quality and commitment to progress.
The T 70 tractor on wheels is the brainchild of the Chisinau Tractor Plant. By clicking on the link you will get acquainted with all the information on this tractor.
Of course, no one is forcing us to retrain as a blacksmith in order to forge all the necessary parts using the ancient method that was used several decades ago. But we still need a basic list of welding and plumbing equipment:
- Welding machine(it is preferable that this machine be designed for arc welding).
- Grinder with a set of different discs and attachments.
- Electric drill with a set of reliable drill bits.
- Electric emery.
- A gas burner, which is necessary to heat the metal during hardening.
- Vise or workbench.
- Various files and other consumables (bolts and other fasteners).
This list relates directly to the tools we need. In addition, you will need the material itself from which self-assembly will be made, but we will talk about this in more detail in the process of describing methods for making hillers.
Instructions
I would like to start by considering the process of manufacturing a disk hiller, because this type devices are the most popular today.
In addition, the use of this type of hiller allows you to synchronize it with the capabilities of your walk-behind tractor, i.e. adjust power and speed.
By installing disk sizes of different diameters, you can hill up potato bushes various lengths.
Disc hiller
Many people ask the question - how to make a hiller for a walk-behind tractor with your own hands? At home, this is quite possible if you follow certain recommendations. So, let’s describe the manufacturing process step by step (for example, let’s take a disk hiller for the Neva walk-behind tractor):
- For production to us you will need cutters from an old seeder, or sheets of metal 2 mm thick. They are secured using bearings with seals.
- They need to be placed at an angle to each other. The distance between the lower parts of the disks should correspond to the track width of the walk-behind tractor. They are connected by welding or using ordinary bolts.
- Here you need to follow a strict recommendation - the disks must be symmetrical to each other. Otherwise, the walk-behind tractor with the hiller will drift to the side, which will significantly complicate the entire work process.
- In addition to the discs themselves, the design of the hiller includes screw lanyards, T-type leash and stands. Lanyards, in this case, perform the adjusting function of rotating the disks along the vertical axis.
- A do-it-yourself hiller for a walk-behind tractor, the drawings and photos of which you see below, must be made in strict accordance with the dimensions. Of course, there will be improvisation, but for the first assembly experience it is best to use other people's work.
- Depending on the capabilities, you can make a fixed or adjustable working width. The second method is more convenient, because you can change the inter-disk distance by simply rearranging the racks.
- To aggregate the hiller with a walk-behind tractor, you need use the hitch bracket, on which there is no beam. The hiller's leash is attached to the hitch using a stopper, connected with bolts and washers. The stopper itself is inserted inside the square pipe and then tightened.
READ ALSO: How to properly install the clutch disc
The disk hiller for the Salyut walk-behind tractor is made using the same method, because the design itself and the method of connection to the walk-behind tractor are completely identical to the Neva.
Active hiller
To make such a hiller, we will need exactly the same list of materials and tools that we used in the manufacture of the disk hiller:
Using similar tools, you can make an active hiller for the MTZ, Plowman, Champion, Carver, Husqvarna, Lifan walk-behind tractor. The manufacturing principle is in many ways similar to the disk version:
- The axles also need to be adjusted to the parameters of the walk-behind tractor, and the parts themselves are welded using a welding machine.
- As previously reported, this type of hiller places certain demands on the walk-behind tractor. It must have two forward gears, as well as a PTO - power take-off shaft. Many sellers of walk-behind tractors, when they say that a walk-behind tractor has two gears, mean one rear and one forward.
- So you need to clarify this point when purchasing.
- It would be advisable production of several bushings with brackets, as well as additional metal blades.
Double row hiller
The two-row hiller is the same lister type of hiller, but in double volume. Let's look at the whole process step by step:
- For work we need a sheet of metal about 3 mm thick. From of this material it is necessary to weld the base of the hiller.
- A 4 mm steel strip can be used as a bracket. The field board is made of a steel sheet 5 mm thick.
- Rack hiller takes on the main load at work. Therefore, you need to make sure that it is the most stable and reliable in comparison with other parts of the hiller.
- The wings of the hiller can be made from a sheet of steel 2 mm thick. They need to be bent a little using a pipe of the required diameter.
In principle, this is where the process of making a two-row hiller ends. Can I have some more do adjustable system hiller wings, which are attached to the base using hinge technology. At the tail of the structure there are rods that regulate the angle of the wings.
Otherwise, the manufacturing principle is completely identical to that of the fixed list version.
After completing the self-assembly of the hiller, the most important thing is to test it in the garden. Successful production does not yet guarantee high-quality work, because this depends on a combination of many factors - weather conditions, soil conditions, correct sharpening of the hiller elements, etc.
Before you start hilling, you need to walk along an ordinary piece of land. During the work, you will feel the correct operation of the hiller and will be able to adjust the optimal depths and angles of entry into the soil.
Second an important point is the speed at which you will carry out the hilling process. A correctly selected pace of work can be no less useful in work than the presence of a hiller itself, because at high speeds the unit will simply scatter the earth into different sides without hilling.
Conclusion
Potatoes are a very important crop in our country. It’s not for nothing that they call it “second bread.” In this regard, many summer residents rush to their plots at the end of May to plant potatoes, which can feed them throughout the next year.
However, the process of ripening potato tubers depends not only on directly planting them in the holes, but also on further care, i.e. hilling and weeding.
You can, of course, do this manually, but it is very labor-intensive and time-consuming. In addition, if you have a walk-behind tractor, you can use it in combination with special attachments - a hiller. Making it yourself does not present any particular problems if you have the necessary list of tools and materials.
In this case, we do not mention the presence of the necessary skills to work with these tools, because this goes without saying.
Thus, using minimum investment you can make a fully functional hiller for aggregation with a walk-behind tractor, in no way inferior to purchased analogues.
Source: http://machinspec.ru/selskoxozyajstvennaya/motoblok/okuchnik-svoimi-rukami.html
Do-it-yourself potato hillers for a walk-behind tractor - realizing your metalworking talents and saving money!
Proper cultivation of a personal plot significantly increases the yield of planted crops. In modern conditions of time shortage, summer residents often resort to small-scale mechanization of garden work. The walk-behind tractor has not been in short supply for a long time, and it can be found in almost every household.

Having spent a certain amount on purchasing this useful device, you want to save as much as possible during operation. One way to save money is to make your own attachments.
Of course, no one suggests forging a plow in a forge, as was done many decades ago. However, you cannot do without basic plumbing equipment.
To make homemade accessories for a walk-behind tractor you will need:
- Welding machine, preferably for arc welding;
- Gas-burner. Not to replace electric welding, but to warm up the product during hardening;
- Angle grinder (grinder) of medium power, with a set of cutting and roughing discs;
- Drilling machine or powerful drill. Of course - high-quality drills;
- Electric emery (sharpener);
- High-quality bench, vice, files and fastening tools.
The most popular in use are mechanized hillers for walk-behind tractors. We will talk about the culture for which summer residents are ready to stand in the field for hours, bent over. And an indispensable assistant in the fight for the harvest is attachments.
How to make your own potato hiller
First of all, let's decide which tool is right for you. There are several types of devices for hilling:
Lister with fixed and adjustable angle

Fixed is the easiest device to use and manufacture. It is easy to make using the attached drawings:
The base is made from steel sheet with a thickness of at least 3 mm. This node is the first to encounter soil resistance.

For the bracket we use a 4 mm steel strip; it is advisable to harden the part after molding. The field board can be bent from 5 mm steel, for example from a spring sheet. Only the metal must first be “tempered” and then hardened again.
READ ALSO: How to properly level a refrigerator
A stand is a structural element that bears the entire load. Therefore, select a strip of at least 8 mm thick for it.
General view of the base in the illustration:

Welding must be done in two passes, on each side of the joint.
Wings can be made from thinner sheets. 2 mm is enough. It is important to maintain the dimensions, otherwise it will not be possible to properly connect the wings to the base.

The wings are bent on any template - a steel pipe of suitable diameter will do.

Due to the concave geometry and the presence of welded seams, the structure is rigid.
An adjustable lister hiller is also easy to make yourself. The difference is that the wings are hinged to the base, and the tail section has rods for adjusting the angle.

The technology and thickness of the workpieces are the same as in the previous model. The versatility of the nozzle increases significantly.
The processing speed can be doubled if you make a two-row hiller for a walk-behind tractor.

For an already finished design, it is only necessary to modify the traction devices. It makes sense to make the fastenings movable so that the width of the rows can be adjusted.
Disc hillers

The advantage of this type of attachment is that it is synchronized with the capabilities of the walk-behind tractor. You can adjust speed and power, which are mutually exclusive. Since the resistance in the soil is small, there is no need to use a more powerful walk-behind tractor.
Another advantage is that by choosing the right disc sizes, you can hill up potatoes at different growth phases.
The design principle is clear in the diagram:

You can make such a canopy yourself. The only difficulty is in forming the discs. Most often, used cutters from a collective farm seeder are used. After traveling around the villages, it is fashionable to find inexpensive, good specimens. It is better to mount it on bearings with seals installed. The sliding bushings will jam.

If one disk jams, the walk-behind tractor may turn to the side. Setting up a disk hiller involves selecting the angles of inclination and immersion depth. For this purpose, the bracket is equipped with movable elements with bolted fixation.
An interesting donor option for circular hillers is worn-out circular saws.

With their help, the soil is not so effectively lifted from the row spacing, but the tines additionally loosen the soil, and it is possible to set a less acute angle between the discs.
This compensates for the lack of a cup-shaped profile. Of course, the axles must be on bearings. Otherwise, there will be no rotation - you will simply rake the earth along the rows. If you couldn't get disk bowls, this is your option.
Propeller hillers
Two forces are used - translational motion and rotation. An active hiller for a walk-behind tractor requires the unit to have two gears and a power take-off shaft. The efficiency of processing increases significantly, and the cost of equipment increases accordingly. Therefore, just like previous models, propeller-type hillers can and should be made independently.

Again, nothing other than high-quality iron, an angle grinder and a welding machine is required. The axles are adjusted to the walk-behind tractor, the remaining parts are simply arc welded.
The advantage of this device is that it performs two tasks in one pass of the walk-behind tractor.
The row spacing is loosened, and part of the soil is simultaneously transferred to the rows. That is, hilling with loosened soil occurs.
Adjustment of the propeller-type hiller is not required; only the distance between the nozzles is set. Different degrees of loosening and hilling heights are determined by the shape of the lugs and installation angles relative to the axis of rotation.
You can make a pair of bushings with brackets, and a set of blades for different types of hilling. It will be enough to quickly change the hooks, and you will have a new tool every time, with virtually no additional costs.

Practical adjustment of the hiller on a walk-behind tractor
The theory of operation of the device for hilling is described in textbooks for summer residents in such detail that even a person far from agriculture can understand the settings. However, in practice the saying “it was smooth on paper, but they forgot about the ravines!” works.
Features of the soil, current weather, quality of sharpening of hillers - this is not the entire list of factors affecting the quality of plowing. Not to mention the characteristics of the walk-behind tractor.
Therefore, before entering the garden bed, it is necessary to walk through the “virgin soil” with the equipment.
It is desirable that the soil characteristics be the same as on cultivated soil. During the “work”, firstly, you will feel how the attachment behaves, and secondly, you will set the correct angles and depth of processing.
It is equally important to choose the correct plowing (hilling) speed. The relationship between speed and power when using disk attachments was described above. The same applies to other devices. Sometimes a poor homemade hiller, with properly selected speed, works wonders. And expensive active baking powder simply scatters the earth around.
For a detailed story about the settings of the potato hiller and its installation on the KADVI walk-behind tractor, see this video material.
For growing quality harvest Potatoes waste a lot of time and energy. In order for potato tubers to be strong, you will have to regularly loosen the soil when growing potatoes. This will improve the supply of oxygen and moisture to the soil. To do this, it is better to use a manual potato hiller, which makes loosening the soil several times easier.
It is known that during the active growth of potato bushes it is necessary to loosen the soil. However, not everyone knows exactly why the soil is loosened and a potato hiller is used.
Loosening the soil using special equipment is carried out to supply oxygen to the soil and accelerate plant growth. If it regularly gets into the soil Fresh air, the formation of new root crops doubles. Thanks to this, the amount of total harvest will increase by 50%.
When to hill potatoes?
Having become familiar with the purpose of loosening the soil, you need to decide when it is best to do it.
It is recommended to carry out hilling at the most appropriate time. The first time the procedure is carried out after the first shoots appear. Moreover, their height should be at least 5–7 cm so that the seedlings are clearly visible above the ground.
It is necessary to loosen the soil with a potato hiller 2-3 times per season. The procedure is repeated when the bushes grow to twenty centimeters. It is recommended to do this in the evening or in cloudy weather, so that there is no sun. Hot sunny days are not suitable for this procedure, since in large, unshaded areas, the hilled parts of plants above the ground may burn.

It is also necessary to loosen the soil after rains and prolonged downpours. After precipitation, the soil surface becomes covered with a crust, which prevents the penetration of oxygen into the soil. If you do not get rid of it in a timely manner, the plants will develop worse.
Design and purpose of a manual hiller
There are two main types homemade hillers for potatoes.

Disk
The disk-type design looks like a small frame on which several metal disks are suspended. Such models are made from the following elements:
- two screw lanyards, which are responsible for adjusting the speed of rotation of the disks;
- T-shaped leash;
- two disk blades;
- two metal stands.

The main advantage of a homemade disk manual hiller for potatoes is the ability to adjust the racks located between the disks. This allows you to independently set the most suitable row spacing. When adjusting, you need to make sure that the racks are at the same distance from the disks. If the distance is different, one of them will pull the hiller to the side.

In the form of a plow
The model, made in the form of a plow, is also often used for cultivating land when growing potatoes. This product is much more convenient than the disk model and allows you to quickly hill up and even plow areas with large area. For ease of hilling experienced gardeners It is recommended to use the device together with a walk-behind tractor. This will allow you to loosen the garden much faster.

Do-it-yourself manual potato hiller
Some vegetable growers do not want to spend money to purchase such a device and therefore try to make a manual hiller themselves.
Before you start work, you need to prepare all the materials and necessary tools. To create the design you will need the following:

- sheet rod 2–3 mm thick, with which dumps will be made;
- one hollow pipe at least a meter long for the manufacture of rear and front rods;
- meter water pipe, which will be needed when creating vertical stand;
- a steel plate or lanyard to connect the vertical post to the front link;
- gas burner for heating metal products at their bends;
- grinder for working with joints;
- welding machine.
Also, to create a hiller yourself, you need a drawing that will show correct location all components. Of course, you can make a product without the help of a drawing. However, such a hiller is more likely to be of poor quality and will quickly break.

Making a vertical stand
It is necessary to make a potato hiller from a vertical stand, which is considered the basis of the entire structure. For this, a pipe about a meter long is prepared.
To create a high-quality rack, the pipe will have to be bent 10–20 degrees forward at a distance of 300–400 mm from the beginning of the structure. Used for bending metal pipes special device- pipe bender However, not everyone has the opportunity to use it and has to do everything with their own hands. To bend yourself metal pipe have to:

- pour river sand into the pipe cavity;
- install plugs at the edges of the structure that will hold sand;
- heat the place where the pipe is to be bent with a soldering apparatus;
- Carefully bend the pipe at the heating point.
Some try to repeat the above steps, but without using sand. However, without sand between the walls of the vertical pipe, its shape will deform due to heating and therefore it will not be able to maintain its original cross-section.

We make front and rear links
To make the rear and front links you will need ¾ inch diameter pipe. It will have to be bent in the same way as the pipe when creating a vertical stand. When the product is bent, several holes are made in it at the top and bottom where the fork will be installed. The holes created will be needed in the future to change the height of the rack.

When making the front fork, it is necessary to take into account the height of the person who will work with a hand-made manual disc hiller for potatoes. Therefore, the front link is created so that its forks are at least 60 cm long. To connect the fork to the vertical post, holes are drilled for large screws.

Double shaft plow
Make hand plow for hilling potatoes is quite simple. For this, two metal plates with a thickness of at least 3–4 mm are prepared. They should have small semicircular bends to make it easier to loosen the ground. A self-made plow is attached to a vertical stand. For more reliable fastening of the structure, a welding machine is used.

Pruning knife
At the very end, a pruning knife is created for a manual disk potato hiller. This part of the structure is made of carbon steel, from which a knife of the required length and diameter is cut. After cutting the product, you will have to sharpen it exactly at an angle of 40–45 degrees to create a sharp blade. When the knife is ready, it is welded to the upper half of the vertical stand and the weld seams are ground with a grinder.

Hilling technology
Before using a potato hiller, you need to familiarize yourself with the features of loosening the soil.
First you need to break through the weeds in the area where potatoes are grown. In this case, the torn grass can be left on the site to protect the potato bushes from the sun's rays.

When all the weeds have been picked, you can begin loosening the soil with a homemade potato hiller. This is done in the evening or in cloudy weather. When loosening the soil, the hiller is pulled twice between the rows of potatoes. If after use hand tool In some areas there is crust left under the bushes, you will have to get rid of it manually with a regular hoe.

Conclusion
When growing potatoes, you need to carefully care for the potato bushes. To obtain good harvest, it is recommended to regularly loosen the soil. To do this, you should use a manual hiller, which will quickly get rid of the crust that has formed on the ground.
