Wind generator from a computer cooler. How to make a bedini charger from a computer cooler
In this article I will tell you how to make an engine - a Bedini generator from a computer cooler. This device model is one of the lowest power, but at the same time it is very convenient to use, cheap and easy to manufacture. It is very convenient to conduct experiments with the model. It takes up very little space and is easy to maintain. I will tell you the best, in my opinion, way of making it.
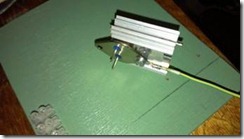
You will need: Transistor 2N3055 TO-3; Diode 1 N 4001 and 1 N 4007; Resistor 47 Ohm - 100 Ohm (I recommend 51 Ohm, 1W -2W); 1kΩ trim resistor (I recommend R-17N1-B1K, L15KC or 3296W-1-102LF potentiometer 1K(SP5-2VB)); computer cooler (I took JF0925S1H, fan 12V, 92x92x25mm), but in general it doesn’t matter what kind of stickers there will be on the cooler; terminals, crocodiles. You can buy all this at a radio store, electrician, or take it out of radio devices; I bought it at the Voltmaster store. I really liked the store, their prices are an order of magnitude lower than others. You also need a neon light bulb NE - 2. Pull it out of the starter to fluorescent lamp, radiator (you can take a piece of aluminum, you can pull it out from some unnecessary radio equipment), a piece of plywood or organic glass 16.5mm * 15.5mm and other small fittings (single-core and stranded wires, bolts, nuts).

Here is the diagram to assemble:

Here is a visual diagram:


Now attach the transistor to the heatsink and the heatsink to the base.


The next step is to prepare the cooler. Remove the sticker, then the rubber plug from reverse side. Using a small screwdriver or tweezers, remove the cotter pin (circlip). Remove the blades.

You will see 4 coils attached to the chip with three legs. Grab the core of the coils with pliers and insert a small screwdriver into the space for the blade axle. Holding everything firmly by the core, hit the screwdriver with a hammer. The microcircuit with coils must separate from the entire structure.

Unsolder the coils from the microcircuit. The chip has 3 pins, you must insert a cutoff pin as the fourth pin. There are 2 wires soldered to one of the legs, unsolder one and solder it to the new leg so that there is one wire going to each leg.


Place the coil assembly back onto the axle, solder 4 different colored wires and lead them out.

Constantly rising prices for electricity, old power grids, force modern man search alternative sources electricity. This article is a great illustration of how to make it yourself wind generator in the garage without special tools costing about $200.
Many of the DIY designs are toy projects that won't hold up in high winds. This turbine will resist the wind whose speed is greater 64 km/h., A produce electricity will be available starting from wind speed in 24 km/h.
Wind generator production began with the above-mentioned projects, but soon realized that all these structures would not withstand strong winds.
After months of trial and error, a design was developed that combined strength, reliability of design and efficiency in producing useful electricity.
I would like to note that author this project - high school student, no experience with electrical systems, so before you tell yourself that building a wind generator is beyond the scope of your skills, believe me, it is not as difficult as it seems, anyone who puts a bright mind to it and their hands can do this homemade.
Step 1: Materials
- Electric motor;
- Steel sheet measuring 30*46 cm;
- Steel pipe 60 cm long and 25 cm in diameter;
- Pipe square section with a side of 2.5 cm and a length of 122 cm;
- 4 pipe angles (angle 90 degrees) with diameters of 2.5/1.9 cm;
- 4 tees (diameter 2.5 cm);
- 4 pipes 60 cm long, 2.5 cm in diameter;
- 4 pipes 60 cm long, 1.9 cm in diameter;
- 2 15cm x hose clamps;
- 4 bolts with ring (0.6/6.4 cm);
- Cement;
- Floor flange 3.2 cm;
- The pipe is 61 cm long, 3.2 cm in diameter;
- 2 pipes 61 cm long, 2.5 cm in diameter;
- The pipe is 30 cm long, 2.5 cm in diameter;
- 2 grounding clamps with a diameter of 2.5 cm;
- Cable;
- Bolts are 3 cm long and 6 mm in diameter;
- Bolts are 5 cm long and 6 mm in diameter;
- Washers with a diameter of 6 mm;
- Nuts with a diameter of 6 mm;
- Grover washers with a diameter of 6 mm;
- Plastic pipe 61 cm long, 15 cm in diameter;
- 3 steel edge plates.
Step 2: Generator
The generator is the heart of the project and it is important to get a good one! Now you are looking at industrial engine with permanent magnet. It was purchased for about $65 and came with a drilled hub for attaching wind turbine blades, which saved me a lot of time that would have been spent drilling holes.  The motor is designed for 90V at 1750 rpm. Using it as a generator, the efficiency of this system will be 80%
. Therefore, when the shaft rotates at a speed of 1750 revolutions per minute, it will produce 72V of electricity. Let's face it, the shaft won't spin that fast, but a consensus can be reached. To charge 12V deep cycle battery, the generator must produce at least 12V. Let's use mathematics to calculate the required rotation speed. The shaft must rotate at least 233 rpm for charging 12V batteries.
The motor is designed for 90V at 1750 rpm. Using it as a generator, the efficiency of this system will be 80%
. Therefore, when the shaft rotates at a speed of 1750 revolutions per minute, it will produce 72V of electricity. Let's face it, the shaft won't spin that fast, but a consensus can be reached. To charge 12V deep cycle battery, the generator must produce at least 12V. Let's use mathematics to calculate the required rotation speed. The shaft must rotate at least 233 rpm for charging 12V batteries.
With plastic blades 24 km/h the wind easily rotates the shaft 233+ rpm, which will allow you to charge the batteries.
Step 3: Blades
 Instead of spending hundreds of dollars on blades For wind generator, they were made from plastic pipes that were lying around in the garage.
 Everyone says that it is better to use pipes with a diameter 20 cm for wind generator blades. Let me tell you that they really work much better than pipes. 15 cm. But since I had 15 cm pipes at my disposal, I would have to approach the issue creatively (they have less curvature than 20 cm).
 Let's start cutting PVC pipes. Let's do it rectangles sizes 14 by 61 cm. Then cut triangles out of them, where the short leg is long 3 cm.
 After that, we cut out a triangle at the end of the blade, with its help it will be attached to the generator hub.
Adviсe:
- Use a metal square to mark where you need to cut (a square will help you get straight lines).
- you can use hand saw, but I recommend taking a “reciprocating saw”.
- Use saw blades designed for steel (fine teeth).
Step 4: Blades - continued

 In order to modify the 15 cm pipe, a structure was added. The photos show it has been used steel garden edging With drilled holes to extend the length of the blades.
 Let's clamp edging in a vice in order to level the surface and drill holes so that they are in approximately the same place.
 The most important part of this all was that the inserts were angled relative to the blades at an angle of 30-45 degrees to the hub, allowing the wind to push them sideways rather than backwards, taking the stress off the tension cables and base and producing more electricity.


Step 5: Add a Weathervane
Before starting work on the production of a weather vane, I recommend paint 122 cm square pipe. In my case, it was not galvanized and therefore rusted within a few months, so I had to disassemble everything again, sand and paint.
 Mark a line below the center on 2.5 cm square pipe, make a cut from one edge with a length of 30 cm.
 Drill two holes through a pipe and a sheet of steel, twist all this together.
Step 6: Generator Installation
Firstly, install motor on top of the square pipe (the motor should be flush with the end of the pipe). Drill hole for the power cord. I recommend drilling a larger hole to make sure the metal doesn't cut into the wire. The next step is to attach a 3cm flange to the square pipe. The flange should be located behind where the motor is mounted (it should all be fairly close to each other to balance the pipe's equilibrium point). Drill two holes and screw the flange to the pipe. Drill a third hole in the center of the flange for the wire to run inside the flagpole. Thread the wire from the motor inside through both holes you drilled and attach the motor to the pipe using large clamps (make sure the clamps are tight).
 Note
: the motor that was used in the project was with plug at the end of the cord, but I had to remove it in order to thread it through the pipe.
Note
: the motor that was used in the project was with plug at the end of the cord, but I had to remove it in order to thread it through the pipe.
 After all this is done, thread a pipe with a diameter 3 cm into the flange. We use a pipe 61 cm long. It will act as the basis for the wind generator.
Step 7: Foundation
 In my personal experience a base frame simply laid on the ground is not a good support in strong winds and does not protect the wind generator from tipping over, damaging both the installation itself and the generator blades. To do this, to withstand strong winds without problems, you need dig foundation and pour in his solution in key places. Place a steel pipe at the base and dig a hole around it.
 Pour the solution around 4 vertical pipes, the remainder was distributed at our own discretion. It might be more efficient to make a foundation for the base, but that's an idea for another project.
 Once everything is in the ground, outer pipe will stick out not too far from the ground. The main turbine pipe has internal thread, so let's take a 2.5 cm tee to connect the pipes. This serves a dual purpose: as a holding element, the wire from the generator runs through it.
 Note
: The cord that was used in the project was cut off from an old extension cord.
Note
: The cord that was used in the project was cut off from an old extension cord.

Step 8: Stretches
 High-strength paracord was initially used for guylines, but it broke in strong winds, so it was decided to switch to braided rope, which came complete with durable mounting screws. By attaching them to the main pipe using two grounding clamps. The clamps are equipped with bolts, but replace these bolts with carbines, so stretch marks can be quickly removed.


Step 9: Charge the Batteries
The windmill charges two batteries that are connected in parallel. We simply connect the generator contacts to the battery terminals, while solder a diode into the power cord to ensure that the electricity is won't work from the battery to the motor, rotating it like a fan, it is also necessary to install charge controller. This is a win-win option for those who do not have the opportunity to frequently check their battery charge.
 I also recommend purchasing for installation load resistance. The controller will redirect electricity, from the generator to the resistor when the batteries are fully charged. It is necessary to ensure that the wind generator should always be under load, to prevent failure motor. In my case, the load resistor is not doing its job because my batteries are never fully charged (they are always under load).
The wiring in my project looks terrible, but don't worry, the Internet is full of charge controller wiring diagrams.
Thank you all for your attention! Don't be afraid to experiment!
The computer “system unit” gathering dust on the balcony deserves a more worthy use. For example, the capabilities of the old cooler, which recently cooled the processor, are very interesting. A little ingenuity and patience - and on its basis it is possible. Of course, it is not enough to power the entire house, but it is enough to power small appliances or devices. A normal 12km/h wind will easily cause the generator to produce about 2V for a small radio, lamp or clock mechanism.
Why is it profitable to domini wind generator from a computer cooler
The following advantages are definitely worth noting:
- the device is fully assembled, and you don’t have to fiddle with small parts;
- the cooler is adapted for rotation by default, and in its additional settings not necessary;
- you save on purchasing additional parts;
- It’s not difficult to get the old cooler out of your computer, and you can immediately start assembling the device.
List of required materials
In addition to the old cooler, comparatively large sizes, for work you will need:
- thick plastic bottle;
- wire designed to operate under low voltage;
- small wooden block 1.5 inches in diameter;
- metal tubes that fit into one another;
- epoxy and superglue;
- unnecessary CD;
- tightening clamps.
All of the above can be easily found in your home pantry or purchased at the nearest market.
To quickly produce a working device and not waste time on fixing and repairing it, build the generator assembly in the following sequence:
- A computer cooler is “tailored” to its main tasks. Therefore, for its magical transformation into a generator, unnecessary parts must be removed. Remove the rubber seal and the retaining ring hidden underneath it. This will allow you to remove the “extra” cooler blades, since they will be replaced by larger ones.
- On the copper coils of the cooler winding, find the connection points of the wires. These are connectors. One of them has two wires, the others have one each. To the latter you need to add one additional wire, carefully soldering them to the connection.
- The alternating current that will be generated in the new generator must be converted to direct current. This will require 4 diodes. They are cut in pairs to a distance of 1 cm: one pair is at the edge with black strokes, the other is on the opposite side. The long ends are bent so that the shape of the diode resembles the letter P. The cut diodes are soldered. At the same time, a wire of the required length is connected to the fan.
- Now you can test the device. To do this, you will need a household tester or LEDs. Connect them to a cooler, spin it up and see if it manages to generate electrical energy.

After electrical part completely ready, you can start building a mini wind generator:
- The basis of the design of the blades is the dense plastic of a clean water bottle, shampoo or household chemicals. After cutting the bottom and top with a lid, the resulting cylinder is cut lengthwise.
- Draw a drawing of the blade on paper. Its length depends on the length of the plastic cylinder obtained from the bottle. An angle of 120 degrees is cut at the end of the blade for subsequent convenient connection.
- When cutting out the blades, pay attention to their complete coincidence in size. Otherwise, it is necessary to align the elements so that they work in the same mode.
On next stage the blades are connected to the cooler. To his plastic side Using superglue, glue the parts one by one. The curved shape of the blades will provide excellent aerodynamics and rotation efficiency. Therefore, there is no need to align the parts. As a support finished design A wooden block will serve as the blades.

A CD should be used to make the shank. A through hole is made in the block along the diameter of the metal tube. If the hole is larger, it can be sealed with epoxy glue. Also using adhesive composition You can process the places where the wires are soldered and the connection point between the timber and the cooler. The disk shank is inserted into a small cut at the end of the block and then fixed with thin screws through the through holes at the cut site.
At the final stage of installation, a metal tube of a larger diameter is inserted into a smaller one, already connected to the generator structure. PTFE can be used as a bearing to ensure rotation of the inner tube.

To make sure that the mini wind generator you made from a motor is working properly, carry out final testing. It remains to be found appropriate place for a new device and install it.
Free electricity in mini volumes will help you quickly understand the power of free energy. You will need an old fan (aka cooler) from a computer and three neodymium magnets. This simple version of the BTG fuel-free generator is a miniature of large free electricity generators.
This is what a finished perpetual motion machine, also known as an electricity generator, looks like:
Here's what you'll need to build a perpetual generator:
- Three neodymium magnets
- Fan from the system unit
- 12 volt light bulb
- Current loop diode
As well as a wooden platform (or any one of your choice), as well as a glue gun.
1. Cooler

2. Thin neodymium magnets:

3. 12 volt light bulb (35 W)

here is the marking

4. Diode

Let's start assembly.

Apply glue to the blade and glue it.

second magnet on the opposite side

glue it the same way

You don’t need to do this! — initially there was a desire to make 4 magnets, but they were larger and heavier, so the cooler engine did not work.
here is the error

and so on in the end - until two large ones peel off.

Step No. 2 (assembling the energy generator on the plateau)

glue a cooler to it

It’s better to glue it well, otherwise there will be vibration...

glue the lamp to the cooler

here's the end result:

Step No. 3 (solder the wires and diode)

first wire through diode

the second one directly to the light bulb

Let's start testing the generator!
Pre-peel off two magnets, so it will be easier for you.. you only need to glue two

We bring the magnet
movement begins

the revs increase, the lamp burns brighter

Having found the ideal point for the placement of the magnet, glue it.
Now you can start the perpetual motion machine with a push of your finger...
Free Energy to you!
Ready to repeat this experiment?
Do you believe this is true?
Do you think there is deception here?
- write your comment on the page below:
Remember!
That you can become part of a community where there is a knowledge base in which a collection ready-made instructions on the assembly of BTG, drawings, diagrams, DISCUSSIONS, and the same enthusiasts.
In the FreeTeslaEnergy community, you can always find friends and like-minded people, fellow free energy enthusiasts.
We have put together a collection of instructions, models, and BTG drawings that you can assemble too. Join the closed community of FreeTeslaEnergy enthusiasts
Community members discuss together the models and assemblies of the authors, looking for those who can assemble a fuel-free energy generator for lighting or heating a house or apartment...
Write below on this page about your experience and what you think about it...
In contact with
If you have an old computer cooler at home, you can build an excellent wind turbine that will produce electricity. A mini wind generator is a great thing, especially for areas with frequent and strong winds. We will learn about the features and technology of its production further.
How to make a mini wind generator with your own hands
Work on a mini wind generator should begin by making drawings of the future wind turbine. In addition, you should prepare materials in the form of:
- thick plastic bottle;
- an old cooling cooler or fan, the power of the generator itself directly depends on its size and power;
- low-current wire in the amount of 5-8 meters;
- wooden beam, the cross-section and dimensions of which are determined individually;
- two steel pipes that fit into one another;
- diodes;
- epoxy-based glue and super adhesive composition;
- fastening elements in the form of tightening ties;
- old CD.

First of all, you need to start by finding a suitable cooling mechanism. We suggest using a cooler from an old computer. Initially, the cooler is disassembled; its propeller part is located on an electric motor. Most often, it is fixed on a retaining ring; it is located under a rubber seal. After removing the O-ring, remove the blades on the fan.
Next comes the process of soldering the cables that ensure operation generator set. There are two wire connections on the copper fan coils, these are the connectors on the coils. One of the sections is distinguished by the presence of a connected copper wire, and the second has two wires. Two wires are connected to the legs of one wire by soldering.
At the next stage of creating a small wind generator, a rectifier is created. The main function of this device is to convert alternating current to permanent. For these purposes, you will need four diodes; they are cut so that one pair from the black mark remains with a 10 cm segment. The long end of the diode is bent to form a U-shaped connection. All diodes are connected to each other by soldering. To test a wind generator, connect diodes to it, if the LED works, then the wind generator is functioning correctly. The outer plastic part of the cooler is removed; use a knife to smooth out any irregularities.

Next comes the manufacturing process of the wind generator blade. To make blades, use an old bottle, such as a shampoo bottle. The top and bottom parts of the bottle are cut off. The product will be cylindrical in shape; it needs to be cut lengthwise. Pre-make a drawing in the form of blades, according to it, cut out the blades for the wind generator from the bottle. Please note that the end part of the blades must be cut at an angle of one hundred and twenty degrees. Next comes the process of fixing the blades on the cooler.
At the next stage, the windmill tail is manufactured. To fix the motor, a beam made of wood is used. Its rotation is carried out using steel tubes. To make a shank, use a waste disk. The wooden block is equipped through hole, its diameter should be slightly larger diameter steel pipe. If the tube is not installed tightly, fix it with epoxy-based glue. At the end of the block, a cut is made for mounting the disk. The place where the motor is connected to the bar must also be treated with an adhesive composition. It is also recommended to cover wires and soldering with glue to prevent corrosion.
Next comes the process by which the support is made. To construct it, use two tubes. One of them is recorded on wooden block, and the second is set in relation to rotation. To connect them, you can use bearings, and to improve sliding, use fluoroplastic.

Do-it-yourself mini wind generator from a motor
We offer an option for making a wind generator from a motor from an old printer. This model It has average performance and works even in the slightest wind. The wind generator also requires a battery to operate. maximum power device is 100mA.
The main part of the windmill is a motor from a non-working inkjet printer. The printer must first be disassembled and the motor removed from it.
A transistor is used to lock the blades. It must be drilled in relation to the size of the shaft being installed. Next, all parts are fixed using an epoxy-based adhesive. In addition, this composition protects critical parts of the device from moisture and bad weather.
Using a segment plastic pipe, about 12 cm in diameter, cut out the blades for the windmill. A cutting machine is used for these purposes. The optimal width of the part is 90 mm, the holes are constructed special device, and then the shaft is installed on the generator motor using screw connections.

A pipe with a diameter of 55 mm is used as the basis for the manufacture of a windmill. To make the tail, use plywood. The motor is installed inside the pipe. Next, the rectifier is constructed. Since the motor does not reproduce a large number of electricity with little wind. Thus, it is possible to apply a doubling scheme switched on in series.
The circuit is installed in plastic bag and is installed inside the pipe along with the rectifier. Next, the motor is fixed using a wire. In addition, all holes are sealed with a silicone gun. One hole is used for water drainage, and the second for evaporation of condensate masses.
A bolt and wire are used to secure the tail of the wind generator. In this way, the installation will be securely fixed. Monitor the rigidity of the resulting joints.
In order to build a mast for installing a windmill, use beams connected to each other using self-tapping screws. Fix the windmill on the mast and install it in a previously designated place. With this installation it is possible to charge mobile phone or organize lighting.

Making a mini wind generator with your own hands
Before you start working on a wind generator, you need to decide on the number of winds in your climatic region. Gray-green - windless zones imply the use exclusively of sail-type wind generators. If necessary, provision direct current, a device in the form of a booster is added to them. This device acts as a rectifier and also stabilizes the voltage. You will also need a charger, a high-power battery, and a converter. The cost of manufacturing this installation is prohibitively high and is not always justified.
In areas with low winds, designated yellow, it is possible to manufacture a low-speed wind generator. These devices have good performance.
For windy regions, any wind turbines are suitable. Most often, vertical type devices are used - paddle boats or sailboats.

In order to perform calculations to determine the power of a wind turbine, it is necessary to take into account factors such as:
- constant wind speed in a particular region;
- air is a continuous medium, therefore the power of the wind generator depends on the quality and performance of the rotor;
- air currents have kinetic energy.

We propose to consider the features of sailing wind generators. These devices are made of wear-resistant material that perfectly withstand winds. If you decide to make such an installation yourself, then you must first of all carry out a series of calculations related to these devices.
As a material for making a wind generator, you can use various pieces of iron that are lying around your home. The most expensive element is the battery. Its power determines the size of the installation and its productivity.
It is quite easy to make a homemade axial type wind generator at home. Work should begin with the mast. For its manufacture, pipes are most often used; they must be different in diameter. Used to connect pipes to each other welding machine. The mast is installed on a concreted platform. At the same time, several meters of it are deepened into the ground to obtain a stable structure. Two magnets need to be glued onto individual parts of the installation. For stronger fixation, they are additionally filled with epoxy resin.
Next comes the process of making the mold and plywood. For these purposes, coils connected by a phase are used. The stator manufacturing process looks like this: wax paper is installed on a previously cut square of plywood. Next comes the installation of plywood, on which holes are pre-cut for mounting the stator. Next comes the process of installing the fiberglass circle and installing the coils.

After this, the finished stator is removed from the previously prepared mold. A duralumin pipe is used to make the screw. The screw is made with a diameter of one meter. To cut out the blades, use electric jigsaw. In the central part of the installation, equip a hole with which the screw will be fixed to the generator.
The wind generator has a tail element offset relative to the axis. When there are strong gusts of wind, pressure occurs on the surface of the wind generator and it moves to the side. This scheme allows you to protect the device from strong winds. This wind generator model allows you to generate sufficient quantity energy to provide street lighting at home. Making a wind generator is not difficult; the main condition for obtaining a high-quality device is to compare the strength of the wind in your region with its power.

Do-it-yourself mini wind generator manufacturing technology
Manufacturing a wind generator requires a minimum supply of tools and materials. We offer an option for constructing a mini wind generator for a summer residence. This device is capable of providing small house With minimum quantity electrical appliances - electricity.
To make such a wind generator, you will first need a disk on which magnets are mounted. Next comes the process of winding copper coils, which are filled with resin. To carry out rotation, the generator is installed on a previously provided base.
These wind generators are distinguished by good performance and high-quality work. The ratio of the magnet to the poles is two to three, if the wind generator has two phases, for a single-phase device a ratio of one to three is sufficient. All poles are related to each other depending on the coil options used.

The power of a wind generator is determined primarily by the size of the magnets used in its construction. As a mast for the generator, it is sufficient to use a steel pipe or log. It is not necessary to use new batteries; any devices of suitable power will do.
It is possible to manufacture several wind generators at once, and each of them will perform certain functions - one provides the home with light, the second is responsible for the operation of the TV, and the third is responsible for night lighting.