A summer kitchen at the dacha is a cozy place where you can eat delicious food and have a good rest. Summer kitchen “Tasty silence Do-it-yourself summer kitchens
In order for the food to be tasty, and the process of preparing it not to be tedious, you need it. If in an apartment or private house there is a specially designed room for cooking, then in a dacha, which is usually a small building, you have to resort to various tricks. You can set aside a small area in the house for the kitchen, but in the heat it’s quite uncomfortable to cook anything in a cramped room. That is why many people prefer to set up summer kitchens in their dachas, projects and photos of which we will consider in this review. We will also talk about some of the nuances self-construction, design and materials used.
Read in the article
What is a summer kitchen and its types
Summer cuisine on summer cottage- This is a free-standing or intended for cooking and relaxation. Depending on the type of construction, it can be used only during the warm period or all year round. An outdoor kitchen can be open or closed.


Outdoor summer kitchens
Open-type country kitchens, or, as they are simply called, summer kitchens, are a structure of 1-3 walls with a canopy and look very similar. This type of kitchen has its advantages:
- simplicity of design, which allows you to build it within 1-2 days;
- low cost;
- absence of stuffiness, odors and burning, typical for kitchens located in the house.
The disadvantages include:
- use only in the warm season;
- equipment and furnishings have to be removed during cold weather;
- You can’t leave food out for a long time.


Combining a summer kitchen with a veranda or terrace of the house
The simplest option at the dacha is to equip it on. It is ideal if the extension already exists, otherwise you will have to build it first and only then arrange a place for cooking, eating and relaxing. Ideally, the veranda and the main building will have a single glazed wall.


Open structure attached to a building
You can arrange a kitchen on a site adjacent to the “blank” wall of the building. To do this, you first need to level the soil, lay it and install an awning. Having prepared the place, you can place a grill or barbecue on the site.
You can protect yourself from drafts by installing removable or sliding ones, as well as using roller blinds or tarpaulins. Also, large decorative pots are often installed in the openings, which provide additional coolness on a hot day. This kitchen option is much simpler and cheaper than the others, but if the soil subsides, the kitchen may tilt.


Open kitchen-gazebo for a summer residence
A good option for an open kitchen, especially if you plan to install it, or for a pleasant pastime in a close circle of family and friends. This design is also convenient for processing the harvested crop.
Since this is a stationary structure, it will require arrangement - columnar or strip. The type of base depends on the material from which the gazebo will be constructed. The supporting structure can be made of metal profiles, stone or brick, and the roof can be made of ondulin. One wall must be closed, preferably on the side of the prevailing winds. Openings can be closed with roller blinds, curtains or lattice panels.


Closed summer kitchen in the country: projects and photos
An enclosed kitchen is a permanent structure, built separately, attached to a house or any building located on. In such a building you can cook, eat or relax with friends at any time of the year, regardless of the weather outside. Closed summer kitchens have, and. They can have regular fireplaces, barbecues or barbecues. The pavilions with kitchens are also equipped with utility rooms. In principle, this is a full-fledged house in which guests can even stay overnight.


Where to start building a kitchen in the country
Before building a summer kitchen on your site, you need to decide on a number of issues. In particular, you need to decide for yourself:
- How often will the building be used: only in summer or all year round (the type of structure depends on this).
- Dimensions. This parameter determines whether the room will be used only for cooking, family dinners, harvest processing, or for evening gatherings by a large group.
- Will it be installed, grill or barbecue?
- What kind of exterior and interior design is expected?
- Kitchen location. Will it be a free-standing structure or attached to the main building? How far will it be from communications and the roadway?
- Budget.
Choosing a kitchen design in the country: photos of projects
Basically, the design of a country kitchen is determined not by some standards, but by a personal idea of its appearance and functionality. However, few people can clearly imagine whether the chosen project will be comfortable and successful. That's why we've put together a collection of the most good options summer kitchens, photos of which are presented at the very end of our review. Like any room in the house, the summer kitchen has its own functional areas: working and dining room. In accordance with this, the design is developed.


Summer kitchen design: dining area
When arranging the dining area in the summer kitchen, you must first take into account maximum amount people that can accommodate for , and not on weekdays, but on holidays. Minimum dimensions dining area should be 3 × 3 m 2. Standard set furniture includes, benches or. For an open-type kitchen in the dining area, it is better not to use it, since dampness will quickly ruin the upholstery. Ideal option There will also be sofas.


Summer kitchen with barbecue: work area
Because the work zone designed for comfortable cooking, it must include the required elements:
- or gas stove;
- cabinet for cutting food and cooking;
- cabinets for kitchen utensils.
This set can be supplemented with either a barbecue or a fireplace in the dining area.


Do-it-yourself summer kitchen in the country: deciding on the material
Depending on the design and type of summer kitchen, the material is selected. If this is a simple open building, then you can make a frame from a metal profile and an awning. If the kitchen is located in a pavilion, you will need brick, stone or wood. For capital structures, you will need to build a foundation, which means you will have to fork out money for pouring. Let's consider several options for summer kitchens from different materials.

Brick summer kitchen
During the construction of a summer kitchen, it can be used for the construction of support pillars, a protective partition ( open type), walls, stove, fireplace, barbecue, fences, etc. (semi-closed and closed type). For the main structure, ordinary or is used, and for fireplaces - fireproof. In some cases, the material is specially coated with a transparent protective layer.


Wooden summer kitchen made of timber
Just like brick, it is used for the construction of open, semi-closed or closed type. This material is mainly used to make support posts and harness. Sometimes summer kitchens are made entirely of timber, but this option is good if other buildings in the country house are made of the same material. Such structures look massive and are not cheap.


 Kitchen attached to the bathhouse
 Nuances of using other materials for construction
For walls, in addition to brick and timber, it can be used a natural stone, polycarbonate, glass, corrugated sheets, metal-plastic panels, etc. As finishing material use or lining. When arranging the floor, paving slabs, wood or stone are used. It all depends on the interior design and budget.


 Combination of glass, metal, polycarbonate, wood and plywood
 How to build an indoor summer kitchen with your own hands: main steps
To build a kitchen without problems, you need to break the work into several stages and follow the recommendations given. First of all, a place is selected and clearing is carried out. Next you need to create . Once the base is ready, you can begin building the walls and installing the last stage - completing the interior decoration.
 Summer kitchen plan
 Choosing a site for construction
In order for the kitchen to look harmonious in the territory of the dacha, you need to choose the location wisely. The building must meet the following requirements:
- optimal distance from the main entrance to the house;
- maximum distance from the street, cesspools, places of detention, etc.;
- the distance from the kitchen to the roadway should be such that noise and exhaust gases reach it;
- accessibility for water supply, and.


A comment
Head of the repair team construction company"House Premium"
Ask a Question« When building a country kitchen, you need to take into account the proximity groundwater to the surface of the earth, the relief, the presence of trees nearby and the wind prevailing in the area.”
Site clearance and foundation installation
Once the construction site and the design of the dacha have been chosen, you can proceed to clearing the site and constructing it. It depends on the design what kind of foundation will have to be made. It is possible to build a country kitchen without a foundation, for example, if it consists of four supports with an awning installed on a concreted area. For closed type kitchens made of stone or, as a rule, a strip foundation is installed, and light or wooden structures erected on a columnar foundation. We will consider for a closed kitchen:
- First, we clear the selected area of grass and bushes, carefully removing all roots.
- We make markings according to the size of the future kitchen (drive pegs in the corners and stretch twine between them).
- Dig holes around the perimeter with dimensions of 300×300×700 mm or a trench 300 mm wide and 700 mm deep.
- Creation of sand and crushed stone 200 mm thick.
- Preparation of concrete solution and pouring of pillars and platforms (hardening of concrete can last from a week to one month). If you decide to build a strip foundation, then you need to make it from boards or OBS slabs, place it on both sides of the trench, and fill it with concrete.


For your information! When constructing a light open kitchen, it is recommended to raise the floor level above the ground to a height of at least 70 mm so that during rain there is no flooding of the room.
Walling
Regardless of whether there are walls or not, support pillars they will still have to be erected, since the roof of the summer kitchen will be installed on them. For supports, use metal profiles, bricks, stones, or rounded logs. You can build capital walls with and doorways, and it will be a full-fledged house in which you can spend time even in winter, especially if you make it. The summer kitchen also looks beautiful, in which metal-plastic frames with double-glazed windows are placed between the supports. You can make frames and sheathing from clapboard (wooden or plastic), corrugated sheets or siding.


Installation of a summer kitchen roof
The lid is a very important element of any structure, since it protects from wind and various precipitation. For a country summer kitchen, you can choose a flat or lean-to kitchen, which is an inexpensive and easy-to-install option. A gable roof is more durable and reliable. There is another option - a hip roof.


For your information! A long roof overhang will well protect the walls and base of the building from the destructive effects of precipitation.
Interior decoration and decor
After the box or frame is made and the roof is installed, you can begin to decorate the interior of the room. Wooden walls and ceilings must be impregnated with a special antiseptic and moisture-repellent composition, after which they can be coated with varnish or The comfort of staying in the room largely depends on the interior decoration Cushioned furniture comfortable, but not the best option for open summer kitchens
Don't forget about the surrounding area. Along the perimeter of the kitchen you can place tall or climbing plants, arrange paths made of sand or stone, and also install garden lanterns ( good idea – lighting on solar powered).


Construction of a very simple summer kitchen design with your own hands
Let's look at how to independently build a simple but functional closed summer kitchen at your dacha. First you need to draw up a drawing indicating all dimensions, prepare the material and the appropriate tools.
| Illustration | Description of action | |
  | First of all, we clear the area for construction, make markings using pegs and string, and determine where the foundation piles will be located. In our case, there are 12 of them. With the help of a gardener or homemade drill we make holes for the piles. | |
 | Next, we make “glasses” (galvanizing waste, old plastic buckets, etc. will do) and a reinforcing lattice or mesh. We insert them into the drilled hole and fill them with concrete. The depth of the pit for the pile is made in the range of 700-800 mm, and the diameter is 300 mm. For the base to last a long time, it must harden from a week to a month. | |
  | Lay a layer of roofing felt waterproofing on the finished pillars. Next, we make the bottom frame of timber on the piles. | |
 | Install vertical supports, we fasten them together with transverse beams and make the top trim of the pillars. Next, we install a gable roof on the finished frame. | We install door and window frames. We make the windows semi-hinged. |
 | In order for the building to last for a long time, it is necessary to treat it with antiseptic and water-repellent compounds. You can give a beautiful external and internal appearance to the structure by covering it with stain and varnish for external use. | So, our summer kitchen is ready. We install a bench nearby, lay out paths and you can decorate it with plants. |
As you can see, it is quite possible to build a kitchen in your dacha. If you have little experience in construction, then it is better to choose a pitched roof option.
The cost of a summer kitchen for a turnkey cottage
After reading this article, many people will have a question: a summer kitchen in the country is good, but what is the price of the issue? The cost of construction depends on which option you prefer - do everything yourself with your own hands or order a ready-made one collapsible design in the building company. If the choice is made in favor of the latter option, then the simplest summer kitchen made of timber and measuring 3x3 m costs at least 45,000 rubles. To determine the cost of a structure built independently, you just need to calculate the cost of the necessary materials, delivery and time costs.
A few words in conclusion
Every dacha should have a summer kitchen, because you can not only comfortably cook food in it on a hot day and dine with the whole family, but also gather in the evenings in a close company of friends. We told you what types of summer kitchens there are, what can be used for construction and how you can build them yourself. We hope our article will help you when you decide to start building a kitchen in your dacha. If you still have any questions, ask our experts and they will be happy to answer them. We invite you to look at photos of kitchens in the country, made with your own hands, perhaps you will find something interesting for yourself and want to implement it on your site.
At the dacha you just need a room where in the warm season you can cook dinner or do preserving for the winter. And even if there is a big house, every housewife simply dreams of a summer version of a closed kitchen.
But users will learn how to inexpensively make such a design with their own hands by reading this article.
Features and types of buildings
A closed summer kitchen is a full-fledged separate building with running water and electricity. An excellent place for receiving guests in the warm season, family dinners and friendly gatherings in the evenings. This is the right solution for regions with rainy summers and early frosts. However, to use such a construction in winter time It’s not worth it unless the owners have taken care of heating in advance.


Such a kitchen can be an independent structure or an extension to the main house, utility room or bathhouse. It can be equipped with a fireplace, barbecue or stove.
An interesting layout option is a kitchen-house with a terrace or veranda. All the necessary kitchen appliances and equipment are compactly placed inside, and a dining area is formed under the canopy.


In villages, preference is given to a type of structure with a cellar and barbecue. But you need to take into account the fact that the walls basement will become the top part of the kitchen foundation, so they should be made of the most durable material possible.


It is important to note that if it is not possible to conduct electricity on the site, then the right decision would be the purchase of a generator running on diesel fuel, which will provide light for both the building and kitchen electrical appliances.
The construction of a closed structure is a labor-intensive process that requires accurate calculations and drawings of every detail of the building. Developing a project with correct dimensions will speed up construction and help avoid mistakes.
Site selection and structure design
The initial stage of constructing a summer kitchen at a summer cottage is choosing a location, and then designing all its components. And so that the result of the work does not disappoint, you need to remember several features.


The best options for building materials
The choice of building materials directly depends not only on the service life, preferences of the owners, but also on financial capabilities. But today there are many practical examples of successful combinations of cheap materials with more expensive ones.
During construction summer building The most in demand are:
- brick;
- concrete;
- polycarbonate;
- natural stone;
- corrugated sheeting;
- tree;
- lining;
- aluminum.
We must not forget that the summer cottage should emphasize the beauty of the future structure, so it would be appropriate to lay out gravel or tile paths, plant flowers and perennial shrubs. And if you have the financial means, build an artificial pond.


If the area is surrounded by a brick fence, it is good to make the kitchen from the same material or using natural stone. Such a structure is not afraid of influence external environment and will last for more than a decade.
It is much easier to make a prefabricated indoor version of the kitchen from timber. Such a project will be less expensive, but every detail of the building will require constant care and treatment. In addition, wood wears out much faster than brick or stone.

To cover the floor use:
- laminate;
- parquet;
- linoleum;
- decorative tiles.
The roof can be covered with:
- corrugated sheets;
- soft roof;
- metal tiles.
Exterior decoration of the building with siding elements will give the kitchen a modern look.
Laying the foundation
Having decided on the location and formed the design of the structure, it is necessary to begin constructing the foundation of the building.
When planning an open version of a summer kitchen, you could simply make a small depression in the ground over the entire area of the future structure and fill it with sand. Allow time to stand a little, and lay out a layer of bricks or boards. But the basis of a closed kitchen should be a durable and solid foundation, requiring step-by-step installation.

If flooring will be made of decorative tiles, the working surface must first be sanded or smooth screed from cement.

Photo: monolithic foundation ready for construction
Construction of walls
If the owners of a summer kitchen plan to use it in late autumn during the first frosts, you need to take care of strong walls so that the room inside does not freeze under the influence of low temperatures. Therefore, in such cases, it is better to build masonry half or a whole brick thick.

Photo: process brickwork using laces
Lovers of wooden house structures will assemble the walls much faster. Their basis will be a frame made of timber. And for fastening elements it is better to use metal corners and self-tapping screws. The outer part of the walls can be sheathed thin layer boards
Interior decoration performed using plasterboard, plastic, lining or plastering.
Roofing installation
The roof of an enclosed kitchen should be durable and practical. Therefore, when purchasing materials for its installation, you can choose.
Until recently, a summer kitchen was an integral attribute of every yard. Over time, the relevance of this structure was lost, but modern summer residents are increasingly returning to the traditions of past times. Modern materials and construction technologies make it possible to build summer kitchens of a wide variety of designs. In this article we will talk about such a concept as a summer kitchen in the country: projects, photos will be presented here.
Where to place the summer kitchen?
When setting the goal of building a summer kitchen, you should understand its purpose. In the warm season, such a structure is indispensable for zealous owners. Here food is prepared and winter supplies are packed. All these activities are associated with a large amount of fumes and elevated temperatures, which does not add comfort on hot days. Its area accommodates the necessary furniture and a hob. In the summer kitchen it is doubly pleasant to eat or simply spend free time.
Such a structure is not necessary on a dacha plot, but its presence makes the dacha cozy and comfortable.
A summer kitchen adds coziness to the cottage
Types of kitchens
For its construction you can use:
- wood. The material can be laminated veneer lumber, rounded logs and similar materials;
- metal. The structures are usually simple and easy to install. In addition, if necessary, it can be moved;
- brick. Capital buildings, the material of which is a combination of various materials;
- improvised materials.
 Kitchen made of wood
 Summer kitchen: projects and choice of location
Depending on how open the kitchen space is, it can be open or closed.
Open
This structure is structurally closer to a gazebo or veranda. An integral element of it is the presence of a canopy or roof. Of course, the main attributes of a kitchen are cooking equipment, as well as the availability cutting table, sink, dining set.
 Open summer kitchen in the country
 As a rule, such kitchens are made of wood, and the foundation is built of brick or stone. If it is made in the form of an extension to the house, then, subject to a certain style and appropriate decoration, you can create an architectural ensemble with a unique style.
A separate kitchen building next to a swimming pool or among trees can be stylized in the most unusual way. At the same time, it is possible to expand the space due to the absence of walls and get closer to nature.
Closed
Constructed separately from the main buildings, the summer kitchen building, suitably equipped, acts as a full-fledged house. It is not uncommon for such kitchens to be used as a guest house. The difference from a full-fledged house is its limited use during the cold season.
 Closed summer kitchen in the country
 To build such a kitchen, lightweight materials are most often used. However, more durable and solid structures are created with brick, stone or using foam blocks.
Where to place the summer kitchen?
 Summer kitchen in the country
 When choosing a site for this structure, it is necessary to understand that for the organization full place For cooking, a supply of water supply and sewerage communications, as well as electricity, is required. By reducing the distance between the kitchen and the house, this task becomes much easier. In addition, the configuration of the structure determines the need for free space for the building.
We also must not forget about precautions, since a wooden structure is not allowed to be placed near other flammable objects. When determining a place for a kitchen, the degree of heating is essential. You can choose a place shaded by trees or an open area. To prevent diseases, it is necessary to take into account the presence of drafts.
Terrain features also significantly influence the choice of construction site. It is important to find out the depth of groundwater, soil characteristics, and pay attention to the surrounding landscape.
Do-it-yourself outdoor summer kitchen in the country: the main stages of construction
Site structure
An important preparatory stage is the correct organization of the earthen site. The main criterion for this event is the creation of a flat surface with a slight slope to organize the flow of atmospheric moisture. In the case where it is planned to supply communications, this work must be carried out at this stage of construction.
If you plan to build an open kitchen, then the foundation is not a mandatory element of the structure. It is believed that it is enough to plan the site. For this purpose, a pit is dug to a depth of 100-150 mm. A sand cushion is built at its bottom, on top of which a base-floor is built.
When constructing a foundation, the requirements for it are reduced. The most suitable foundation in this case is the use of a monolithic or columnar foundation.
 Columnar base
 Metal and flagstone can be used as roof supports. These materials are affordable and do not require special skills when working with them.
Using a profile pipe is in some respects preferable to using a round one. It is more aesthetically pleasing and can be left without cladding. Installation of racks can be carried out during the organization of the foundation or using anchor fastening. In the latter case, a heel with drilled holes for anchors is welded into the end of the pipe.
 Summer kitchen: work stage
 After this, the supports are covered with flagstone to form columns. It is advisable to combine this process with the organization of the work surface to achieve stylistic unity.
Working surface
Most often, the work surface is made using flagstone. In this case, the required number of columnar supports are constructed, which are covered with a pier. This creates niches for kitchen utensils. Then the countertop is installed, the material for which is selected in accordance with taste preferences and budget.
 The work surface should be comfortable
 Roof
In this case, the roof is a simple flat roof laid on straight beams and then carefully fastened to them.
Depending on the type of roofing material, its material can be laid directly on the frame, or hemmed with OSB boards. Corrugated sheeting or metal tiles do not need this, and when used soft tiles it's necessary.
Floor
The construction of the floor of an open summer kitchen should include the use of materials that can work in difficult conditions. The most suitable material in this case is the use of porcelain tiles. If initial stages The construction of the kitchen foundation is carried out correctly, and the floor has a horizontal surface, then even a non-specialist will be able to lay the tiles.
A closed summer kitchen in the country is convenient
Foundation construction
The design of the foundation is selected in accordance with the load it must withstand. This is influenced by the materials used, the dimensions of the building and design features. As a rule, when constructing a summer kitchen, a strip or column foundation is used.
 Strip foundation
 If the structure is built of wood, then the columnar supports will be able to support it. For a heavier structure made of brick or artificial stone, a more durable one should be organized belt type foundation.
When installing the kitchen base, in some cases, the subfloor is poured. To do this, a 150 mm layer of sand is poured onto the prepared site, a layer of crushed stone is poured on top of it, and then the cement solution is poured.
At this stage of construction it is necessary to provide for obtaining high-quality surface screeds. In the case of floor covering with ceramic tiles, this nuance is of great importance.
Walls
Regardless of the chosen wall material, it is necessary to install supports in the form of pillars that will hold the roof.
If the structure is made of wood, all parts are connected using screws or metal corners. Wall cladding on the outside can be done with boards or siding; on the inside, using plasterboard, lining or tongue and groove boards.
The specific purpose of the building does not require a powerful wall structure, so in the case of brickwork, its width should be a brick. If the premises are intended to be used in winter period, then you should insulate it from the inside.
Roof
 The roof must have slopes
 The construction of a flat pitched roof is the best option, combining simplicity of design and affordable cost. The option of having two slopes cannot be ruled out.
When operating a structure all year round, it is necessary to provide thermal insulation. To do this, basalt fiber, glass wool or foam plastic is laid between the roof joists. In order to prevent damage to the walls by atmospheric moisture, it is necessary to provide for the organization of a canopy of the appropriate length.
Kitchen interior decoration
Good for flooring ceramic tile or decking board. The latter must be painted or varnished.
 Kitchen interior decoration
 Protection of walls and ceilings from external factors can be realized by covering the wood with drying oil.
By decorating the interior with various accessories using a combination of various materials, we achieve original look premises.
Summer kitchen with terrace: simplicity and comfort
Of all possible options designs for a summer kitchen with a terrace, construction of an extension to country house, is the most popular. This is due to the simplicity of the design and low construction costs.
 Summer kitchen with terrace: convenient
 To implement the plan, you need to build a canopy over the wall of the house and create a fencing for this space. In this case, it is necessary to zoning the extension, where one part will be used for cooking, and the other for its consumption and relaxation.
To organize such a kitchen, you do not need to supply communications separately; this can be done directly from home. The need for materials in this case is minimal, and Appliances can be moved temporarily from the kitchen in the house.
Another, more expensive option is the construction of a separate building. The distance from home and proximity to nature is an undoubted advantage of this type of kitchen placement. It can be done in a closed or open design, and a cellar can also be provided under the building.
Summer kitchen with barbecue, grill, cauldron: for a delicious lunch
A summer kitchen equipped with a barbecue will look original. The option is quite simple, but at the same time not without some sophistication.
The construction project involves the creation of a stone structure, which consists of three walls. To give a certain style to a room, the inside is lined with stone of natural or artificial origin. Crowns such a kitchen gable roof with wooden ceilings. A barbecue, grill or cauldron is placed near one of the walls. And at some distance inside the kitchen there is a table and chairs.
 Summer kitchen - a place for a delicious lunch
 Summer cuisine. Photos of original projects
The photos of summer kitchens presented below will help you get inspired to create your own masterpiece and create your own comfortable and original summer kitchen on your site.
 Lighting in the evening will make the kitchen more romantic
  for a summer kitchen you can use any architectural style
 Open summer kitchen with seating area
 Closed kitchen at the dacha (photo)
Also, if it is not entirely clear how to build a summer kitchen with your own hands, the video offered on this page can be used as step-by-step instructions.
The construction of a summer kitchen of any type is carried out in accordance with a certain technology. Any construction with your own hands is painstaking work that requires both time and effort. This is especially true for capital buildings with a complex foundation, walls, roof, installation brick oven and chimney. But if you follow all the technical requirements and follow the sequence of work, even a novice master can easily cope with this work. It’s better to start from the very beginning simple option summer kitchen, such as an island or frame kitchen, especially if you have to work alone.
Before building a summer kitchen in the country, you need to choose a development option and assemble necessary materials. Sample modern device kitchens in the country, radically different from traditional houses, located apart from other buildings in the country. For such a kitchen you only need a ready-made platform on which you can place a kitchen “island”.
Arranging this corner of nature will take a maximum of a week, so this option is especially popular with young people.
In addition, such a kitchen can be conveniently located next to a swimming pool, an outdoor home theater or a terrace with comfortable chairs or a swing.
As an example, we will consider the most common version of a waterproof kitchen “island” on a wooden frame, which successfully combines relative simplicity work, low financial costs and at the same time ensuring the durability of the structure.
For construction you will need the following materials:
- wooden beam 2x4 cm;
- 3/4 inch plywood sheet;
- construction felt (for insulating a wooden frame);
- plaster mesh;
- plaster mortar for exterior work;
- sealant for external use;
- metal legs;
- artificial decorative rock from lightweight concrete for finishing work.
The construction of an island summer kitchen includes several stages.
It is first necessary to draw a plan for the frame and the entire structure, based on the diagram. The plan must indicate all dimensions and parameters of the structural parts. Then, in accordance with the intended plan, you need to cut the timber and assemble the frame, connecting the beams together with 2.5-inch long screws. At the joints of the beams, cutouts should be made 1.5 inches high and deep. It will be more convenient to build the frame if each module of the kitchen “island” is assembled separately, and then sequentially fastened together using the same screws. For greater structural strength, it is recommended to attach an additional beam to the bottom of the middle part of the frame. Then you can screw the metal legs to the frame.
The next stage is covering the frame with plywood. Sheets of plywood need to be cut, apply sealant to both the timber and the plywood at the joints, place the sheets of plywood on the frame and secure with 2-inch screws.
At the same stage it is necessary to cut and fit internal shelves and doors. After this, all removable parts need to be removed and the base needs to be finished.
When constructing the frame structure, a lower position of the grill should be provided - its grate should be at the level of the main tabletop made of concrete slab.
Construction felt sheathing and overlay plaster mesh– this is the next stage.
At the beginning wooden frame it is necessary to paste over it with construction felt, while at the joints the sheets of material should overlap by about 5 cm. This is necessary in order to prevent water leaks to wooden base. Next, using roofing nails, you should secure the plaster mesh shingles under the plaster, making sure that the direction of the pattern matches. At the joints, the pieces of mesh should also overlap each other by about 5 cm. The parts of the mesh protruding beyond the frame must be cut off. It is important that the shingles do not sag anywhere, and if necessary, the mesh will need to be additionally secured with nails.
At this stage, the kitchen “island” can be installed directly on the selected location or nearby. Otherwise, due to the fact that the cladding will increase the weight of the structure, it will be quite difficult to move it over a long distance. Plastering should be done in two steps. For outdoor work it’s easier not to do it plaster mixture yourself, but buy ready-made. It must be diluted with water strictly according to the instructions, and then applied to the mesh, carefully ensuring that the plaster fills all the cells of the base.
The layer of plaster should not be too thick - it is advisable that the shingle pattern be visible through the first layer. After about an hour, when this applied layer has set, a second layer of plaster can be applied for subsequent stone cladding. The plaster should be applied with a special trowel with 0.5-inch notches. They need to work slowly, smoothly moving it horizontally and holding it at an angle of 45°.
The strips should be parallel, then it will be easier to lay the stone. A corrugated surface is required to ensure better adhesion of the facing stone to the base. The second layer of plaster should be thicker than the first and will take about a day to set. After this, you can begin cladding.
A photo of how to build a summer kitchen with your own hands will help you understand all the stages of construction technology.
Look at how to build a summer kitchen in the photo, and let's start learning this process:
 STEP #1
  STEP #2
 STEP #3
  STEP #4
 STEP #5
  STEP #6
 STEP #7
  STEP #8
 STEP #9
  STEP #10
 STEP #11
  STEP #12
 STEP #13
  STEP #14
 STEP #15
  STEP #16
 STEP #17
  STEP #18
 STEP #19
  STEP #20
 STEP #21
  STEP #22
 STEP #23
  STEP #24
 STEP #25
  STEP #26
 STEP #27
  STEP #28
 STEP #29
  STEP #30
 STEP #31
  STEP #32
 STEP #33
  STEP #34
How to make a summer kitchen at the dacha with your own hands (with photo)
Even before making a summer kitchen, you should decide what equipment will be used - grill, hob, sink, cabinets with shelves for dishes and storing kitchen utensils, a compact refrigerator, an oven or oven for baking, a gas or bio-fireplace, a bar counter, etc. It is also necessary to connect all the necessary communications to the kitchen island - electricity, water supply and drainage - and think about lighting the site. When using bottled gas you need to provide a place for the cylinder in advance. Only after thinking through all the details can you correctly determine the size of the summer kitchen and the design of the kitchen island. And to acquire everything necessary equipment, materials and tools, careful calculations must be made.
Before you make a summer kitchen with your own hands, you need to think about the internal and exterior finishing. Such cladding is required for finishing with stone and tiles. If you plan to paint the surfaces of the kitchen island in the future, the second layer of plaster should be leveled and grouted for subsequent puttying and painting. But in general it is recommended to do the finishing in accordance with the finishing country house, i.e. use the same cladding or decorative plaster, as for the main building. For example, if the house is brick, and in the construction of the kitchen you can use brick, if it is stone - stone, if it is wooden - cover the frame of the kitchen-island with wood, etc. Cladding the frame can be combined with tiles of the kitchen terrace or other elements of country decor - a fence, a wall , stone pond, etc.
Before making a summer kitchen in the country, after the corrugated plaster layer has dried, you can hang the internal shelves and attach them to the door body, and then mark the boundaries beyond which the stone cladding should not go. When finishing a kitchen “island” it is better to use artificial concrete stone, much lighter than natural, but at the same time perfectly imitating natural samples. In addition, with artificial stone and work easier.
When laying stone, it is necessary to ensure that the vertical seams of adjacent rows overlap and select stone fragments in accordance with the shade, creating a single harmonious picture. You should start facing from the corner elements and from the bottom row, laying out the rows in a circle.
The mortar is applied to reverse side stone in a layer of about 2.5 cm and small indentations are made on it using the handle of a trowel. Then the stone must be carefully applied to the prepared surface and pressed tightly, remove excess mortar protruding from the sides, and tap the stone to make sure that air gap underneath it is missing. If you don't do this, masonry may not last long. If you hear a characteristic sound when tapping, indicating the presence of voids, it is better to play it safe - remove the stone, apply the solution again and press firmly to the intended location.


Based on the considered basic version You can make an island kitchen something unique by adding new elements to it or using other materials for construction and maximally adapting the summer kitchen to your own needs.
Any stones that are too long or wide must be processed using a diamond tool, remembering to follow safety precautions - use safety glasses while working and be careful not to injure your hands.
It takes at least a day for the mortar under the stone to completely set, after which you can hang the doors, install the countertop, grill and sink.
For example, you can choose a different material for the countertop - the main thing is that its surface is moisture resistant and resistant to low temperatures. winter temperatures. Natural stone, wood-look porcelain stoneware (if the house next to it is wooden), ceramic tiles for outdoor use or mosaics can be used as building materials. composite material, lining. You can build an island kitchen entirely out of brick, and then line it with siding - faux brick - or not line it at all. You can limit yourself to simply plastering and painting, postponing the more expensive cladding for the future, or use a metal frame instead of a wooden beam. The kitchen “island” and countertop can generally be made from of stainless steel, i.e. completely without cladding. There are many options, and in this case your own preferences also prevail.
As for the structure of the structure itself, it can also be supplemented with any elements - for example, combining a kitchen “island” with a bar counter, creating U-shaped and L-shaped structures, or making the structure closed or semicircular, etc.
Well, where else can you gain so much strength and improve your health so well, if not on your own, albeit sometimes modest, but undoubtedly beloved suburban area? A special source of pride for summer residents is the summer kitchen, designs and photos of which can be found on various websites on this topic.
What could be better than organizing a barbecue or barbecue in the fresh air filled with the smell of herbs. Only a country house or dacha provides the opportunity to enjoy eating in nature. If you approach this task on a large scale, then a nice country kitchen will probably grow on the site. In this case, preparing country delicacies will become a real pleasure.
Purpose and benefits
A summer kitchen at the dacha is an area for cooking in the heat, when you don’t want to be in the house, and even fill it with the aromas of boiled or fried food. The summer kitchen in the photo is a kind of platform where there is space for preparing and eating food. Plate, dinner table, chairs, benches, cabinets, shelving and everything that is on ordinary kitchen. If at your dacha you want to achieve maximum comfort and fully enjoy a family vacation, it makes sense to think through a kitchen facility on a summer cottage well and comprehensively and then begin construction. 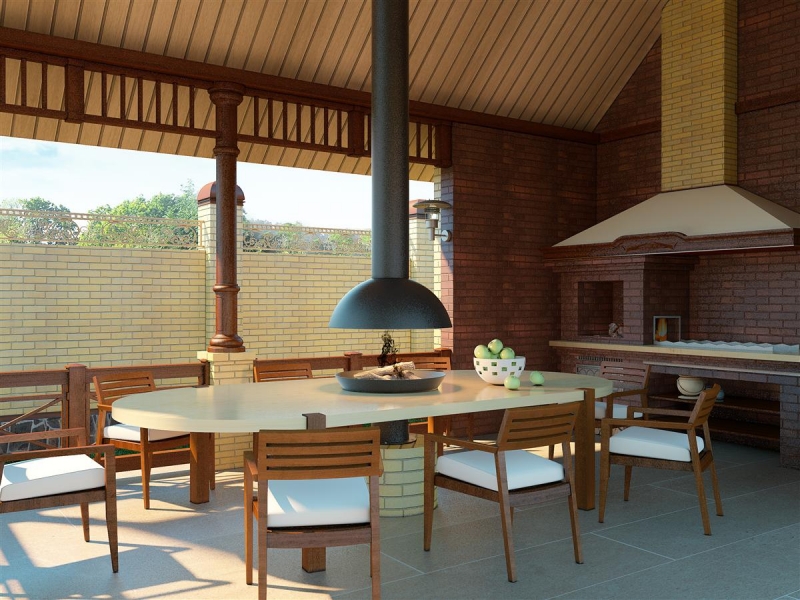
Varieties
Summer kitchens can be open or closed.
Open
A lightweight canopy or durable roof will protect you even from heavy rain, and replaceable bulkheads will save you from the wind, roller blinds or sliding wall structures. If you are building a summer kitchen with your own hands, then the easiest way is to cover pitched roof. When the owner of a dacha entrusts this work to professionals, then there is no limit to imagination. 
To build a summer kitchen in the country with your own hands, you will need a stone for the foundation and wood for cladding the walls. For the construction of the roof use:
- metal tiles;
- slate;
- corrugated sheeting;
- polycarbonate;
- bitumen shingles.
Advantages:
- Low construction costs.
- A simple construction method and the least number of calculations.
- Cooking dinner in the fresh air is a pleasure.
- The act of eating in nature can be a very enjoyable experience.
- Open kitchen at the dacha in the photo below is quite suitable for receiving guests.
- In the gazebo there is no fear of crumbs falling on the floor or spilled soup.
Flaws:
- It is impossible to use the premises in winter.
- There is no protection from winds and insects.
- Moisture gets in from outside.
Closed
Those whose summer season is not limited to the warm season need to take care of a more solid structure that will be comfortable in all weather conditions. Summer kitchens in a closed country house, photos of which you will see below, can become a multifunctional object. Sometimes it’s not a sin to place guests in them for the night, if necessary. Concerning building materials, then everything here depends on the owners’ budget and the service life of the kitchen house. The materials that may be useful are plasterboard, lining or plywood, and if the construction is planned for many years, then it is better to use foam blocks, brick or stone. 
Advantages:
- Reliable shelter from rain and wind.
- Temporary shelter for guests.
- Absolute safety of things and products.
Flaws:
- An enclosed outdoor kitchen in a country house will cost more, since more material will be needed for construction.
- A summer kitchen project of this type will require additional calculations.
Choice places
An outdoor kitchen can take up both large and small space on a site. Therefore, a place for it must be selected immediately along with drawing up a construction plan. 
If you are thinking about how to make a summer kitchen, here is what you should focus on when designing:
- Consider the remoteness of the object relative to the house, garden, or farm yard.
- It is allowed to build a kitchen in the shade of trees, but so that at least a few hours garden kitchen warmed by the sun.
- You need to examine the topography of the area where you intend to build, the groundwater level at your dacha, vegetation, distance from neighbors, and others. landscape features.
- The proximity of communications should be taken into account, because water and lighting will need to be installed. Therefore, it is best if the summer kitchen at the dacha is not far from the house.
- You cannot choose a place for a veranda in a low area - the floors here will become saturated with moisture.
Material selection
Natural materials - stone, wood - will organically fit into the design of a kitchen in the country. Light and durable materials are also supplied to the markets, which have won the approval of consumers for their durability and practicality - PVC, aluminum, polycarbonate, polystyrene foam, etc. 
Stone
The floor and walls can be faced with stone - marble, slate, granite, limestone. A genuine stone-covered (or stone-stylized) authentic or decorative fireplace. Fine tiles will do, which will perfectly withstand not only bad weather, but also the usual pollution and litter for a given room. We invite you to see what a brick summer kitchen looks like, the photo of which is below. 
Tree
Wood is much more economical than stone. It is easier to process wood, and buildings made from it look lightweight, beautiful, and have a pleasant smell. However, without specific treatment it is subject to decay, deterioration, and fungal infection. 
Other materials
This can be lining, plywood, drywall. Parquet, laminate, and linoleum are used for flooring. The interior decoration of the summer kitchen is tiles, wallpaper different types. Siding can be used for exterior finishing; corrugated sheeting and metal tiles for roofing. 
Design selection
The basic rule is that the design of a summer kitchen must fit harmoniously into the concept of the entire site. When designing a veranda made of stone, details made of wood or compositions with other natural materials are applicable and even necessary. 
Often, verandas at the dacha look like fairy-tale towers or gazebos. This design of a summer kitchen is very easy to organize: you just need to hang lanterns, decorate it with carvings and decorate it with climbing plants.
Filling and furniture
Country furniture Now it’s easy to buy in every furniture store. It is possible to purchase ready-made sets or order the kitchen interior from a professional designer. The furniture and the entire design of a summer kitchen in the country, photos of which can be seen in the article, look extremely beautiful, your eyes run wild with ideas and projects, but you need to equip your own kitchen. 
When thinking about furniture, it’s a good idea to come up with an image of your particular kitchen: a major one or a simple portable one. In the first case, all furniture objects are fixed at the required points and cannot be moved around the perimeter. This version may be relevant for a completely open plan. 
The countertop should have such dimensions that it can comfortably accommodate the utensils and food products necessary during food preparation - this is at least 90x60 cm. A cabinet under the countertop will also add ergonomics. It is good to arrange pots, plates, pans and necessary cutlery.
Decor
Wooden decor looks great on the veranda, but it must be treated with high-quality varnish that can protect the wood from rain and sun if the room is open. Summer kitchen in the country - projects, photos of which can be found in abundance on the Internet, will surprise you with the variety of decor and filling. 
Don’t forget about accessories in the interior. On hanging shelves You can beautifully arrange decorative dishes, vases with bouquets of summer flowers, and various containers with the necessary spices.
Popular ideas
Let's move on to the main thing - a kitchen in the country: ideas and tips for their implementation.
Alcove
Gazebos are convenient for setting up a grill, barbecue or oven. 
Frame racks made of timber, brick, stone are placed in the corners, and the entire structure is secured with a roof made of simple roofing material(ondulin, bitumen sheets).
Gaps between the counters are left or sheathed on one of the walls in order to hang shelves or kitchen cabinets. 
Openings can be decorated with curtains, openwork wood panels, which can subsequently entwine weaving plants. To make the room comfortable in any weather, you need to install retractable, replaceable fences or roller blinds.
House
Country kitchen in the form of a house it looks like a real home. But building it will require much more work, be it laying a base (preferably monolithic) or installing windows and doors. 
The gable roof is most functional. Heavy downpours and snow caps will not be a problem with such a roof. It won't hurt at all good cellar, in this case, construction must begin with digging a pit. It is in the house that a summer kitchen with a veranda as a dining area will look beautiful.
Veranda
If you decide to equip a summer kitchen on the veranda, then remember, it should be in good harmony with the whole house. Construction begins with a foundation, the depth of which should be commensurate with the depth of the foundation of the house. 
It's better if country house and the veranda have one thing in common roof covering. To make the room bright, install large casement windows or glaze the entire wall.
Extension
The project of a summer kitchen with a terrace is shown in our article. Support beams are placed along the walls of the house, covered with a tilted roof. On a well-leveled area where water does not accumulate, the floor can be simply laid on the ground. It would be an excellent material for it. paving slabs.
Summer kitchen in the country - projects, photos of which are also presented in the article, will help you decide on the final look of the future building. When developing a construction plan, you need to take care of the paths that will connect it to the main house. Sandstone, pebbles, decorative tiles or stone. As a rule, the paths are made the same as the flooring of the gazebo.
Photo gallery
We invite you to look at 29 more photos of ways to decorate a summer kitchen.


