Solid wood furniture drawings. Technology for creating antique furniture with your own hands, as well as diagrams and drawings
Due to its unique appearance, exclusive design and high environmental friendliness, wooden furniture has always been particularly popular among the population.
Furniture made by yourself will cost much less than the store-bought version.
Of course, wooden items purchased in a store cost an order of magnitude higher than furniture made from MDF and chipboard. And often they do not have that very individual note that each of us wants to see in our interior. Do-it-yourself wooden furniture is a topic that interests many. Making it can become an interesting creative hobby, and the resulting masterpieces will take their rightful place in the apartment, at the dacha, and will become an interesting and memorable gift. Handmade production such furniture is more of a creative ceremony than a technological operation. Wood loves careful processing and requires a lot of time and attention. But the result is worth it. A piece of furniture made by yourself will delight you for many years and will become an interesting and functional highlight.
Material selection

Requires knowledge of some nuances. In particular, many are concerned about the question of what wood should be used when making furniture with their own hands. The choice of wood depends on what you are going to do, what purpose this item will have, and in what conditions it will be used.
Garden and home wooden furniture is made from different breeds, or their processing occurs completely various technologies. Each wood species has its own specific properties, some of which are completely unsuitable for making furniture. It is necessary to select wood taking into account such qualities as strength, wear resistance, and resistance to deformation processes. The color of the rock has some significance, but is not the main factor, since the finished product can be painted. For many years, the most valuable types of wood have been considered mahogany, acacia, and rosewood. Cherry, birch, and oak are often used. Furniture made of cherry, pear, maple, pine, and walnut is often found.
The entire work process depends on the initially selected material. Each tree species is different in its structure, textures and physical qualities. Listed below practical advice on choosing the optimal type of wood will undoubtedly be useful for novice joiners and carpenters:
Return to contents
Color
Wood is famous for its naturalness and environmental friendliness, therefore most of people prefer to leave wooden furniture in its original form, without painting it, but only emphasizing its natural beauty.
In order not to expose the wooden product to painting, it is worth choosing from the very beginning desired shade wood.
Forest tree species differ mainly light colors. Lilac has an interesting purple hue. Furniture made of cedar, poplar and pear will be brown in color. Yew and mahogany are characterized by a refined pink hue.
Return to contents
Popular varieties

Beech and oak wood are in great demand in carpentry. They are rot-resistant, durable and quite easy to process. Beech and oak products will last a very long time, without losing their beauty and strength. Transparent varnish coating will only add external aesthetics and increase the lifespan beneficial use these products.
In production wooden furniture Other wood species are also used. Each of them requires an individual approach and has its own processing characteristics. For example, before starting to work with larch, it must first be deresined. But maple requires tenderness and accuracy, as this is a soft and pliable species.
Return to contents
At the preparatory stage of work, the wood should be carefully examined for substandard conditions. Knots, fungus, and cracks will not make it possible to create furniture of decent quality. Defective wood cannot be used in the manufacture of massive and load-bearing structures, facades.
Return to contents
DIY wooden furniture: preparing tools

If you decide to make wooden furniture with your own hands, you need to take care of the set in advance necessary tools. One hammer and chisel will clearly not be enough. You will need a milling cutter, a jigsaw, a plane, a drill, and a screwdriver. A good and high-quality tool is necessary not only when preparing parts, but also for decorative finishing of front parts, legs, and drilling for fittings.
The final appearance of wooden furniture depends on the quality of the tool. All devices can be divided into electric and manual.
Return to contents
Electrical range

When making wooden furniture with your own hands, you will need:
- Circular Saw. With its help it is easy to make transverse and clean cuts and cut rock. It is also suitable for pre-processing and manufacturing of various parts and shaped blanks.
- Plane. Used to treat the surface of a part.
- Electric hacksaw. Cuts large and thick beams and metal profiles, suitable for rough processing.
Return to contents
Hand tool

Any carpenter understands that the production of wooden furniture is a process comparable to the art of jewelry, and without good hand tools it is not possible to achieve a high-quality result. Hand tool helps not only in the production of rough and massive parts. It is also used to decorate pieces of furniture.
- Axe. With its help, wood is split, chopped and trimmed. Required condition is to use a properly sharpened carpenter's axe. If the tool's bevel is concave, the ax will bounce off the rock and reduce the quality of the work.
- End plane. Used for processing end parts.
- Gorbach. Type of planer. Helps in processing shaped (concave and convex, cylindrical, oval, etc.) surfaces.
- Tongue and pile pile. Used for making grooves on the edges of parts.
- Shtap. Helps produce gutters of various sizes and radii.
- Jointer. Designed for planing and leveling large surfaces of wood, as well as for jointing the edges of long parts.
- Various chisels. Used for artistic carving. A straight chisel cleans the background, a chisel-jamb is suitable for geometric carvings, a cranberry creates the desired relief, and jamb knives help to cut out contours and three-dimensional elements.
If you are tired of standard and tasteless furniture, which stores and various factories offer in a huge assortment, try making original solutions for your home with your own hands. Knowing all the intricacies of this matter and competently approaching the creation of a table or cabinet yourself, you can get a great result. He will become original decoration any room, will give the interior individuality and uniqueness. In addition, by creating such exclusives with your own hands, you can save money. family budget. From this review you will learn how to create furniture with your own hands - drawings and diagrams will help you quickly understand the assembly of specific items.
Advantages and nuances
Making your own furniture yourself, if we are not talking about a simple stool from the school curriculum, is a complex and time-consuming process. At least minimal skills, and not just desire, will come in handy. It is worth knowing in advance about the pitfalls that can await a craftsman who has taken up making furniture with his own hands for the first time:
- We recommend purchasing cheap materials and accessories only if you decide to practice making furniture for your dacha yourself. If you plan to install a cabinet or table in an apartment, then choose high-quality raw materials.
- Get ready for physically hard work, especially if you work with natural wood. Pine doors or even a countertop will be far from lightweight.
- For professional furniture makers, making furniture with your own hands takes little time. A novice amateur may need more than one day, or even more than one week, to complete the work. Here everything will depend on the complexity of your idea.
Important! Making furniture with your own hands and working with various instruments, especially with industrial machines, and they may be needed for processing wood, be extremely careful and follow basic safety rules. Otherwise, injuries cannot be avoided.

After reading this, don’t be afraid and put off your DIY furniture projects. This process also has advantages:
- The most important thing is that you have the opportunity to make your wildest dreams and ideas come true. Everything is in the hands of the designer, that is, you. Nothing and no one limits your flight of fancy.
- You control the creation of wooden furniture with your own hands at every stage. You know how well the doors are screwed on, how strong the cabinet box is. Producer and consumer rolled into one - great combination for perfect results.
- You buy the materials and accessories for making furniture yourself. As we already said, this is not worth saving on. And this is also the advantage of the process. It's no secret that factory-made furniture, especially standard designs, is made using cheap fittings to reduce costs. Therefore, sometimes kitchen doors begin to fall off their hinges after just six months of use.
- Even at the design stage, you will be able to create not just one piece of furniture, but the complete furnishings of your apartment or house in the same style.
- An incomparable pleasure. When the process of transforming sheets of particle board into a specific piece of furniture is a very exciting one, a person gets a lot of positive emotions. It's great when something useful brings you joy.
- Whatever one may say, you save your family budget - not on materials or hinges, but on work. In addition, having mastered all the nuances of wood processing various projects DIY furniture, you can make your hobby your main job and a source of good income.
Creating Drawings
When creating wooden furniture with your own hands, drawings and assembly diagrams will be required. There is no need to rack your brains here; the most important thing is to understand the principles by which the work is carried out. But first you need to create a basis - a good and clear sketch. If you don’t find one on the Internet or in a construction magazine, then try to draw it yourself, at least schematically.
Manufacturer's standard equipment
Also, each manufacturer must include drawings for any set of cabinet furniture with their own hands. They contain:
- General view of the product;
- Assembly drawing;
- List of accessories;
- Detail drawings of all furniture panels indicating the location of the holes and their parameters, the panels also have marked surfaces that are subject to edging;
- Specification.
Important! In the process of making furniture with your own hands, some points can be excluded, but you need general drawings of furniture, even the simplest. The diagrams must indicate parameters, distances from one part to another, joint points, otherwise you may end up with not furniture, but a set of curves made of wood.

Independent design
When drawing up such a detailed plan, it is necessary to take into account the general principles that carpenters apply. Take, for example, the process of preparing to make furniture with your own hands for the kitchen:
- If you do kitchen set or some kind of kitchen furniture, you need to know the length of the walls. Then the height of the walls of the room is measured.
- If, when making furniture with your own hands, you take as a basis standard sizes kitchen cabinets, they will be as follows: height of the base cabinet - 85 cm, depth - no more than 50 cm, width - from 30 to 80 cm.
- Wall cabinets are made either according to the same parameters or in a smaller version.
- The distance from the wall cabinet to the floor cabinet is 65 cm.
These numbers are statistical averages. When creating furniture with your own hands, change drawings and diagrams to suit individual requests:
- For example, if the housewife who will prepare food in such a kitchen is short, then it is better to reduce the height of the table for convenience during further use. And install wall cabinets slightly lower than generally accepted standards.
- The next point is quantity household appliances, which will be installed in the kitchen. It could be a couple of devices that make life easier for owners, or it could be a set of a dozen of them household assistants. And they are planned to be built-in.
Important! All furniture drawings today can be created not only with a pencil and a piece of paper. On the Internet you can find many special graphic programs, even with a 3D effect, which will help you not only competently create furniture designs with your own hands, but also imagine in three dimensions what it will look like in the end.

We are developing a kit
If you decide to make a wall of furniture, a kitchen set, or a whole set of children's furniture with your own hands, drawings and assembly diagrams should be not only for the entire complex, but also for each item separately. All elements in this case are detailed, described according to components. For example, a kitchen cabinet is painted as follows:
- back panel - size;
- side walls - size;
- doors - size;
- shelves - size.
Important! Drawers are detailed separately. The mounting locations for the fittings are indicated. All dimensions are indicated with strict accuracy so that the furniture drawings are error-free.
Wooden materials
When a sketch is ready, for example, do-it-yourself children’s furniture, drawings and assembly diagrams are also completed, it’s time to choose suitable materials. Before you run to a hardware store, find out which raw materials are best suited for which purposes, and how difficult it is to work with a particular material.
Types of wood
The variety of colors, textures and grain patterns makes this material interesting for several types of furniture. It's no surprise that most woodworkers love working with solid wood:
- The main advantage is that DIY wooden furniture is strong and durable. A chest of drawers made from such material can outlive not only its owners, but also their grandchildren.
- On wood of any species it is easier to correct scratches or gouges that inevitably appear during use.
- This raw material does not release components into the air that could harm human health; wood is rightfully considered the most environmentally friendly material.
- Do-it-yourself wooden furniture makes the interior of any room more attractive and presentable.
- A table, chair, chest of drawers or cabinet made from real wood becomes a comfortable item that has improved characteristics.
To make wooden furniture with your own hands, two types of wood panels are usually used:
- Solid, made from a single piece of wood and processed using a special method.
- Pressed or glued, obtained by joining and further pressing thin panels. The result is a more durable and reliable material for making furniture with your own hands.
Wood species
Today, more than 40 tree species, which can be classified as hard and soft wood. The latter - alder, poplar, aspen, is used for decorative elements and original facades that are not designed for high loads. Let's take a closer look at the first option:
- Craftsmen often choose oak to make furniture with their own hands. Its fibers create a beautiful pattern on the surface, which only emphasizes the style of the interior.
- The creamy yellow color interspersed with brown shades is characteristic of beech. This flexible wood is universal because it can be given any shape, including rounded ones.
- Pine is the cheapest and most accessible material. But, despite these qualities, it is in no way inferior to other breeds. Ideal for any interior design. In addition, this breed emits its own unique aroma, which will always create a special atmosphere in the house.
- Another favorite material among craftsmen is cherry. The older the tree, the more beautiful and rich its structure. This pleasure, of course, is not cheap, but the rich color pays off handsomely.
- If in your interior you see only luxurious brown shades, then choose Walnut. DIY wooden furniture made from this material adds beautiful accents to classic and modern spaces. And such an exclusive will decorate any interior.

We check the quality and prepare parts correctly
Because of its environmental friendliness, wood is most suitable for assembling children's furniture with your own hands. Drawings and assembly diagrams are also drawn up at the stage preliminary preparation. But the finishing part of the work should be given special attention:
- Pay attention to how the surfaces are treated. There should be no roughness or splinters. Sand all surfaces thoroughly when making your own furniture.
- All parts must be pre-treated with an antiseptic, because they will be in the children's room and create a special microclimate.
- Do-it-yourself wooden furniture for a nursery should be varnished and painted. It’s better to choose a common color scheme. Since children often scratch and damage the surface of the same table, it will not be possible to make a quick repair if the item is made in an exclusive pink and purple color.
- Another nuance - in such furniture it is worth making the corners rounded. This way you will avoid many childhood injuries, bumps and bruises in advance.
Important! It is better to avoid overly complex and elaborate designs when making furniture with your own hands; surfaces should be as accessible as possible. wet cleaning. Otherwise, the child will constantly have to breathe dust.
Work order
The main stages of making wooden furniture with your own hands involve performing the following work:
- Marking and sawing wood material.
- Processing of individual parts.
- Making holes for reliable connection of parts.
- Painting with paints and varnishes.
- Varnishing.
- Furniture assembly.
Connection principles
Do-it-yourself wooden furniture can have 2 types of connections - detachable and permanent. The design includes linear, planar and volumetric elements:
- Flat elements are special panels made of bars or slats.
- Adhesive structures with permanent connections are used to make table tops, door leaves and other household items.
Analogs
Many craftsmen make their own furniture from materials that are more affordable than wood. Today we can highlight several of them:
- Chipboards are the most popular material in domestic furniture factories. Its plus is its budget price.
Important! The disadvantages of making furniture with your own hands from chipboard include the harmful formaldehyde emissions produced by the resin, which acts as a connecting link between sawdust and shavings. But this is subject to low-quality products.
- “Brother” chipboard is the same material, only covered with a melamine-coated film. This makes the sheets resistant to mechanical and thermal stress, allowing you to create any color, texture, and even imitate real wood.
Important! The disadvantages are the same formaldehyde resins in the composition and the impossibility of fine processing due to the high density of the material.
- Another sheet material, which is popular when making furniture with your own hands, is wood-fiber boards. They are obtained after steaming and grinding wood raw materials, which are also pressed. To give strength to the material, paraffin, ceresin and antiseptics are used. These boards are elastic, so they can often be found in the form of bent-laminated elements. Fiberboard is inexpensive, quite durable and has good thermal insulation.
Important! The disadvantages include the inability to use in rooms with high humidity- this leads to swelling of the material.
- An analogue of wood fiber boards is MDF. The same material, but in an improved version. During production, the content of formaldehyde resins is minimal, therefore environmental friendliness is high. Fine and uniform texture improves strength, moisture and fire resistance. To these obvious advantages another one is added - the possibility of fine processing. However, when making furniture with your own hands from MDF, it is worth considering that such boards are quite expensive.
Tools
Making furniture with your own hands will require stocking up on tools. You will need not only electrical, but also hand-held devices. A sample list of essentials looks like this:
- It is better to immediately abandon the hacksaw. Sawing slabs or wood with it is both time-consuming and difficult. Plus, you'll end up with a ragged edge.
- Electric jigsaw or a circular saw are much more suitable for this job. However, it is worth considering that when working with a jigsaw, you still cannot do without chips along the edges.
- To reduce their number, use an electric circular. It will also be useful to you for creating rounded corners DIY wooden furniture.
- The main tool that should be in the kit is a screwdriver. Having such a device in your arsenal, you can easily connect together all the elements of future furniture. It is worth supplementing it with a set with various bits.
- You can't do without a ruler either. To ensure that all the elements when making furniture with your own hands are perfectly even, when cutting a sheet of chipboard you need to use a metal meter and a corner.
Accessories
Various DIY furniture projects can be easily brought to life by assembling elements not only with the help of tools, but also with the help of good, high-quality fittings. Let's look at this issue in more detail:
- When connecting furniture into a single structure, you cannot do without self-tapping screws. Before screwing them into the wood, drill holes at the site of the future connection.
- When working with furniture screws, it is better to put the screwdriver aside and take a special hex key in your hands.
- Do-it-yourself wooden furniture will look much neater if top part Cover screws and self-tapping screws with plastic plugs; don’t forget to buy them too.
- The ends of the sawn parts are most often covered with furniture end tape. This plastic element is very flexible and can cover even curved edges when making furniture with your own hands.
Important! For the same purposes, a melamine edge is used, which is a laminated surface, on the back of which is applied thin layer polyethylene. This end tape is glued to the end of the furniture piece using an iron.
- Also quite popular PVC edge, which is more wear-resistant and durable.
- For drawers You will need special metal furniture guides.
Other accessories that are used when creating wooden furniture with your own hands are various pens, legs, furniture hinges. External elements The furniture can be of any shape and color, the main thing is that it is in harmony with your interior.
Making furniture with your own hands is a complex and time-consuming process. It is necessary to choose the right materials and tools, and do not forget about drawing up competent drawings. Knowing all the subtleties and nuances, you can safely try your hand at carpentry. At a minimum, you will be able to make an original item for your home yourself, and at the maximum, you will find a new, interesting job that you will like.
Currently, new companies producing products appear on the market every year. Often the quality or cost of their products leaves much to be desired. In addition, you may have an endless supply of ideas that you want to implement in or. DIY wooden furniture is an excellent solution for creative people who are at least a little familiar with carpentry.
Features of the production of children's furniture made of wood
All items must be as strong, durable and, most importantly, safe as possible. In addition, the following requirements are put forward to them:
- There are no sharp corners that could hurt a child (it’s better to make them rounded).
- Non-toxic paint coating.
- No small parts (it is better to use large elements securely attached to the body).
- The connections are made without the use of nails ( the best option– screws).
- Simplicity (it is better to use bright colors than complex shapes and embossed facades; it will cost less, and the child will like it more).


Making wooden furniture for a gazebo with your own hands
– element summer cottage, which will make your stay even more comfortable. For the manufacture of elements filling the gazebo, not only an array is suitable. For example, the leg can be made from a large stump, and the tabletop from a saw cut. The main thing is don’t forget about processing!
An excellent design solution is to decorate the elements in the gazebo in an antique style by brushing. You can do this as follows:
- Treating the surface with a stiff brush to remove the soft layer of wood. At the same time, the solid layer remains uneven, due to which the surface becomes embossed.
- Sand the surface using a polymer brush or coarse sandpaper.
- Processing with other dyes. It is the correct selection of painting materials that allows you to achieve.
- Polishing and varnishing (important - there must be several layers of varnish).

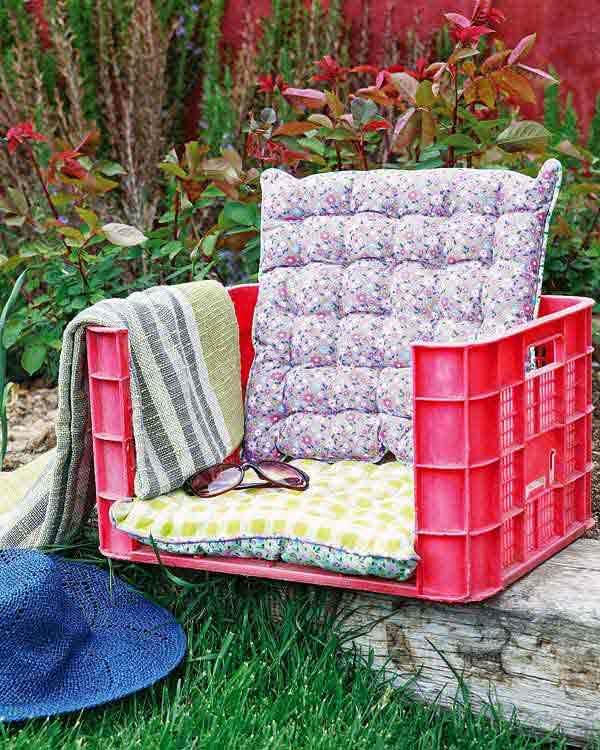
Do-it-yourself production of garden furniture from wood
A dacha is a place for leisure where everything is usually made from scrap materials. In this case, you can use old cable reels and so on. Alternatively, you can use leftovers from old broken furniture. It all depends only on your imagination.


For example, you can make an interesting and natural materials as a support (for example, stones). To do this you need to do the following:
- Adjust the height of the stones. To do this, you can dig holes of varying depths under the stones.
- Drill holes in them and in the board for connection. Use a diamond bit to prevent stones from breaking.
- Assemble the structure.
- Coat the board with protective varnish.


Making wooden furniture for the bathhouse with your own hands
For a comfortable arrangement, it is necessary to correctly place furniture in it: benches, a couch, and so on. All this, of course, can be bought, but it is much more economical to do it yourself.


First of all, you need to choose the right breed; it must meet the following requirements:
- Low.
- No knots or cracks. All irregularities must be sanded down.
- High density and strength.
Only hardwoods are suitable for the steam room: oak, alder, and so on. You can also use conifers for the waiting room and rest room, the main thing is proper processing.
Wooden kitchen furniture
Of all the interior items, they are the most structurally complex, as they contain many drawers and shelves. For the manufacture of kitchen furniture made of wood with your own hands, you need to perform the following procedure:
- Make a project.
- Prepare materials and...
- Cut the sheets into the necessary elements.
- Assemble the structure.
In order to competently draw up a project, you need to draw a floor plan and designate the necessary zones (working surface, storage space, and so on).

Important! When determining the location of cabinets, you must follow the rules .
- install as close as possible to the water supply riser.
- remove as much as possible from .
- The stove should be located no further than 2 meters from the gas pipe, but the meter should not be above.
Now we cut out and collect the elements. The main thing is to be careful and attentive, then the kitchen will be durable and will serve you for many years.
Do-it-yourself restoration of wooden furniture
How to update wooden furniture with your own hands? The main thing is diligence and accuracy, because old interior items are often quite fragile, as they have been exposed to external adverse factors for a long time.


Before you start decorating, you need to remove all the drawers (for example, sandpaper) and clean the surface.
Important! Surface cleaning old furniture should be complete, so for hard-to-reach places you should use an old toothbrush.
Only after the preparatory work has been completed can you proceed directly to decoration. Below are interesting options that will inspire you to create your own unique interior items.


Conclusion
Making furniture with your own hands is a complex but interesting process. The main thing is to clearly draw up an action plan and select the right materials for each specific case. Then you will be able to create unique interior items at the lowest cost.
Every person strives to organize his space in such a way that he feels maximum comfort. However, in addition to a decent aesthetic appearance, its functionality is important, which is why many residents make cabinet furniture with their own hands country houses And summer cottages. Many people do not have experience in this matter, so they often turn to ready-made instructions.
Before you start learning the assembly process yourself, it is first important to prepare the necessary tools:
- Screwdriver. You will need it to tighten various parts: bolts, confirmations, screws. With their help, prepared parts of the fittings are necessarily attached. Exists alternative way assembly - using ordinary screwdrivers, but in this case the whole process may take some time. long time, and not every person has such an opportunity.
- It is advisable to immediately purchase drills of various diameters. In many construction stores they are sold as a set (from 4.5 to 10mm). This will also save time searching for everyone necessary materials, especially since such a tool may be useful in the future;
- A drill for confirmation is purchased separately. In this case, drilling a 5 mm hole can cost very little. a short time. For steps without special costs the hole expands to 7mm;
- In order to tighten the confirmat efficiently and tightly, it is recommended to purchase a hexagon. As an alternative, some home craftsmen use a screwdriver equipped with special bits, but with this design it is impossible to get into hard-to-reach places;
- Anyone who wants to assemble cabinet furniture should have a Forsnel drill, since it is used to tighten hinges and other fittings;
- Marking supplies: ruler, pencil or bright felt-tip pen, metal square, tape measure, stationery knife;
- Circular saw;
- Electric jigsaw;
- A hammer, preferably with a nail puller (will be needed if you need to dismantle individual elements);
- Construction hair dryer.
If the furniture does not have any special features, when assembling it is recommended to use universal diagrams that are designed for a drilling angle of 90 degrees. Unfortunately, such a device cannot be called budget option, therefore, such an acquisition is advisable only when assembly becomes a professional trade.

Manufacturing technologies
Answering the question of how to make cabinet furniture at home, we divide the whole process into several stages.
Cutting out the parts that make up the overall structure
When you plan to work with chipboard, it is impossible to do without cutting. Using a machine, we cut chipboard, on which we distribute all the workpieces in advance. This will help reduce material consumption. It is recommended to use a high-performance machine, due to which the optimal sawing frequency is achieved, since a scoring saw is installed here.
It’s easier to work with ready-made laminated chipboards. In stores you can buy options covered with a decorative layer to suit every taste. All that remains is to cut out the necessary parts from them. If the furniture is made from unprocessed raw materials, then you need to paste over the already cut parts. Cladding can be done self-adhesive film or special plastic.

We take measurements

We make cuts with a machine
Processing slices
Before assembling the cut parts, you need to process the cuts. For this purpose, adhesive-based edge tape is used. Before work, it is important to pay attention to the conditions in the room:
- The humidity percentage should be as low as possible;
- It must be warm to avoid deformation of the material.
For gluing parts with edge tape, prepare a mock-up or construction knife and an ordinary iron. Most often, the edge is sold with an already sticky layer, and no additional surface treatment is required.
You can use a professional iron. During operation, it is important to keep it at a certain distance from the surface in order to avoid displacement and secure all parts tightly in place.
It is important to remember that the iron must be held on the edge without a large number of time, otherwise it will overheat and bubble. As soon as the edge is fixed and takes a certain position, take a knife, trim the edge and smooth out all the irregularities with sandpaper.

Trim off unnecessary parts

Glue the edge
Marking points for fittings
The finished parts must be laid out on a flat surface. Next, mark the locations for attaching the fittings, in accordance with the plan. finished product. Check all dimensions; an error of just 1 mm can cause the entire structure to become distorted. The cabinets will stop opening, the doors will not fit together correctly. Next, you need to drill all the holes of the required diameter to secure the fittings.

Lay out the parts on the floor

Creating markup

Drilling holes

We fasten the fittings
Installation
After the work with the fittings is completed, we proceed to assembling all the elements. Many newcomers to this business first turn to video instructions, which not only show the order of assembling a certain model, but also give practical advice on how not to confuse the entire process. We collect the nodes. This is the final stage when it is necessary to assemble all the prepared parts into a single structure. It is important to perform all operations sequentially.

Step-by-step instruction
First you need to determine what cabinet furniture is made of. The most common and available materials are considered laminated chipboard, fiberboard or chipboard. Solid wood is more reliable and stronger, but it costs more and is more difficult to work with.
Design
All instructions for creating cabinet furniture can be divided into two stages. The first is the design of cabinet furniture. This stage involves artistic or graphic image all elements (drawings of cabinet furniture). This is a complex undertaking, since a project diagram must be correctly developed to help visualize the necessary functionality of the furniture.
Just a few years ago, such a project could only be developed by a qualified designer, but with the help of modern applications and programs, you can work on the task yourself. To draw up a clear plan for designing cabinet furniture with your own hands, it is worth determining what information should be contained in it:
- On a separate plan you need to draw overall design premises to visualize the position and appearance of cabinet furniture;
- All dimensions are included in the project - section dimensions, height, depth;
- All the details that will serve as the basis of cabinet furniture are worked out, drawings of facades with the required dimensions are included;
- The texture and color scheme are selected.
On the Internet you can find special 3D programs with which you can recreate absolutely any furniture project. In the functions you can set special parameters and even select the material from which you plan to create the desired interior items. The main advantage of such services is that there is no need to study information on how to calculate dimensions or draw “the old fashioned way,” especially since not every person has such skills. The finished version is printed on a printer as a photo project, and then it’s a matter of technique and practical skills.
Graphic rendering common project determines the success of the planned business, but the creation of details is an equally important undertaking. First of all, everyone should think about what functions the furniture should perform and only after that start drawing. Correct sizing is a determining factor in the success of all further assembly. Otherwise, the part may not fit into place, which means that its shape will need to be adjusted, which means additional financial expenses. Even if the plans include making an ordinary storage cabinet, each detail should appear from a separate perspective in the drawing:
- Back wall;
- Front Panel;
- Side walls;
- Each shelf;
- Door.
As for the parts that will be retractable, they are also drawn separately from the rest.

We create the overall design

We take measurements

We create color design
Creating parts
The production of parts is carried out according to the general instructions:
- Selecting the material from which the parts will be formed;
- Creating a project on a computer using a 3D program or drawing by hand on whatman paper;
- Making patterns by printing on a printer or making patterns by hand;
- Transferring blanks to the material by tracing patterns with a pencil or bright marker;
- Sawing using a high-performance machine;
- Edge processing, grinding if necessary;
- Drilling holes for fasteners.

Choosing manufacturing materials

Let's make a project

Creating patterns and cutting materials

We cut chipboard

Sanding the coating

Making holes
Assembly
When transitioning from constructing furniture with your own hands to assembly, the entire process can be described in the following steps:
- All present fittings (hinges, locks, ties, runners) are attached to the main parts;
- Assemble the frame and back wall, mount the mirrors;
- They check the fittings, attach handles, plugs, and install retractable elements in their places.
Depending on what piece of furniture you plan to assemble, the process may differ slightly, but the basic procedure remains the same. So that every person planning to create furniture with his own hands understands how he needs to act, we can analyze the whole process using the example of creating an ordinary cabinet.

We fasten the fittings

Assembling the frame

We mount the handles

We attach the plugs
Stage 1. Frame
The cut parts are connected according to the plan. To perform the screed, it is first recommended to prepare a screwdriver with special bits. Twisting will happen much faster than with a screwdriver. In addition, much less effort will be spent on such work. It is important to ensure maximum structural strength, so it is not recommended to use nails to strengthen the bottom of the cabinet. Optimal choice screws will become 4 by 16. Side surfaces, as well as the top and bottom are connected at right angles using furniture corners. You can nail the back wall of the cabinet to the finished frame.

Assembling the base

Making holes

Installing the bottom frame

Stage 2. Sliding system
To ensure correct movement sliding doors, first of all, the guides are attached. They are mounted parallel to the top and bottom planes of the cabinet. One of the best options would be to use a specially developed system called “Commander”. Without much effort, you can not only move the doors to the desired position, but also easily make adjustments. As a rule, adjustment is needed if gaps are observed during the assembly process, which not only spoils appearance, but also makes it difficult to use. In most cases, during the first time after assembly, cabinet furniture shrinks, which can also result in cracks appearing. This is considered normal due to the specific characteristics of the material.
Special rollers are screwed to the doors. Ready design install in the guides and check the progress.

Installing the stopper

Installing the rubber pad

Installation of guides

Adjusting the system
Stage 3. Installation of fittings
At this stage, all shelves, drawers are inserted into place, coat hooks and other small elements are attached. The cabinet is ready. Even a person who does not have experience in creating cabinet furniture with his own hands will not spend excellent quality a large amount of time. The average assembly time is no more than three hours excluding preparatory work. In addition, the cost of a handmade product is much lower than the price finished furniture in the shop.
Assembling cabinet furniture with your own hands is a combination of the optimal design solution, choice quality materials, as well as acquiring new skills with which in the future you can create entire furniture sets.

Every owner of a private house in a city or suburban type, dacha or personal plot, sooner or later faces the need to improve its territory. And we are not talking about creating beds and flower beds, planting trees and shrubs, but arranging comfortable, but at the same time practical areas for relaxation, cooking and eating food in the fresh air. It’s difficult to imagine a landscaped area without garden furniture, but not everyone can afford to buy one, and it’s much more pleasant to sit on a bench you made yourself or dine in the fresh air at a table that didn’t cost you a penny to make. In this publication, we have collected many options for garden furniture that you can make with your own hands. Possessing only available materials, a small set of tools and a great desire to make your site landscaped, comfortable and aesthetically pleasing.

In order for garden furniture to appear on your site, capable of becoming not only a reliable piece of exterior furniture, but also a reason for the pride of the owners and the envy of neighbors and guests, not much is needed - waste material, perseverance, a little imagination, work and effort. In this article you will find examples of making garden furniture from wood, construction pallets, and used household items.


Choosing material for making country furniture
In order for hand-made furniture to fit organically into the existing image of a summer cottage or private yard, it is necessary to take a responsible approach not only to the manufacturing process itself, but also to the choice of material. The most versatile and at the same time very malleable material from the point of view of processing is natural wood. The advantage of wood is that it can fit perfectly into any stylistic direction in landscape design. And this can be achieved through a variety of design options - from massive furniture made from logs to light and elegant products woven from wicker or twigs.


The advantage of wood for creating furniture with your own hands is that it has many manifestations. You can create a piece of furniture with minimal processing of the material in the shortest possible time. For example, ordinary hemp can be turned into stools or small stand tables. You just need to make sure that the surface of the new pieces of garden furniture is perfectly hewn and becomes safe for use.


You can create garden furniture from branches and twigs...

Or logs and large timber...

Benches and benches are an integral attribute of country life
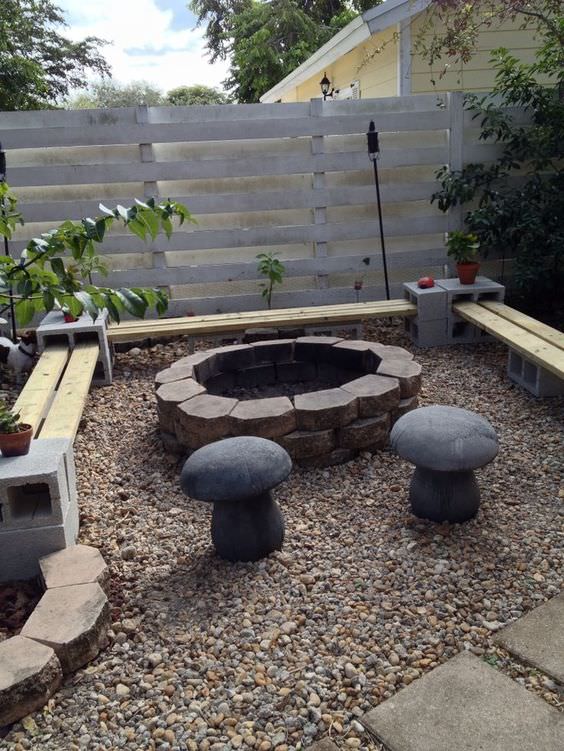
Even a very small backyard needs outdoor furniture to sit on to enjoy the fresh air, watch the sunset or watch the sunrise. Well, on the property of a large family or in the courtyard of hospitable hosts, where companies gather, it is absolutely necessary to take into account the possibility of seating several people.


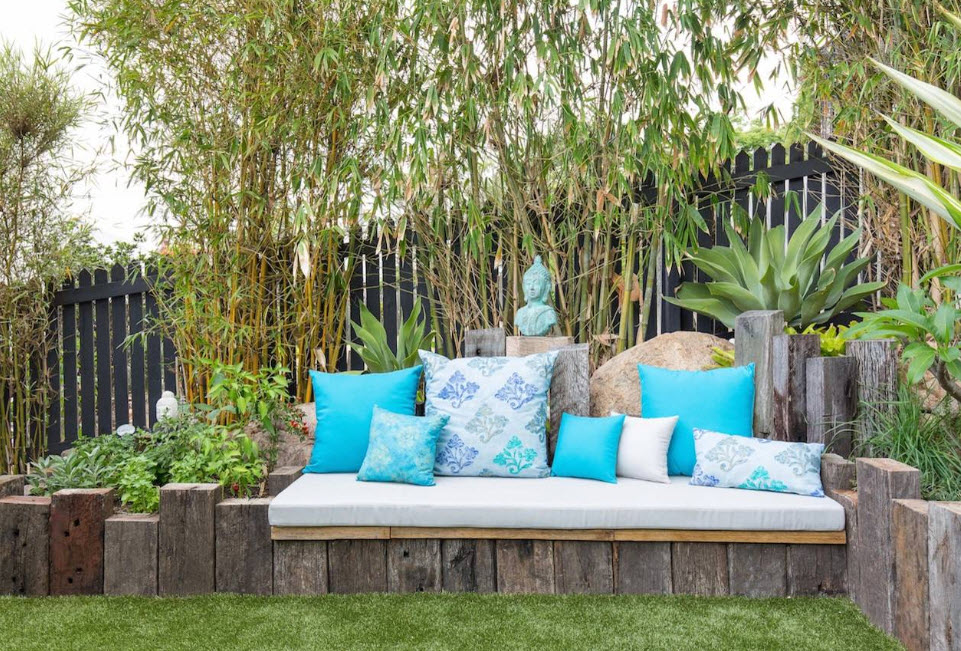
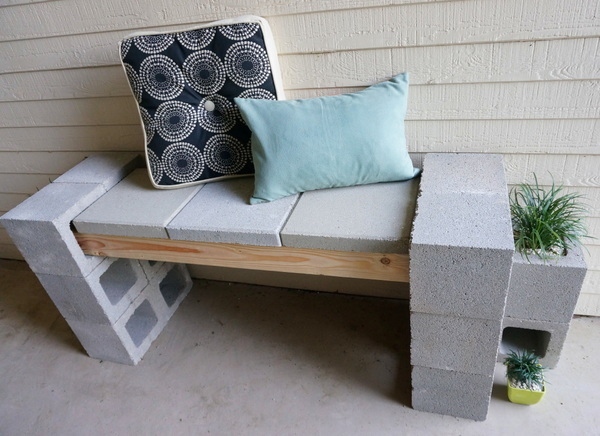
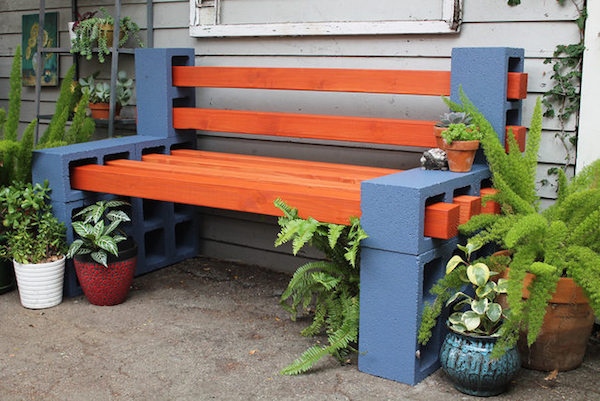
One of the most simple ways creating benches and benches - using wooden beams and cinder blocks with square holes. A bench or bench can be assembled like a construction set; you don’t even need to use any tools or fastening mortar or construction adhesive. The advantage of such structures is not only ease of installation, but also portability - you can easily disassemble your piece of garden furniture and move it to another place or put its parts in the shed until the new warm season.
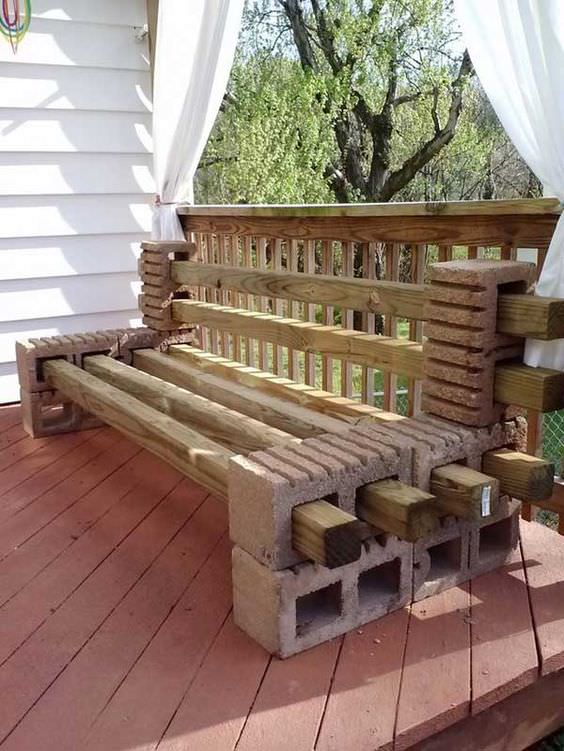

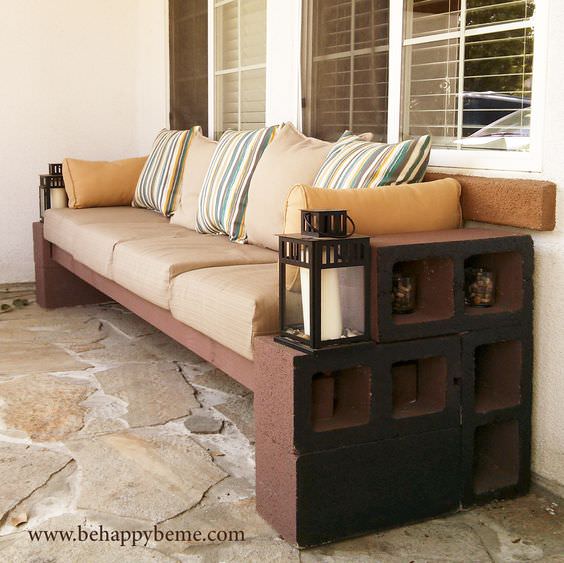
If you put soft seats on a bench made of cinder block and timber and sofa cushions, then an ordinary hard garden bench turns into a convenient, comfortable sofa.


By combining materials for garden furniture, you can increase the strength and improve the appearance of the products. For example, together with wood in one modification or another, you can use metal constructions, for example, parts of beds (backs, legs).

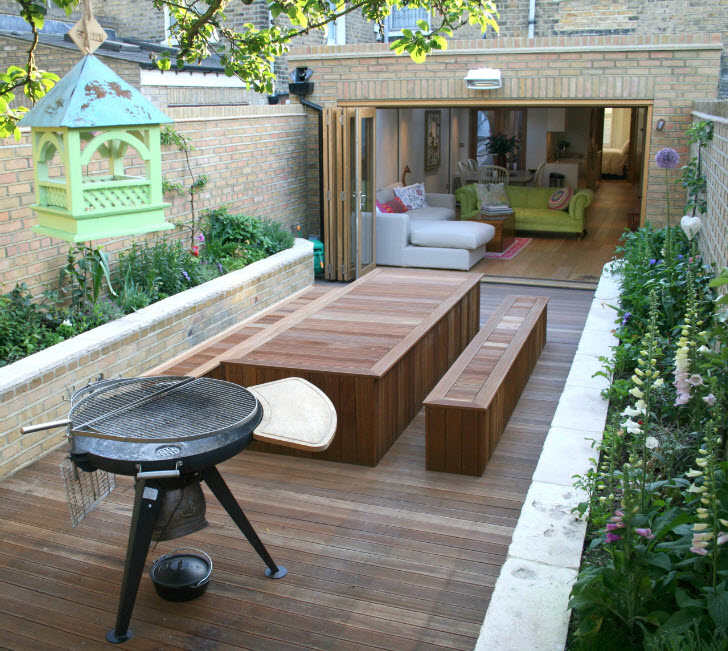
Outdoor dining area
Any dish tastes better in the fresh air. Every owner of even a tiny backyard tries to create an environment in which they can have meals outdoors. outdoors, even if we are talking about short breakfasts. Depending on the needs and size of your family, you can arrange either a small area for short meals or a spacious dinner table for receiving guests in the fresh air. It is noteworthy that both options can be implemented on your own.
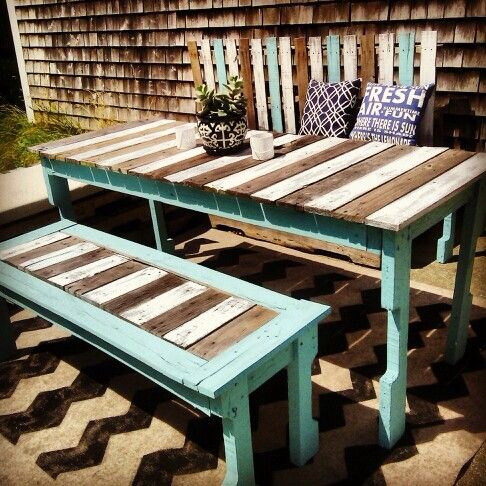


One of the simplest, but at the same time practical ways to organize a dining group in the fresh air is to make a table together with benches. The model shown in the photo will require minimal amount material, but at the same time it will be quite spacious. The only drawback of such a dining group is that if you need to increase the number of people sitting at the table, you can only do this with 2 seats (you will need chairs or stools).

Equip dining area or a segment for short meals (breakfasts and afternoon snacks) can be like a bar counter. This is easy to do using building blocks and wooden beams or boards. The only thing that needs to be selected for such a tabletop is bar stools with the appropriate height.

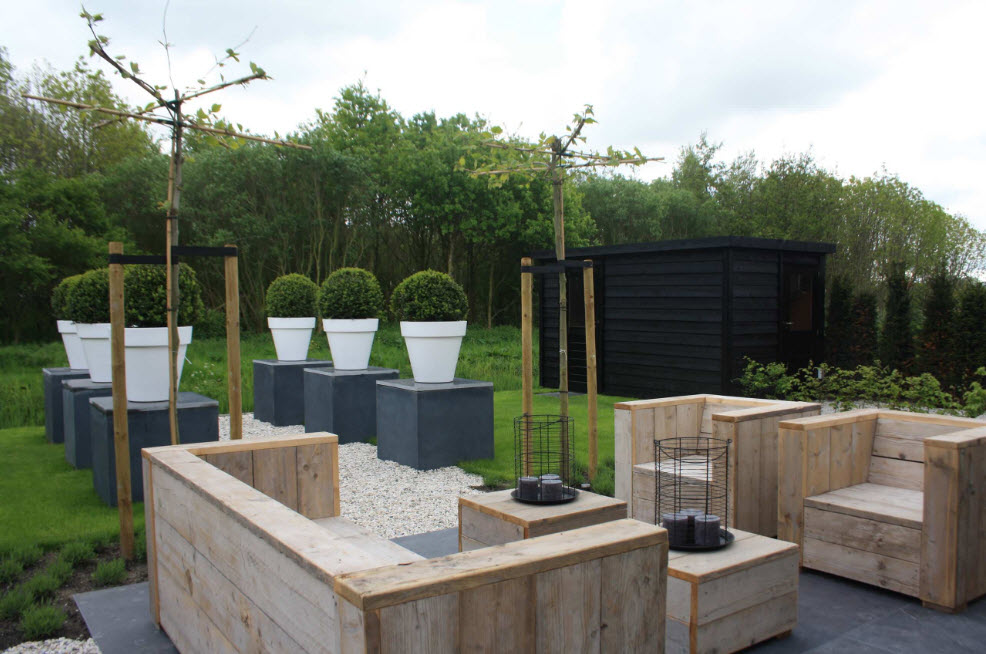
Relaxation area in a summer cottage or garden plot
Everyone associates the outdoors with different things. For some it’s gatherings with friends and neighbors, for others it’s reading on a slightly swaying swing, for others it’s just sun loungers. air baths necessary. For all options for active and not so active recreation, you can make furniture with your own hands, and even from improvised means at minimal cost.


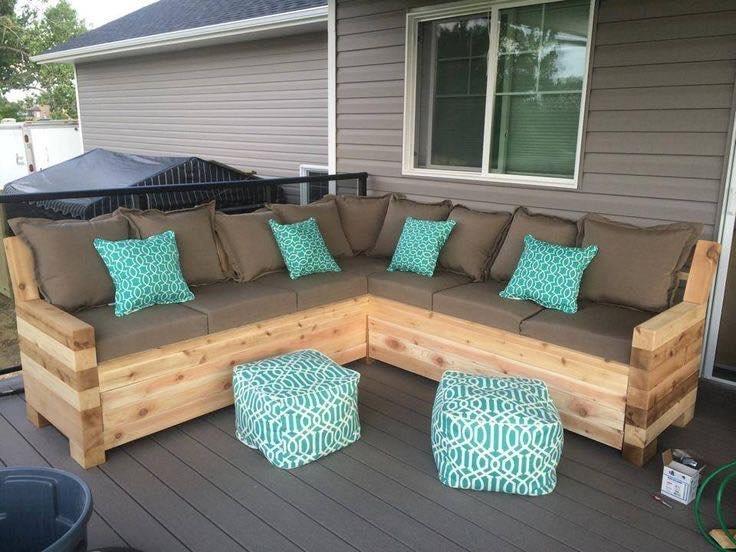
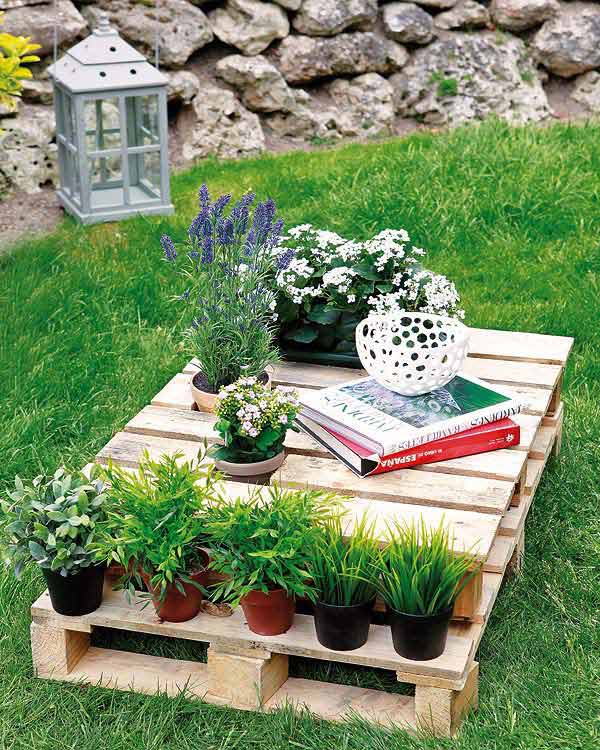
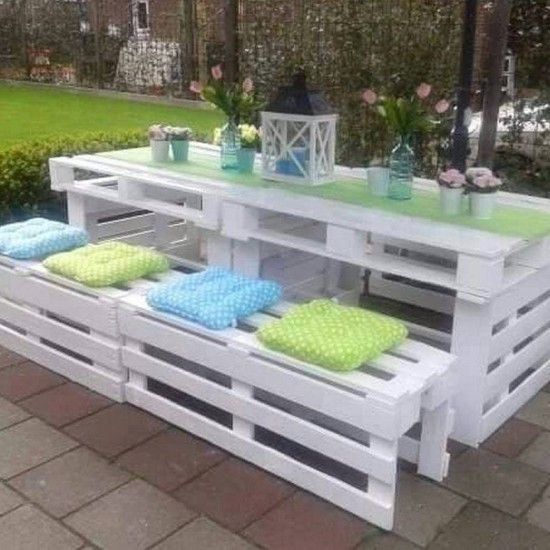
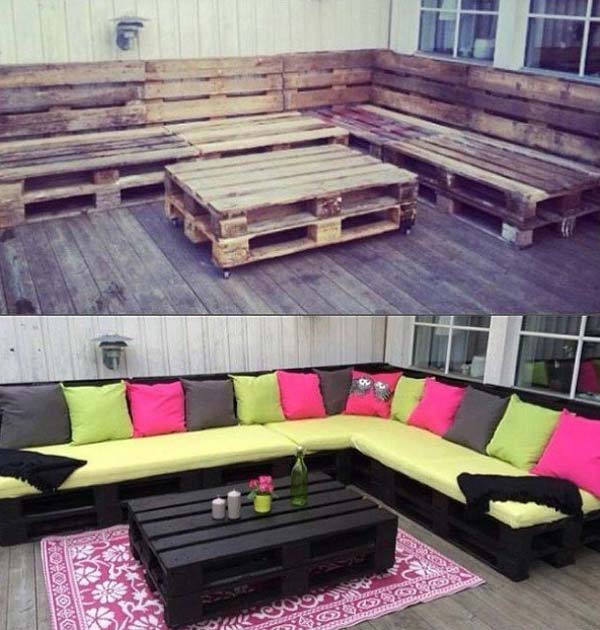
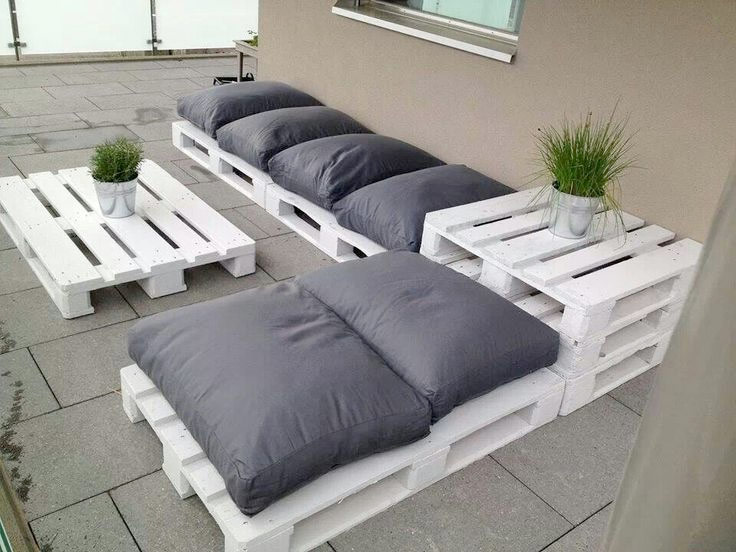
One of the most common ways to create garden furniture for a recreation area is to use construction pallets or pallets. The advantage of such an assembly is its simplicity - wooden blocks have already been formed in terms of future armchairs and sofas. Well, even the owner of a summer house or any other can build a coffee table from pallets land plot who had never held a hammer in his hands before. You can even use construction glue to hold the elements together.

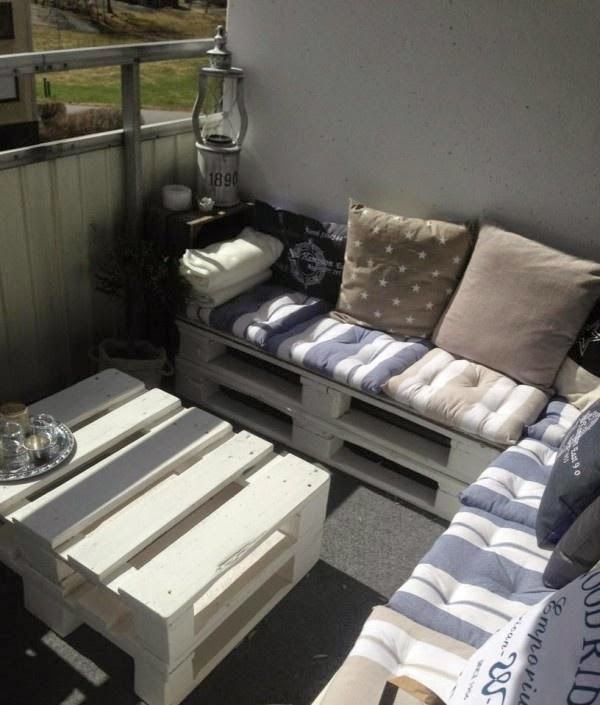

Another advantage of using construction flights for the manufacture of garden furniture is that you can get the material at a very low price or completely free, because we are talking about used products. You just need to take care of thoroughly cleaning the surfaces, leveling and lightly polishing, and impregnating the material with antiseptics against rotting.


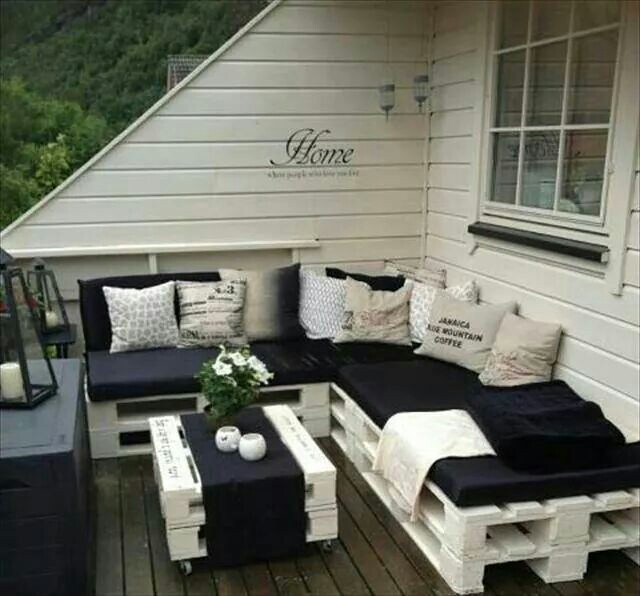

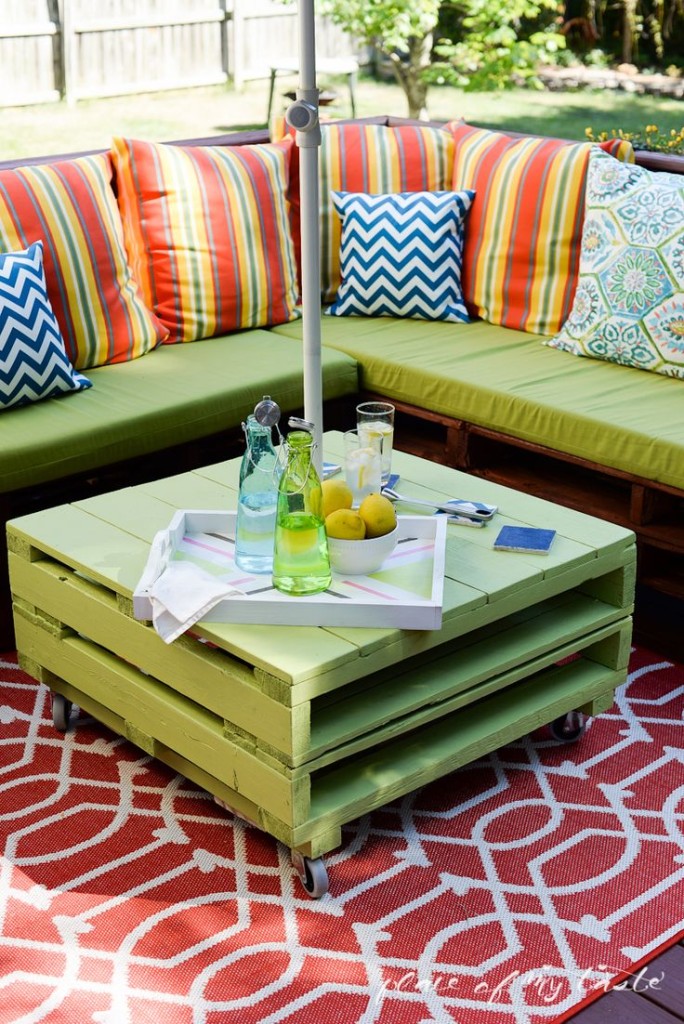
From construction pallets you can create entire compositions for outdoor recreation areas. This can be a spacious corner complex, designed like a sofa, comfortable armchairs and coffee table. Enough to put soft pillows and seats into armchairs and sofas to create a living room setting right in your summer cottage or garden plot...


With help wooden pallets you can arrange an area not only for relaxation, but also for sleep. A summer bed or just a layer of construction pallets with a mattress is an excellent opportunity to create a bedroom in the fresh air - just take care of a canopy over the sleeping area to protect from the sun.


It’s easy to build a comfortable swing from old pallets. You can tie them on ropes or chains to the roof of a canopy or gazebo, on a terrace, or simply under a tall, spreading tree with thick branches.


Slightly less popular, but still practical way arrangement of a summer cottage garden furniture– use of construction wooden coils. Chairs can be made from them...
