Bridges in the garden and at the dacha ⛲ with your own hands - photos and drawings. How to make a garden bridge with your own hands Do-it-yourself arched bridge
One of the most attractive and unusual small architectural forms for a summer cottage is a bridge. It can only be found on those suburban plots whose owners have creativity, rich imagination and, in rare cases, just luck if a narrow pond flows through their plot. Building a bridge with your own hands is impossible enormous work, and its decorative function will definitely attract the attention of guests, so read the information provided below and, having gained inspiration, make this miracle building in your dacha!
- Article
- Video
The purpose of the garden bridge
Even in ancient times, in the countries of the East, the bridge had not only a functional purpose, like a crossing, but also a decorative and even spiritual function. The Japanese are confident that the garden bridge is an intermediary between our world and the cosmos, and that all the problems that a person has along the path of life must be solved and thought through while standing on the bridge.
If you have a small pond, natural reservoir or stream in your summer cottage, which is located in the middle garden plot, then the construction of a bridge will be the only solution so that you can cross to another part of the shore, this is the functional part of the garden bridge.
Today, experts in the field landscape design began to actively use the bridge as an unusual decorative element of the garden plot. Moreover, so that the presence of a bridge at the dacha does not raise questions, designers specially create narrow, extended water obstacles in the form of artificial reservoirs, through which they build garden bridges.
In addition to bodies of water, garden bridges can also cross more decorative elements, such as a dry stream or a small ravine.
Material for creating a garden bridge
The most common, aesthetically attractive and inexpensive building material for constructing a garden bridge with your own hands is wood. In addition to the above advantages, wood has the following advantages:
- Environmentally friendly material
- Relatively long lasting if treated early protective equipment
- Ease of installation/disassembly
- Lightweight structure (for a bridge this plays an important role)
- Wood fits into almost any garden style, especially landscape and
It is precisely because of such a number of advantages and practically not a single disadvantage that in our instructions we will also talk about how to make a wooden garden bridge with your own hands!
In addition to wood, garden bridges are often made of metal, natural stone and concrete. These building materials better than wood only because they have a longer service life.
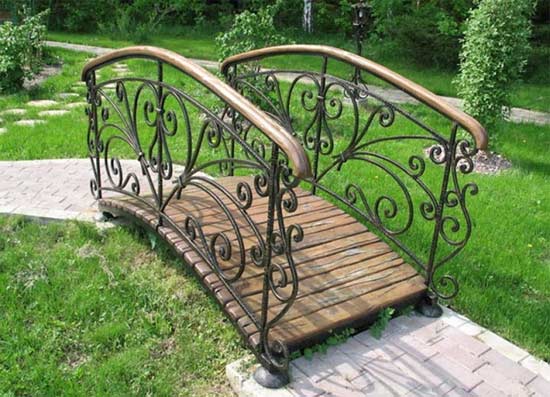
A metal garden bridge made using figured forging will perfectly decorate your garden area and make the appearance of the bridge more luxurious.
If you use concrete and natural stone to make a garden bridge, you will not only lose a significant amount material resources, but also miss the chance to make this architectural form with your own hands, because... you will need the help of specialists. A significant disadvantage of such a bridge is its weight, because of which you will have to take the issue of strengthening the soil on which the bridge will rest very seriously, otherwise it will begin to creep and the structure may collapse.
The advantage of a bridge made of concrete and natural stone is its ancient, rich appearance, which can perfectly complement an antique garden style.
Experienced gardeners and craftsmen recommend implementing a combination of styles that will “kill two birds with one stone.” For example, if you make the base of the bridge from reinforced concrete, the bridge will be strong and stable, and the railings are made of wood, then the appearance of the building will become more attractive. The more popular metal-wood combination is used with the same success.
Where to place the garden bridge?
Since the garden bridge is an unusual architectural form that can be used to complement the garden, it is recommended to place it in an equally unusual place. If it serves a purely decorative function, install it in your backyard as a small surprise for garden visitors.
You can also place a garden bridge in the foreground if you use decor garden territory in the form of a dry stream, complemented by a stone garden and a mixborder.

A functional garden bridge must be placed in the place where it will be most in demand, relegating the decorative function a little to the background.
Very a good decision will install a garden bridge next to the garden so that after a walk completed by the bridge, you can relax with a cup of tea in the barbecue area.
It is not recommended to connect the banks of a round pond with a bridge; it will look ridiculous and will only worsen the overall composition of the garden. Remember, the best location for a bridge is to connect the banks of a narrow pond or reservoir.
If you are creating artificial pond, make a small island in the middle of the pond, onto which the garden bridge will cross.
It would look very awkward to place a large garden bridge under a small tree, and vice versa.
The most attractive look will be a slightly curved garden bridge, near which are neatly planted low-growing perennials And .
What should you consider when creating a bridge with your own hands?
When creating a garden bridge with your own hands, you must first take care of safety measures.
Since the height of the bridge will exceed the soil level, be sure to build a railing at a height that is comfortable for a person of average height. The railings must be secured firmly so that they are stable.

Another requirement - good lighting bridge, because Walking will take place mostly in the evening. It is recommended to install lighting in the wooden bridge deck or install lanterns along the contour garden path and the bridge itself. Not a bad option for the dacha there will be a lantern installed on a pole or decorative above the bridge.
Well, the last of the most important safety measures that need to be taken into account when creating a bridge with your own hands is that the bridge deck must be made of non-slip materials, because When it rains, you can be seriously injured by crossing this structure. In order to make the flooring less slippery, it is recommended to install rubber inserts into it or make notches manually, in the form of protrusions.
How to make a wooden bridge with your own hands?
Creating a garden bridge with your own hands is not difficult, and the process itself takes no more than 1 day, we will confirm this with this video tutorial:
The first step is to prepare a place for the garden bridge. For this purpose, the banks are strengthened using compacted crushed stone or cobblestones. It is necessary to lay two strong wooden blocks in parallel on the prepared slopes; the distance between the bars will determine the future width of the bridge. At those points where wooden blocks will be adjacent to the soil, it is necessary to carry out waterproofing. Minimal waterproofing - treating wood with antiseptic protective agents, wrapping it with roofing material or coating it with molten bitumen.
After the bars have been processed and laid, we move on to securing them. To do this, metal pegs are driven into the notches of the bars and span bars are secured on top of the supports (their length is equal to the length of the bridge). The span bars must also be secured using metal brackets.

Next we move on to creating the flooring. To do this, boards with a thickness of at least 3 cm are nailed across the longitudinal bars. Pressure bars are attached to the top of the boards. We do not forget about safety measures and immediately when creating the flooring we take care of its slipperiness.
After the flooring has been created, all that remains is to make the railings and light the bridge. The simplest option for railings is to fix the bars (1 meter long) vertically, at a distance of about 30-40 cm from each other along the long sides of the bridge. Attach another bar to these bars on top, only this time horizontally - these will be the railings. Remember that the railings must be strong and stable, so do not skimp on self-tapping screws to secure them.
After the bridge structure is made, all that remains is to decorate it to your taste and decorate it with garden lanterns.
As you can see, creating a garden bridge with your own hands does not present any special difficulties or construction skills. All you need is determination, a little time and imagination!
Video example of creating a wooden garden bridge with your own hands
Decorative bridges are not found in all gardens: this element of landscape decor is less common than flower beds, but it is this element that enlivens the natural landscape, making it more varied and complete.
Small bridges over artificial ponds are created by many summer residents, but in order to design such a structure, it is not necessary to have a pond on the site. To do this, it is enough to arrange a “dry” water artery on the territory - a stream.
Bridges as a landscape object
Bridges on a summer cottage are decorative elements Not big size, similar to the figurines used to decorate the garden. They just make a stronger impression.
Even a miniature bridge turns into a full-fledged landscape element.
 DIY decorative bridge for the garden, photo
 Garden bridges are attractive and effective elements of territory decoration. From the bridges installed in the summer cottage, you can admire plants blooming in the garden, fountains or fish swimming in the pond.
Of course, there is usually no practical need for arranging bridges on a private estate, especially if there are no water bodies. But if we talk about their role in landscape decoration, then it is really great.
Beautiful bridges are specific elements that can easily change the perception of the surrounding landscape. They are often used to shape and emphasize the relief of the territory.
 Wooden bridges for the garden, photo
 The psychological perception of the landscape is such that, if there is similar element the site seems more spacious, the structure of the space becomes more complex.
In addition, bridges are an artificial object, not a natural one; they differ in configuration and decoration, attract attention and decorate the site.
Advice. Even in a small garden there will certainly be a place for a compact bridge that will serve a decorative function. Create such an object in your garden, and you will immediately notice how the landscape will transform.
Features of accommodation
The need for bridges arises if there is an object or specific terrain on the territory that requires stepping over, and also if it is necessary to emphasize the attractiveness of an object lying on a plane.
 Garden bridges made of wood, photo
 Most often, bridges in the garden are placed over artificial reservoirs, such as streams. In some cases, structures are located in non-standard places.
Important! Crossings running through artificial waterways should be installed at the narrowest point.
Decorative bridges look so aesthetically pleasing over “dry” waterways, over sharp relief drops, and in areas with particularly picturesque views.
Graceful bridges with a simple design, spanning “dry ponds”, advantageously enliven the monotonous composition consisting of greenery and stones.
 Garden bridges, photo
 It is very important to choose a good place to install the bridge - the location has a great influence on its visual perception. You should also take into account the presence of various structures on the site, which will be located in close proximity to the bridge: gazebos, lanterns.
Many landscape design projects involve the installation of a decorative bridge in the area where the gazebo is located: thus, picturesque recreation areas are created on the site.
The gazebo, which overlooks a pond with water lilies with a decorative bridge, will be an ideal place to relax.
Kinds
Eat a large number of varieties of garden bridges, but most often the division into two categories is used:
- functional;
- decorative.
Functional structures are used for their intended purpose - for transitions from one zone to another. In this case, the zones are separated by waterways.
 Decorative bridges for the garden, photo
 Decorative bridges, like functional ones, are also usually built over bodies of water: canals, streams, ponds. You can design a bridge that approaches the pond or slightly “enters” it. Here, a lot depends on the imagination of the site owner or landscape design specialist.
But, as noted above, the presence of a water artery is an optional requirement for creating bridges.
Difference decorative designs from functional ones is that they have smaller dimensions and do not move around them. They are installed solely for decorative purposes.
But in terms of their design purpose and the impression they make, decorative structures are practically no different from large bridges.
 Bridges in the garden, photo
 Such structures can be installed over small streams or in any picturesque corner of the site.
Important! If you have made a choice in favor of a functional bridge, when creating it, pay attention to both aesthetic and operational parameters. The crossing should be not only beautiful, but also durable, capable of withstanding significant loads. Do not neglect such points as the safety and reliability of the structure.
Design features
The design of bridges installed in summer cottages may vary. Such structures can be tall or small in height, made like a flooring, straight, arched, curved, consist of separate parts, equipped with railings different configurations. Arched, suspended, stepped, zigzag - the design of garden bridges is striking in variety.
 DIY garden bridges, photo
 Important! In order for the decorative walkway to fit organically into the natural landscape, think carefully about what its design will be.
Mini-bridges that perform a decorative function are usually created from wooden blanks. Simple and a little rough wooden structures ideal for garden plots decorated in country style.
Structures, the original function of which was to provide a crossing over a body of water, can be brick, concrete, or combined, combining several materials. Bridges decorated with elements look especially impressive artistic forging– such a forged structure can become the highlight of a landscape landscape.
 DIY bridge in the garden, photo
 What type of bridge do you prefer for your garden? When choosing, you should be guided by the characteristics of the site, the style in which the landscape decor is made.
Before making a decision, look at photos of such structures to demonstrate the effect with which they complement the landscape and decorate gardens.
Dimensions garden swing made of metal are indicated in the article.
How to assemble a pavilion with mosquito net? The installation and assembly procedure is described in the article at:
Creating a bridge
Before making a bridge for the garden, make a strong frame base: it can be wooden or metal, concrete is also suitable for this purpose.

If you need a functional bridge, be sure to build a foundation, especially if there is a body of water under the “crossing.” Facing materials are mounted on the frame.
In a number of styles, bridges are made from large smooth stones laid in a chain. Most often, such decorative objects are found in Asian styles - for example, when creating Japanese garden. Taking into account the mass of stones and the simplicity of the structure, a foundation for such a bridge will not be needed.

But if a similar bridge is constructed from large elements, it cannot be done without a foundation.
On a note! Creating a structure in accordance with construction requirements is necessary only for real bridges; bridges erected for decorative purposes can be built without thorough preparation.
For example, a small bridge made of thin logs, which will perform an exclusively decorative function, is created as follows: arched supports for the future bridge are cut out of wood required sizes, holes are made in them for thin logs. Other parts can be mounted into similar slots. Railings for decorative crossings can be made, for example, from thick branches.
You can design a garden bridge with your own hands from facing bricks or natural stone. But the simplest solution is to put finished design in a style that matches the design of the site.
Bridges for garden decoration can be purchased ready-made or made to order.
 Wrought iron bridges for the garden, photo
 Compact options, decorated with forged elements, as well as designs in which forging parts are complemented by wooden ones.
Bridges over the “dry stream”
Creating “dry water arteries” is a successful technique used in landscape decoration, and an excellent solution for those who, for one reason or another, do not have the opportunity to make a real pond or stream in their garden.Dry water arteries represent water and imitate it using natural tools, for example, through pebbles, small flowers, and decorative grass.
On a note! When creating dry ponds, you can use gravel, both natural and painted.

If your goal is to make a “water artery” from materials that have a granular consistency, then first of all, you should create a “reservoir” bed by removing a layer of soil, laying a film and pouring a sand layer, then backfilling with material that will imitate water. For example, you can create a stream using pebbles or a small pond using sky-colored gravel.
To imitate a body of water, bark with an emerald tint will also work.
If you want to design a larger waterway, use the following technique: lay down cellophane film and pour blue gravel onto it. Despite the simplicity of the material, the film will look beautiful: shimmer in the light of the sun’s rays, creating the effect of the presence of water.
Another interesting option- “flower pond”. To create it, dig a channel, select the roots of weeds, and dig a small elastic plastic border around the perimeter. After this, plant flowers and ornamental grasses in the riverbed. Plants need to be planted as close to each other as possible.

Advice. To make the composition as impressive as possible, plant vegetation of one type, blooming in one color. For example, you can make a “stream” of ageratum or snow-white alyssum.
To create flower streams, you can use low perennials– small bright hostas or other flowers.

Flowers and others ornamental plants are an excellent decoration for garden bridges, not only for those that run across dry waterways, but also for structures laid over real bodies of water.
Bridges entwined with plants give the garden enchanting view- This is a real masterpiece of landscape art.
With such a decorative element, it is easy to create a fabulous landscape and make the landscape of your personal plot unique.

But when choosing plants to decorate the bridge, make sure that they are combined with each other and are in harmony with other elements of the landscape decor.
Not only flowers are also suitable for decoration, but also various available materials - for example, beautiful smooth pebbles: they can be used to line supports.
Bridges laid across “dry streams” are distinguished by their functionality. Even if there is no pond or stream in your garden, you can make a “crossing” in the area where there is a relief drop.

The miniature decorative bridge can also be used as a stand. Another good idea is to turn the bridge into a continuation of the path, using it as a crossing to overcome a wet or overly relief place, for example, a depression.
There is an opinion that the installation of miniature decorative bridges is appropriate only on large summer cottages, but this is a misconception. Even for small garden you can choose a nice compact bridge that will not take up much space, but will transform the landscape, making it more attractive and original.
Give free rein to your imagination and your country cottage area will be transformed. To make the garden sparkle with new colors, it is enough to complement the landscape design with a beautiful decorative mini-bridge.
Video
Some original ideas Watch bridges for a summer house in this video:
Photo gallery
We invite you to look at a selection of photos from beautiful ideas decorative garden bridges made of wood and metal:


They can perform various functional loads. Among possible ways using a decorative bridge in the garden - planting flowering and climbing plants. Properly designed bridges for a pond can be specific supports for additional lighting and installation of flower containers. The material describes how to make a decorative bridge with your own hands.
Bridges and bridges are structures various designs, with the help of which you can overcome any obstacle, such as a river, stream or ravine. Sometimes they say that bridges are only possible in large gardens; in my opinion, bridges are also good in small gardens. Being a natural extension of the path, they not only provide an opportunity to cross something watery or inconvenient, but also make the walking route more intriguing. They are built across fast and quietly murmuring streams, they connect an island located in the center of a large pond with its shore, and with the help of bridges they “force” the water area or inconvenient wet places. Of course, bridges are primarily of practical value, but they make the impression of a pond or stream stronger.
Bridges in landscape design and their photos
Bridges in landscape design will look stylish and fit organically into the garden space only if their design is well thought out. How smaller garden, the simpler the design of the bridge should be and the more neutral its color.
Choice of style and location. The design and materials for the bridges are selected based on the style of the house and garden; they must be combined with the appearance of the gazebo and lanterns located nearby.
Bridges are indispensable in low-lying areas or areas that are flooded in the spring, where you need to make a path between buildings or cross a ravine. Sometimes they are built to highlight an object or give the area completeness; you can design a wooden path in the form of a bridge leading
The drawbridge can be installed both over a pond and river, and over a “dry” stream or reservoir.
Look at the bridges in landscape design in the photos that accompany this article:
Photo gallery

Requirements for bridges:
1. The bridge should be beautiful, in harmony with the garden and house, its reflection in the water should be interesting.
2. The bridge must be functional.
If it is placed accidentally, just like that, it looks out of place. A strongly curved bridge is perceived more as an obstacle than as a crossing. It should be comfortable, because most likely not acrobats, but ordinary people, maybe even elderly people, will walk on it. Its ends should be moved away from the banks so that it does not appear short.
3. The design of the bridge must be strong, comfortable, durable, stable, and the surface on which they walk must be non-slip, especially if it is a passage over water or a ravine for year-round use. In the case of a wide stream or large pond, the bridge should be made with railings on one or both sides so that it is safe to walk on it.
The bridge is thrown from one bank to the other, it is logical to arrange it in the narrowest part of the reservoir, while the bridge divides the area of the water mirror into two parts that are not equal in size, the ratio of which is best calculated using the golden ratio rule. And the purposes of these two parts of one reservoir may be different, for example, one may be a bathhouse for people, and the other may be a place where nymphs thrive; one may be deep-sea, and the other shallower.
Being an integral part, bridges can play the role of an observation deck over the water surface. From here it is convenient to admire the blooming nymphs growing along the shore and reflected in the water,
The garden bridge is a mandatory element of Japanese and Chinese garden. The water mirror reflects the sky, coastal vegetation, the first rays of the rising sun, a pond in chinese style It’s impossible to imagine without graceful wooden or stone bridges; they are also good over fast ones.
How to make a decorative bridge for a pond with your own hands
How to make a bridge with your own hands on the site - many owners answer this question country houses looking for an answer depending on the type of landscape design. Bridges for a pond can be monolithic, or you can make it in the form of step-by-step slabs of natural stone, boulders, or even large plank circles or squares. A shallow pond will become much more attractive if you organize a bridge for the pond with your own hands like this: put several stones in the water, after walking over which you can find yourself on the other side. It is especially impressive if these stones are combined with the design material coastline. Stones are selected of approximately the same type and approximately the same size. Such a crossing is possible with a reservoir depth of no more than 45 cm. The upper surface of such step bridge should be 10 cm higher than the water surface. The minimum diameter of stones or slabs should be about 60 cm, then you can stand on them confidently. The stones are laid carefully and firmly, so that there is a distance of 60-65 cm between their centers, that is, the step size.
It is interesting to use boulders as a passage through shallow water when building a bridge with your own hands. irregular shape with a flat top, such “bridges” are especially good in streams where the water forms eddies around the stones. You can use not natural boulders, but their concrete imitation. Select stones of suitable shape that will not collapse from constant contact with water and frost and do this:


1. Free the pond from water and place it on the bottom in the right places using mortar approximately 5 cm thick foundation stones of suitable size. Their upper surface should be in the same horizontal plane.
2. When the mortar has hardened, use mortar to lay four bricks on each stone (2 pieces in 2 layers, one layer perpendicular to the other), the upper surface of the bricks should then protrude slightly above the water.
3. Lay paving slabs or flat stones with a diameter of about 60 cm on top of the bricks using mortar.
4. After 2-3 days, when the solution has completely hardened, fill the reservoir with water.
How to build a bridge and bridge over a pond with your own hands
A white wooden bridge over a pond can be easily created using available materials. Before building a bridge, you should prepare everything you need. The following is presented detailed instructions how to build a bridge with your own hands on the shore of a pond on the site.


1. Drain the water from the pond and place each boulder on thick layer thick mortar with the flat surface facing up. Level them in height using mortar or concrete slabs, laid unnoticed under the stones. Top part stones should lie in the same horizontal plane.
2. Let the solution dry for 1-2 days.
A bridge cannot appear in some place by chance; there must be a path leading to it; by the way, it will successfully connect. If a stream or pond is not very interesting, a bridge will distract attention from it and make it more impressive.
The appeal of this garden element so great that sometimes bridges are built in the absence of practical need, for example, a wooden bridge on a dry area leading to wooden gazebo, points the way and gives a sense of unity of style.
Decorative garden bridges in the country and their photos
Bridges at the dacha are equipped and finished using the same construction and finishing materials, as for paving paths and platforms, lining gazebos and stationary ones, as well as when decorating the shoreline of a pond or.
Often, to extend the life of bridges, a combination of wood and metal base, which is in direct contact with water.
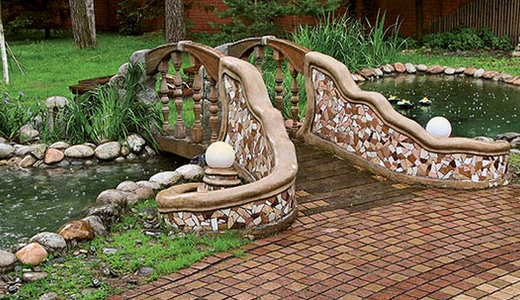
If there are compositions made of stones in the garden, then the decorative bridges in the dacha can be made of stone, for example, sandstone or granite. In order to build a bridge across a narrow stream, it is hardly worth constructing a bulky structure; a large sandstone slab placed on both banks of the stream will be practical and will make a strong impression; such bridges made of solid untreated stones look natural and very Japanese. If you don't have such a large stone at your disposal, you can make a stone bridge using two steel beams or thick logs and several large enough stone slabs covering them.
An Art Nouveau style garden will suit elegant wrought iron garden bridges made of metal with a complex pattern of flowers with intricately intertwined lines. When metal oxidizes in air, a natural patina is formed, which gives a special charm to the entire structure; artificially patinated metal can also be used. A metal bridge, partially entwined with a small graceful vine, such as a prince, looks good. Near such a bridge you can place metal figurines of animals.
Look at similar decorative bridges at the dacha in the photo below:
Photo gallery
The style and proportions of a wooden bridge depend entirely on the design style of the site; it is important to think through all the elements garden design, keep them in the same style, avoid eclecticism and disharmony.
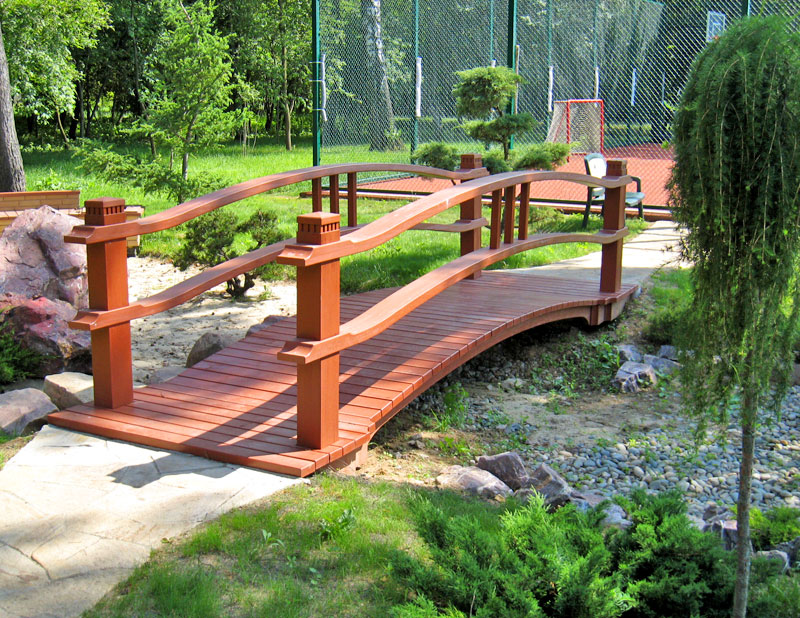
A straight bridge up to 2.5 m long consists of supports, spans, decking and fencing. For supports, thick timber or tarred logs are used, which are laid on support platforms in the form of ledges on the coastal slopes. Sometimes they limit themselves to this; such a bridge exudes austere minimalism, but crossing a stream over it is rather scary; it is more of an art object. In most cases, thick boards or poles are laid across the supports to form a deck. The main requirement is that the bridge should not bend. The flooring elements are laid with slots, then water will not linger on its surface. To ensure that the surface is non-slip, cover it with a metal mesh on top.
The fence is a protective vertical structure on one or both sides of the deck, clearly visible from afar and giving the bridge a special decorative look. For fencing, a rhythmic repetition of a pattern is usually used, such as a Roman cross. You can use balusters; they are attached to the flooring and railings are laid on top.
If the length of the bridge is more than 2.5 m, then intermediate supports, for example concrete or wooden piles. On a long straight bridge, a frame is used to attach the fence.
If there is a wooden buildings When large trees grow from timber or logs, it is better to make bridges from roughly processed wood, such as pine or larch. Special antiseptic treatment imparts durability to the entire structure without distorting the texture and color of the material. The wooden bridge looks impressive, which, almost touching the water, crosses and rests on the gazebo. In this case, the gazebo (also wooden) closes the perspective.
Zigzag bridges are of Chinese origin, but they are also popular in Japan. It is good to place such a bridge over a wetland, pond or thicket of Japanese trees. Zigzag bridges are made mainly of wood, but they can also be made of stone.
A small wooden bridge can be placed over a dry, winding stream of gravel or flat pebbles, framed by creeping shrubs and ground cover perennials.
If there is a drainage ditch in front of the front part of the fence (this often happens in gardening communities), then a bridge in front of the gate is very appropriate.

A 2.5 m long birch bridge across a ditch with standing water at the edge of the forest looks nice. Its supports, flooring and fencing are made of unsanded birch trunks and thick branches. For a fence 0.7 m high, rectangles crossed by two diagonals (Roman cross) were used. This crossing is simple, strong and stable; it can support the weight of two people.
Photo gallery
Garden bridge made of bamboo
In order to emphasize the oriental flavor of a corner of the garden, a garden bridge made of bamboo is used - bamboo sticks are placed across the supports and tied with rope. Such bridges can have railings in the form of a slack rope, which is attached to bamboo poles. Bamboo bridges span real “wet” streams or stylized gravel ones.

It’s a good idea to place a stone Japanese lantern near the edge of the bamboo bridge.
When creating a pond, try to make it so that you can get very close to the water. Small walkways or even a few large flat stones, along which you can walk some distance from the shoreline deep into the pond, will allow you to look into a completely different world. A pond is a habitat for plants and animals that are extremely interesting to observe.

Spacious wooden walkways, which should rather be called a platform or decking, will allow you to create a relaxation area by the water: a table with a couple of chairs above the water looks great, and a wonderful view opens up from here. The decks overhang the water, creating the illusion that there is water underneath, making the pond appear larger in size. On a sufficiently large platform you can receive guests, sunbathe on a sun lounger and enjoy the garden, you just need to equip it with the appropriate one.
The platform is constructed from wooden boards (preferably with a ribbed surface that does not slip in the rain) 3-4 m long and 12-20 cm wide or from stacked square slabs with a side of 45-60 cm, made up of boards located diagonally or under a straight line angle to the frame. Minimum thickness boards 2.5-3.0 cm. Wood of various species is used for flooring. If possible, it is better to use expensive hardwood; of course, such flooring is more durable and of higher quality. The surface of the flooring should be regularly brushed to remove dirt and algae.

The placement and size of the deck are determined by the location and size of the reservoir; it will only benefit if its area is large enough. Configuration wooden flooring can be the most intricate, the flooring can be adjacent to the reservoir, or you can make it so that the water will be completely located inside it. If you build round walkways over a small round pond, such a repetition correct forms will enhance the impression of this part of the garden.
Gardeners often locate a bathhouse next to a large, deep pond. In this case, opposite the entrance near the water, you need to place a walkway, which should be equipped with reliable railings (if you use a bathhouse and swimming pool all year round, then the railings should be wooden, but if they are metal, wrap them tightly with a rope so as not to “stick” in the cold). Attach a thick one to the steps plastic mesh with cells 20x20 mm to prevent slipping.
Stone and wood combine perfectly with each other, a paved patio may well be adjacent to the flooring, and a continuation of the flooring can serve step-by-step path made of stones for crossing a pond, as if floating on water.
Bridge for the garden
The simplest bridge for a garden can be made in the form of a wooden deck. Instructions for constructing a deck over a pond:


1. Level the surface of the ground on which the platform will be located, fill this area with gravel with a layer of about 5 cm.
2. Install after 1.2m concrete blocks with recesses for logs, which will be installed so that the flooring is located in a horizontal plane. The approximate cross-sectional size of the logs is 8 X 5 cm. They should not come into contact with wet soil and water. Air should flow freely under the flooring from all sides.
3. Paint the wooden parts of the structure or impregnate them with protective agents. Use a level to check that the top plane of the support posts is horizontal and attach the logs on top of them.
4. Cut boards to the appropriate size for the deck, seal or paint them and lay them down. Screw them to the joists with self-tapping screws, leaving 5-6 mm gaps between the boards so that rainwater flowed down freely, and the boards were blown with air. Make sure that none of the screws protrude above the surface of the deck.
5. Once all the boards are screwed, you can attach them vertically to their edges curb rail, covering the raw edges. It is better to choose it so wide that it goes down to the water level.
Decorating your site beautifully is a surprisingly pleasant and entertaining process. You yourself create a zone where you can relax both mentally and physically. This article will devote a lot of space to how to make a decorative bridge at the dacha with your own hands.
Colorful flower beds, all kinds of decorations - all this pleases the eye and makes the mind work even more in a creative direction. The construction of bridges on a personal plot will add attractiveness, uniqueness and brightness to your garden.
Kinds
Their purpose in terms of functionality is different today. As a rule, they used to serve to connect opposite banks ().
Now their main function is decorative finishing, highlighting different areas of the garden.
Therefore, when choosing wooden bridges for your dacha, you need to take care detailed analysis, in particular answer the questions:
- what will such an elegant wooden structure be used for?
- what areas of the garden it will connect.

In the photo - a simple Japanese wooden bridge
These points directly affect the location of the structure.
In addition, there are some other points:
- The design will depend not only on its location, but also where it begins and where it ends.
Advice: if there is a garden with stones on the site, the bridge should be designed simply in the style of Japanese architecture.
- In a garden with many trees, place an elegantly decorated bridge.
- Decorative bridges in the country, which are located over streams or artificial lakes, will look great. A gazebo on the shore will complete the harmonious picture of the garden.
If you decide to build bridges for your summer cottage with your own hands on your personal plot, the best material will be wood. Structures made from it look great and decorate any garden.
It should also be taken into account that failed parts are much easier to replace than concrete or metal structures. The latter sometimes require a thorough rework or you will have to ignore the damage that has occurred.

What to consider during construction
- Maintain proportionality and density of trees planted next to the structure. Avoid installing a small bridge directly under a dense planting.
- It is preferable to place it so that the path that will lead from it is directed deep into the site. If you plant perennial deciduous plants and bright beautiful flowers on the banks of your stream or lake, it will look quite elegant.
- Bridges around which grapes, fragrant wicker roses or clematis will curl will become romantic.
What you will need:
- Wooden boards, screwdrivers, hammers, sandpaper. The price of the material is quite affordable for everyone.
- Saw and plane, drill and drill bits for it, paint brushes.
- Ruler, protractor, pencil, varnish, file, screws and nails.

Phased construction of a country bridge
| Foundation | Any structure requires a reliable foundation. For our design it will be wooden boards width of at least 120 mm, thickness of 60 mm or more. The length of the foundation is selected based on the size of the structure, but it is better to make it 500 mm longer to make it easier to secure the bridge in the required place. |
| Form |
You can achieve a rounded foundation by installing boards on the base additional elements, which can give the bridge the desired roundness. |
| Material processing |
|
| Installation | Installation is carried out on a horizontal surface. Lay two parallel boards intended for the foundation and attach the steps of the bridge to them. Boards that are small in width look great, but they will need some work. |
Tip: before hammering in nails, the instructions first recommend making a small hole in the board with a drill.
This will prevent cracks from appearing in the wood and, therefore, increase the service life of the structure.

In the case when you plan to build a stepped bridge, you need to attach the risers to the foundation, forming the base of the steps. Fix boards of small width on top, which form the outer fabric of our structure.
Having finished with external finishing bridge, we make supports that are located parallel to the steps along the edges of the bridge. They serve to hold the structure together and lift the structure.
To make a railing, buy balusters or use regular boards small thickness. They need to be sanded and treated with an antiseptic for protection.

Self-made railings are usually made straight. To achieve a rounded shape, you should calculate the height of the last balusters, provide for the joining of the railings and assemble the bridge using fasteners.
Tip: treat the constructed bridge with a special wood varnish. This will increase the reliability of the structure’s protection, and the wood will acquire a beautiful color.
Conclusion
With the help of decorative bridges on suburban area It’s easy to create an original atmosphere. They will not only complement the composition, but can also become its center of attraction. The best materials to use are wood, which must be properly processed for long-term use ().
The video in this article will help you find additional information on this topic.
Minolta DSC 
August 5th, 2015 , 12:11 pm
Original taken from print_design to the Humpbacked Bridge at the dacha. Made of Metal Project
Plans have long been hatched to make humpback bridges on the site. Some dreams are only about 20 years old.
This year, thanks to the found “masters” who undertook to bend the parts, the project was realized. Why the master is in quotation marks will become clear later.
Very detailed step-by-step master class on how to make a humpback bridge with your own hands.
By clicking cut, you guarantee that you are able to view 87 photos with a capacity of 36 megabytes.
01. It all starts with drawings.
As the play progressed, profiles were replaced with others, something was added, but much more was removed. In general, as usual, we sculpted, essentially, from a sheet of paper.
02. The preparations were delivered. You can't look without tears. The metal was bent by some crooked mediocrities. It’s a pity that we bent two sets of blanks at once. It would have been necessary to bend the manufacturers as well, but we forgave the poor.
(No, this is not a bottle of Žatetsky Hus beer, which we use to celebrate the beginning of construction of the bridge - this is gasoline)
03. I chose four arcs that were closest in shape. It was not easy, they are all different.
04. The design is oversized; at our dacha we don’t have a workbench for such a thing. I cook on a paved area. I achieve horizontality using different linings made of wood. Great way. Don't throw away scraps of plywood and other stuff. Even the linoleum came in handy somewhere.
I check it with a laser level. Everything comes out quite accurately, no “screws”.
05. On the welded first side, I lay it on top of the second and weld it.
06. Ready - move aside!
07. I make everything that goes underground from a corner. We have it in bulk, it’s not clear where to put it, and it’s a pity for the profile.
“Fangs” from all sorts of scraps are welded onto the legs so that they stick better in the cement.
08. In progress.
Now that it is clear that there is nowhere to retreat, it’s time "destroy to the ground, and then..."
09. This is an old bridge that has served for 10 years. It looks organic.
10. But it is rotten through and through and it is downright dangerous to use it.
11. Breaking is not building
12. No bridge!
13. I move with tools to the distant cardon
15. Key elements holding the flooring. I don't regret the electrodes.
I carefully brew all cavities where water can leak. I don’t clean the seams - it’s not necessary, it won’t be visible, and it’s extra work.
16. The structure emerges.
17. I weld the buttresses.
19. Now you can put it in place and fill it with concrete.
Everything below is painted with high quality. Then you will no longer have access to this.
It was decided to quickly pour it in order to give it time to sit well and harden, since a decent break in work was expected.
20. Four holes for almost the entire depth of the drill (about a meter) on both banks. They immediately filled with water.
21. Delivered
22. Aligned vertically
23. And he pounded it well with broken bricks
24. The process of pouring concrete.
At first I made it thinner in order to thoroughly fill all the cavities in the bottle. The last batch for each leg is thicker.
25. All groundwater was squeezed out by concrete without problems. I don’t know what brand it turned out to be at the bottom, but it will stand. The entire bank will be washed away, but the bridge will not move.
26. And on the other side it’s the same.
Let's move on to the next step - welding the balusters.
27. First, I bend the internal arcs to the desired shape.
A couple of trees are just right for this
28. Trying it on in place.
30. Smoke break whatsapping (from whatsapp)
Interestingly, enterprises now allocate special places for perevatsapa with fast wifi? Especially for those who do not smoke and he will die healthy.
31. Be sure to mark the location of each half of each arc, because then they will be dissected and the main thing is not to confuse which is which.
32. I work in such conditions
Meanwhile, the process of preparing the wooden flooring is underway.
33. A larch board was selected that had been lying idle in the barn for several years. The surface is “corduroy”.
In general, as far as larch is concerned, it is a strange and dangerous material. This is not the first time I have been convinced that when it dries, it releases hard and sharp chips that can cut you like a scalpel.
It was the same this time. Therefore, the reverse side of the boards (the one with fewer grooves) was chosen as the front side for the flooring. It turned out to be in better condition than the facial one.
Well, the hope is that no one will walk on these bridges barefoot.
34. The boards are first treated with an antiseptic. Are dried
35. Then they are generously soaked in “working off” - machine oil.
Traditionally, my father does all the woodworking. Well, I don't like working with wood.
Let's return to metal.
36. Brought a wheelbarrow full of tools.
37. Welded arcs
38. The process of cutting balusters. Each was customized to fit. Not one is the same.
39. The first of 4 spans is ready
40. It's already two. Step by step.
41. I cook while standing in the water, of course.
42. It was easier to weld the balusters “on land”. But as I said, I wanted to pour the concrete faster so as not to waste time. Now I'm spanking...
43. The working day is over
Two seconds to think about it and I’ll give the correct answer. Look at the photos above.
Answer:
I mean the ends of the handrails and buttresses.
45. The ends of the handrails were made by hand-assed metal benders. Honestly, such people should be driven out of the profession.
46. I can’t watch, I cut off the front sight for nothing.
It even looks better this way.
47. And this is a waste.
As for the buttresses, they were changed from the original drawing. But even this form, invented by me, I don’t really like. She does not live with the smooth curves of the bridge. But let’s close our eyes to this for now. He will endure it, he will fall in love.
So - the end of the handrails.
I'll make my own.
I don’t have a bending machine for bending profiles. Making homemade takes a long time.
I chose a labor-intensive but error-free method - notching.
48. Based on the difference in the outer and inner lengths of the arcs, I calculated how wide the notches should be and in what quantity. I marked the profiles in 1 cm increments.
49. First notched in a circle of 1 mm. I didn't cut it all the way around 2.25 mm. It doesn't make sense until the end, because... there remains a gap from the millimeter circle.
50. I received such a “washboard”
51. And he bent her
52. Fixed the desired bend and brewed. I did not touch the inner surface, because... it's difficult to clean.
53. The logo of the Moscow Department of Transport is ready
54. Perfect connection of the inner surface
55. Worms...
56. The length was generous.
After fitting it in place, I sawed off the excess
57. I welded the open end (I hate plastic plugs) and cleaned it thoroughly.
58. And - the ends of the handrails are ready!
60. Compare with what was
62. I strengthen the banks with pipes and boards to prevent erosion. Because it won’t be visible, don’t look for special beauty.
64. Now is the time to fix another problem of metal benders - crumpled profiles.
65. I putty the worst holes in the handrail
66. Layer by layer
67. I work with these automotive putties.
Below - rough with fiberglass filler. Above is the finishing line.
They harden very quickly. This is convenient, but you need to act quickly, if you hesitate a little, start a new batch.
68. Layer finishing putty. At the same time I putty the inner surfaces of my handrail ends.
71. Ready for painting.
72. Before laying the flooring, everything must be thoroughly painted. Classic color - yellow-green black.
73. It immediately started playing differently...
74. The final marriage of metal and wood
75. Can be used
77. But first, it is necessary to hold an official opening ceremony of the bridge.
78. In the meantime, the invited persons are gathering...
79. Children have a photo shoot
80. The honor of opening the bridge is given to the elder of the clan.
The ancient tradition of opening bridges says: The builders of the bridge are required to stand under it and stand there while a herd of animals with loaded carts is driven across the bridge. Thus, the builders make it clear that they are so confident in the quality of their work that they bet their lives on it. If the bridge collapses, they will be crushed.
81. The builder crawled under the bridge
82. A herd of animals with loaded carts
83. The bridge has not collapsed, you can use it!
Satisfied builder.
84. Satisfied pedestrians