Restore an old kitchen set by hand. DIY ways to update your kitchen cabinets
The dream of many housewives is new kitchen furniture. Unfortunately, not everyone has the opportunity to often replace a worn-out headset with a new one. But with a creative approach, it’s quite possible to update the old one. kitchen furniture with your own hands.
Maximum kitchen update with minimum costs carried out in various ways. To do this, you can refresh individual interior details:
- do new facade on the kitchen cabinet;
- decorate the wall with new fittings;
- use decorative elements.

For work you Tools and materials needed:
- acrylic lacquer;
- primer and paint for wood;
- brush or roller;
- wood glue;
- metal ruler, tape measure;
- sandpaper;
- scissors;
- decorative overhead elements, furniture fittings;
- ceramic tiles, rattan;
- molding or decorative strips made of wood.
Restoration of a damaged tabletop (video)
Changing the color of the facade
Painting the facade in a different color will help radically change the appearance of your kitchen unit. Before this, the cabinet must be disassembled, fasteners and fittings removed. The wall is cleaned of old varnish and paint. They are removed with a solvent or sanded with sandpaper.
When the surfaces are cleaned, a primer is applied to the cabinet. After 1.5-2 hours the painting itself takes place. Choose waterproof paint. Automotive is also suitable for these purposes.
If you don't like using brushes, try using spray bottles. This is very convenient if you want to decorate your closet by applying an intricate pattern using a stencil.

We use decor
If updating furniture solely by painting seems boring to you, you can decorate the wall with additional decorative elements. When the main painting is done, The following is attached to the façade parts:
- stucco;
- overlays;
- molding.


They are used both separately and in combination with each other. Such elements add texture to the appearance of the furniture. Let's consider technology for decorating a set using wooden molding:
- Choose thin strips of convex semicircular or carved shape.
- Markings of the future pattern are applied to the surface of the facade.
- If the molding will be attached along the perimeter of rectangular surfaces, the edges are cut at an angle of 45 degrees.
- The planks are attached to furniture using glue to fix wood products.
- Held final painting facade.
Stucco molding looks beautiful as decorative inserts in the corners between the molding strips.
If there are unused ceramic tiles left after renovation, they are also perfect as a finishing material. It can be used to cover both a wall and a kitchen table.
Decoupage of old kitchen furniture (video)
Porcelain mosaic
If the prejudice that you can’t store broken dishes in the house is not about you, then it may well become original finishing material for furniture decoration. Porcelain mosaic tiles on doors or table surfaces are not only very beautiful, but also functional. Such materials are resistant to temperature changes, high humidity and other harmful factors.
To decorate furniture with broken porcelain:
- Select a pattern and draw a sketch.
- Transfer it to your work surface.
- Apply adhesive.
- Lay out the fragments according to the pattern.
- Fill gaps between porcelain with matching ceramic tile grout.


Updating facades with rattan
Rattan is a very multifunctional material. It is used for both furniture production and decoration various surfaces. It is very flexible and at the same time very durable.
They work with rattan using the following technology:
- Measure the wall to calculate the required rattan length.
- Soak the roll of material in cold water before work for 20-30 minutes.
- Cooked evenly wooden planks, with the help of which the rattan will be pressed to the surface during the gluing process.
- Rattan is cut according to measurements.
- Glue is applied to the cabinet, to which the finishing material is pressed.
When the elements are firmly glued, the final painting of the surfaces is carried out.
Techniques for working with rattan rods (video)
Covering a cabinet with photo wallpaper

To update kitchen wall You can use a very interesting technique - pasting with photo wallpaper. The images on them can only be limited by your imagination. After all, today it is possible not only to choose a color and pattern in a store, but also to order any other one from a printing house. For this you can also use photographs from your personal archive.


To wallpaper a closet:
- Furniture surfaces are cleaned of old varnish and paint grinder or sandpaper.
- Wipe off dust and cover with a layer of primer. If separate photographs are used, after priming the furniture is painted in a single color.
- Paste them with wallpaper or directly with your own photographs.
- There is no need to fill all the available space with personal photos. It is enough to decorate the doors with them.
- After the glue has dried, the furniture is coated with colorless varnish.

Complete facade replacement
If the furniture is so worn out that painting will not significantly affect its appearance, the cabinet will help to update complete replacement facade. This method is more expensive than all of the above, but it is still more economical than buying a new headset.
For modern models modular furniture Facade parts can be ordered directly from the manufacturer. All you have to do is screw new doors into the old place and, if necessary, replace the drawers. For more ancient, rare furniture, the facades will have to be made according to individual measurements.
To install facades yourself, you will need:
- Remove old doors.
- Paint and varnish new untreated pieces to match the furniture.
- Assemble the parts by screwing them into the old place.
Adjusting fittings on kitchen facades (video)
Conclusion
Now that you know how to update furniture with your own hands, all that remains is to choose the option that suits you and get to work. As you can see, this does not require significant material costs and special skills. Only a set of standard tools, creative approach and the desire to breathe new life into your old furniture.
Examples of updating old furniture (photos)


U experienced craftsman restoration of kitchen facades will not take much effort and money, and a non-professional can do it similar work, if you get acquainted with useful tips. 
Similar articles:
How to update a kitchen set with your own hands: interesting ideas and useful tips
The front part of a kitchen unit is called a facade, in particular, the front side of its doors and drawer lids. For its manufacture it is used:
- natural wood;
- chipboard (chipboard);
- fibreboards medium density(MDF);
- plastic.
Special dyes, glass, metal, and self-adhesive films are used to finish the front surface. Sometimes these materials are combined with each other, for example, when creating stained glass windows.
If damage occurs (holes, cracks, fire marks), you need to completely renew the coating. Handles, hinges and other fittings are removed from the part, cleaned and dried, and then a film is glued on. Desired color and they will help you choose the texture in a furniture company or a specialized store, the main thing is to show a sample.
Good to know! Most often, the film peels off near heat sources (stove, oven, radiators) and water (sink).
Repair of wooden surfaces
Monolithic elements of sets made from solid natural wood, restored by re-painting the facades.
For the kitchen it is better to choose enamel rather than paint. The first has more high degree abrasion resistance, less fading.
Acrylic enamels have water base. Having chosen to paint kitchen wooden facades with this material, it is recommended to apply on top protective layer from transparent varnish. Alkyd enamels do not need such protection.
Painting kitchen facades is a popular method because it does not require much expense and takes little time. Most often, a different color is simply applied on top of the old, washed and degreased layer.
For major damage ( deep scratches, holes, traces of fire) it is necessary to prepare the surface from natural wood. old paint removed using chemicals (washes) or heating with a hairdryer. After this, the wood is cleaned with fine emery cloth. Deep damage must be filled with a special putty for wood. To ensure that the composition holds better, cracks and crevices are cleaned of dust and debris.
The putty is applied using a plastic spatula, pressing it in so that it fills the entire space. Otherwise, it will sag and depressions will appear.
The next step in restoring the coating is applying a primer. It will create better adhesion of the base to the paint, play the role of a protective layer, and extend the service life of the product.
The last stage is coloring. It is done with a paint roller or brushes different widths. Narrow ones are used to process thin relief parts (they are painted first), wide ones are used for panels and other planes. For best result It is recommended to apply several layers of paint.
Restoration of glossy coatings
Another way to restore the kitchen facade with your own hands is varnishing. This method allows you to show the beauty of texture different breeds, gives the furniture an expensive and representative look.
In order for the surface to sparkle with gloss, it is pre-prepared. All fittings are removed, after which the paint from the facade or old varnish is removed. The wood is cleaned with sandpaper, first coarse-grained, then fine.
Existing cracks in kitchen facades are sealed with putty, which is matched to the color of the wood. To make it look more similar, sometimes colored pigments are added to it. The putty must be dried before you begin varnishing the facade.
 If necessary, use a special transparent primer. She:
- levels the surface;
- creates a protective layer;
- enhances the texture of the source material.
The peculiarity of working with varnishes is that it is applied in several layers. The first layer is made as a base layer, allowed to dry, after which the next one is applied. Last layer is made the thinnest and most transparent. It gives the facade a glossy shine and enhances the depth of the pattern.
The varnish should be allowed to dry before hanging the doors in place. Drying it with a hairdryer is not recommended. Characteristic ripples may appear. It will ruin the appearance.
What do you do with old furniture?
If your kitchen has lost its former attractiveness, the furniture has worn out under the influence of steam and grease, you should not sit idly by. However, hurry to replace kitchen set You shouldn't go for a new one either. If the cabinets, table and chairs are still quite suitable in functional terms, then throwing them away is a rash decision. Do-it-yourself restoration kitchen furniture will help you save family budget, and our guide will tell you how to do it beautifully, interestingly and without much difficulty.
How to update your kitchen with your own hands: ways
You can decorate a room so that it sparkles with new colors without significant costs. With a minimum of effort, you can give new life to your kitchen furniture by upgrading its appearance with your own hands. There are several types restoration work, which a “home master” can do:
- updating of fittings;
- pasting with self-adhesive film;
- varnishing and painting;
- fabric trim;
- gluing tiles;
- fabric upholstery of seats.
Taking advantage the listed methods, you can restore kitchen facades, tables and chairs. And some interesting ideas, given in the article, will help you decide on the new design of your kitchen.
We restore the kitchen set
Facades
Let's start with work that does not require the use paint and varnish materials. You can update facades using vinyl film, decoupage techniques and molding.
Pasting with film will help dramatically and without special costs improve the appearance of furniture. It can be varied - textured, smooth, imitating wood, marble, etc. It is convenient as a material for redesign because the damaged area is easily replaced with a new one.
Sequence of work:
- Take measurements of cabinets and drawers: height, width. For bends, leave allowances of 2 cm.
- Open the film using sharp scissors.
- Prepare the facades: unscrew the handles, clean and degrease the surfaces.
- Apply the film from bottom to top, gradually removing the back layer of paper.
- Smooth the surface using a rubber roller.
- Screw back the removed hardware parts.
To glue the film, remove the facade elements to take measurements and paste on a flat floor surface. If done by weight, the work may turn out sloppy.
Decoupage- a technique known to everyone, which has not lost its relevance today. In this case, restoration kitchen facades can be done using thick fabric or oilcloths with a pattern. Decorative materials should be selected based on general design your kitchen. This type of finishing is most suitable for Provence, country, and vintage styles.

The decoupage process is quite simple:
- Clean the surface, ensuring a perfectly even coating. Sand it with sandpaper.
- Glue the pre-prepared fabric to the surface of the facades using regular PVA glue.
- Varnish the finished elements with acrylic varnish in 3-4 layers. A long and narrow brush is best for this.
Using the decoupage technique, you can revive not only wooden facades of furniture, but also plastic and even glass. You just need to thoroughly degrease the surface and you can get to work.
Molding will allow you to change your appearance almost beyond recognition old furniture in your kitchen. Its essence lies in the fact that overhead wooden or plastic parts. Finish options:
- wooden planks;
- carved elements;
- imitation stucco.

Selected parts are cut out required sizes(or buy ready-made ones) and glue them to the facades with glue.
By combining molding with other types of redesign, you can completely transform old set. For example, complement it with painting.
Coloring is one of the most economical, but at the same time effective ways update the furniture in the kitchen. If you want radical changes, then simply choose a paint that is contrasting with the original color. Restoring kitchen facades using this method will be more thorough and practical if you use auto enamel for painting. It is resistant to temperature changes, acidity and humidity, which means the result of your efforts will last much longer.

Painting work is carried out as follows:
- The facades are being dismantled. Areas that are not to be painted are sealed with mounting tape.
- Surfaces are plastered with sandpaper.
- Apply wood primer in 2 layers.
- Painting is done using a brush, roller or special spray gun.
An original solution would be to use glisal instead of regular paint. It is translucent and thicker. Apply it to the surface in a thick layer and use a damp sponge to make any patterns without waiting for the glitz to dry.
Varnishing will allow you to carefully renew the natural coating, returning it to its attractive appearance. Using varnish with pigments, you can give wooden facades different shade. The process is practically no different from the painting procedure, with the exception of the last step - instead of paint, several layers of varnish are applied.
To avoid unpleasant odor When carrying out varnishing work, the use of a special acrylic composition will help.
The stain is applied similarly to varnish. It will improve furniture set made of mahogany, will give it a retro look. The facades should be covered with stain in several layers - 3-4 will be enough.
Accessories
Replacing or repairing these furniture elements will make it easy to improve the appearance and functionality of your kitchen set yourself. You can update handles, hinges and guides yourself.
Handles of a different design will easily and unobtrusively add new notes to a boring kitchen interior. They will look appropriate only when replacing them on all cabinets and drawers.
Handles made from combined materials look interesting. For example, wooden ones with glass or metal inserts.
Hinges on cabinet doors may become loose or partially come off. In this case, it is recommended to move them to a new location. It's very easy to do this:
- dismantle the old ones;
- mark holes for new ones;
- drill holes;
- secure new hinges.
Old holes should be sealed with acrylic-based putty, the surface of the “patch” should be leveled and a final layer of paint or varnish should be applied. The putty is applied in several layers.
Guides in kitchen cabinets can also fail. In this case, it is better to replace them with new ones - ball ones. This is done in two simple steps: unscrew and remove the old guides, fasten the new ones.
Renovating the dining area

Conversion appearance kitchens do not end with just facades. Restoration kitchen table with your own hands, as well as a small repair of chairs, will allow you to completely update your boring and time-worn interior.
The dining table loses its aesthetics earlier than other furniture and becomes deformed. However, throwing it away would be a rash decision. A small restoration of the tabletop and legs will transform your dining area almost beyond recognition. Kitchen table redesign options:
- painting and varnishing;
- decoupage;
- tile finishing.
The first two methods are carried out similarly to updating facades, so we will not dwell on them. The most interesting and an unusual option restoration of the tabletop is finishing it decorative tiles. This method has several significant advantages:
- tiles are a durable and reliable coating;
- it is easy to care for, it is not afraid of moisture;
- hot dishes can be safely placed on a countertop with such a coating;
- variety of colors and design options.
Decorating a table with tiles yourself is not difficult at all. Stages of installation work:
- Clean and degrease the countertop surface.
- Apply special tile adhesive to the base using a notched trowel.
- Lay out the selected tiles in the desired composition, pressing them tightly to the base of the table. Monitor the position of the parts using a building level.
- Now you need to rub the seams with the mixture intended for this. It can be found in any hardware store. Apply grout only after the glue has completely dried.
Complete the restoration of the table by decorating its side parts with special edge profiles. This will give your table an even more aesthetically pleasing, elegant look.
Do dining area bright accent in your kitchen. To do this, take a tile of various colors and break it into pieces different sizes and shapes. Lay out your own ornament from the resulting multi-colored mosaic. This tabletop will look original and stylish.
Chairs are an equally important piece of kitchen furniture that may also need restoration. The legs can be easily revived by painting or varnishing them. The seat requires a more careful approach. Replacing the upholstery will allow you to completely change the appearance of your chairs. It is done as follows:

- Dismantle the old seat by carefully removing fabric covering and upholstery.
- Make a pattern according to the shape of the seat from a thick piece of cardboard.
- Using it, cut out blanks of the fabric base and the soft part (from foam rubber, batting). Remember to leave at least 10cm on each side for hem.
- First glue the foam to the base of the seat. You can use regular super glue for this.
- Stretch the prepared fabric around the entire perimeter of the chair and secure it with a construction gun.
In the event that the old seat is only frayed, but not deformed, new upholstery can be pulled over it, this will significantly reduce the time and complexity of the process.
By using one of these DIY kitchen cabinet redesign methods, you can easily freshen up other items in your kitchen. For example, update work area– tabletop and apron, finishing them ceramic tiles or using the decoupage technique. The process is no different from restoring facades or a kitchen table in a similar way.

Purchasing new furniture is a faster and less labor-intensive process than complete restoration kitchen set, but not the most rational. If the cabinet fronts, table and chairs are still quite suitable for use, do not rush to say goodbye to them. Using our recommendations, you will special effort You can give these pieces of furniture new life. An added bonus will be saving a significant amount of money, which can be used for other important changes in your home. Or just go relax, you deserve it.
Any, even the highest quality and reliable kitchen furniture wears out over time and loses its attractiveness.
And in order to reduce the cost of a new kitchen set, owners have to think about how to update the furniture in the kitchen with their own hands.
In fact, this task is not at all as difficult as it might seem at first glance. If you have really high-quality kitchen furniture installed, then you can extend its “life” almost indefinitely.
Yes and with modern models furniture not designed for long service, you can cope - the main thing is not to give up and show a creative approach.
Updating kitchen furniture
Approaches to updating a headset
Restoring a kitchen set is a fairly multifaceted task.
Approaches to its implementation depend on many parameters:
- What condition is the furniture in?
- What damage is there on it?
- What do we want to get as a result?
- What means, materials, and most importantly, what skills do we have?
Without answers to these questions, there is no point in starting repairs.

- Kitchen furniture made from natural wood is the easiest to restore. In general, the better quality the kitchen set was originally, the easier it is to restore it.
- The more damaged the furniture is, the more money will have to be invested in restoring it. In some cases - especially when it comes to inexpensive headsets based on MDF or chipboard - it is more rational to simply replace the furniture, since the cost of repairs will be close to the price of a new kitchen.
- It is often easier to radically change the appearance of kitchen furniture than to return it to its original state. Therefore, even if it seems to you that the kitchen cabinet or countertop is damaged beyond repair, do not despair - show your imagination and make yourself a completely new kitchen.
Decor instead of renovation
Before you start repairing kitchen furniture that has lost its original beauty, we advise you to think - maybe the repair can wait for now?
Indeed, today there are several ways to decorate kitchen furniture without radical alterations, while simply hiding the damage caused.
Therefore, if your kitchen set has lost its presentable appearance not as a result of wear and tear from old age, but simply due to pinpoint damage (scratches, chips, stains, etc.), you can use methods to disguise defects.

- Method one - use vinyl stickers. Modern industry offers a fairly wide selection of stickers made from adhesive-based polyvinyl chloride that is resistant to any impact. Such a sticker is simply applied to the damaged area on the kitchen facade or the back of a chair - and serves not only as a disguise, but also as an interior decoration.
Advice! It is necessary to carefully select stickers in appearance and color scheme so that they look like a natural addition to the kitchen design.
- The second method is decoupage (pasting furniture with decorative napkins). A special decoupage glue is applied to the damaged area, a thin napkin is placed on top of it, and on top - after the glue has dried - a layer of transparent acrylic varnish. Decoupage is one of the most popular methods of decorating furniture, and allows you to create a unique, unlike anything else interior.
You can see examples of kitchen furniture updated using decoupage technology in the photo in this article.

Both of these methods will not only hide minor damage, but also save time and money spent on repairs.
Well, if the damage to the furniture is serious enough, well, you’ll have to start a full-fledged repair.
Kitchen furniture repair
Restoring kitchen furniture using self-adhesive film
The easiest way to update kitchen furniture is to cover it with self-adhesive vinyl film.
Most often, kitchen facades are updated in this way, but other pieces of furniture can also be covered with film - the main thing is that they do not experience serious operational load.

Advice! To update your furniture, choose high-quality film, since cheap varieties of this material peel off from the base very quickly.
Below are instructions for updating kitchen facades using film:
- We remove the handles from the kitchen furniture, decorative overlays and other fittings that may interfere with gluing. We measure the surfaces that we will cover with film - the façade, sides, shelves, etc.
- We cut out the film according to the dimensions obtained - to make the work easier, you can use the centimeter grid applied on the back surface of the roll as a guide. In places where the film is folded, leave an allowance of about 20 mm.
- Before gluing the film, prepare the surfaces by thoroughly washing them with a damp sponge and a degreaser. The better we clean the surface, the more securely the decorative film will be applied.

- Then we proceed to the actual pasting. Peeling off a few centimeters protective film, apply decorative film to the surface and begin to smooth, gradually removing the protective layer. For smoothing, you can use a special plastic squeegee, or you can simply use your palm - whatever is convenient for you.
- If there is a small bubble under the film, you can try to “drive” it to the edge, or you can pierce it or carefully cut it.

Note! If the film is glued unevenly, it must be peeled off immediately (with a sharp movement), since after a few hours this will be much more difficult to do.
You can’t re-stick the peeled off film - it still won’t stick strong enough.
This method is one of the simplest and most accessible, since the price of the film used is low.
But the appearance of a kitchen updated in this way will not be the most attractive - that’s why other renovation methods are often used.
Painting kitchen facades
More in a radical way is painting facades and other elements of kitchen furniture.
This restoration method makes it possible to completely transform the kitchen - therefore it can be recommended not only when repairing furniture, but also when changing the style of the room as a whole.
Painting is quite simple:
- We remove the facades from their hinges and dismantle the fittings. We disassemble the remaining pieces of furniture intended for painting to facilitate the painting work.
- We thoroughly wipe all painted parts with a damp sponge, removing dust and dirt, and then degrease them.
- Place the prepared parts on a work surface previously covered with plastic wrap.
Advice! All work related to painting and varnishing kitchen furniture should be carried out on outdoors or in a well-ventilated area.
- Using a spray gun, apply a layer of primer to the furniture. Leave the primer to dry completely - this will take about an hour and a half.

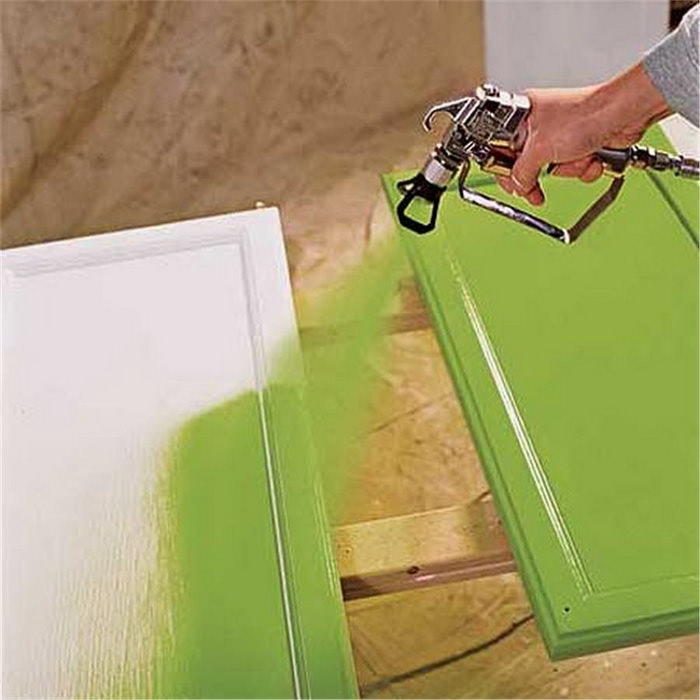
- When the primer has dried, we begin to apply the paint of the shade we have chosen (the painting procedure is shown in detail in the video). For painting, you can use a fairly wide brush, but it will be much easier and faster if we use a spray gun. We apply paint in several thin layers, after each application, allowing time to dry.
In this way, in just a few hours you can have a completely new kitchen - one that fits perfectly into your new design!
If the owners don’t like the kitchen set in their apartment or it has become dilapidated for one reason or another, then it’s time to think about how to update the kitchen set? It is not always necessary to purchase new pieces of furniture; you can easily update a set with your own hands.

The kitchen is the place where we spend a large number of time. Here not only food is prepared, but guests are received.
Therefore, a modern kitchen should not only be multifunctional and comfortable, but also attractive. You can achieve comfort with the help of a beautiful kitchen set.
If it is not possible to carry out repairs in a timely manner, then you can resort to more budget-friendly options for updating furniture.
Modern furniture decoration options
| Photo | Description |
 |
Option 1. Painting
All work is done using chalk paint. Paint will change the appearance of furniture beyond recognition. Thanks to the diversity color ranges and shades can effectively change the furniture. In order for the paint to adhere as firmly as possible, it is necessary to first coat the façade of the unit with a primer. Experts advise using moisture-resistant varnish as a fixing (surface) layer. The varnish is applied after the paint material has completely dried - no earlier than 24 hours. |
 |
Option 2. Self-adhesive film
This is an incredibly budget-friendly and attractive option to update your kitchen set yourself. This update may be a temporary update. The film is easy to stick, in addition, it is easily removed from the surface and does not leave marks or damage. The approximate service life of the film is three years. The best option for a kitchen set for such an update is solid facades that do not have corrugated parts. How to cover a kitchen set with self-adhesive film? Difficulties arise mainly when the gluing process occurs. Do not allow bubbles to form. |
 |
Option 3. Decoupage
An old kitchen set will get a presentable appearance thanks to the well-known decoupage technique. In this way, you can easily hide defects, scratches, chips and other irregularities on the surface of the headset. You can use a wide variety of shades and thematic designs. |
 |
Option 4. Moldings
Interesting and sufficient modern version updating the appearance of the kitchen set - moldings. You can purchase ready-made plastic or wooden planks. In addition, you can update your kitchen set with homemade slats. I note that you need to cut the required length at an angle of 45°. |
 |
Option 5. Decorative elements
You can make the inserts yourself from scrap materials, or you can use ready-made varieties. For example, elements of rattan fabric look attractive. |
To update the façade of a kitchen unit, it is recommended to use chalk (mineral) paint. Firstly, it has a thicker consistency and high adhesive properties. For this reason, it easily penetrates into layers of any material. Secondly, on modern market There is a huge variety of colors and shades.

Restoring a kitchen set with your own hands is possible with the help of a redesign. Redesign is the process of changing old furniture with new facades.
WITH modular kitchens It is easier to complete this task, since finding a suitable new facade will not be difficult. Exclusive kitchen sets will have to be replaced by other methods.
Stages of furniture renovation work
To update your kitchen set, you can use any of the five proposed options. Each of them has certain subtleties and nuances. My instructions will allow you to easily carry out all the necessary manipulations.

Before the beginning repair work is it important to understand how to remove a kitchen unit? Different variants decor means various ways Removing the kitchen unit:
- Removing cabinets. It is most often used when modeling furniture using decorative strips, decoupage or when covering facades with film.
- Removing the doors. It is used when painting furniture, as well as when decorating with moldings and decorative inserts.

Painting the façade
How to repaint a kitchen set with your own hands:
- First remove all handles and fittings.
- Use sandpaper to remove old material. At the same stage, the working surface is degreased. You can use alcohol.
- Primer. Facades can be coated in two or three layers. Each layer must dry thoroughly.
- Next, paint is applied. It is recommended to apply the paint in two or three layers. After the outermost layer has dried, the surface is varnished.
- Finally, old or new fittings and door handles are installed.

Self-adhesive film
It is important to use sharp scissors and a ruler. The facade covered with self-adhesive film is durable and durable:
- On initial stage All fittings and furniture handles are removed from the working surface.
- Measurements are taken and the film is cut.
- It is good if the entire working surface is first degreased using an alcohol solution.
- When gluing the film, please note that it is necessary to create a free sheet. It ranges from 3 to 5 cm, and is intended to go around the edge of the door and facade.
- The corner part of the film is cut at an angle of 45° and folded over each other. Thus, you get a beautifully decorated corner.

Decoupage
A prerequisite for decorating using the decoupage technique is degreasing the surface. You can use a specialized degreaser or alcohol:
- The second layer is removed from the prepared napkins. If necessary, you can cut out the desired design.
- Lubricate the drawing and the working surface with PVA glue.
- The façade is coated with protective varnish.

Conclusion
Today, decorating a kitchen set with your own hands is quite common, but there are not many reasons for this:
- First of all, it's great a budget option updating the usual appearance of the kitchen.
- Secondly, such methods are low cost.
- Thirdly, you get great opportunity independently realize your creative potential.
It is also noteworthy to note that the facades of the kitchen set are capable of performing not only decorative, but also protective functions. For example, self-adhesive film has a moisture-resistant effect, and plastic strips that can decorate visible defects formed during the operation of the kitchen set.
Watch the video in this article, and if you have questions, leave them in the comments and we’ll discuss them!