When covering a roof with corrugated sheets, what kind of overlap is made? We carry out the correct installation of corrugated sheeting on the roof
Warning /var/www/banya-expert..php on line 2585
Warning /var/www/banya-expert..php on line 1807
Warning /var/www/banya-expert..php on line 2662
Warning: Use of undefined constant WPLANG - assumed "WPLANG" (this will throw an Error in a future version of PHP) in /var/www/banya-expert..php on line 2585
Warning: count(): Parameter must be an array or an object that implements Countable in /var/www/banya-expert..php on line 1807
Warning: preg_replace(): The /e modifier is no longer supported, use preg_replace_callback instead in /var/www/banya-expert..php on line 2662
Warning: preg_replace(): The /e modifier is no longer supported, use preg_replace_callback instead in /var/www/banya-expert..php on line 2662
Corrugated sheeting can hardly be called an elegant or presentable coating; in these parameters it is significantly inferior to other roofing materials. However, bathhouse owners often prefer corrugated sheeting as an inexpensive and durable coating. Plus, you can choose a coating with a shade that best suits your general style the buildings.

Corrugated sheets are corrugated steel sheets. The corrugation profile is trapezoidal, providing the material with the necessary rigidity.

When choosing a roofing sheet, consider the height of the wave. The bigger it is, the higher mechanical strength roofing material. But there is also back side medals: the higher the wave height, the higher the risk of moisture seepage in the holes for hardware due to increased water pressure.
You should not choose corrugated sheeting with a wave height of less than 20 mm for the roof of a bathhouse. This material cannot withstand snow loads and is deformed if you move directly over the roofing during the roof repair process.
Prices for roofing corrugated sheets
roofing sheeting
Which corrugated sheet to choose for a bath?
| Profile | terms of Use | Sheet thickness, mm | Weight, kg / 1 m2 | Overall / working width (that is, taking into account the longitudinal overlap), mm |
|---|---|---|---|---|
| Pitched roofs. Has a groove to drain water and increase strength. Installation in areas with high wind loads is acceptable. | 0,5 – 0,9 | 5 - 12 | 930 / 860 | |
| Flat and pitched roofs, floors and load-bearing structures. Withstands very heavy loads. | 0,7 - 1 | 9,25 – 12,9 | 820 / 760 | |
| Load-bearing corrugated sheeting, characterized by maximum strength and rigidity. A pitched roof made of N-107 corrugated sheet will last for many decades. | 0,7 – 1,2 | 10,2 – 14,5 | 830 / 750 | |
| Inversion roofs. Relevant if you plan to have a bathhouse on the roof playground, decorative garden, gazebo, etc. | 0,7 – 1,25 | 8,65 – 14,85 | 973 / 930 | |
| The corrugated sheet is for walls, but can be used when arranging pitched roofs. | 0,5 – 0,7 | 3,87 – 5,57 | 1187 / 1150 |
Data from the table is used to determine required quantity sheets for roofing. To calculate you need:
- specify the length of one side of the roof and the useful width of the sheets used;
- divide the length by the useful (working) width of the sheet;
- Round the result up to the nearest whole number.
*Calculation for rectangular slopes.
- the length of the slope is 6 meters, and the working width of the sheet of grade S-8 is 1150 mm;
- convert meters to millimeters, 6 m = 6000 mm;
- divide 6000 by 1150, we get 5.21;
- round to a whole number, we get 6. This is exactly how many sheets of corrugated sheets will be needed for one roof slope, if the length of the corrugated sheet corresponds to the width of the slope.
It is recommended to give preference to corrugated sheets with a length no less than the width of the roof slope. Then, when installing the roof, there will be fewer transverse joints, and the waterproof properties roofing will be improved.
Note! The durability of a bathhouse roof directly depends not only on the quality of the corrugated sheets themselves and additional elements for them, but also on the correct installation of the entire system.
Additional elements: what to include in the estimate besides roofing material

For construction pitched roof baths may be needed:
- lathing materials;
- waterproofing materials (films, membranes);
- materials for roof insulation (if necessary) and vapor barrier;
- under-roof ventilation system;
- skylights, if provided for by the project;
- roof penetrations (for chimney, sewer and ventilation outlets);
- safety devices such as snow guards, ladders for roof repair/maintenance;
- materials for filing cornice and gable overhangs;
- strips: cornice, wind, abutments, valleys, ridge (plus ridge aero element). The length of the slats for most manufacturers is 2 and 3 meters;
- ventilation tape to protect the ventilation gap on the eaves from debris, insects and birds;
- drainage system.
On a note! It is worth purchasing repair paint along with the roofing material. It is useful for touching up minor scratches and abrasions.

Prices for repair paint
repair paint
Transportation and unloading: what to pay attention to
Profiled sheets are transported in vehicles that have the ability to top load the material. In this case, the dimensions of the trailer or body must be at least 20 cm larger than the dimensions of the roofing material. Packages with sheets are secured along their entire length and transported at a speed not exceeding 80 km/h.
When accepting the material, it is necessary to check the actual number of packages and make sure there is no damage or defects.
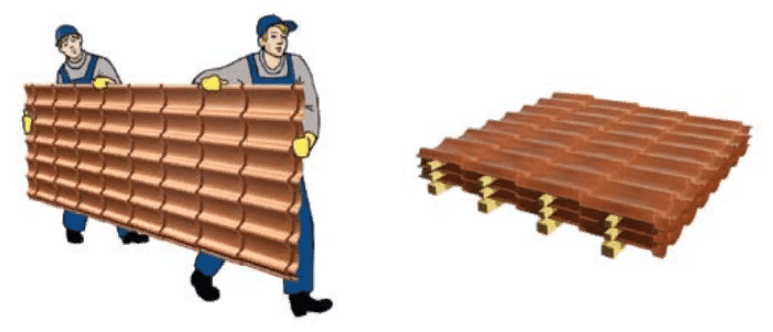
Unloading of corrugated sheets is carried out using lifting equipment with soft slings or traverses if the length of the sheets is more than 5000 mm. If you plan to unload sheets manually, then at least two workers should do this. When transferring sheets, it is important not to allow them to bend significantly and keep the material vertical.

Important! Don't forget to use work gloves.

After unloading, the sheets are laid horizontally. It is not recommended to store directly on the ground; it is advisable that there be a gap of 50-100 mm between the metal and the ground surface (you can use 50x150 mm boards, laid out in 50 cm increments).

Profiled sheet with protective film can be stored for no more than one month, and with original packaging no more than six months, provided that the material is protected from sun rays, no heavy objects are placed on top of it, no welding or other work is carried out nearby, during which the corrugated sheeting coating may be damaged. If planned long-term storage corrugated sheet, it is unpacked and transferred to an unheated dry room and stacked in stacks up to 70 cm high, with rows of sheets laid with identical slats).
Important! Be careful: when the original packaging is removed, there is a risk of sheets being moved by strong gusts of wind.
Sheathing for corrugated sheets: installation rules
The lathing can be sparse or continuous. In bathhouses, the roof sheathing is traditionally made of wood, edged boards or OSB-3. The choice of the type of sheathing is not spontaneous, but depends on the slope of the slopes and the selected sheet profile.
| Brand | Angle of slope, in degrees | Lathing type | Step, cm |
|---|---|---|---|
| N-60 | >8 | Sparse | No more than 300 |
| H-75 | >8 | Sparse | No more than 400 |
| S-8 | >15 | Solid | 1 |
| C-10 | Solid | 1 | |
| C-10 | >15 | Sparse | 30 |
| C-20 | Solid | 1 | |
| C-20 | >15 | Sparse | 50 |

For sparse lathing with a pitch of less than 600 mm, it is recommended to use an edged board with a section of 100x25 mm.

Calculator for calculating materials for sparse lathing


Today we’ll talk about such a popular building material like corrugated sheets. About its advantages and disadvantages, where it is used, and the technology of installation on roofs. After reading the article, you will not need to look for information in other sources. But the main emphasis here will be on information about corrugated roofing.

What is corrugated sheeting
This is a galvanized steel sheet with a thickness of 0.35 to 1.2 mm, which is formed by cold rolling into a wave-like material. It is in this way that the load-bearing capacity of sheets is increased. In this case, the shape of the corrugation can be wavy or trapezoidal.
Corrugated sheeting is made only from galvanized steel, which has high moisture-proof properties that resist metal corrosion processes, plus increase the service life of the material. Today, manufacturers offer painted profiled sheets or coated with a polymer layer. This, firstly, further increases the service life of the profiled sheets, and secondly, it becomes possible to select a coating with a specific color design.
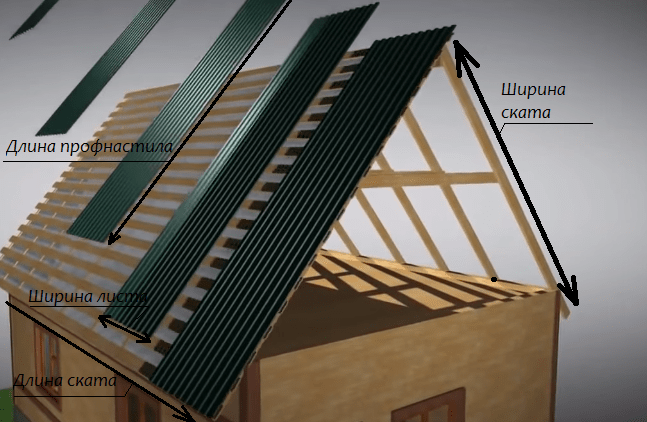
Main parameters of corrugated sheets:
sheet thickness;
profile height;
profile width;
working width of the material itself.

Dimensions of profiled sheet Source proftehnastil.ru
Advantages and disadvantages
Let us outline the advantages of the material:
small specific gravity, which facilitates operations carried out with it;
simple installation process;
low price compared to other roofing coverings;
variety of colors;
aesthetic appearance roofs.
As for the cons:
corrugated sheeting is a metal product, so it has high thermal conductivity, which requires roof insulation;
low sound insulation.
On our website you can find contacts construction companies who offer roof design and repair services. You can communicate directly with representatives by visiting the “Low-Rise Country” exhibition of houses.
Criteria for choosing corrugated roofing
The construction of a roof from corrugated sheets begins with the selection of the roofing material itself. Today, manufacturers offer three types of profiled sheets:
The marking “H” indicates bearing type, used specifically for roofing.
Wall models are produced with the “C” marking, which are most often used for the construction of fencing structures and cladding of wall and ceiling surfaces. Although we must pay tribute to the fact that corrugated wall sheets are also used for the construction of roofs of light canopies, terraces and gazebos.
"NS" - universal look, used in any building structures, and on the roofs too.

That is, it turns out that any of the above varieties can be used to cover roofs. But there is one here important nuance. If you want a roof built from corrugated sheeting to last a long time and withstand serious loads, then you need to choose a material with a thickness metal sheet not less than 0.55 mm.
Please note that this is the thickness of the metal, which does not include paint or a polymer layer. And if in the store you take a measurement with a caliper and it is 0.55 mm, then know that the actual thickness will be 0.5. Please also note that this size is not indicated separately in the certificate of conformity. It is indicated on the product labeling. For example, H75-750-0.9. “0.9” is the thickness of the metal.
As for the profile dimensions (height and width), the larger they are, the higher load bearing capacity material. But at the same time they decrease dimensions profiled sheets. This means that it will be necessary to purchase more roof covering elements. For example, corrugated sheeting grade N75-750, where 750 is the width of the sheet. Or C40-1000, where 1000 is the width. That is, the load-bearing capacity of the roofing material increases, while the area of the coating itself decreases.
Rules and nuances of installing profiled sheets on the roof
Installation of a corrugated roofing begins with the acquisition of the required amount of material. For example, if it covers a gable roof, then you need to measure the width of the slope and divide it by working width leaf. This is the quantity per slope. In this case, the length of the profiled sheets is not taken into account, because they are produced either six or twelve meters long. In this case, the store will cut the panels to the required length dimensions in 50 cm increments, starting from 0.5 m and more.
This is another great advantage of the technology of covering the roof with corrugated sheets. It ensures minimal waste. And if you correctly measure the length of the slope, then the roof covering will be without joints. The latter are places of possible leaks if you incorrectly take into account the angle of inclination of the slope and the size of the overlap of two adjacent elements.
We move on to installing a roof from corrugated sheets over wooden sheathing.
Lathing for corrugated sheets
For this, edged boards with a thickness of 25-35 mm and a width of 100 mm are used. The main design parameter is the distance between elements. It is determined by the size of the corrugated sheet itself. The greater its load-bearing capacity, the greater the distance in the construction of the sheathing. For example, for profiled sheet H75 the distance between the boards is 1.5-2 m, for C40 the distance is 0.5-0.6 m.

Video description
The process of assembling the sheathing for corrugated sheets in the video:
Roof covering
First of all, the roofing material must be lifted onto the roof. If the house is one-story, then the easiest way is to install two bars or two boards 50 mm thick with a distance between them less than the width of the corrugated board. The photo below shows how to install the boards.
Raising is done like this:
in one sheet at the edge in the middle they do through hole;
it is laid on boards so that the hole is at the very bottom;
You can put a couple more sheets on top;
a hook tied to a rope is inserted into the hole;
They pull the rope from the side of the roof, and push it up with their hands from below.
The installation itself is carried out on either side of the slope. The main task of the work manufacturer is to align the sheets exactly along the cornice, that is, horizontally. Therefore, it is important to accurately align the first sheet to be fixed. Fastening is done roofing screws with a wide hat. In this case, the screws are not screwed in completely, leaving the opportunity to once again check the accuracy of the corrugated sheet installation. And if everything is correct, then tighten the fasteners to the end.
The sheets themselves are laid overlapping with an offset in one wave. This ensures reliable closure of the joint between the elements, which ensures that there are no leaks.

Option for lifting profiled sheets onto the roof Source angara32.ru
Roof covering with separate sheets
If the installation of a roof made of corrugated sheets is made in short sheets (less than the length of the slopes), then it is important to carry out the installation correctly in terms of choosing the overlap of the sheets in the longitudinal direction. This parameter depends on the angle of inclination of the slopes. Here the dependency is:
tilt 5-10°, overlap 30 cm;
tilt 10-15°, overlap 20 cm;
tilt more than 15°, overlap 17 cm.
Fastening rules
The rules for covering a roof with corrugated sheets include items related to correct fastening sheets to the sheathing.
Attaching to the sheathing is done through the lower wave.
The fastening of two sheets in a transverse overlap is carried out in the upper wave.
The screws are screwed in strictly perpendicular to the plane of the roof slope.
You must not over-press the fastener or under-press it, because in the first case this will lead to a break in the gasket, and in the second to its loose pressing. Both reasons are the appearance of leaks in the place where screws are attached to profiled sheets, which will lead to leaks.
Places of fastening - along the upper and lower edges of the sheet through a wave, intermediate fastening over the entire remaining area through 2-3 waves for each element of the sheathing.

Installation and fastening of additional elements
Additional elements for the roof made of profiled sheets include ridge and gable strips. The eaves strips are installed before the installation of the corrugated sheeting begins, and they are attached to the rafter legs or the first lower element of the sheathing.
The ridge is closed with a special element, which is attached to the sheathing through laid corrugated sheets. The fastening is made through the upper wave of the roofing material. The fastening pitch is 20-30 cm. The length of the ridge element is 3 m, so they are installed overlapping each other with an offset of 10-15 cm.
Gable strips are installed for one purpose - to protect the roofing from the wind, so that it cannot penetrate under the corrugated sheeting and not penetrate it with its force. Plus, the aesthetic side of the matter is ensured, completeness roofing structure. The gable strips are attached to the profiled sheets in the upper outer wave. If there is a gable beam in the roof structure, then the same applies to it.
The standard length of the planks is 3 m, they are laid overlapping with an offset of 10 cm. The fastening spacing with self-tapping screws is 30-40 cm.

When choosing corrugated sheeting for roof construction, you need to choose it correctly according to the type of polymer layer applied. Manufacturers offer several polymers that cover profiled sheets.
The thicker the protective polymer layer, the higher the price of corrugated sheeting. It is necessary to take into account that expensive roofing material must be used wisely. He has good specifications, especially wear resistance and resistance ultraviolet rays. Therefore, it is recommended to use this material in areas with active loads. For example, with negative impact air with a high concentration of salt (coastal areas), with a high concentration of acids and other active substances in the air (large industrial cities).
Online roofing calculator
To find out the approximate cost of a roof various types, use the following calculator:
Video description
Installation of corrugated sheeting on the roof:
Conclusion
The correct choice of corrugated sheeting used as a roofing material, plus its proper installation, guarantees long-term operation of the roof. In addition to the economic side of the matter, you need to correctly calculate the required amount of roofing.
Quality roofing for your home is a guarantee reliable protection from leakage and destruction, which will primarily provide coziness and comfort.
Steel is one of the most durable and durable materials, but its only drawback as a roofing material was its weight. The combination of heavy sheets added up to a huge mass, which negatively affected the roofing frame. The problem that arose was solved by corrugating a steel sheet, which, having a low weight in relation to its size, retained its strong and rigid qualities thanks to the trapezoidal profile design - and this is how corrugated sheeting came into being.
For several years he recent years has gained great popularity due to its practicality in use, as well as minimal harm to the environment.
Corrugated sheeting - what is it, its pros and cons
Profiled flooring is produced by cold rolling from a sheet of hot-graded steel. During production, it can be treated with several layers of protection to increase strength and durability. At the initial stage, the workpiece is treated with anti-corrosion phosphate and only then primed. Top part The sheet is covered with a mixture of polymers, and the bottom is covered with a special varnish.
Thanks to the work done, the result is a durable material High Quality, which combines many more advantages than negative qualities.

- Material service life;
- Competitive price with other types of roofing materials;
- Material weight;
- Simplicity and time saving during installation and dismantling;
- Resistant to temperature changes.
The disadvantage of corrugated roofing is low level noise absorption, due to which sound insulation is significantly deteriorated.

Types of corrugated sheets
The widespread use of corrugated sheeting and not only in roofing has divided all its types into three classes:
- N - for coatings and ceilings, as well as permanent formwork(the best roofing material). Additional stiffening ribs, thickness and height of the corrugation make it the most reliable and durable option.
- C - for fencing fences and walls. This option costs much less than the previous one. The sheet thickness is smaller, and accordingly the service life and reliability are significantly inferior.
- NS - combined corrugated sheeting. The brand is also often used in roofing works, but in most cases for non-load-bearing roofs. It all depends on the angle of the roof slope, which is a lot important factor in winter. A thin sheet of steel and a flatter roof structure can lead to fatal consequences under snow pressure.

Roof angle
For correct installation corrugated sheeting, you must first take into account the slope of the roof. This will help calculate the required amount of overlap with the adjacent sheet.
- If the roof slope is less than 15° or more than 12°, the overlap of the sheets should be at least 20 cm;
- In cases of inclination angle 15°-30° - from 15 to 20 cm;
- A roof slope above 30° allows you to reduce the overlap to 10-15 cm;
- A slope angle of less than 12° requires additional work to seal overlaps using silicone sealant.

Preparatory work
Before the installation process itself, it is worth carefully and correctly calculating the amount of roofing material and its type. You can do this yourself or use the services of a company whose manager will help you.
- During transportation and loading, avoid strong bends, and also provide a flat surface for the means that will transport the material.
- Manual unloading requires one worker for every 2 m of length. When using lifting equipment, it is necessary to use soft slings.
- Transportation to the roof should be carried out using a log to connect the edge and the ground, not exceeding the norm of one sheet.
You will definitely need such tools as: tape measure, hammer, hacksaw, cord, rack, drill and drill bits.

Waterproofing and ventilation
Moisture released from the premises of the house always collects under the roof. To prevent this, it is necessary to organize the roof so that the temperature outside and under the roof are the same. To achieve this goal, you need to take care of proper vapor and heat insulation, as well as ventilation.
Waterproofing is most often installed before attaching corrugated sheets to the sheathing.

where 1 is the rafter leg; 2- waterproofing; 3- rafter strips (concrete lattice beams); 4 - sheathing.
Advice from the professionals: waterproofing film install it so that it hangs slightly, approximately 20 mm, in a position perpendicular to the roof slope. Installation should begin from the bottom edge of the roof to the ridge. Its overlap, sealed with adhesive tape, should be 100-150 mm.
Method of laying film on rafters:

To ensure the most efficient movement of air flow from the eaves under the roof ridge, organize ventilation holes between ridge strip and roofing sheets. In places where air flow is difficult, it is necessary to make additional channels for ventilation. However, the most in a simple way is placement wooden slats directly onto the waterproofing layer.
Rafters and sheathing
Rafter strips or steel purlins are mounted on top of the hydro- and vapor barrier if the profile height is 40 mm. Next, a sheathing is attached to them in the longitudinal direction, the pitch of which depends on the type of corrugated sheeting.
To organize the sheathing you will need:
- timber measuring 50x50 mm;
- board 32x10 mm;
- moisture-resistant plywood sheets with a diameter of 10 mm.

There are two types of lathing: solid and thinned. The first type is installed on ribs, ridges and around chimneys. The thinned pitch is 50 mm. Lay the boards at the same distance, this will facilitate the entire further process of attaching the corrugated sheets.
All wooden parts Be sure to treat with an antiseptic and fire-fighting mixture.
Experts advise laying a so-called diffusion gasket on top of the sheathing, which will prevent the formation of condensation. It is fastened with small nails with a wide head.

The arrangement of the sheathing should be treated with special responsibility, since the reliability of the entire structure largely depends on it.
There are also no exact standards for the thickness of the sheathing; everything depends on the same parameters of the profiled sheets and the length of the fasteners. The minimum cross-sectional dimensions of the sheathing are 32/100 mm. The board that is located along the cornice should be slightly thicker than all the others. Near the chimney it is necessary to organize the fastening of additional boards.
Eaves overhang
We lay the bottom row of corrugated roofing sheeting on the sheathing, thereby forming a cornice overhang. Its dimensions depend entirely on the height of the profile sheet.
However, initially it is necessary to take care of the eaves strip, which must be arranged below the waterproofing layer. This is necessary in order to wastewater and the resulting condensate fell into the cornice strip, along which it flowed into the catchment, and then along drainpipe. Otherwise, water will flow down the walls of the house, which will cause negative consequences.
Installation of corrugated sheets
It is worth immediately noting that the installation of corrugated sheets should be carried out strictly according to the instructions.
Cutting corrugated sheets
Of course, it is better to purchase corrugated sheets on the market that match the size of the roof, but often these two parameters do not correspond, so you need to know how to cut correctly and what tool is best to use for this.
The material must be adjusted on a flat surface, for example, on the ground.
A variety of tools can be used for these purposes, but it is best to use electrical devices like a drill with a disk attachment. If you couldn’t get such a tool, you will have to cut it manually using steel-based metal scissors or a fine-toothed hacksaw.
It is prohibited to use mechanisms with an abrasive cutting disk, for example, a grinder, to cut corrugated sheets. The reason is that such devices emit relatively large heat energy during operation, which negatively affects the performance of the material.
When cutting roofing material, the edges will not be damaged without damage, so it is necessary to take care of the paint in advance to match the color of the corrugated sheets.
We lift corrugated sheets onto the roof
When lifting corrugated roofing sheets onto the roof, difficulties often arise due to the dimensions of the material, so for comfortable work It is best to carry out this stage of work using a log.
They should be installed in such a way that one side rests against the ground, and the other directly against the eaves of the roof slope.
The distance between the planks should be slightly less than the width of the corrugated sheets themselves. Thanks to this system, two people can easily lift the roofing sheet for further installation. You can replace the logs ordinary stairs without railings.

Fastening corrugated sheets
Roofing with corrugated sheets should be done following the following technology:
- The sheets should be secured using hexagonal self-tapping screws 80 mm long and a sealing gasket. It is worth remembering that you should not over-tighten the screws, as this can lead to excessive density of the gasket, which may result in damage to the waterproofing layer.

- The sheets should be fastened at the bottom of the wave, and in the ridge elements and overlapping areas - at the top.
- It is best to start installation from the end of the slope. The side overlap should extend halfway across the sheet wave. However, if the slope is flat (the angle of inclination can vary from 8 to 120 degrees), then to avoid leakage the overlap should extend to 1.5 waves.
- At transverse and longitudinal joints it is necessary to additional seal using self-adhesive tape or bitumen mastic.
- The front parts of the roof should be equipped with wind linings that will protect the corrugated roofing from destruction and blowing. They need to be secured using self-tapping screws, the pitch of which is 200 mm.
- Depending on the wave height, the length of the self-tapping screw L is selected, which is equal to:
L= L1+H+L2, WHERE
L1, L2 - respectively, the profile thread (about 25 - 30 mm) and the thickness of the washer with seal (about 3-4 mm), H - the height of the corrugation.

For 1 m2 you need to use approximately 5-8 self-tapping screws.
Installation of corrugated roofing - video:
Making a pediment cut
To prevent corrugated sheets from breaking during strong gusts of wind, it is necessary to properly equip the gable cut.
If the allowance of corrugated sheets from the front of the house is 50-70 mm, then a wind lath with dimensions of 25x80 mm is used, which is attached using self-tapping screws. If there is little or no allowance at the front of the house, then in addition to the slats, a wind strip is also used. It looks like a regular steel angle. It must be fastened in increments of 200-300 mm and with a transverse overlap of 100-150 mm.

Corner strips are used to connect the slope to the wall. The planks, regardless of the type of connection - longitudinal or transverse, should be mounted using self-tapping screws with a pitch of 200-300 mm and an overlap between these planks of about 100 mm or more.
Transverse connection to the wall:

Longitudinal connection to the wall:

Installation of ridge and snow barrier
Begin installation work related to fastening the ridge on the side that is less susceptible to gusts of wind and leaders. For example, if for your area the predominant windy side is considered to be the west, then it is better to start fastening the ridge from the east. It can be simple, figured or tiled. The ridge is fixed using self-tapping screws with a pitch of 200-300 mm, and do not forget about the sealing gasket and ventilation gap.

A snow barrier is especially important during a thaw; it prevents avalanches from falling snow from metal roofing. It must be installed slightly below the edge of the roof across the roof slope. Fastening is carried out in pre-mounted beams.
Roof insulation from corrugated sheets
To insulate the roof you will need mineral wool and a vapor barrier. Along with mineral wool, you can also use durroy insulation, but this is the most effective.
And so... we go down from the roof to the attic and we can begin the final stage of arranging the roof from corrugated sheets.
Mineral insulation can be rolled or sheet, whichever you choose - it doesn’t matter, since both have excellent performance properties. It is mounted in the gap between the rafters; any method can be used to attach it - screw it with screws, fix it tightly with thread, or glue it. The main thing is that any of them perform their functions, and at the same time do not unnecessarily compress the seal, since it is not the cotton wool itself that holds the cold outside, but the air that is located in it.

2-sheathing; 3 - seal; 4 - ridge; 5- layer of waterproofing; 6.7 - rafter strip and leg, respectively; 8 - mineral wool; 9- vapor barrier; 10- ceiling rail; 11- lining or some other finishing material; A - roof ventilation; b - ventilation between waterproofing and mineral insulation.
A vapor barrier should then be attached on top of the mineral wool. It is necessary to prevent moisture in the air from entering the insulation, as this can significantly reduce the performance properties of mineral wool - the more moisture it absorbs, the more difficult it will be for it to retain heat.

It is worth remembering that the entire roof space does not need to be insulated, but care should be taken about the so-called cold triangle. The space located at the top of the roof at a distance of 300-400 mm must be left untreated mineral wool, since this cold triangle will promote good air circulation in the attic and in the interior of the roof.
Installation of a roof made of corrugated sheets is also allowed on an old roof, which meets all its requirements operational properties, this will increase its thermal insulation properties.
The cost of installing a roof made of corrugated sheets primarily depends on the complexity of the structure, dimensions and, of course, on the roofing material itself.
Caring for corrugated sheets
This roofing material is not at all fussy to care for. However, it should be handled with particular care, since the profile sheets can be easily damaged. Before installation, do not place them on the ground, but rather use a special wooden stand for this purpose, the boards of which are about 25 cm thick and located in 50 cm increments. At least once every six months, do a general cleaning of the roof from dirt, sheets and other “pests”.
If scratches appear on the sheet, there is nothing to worry about, since the zinc layer located under the plastic will protect the corrugated sheet from rust, and the damaged area can be treated with paint of the same color.
Corrugated sheeting has excellent performance qualities, due to which it is widely used in civil and industrial construction. Create high-quality coating roofs using it are possible, provided that the laying technology and slope of the roof made of corrugated sheets are followed.
Minimum slope angle
When constructing buildings for industrial purposes, it is allowed to use this material for roofing when the minimum slope of a corrugated roof is 8 degrees or more.

It is important to know that when installing roofs that are too low industrial buildings It is allowed to use special products - with a self-supporting profile. Such products are quite expensive, but if there are financial opportunities, they are also used in the construction of private households - then the roof slope angle can be at least 15 degrees.
Failure to comply with permissible roof slope standards and consequences
If, when designing a roof, the provisions of SNiP regarding permissible minimum slope for a professional sheet, property owners will face a number of serious problems:
- leaks that occur during heavy precipitation penetrating through the holes for the screws;
- pushing through the roofing surface with snow masses;
- increased heat loss through the roof;
- deformation of the roof covering under strong and sudden gusts of wind.

Among the owners of private houses, there is an opinion that a flat roof is an economical option, since its installation requires less material. In reality, the construction of such a roof requires the use of an increased amount of rafter legs when the installation step is reduced to 40 centimeters. In addition, on flat roofs the covering material is installed with a large overlap, so experts recommend building steeper slopes.
The amount of overlap of corrugated sheets on the roof
This indicator most depends on the slope of the corrugated sheet roof, which was chosen when designing the facility.
The overlap, for example, should be:
- at a slope angle of 15 - 30 degrees -20 centimeters;
- at an inclination of 30 degrees or more -15 centimeters.

When in project documentation The minimum slope value is specified, the corrugated sheet is mounted with an overlap between the rows of 2 waves. At the same time, sealants and special seals are used. In addition, corrugated sheeting must be laid on a continuous sheathing.
Selection of profiled sheets
Manufacturers produce two types of profiled sheets - wall (C) and roofing (K). Also this material differs in profile shape. When covering truss structure They usually use products with relief in the shape of waves or trapezoids, having a height of 25–31 millimeters.

Optimal thickness The profiled sheet for the roof is considered to be 0.8 millimeters. In some cases, 1 millimeter products are used for cladding. Roofing material of this thickness is chosen when arranging a roof with a minimum slope of 8 - 15 degrees. On slopes having large area, profiled sheets need to be laid in two or three rows.
But usually when designing a roof, it is necessary to install the roofing covering in one row, for this reason you need to pay attention to the length of the corrugated sheet. Typically, products with a length of 6 meters are available for sale.
Calculation of the amount of roofing materials
The roof project, developed by professionals, is accompanied by drawings and cost estimates. The procedure for calculating the amount of roofing material is simple. It is necessary to divide the area of the slopes by the area of one profiled sheet.
At the same time, one should not forget about overlaps. Since the minimum permissible slope of a corrugated roof according to SNiP is 8 - 15 degrees, the value of this parameter will be equal to 20 centimeters. Then you need to subtract the overlap size from the sheet area.

When purchasing materials, it is necessary to make a small supply, since damage to the products may occur during the installation process. The same applies to additional elements. Especially if you choose a minimum slope for a corrugated roof. In this case, compliance with the acceptable parameters is mandatory.
In any case, laying roofing on a flat roof is more difficult than on a roof with steep slopes, because in addition installation work sealants and sealants will have to be used.
Corrugated sheet laying technology
After a decision has been made as to what the slope of a corrugated roof should be, a project has been drawn up and the necessary building materials have been purchased, they begin to install the roof covering, starting from the lower edge of the slope:
- Before laying the sheets, install the cornice strip, drainage system, waterproof the chimney.
- The corrugated sheets are fastened in blocks using self-tapping screws, to which special seals are attached. Place fasteners in the bends of the waves. To do this, first, at the ridge, the first sheet is attached to the sheathing, and then the second, which is fixed to the first. Do the same with the third sheet. Then the weight of the block is completely leveled relative to the cornice and finally secured.
- To complete the work, install the ridge, end strips, valleys and apron of the chimney pipe and, if necessary, snow retention elements.
When working with corrugated sheets, you should adhere to several rules:
- You need to lift the sheets up to the place of installation one at a time.
- Metal shavings that appear during the process of screwing in the screws must be immediately removed with a brush, otherwise the polymer layer that protects against corrosion can be damaged, which significantly reduces the service life of the roofing material.
- You should walk on the roof surface in shoes with soft soles.
- If the polymer layer is damaged during installation, these areas must be immediately coated with a special compound.
- Minimum slope roofing made of self-supporting corrugated sheets is 8 degrees.
- The sheets are secured to the sheathing with special self-tapping screws and a gasket. Rivets or nails must not be used. The fasteners are not screwed in too tightly.
- The steeper the angle of inclination of the corrugated sheet canopy, the more strongly the wind load affects the building. But in addition to the wind strength, its prevailing direction and average annual precipitation should be taken into account.
The work of laying roofing, as always, begins with checking the geometric dimensions of the roof slopes and leveling them, if necessary.
Under the valley plank (Fig. 71), you need to make a dense boardwalk at the level of the sheathing at a distance of 60 cm on both sides of the valley. The bottom (lower) valley strips are installed with an overlap of at least 200 mm. At the joints of flat roofs, sealing mastic is used. The bottom strip is attached first from the edges using several nails, the final attachment is made simultaneously with the roof.
Rice. 71. Installing the lower (bottom) valley strip
The upper end of the bottom valley strip is bent over the ridge of the roof or a flange is made on it. The plank must fit at least 250 mm under the corrugated sheet. The distance between the profiled sheets is different slopes the roof should be about 200 mm. It is advisable to lay a universal or profiled seal between the bottom valley strip and the corrugated sheet.
On rectangular slopes, it is more convenient to begin installing corrugated sheets after installing the end boards (Fig. 72), this makes it easier to position the roofing sheets on the roof. The upper end board is installed at the height of the roof profile above the sheathing. Subsequently, this board will be attached end strip(wind corner).
 rice. 72. Assembly of the end overhang of a roof made of corrugated sheets
 Installation of corrugated sheeting begins with the installation of a cornice strip (Fig. 73), which is secured with nails and self-tapping screws. Required condition when installing the eaves strip: it must be lower than the waterproofing carpet, that is, condensate rolling down the waterproofing must hit the strip and then fall into the catchment area or onto the ground (on the blind area). If cornice strip mounted directly under the corrugated sheet, it is necessary to ensure ventilation of the under-roof space to remove water vapor. A breathable seal is installed under the corrugated sheeting.
 rice. 73. Option for installing a roof eaves made of corrugated sheets
 The corrugated sheet has a drainage groove, which is covered with the next sheet. Installation is carried out both from right to left and from left to right, that is, by laying a sheet on top or slipping it under the previous one. On flat roofs, the overlap of sheets in a row using a longitudinal sealing gasket is one wave, without using a gasket - two waves. On steep slopes, one wave overlaps, without the use of a longitudinal seal.
Laying profiled sheets on gable roof start from the end edge of the roof, on hip roof- from the center of the hip. The sheets are aligned along the cord stretched along the sides of the eaves; it is not recommended to align the sheets along the end of the slope.
The sequence of installation of corrugated sheets is similar to the sequence of installation of metal tiles. Not forgetting about the eaves overhang (35–40 mm), install the first roofing sheet in its place and temporarily attach it with one screw at the roof ridge in the center of the sheet. Place the next sheet next to it, align its edge at the overhang with the previous sheet and temporarily strengthen it in the same way as the first slab. Connect the roofing sheets from the overhang to the roof ridge to each other at the crest of the wave using self-drilling screws 4.8x19 mm with a pitch of 500 mm. Install 3-4 roofing sheets in this way, align them along the roof eaves line, and then attach them completely.
At the overhang and at the ridge, roofing sheets are attached to the sheathing through the bottom of the profile in every second wave. At the end edge there is a bottom of profiled sheets in each lath. In the middle, in a checkerboard pattern, screwing 4.8x38 mm screws into each square meter sheets of 4–5 pieces.
 rice. 74. Sequence of laying profiled sheets: single-row and double-row
 On long roof slopes, the corrugated sheets are built up with an overlap of sheets of at least 200 mm. The sheets are fastened to each other at the same time as they are fastened to the sheathing at each bottom of the profile. When laying corrugated sheets in multiple rows, two common laying methods are used (Fig. 74).
1. The first sheet of the bottom row is laid, the first sheet of the second row is laid and attached to it. Then the second sheet of the first row is laid and attached, then the second sheet of the second row. Thus, a block of four sheets is obtained on the roof. The next block is docked to this block. In other words, four sheets are assembled into one large sheet and a second assembly sheet is laid next to it with a side overlap of the first sheet. The method is used for corrugated sheets with a drainage groove.
2. A block of three sheets is made. Two sheets of the first row are laid and fastened together, then the first sheet of the second row is docked and attached to them. The block is aligned along the cornice and finally secured. Then the next block is attached to it. This option is used for profiled sheets without a gutter, since in it all sheets of the first row are covered by the second row.
Articles are based on regulatory documents and instructions from roofing material manufacturers.