Doorway design options. Making a doorway without a door Finishing interior openings without doors by hand
The interior of a house will not have a complete look without modern doors - beautiful, comfortable and reliable. And in order for the door to be opened conveniently, the doorway slopes must be correctly installed and finished with high quality. In addition, a fully finished slope can be attached to the door frame. In this case, you will not have to spend time on finishing work.
MDF door frame
The door slope is part of space. located between the door leaf and the wall, which can be decorated using:
- MDF panels (finely dispersed fraction);
- drywall;
- plastic;
- laminate
According to the repair rules, the installation of slopes is carried out at the final stage of door installation, and the finishing method is chosen based on the type of door frame. So, if the door is located at the entrance, then it will need to be insulated. Interior doors, as a rule, are not insulated, so their door slope serves only a decorative function.
In general, all slopes (external and internal) are subject to general requirement- they should be perfectly smooth and neat .
If you choose from different ways finishing, then an MDF door frame is the best option. The great demand for MDF panels for finishing the opening can be explained by:
- the advantage of finishing material made of MDF;
- affordable price;
- many variations of style solutions.
Advantages of using MDF in finishing doorways
MDF door frames are often chosen for finishing door openings made of wood. This is primarily explained by the beautiful texture of MDF panels, and the positive characteristics of the material are added to this:

When finishing with MDF panels, experts recommend do not use the material in conditions of high humidity. Therefore, when purchasing a product, you need to pay attention to its quality. There are cases when door slopes, finished with low-quality material, quickly lose their aesthetic appeal due to its swelling, delamination or damage to the outer surface.
Finishing the door slope with MDF panels
Finishing process door slopes MDF consists of several stages:
- Preparation and insulation of the opening.
- Plastering.
- Preparation of MDF fragments for finishing.
- Installation of panels.
- Installation of platbands.
Preparation and insulation of the doorway
The initial stage of arranging a doorway consists of from door preparation and the entire adjacent space for finishing work.
To do this you need:

To prevent the cold from outside from penetrating into the room, along the door slope lay a layer of insulation from:
- mineral wool;
- isolona;
- polyurethane foam;
- padding polyester;
- foamed polystyrene.
It is also possible to spray insulation, which will cost more.
Plastering slopes
To facilitate further cladding, as well as to eliminate remaining gaps, you should carefully plaster the slopes. Applying a small amount of plaster on them will be sufficient, and it is not necessary that the surface be plastered perfectly evenly. At the corners of the slopes, you need to install special profiles that will not only help make them even, but also strengthen the corner segments.
Preparation of MDF fragments for slopes
Before finishing the opening slopes with facing panels, it is necessary to take measurements and then cut the material into fragments of the required size. In order to take measurements correctly, you will need:
- roulette;
- square;
- templates for creating patterns.

Panel installation
Installation of facing material performed in the following order:

The cladding can be nailed to wooden planks using small nails without heads or glue liquid nails .
To complete the finishing, the protruding foam is cleaned off with a painting knife. If necessary, it will need to be puttied to prevent destructive effects. external factors(temperature and humidity). At the same time, the new door slopes must remain clean, and therefore they will have to be carefully covered with masking tape.
Installation of platbands
Ideal in appearance doorway becomes after the final finishing stage. This includes:
- installation of platbands (they are installed in the upper part of the door opening);
- masking material joints on door slopes. The nail heads are carefully covered with mastic, matched to the tone of the finishing material (for this you can use furniture stickers).
The simple technology of covering door slopes with MDF panels will especially appeal to those who try to carry out repair work with their own hands.
Conclusion
Finishing door slopes MDF panels fully comply with the basic requirements for arranging a doorway according to:
- strength;
- protection from external influences;
- improving thermal and sound insulation performance.
Finishing a doorway with MDF panels: technology for performing the work
After installing metal entrance doors, the question of finishing the opening on the side of the apartment certainly arises. The door is placed flush with outer wall and is decorated from the entrance with platbands. A interior design opening is considered additional work and not all installation companies do it.

When installing modern metal entrance doors, the installation of extensions is also provided.
Opening design options

The opening after installing a metal door looks unpresentable and requires finishing work.
The most common types of decoration are:
- plastering the opening with regular cement mortar;
- forming edges using drywall sheets;
- finishing doorways MDF panels;
- plastic linings;
- wooden extensions;
- doorway finished decorative rock.

Plaster work on the design of openings is considered the most common.
These elements have their own characteristics that need to be taken into account when choosing an installation option.
Slopes front door must meet the following requirements:
- should serve as a beautiful detail that goes not only with entrance group, but also with the entire interior;
- must have good thermal insulation properties, preventing cold air from entering the apartment;
- must be strong enough not to be accidentally broken;
- Such a characteristic as resistance to scratches and mechanical stress is also valued, because they often cling to the slopes and touch them with objects brought in and out through the door.
Plaster
The plaster solution is applied in several stages and rubbed in well.
The most labor-intensive option is considered to be plastering the opening with cement mortar. But it also has its advantages. Such slopes are monolithic and completely cut off the possibility of cold air penetrating through them.
The plastering process is carried out in several stages and can take 3-4 days, since it is necessary to wait for the previous one to dry before applying the next layer. After finishing the plastering, you can paint the surface or stick any material on it.
Important. If you already have metal doors with MDF finishing installed, then take care of their safety during the plastering works. We recommend covering them well with film, securing it with tape so that drops of the solution do not fall on the front surface of the doors.
Drywall
The photo shows the process of applying glue to the back side of drywall blanks.
This option is used quite often when there is no time or desire to do plastering work.
There are two options for working with plasterboard sheets:
- glue installation;
- installation on guides.
For doorways, adhesive installation is more often used. Special glue is diluted thickly and distributed in cakes in the form of beacons on the back side of the plasterboard blanks. The strips are then glued into place, leveling is done by pressing the sheets until the glue dries.
Important. The disadvantage of this method is that there is free space under the plasterboard strips, and the plasterboard can be accidentally punctured during operation.
MDF panels
Facade option for entrance doors made of MDF.
The benefits of finishing MDF doors panels and the design of the opening made from them can be felt at the installation stage. The opening does not require preliminary preparation or plastering. The registration process is accelerated, and doing it yourself becomes quite possible.
Interestingly, even with an old metal door that you would not want to replace, it is also possible to decorate the doors with MDF panels yourself. You can choose sheets in the form of door facades and similar sheets to decorate the opening.
Installation of facades
More recently, it was difficult to imagine a different finish for a metal entrance door than upholstering it in leatherette. Today, manufacturers provide us with a wide selection of different materials.
The most interesting of them are products made from MDF. The price of such facades is slightly higher than the price of leatherette, but the result exceeds all expectations. And this applies not only to the appearance of the doors as a result of finishing, but also to their acquisition of excellent performance qualities.
It is not at all difficult to decorate the front door with MDF panels yourself.
You just need to perform the actions in a certain sequence:
- first of all, thoroughly clean the door of the old coating;
- remove the lock and other fittings;
- metal sheets must be treated with products designed to combat corrosion;
- carefully mark and cut out holes for the lock on the MDF panel;
- we attach the panels with glue, securing them in several places with self-tapping screws; we choose the screws of such a length that they do not damage door panel on the back side;
- install locks and fittings;
- The finishing of the MDF entrance door from the inside is complete, let's move on to the design of the opening.
Installation of slopes
Opening design diagram.
Before you start sealing the opening with panels, you need to completely seal all the holes and cracks and cut off the excess foam around it.
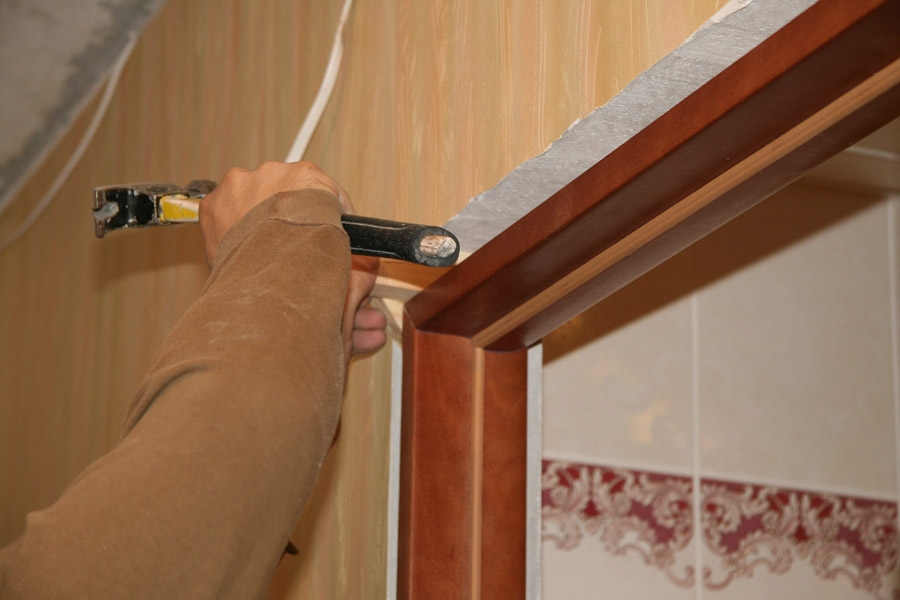
The sequence of work on finishing the slopes of the front door is described by the following step-by-step instructions:
- We fill wooden guide strips on the edges of the openings according to the level;
- we apply the platband on the outside of the slope and measure the distances to determine the width of the workpiece;
- when measuring the distance, take into account that it will be necessary to install a decorative finishing corner on the edge under the casing;
- Using a jigsaw, cut along the workpiece for the upper slope;
- We fasten the workpiece to the top bar with self-tapping screws;
- proceed in the same way with the side blanks;
- glue a decorative corner along the top and sides of the opening;
- we close the corner with platband;
- in the places where the slopes join the door frame we also glue thin decorative corners;
- small gaps between the slopes themselves can be sealed using a special wood putty.
Advice. To make it easier to complete the opening design work, you can use cardboard templates. Before turning on the jigsaw and sawing off the workpieces, try on cardboard templates on the slopes. And then cut out the parts using them, so you will protect yourself from damage to the material.
In the video presented in this article you will find Additional information on this topic.
DIY door decoration with MDF panels
Door design techniques
Finishing doors with MDF panels is gaining popularity and is displacing the finishing materials made of leatherette and laminated chipboard (chipboard), which have been recognized for years, from the construction market. What does the abbreviation MDF mean and its full name?
Tracing paper with in English- Medium Density Fiberboard translated as “wood microfiber” or Finely Dispersed Fraction and abbreviated form in Russian (MDF), meaning the name of the new material and panels to which these three letters are added so that they cannot be confused with other panels.
Sequence of operations when finishing doors
The practicality of the appearance of the MDF panel coating and its beautiful appearance put them on a par with elite finishing materials.
So:
- The popular finishing of doors with MDF panels harmoniously combines a presentable appearance, high resistance of the material to mechanical damage and the absence of properties that interact with the environment.
- The best sound and heat insulation of a room is determined by the thickness cladding panel, instructions can be obtained directly from the store, as well as the price of these materials.
- Any work can be done with your own hands and your own tools, but it is better to entrust something to specialists who have the necessary equipment.
- Manufacturers have brought closer the opportunity to have beautiful entrance doors without replacing them and are providing consumers with big choice manufactured MDF panels.
- Finishing doors with MDF panels of standard sizes does not take much time. When finishing metal doors Paint and wooden dies are often used in the apartment.
Now there is an opportunity to have steel doors with MDF finishing and even on both sides.
Installation is carried out in several stages:
- Preliminary processing metal surfaces anti-corrosion agents that protect metal from dampness and condensation.
- Marking and drilling of holes for the door handle, lock and other fittings, if present on the doors, is carried out.
- The panels are fastened with special self-tapping screws, the length of which does not allow damage to the door panel on the other side.
- The panels are secured, fittings and locks are being installed.
Ready-made standard steel doors with MDF panels have a basic size of 2050 x 860/960 mm. The effectiveness of installing MDF panels on doors with an external steel sheet thickness of 2 mm is enhanced by the presence of two reliable locks and a built-in peephole with an almost all-round view (120° viewing angle).
Of particular interest are MDF panels lined with plastic, which has high strength and does not scratch. External finishing of MDF doors by other manufacturers is carried out by covering the panels with veneer made of valuable species with a panel milled from solid wood and varnished.
Finishing work of openings and slopes
After completing the installation work and installing the doors, disposing of the old slopes, a not very attractive picture is revealed that needs to be corrected. Finishing door slopes is labor-intensive, although necessary process.
A quality finish guarantees an aesthetic appearance.
Attention: Please note. Companies that install doors usually fill the space between the installed door frame and the doorway with foam, and then the finishing work is carried out for an additional fee, which you can do yourself.
Tools
Plastering is a complex and long process that requires certain skills. Finishing MDF doorways greatly simplifies work and reduces the cost of time, effort and emotions.
Independent work requires having the necessary tool, improvised things:
- MDF panels;
- Platband,
- Decorative elements - a strip and a bending corner, all in the amount of three pieces;
- Liquid nails, dowels, screws and execution preparatory work. Seal cracks and holes, level the surface surrounding the door opening, level with wooden blocks those places where there is no possibility of quick leveling with mortar.
After preparing the tools and material, you can start working:
- Wooden guide strips are placed onto the prepared opening. The thickness of the slats (slats) is 10 mm and the width is not less than 30 mm, along the perimeter their length is not less than 9 meters.
- They are fastened from top to bottom and controlled by the level where the deviation is observed; a piece of wood is placed there or a plank is pulled to the wall. The upper strips are strictly fixed to the corners of the door frame.
Attention: Before installing the guide strip and adjusting the MDF panel, it is necessary to take into account the thickness decorative corner so that the platband fits tightly to the wall.
- To obtain the desired result, it is necessary to lean the platband and determine the gap; perhaps the thickness of the corner does not need to be taken into account in this particular case and it will not have to be cut and adjusted flush with the wall, but it will be enough to glue it.
Sectional layout of materials
- A decorative corner is necessary for fastening the outer and inner sides of the panels, and it is almost impossible to obtain an ideal cut at home.
- After adjusting and installing the upper slope, you need to attach it to the top bar with small nails or short screws; their heads will then have to be hidden
- When marking guide strips for side slopes, this difference is taken into account and the thickness of the strips is adjusted.
- We measure the height and width of the future slope on the left side.
- In height, one measurement is taken from the upper slope of the outer corner to the floor. The width measures the distance from the metal frame to the outer corners of the top and bottom of the doorway.
Finishing the slopes of the front door with MDF panels comes at a crucial moment in order to correctly and immediately cut off the upper corner of the side panel on the left. You can't do without a template here. - It is preferable to prepare a template from a thick sheet of paper (cardboard), which slides upward along the guides. The corner is marked and the excess is cut off with a very sharp knife to get a straight line.
The operation can be repeated several times until the template fits completely and tightly. - The finishing of door slopes with MDF video clearly demonstrates that all doors have an offset to the left relative to the doorway or to the right, no matter how they are aligned, and the opening angles are therefore different.
Panel adjusted to size
- The slope is attached from the side of the frame with glue or small nails, which can then be covered with a decorative strip, outer side secured with self-tapping screws.
Attention: To ensure a tight fit of the panel to the door frame, adjust the end angle between them.
- The final finishing of the entrance door slopes with MDF panels includes filling the gaps between the slopes with putty.
All that remains is to creatively approach the design of the outer part of the slopes:
- The bending corners are glued and the protruding parts are carefully cut off to create a straight line with the wall.
- The trims are attached; experts recommend starting with installing the side ones and finishing with the top. Practice shows that even a 1 mm offset to the side or a mounting error in height leads to big problems with top casing.
Graduated from the Faculty of Architecture of Penza state institute architecture and construction. For the last ten years, he has been a leading specialist in a large construction company in Penza, engaged in the construction of multi-storey residential buildings. Total work experience in the specialty is 18 years. Consults on design issues, selection of materials for interior and exterior decoration, and technology for finishing work.
Sources:
Interior design will not have a complete look without a comfortable, reliable and aesthetically pleasing door design.
MDF slopes will allow the interior decoration to become complete. But, it should be noted that installation requires compliance with recommendations and standards that contribute to achieving the durability of the structure.
Advantages of building materials
Finishing a door opening is a labor-intensive process that requires precision and following advice. Therefore, it is possible to make this kind of cladding yourself. Slopes can be finished with panel materials, the variety of which can satisfy any needs. Often finishing work is carried out with plastic, wooden panels, plasterboard, but MDF panels are considered the most successful.
Advantages of MDF panels
Since this finishing building material has numerous advantages:
- Availability of material.
- Easy to install.
- Aesthetic appearance.
- The density of the material creates additional sound and heat insulation.
- Environmental friendliness. Fiberboard produced by pressing wood shavings under the influence of temperature and pressure. The core binders of the fibrous material use carbide resins, which are harmless to humans. Consequently, MDF is an environmentally friendly building material that can be safely used for cladding both exterior and interior structures.
- The color palette allows you to satisfy any request. You can choose the colors of the panels from wenge to bright shades.
Doorway lined with MDF slopes
But like any building material, MDF panels are not without disadvantages:
- Weak resistance to mechanical damage. If the MDF panel is deformed, the damage cannot be restored.
- Does not withstand significant levels of humidity.
Therefore, finishing door slopes with MDF panels should not be done in conditions of high humidity.
Do-it-yourself MDF front door slope (video)
Preparatory moments
All the benefits that come from lining the slopes of external doors with MDF panels can be demonstrated during installation. Therefore, before starting work, you can study a video of exactly how slopes are made at the front door. Wood fiber panels come in 2 options:
- Designed for finishing work (they have an L-shape).
- Wall panels.
Measuring the doorway
Most novice craftsmen have a completely natural question about how to sheathe the slopes of an MDF entrance door correctly. First you need to do some detailing. To make door slopes from MDF, you need to take the dimensions of the opening, which should be drawn on paper. Based on the transferred data, each element should be schematically depicted. It is recommended to take into account the following points:
- Presence of a threshold.
- The order of placement of parts.
- Opening width and angles of inclination.
After installing the door, all gaps between the wall and the frame must be sealed with foam. After the foam has hardened, all excess should be cut off.
Installation of slopes using a frame method
Installation wooden slats
Slopes from fiber panels can be made using the frame and glue method. DIY installation of slopes from MDF panels frame method produced using the following technology:
- Along the edges of the slope, both internal and outside Using dowels, fix the wooden slats, which need to be covered over time with MDF panels. The bars should be level. To avoid distortion of the structure between the skeleton and the opening, wedges must be driven in.
- Cut 3 sheets from MDF (2 for vertical mounting and 1 – horizontal).
- The parts should be attached to the opening and points for cutting should be marked.
- Trimming should be done strictly to the size of the door opening.
Installation of wooden slopes
- Apply liquid nails to the inner edge of the panel and attach to the frame.
- The panels should be aligned so as to achieve a minimum gap between them.
- Fixation can be strengthened using self-tapping screws that are screwed into the upper and lower parts. The screw caps are decorated with special elements.
- The final point is attaching the platbands.
If the depth of the opening does not exceed the width of the MDF, then in this case it is possible to fix it in a seamless manner by installing it vertically.
Installation of slopes using the adhesive method
Plastering a door slope
If preference is given to the glue method, then you should familiarize yourself with the tips for installing the front door and MDF slopes. Work algorithm:
- First of all for glue method the slopes need to be plastered.
- It is recommended to treat the prepared surface with a primer. After priming, the surface must be waited until completely dry.
- Install beacon profiles according to level. To install profiles on slopes, apply a solution and level the beacons in all directions. Give the solution time to set.
- The solution is applied to the slopes and leveled along the beacons with a spatula. After the manipulations, the slopes should be left for 2 days until the solution completely sets.
- The inside of the part is coated with glue and pressed to the surface.
- When all the elements are installed, the resulting joints are sealed or covered with overlays.
Important! After completing all the manipulations, you can proceed to the exterior decoration of the door structure. For this purpose, it is possible to cover the surface with platbands or level the surface using putty. In the vastness of the Runet there are photos, videos and reviews that describe in detail the whole step by step process frame and glue method.
How to bend MDF
Sometimes it becomes necessary to trim elements of a round or semi-oval configuration with wood fiber sheets. Naturally, the question arises of how to bend the material and whether it is possible. It should be noted that it is possible to bend MDF if thin panels are used (the average value should not exceed 3 mm).
How to bend an MDF panel at home
To bend the panel, perform the following steps:
- Manufacturing blanks from fiberboard.
- Make notches in the sheet across the bend.
- Cut pieces of MDF to the required dimensions.
- At the bend points, apply lines at intervals of 5 mm. The undercut should be 1 mm.
- The resulting shavings must be collected and mixed with glue until a paste-like mixture is formed, which fills the holes.
- Post MDF sheet onto the template and fix it with nails. The nails do not need to be driven deep for ease of removal.
- The last stage is removing the workpiece, sanding and painting.
Following the recommendations, you can sheathe without effort MDF slopes panels or other building materials yourself. Anyone can do all the manipulations with their own hands, despite the fact that finishing slopes with a material such as MDF is a painstaking and time-consuming process.
Photo gallery of finished works
One of the common options visual increase spaces in the room - this is the dismantling of interior doors. This solution allows you to visually expand the premises and create a single space in the interior. In this case, an important task arises - finishing the doorway. In this article we have collected the most popular and non-trivial ways to solve this issue.
Preparing the opening
Preparation process work surface varies due to the materials chosen as finishing.
- If you decide to decorate the opening with a decorative mixture, you need to carry out a rough finish using ordinary plaster. After this, all surfaces must be thoroughly cleaned using fine sandpaper. This will avoid peeling of the plaster layer. Application building level or a plumb line will allow you to save on finishing material.
Leveling the opening with plaster using a rule and metal corners
- In the case of using overlay elements (stone tiles or PVC panels), leveling the opening is not required; it is enough to hide obvious defects - tubercles and pits.
- If a sheathing is being erected, there is no need for rough finishing: everything will be hidden under a durable wooden or metal frame.
Drywall on frame
- Drywall is another option for covering a doorway, which results in a perfectly flat surface. Does not require additional processing; you can paint or glue wallpaper immediately after installation and grouting of joints.
Leveling with plasterboard without frame using glue
Types of finishing materials
The choice of materials for finishing a doorway on the construction market is extensive; there are both economy-class options and expensive alternatives. Everything depends directly on the needs, desires and capabilities of buyers, as well as several important aspects:
- you should not skimp on the quantity and quality of fastening elements (for example, if you make a sheathing from wooden blocks, you need to check them for the presence of mold, rot and large cracks);
- when purchasing materials packaged in different boxes, you should check the delivery batches; if they differ, then the shade of the contents may also differ;
- durability of the material, its ability to withstand daily contact with various external influences- this is what all masters should think about first.
Using the example of the most popular options for finishing a doorway, we will consider in more detail the workflow for each of them.
Plaster
This option can be called the most popular due to the simplicity of the work and the practicality of using the finishing material.
The only thing you should take care of before starting finishing is to cover the floor with film or newspapers so as not to damage or contaminate the surface.
- Work begins with preparing the opening: removing old materials and priming the surface.
- Installation of beacons (you should mix a little mortar and fix the perforated corners on the walls, aligning them to the building level).
- A masonry reinforcing mesh is attached between the corners.
- In preparation mortar in the required quantity.
- Using several spatulas, the mixture is applied to the walls in a chaotic manner, after which it is smoothed over the surface using a rule.
It is important to remember that the thickness of one layer should not exceed 2 cm, otherwise voids or cracks may form, and this will negatively affect the durability of the finish.
If everything is observed, all you have to do is wait until the surface is dry, and you can proceed to finishing: painting, wallpapering or applying decorative mixtures.
Clinker tiles, mosaic
This material is intended for cladding a variety of areas of a residential building, including the doorway. There are no special installation rules; options are offered depending on the interior design:
Covering a doorway with tiles or mosaics does not require any special tools or special skills; the work process consists of step-by-step actions:
- after the surfaces have been cleaned and plastered, it is necessary to apply markings according to which the tiles will be located in the doorway;
- prepare special glue (liquid nails are used only in cases where the surface is perfectly flat);
- apply glue with a spatula to the back side of the tile, spread it over the surface, remove excess;
- Press the tile against the wall and hold it for a few seconds, applying force.
Scheme for laying clinker tiles
To ensure that the products are fixed evenly on the surface of the opening, you should prepare plastic beads in advance, which are inserted into the seams between the tiles. It is removed after the adhesive mass has hardened, no earlier than 24 hours later.
It is very important that if glue gets on the surface of the tile, it should be removed immediately, since the hardened mass is very difficult to remove.
When the opening is completely ennobled, the seams between the tiles are sealed with special grouts, the color of which is matched to the tone of the walls or finishing materials.
Decorative rock
Another option that is used as an alternative to clinker tiles is decorative stone. It has several advantages over other finishing materials:
- an exact imitation of natural rocks, while there are a lot of varieties of textures: marble, limestone, jasper, brick, cut wood and many others.
- tolerates high humidity without consequences;
- easy to care for, because does not require the use of special means to remove dirt from the surface;
- resistant to mechanical damage if installation rules are followed.
The installation process is very similar to laying clinker tiles, but there are several important points that should not be forgotten:
- depending on the thickness, the weight of the products may vary, which may increase the consumption of the adhesive mass;
- When purchasing finishing material, inspect several pieces with back side, if there are many pores on the surface, they have a low density, which will affect the strength of the stone.
This finishing material comes in two types:
- Natural. Made from natural rocks crushed into crumbs. Such products are distinguished by their heaviness and strength under direct mechanical influences.
- Artificial. It is based on gypsum, to which dyes and polymers are added. The main advantage is the low price, which fluctuates around 300-800 rubles per square meter.
Wooden panels, MDF
An equally popular option for finishing door slopes are wooden or MDF panels laminated to resemble wood, which harmoniously fit into the classic style. The advantages include:
- aesthetics;
- durability;
- no visible defects upon contact with water.
The process of installing panels made of wood or MDF will require you to purchase additional materials - wooden slats that will be used as sheathing:
- The slats are cut to fit the width of the opening and attached to the walls using dowels and screws.
- The panels are also adjusted to fit the opening with a small indentation, to hide which an end corner is used.
- The starter panel is secured with finishing nails.
- All subsequent panels are attached through a tongue and groove (connection system present on the products).
- From the end, the structure is closed with a side panel - a platband, which is attached with nails to the sheathing or with an end angle.
Photo instructions for finishing the opening with MDF panels
To hide the fasteners, you can use special furniture wax or adhesive plugs, matching them to the color of the panels.
This finish will look rich, even if inexpensive MDF panels with a textured pattern imitating exotic wood were used.
Laminate
Many finishers love laminate for its flexibility, which allows this material to cover almost any openings, corners and nooks found in residential premises. The only thing worth worrying about is that it does not tolerate moisture well and after contact with water, swelling may form at the ends of the products, and such defects cannot be eliminated.
The laminate is attached using self-tapping screws to the sheathing in the same way as finishing with PVC or MDF panels.
If the walls are relatively smooth, then you can use liquid nails and spacers, which will press the material to the surface of the walls for several hours.
Stucco molding - gypsum and polyurethane foam
One of the most interesting, but in its own way capricious materials is stucco. Using it in the interior to decorate the door opening, you should maintain a single concept general design, fit into the style of columns, pilasters with capitals and other similar decorative elements.
The stucco molding on the opening should be combined with other interior elements, for example with floor and ceiling plinths
There are two types of stucco on the construction market:
- Plaster. It is impossible to imagine interiors without it country houses, made in Venetian or classic style. But in small apartments such products seem too bulky; interior openings narrow not only visually, but also actually. Plus, gypsum is a very heavy and fragile material; under mechanical stress it will not last long.
- Artificial, or rather polyurethane, is an affordable analogue of gypsum.
The advantages of polyurethane foam decor also include:
- ease of construction;
- ease of installation: products are easily cut with a stationery knife and attached to liquid nails;
- variety of ready-made forms;
- The polyurethane surface is suitable for painting.
Stucco molding looks ideal in the frame of a doorway with an arch, especially if the width allows the erection of monolithic column supports along the edges.
Doorway shapes
Finishing openings between rooms without a door is complicated not only by the choice of material used, but also by what shape this very opening will be.
The solution to this issue will affect the harmony of the transition between rooms, the lighting of the rooms, the combination of styles in the interior and the practicality of movement.
Rectangular
A common option is rectangular. Such an opening remains immediately after dismantling the door frame and it has its advantages:
- suitable for all finishing materials;
- no additional structures are required;
- clearly delineates two living spaces, for example, a balcony and a kitchen, while visually expanding both;
- Great for modern interior design styles.
A wide rectangular opening allows the slopes to be used as niches for interior items
Arched
The arch has an interesting ability: in rooms with low ceilings it visually raises them, and in cases with high ones, on the contrary, lowers them. Moreover, the wider the arch-shaped opening, the lower the ceiling appears.
Many people prefer this option for its softness and lack of sharp corners, which makes transitions between rooms more invisible. The arch fits perfectly when exiting the hall; if it is wide enough, the movement between rooms will be imperceptible.
The absence of massive doorway decor emphasizes the beauty and complexity of the rest of the interior
A nice addition are ready-made solutions - arched extensions, prepared for installation in doorways.
Extensions and developed edging of the opening emphasize the complex shape of the opening, placing a visual emphasis on it
Trapezoidal
This form is used very rarely, due to the fact that in small areas such a solution has the opposite effect: the room does not expand, and the ceiling visually lowers. Especially in cases where the upper horizontal part of the trapezoid is too narrow. It may seem that when decorating the opening they wanted to make an arch, but did not have enough strength and skills.
Such an opening looks good when it matches the shape of the room located behind it, as in this picture
The polygon will fit well into the transition where double doors were planned or installed interior doors. Using drywall, you can easily and effortlessly turn a rectangular opening into a smooth trapezoid by securing it at the corners of the opening.
Asymmetric
A doorway that embodies the fantasies of the owners of a living space is an asymmetrical shape. Designers love it for its ability to bring the most amazing solutions to life. The opening ceases to be the boundary of two rooms, it turns into a decoration of the apartment, into an element that attracts the eye and emphasizes the given style.
An asymmetrical opening is the highlight of any interior
However, there are nuances here that many people forget about and encounter difficulties during the work process:
- you cannot undertake the expansion of the opening without creating a project where all the possibilities of load-bearing walls and ceilings will be taken into account;
- sharp corners and sharp shapes have a negative psychological impact on others; it is necessary to minimize the presence of irritating factors so that ennobled openings serve as an advantage and not a disadvantage.
Decoration with curtains
Simple but very interesting option decorating a doorway with curtains is a look into the past. Several decades ago, people demarcated their living space in this way, decorating the passage with wooden or fabric curtains. The desired effect was achieved: the boundaries of the room were visually outlined, without creating a closed space.
Curtain - a simple and effective solution
But similar solutions are still popular now, but the variety of shapes and materials has become much greater. The most commonly used are bamboo sticks, which are very durable and produce a pleasant sound when colliding with each other. You can paint them yourself in the desired shade or choose a ready-made option to suit your interior.
You can use curtains anywhere, even on the border between the hallway and the bathroom, although this is a little intimate, but if home owners are interested in this option, then why not experiment.
A doorway that is not equipped with a door is an original and aesthetic solution, often chosen by apartment owners. With proper design of such structures, you can significantly transform your living space and free up usable area. In a small apartment, get rid of extra door- enough easy way make the space visually wider. Finishing a doorway without a door is successful and stylish solution problems of small space.
Features of openings without doors
Doorways without doors are successfully designed in public buildings, spacious cottages and small dwellings. This solution is a win-win when combining a living room and a hall. With the help of open passages, small kitchens and hallways are often combined.

Quite often there are situations when the door turns out to be unnecessary. It interferes with moving around the apartment and creates unnecessary difficulties. Doors should be installed in the bedroom, office and children's room. This is explained by the fact that such rooms are designed to create personal space.
Sometimes you can’t do without a door to the kitchen either. Foreign odors do not enter living rooms. The smell of cooking food is a very strong irritant. Therefore, if there is no normal system for removing smoke and gases from the kitchen, it is necessary to install a door. Photos of doorways without doors will help you understand what to choose for your apartment.

To execute decorative design opening, it is not always necessary to invite professional builders. Such work can be done independently. However, you should become familiar with the features of the process and the main errors. It doesn’t hurt to take a closer look at the photos of completed projects.

Attention! Sometimes the design of a room involves the same finishing of all openings in the room - both doors and windows. Traditionally, lamps are installed in the aisles. They line up along the perimeter of the passage. Other popular options are curtains, shelves, and other decorative details.

Opening shape
The design of an opening without a door can be of any configuration. The main condition is that the shape must correspond to the size of the room and its style. Skills must also be taken into account interior decoration worker. If they are absent, you should not take on a complex project.

Rectangular openings
Often the doorway is left in the same shape as it was before the door leaf was dismantled. Even a craftsman with little experience can complete the work of finishing it. Rectangular structures lend themselves well to finishing. In addition, when covering them, you can realize a wide variety of ideas. Usually, to create a harmonious look, they are finished with plasterboard panels.

The most affordable option is to paint the opening to match the wall surfaces. Rectangular vaults are often shaped like an arch with facing stone.

Designer arch
The arched passage also represents classic version. However, the variety of forms provides ample opportunities to realize original fantasies. How to finish an arch without special skills? The simplest solution is to buy a ready-made wooden vault. Such products usually have standard dimensions.

For those who like to experiment, we can offer the following solutions:


If you choose an arch of an original shape, you can experiment with the visual perception of space. With the original form of the vault, the design should have a strict appearance.
Finishing materials
A variety of materials can be used to design doorways without a door. They usually have different shades, textures and prices.

Decorative rock
The appearance of stone elements is always distinguished by nobility and respectability. Its different types have their own installation features. Their durability also varies. The main difference between natural stone and artificial stone is that it costs much more. It is worth remembering that artificially created minerals can also come in a variety of colors and textures. One of the main advantages of such products is lightness.

The stone will look good at the entrance, indoors large area and in rooms where there are few pieces of furniture. An opening decorated with such material will look ideal in a room with a fireplace.
Quite often, in parallel with the open opening, the same installation is carried out around the window. Thanks to this technique, the design becomes complete and more comfortable. Therefore, such a solution when decorating openings is very popular among apartment owners.

When performing work yourself, it is necessary to observe certain subtleties of technology:
- Before working, markings should be made around the opening. It is necessary to note the shape of the masonry.
- Experienced craftsmen recommend that before performing such work, first lay out all the stone elements on the floor in the order in which they will be fixed to the opening.
- Laying begins from the bottom corner.
- The slabs should be laid symmetrically on both sides of the opening. In its lower part the masonry should have a more massive appearance. All sharp corners of the masonry must be processed.
- After finishing the work, the mineral should be treated with a special solution that gives the surface a natural shine.

To properly decorate a doorway with stone, you should lay it so that it contrasts with the shade of the wall. It is better not to combine stone and plastic.
MDF panels for finishing openings
Such boards can perfectly imitate natural wood. They are quite durable and at the same time suitable for finishing both interior and entrance openings. This is due to the universal properties of the material. It is quite light and attractive.

The installation technology of MDF panels is simple. They must be secured using special adhesives. Liquid nails can be used. All joints are closed using platbands. The disadvantages of such products include only limited color palette.
PVC panels
Plastic panels can be selected in almost any shade. Moreover, they can have any texture. More popular is plastic that imitates wood. Even an inexperienced home craftsman can handle the installation of PVC panels. The material is lightweight, so it does not slip when installed with glue.

Caring for plastic elements is quite simple. Such openings are decorated with lamps. The disadvantages of this design of the opening include the fact that it is only possible for interior space.
Clinker tiles
In my own way appearance such facing material resembles a brick. She is being released various colors and forms. Typically, tiles are used for exterior cladding of houses. However, the material is often used to create open doorways. This is due to the simplicity of its installation.

Depending on the characteristics of the surface to be finished, clinker elements are mounted on liquid nails or tile adhesive. The tiles are laid asymmetrically.
Plasterboard and stucco
Plasterboard slabs are flexible and lightweight. This material allows you to design a doorway of the most original shapes. The disadvantage of this solution is the increased fragility of the material.

Stucco molding is a product made from polyurethane or gypsum. They are traditionally chosen to create beautiful openings. This material presents some difficulties during installation. The master will need to have good taste and experience in such work.

Ready-made decorative parts made of polyurethane can be purchased at a hardware store. When using stucco elements, one rule should be followed - the smaller the area of the room, the smaller the decorative details you need to choose.
Curtains
Often the vault is decorated with curtains. This method is the most common. Thanks to this solution, a special comfort and completeness is created. It is better to choose curtains that will match the curtains.

For this solution, you should use decorative composition from various fabrics. The original canvas can also be used. You can choose curtains made from bamboo. When hanging the curtain, it will not interfere with free movement. Usually the curtain is made with side fastening to the wall.
An open doorway, which is decorated in the general style of the room, can transform any room.

Preparing the opening
Before finishing work begins, the passage is leveled. This can be done using:
- plasters;
- gypsum board sheets.

Plastering an opening without a door - this finishing method is one of the most common. However, when choosing it, a lot of dirt and dust is formed. For this reason, many people choose drywall to finish a passage without a door.
Depending on the design of a passage without a door, it can be made a bright element of the interior, or practically hidden, to divert attention. After plastering, the opening can be either painted to match the wall or covered with panels of decorative stone.

When covering an opening without a door with plasterboard slabs, the surface becomes as smooth as possible. Any decorative elements are glued to it if you want to draw attention to it. If you want to leave the opening without a door unnoticeable, you should simply paint it.

Unlike plaster, drywall is easier to process when constructing an opening without a door. When working with it, no debris or dust is generated, and attaching the slabs is quite simple. With plasterboard it is easy to create a passage without a door of any configuration. This attracts many apartment owners.
After plastering or covering the opening with plasterboard sheets is completed, before finishing work the surface to be treated should be cleaned of various contaminants. Then you can start decorating.
Complex openings without doors
If the considered options for finishing the opening seem too simple, you can experiment with finishing. It is necessary that this be possible at a certain ceiling height and room dimensions. For example, at the top of an opening without a door, you can create a structure of complex shape. In such cases, plastic elements, colored glass and lamps are often chosen to decorate a passage without a door.
For most modern interior styles, it is important to install point diodes into an opening without a door. They will look very stylish.

The opening can be made of any shape if you use drywall panels. Shelves that are installed on the wall near the openings are quite fashionable. Openings that include bar counters look great. Thanks to them, successful zoning of the territory is carried out.
Doing this kind of work with your own hands is quite difficult. Therefore, when deciding to create such an opening, it is necessary to invite specialists. They will help you draw up a project and calculate how much materials will be needed to finish a passage without a door. Installation work when calling professionals, they will be completed as quickly as possible.

If there is no canvas installed in the doorway, the room can be radically transformed. At the same time, the space will visually expand. If the home is a studio room, arches of complex shape will look original. Rough and simple openings without doors should be installed in hallways.
When renovating small apartments with narrow corridors, they are increasingly abandoning the door to the kitchen. An open entrance allows you to visually increase the space and save space. In this case, a partition remains that performs zoning functions.


In large private houses, a beautifully decorated entrance to the kitchen from the hall or living room can be a whole work of art and interior decoration.


 A wide span can be so functional.
 After dismantling the door frame, the entrance from the corridor and other adjacent rooms, for example, the dining room or living room, can be decorated with various materials and different shapes. But you need to remember a few important points.
It is forbidden:
- Dismantle the door in the gasified kitchen. In this case, claims of a fine may be on the part of gas service. Here the door is necessary for your own safety. Gas stoves in the kitchen were common in old houses, in modern apartment buildings Mostly electric ones are installed.
- Widening the opening is a redevelopment, which entails making changes to the technical documentation. Be sure to agree similar works with BTI and other authorized services.

It should also be taken into account that expanding the entrance will require the installation of a more powerful hood. Especially if the kitchen opens onto the living room. Otherwise, odors will spread freely throughout the apartment.
Open doorway - more good idea, if there is a corridor between the kitchen and other rooms.

 Entrance to the kitchen in Khrushchev
When entering the living room, you may need not only a powerful, but also a quieter hood so as not to disturb the guests’ rest.

Examples of the most successful design options
When finishing an open doorway there are practically no restrictions on the choice of materials.
This could be a stone or brick design.


You can finish the span with the same materials as the walls.

Can be used gypsum plaster to create a semblance of stucco.
It is necessary to take into account the possibility of caring for the surface, especially if the entrance is located next to the stove or sink.
Here are some solutions on how to design a doorway without a door to the kitchen.
Finished rectangular opening
The most versatile and simple option. After dismantling the door frame, the passage into the kitchen is left in the same shape.
Or they can be highlighted with plastic or wooden panels, covered with wallpaper or decorative plaster. The choice of materials depends on the style of the interior.


The entrance can be framed by narrow built-in ones, as in the photo below.


In the form of an arch
The ceiling, recognizable by its graceful curve, is one of the most popular alternatives to interior doors.


The arch can be symmetrical or irregular in shape. Such unusual shapes This can be achieved with a plasterboard construction.


How to make an arch with your own hands, watch the video:
More ideas for decorating with different materials can be seen in the photo gallery below.
Photo gallery of ideas and design techniques (30 photos)
In classic styles for design will suit stucco or decorative wooden inserts and platbands in the form of a column.


Modern design welcomes simplicity in forms and restraint in decorative elements.


The following materials can be used.
- Stone;


- Brick tiles;


- Brick decoration can be done using a material such as gypsum plaster;

- Plastic;

- tree and MDF boards, laminated chipboard.
Depending on the style, kitchens can be as rough wooden beams, and elegant platbands.
Depending on the dimensions and layout of the apartment, the doorway can be designed using a door or an arch without a door leaf, which will look advantageous between the kitchen and the dining room, between the living room and the corridor. In any case, the passage between the rooms plays important role in the interior, attracting attention and adding, in some cases, convenience and functionality.
Doorways without traditional doors surprisingly transform a room
If for a number of reasons you decide to leave the doorway open, you should understand the advantages and disadvantages of this method.
The advantages include the following points:
- Allows you to add functionality to adjacent rooms. The most suitable option is this design between the kitchen and dining room.
- There are no hinges or fittings in the open arch, so nothing will fail.
- Finishing the day opening will be carried out without difficulty, since construction stores have a fairly wide range of facing materials.
- Decorating an open doorway does not require large financial investments, effort and, in most cases, time.
- You can do the work yourself.
- An open arch will harmoniously fit into any interior and design style. Its shape can be any - square, triangular, curved, arched.
The disadvantages include the lack of sufficient sound insulation in adjacent rooms and the free penetration of odors, which is especially important for the kitchen.

An opening without a door is a win-win solution for visually combining adjacent rooms: living room and hall, corridor and dining room, kitchen and living room
All doorways can be divided into several main types:

The design of doorways, depending on the purpose, has some features. In particular, bedrooms and children's rooms should provide peace and quiet, so it is not advisable to leave them without a tightly closing door leaf. Kitchens, libraries and living rooms, on the contrary, can be equipped with an open doorway - this will add convenience when moving, expand the space and allow sunlight to easily enter small rooms.

Light doorway decor will highlight the beauty and complexity of the room’s interior

A wide edging, on the contrary, will highlight the complex shape of the opening and place a visual emphasis on it
In small apartments with low ceilings, arched openings will look best. This type will visually expand the space and add height to it. In this case, the arch should be flat and have a large radius.
How to design a doorway?
Popular design options:
- Decorating with curtains or drapery. It will serve as an ideal option for the passage between the bedroom and the loggia. We recommend using high-quality dense textiles that prevent the passage sun rays. For a lighter option, curtains made from threads of beads and beads are suitable.

For a bohemian style, curtains made of dense material in rich colors are suitable.
- Various vertical blinds are also suitable for decorating doorways. Their range is widely represented in construction stores. You can use folding wooden, glass, fabric or plastic partitions.

Vertical blinds as a decorative partition
- A more classic option for decorating open doorways is cladding with plasterboard and wood. The convenience of the first is that you can build almost any shape from it and cover it with a finishing material - decorative plaster, paint or wallpaper - the choice is yours. Patterns and ornaments can be carved into wood decor. The tree will look more “chic” and will last a long time. When changing the color scheme of the room - wood trim You can easily repaint it in a different shade.

Wood paneling is a good solution when you want to highlight the edging against the background of the walls.
- A small decorative cornice called a “sandric” will harmoniously fit into classic interiors. It may consist of columns or stucco moldings and contain elements of statues.

Decorating a doorway in a classic style
- If the interior is made in the Renaissance, Gothic or Baroque style, you should take a closer look at the decorative stucco moldings and columns. This technique will definitely add chic and aristocracy to the room. They are not suitable for rooms decorated in high-tech and modern styles. The surface of the stucco moldings can be painted various colors, decorate and apply gilding. It is not necessary to use natural materials; polyurethane will cope well with this task. It is much lighter and stronger than plaster. In addition, it can be used to imitate the finishing natural stone and marble.

Decorating the opening with stucco molding will make the room elegant
A glass door will appeal to those who do not want to completely separate and isolate the space. You can use stained glass, frosted or tinted glass. Apply an ornament to it or leave it completely transparent.

A glass door is relevant when complete visual isolation is not needed, but it is necessary to protect yourself from noise and smell
Sliding doors are suitable for owners of large premises with the ability to equip a wide opening. Their convenience lies in their versatility. If you need to delimit space, just close the doors.

Sliding doors can be selected to suit any interior style
wonderful and in a convenient way The design of doorways in small apartments will be an accordion door. Can be glass, plastic or wood. It takes up absolutely no space and does not require free space.

The accordion door folds compactly, so it is very appropriate in small rooms
Decorating a doorway with stone
Cladding doorways with decorative stone will appeal to connoisseurs of natural materials. This type of decor is quite expensive and labor-intensive. Selecting a stone will not be difficult, because the palette of colors, shades, textures is very wide - from smooth gray, black to brick-colored relief elements. This material can be found in various sizes and shapes. Using artificial stone, you can imitate shell rock, malachite, sandstone or any other.

If you choose finishing with natural stone, remember that the idea must be really worthwhile and supported by similar details in the design of the room

Doorway cladding with “ragged edges”
Commonly used elements small size, placing them along the edge of the opening, creating either smooth or torn edges. The stone can be used in both color scheme with the interior, and highlight the finish using contrasting shades. Stone is combined with both textiles and wood. A fairly durable, low-maintenance way to design a doorway. Since the decorative stone is heavy, it is important to attach it tightly to the wall. To do this, you should use specially designed adhesive-based compositions and liquid nails.
Brick tiles are often used instead of decorative stone. This material is moisture-resistant and fire-resistant. Can last for several decades. Just as in the previous version, it is laid out scattered along the contour of the opening or smooth edges are formed. It goes well with both plaster and wallpaper.

Option for designing an arch with tiles to resemble old brick

And here the doorway was lined with real brick
To prepare a section of the wall for laying tiles, you need to remove all previous finishing materials and degrease the surface. If the wall has rough unevenness or cracks, it is recommended to level it with putty or plaster. The obligatory stage is priming in two stages.
At the end of the drying process, proceed with the installation of the “clinker”. Tile adhesives and liquid nails are used to attach tiles to the wall. It is important not to allow glue to appear in the seams between the elements. To ensure that the joints are perfectly even, it is recommended to use special crosses. They can be found at any hardware store. The last stage There will be the use of grout, which can be similar in shade or contrasting to the tile.
How to decorate a doorway using plastic
Fast and a budget option doorway finishing. The installation process is simple. You can do it yourself. Quite durable, flexible and easy to care for. You can run wiring under the material and backlight it with small lamps. The plastic is secured using glue for plastics.

Before gluing the panels, the planes should be leveled with putty and primed

Corner elements are used to seal gaps between panels and walls.
With the help of an open doorway you can radically transform a room. It will add space, light and lightness. If the apartment is small, this option is simply irreplaceable, as it will save usable space. It will serve as a win-win option for combining a kitchen with a dining room, a bedroom with a loggia, a library with a living room, a hall with an entrance hall.
A wide range of finishing materials and a variety of shapes will allow you to choose the design of a doorway for any room - from country cottages and huge mansions to modern apartments in new residential complexes. If you are going to combine a sleeping space with a loggia, do not forget about various ways to block sunlight, such as curtains, drapes or blinds.

Arch of original shape in the bedroom

Decorating a doorway with wooden columns
Whatever option you choose - finishing with decorative stone or wood, plastic, brickwork, wallpaper or drywall - it is important to maintain a balance. All interior elements must be harmoniously combined with each other.

An original solution - built-in open shelves
Video on how to decorate a doorway with stone
And in big house, and in a typical apartment there are rooms that do not need to be hidden behind the door. For example, it is not needed in the kitchen, living room and hallway, because these rooms have high traffic and are a meeting place for family members and guests. The door takes up a lot of space, so it is often not installed, and the opening is designed in an original way.
It is not initially installed in the hole between rooms door frame. But already at the beginning of the remodeling you need to choose the shape of the opening. It can be done in the form:
- arches;
- semi-arches;
- portal;
- any geometric figure.
If there are several doorless openings in an apartment or house, then they should all be of the same shape - this will create a feeling of a single space. Designing openings in this way is especially suitable for small residential premises. A swing door takes up approximately 1 square meter. m. area. If it is removed, this footage can be used wisely.
Door frames have standard size, and the opening can be made wider. This technique is often used in the design of small rooms. If you make the entrance larger, the room will seem more spacious. There will be air and free space in it.


If you don’t know how to design an opening without a kitchen door, make it in the shape of an arch. It looks more interesting than a simple one swing door, and decorates the room in any style - classic, Italian, rustic, ethnic, Mediterranean, modern.
Arched openings come in several types:
- round;
- trapezoidal;
- triangular.
These structures are made of plasterboard; different materials are used for their decoration. Round arches is a universal solution suitable for all premises. Such a structure can connect the hall and the corridor, the kitchen and the balcony. To make it look beautiful, do not forget about an important rule: the lower the ceiling height, the wider the round arch needs to be made.
The trapezoidal hole consists of straight lines and looks strange. Doorways of this shape are made in rooms in the style of techno and minimalism. Triangular arches first appeared in medieval interiors, and then came to modern design. They are suitable for rooms with high ceilings and appear more often in private homes.


In this case, only one part of the opening is rounded, while the second remains square. If the size of the wall allows, such a semi-arch is made wide and shelves or niches are installed on one side, and lighting is provided. An asymmetrical opening becomes a noticeable element of the interior, where two rooms are combined into one space. Such half-arches are often made to hide defects interior wall or other errors.


Conventionally referred to as arches, but in fact it has a rectangular shape. Basically, it's like a doorway, but there's no door in it. Portals in classic interiors are usually finished natural wood, MDF and other similar materials. Beautiful carved platbands in a contrasting color are selected that stand out against the background of the wall. The hole is made wider than a standard opening, making the room visually more spacious.


Non-standard forms
Who said that interior openings should only be round, triangular or rectangular? There was no such installation! Therefore, the passage between the rooms is connected by arches with wavy edges or other non-standard shapes. Asymmetry never goes out of interior fashion, just like bold decisions. Metallic profile, on which the drywall is attached, is very flexible, so complex structures can be easily made from it.
Choosing material for finishing the doorway
There are various options for arch design. Doorways are finished with the following materials:
- plastic panels;
- polyurethane stucco;
- tiles;
- decorative stone;
- tree and its derivatives.
The choice depends on which interior opening the material will be used to finish. For example, it is better to finish a kitchen arch with tiles or plastic - they are easy to clean and do not absorb dirt. The finishing material for the doorway must fit into the interior style. If the room is made in eco-style, there is no need to cover the openings with plastic panels, and decorative stone will not look good in minimalism.
Plastic panels
Plastic panels are actively used for lining interior openings. They are inexpensive, easy to install, last a long time, are not afraid of moisture and look beautiful. Plastic bends easily, so it is used to decorate arches and semi-arches.
Palette plastic panels rich. They come in one color, with a pattern, wood or stone. You can match them to the laminate or choose a color that contrasts with the wallpaper. It is customary to use such panels to decorate the opening between the kitchen and the hallway or balcony - this is an area with high traffic, so you need a material from which dust and dirt can be washed off well.
Stucco is used to decorate arches and portals. This can be a thin plinth or a wide platband with complex carvings. White looks like plaster, so it is not suitable for all interiors. It can be used to decorate openings in rooms in the classical style, baroque, rococo and all those that vaguely resemble the palaces of Roman emperors and European monarchs. If there is a room in the room carved furniture, and a crystal chandelier will take its rightful place under the ceiling, which means the doorways here must be decorated with stucco. It is easy to install, weighs little, but does not like moisture, so it is rarely used in kitchen design.


Facing with decorative stone or tiles
Often used for decoration tiles and decorative stone. The latter is often used to decorate openings in eco-style rooms. To make the interior complete, you can use the same material to lay out the apron and tabletop and cover them with a durable glass sheet.
Doorways can be tiled with medium-sized tiles or small mosaics. The choice of ceramic tiles is huge. Installing it will take more time than installing plastic panels, but it's worth it. The tile retains its original appearance for up to 50 years and is not afraid of moisture and temperature changes.
It is customary to decorate arched openings in Provence and Italian styles with artificial or clinker bricks. If you choose the right decor and furniture, then ordinary kitchen and the corridor can become like a cozy European courtyard. You can play with this idea in different ways. So, for example, you need to make arched niches in the walls, also trim them with bricks and paste a photo of Prague or Rome in light brown tones inside. For seams, it is better to use a contrasting grout - with it, a clinker wall turns out to be very similar to a real brick one.


Wood paneling
To design doorways, you can use wood and wood-like materials:
- veneer;
- laminate;
- eco-veneer;
- array;
- Chipboard.
Buying solid wood will cost the most, but it will also look more beautiful than other materials. Wood for openings in classic interiors is selected with a complex carved pattern, in color to match the furniture and floor. But veneer is more popular - it bends easily, looks natural and costs several times less than wood. Laminate, MDF and laminated chipboard come in different shades - from bleached oak to mahogany - and are suitable for decorating openings in different rooms. Wooden panels are also used to frame portals and triangular arches.
Doorway decor
Door arches not only expand and give them an original shape, but also decorate them. Here it is important not to overdo it and choose decor that will be in harmony with other interior items. A decorated arch seems more massive, so in small rooms the openings are designed minimally.
Arches, semi-arches and portals can be decorated:
- columns;
- painting;
- textiles;
- moldings.
An opening with curtains or painting becomes an important part of the interior and attracts additional attention. If you want the passage between rooms to be invisible, it is better not to decorate it.
Columns
You can decorate the portal in a spacious luxurious living room with white columns. So that they do not stand out, but look organic, the walls and ceiling should be decorated with voluminous stucco. Columns are definitely not suitable for loft, minimalism or Scandinavian style. They will look good in rooms decorated artificial marble, Venetian plaster.

With openings decorated with columns, the room becomes like the hall of an ancient palace. You can play with this and place plaster statues and large flowerpots with fresh flowers in the living room. If you love neoclassicism, be sure to use columns for decoration - they will fit perfectly into such an interior.
Curtains and curtains on doorways have become fashionable again. The tendency to decorate arches and portals with textiles appeared in the 60-70s of the last century, then they forgot about this technique, but now they have remembered it again.
Curtains are attached to doorways in order to zone the space. Sometimes it becomes necessary to close the living room or kitchen so as not to disturb, for example, sound or light, to create a calmer atmosphere. Here the function of a door can be performed by curtains made of thick fabric.

Curtains on doors and windows should be the same or in the same color scheme, and it is also desirable that they fit into the overall concept of the interior. For the rich classic design thick velvet curtains are suitable, room in english style can be complemented with thick checkered curtains, for rustic - linen curtains with a floral print, for eco - plain cotton ones.
Door curtains should be combined with other textiles in the room: pillows, towels, bedspreads and homespun rugs. For such curtains, you can choose beautiful cornices, original tassels, and make lambrequins. It is better not to use tulle; it is suitable for windows and will quickly get dirty. With curtains, any interior becomes more comfortable, homely and intimate, but here, too, you need to know when to stop. Any curtains take up additional space, so they are not hung in small rooms.


painting
Ceiling and wall paintings will decorate any interior. It never goes out of style and always inspires admiration. The doorway in the living room or kitchen can be painted. Only an experienced artist can complete this task from scratch, and beginners will come to the aid of stencils, which are best purchased at any hardware store.
The painting will look perfect in and around a typical semicircular arch. For the pattern to be noticeable, the wall around it must be monochromatic. If the partitions in the living room are decorated with wallpaper with floral ornament, a similar pattern can be used to decorate the doorway. It is advisable to choose a monochromatic or multi-colored image. For example, a Chinese-style room is decorated with black hieroglyphs, and a loft is decorated with inscriptions in Latin (all this is also considered artistic painting). Here you just need to choose the optimal paints for a specific surface and be patient - this is a long and painstaking job.
Moldings
The doorway can be decorated with moldings - elements made of polyurethane in the form of a thin strip or plinth. They are actively used in design: they decorate walls, fireplaces, ceilings, doors and arches. They are also used as frames for paintings and wall paintings.

You can highlight an opening of any shape with a thin molding. It is recommended to attach the white plank not close to the edge, but by making a small indent from it - this will make the opening appear even wider. White moldings look good on a plain, dim wall.
In order to have more space in the apartment and a few extra square meters, it is better to remove the doors between the corridor and some rooms, and make the openings wider and refined. There are a lot of options on how best to do this. First, they need to be given the desired shape using drywall, and then decorated with plastic, wood, stucco, painted or covered with curtains. If you carefully think through each step and choose the right decor for a specific room, then a typical doorway will become an important part of the entire interior.