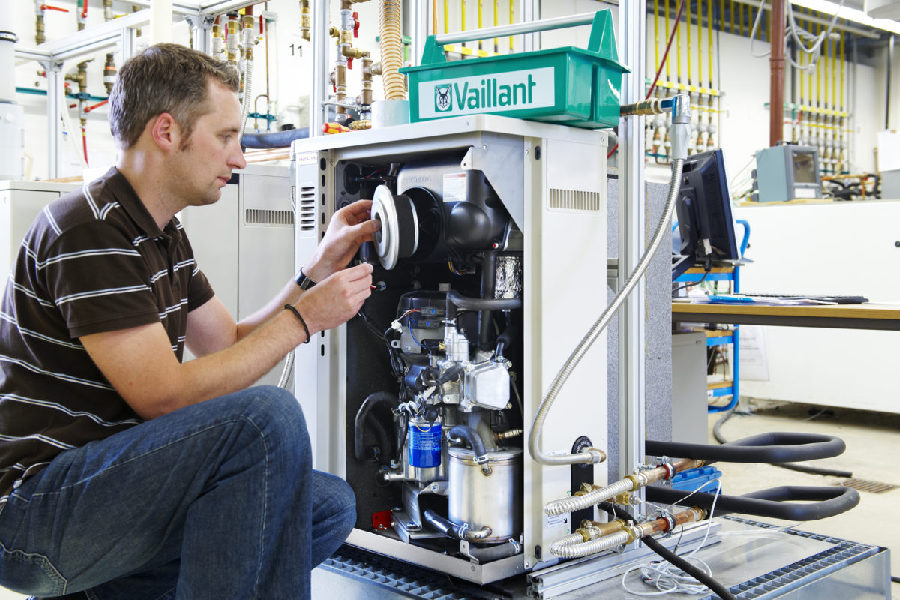
Dion geyser repair. Internal structure of a geyser
Regardless of the model of the geyser, its design includes the following elements.
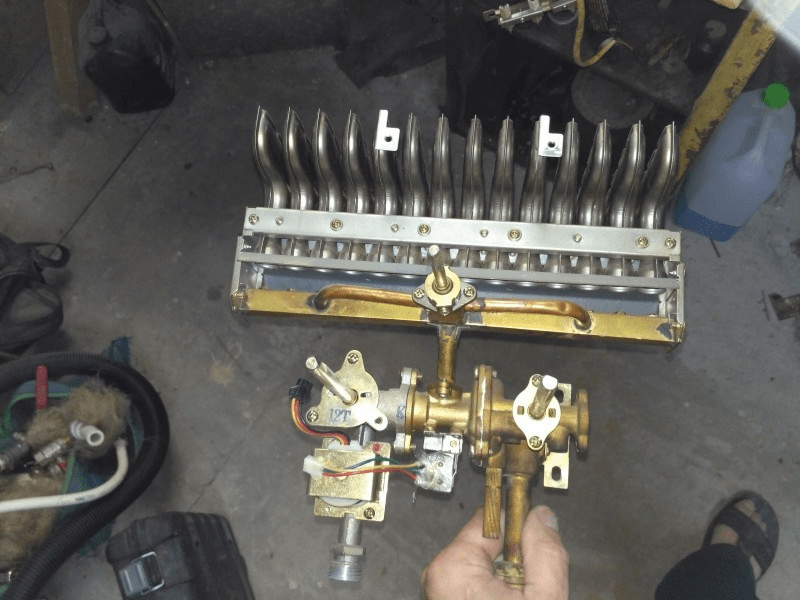
- Heat exchanger.
- Main burner.
- Pilot burner.
The gas water heater works according to the following principle.
- When you open a water tap, the pressure in the system drops and the pilot burner in the column is activated.
- After which the pilot burner ignites the main burner. That, in turn, begins to intensively heat the heat exchanger, which is made in the form of a coil. As water passes through the heat exchanger, it heats up and hot water comes out of the tap.
- Exhaust gas products exit into a specially designated pipe.
This operating principle applies to automatic speakers. In semi-mechanical or mechanical ones, the operating principle is slightly different, but generally identical to an automatic burner.
Also, depending on the model, after the water heating cycle, the flame in the pilot burner remains burning, thereby maintaining a high temperature in the heat exchanger. When you open the water tap, the whole process begins again.
Kinds
Currently on the market gas appliances a wide selection is available various models gas burners. Generally speaking, all gas heaters operate on the same principle and differ from each other in the following characteristics.
Power. The greater the power of the heater, the more water it can heat in a short period of time.
Among the most common types of power, the following three can be noted:
- Heater with a power of 28 kW.
- Heater with a power of 26 kW.
- Heater with a power of 17 kW.
The latter type has a low cost, but at the same time cannot provide both hot water bathroom and kitchen. As a rule, most users choose the second type, as it has an optimal price-performance ratio.
Safe operation of the device. It is one of the main criteria when choosing a heater. Despite advanced technologies, there are still cases when water or gas is turned off and in order to prevent leakage of fuel or combustion products, the dispensers are equipped with the following sensors.

- Gas shut-off sensor in case the flame goes out.
- Flame sensor. It is redundant and also turns off the gas supply if the flame goes out and the first sensor does not work.
- Water pressure relief valve. Prevents from tearing water pipes columns in case of high pressure in the system.
- Sensor for opening and closing a water tap. Performs the function of turning the heater on and off when the tap is opened.
- Traction sensor. Prevents the column from turning on in the absence of traction, while avoiding carbon monoxide poisoning.
- Water pressure sensor. Prevents the heater from turning on in case of low pressure in the water supply.
- Thermostat. Ensures that water heating is turned off when the temperature has reached the desired level.
This is the main list of protective sensors that a modern geyser should be equipped with. If one of them is missing, such a device is highly not recommended for use from a safety point of view.
Type of arson. Arson can be carried out in one of two types.
- Piezo is a mechanical type, which means you have to burn it manually.
- Auto-ignition operates using batteries and is automatic. The principle of operation is the same as in piezo arson only without human intervention. Automatic ignition also includes hydroturbine ignition, powered by an electric generator.
Additional features. These functions include the presence of an LCD display that displays various information, additional settings etc.
The most common breakdowns

As you know, nothing lasts forever and gas heaters are no exception. Like all equipment, they tend to fail, due to many factors. Some of the more common breakdowns include the following malfunctions.
- The main burner does not ignite when the ignition is working.
- Burner goes out for no reason.
- Doesn't heat water well.
- There is some popping noise when the speaker operates.
- When you turn on the heater you can smell gas.
- The device does not light up.
This is a list of common problems with gas heaters. If you have a tool and a little knowledge, you can fix these problems yourself. Otherwise it's better this process trust someone who understands.
Scale on the heat exchanger - how to fix it
The need to clean the heat exchanger is usually caused by the following reasons.
- The water takes a long time to heat up.
- Poor water pressure.
- The overheating sensor is triggered and the column turns off.
If the above happens to the column, this means that it is necessary to clean the heat exchanger, as it has formed a large number of scale
Step-by-step instruction
Cleaning the heat exchanger consists of the following steps.
- It is necessary to shut off the water supply to the heater with the valve and dismantle the heat exchanger, disconnecting it from the water pipes. If cleaning is carried out infrequently, it is recommended to use a lubricating spray for dismantling, which makes it easier to unscrew the oxidized nuts. After treating the nuts with a spray, you need to wait 15-20 minutes and start unscrewing them.
- After dismantling the heat exchanger, you can begin cleaning it. To clean scale, you can use a solution prepared at the rate of 100 grams. citric acid for half a liter hot water. Using a watering can, the solution is poured into the heat exchanger and left there for 12 hours.
- Afterwards, you need to drain the solution and rinse the part thoroughly with clean water. It is necessary to thoroughly clean the heat exchanger from any remaining scale, as it can clog the tubes, blocking the flow of water. This can be done using pressurized water or compressed air.
- The final stage at which it is necessary to install the heat exchanger in place in the heater after first changing the sealing washers.
The radiator is leaking - how to fix it
If the radiator in a gas heater begins to leak, it would be more expedient to replace it with a new one, but its cost is often one third of the cost of the heater, which is completely irrational. In such cases, it would be more natural to solder the leaky radiator. This can be done using solder, since the water that passes through the radiator does not exceed 100 degrees, and the melting point of solder is 200 degrees.
Step-by-step instruction

In order to solder the radiator, you must perform the following steps.
- Drain the water from the column and remove the radiator.
- Find the location of the leak and shallow sandpaper clean the soldering area. The cleaned area must be wiped and degreased with alcohol.
- Immediately before soldering, the leak site must be tinned. This can be done using regular rosin.
- Soldering must be done with a soldering iron with a power of at least 100 watts and solder. On the prepared area for soldering, you need to apply a uniform layer of solder with a heated soldering iron. If the soldering is applied unevenly and is loose, you need to heat the soldering area more strongly.
After soldering, you should check the radiator for leaks and if everything is fine, install it into the column in the reverse order.
The gas water heater does not light - how to fix it
If the heater does not ignite, it is first necessary to determine the cause of the malfunction.
Step-by-step instruction
In most cases, the following circumstances may be the cause of the malfunction.
- Lack of traction. If the exhaust pipe for exhaust combustion products is clogged, the draft sensor will trigger and prevent the column from setting fire. In such cases, it is necessary to clean the exhaust gas outlet pipe.
- The batteries are dead. If the heater has automatic ignition, then the cause of the malfunction may be dead batteries that do not have enough energy to start the fire. In this case, it is enough to replace the batteries with new ones and the breakdown will be eliminated.
- Low water pressure. As you know, all modern water heaters are equipped with water pressure sensors and if the flow is not large enough, the heater does not turn on. The cause of this malfunction may be a clogged water filter, which is located before the water enters the column, or heavy deposits in the heat exchanger. This malfunction can be eliminated by cleaning the filter or heat exchanger, depending on what is clogged.
- Also, the cause of a non-working column may be clogged gas nozzles, a heat exchanger clogged with carbon deposits, faulty sensors, etc. To eliminate such breakdowns by elimination, you must start by cleaning all possible heater components and gradually move towards replacing the sensors.
Sounds when turned on - how to fix it
One of the most common speaker malfunctions can be popping noises when turned on. Initially they are not strong and are not given of great importance, but each time they become more intense and at one point it may slam so hard that the windows fall out or the chimney bursts. The following malfunctions are the cause of these pops.
- Lack of draft in the pipe for removal of waste combustion products.
- Inoperative arson retardant.
- The batteries are dead (in speakers with automatic ignition).
- The position of the spark plug is faulty.
You can partially fix such faults yourself, but some are recommended to be fixed with the help of a gas service specialist.
Step-by-step instruction
Popping noises when the column is set on fire are eliminated as follows.
- Chimney cleaning.
- Replacing batteries.
Replacing gaskets
One of the reasons for column leakage may be gasket wear. Also, one of the reasons for gas leakage from the heater is wear of the gasket.
Step-by-step instruction
Replacing gaskets consists of the following steps.
- It is necessary to shut off the gas and water supply to the heater.
- Burn out the remaining gas and drain the water.
- Unscrew the heat exchanger from the water supply pipes and remove the old gaskets. Then install new gaskets and screw the radiator in the reverse order.
- Afterwards, you need to unscrew the column of the gas line, remove the old gaskets, install new ones and screw the heater back on.
It is not recommended to use homemade pads made from improvised materials, as this can lead to bad consequences. It is better to purchase gaskets in specialized stores and of good quality.
When starting to repair a geyser, you should remember that this is a high-risk device and requires unconditional compliance with safety rules. Also, when repairing heaters, you should adhere to the following recommendations.
- For any repairs, turn off the gas and water supply to the device itself.
- Use high-quality components and parts purchased in specialized stores.
- After dismantling the heater or its components, carefully check the connections for leaks when reinstalling them.
- You should not repair a column if you have no idea how it works and what causes the breakdown.
It should also be remembered that if the repair is unsuccessful, the column may fail and cannot be repaired, so you should be meticulous in approaching this process.
Repairing a geyser cannot be compared with any other home appliance in terms of its complexity and the number of possible technical problems. Only repairing gas boilers at home can be more complex and rich in possible technical nuances. If you can still try to repair the water heating device yourself, then it is best to entrust the maintenance and repair work of the heating boiler, regardless of the amount of built-in automation, the presence of a secondary circuit and the manufacturer, to a certified specialist.
What can you repair in a gas water heater with your own hands?
Of course, a gas hot water heater does not always wear out or break so thoroughly and irrevocably that it is impossible to do without the help of a specialist. According to reviews from the same mechanics of the gas maintenance service, in 70% of cases repairs geysers boils down to routine maintenance and troubleshooting minor defects, usually associated with poor quality parts or improper adjustment.
The list of works available for repairing geysers at home can include the following:
- Minor repairs and repackaging of coupling and nut joints of pipelines;
- Replacing the elastic membrane in the water-gas column regulator;
- Cleaning and adjusting the operation of the draft sensor;
- Cleaning and washing the heat exchanger;
- Ignition board repair.
It is clear that there is a certain category of expensive hot water heaters, full of automation and electronics, which there is simply no point in even trying to repair at home. For example, repairing Electrolux or Vaillant geysers will cost less at a service center due to the high cost of spare parts. The exception is particularly critical nodes, such as three-way valve or ignition board, it is better to buy them from an authorized dealer, even if the price is higher. This is the only chance to carry out repairs and not destroy an expensive Italian or German speaker with substandard spare parts.
Repair of geyser Oasis
Chinese Oasis water heating devices have attracted attention on the domestic market, primarily due to their low price and simplicity of design, which allows for do-it-yourself geyser repair in almost any problem situation. The structure and format of the main parts are very similar to most domestic systems, so there are no problems with disassembly and repair, even if there are no repair instructions or diagrams for the Oasis gas water heater.

It is known from practice that Chinese Oasis gas appliances suffer from three types of defects:
- Rapid battery discharge;
- Failure of spark plugs;
- Water leakage on the seal of the membrane water pressure sensor.
In the first case, the problem with the batteries manifests itself in a rather unusual way; the indicator display pleases with blue or green light, but when you try to turn on the gas water heater, nothing happens. Repair of such a defect is carried out by simply replacing conventional salt batteries with alkaline cells with increased charge capacity. They should last for at least a year.

Disassembling the Oasis for repairs
If drops of water begin to appear under the column, this most likely means that repair of one of the flow parts of the water heating apparatus will be required. To determine the cause of water leakage and carry out repairs, the Oasis must be disassembled. First of all, you need to remove external cladding apparatus. To do this, remove the handles and unscrew the screws in the lower part of the body.

The next step is to disconnect the connectors from the indicator panel and microswitch.
We gain access to the future place of repair - the membrane water pressure control unit.
We repair the gas water heater control unit
In order to remove the pressure control unit, you must carefully disconnect the microswitch connector and remove the two screws securing the heat exchanger flange to the unit body.
It is clear that before repairing a gas water heater, the water must be turned off and the remaining water pressure in the system must be released by opening the tap.
For repairs, you will need to additionally remove the gas block of the water heater and the burner device.
The removed unit can be disassembled for repair by removing four steel screws. Typically, steel fasteners stick strongly to brass, so the joint is pre-treated with VD-5 or brake fluid.
The pressure control unit operates as follows:
It is clear that the surface of a steel rod, when in contact with rubber, intensively corrodes and becomes covered with cavities. Each movement of such a rod leads to catastrophic wear of the oil seal, which begins to leak within a year. In addition, during any repair, at the first opportunity it is necessary to change the membrane to a high-quality rubber one.
A situation often occurs when, before repairing the seal, the geyser begins to boil and spew steam. This suggests that the membrane also needs to be cleaned of dirt and, if possible, replaced.
Repair of the geyser electrode system
Chinese manufacturers of Oasis geysers always like to save on the quality of the materials used. An example is a situation where a new, fully operational gas water heater stops igniting even with a working water and gas control unit and ignition board.

The reason is the failure of one of the three spark plugs of the burner flame. The design of the burner device is such that in order to ignite the gas, it is necessary that all three spark plugs be in good working order.
Repairing the gas water heater ignition system begins with identifying the faulty spark plug. To do this, you need to remove the cladding, turn off the lights and shade the room. When starting the gas water heater, you can see how on one of the spark plugs the electric discharge strikes not into the gas flow, but much lower, into the housing.
The situation is extremely dangerous and requires urgent repairs ignition systems for gas-air flow in the column. Repairs cannot be postponed, even if the column lights up the second or third time it is started. When starting, a large amount of a mixture of gas and air is pumped into the fuel chamber and exhaust device, and if the ignition of the column is triggered with a long delay, an explosion and fire are possible.
For repairs, it is necessary to dismantle all three spark plugs, clean them of carbon deposits and oxidation products. One candle definitely pierces the body, the rest are unknown in what condition, so all three are put in an insulating heat-shrinkable polymer tube, at least three or four layers. During the repair, you will need to insulate the clamping bar in the same way, which secures the spark plugs to the burner body.
Repair of geyser Neva
Most models of Neva geysers have proven themselves to be simple and easy-to-repair water heating devices. They are far from the reliability of European models, but repairing them is much cheaper, and you can almost always do it yourself.
Failure and subsequent repair of a spark plug is considered by the rules to be an atypical case of breakdown, therefore, after performing repair work, it would be correct to look for the cause of the defect. Most often, plastic burnout occurs due to condensation flowing through the ventilation system onto the body of the gas burner.
How to repair a heat exchanger union nut
One of the most common defects of Neva geysers for almost all models is the low quality of the metal of the heat exchanger. According to the rules, the heat exchange circuit through which water moves should not come into contact with aluminum parts, for example, a gas burner or a control unit. Any such contact can cause electrochemical corrosion of the copper walls, and then repair will simply be useless.
In addition, the rules for tightening the union nuts that secure the heat exchanger to the regulator and outlet pipe are not always followed. With each heat exchanger removal and repair, the nuts cut a thin, barely visible path into the copper wall. Ultimately, the flared end and part of the copper pipe simply break off the tenth time of twisting.
In this case, you have to trim and level the place of the breakdown, install a new nut with external thread and connect the heat exchanger to the conventional block regulator flexible hose. Any other repair option, as practice shows, turns out to be short-lived.
Repair of a microswitch in the geyser starting system
A situation similar to the Oasis with dead batteries also happens with the Neva gas water heater. When you try to start the Neva, the indicator board lights up, but the gas burner does not ignite. Sometimes the column can be turned on 4-5 times.
In this situation, repair of the microswitch is required due to premature wear of the part or improper adjustment of the unit.
The switch is located next to the water pressure control unit. When the column starts, the membrane on the block pushes out the rod, which unlocks the switch contact. Unlike the Oasis, all parts of the unit, including the rod, are made of brass, so there is no corrosion; the microswitch itself must be repaired and replaced.
For execution repair work you need to disconnect the connector, unscrew the two M3 screws and remove the switch body from the strip, as in the video
Replacing the microphone is easy. You can buy an original part for 400-500 rubles. in a specialized salon or purchase an analogue for 50 rubles. in any radio parts store. There is no difference for repairs; in both cases they will sell a part from Chinese consumer goods.
In order to carry out repairs, you will need to unsolder two wires with a connector from the switch legs, put on heat shrink tube and solder to the contacts of the new part.
At the final stage of repair, the switch is screwed with old screws onto the mounting strip on the block. Next, you need to adjust the position of the microswitch body so that the rod completely releases the contact when moving. This is done using mounting screws. One of the screws bends with a radius; accordingly, by rotating it, you can move the switch body in the desired direction.
Repair of the Junkers geyser
The advantage of domestic geysers is their high resistance to overloads and poor quality of water, and first of all, gas. Experts say that German equipment traditionally shows long service life without repair, but under one condition - the system must be protected from power surges in the network and equipped with protective filter elements that soften the hardness of the heated water.
But even in such conditions it is necessary to periodically perform minor repairs DIY gas water heater Junkers. The reason is simple, automation, ignition and ignition devices turn out to be very sensitive to dirt, dust and rust in domestic gas. On dirty gas fuel, the igniter is the first to fail.

To restore the column, you will need to remove the cover and pull out the thin profiled aluminum tube, ensuring operation in standby mode. The tube is carefully cleaned with copper wire and washed with alcohol. Due to the high content of iron pentacarbonyl in the gas, fine metal dust falls on the walls of the gas pipeline, killing the spark plugs and igniter.
Filters practically do not retain pentacarbonyl, so craftsmen often replace the aluminum tube with a copper one larger diameter. The new gas pipeline is wrapped around a heat exchanger, which ensures the decomposition of carbonyl in the pipe before entering the ignition zone.
In addition, dirty gas requires regular opening and cleaning. gas burner columns.
Repair of heat exchangers of geysers
One of the most severe cases of column damage is considered to be burnout, fracture or through corrosion of the copper heat exchanger. In the first two cases, repairs are performed only by replacing the part with a new spare part. In the case of through corrosion, thin, 02.-0.5 mm holes are formed on the walls of the heat exchanger, through which water flows out of the circuit.
A defect, as a rule, is detected by intense soot formation, water leakage and a drop in pressure in the circuit when the tap is closed.
To repair the heat exchanger, you will need to remove it from the geyser mount. Next, the copper surface is cleaned of layers of soot and scale and subjected to a hydraulic test.
The easiest way is to identify the location of corrosion by pumping air or water under excess pressure. For example, the output of the heat exchanger is plugged with a rubber plug, and air pressure is applied to the inlet using a hand pump. The geyser heat exchanger is immersed in a container of water and the location of the damage is determined.
You can repair the damage at home by soldering with copper-silver tin solder. The first is used to restore the hottest spots located close to the flame front. To seal with tin, the copper surface is etched with a solution of zinc in hydrochloric acid, heat it with a torch and tin it with a massive piece of solder. For normal operation, the thickness of the tin patch must be at least 0.5-0.7 mm.
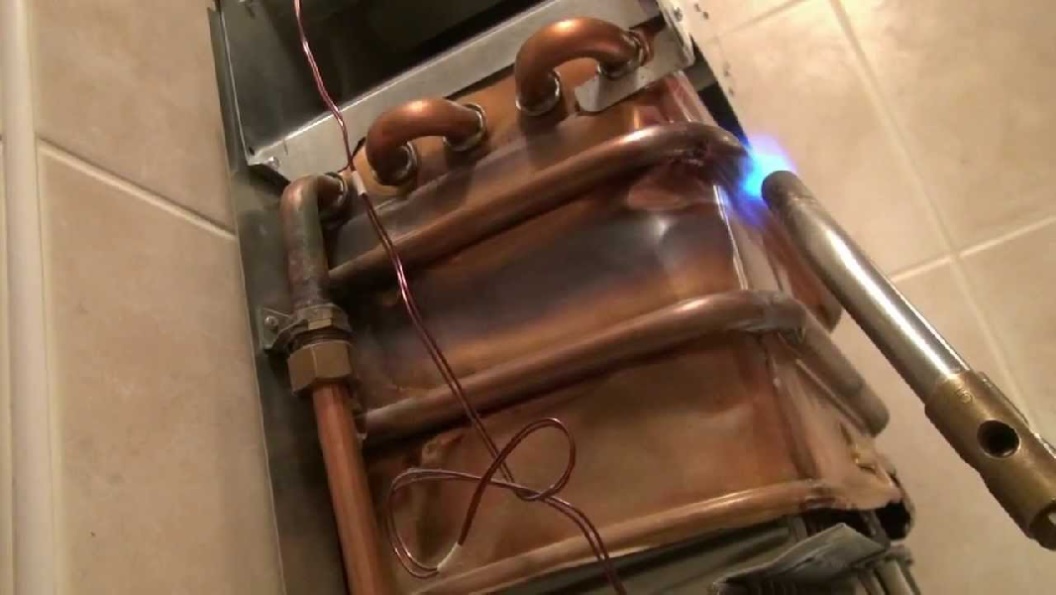
After repair, the heat exchanger is checked twice more - using traditional air injection and holding it under operating water pressure after installing the unit on a gas water heater. The pressure in the circuit should not drop for at least 15 minutes.
Bosch geyser repair
Water heating gas appliances produced by Bosch are distinguished by their compact size and enormous automation capabilities. The more components and mechanisms there are in the design, the greater the likelihood of failure.
Bosch WR10 water heating systems are characterized by two types of breakdowns - random shutdown after a successful start and leaking seals due to high water hardness.
Arbitrary shutdown can occur for three reasons:
- Loss of draft in the chimney;
- The ignition electrode is dirty, as a result of which the automation does not recognize the very small ionization current and turns off the gas supply. Repair comes down to regular cleaning of the electrodes;
- Triggering of the heat exchanger overheating sensor.
The last case is the most relevant. The overheating sensor is a bimetallic plate with contacts. When a certain temperature is reached, the plate bends and opens the contacts.
To restore it, you first need to check the operation of the sensor, for example, short-circuit the contacts directly with a paper clip or copper wire. If the gas water heater continues to operate normally, then you need to buy and replace the sensor. Severe overheating means that the gas flow regulator will need to be adjusted and tested.
Geysers with instantaneous water heaters Regardless of the manufacturer and model, the principle of operation is no different from each other. The difference lies only in the appearance, design and set of additional options, for example, automatic ignition of the burner, an error in maintaining the set temperature of the heated water, the presence of a digital display for setting and indicating the water temperature.
The gas water heater works as follows. Through a heat exchanger, which is copper tube with ribs, water flows. The gas burns, which heats the heat exchanger and as a result the water heats up. Depending on the set water heating temperature and its pressure in the water supply system, the gas unit adjustment system associated with the water unit ensures safe operation. If there is no water pressure or draft, the protection system automatically shuts off the gas supply.
In October 2006, I bought a NEVA LUX-5013 geyser (pictured above) manufactured by Gazapparat OJSC, St. Petersburg. I didn’t want to buy an imported manufacturer; sooner or later everything breaks down, and problems with spare parts become an insurmountable obstacle.
The previously installed model Neva-3208 served for 6 years (continues to work in another place now). The only drawback of this model is that it was necessary to change the rubber membrane in the water unit every year. Over time, it became deformed, because of this, the amount of gas supplied to the burner decreased and the water began to not warm up enough. Over time, the gas supply stopped completely.
I accidentally saw a silicone membrane in a gas equipment store. I replaced the rubber membrane in the water unit, after which there were no problems with the gas water heater.
I was persuaded to choose NEVA LUX-5013 by its high reliability (as I thought), compatibility of supply pipes, water-gas regulator from Mertik Maxitrol (Germany), availability of all types of protection, casing made of of stainless steel.

For three years (warranty period), the geyser worked perfectly, but as soon as the warranty expired, water began to drip from it. The first thing I thought was that one of the rubber gaskets had worn out, I would replace it and everything would be fine. But everything turned out to be much more complicated than I expected, and the repair turned out to be difficult. Opening the gas water heater revealed the presence of a fistula in the heat exchanger, from which a thin stream of water was gushing.
A separate page of the site is devoted to the repair of heat exchangers and boilers of flow-type gas heaters. Do-it-yourself repair of a geyser heat exchanger by soldering.
How to disassemble and reassemble the NEVA LUX geyser
Before starting repairs, be sure to turn off the gas and water supply taps.
To remove the casing of the gas water heater, you first need to unscrew the two screws located in the right and left corners of the lower part of the rear wall using a Phillips screwdriver from below, from the side of the pipe inlet.

The left knob for piezoelectric ignition of the igniter and rough adjustment of the gas supply cannot be removed. The right handle for fine adjustment of gas supply is held only by the casing with two clamps. You don't have to take it off either. But I usually remove it before removing the casing. In addition, so that the handle rotates easily when adjusting the temperature, I filed it along with the clamps in a circle where the handle touches the casing. Now it no longer clings to the casing and rotates easily.

Next, you should pull the casing towards you until the handles are recessed and, when the casing does not touch them, move it up. The upper slots of the casing will come out of the hooks located on the base of the gas column, and it will easily separate.
The geyser casing is installed in place in the reverse order. First, put it on the upper hooks with the slots, for which you will have to stand on a raised platform, then get the hole onto the adjustment handle and at the same time make sure that the holes located above the holes for fastening with self-tapping screws hit the guides. Screw the two screws into place.

The photo shows the appearance of the NEVA LUX-5013 geyser without a casing with a new heat exchanger.
Troubleshooting geyser
The gas in the igniter goes out
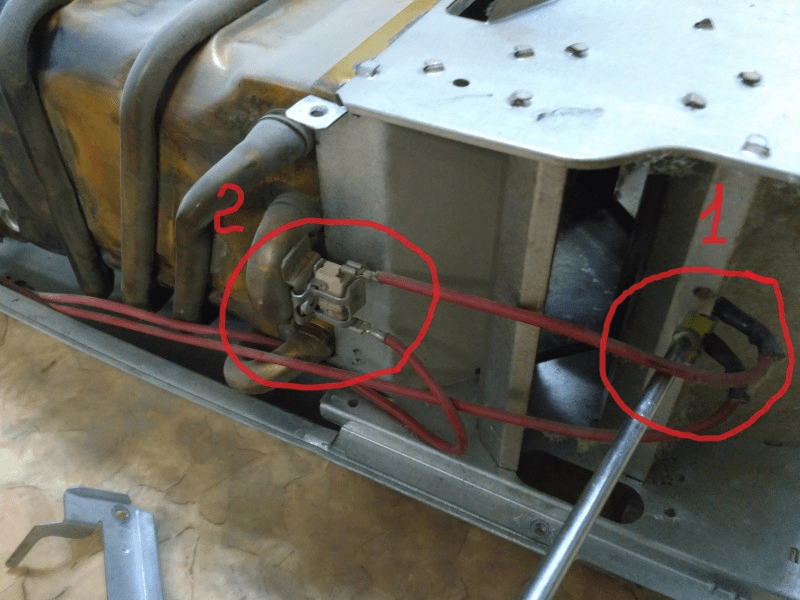
This malfunction is typical only for geysers with an automatic protection system. The gas in the igniter should always burn, regardless of the position of the handles or valves of taps and water supply mixers. The simplest system automatic protection of a geyser consists of only three elements: an electromagnetic valve, a thermocouple and a thermal fuse. The geyser may go out during operation if the protection elements are triggered or the elements themselves malfunction.
Electrical circuit for protecting the NEVA LUX geyser
Evidence of failure of the automation elements is the extinguishing of gas in the igniter after the gas control knob is no longer held. To repair an automatic protection system, you need to understand how its components work.

A thermocouple is two conductors welded together from different metals (I assume chromel and alumel), operating on the Seebeck effect and generating an EMF of about 30 mV when heated. Serves to power the solenoid valve. It fails only after many years of operation. The bottleneck is the loose center conductor coming out of the housing. Although it is insulated, the insulation can wear out over time, and the conductor can short-circuit to the body, and the geyser will go out.
If the contact at the welding site of the thermocouple is broken, then it is unacceptable to restore it by soldering, since the junction point in the thermocouple is a current generator, and not a simple eclectic connection of wires. The thermocouple should be replaced with a working one or repaired.
The solenoid valve is a coil copper wire, inside of which there is a metal cylinder (solenoid) mechanically connected to the valve for shutting off the gas supply to the gas column burner. When the thermocouple is heated, it produces an electrical current which, when flowing through the coil, creates a constant magnetic field that draws the solenoid into the coil.
Since the solenoid is mechanically connected to the valve, the valve moves and gas enters the burner. If the gas in the wick does not burn, the thermocouple cools down and does not produce current, the spring-loaded solenoid returns to its original state and the gas supply to the burner stops. In this simple way it is ensured safe operation geyser.
The thermal fuse is a bimetallic plate, which, when the temperature reaches 90˚C at the installation site of the thermal fuse, bends so much that it breaks the power supply circuit of the solenoid through the rod. In addition, the thermal fuse itself is connected to the circuit mechanically, terminals. Due to the complexity of the design and operating conditions, it sometimes fails. I had to replace it once because the gas water heater was going out randomly.
Checking the thermal fuse
You need to check the thermal fuse if the column goes out, despite good draft in the gas exhaust ventilation and sufficient air flow. If in the room where the gas water heater is installed, the plastic windows are tightly closed, and in addition the exhaust hood above the gas stove is turned on, then even with good draft there will be no air flow. The geyser will begin to overheat, the heating will trip the fuse and open the voltage supply circuit to the solenoid valve. After cooling, the fuse will close the circuit again.

To check the thermal fuse of the geyser (installed in its upper part and accessible without removing the casing), you need to remove the terminals from it (in the photo Pink colour) and short them together with any metal object, such as a paper clip.

If the geyser starts to work normally without overheating, then the cause of the malfunction has been found. Temporarily, before purchasing a new thermal fuse for replacement, you can leave a paper clip, just make sure that it does not touch metal parts gas water heater, and do not leave a running water heater unattended. The thermal fuse is attached to the heat-resistant plastic adapter with two screws. The adapter on the geyser body is secured with a latch.
Checking the solenoid valve of the geyser
If the paper clip does not help, then you need to check the functionality of the solenoid valve. It has a resistance of about 0.2 Ohm and in operating mode consumes a current of about 100 mA. You can check it by applying a voltage of 20-30 mV to the winding at a current of 100 mA. This mode can be easily created using any AA battery or accumulator and a 10 Ohm resistor. The battery must be fresh.
The connection is made as follows. The negative terminal of the battery is connected to the column body (for the valve and thermocouple, one terminal is connected to the body, in the diagram blue wire), and the positive terminal through a 10 Ohm resistor to the thermal fuse terminal (the terminals from the thermal fuse must first be removed), the wire from which does not go to the thermocouple (the left red wire in the diagram). Light the wick and immediately remove your hand from the gas control knob. The wick should continue to burn. If you disconnect the battery, the flame should go out immediately. If everything is so, the solenoid valve is working. Therefore, the thermocouple is faulty. If an external inspection fails to find bad contacts or a short circuit in the wires, the thermocouple will have to be replaced. It is sold complete with wires and terminals.
The geyser goes out during operation
No traction
One of the most common cases with the arrival of autumn is a tightly closed sealed plastic window in the room where the gas water heater is installed. There is no air flow - the column overheats and the bimetallic relay for thermal protection of the column from overheating (self-resetting thermal fuse) is triggered. If after 10-15 minutes the column lights up normally and does not go out again when the window is slightly open, then the reason is precisely the column overheating. If immediately after the gas goes out you can light the wick, and it will continue to burn after you stop holding the gas control knob, then the draft is good.
Traction may also be insufficient due to soot clogging or getting into ventilation duct foreign objects, such as bricks, from which the channel is made. To check the draft, you need to remove the gas exhaust pipe coming from the gas water heater from the channel, and with the window open, close the channel with a sheet of paper. If the paper holds, it means there is enough traction. You can bring a lit lighter and if the flame deviates to a horizontal position or even goes out, then there is sufficient draft in the channel. Otherwise, the canal needs to be cleaned.
Water unit is faulty
Also, the burners in the column, both with and without automation, may go out due to insufficient water pressure in the water supply or a malfunction of the water unit.

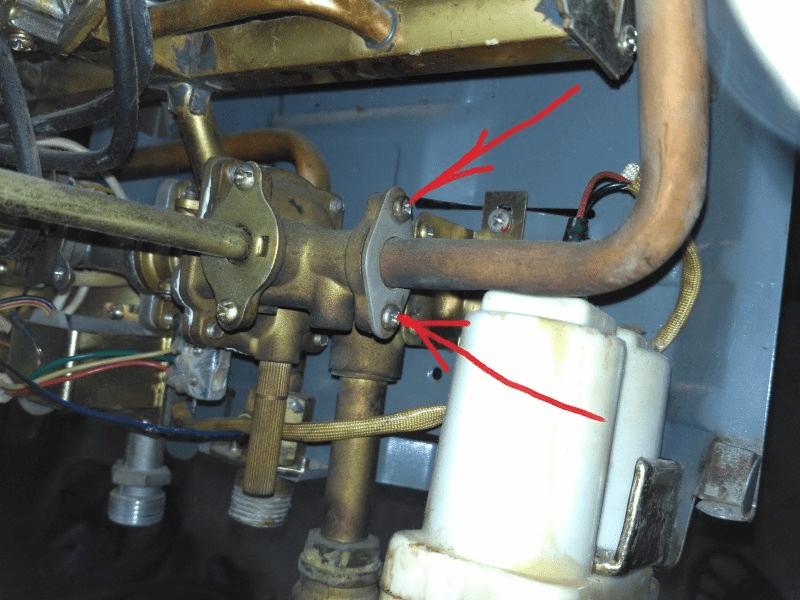
If the pressure of cold water has not changed, but the pressure of water coming from the water column has become weak, it means that the mesh filter at the inlet of the water unit is clogged. This often happens after the water is turned off and supplied again. To clean, simply unscrew one union nut on the water supply side, remove and clean the mesh and pressure difference calibration hole.
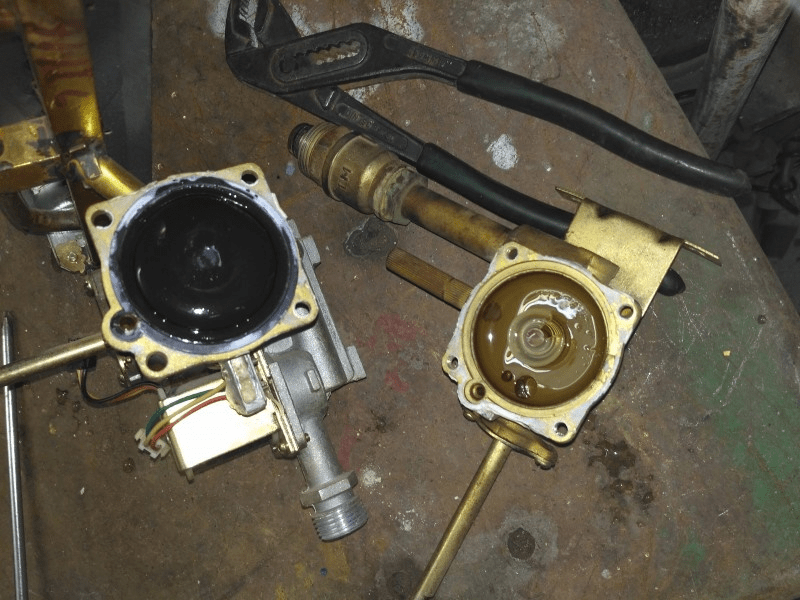
If a water unit is installed in the gas water heater as in the photo, and the water pressure has not visually changed, then it is necessary to check the condition of the rubber membrane in it. To do this, you need to unscrew the two union nuts from the water unit, then unscrew the three screws that hold the water unit in the gas unit by the cone. Disassemble the water assembly by unscrewing the eight screws. When you disconnect the halves of the assembly from each other, you will see a rubber membrane.
If the rubber band is not flat, but deformed, with bends, then it is the problem and needs to be replaced. At the same time, you should clean the filter mesh and the cavities of the water unit from dirt. I advise you to install a silicone membrane, it will last for many years. When assembling the water assembly, first tighten the screws until they stop, and then tighten them diagonally to ensure even clamping of the rubber.
In the old days, when I lived in an apartment on the top floor, where the water pressure was a sluggish trickle of water from the tap, I had to work magic with the water regulator to wash myself. Using a round file, I increased the diameter of the calibration hole to 2 mm, removed the filter mesh and annealed the conical spring of the gas unit. If I missed the size of the hole, I inserted a copper wire into it to make it smaller. Of course, this is a gross violation and the working column had to be constantly monitored, but there was simply no other way out. But there was always hot water.
How to eliminate leaks in gas water heater connections
The left pipe serves to supply water to the gas water heater; a tap is always installed on it to shut off the water supply to the water heater. This pipe is connected by a pipe to the water-gas regulator. From the regulator, water is supplied to the heat exchanger with right side. The middle pipe of the geyser carries hot water into the water supply system, and it is connected through a pipe directly to the heat exchanger on the left side. The right pipe in the gas water heater serves to supply gas and is connected through a copper tube to the water-gas regulator. A gas shut-off valve must also be installed on it.
Water connections in the gas water heater are made using union nuts (American) sealed with rubber or plastic gaskets. Over time, due to temperature changes, the gaskets lose their elasticity, become hard, crack, and water leaks occur. To replace the gasket, use a 24 key to unscrew the union nut, remove the worn one and install a new one. It happens that one gasket is not enough, the union nut is tightened all the way, but water still oozes out. Then you need to additionally install another gasket. Currently, silicone gaskets have appeared. They are more expensive, but last longer and are more reliable.
How to replace a copper water supply pipe to a heat exchanger
When connecting the copper pipe through which water is supplied from the water supply to the heat exchanger, I encountered a water leak from under the union nut. Repeatedly replacing the gasket only made the water leak worse.

Upon careful examination of the pipe at the point of contact of the flange with the gasket and sanding the surface with sandpaper, a crack was discovered, which increased when reattached. Repair by soldering cannot be used in this case, since when tightening the union nut a lot of force is applied, and the solder is soft, and the crack will appear again.

There was no such pipe in the gas equipment store; it turned out that this item was in short supply. The seller offered to replace the cracked pipe with a corrugated stainless steel hose designed for gas, claiming that it was no less reliable. Since there was no choice, I had to take his advice. These hoses are available in different lengths and can be selected for any replacement situation.

The gas tube, adjusted to its length, was installed without difficulty. Thanks to the corrugation, it bent well. When checking the gas water heater, it turned out that the water, passing through the new tube, emitted a loud unpleasant sound. I had to tie the tube to the base of the speaker with wire (as in the photo in the middle), and the unpleasant sound disappeared.

A year later, water started dripping from the gas water heater. It turned out that the stainless gas tube recommended by the seller had rusted at the junction of the tube and the flange, and a fistula had formed in it. Once again the task of finding a suitable replacement tube arose.

The idea arose to try using a flexible water line instead of a copper pipe. By technical specifications she was quite suitable. It could withstand operating pressure up to 10 atmospheres and temperatures up to 90°C. True, the internal diameter was smaller and amounted to 9 mm, but there was no other replacement option.

A flexible water line 40 cm long perfectly took the place of the copper pipe. The smaller internal diameter did not noticeably affect the water pressure from the tap. And it shouldn’t have, because water is supplied to the mixer using a flexible hose with an internal diameter of 9 mm.
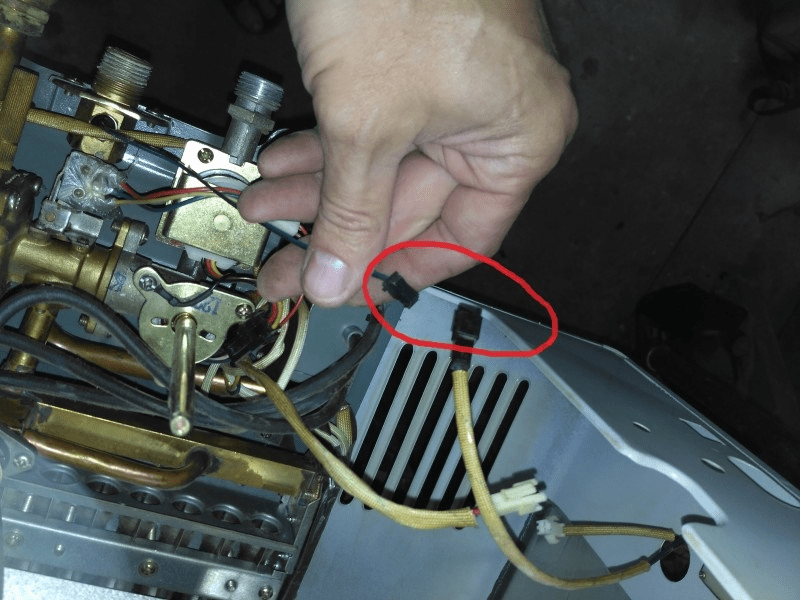
How to remove and clean the igniter of a NEVA LUX gas water heater
Sometimes it becomes necessary to remove the igniter assembly, for example, to clean dirt. Over time, the igniter nozzle in the gas column becomes clogged with soot, and the wick flame becomes insufficient to instantly ignite the gas coming out of the burners when the water is turned on. Gas accumulates, and when a larger volume of gas ignites than expected, an explosion occurs, accompanied by a loud bang. This is dangerous and the pilot burner must be cleaned as a matter of urgency.
It happens that the pilot burner does not burn with a pure blue flame, but half yellow. Yellowness appears when gas is incompletely burned due to a lack of oxygen in the mixture. This releases soot, which is deposited on the heat exchanger. It is necessary to clean the air supply holes in the burner from dirt.

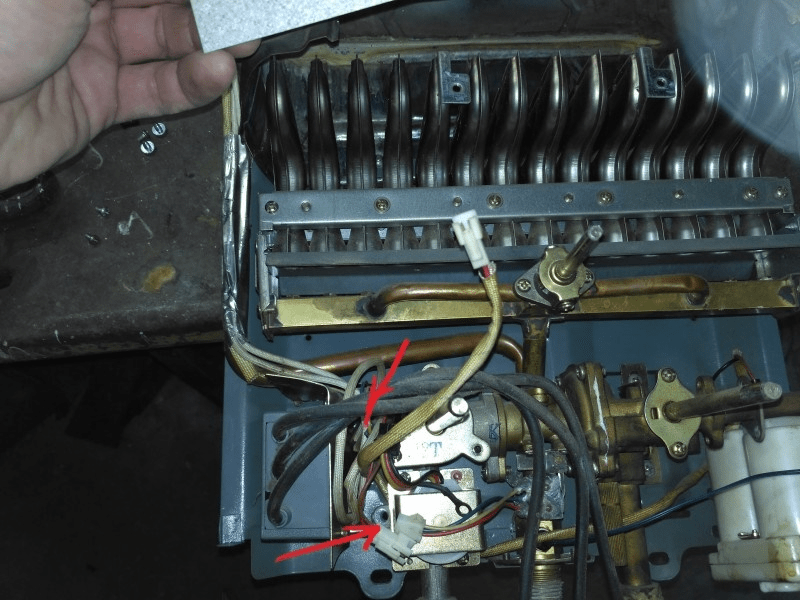
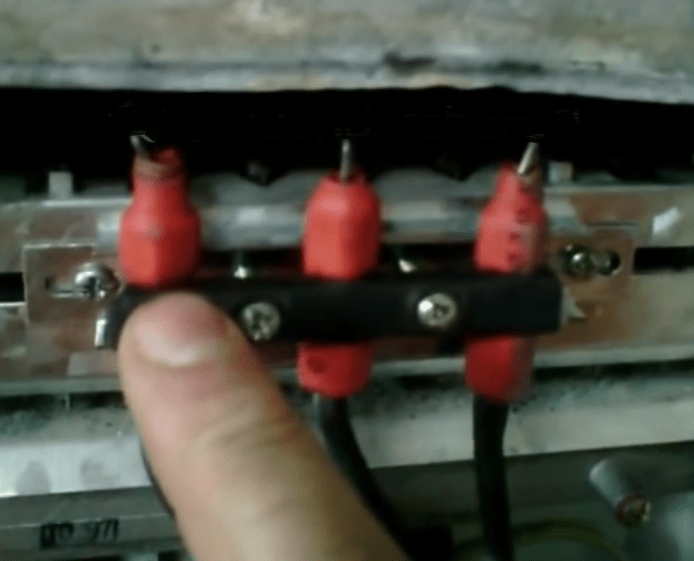
The photo above is a view of the igniter from below. The igniter assembly consists of three parts mounted on one strip - an igniter, a thermocouple and an ignition electrode. A thermocouple is installed on the left side. On the right side of the igniter there is an electrode for piezoelectric ignition of gas.
When turning and pressing the left handle counterclockwise, the valve for forced gas supply to the igniter opens and the trigger mechanism for squeezing the piezoelectric element is activated, which in turn generates a high voltage, about 15,000 volts. A spark jumps from the electrode to the igniter, and the gas coming out of the igniter ignites.

This photo shows the top view of the igniter with the casing and heat exchanger removed. To remove the igniter for cleaning, you need to unscrew the nut securing the gas supply tube (pictured in the center), then unscrew the outer two screws. Pull the bar towards you and lift it up. The jet is clamped in the igniter by the gas supply tube and falls out when it is released. Make sure you don't lose it. All that remains is to clean the nozzle with a thin wire and the air supply holes.
Some models of geysers are equipped with an automatic electric gas ignition system. As soon as the hot water tap opens, the gas in the burner is automatically ignited. But such models have significant drawbacks: they work unstably with low water pressure in the water supply and require periodic replacement of electric batteries.
If the batteries are not replaced in a timely manner, it will be impossible to light the gas water heater. The last drawback can be eliminated by connecting an adapter instead of batteries, which converts the voltage of the household electrical network into constant pressure the required value is equal to the number of batteries multiplied by 1.5 V. For example, when replacing two batteries, an adapter with an output voltage of 3 V will be required.
Cleaning the heat exchanger, descaling
One of the common malfunctions of geysers is insufficient water heating. As a rule, the reason for this is the formation of a layer of scale inside the heat exchanger tube, which prevents the water from warming up to the set temperature and reduces the water pressure at the outlet, which ultimately leads to increased gas consumption by the geyser. Scale is a poor conductor of heat and, covering the heat exchanger tube from the inside, forms a kind of thermal insulation. Gas open to full blast, but the water does not warm up.
Scale is formed in case of greater hardness tap water. You can easily find out what kind of water you have in your tap water by looking into the electric kettle. If the bottom of the electric kettle is covered with a white coating, it means that the water in the water supply is hard, and the heat exchanger is also covered with scale from the inside. Therefore, it is necessary to periodically remove scale from the heat exchanger.
Available for sale special devices for removing scale and rust in hot water systems, such as Cillit KalkEx Mobile and flushing fluids. But they are very expensive and are not available for home use. The operating principle of the purifiers is simple. There is a container in which a pump is mounted, like in a washing machine, to pump water out of the tank. Two tubes from the descaling device are connected to the tubes of the geyser heat exchanger. The flushing agent is heated and pumped through the heat exchanger tube, even without removing it. The scale dissolves in the reagent and the heat exchanger tubes are removed with it.
To clean the heat exchanger from scale without using automation equipment, you need to remove it and blow out the tube so that no water remains in it. Anti-scale agent, ordinary vinegar or citric acid can serve as a cleaning reagent (100 grams of citric acid powder is dissolved in 500 ml of hot water). The heat exchanger is placed in a container with water. It is enough that only a third of it is immersed in water. Using a funnel or thin tube, completely fill the heat exchanger tube with the reagent. You need to pour it into the heat exchanger tube from the end that leads to the bottom turn so that the reagent displaces all the air.
Place the container on gas stove and bring the water to a boil, boil for ten minutes, turn off the gas and let the water cool. Next, the heat exchanger is installed in the gas water heater and connected only to the water supply pipe. A hose is put on the outlet pipe of the heat exchanger, and its second end is lowered into the sewer or any container. The water supply tap to the column opens; the water will displace the reagent with the scale dissolved in it. If there is no large container for boiling, then you can simply pour the heated reagent into the heat exchanger and let it sit for several hours. If there is a thick layer of scale, the cleaning operation may need to be repeated several times to completely remove it.
The gas makes a loud noise when burning in the wick.
After installing the Neva-3208 gas water heater, an unpleasant phenomenon appeared that did not affect the quality of the water heater. When the gas burned in the wick in standby mode, it produced a rather loud sound, which was unpleasant to the ear and created discomfort. After some thought and experimentation, I managed to get rid of the noise in a simple way. He assumed that a stream of gas in the burner under pressure, escaping from the nozzle and hitting the wall at the bend of the burner, creates conditions for noisy combustion.
To test this assumption, I inserted a strip of tin approximately 3 cm long and 5 mm wide into the burner, the main thing being that it fit inside the burner. The noise disappeared. If your gas water heater is also noisy, then you can take any metal strip, for example, cut it out of tin from a tin can, make a hole in it at the edge, put the strip on a straightened paperclip bent at the end and put it into the burner. The result will be something like a fishing lure. The paperclip is needed so that you can remove the strip of metal back from the burner if the noise does not disappear, although if it burns normally, you don’t have to remove it. This experiment can be carried out without even removing the casing from the gas water heater.
The water coming out of the tap is very hot
In the warm season, when the water in the water supply is warm and its pressure is low, a problem arises, seemingly associated with a malfunction of the gas water heater. When you set the gas supply knob to the minimum water heating position, the water from the column still comes out very hot. This is not a malfunction, just this model The geyser is not designed for this mode of operation. The operating instructions usually indicate the minimum water pressure at which the gas water heater ensures normal operation.
Solving the problem is very simple: it is enough to limit the gas supply by slightly turning off the gas supply valve installed on the gas pipe in front of the entrance to the gas water heater.
Instructions for installation and operation of geysers
Before you undertake independent installation or repair of a geyser, I strongly recommend that you read the installation and operating instructions.
Operating instructions for geysers.
Since sooner or later there will definitely come a time when a home hot water heater begins to act up or refuse to work altogether, it would not hurt for users to know what to do in this or that case. Depending on the malfunction, you can carry out some repairs of geysers yourself or call a specialist. The last action is most preferable, since the heater belongs to gas-using installations, and therefore is a source of increased danger. This article will outline what problems you can fix yourself and how to do it correctly.
Speaker malfunctions
Let’s make a reservation right away that we will consider the problems of flow-through heaters with open camera combustion, of which there are a great many installed in apartments and houses. We will bypass the repair of fully automated turbocharged dispensers with power supply from the mains and ignition from a hydrogen generator. These devices are quite complex and intervention in their design by an ignorant person is contraindicated. Troubleshooting of supercharging units should be carried out by service or gas services.
The list of malfunctions inherent in geysers after several years of operation is as follows:
- smell of gas;
- problems with ignition and starting of the main burner;
- turning off the heater during operation;
- various leaks.
If you smell gas, whether constantly or periodically, you must immediately turn off the appropriate tap, open the windows and call the emergency service. Explain to the dispatcher the nature of the problem, and he will make a decision - to urgently send a team to your home or simply send a technician on a first-come, first-served basis. There are no other options; fixing methane leaks on your own is strictly prohibited.
Problems with ignition
There are two types of ignition systems for atmospheric heaters; we will analyze them separately:
- manual, with a spark from a piezoelectric element;
- automatic, battery powered.
For reference. The most modern models of dispensers are ignited automatically from the energy generated by a hydrogenerator. Everything here is relatively simple: if the ignition does not work, then the culprit is weak pressure in the water supply, or the generator itself has failed.
At manual way ignition, sometimes there is a malfunction of the geyser such as failure of the thermocouple. Then, when the regulator or button is released during ignition, the wick that was just burning goes out again. The fact is that the temperature-sensitive element must heat up from the igniter while you hold the handle and apply current to the solenoid valve. The latter will hold the mechanism for you when you release it. If this does not happen, then the contact in the circuit is broken or the thermocouple must be replaced. To perform this operation, it is better to invite a specialist.

As for automatic ignition systems, malfunctions of geysers during the ignition process are not limited to low batteries, as is written on many Internet resources. Moreover, any more or less modern model heater, even Russian production, equipped with an electronic low battery indicator. So the user knows when it is time to change them.
The device will not even begin the process of igniting the igniter until the hot water tap opens and the required pressure appears in the network. When there is not enough of it, the column will not show any signs of life. The same thing will happen if there is insufficient gas pressure or after a shutdown as a result of the draft sensor being triggered (until it cools down). It is better for a specialist from the relevant service to deal with poor gas pressure; you will not be able to do this yourself.
Since we are considering internal faults of the column, the culprit is low pressure water we can call a clogged mesh at the entrance to the water unit. If the charge of the batteries is normal, the water and gas pressure is sufficient, and the heater makes clicks of a spark discharge, but the matter does not go further, then move on to the next section.

The main burner does not start
One of the main devices guarding the safety of the unit is the water unit (in simple terms - “frog”). If there is sufficient water pressure, the frog uses its rod to press the gas valve actuator and it supplies fuel to the main burner (in conventional columns). In automatic heaters, the water unit allows access of fuel to the igniter, and the supply of gas to the main nozzles is already a function of the gas unit.
When the water unit is faulty, fuel will not be supplied to the burner, and in the case of automatic heaters, to the igniter. It happens that when the hot water valve is opened to maximum, the frog still works, but this only indicates the presence small cracks in the working diaphragm. You can bring the device back to life with your own hands; to do this, you need to purchase a repair kit and change the membrane, which will be discussed below.

There are often situations in which the wick ignites, but burns poorly and weakly. If you look closely, you will notice that the color of the fire is yellow rather than blue. When fuel is supplied to the main burner, popping noises are heard due to the fact that it does not flare up immediately and has time to fill the combustion chamber. Here, to repair the column, you need to clean the tube and igniter nozzle. The latter in many models can be easily removed and cleaned, as shown in the video:
Important! You cannot insert steel wire into it to clean the wick. You only need to use thread and a thin wooden stick moistened with kerosene.
Burner switches off during operation
A malfunction of the same water unit can also lead to a cessation of gas supply during the combustion process. With high pressure, a frog with a worn membrane can still cope somehow, but if you open cold water, the pressure drops and the gas water heater goes out. The same consequences occur when the traction sensor fails. The temperature-sensitive element is designed to break the electrical circuit when its surface reaches a certain temperature. The sensor is installed near the exit flue gases and connected to the solenoid valve by wires.

As soon as the draft in the chimney disappears, the temperature of the flue before leaving the duct will increase sharply, the sensor will heat up and break the circuit. The electric valve, in turn, will shut off the fuel supply. The described element does not last forever, sometimes it also needs to be changed. It’s easy to check the functionality of the part: you need to unscrew it from the body and, without disconnecting the wires, hang it outside. Stable operation of the burner indicates that the sensor is working, and the reason lies in the chimney pipe, where for some reason the draft has disappeared.
Deterioration in draft may occur when the fins of the heat exchanger are clogged with soot, and water pressure can drop if its tubes are covered from the inside with a thick layer of scale. The heat exchanger must be periodically cleaned and washed.
In addition to the water unit and the draft sensor, popping noises and unstable operation of the burner can be caused by a malfunction of the temperature sensor, and it cannot be repaired, only replaced. True, it is difficult to detect a malfunction in this case. We will advise you to contact a specialist in a situation where the frog and traction sensor are fully operational, and the symptoms do not disappear.
Water leaks
Inside flow heater water tubes are connected to various components using union nuts and rubber sealing rings. Homeowners who have not maintained their units for years may find water dripping under the unit. If this is discovered, then repairing the gas water heater consists of checking all connections and replacing the seals.

There are other places where water can leak, for example, through the operating rod of the water unit. This suggests that, at a minimum, the seal on the frog rod needs to be replaced, which will require its removal and disassembly. On models equipped safety valve, the latter can also leak, especially if it has had to release pressure several times. Finally, the most unpleasant situation is a damaged heat exchanger in which a fistula has formed. Buying a new one is very expensive; it’s easier to repair the old one, which is discussed in the next section.
Heat exchanger repair
Important! Do not forget to shut off the gas line during any repair work!

It is quite possible to repair a crack or fistula in a heat exchanger yourself when the damage to the tube is located on the front or side. Otherwise, the part will have to be removed, which will require disassembling almost the entire column. Problems with soldering the heat exchanger, when the leak is in the rear part or between the fins of the radiator, should be entrusted to a specialist from service center. To complete the work you will need:
- powerful soldering iron (at least 100 W);
- fine sandpaper;
- white spirit or other solvent;
- solder and rosin.
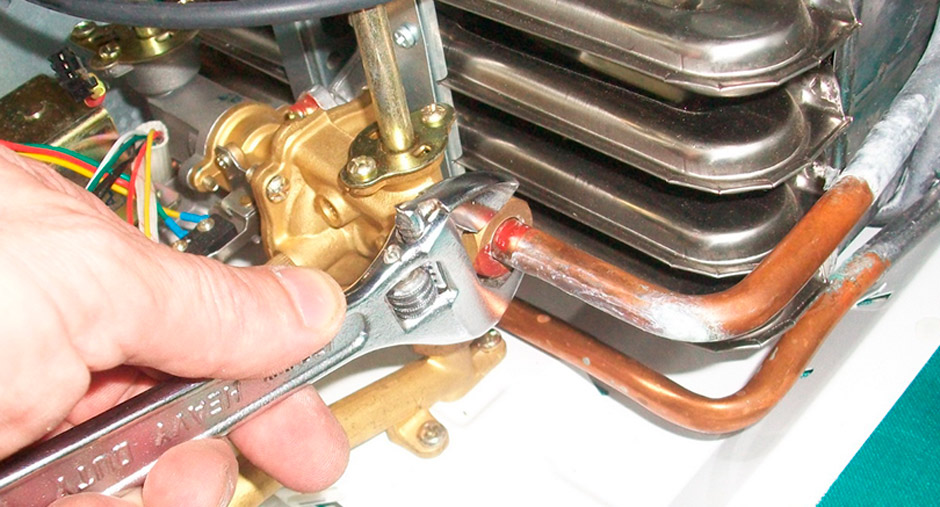
To repair a geyser heat exchanger, you must first drain the water from it. To do this, close the common valve, open the nearest hot water tap and slightly unscrew the union nut at the entrance to the water unit. When the water has escaped, the nut is completely unscrewed and the faucet on the mixer remains open.

The next step is to thoroughly clean the damaged area with sandpaper until no oxide film remains. Then, using a rag moistened with white spirit, the area is degreased. Using rosin as a flux, the fistula is tinned with solder so that its layer is smooth and even. It is necessary to ensure that the solder on the copper surface is not loose, this means that the area is not heated enough. The final stage is building up the tin layer to a thickness of 1-2 mm.
After soldering is completed, open the common valve and inspect the repair site for leaks. If everything is in order, close the mixer tap and test the column in operating mode.
A self-repaired heat exchanger will still serve for some time, since the environment in it does not heat up above 100 ºС, and the soldering temperature is 200 ºС.
How to replace the membrane in a geyser
As mentioned above, to carry out an inspection of the water unit, you will need a repair kit designed for this heater model. As a rule, it includes a membrane, a spring and a set of seals. The tool you will need is an open-end wrench and a regular screwdriver. Before starting work, you need to drain the water from the frog, as was described in the case of the heat exchanger.

Now you need to remove the water unit itself. The nut at the water inlet has already been unscrewed, all that remains is to unscrew the second one and disconnect the frog from the gas valve. The type of connection depends on the model and manufacturer of the unit; the tool necessary for this purpose must be prepared in advance. Then the screws connecting the two halves of the assembly are unscrewed, and the membrane in the gas column is replaced. It is important to install the diaphragm correctly; its position is best remembered during disassembly.
Before installing a new membrane, you should clean the rod (if there is no new one in the repair kit) and replace all o-rings. When the operation is completed, the parts are connected to each other and fastened with screws. They must be tightened in a star pattern, where one screw is followed by the opposite one, and so on. Starting water and carrying out tests are described in the previous section. Details of the process are shown in the video:
Conclusion
It is possible to repair the column yourself if you correctly identify the fault and make sure that you can do it. The types of work described in the article are available to many users, but if you are unsure of success, then it is better to simply invite a specialist and you will sleep easier.
2016-11-13 Evgeniy Fomenko
To understand in detail how to repair a gas water heater with your own hands, we will consider the most common breakdowns, their causes and solutions.
All repair work must be performed with the gas valve closed (read how to repair an Oasis gas water heater), even if you do not plan to disassemble the gas part. There is a chance that you accidentally unscrew the wrong nut and gas will begin to escape.
Scale on heat exchanger pipes
The heat exchanger consists of a casing and pipes into which cold water flows and is heated. In any case, over time, a small layer of scale appears inside. The main reasons for its occurrence are high water hardness and operation of the water heater at temperatures above 80 degrees.
You can determine that the pipes of the dispenser are clogged with scale by the fact that cold water from the tap flows actively, and hot water from the dispenser flows in a thin stream.
You can repair the column without removing the heat exchanger. The gas is turned off and the water valve is closed. You need to remove the casing from the device and drain the water. To do this, unscrew the union nut from the water inlet to the water heater and turn on the tap located lowest in the system, usually a tap in the bathroom. Termaxi geysers have a special tap for draining water from the system. In this case, it is easier to drain the water into a substitute container.
After this, the nuts at the inlet and outlet of the heat exchanger are unscrewed and a special anti-scale liquid, which can be bought at hardware stores, is poured into it through a hose. You can also use a solution with vinegar or citric acid.
The column is left in this form for several hours. Then everything is connected back and the water valve is turned on. You need to slowly turn on the hot water tap. Dirty liquid should flow out. If after this the pressure increases, then the heat exchanger pipes have been cleaned. If necessary, you can repeat the entire cleaning procedure several times.
In order to avoid this breakdown, you need to use the water heater at temperatures of about 40-50 degrees. You can also install a filter at the inlet, which will purify the water from salts, which form scale.
Radiator clogged

The heat exchanger radiator consists of pipes and metal plates located close to each other. The plates are in direct contact with the flame, so soot accumulates on them over time.
You can determine that this is a problem by the following indicators:
- Yellow color of flame.
- The fire tends not upward, but to the side, heating the body.
- When operating at full power, the water heats up slightly.
- Soot is pouring out from under the column.
In order to clean it, you need to remove the heat exchanger. To do this, remove the casing and unscrew all the elements that hold it. During disassembly, cover the burner with a rag to prevent soot from getting into it.
After removal, the knot is carried to the bathroom and washed there. It is best to leave it in a container with high sides for several hours to allow the soot to soften. Next, the space between the fins of the heat exchanger is cleaned under running water using a long-haired brush and detergents. At the end, drying and installation is carried out in the reverse order.
Leaking pipes

If water begins to drip from the column, perhaps the reason is that fistulas have formed on the copper pipes. In order to find the location of the leak, you need to carefully inspect the heat exchanger with the water turned off. Some fistulas are easy to find; you will see water coming out of these places. Small holes can be seen by the green spots and rust around them.
There are three ways to fix a leak:
- Install a clamp with a rubber gasket. If space allows and the pipe does not fit tightly to the casing, the simplest, fastest and most effective way is to install a metal clamp with a rubber gasket. Despite its simplicity, this method allows you to eliminate the leak without damaging the structure.
- Solder the fistula. Having previously cleaned and degreased, the leak area is covered with flux. After this, using a powerful soldering iron or torch with gas cylinder the fistula is soldered. In this case, it is necessary to ensure that the solder covers the desired section of the pipe with a layer of 1-2 mm.
If several holes are nearby, it will be effective to solder a piece of copper plate. It is not recommended to solder cheap Chinese heat exchangers. They are usually painted on top to hide the uneven color of copper with impurities. In such columns, the pipes are too thin and will burn through during soldering.
- Use cold welding. In this case, it is important to carefully look at the instructions and make sure that it can withstand high temperatures. Piece cold welding is pulled out of the package and kneaded with gloved hands until it begins to harden. After this, it is applied to the pipe and smoothed until it hardens completely.
After soldering is completed, water is turned on to the water heater to check it. It is advisable to additionally clean and solder all areas with a greenish tint. Perhaps, over time, new fistulas will appear there.
A leak can also form due to worn gaskets. If water leaks from the pipe joints, you should simply replace the gaskets there with new ones.
Weak traction

The fact that the thrust is not strong enough can be seen from the following attributes:
- The column lights up and then goes out. This triggers the flue gas sensor.
- The water heater only works when the window is open. If the window is closed, the flame will go out after some time.
To check whether the problem is really weak draft, you should hold a hot match to the chimney. The flame on it should deviate to the side. This is also noticeable in the direction of the flame in the igniter.
There may be several reasons for weak traction:
- The chimney is clogged. Perhaps a large amount of soot has accumulated in it or a foreign object has fallen into it. In this case, you need to clean it. If you live in apartment building, then the chimney shaft may be clogged much higher. In this case, you should contact utility services.
- Powerful hood. If an active hood is turned on in parallel in the kitchen, then exhaust gases can be drawn into it, instead of going straight up. Then the exhaust gas sensor will work and turn off the column.
You should turn off the hood fan while the column is running, or change it to a less powerful one. - Insufficient chimney height. If the heater operates in its own home, it is possible that the chimney is not high enough. Its end should rise at least 50 cm above the roof ridge.
- The chimney is covered on top. It is prohibited to install satellite antennas above chimneys. Also, umbrellas, weather vanes and caps should not be installed too low.
For prevention, you should check the chimney draft yourself once every three months.
The membrane has deteriorated

The membrane is located in the water regulator. When water gets into it, the membrane bends under pressure and puts pressure on the rod, which is connected to the gas fittings and opens the gas. Over time, the membrane may stretch or rupture. If the gas switching system is broken, the water heater will either stop turning on completely, or the flame will be very weak.
New Chinese water-gas systems are installed in the Neva Lux, Oasis and Termaxi water pumps. They are located horizontally, with a gas unit on the left and a water unit on the right.
Also, turbocharged dispensers (for example, Termaxi JSG 20R) and dispensers with a hydraulic turbine are distinguished by a more complicated design. It is also advisable to call specialists to repair them.
If you smell gas, you should immediately turn off the heater, close all gas valves, turn off electrical appliances, open the window and call the gas service.
Below watch 3 videos on repairing a Bosch gas water heater.
