How to properly fasten interior doors. How to install an interior door yourself
Interior doors sooner or later become unusable and have to be replaced. This procedure is not too complicated, so it is not necessary to use the services of hired workers. Anyone who has even the slightest idea about a saw, screws and a level can handle it on their own. In this article you will learn how to install an interior door with your own hands.
Types of interior doors
The construction market offers great amount interior doors, which are made from various materials. The most common are: fiberboard, MDF and natural wood. I would like to consider the advantages and disadvantages of doors made of such materials in more detail.
Fiberboard doors
The frame of such a door is made of wood, and the casing is made of fiberboard sheets.
The advantages include:
- low price;
- the lightness of the material, which allows you to take the door home from the store without any problems;
- ease of installation.
Such advantages increase the popularity of these doors among the population. Construction stores have quite a lot big choice fiberboard doors, as they are in greatest demand.
Among the disadvantages it should be noted:
- Fiberboard material is not strong enough, so doors can quickly become unusable;
- Poor resistance to moisture, therefore not suitable for installation in bathrooms.

MDF doors
Doors made from MDF material, is the most acceptable for the population and corresponds to price and quality. Compared to fiberboard, such doors have certain advantages, namely:
- high resistance to moisture;
- high level sound insulation;
- high strength of the material.
The only disadvantage we can note is the higher cost compared to fiberboard doors. At the same time, the quality more than justifies the means.

Natural wood
Such interior doors have always been and are held in high esteem. The material is quite durable to use. The cost of the door will directly depend on the type of wood from which it is made. Classic interior and the author's design is perfectly complemented with the help of such doors.

Step-by-step installation instructions
For example, how to install an interior door step by step, we will take doors made of fiberboard.
Step 1
Before starting work, prepare the necessary tools and Consumables such as: saw, screwdriver, electric drill, tape measure, polyurethane foam, dowels, level, wood screws, handle, drills and drills of the required diameter.

Step 2
Draw up a diagram for installing the door frame in the opening. It is worth paying special attention to the threshold. If you cannot hide it in the floor, then it is better to choose a box without it, that is, in the shape of the letter P. Such a box does not have a crossbar at the bottom, which will ensure walking without any obstacles.
Step 3
Installation of the box. Before attaching the door frame, make sure there are hinges. The door must have a cutout for a handle and a lock. Assemble all the parts of the box together and fit them into the opening. For convenience, place all the parts on the floor as they will be installed in the opening.

Step 4
Installing the door frame in the opening. At this stage, the assembled door frame is installed in the opening and leveled.
Step 5
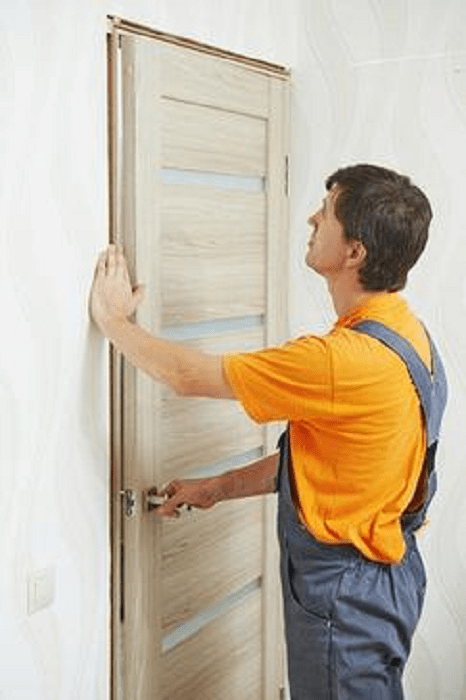
Fitting the door on the hinges. This process is quite simple. Doors are hung on hinges manually; it is better to ask someone to help you at this point.
Step 6
Foaming the gap between the wall and the box.

Step 7
Finishing doorways. The type of finishing of such an opening is selected taking into account the type of the door frame and the width of the opening.

In order to install interior doors without hiring hired workers, it is necessary to consider some steps in more detail to avoid unpleasant consequences in future.
Box assembly
The most painstaking and crucial moment in assembling an interior door is installing the frame. But before you install it, you need to assemble it correctly. At this stage, the proverb about measuring 7 times is extremely relevant.
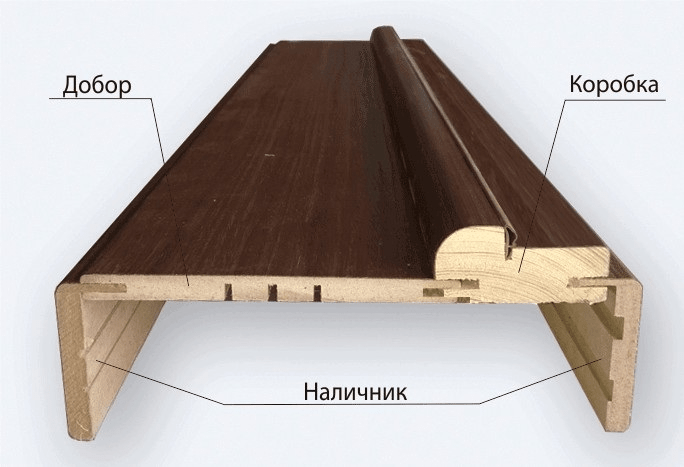
So, to assemble the box U-shaped, You need:
- A false post or beam.
- Looped timber.
- Ceiling strip.
To carry out the assembly as accurately as possible, you need to measure the size of the opening and the canvas itself, down to every millimeter. Next, you should calculate the dimensions of the racks and lintel, taking into account the size of the gaps. After this, saw off the individual bars and connect them into a single whole. It is worth noting that the thickness of the timber should not be less than the thickness of the canvas. When taking measurements, do not change the tape measure, use only one. After measuring the canvas on the right side, try it on the left as well, do not expect an exact match. All deviations will be taken into account in further work.

Calculation of interior door installation
When taking measurements, it is worth considering the following:
- WITH external parties All timber (ceiling, hinge and recessed) that are in contact with the opening must be left with a gap of 1 cm wide for the mounting foam.
- There should also be a gap on the inside of the entire beam, but a little less, 0.3 cm. If the box has a threshold, then such a gap is necessary around the entire perimeter.
- The bottom plane of the door frame and the floor should have a gap between them. On average, its height should be 1 cm. For linoleum, 0.8 cm is enough, and for fleecy coverings, 1.5 cm.
If the opening is not sufficient in size, it should be enlarged and, conversely, reduced if it is too large.

Insertion of loops
Usually two hinges are enough for interior doors, but sometimes three may be needed. The hinges are installed at a distance of 250 mm from the edge of the fabric. If both the canvas and the box are made of wood, then the place for the hinges must be chosen so that there are no knots there. Initially, the loops are attached only to the canvas.

The order of inserting loops looks like this:
- We select the places necessary for the loops and outline them using a knife blade.
- You can work with a router or a chisel; in this case, the material must be selected to match the thickness of the loop.
- We prepare a recess and install a loop in it, the plane of which should be flush with the canvas.
- The loop that is already inserted into the hole must be secured with self-tapping screws.
When you have installed the hinges in door leaf, it is placed in the door frame and the necessary gaps are set.
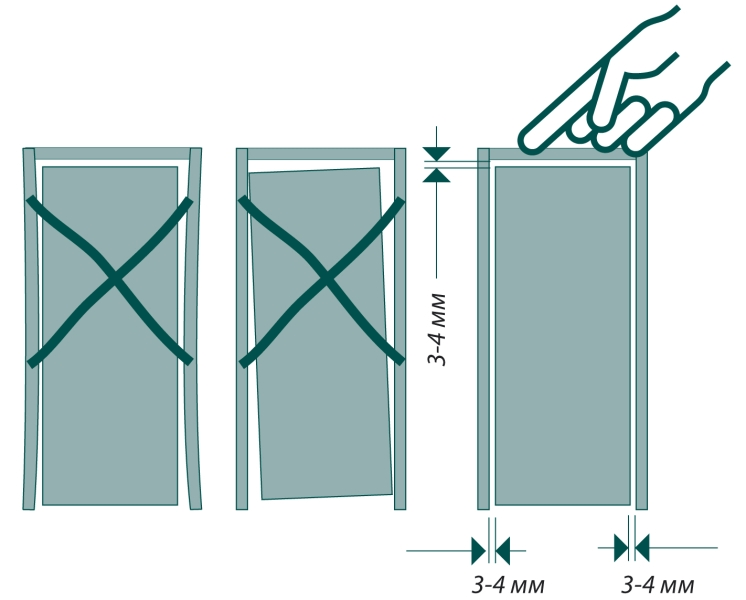
On the hinge side the gaps should be 5 mm, on the opposite side and at the top 3 mm.
When the gaps are set, they are fixed with wedges. It is also necessary to set the canvas itself, exactly horizontally and vertically.
When everything is set up, you should note the location of the mating parts. Sometimes it is more convenient to remove the installed loop and then put it back in place. According to the markings, you need to make a excavation. The depth should be such that the surface of the door frame coincides with the hinge.

Installation of accessories
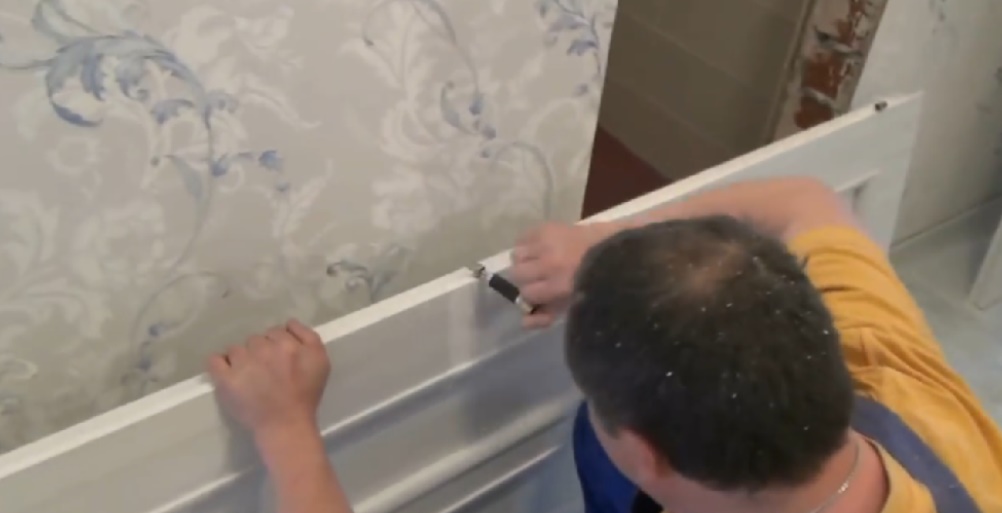
Installation of interior doors cannot be done without installing fittings. According to all safety regulations, interior doors should always open outward. The installation of handles, like hinges, begins with markings, which should be done extremely carefully. First, mark the level of its height. Usually it is 90 cm. On one side, use a pencil to draw a line, 60 mm from the edge. Using a ruler, draw a line at the end and make a similar marking on the other side of the door. All marks must be pierced with an awl.

Using a drill, drill a hole half the thickness of the blade. Do the same on the other side of the door. At the end of the canvas you need to make a hole using feather drill. Make sure that all measurements match and do not allow deviations of even 1 mm. Take a chisel and lightly tap to make a deep mortise for the latch. Screw it on with screws. Now all that remains is to insert 2 parts of the product. Place the parts on both sides and try to get the guides into the holes, then tighten everything with bolts.

Finally, you will install the metal plate on the end of the door frame. Cut out the notches for the plate. Make sure that the frame fits snugly against the end and secure the frame with screws.
Installation of the box
How to install the box correctly? This process requires you to be extremely careful and patient. It is better if someone helps you, then the measurements and installation will be much more accurate.
Installing a door frame in an opening includes the following:
- The pre-assembled door must be carefully lifted, preferably with an assistant, and installed in the opening.
- In order to leave the necessary gaps between the wall and the frame, you need to make wedges from the remaining material.
- Next, screw in the screws.
- We clearly align the base in all directions. There should be no distortions or discrepancies in the gaps. But if there are any, they can be leveled by loosening or tightening the screws.
- We hang the door leaf on the hinges and check.
- Where the polyurethane foam will be poured along the box, we seal the canvas with construction tape. Stick cardboard into the gap and close the door.
As you can see, the process is not that complicated, however, it requires precise measurements and compliance in all sizes.

Foaming
This stage is quite important. Filling the gaps between the frame and the wall with foam should be done after installing the door. Do not forget that as the polyurethane foam dries, it increases in volume. If you suddenly go too far with the amount of it, it may well tear out the screws and even bend the frame, after which you will not be able to close the door. If this happens, the door installation will need to start again. During foaming, it is important to fill the gaps between the wall and the box with something.

Applying construction foam to gaps is not hard work. The vertical seam must be filled from below. Be extremely careful with the amount of foam you use.
Only a third of the opening needs to be filled. In addition to deforming the door, foam can come out and ruin appearance canvases.
The foam dries within a day at a temperature of 20 degrees.
Finishing of openings
Once the door installation is complete, the openings require finishing to bring the overall appearance of the space into order. The type of finish should be selected based on the width of the opening and door frame.
With a thin wall, when its width is equal to the width of the door frame, you can use platbands for finishing. This is usually how bathroom doors are decorated. This option is the simplest and most common. A set of platbands is attached to all sides of the box and covers with construction foam. If the platbands are made of wood, then they must first be attached with screws and only then painted. If the trims are laminated, then they must be secured using nails without heads or using screws with plugs.
If the doorways are wide, then they can be finished using the same platbands or additional trim, which can be cut to the width you need. This plank is attached to the wall using construction silicone. The plank and platbands may have different colour with a door. IN Lately It is quite important to choose contrasting solutions.

If the door frame is made of wood, then it can be finished using slope plaster. Cement-sand plaster will ideally highlight the natural texture of your doors. But this method is not entirely suitable for finishing fiberboard boxes. This is explained by their incompatibility with the high humidity required by plastering work.
Thus, we can say that installing interior doors with your own hands will not take you as much time as it would seem at first glance. Detailed step-by-step instruction will help you avoid the most common installation mistakes. Correctly performed measurements will guarantee successful installation doors. In addition to your own efforts, do not forget to choose quality materials during the work being carried out, so that your efforts do not become a waste of time due to an unsuccessful choice of construction foam or self-tapping screws.
Among the ancestors of door designs were simple exhibits resembling entry doors. Perhaps the owners of ancient housing believed that they were also installing doors. However, after the invention of hinges, the need to repeatedly cover the opening with them every day completely disappeared. Nowadays, entrance and interior “limiters” of personal space are installed once, but for decades. To accomplish this, country property owners often turn to professional carpenters. Meanwhile, installing doors with my own hands can be not only a successful, but also a cost-effective enterprise. You just need to study technological nuances and call on patience to help. The labor unit does not include one person.
Brief overview of upcoming work + preparation
The door, of course, is not a super complex technical system, but it is not simple board, closing the entrance “hole”. Should she without extra effort to close, not to open spontaneously, to “endure” the nervous breakdowns of those who like to clap, without falling apart. In order for the design to adequately cope with its responsibilities, an independent home craftsman will need:
- assemble a box - the supporting base of the structure;
- equip the canvas and box beam with the fittings required for use - hinges, a simple handle or a snap-on analogue with a spring mechanism;
- ideally position and secure the box in the opening;
- hang the canvas, making preliminary adjustments if necessary;
- decorate the result of labor with platbands.
In addition to the first two stages, the primacy between which is not dictated by technology, all other actions must be carried out in a clear sequence, having first found out how to correctly install interior doors in accordance with building codes.
Installation process in detail
A number of plastic and metal-plastic door blocks are supplied in full combat readiness for fastening in the opening. Everything is clear with them.
Let's consider the option with a box not assembled into a single element, which appears before the master's eye in the form of a set of boxed wooden blocks of arbitrary length, canvas and uncut to size strips for platbands.
Box collection options
Construction of the box is the most painstaking and responsible process. The slightest deviations in its assembly will lead, at a minimum, to complications in operation, and at maximum to the purchase of new material. At this stage, you need to forget about laziness and carry out all measurements with special care literally seven times.
Owners who want to figure out how to install a door into the opening with their own hands interior partition, they can make a base without a threshold in the shape of the letter P. To do this, you will need three bars:
- pretend stand (aka timber);
- loop beam;
- ceiling strip.
If you want to make a base with a threshold, a lower beam-plank of equal thickness will be added to the listed kit. Then the assembled box will resemble a rectangle.

Performer's task:
- accurately measure the size of the opening and the canvas;
- calculate the dimensions of the racks and lintels, taking into account the need to provide technological clearances;
- accurately saw off and connect individual bars into a single, durable whole.
The thickness of self-purchased box timber must be no less than the thickness of the canvas.
Measurements must be taken with one tape measure. Measure both the canvas and the opening along the length from the left and right sides separately, without relying on their obligatory “mirroring”. Identified deviations must be taken into account in further work.
What to consider when taking measurements:
- On the outer sides of the loop, lintel, and trim beams in contact with the planes of the opening, a gap of 1 cm should be left for the mounting foam.
- There should also be a gap of 0.3 cm on their inside. For boxes with a threshold, this gap is maintained along the entire perimeter.
- Between the bottom plane door design without a threshold and a “gap” must be left in the floor. Above linoleum 0.8 cm, above shag carpet 1.5 cm, on average 1.0 cm.
Points for sawing off vertical posts, i.e. actual sizes door clearance with frame, we find it on the inside of the beam.
If the opening dimensions are insufficient, it needs to be enlarged. If the opening is too large, it is reduced by stuffing plasterboard cut to size along the U configuration.

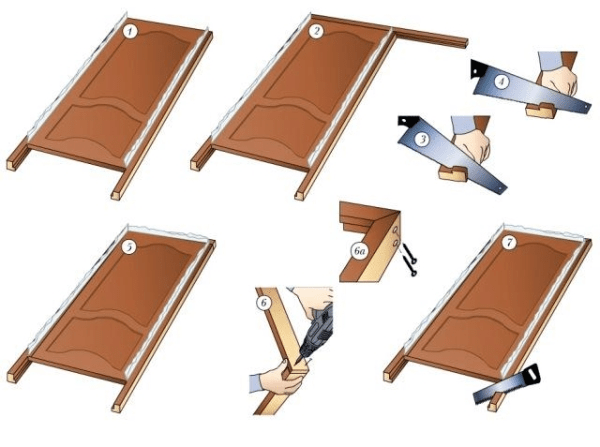
What is the best way to cut timber for a box?
To make cuts it is better to use cross-cutting machine, but as an alternative, a miter box with hand hacksaw. Traditionally, the technology for installing interior doors offers home craftsmen two ways to connect frame elements:
- With vertical posts and lintel cut at an angle of 45º. Enough difficult option for an inexperienced carpenter, requiring attention and scrupulousness. True, the carefully executed joining looks very beautiful. Self-tapping screws are used to connect the elements. The holes for them are drilled through and perpendicular to the cut. All holes for screws in the elements of the MDF door structure are made in advance to avoid damage to the workpieces. They are not drilled completely with a drill with a diameter equal to 3/4 of the diameter of the fastener being installed. Self-tapping screws for MDF doors you need to pick up with threading along the entire trunk to the head.
- With a 90º angle. The easiest way is to use a fine-toothed hacksaw. The size of the internal vertical line of the bars will be the sum of the length of the leaf, 3 mm at the top and 3 mm at the bottom if the door has a threshold. For a door without a threshold, leave 10 mm (8-15 mm) below. The ceiling crossbar is attached to the vertical posts with two self-tapping screws on each side. When calculating its size, you need to remember that between the false and loop beams there should be a distance equal to the sum of the width of the canvas and the 6 mm required for two side gaps.
For the threshold, the timber is cut only at a right angle.

The box must be assembled on a horizontal surface. Two tables placed side by side or a floor covered with cardboard will do.
Installation of door hardware
The arrangement of the interior space is accompanied by the obligatory stage of attaching functional fittings.
To ensure unimpeded evacuation in emergency situations entrance doors should open outwards.
Door hinges can be either right or left, or universal. We are accustomed to the fact that they are usually a flag design that requires careful insertion. However, you can now purchase devices that do not require cutting the veneer or laminated surface to fit the flag to the thickness of the loop.
The standard distance from the top and bottom edges of the fabric is 20 cm, with variations of 5 cm in both directions. If a third loop is used, it is placed 50 cm from the top line of the fabric.
The location where the hinge is attached to the box is calculated taking into account the technological gap. That is, from the top of the loop beam you need to retreat not 20 cm, but 23.3 cm.
The “landing areas” for the hinges should ensure that the flag is installed flush with the box and canvas. They are selected with a milling cutter and finished with a chisel. You can do all the work with just a chisel. This video will demonstrate how to insert loops:
Most independent door installers are convinced that it is more convenient to attach the fittings before assembling the frame, since on the hinged beam you also need to select the veneer for the hinges. However, this operation can also be carried out on an assembled basis.
It will also be useful to watch a video about inserting a lock:
The location of the handle with a latching mechanism is determined by the owner. The standard distance is from 0.9 m to 1.2 m from the floor.
Installation and fastening of the box in the opening
Experienced craftsmen who know perfectly well how to install a door correctly recommend that the anchors used to secure the frame in the opening be covered with hinge flags and a lock strike plate on top.
Three powerful and long self-tapping screws will hold the door structure in place perfectly. After all, the connection will also be supported by foam.

Do not forget that in order to screw screws into MDF box beams, you need to make preliminary holes. Bathhouse owners who are figuring out how to install a wooden door do not need to pre-core holes in the beams and sheets. You can drill a wood frame without prior preparation.
- We carefully (preferably together) lift the door base assembled on a horizontal surface and place it in the opening.
- To ensure that the centimeter gap necessary for foaming remains between the box and the wall surrounding it, we install wedges cut from leftover lumber.
- We screw the screws in.
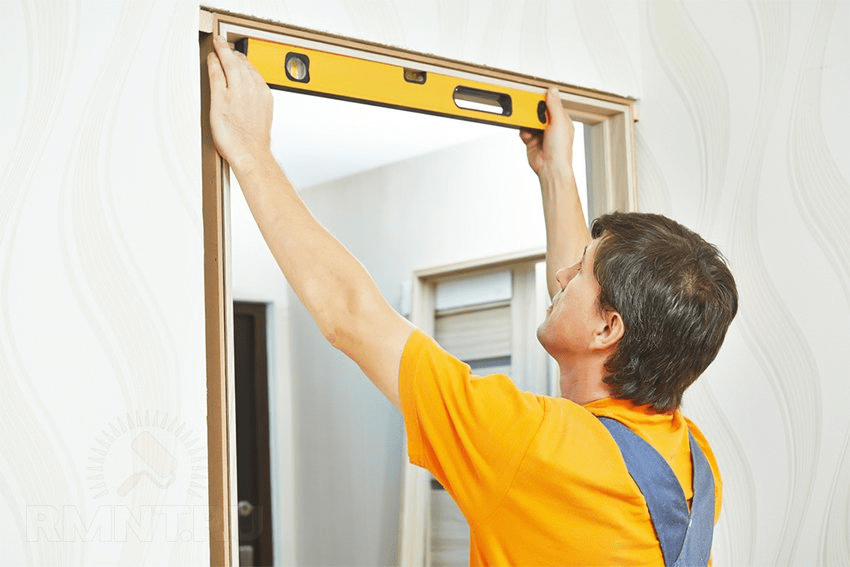
- We align the base in vertical and horizontal directions, checking the positions with a level and plumb line. Deviations are corrected by loosening or screwing the screws.
- We hang the canvas on the hinges and check the operation of the door structure. There should be no distortions or discrepancies in the size of the gap between the box beam and the canvas.
- We seal the box along the future layer of polyurethane foam with construction tape, insert cardboard into the gap around the canvas, and close the door.
- We fill all the cavities around the professional base box polyurethane foam with dispenser.
It is advisable to foam in several stages, taking into account all the manufacturer’s recommendations and the degree of swelling of the composition. The door does not need to be used until the foam has completely hardened.


Now we can assume that you succeeded in assembling the structure and installing the interior door with your own hands. And experience has been gained, and there are many openings ahead, awaiting the caring hand of the owner. All that remains is to cover the not very presentable seams with platbands, the construction technology of which is worth getting acquainted with separately.
Until recently, installing interior doors with your own hands was quite a difficult task and required serious experience and skills from a person. Now everything has become much easier, having a good tool and knowing the procedure for installing interior doors, any House master able to finish work in a day. Next, we will show you step by step how to properly install an interior door in two ways.
Options for interior doors.
Before installing an interior door, you must first select it. When choosing, there are 2 main criteria - the size of the structure and the material from which the doors and the frame to them are actually made.
Material selection
It is not so important to install the interior door in wooden house or in a room in a city high-rise building, the design must not only be beautiful, but also reliable, and this primarily depends on the material.
Fiberboard is perhaps the most common option. The design is a hollow box closed on both sides with thin fiberboard sheets and based on a frame made of wooden blocks.
There is no need to rush to install such a door; it is, of course, light and cheap, and it may look quite decent, but the reliability is not all right; such a structure can even be broken with your fist, plus there is a high probability that in a couple of years it will begin to delaminate.
MDF is the golden mean between cheap fiberboard and good wooden structure. The array is dense, durable, and most importantly completely environmentally friendly. Self-installation interior laminated MDF panels at home is an excellent solution if there is no money for installers, and beautiful door I want to.

The MDF canvas must be laminated with high quality, then it will not be visually different from wood.
Natural wood - traditionally it is believed that installation wooden doors this is the most the best option, but this is wrong, here you need to look at the quality and manufacturer. Believe me, sometimes it is better to install interior doors from good MDF laminate, rather than take a damp pine tree, which will fail in six months.

When purchasing wooden panels, you need to carefully evaluate the quality of the wood.
If you decide to change interior doors and you have a high-quality wooden panel, then you don’t have to touch it, you can only replace the panel. In this case, the technology for installing interior doors will be much simpler.
GOSTs, tolerances and unclear issues
The size of the doorway for installation is perhaps the most important of the initial parameters. To this day, all such designs are made according to Soviet GOST standards; by the way, the Chinese also focus on these dimensions, but in Europe, despite the supposedly uniform standard, many countries do it their own way.
So if our minimum blade width starts from 600 mm and then in increments of 100 mm, it reaches 900 mm, then France produces blades starting from 690 mm, but the graduation also occurs in increments of 100 mm.
Germany, Spain and Italy, as well as all countries of the former socialist camp, in this regard are guided by almost the same standards as our manufacturers.

Interior doors have clear standards that need to be checked before installing an interior door yourself.
As for tolerances, a gap of 3 mm is left on the sides and top between the box and the canvas itself. According to the rules, there must be at least 20 mm between the floor and the canvas. This gap is needed for normal ventilation in the apartment.
Along the perimeter of the frame in block buildings, you can leave any gap, up to several millimeters, the main thing is that the frame is level, but if we cut doors in a wooden house with our own hands, then we set the tolerance to at least 15 mm, it is needed in case the house fails shrinkage
When choosing an interior door, installation is already final stage, before this you need to read the description in detail, because the price may be indicated depending on the configuration, there are 3 options:
- Only the door leaf is sold - this option is good if the door is planned to be installed on an old frame;
- The canvas is sold together with the box, but the box comes disassembled; here, even before installing the interior door with your own hands, you will have to cut it to size and assemble the box, which in most cases is even good;
- Fully assembled blocks with a finished frame, canvas, locks and hinges are installed only if preparation of the opening is not required. There it is enough to cut the racks to the height and install the interior door yourself.
Do not forget that it is not enough just to install interior doors into the opening; the complete installation of an interior door involves the arrangement of trim, extensions (if necessary) and fittings, so it is also advisable to take them right away, otherwise the shade may not be suitable later.

Installation of interior doors will not be complete without platbands and fittings.
There is another important question - when to install interior doors during renovation? So, the instructions for installing interior doors say that such structures are installed at the very end of the renovation, after finishing the walls, floor and ceiling, but before installing the floor skirting boards.
Two mounting options
We’ve sorted out the dimensional tolerances and other pressing issues, now it’s time to find out how to install an interior door yourself. But to assemble and install the structure, we need a tool.
A few words about the instrument and accompanying material
To install interior doors we need:
- A hacksaw for wood, but ideally it is better to have a miter saw, it does not leave chips, plus you can set the exact cutting angle;
- To create openings between the frame and the wall, wedges are required;
- Hammer;
- Chisel;
- Screwdriver;
- Electric drill;
- Plumb;
- Level;
- Pencil;
- Roulette.

Install an interior door yourself without good tool unreal.
Important! Safety regulations strictly prohibit cutting wood with a grinder. If you value your health, don't even think about it.
From auxiliary materials To install the doors you will need:
- Polyurethane foam;
- Masking tape;
- Self-tapping screws different sizes and sections;
- Anchor bolts with dowels.
Preparing the opening
Ideally, before installing an interior door, the edges of the walls should be, if not plastered, then at least leveled with cement-sand mortar.
But in real conditions, preparing a doorway for installing an interior door ends with adjusting the dimensions to the frame, because then the unflattering cracks will be foamed and covered with platbands, so special beauty it makes no sense.

It is advisable to level the doorway before installing the frame.
There's one here important point: often the installation of a double interior door requires widening the opening, so when it comes to partitions, they can be “redrawn” as you see fit. But if the wall is load-bearing, then a slight expansion of no more than 5–7 cm is allowed, otherwise there may be problems both with the wall and with the law.
Box assembly
You can assemble a door frame with your own hands in two ways - by cutting the corners of the top strip at 45º and joining the strips at right angles. Both methods are good, but it is believed that an angular connection at 45º will look more elegant.
Really high-quality corner trimming can only be done with the help of a trimmer; if they assure you that an ordinary plastic miter box and a hacksaw for wood will do for this, don’t believe it, it can ruin the boxes that were made.
The first to be cut at 45º vertical racks, after which you can proceed to trimming the upper horizontal bar. In order to set aside 3 mm, it is convenient to use a piece of fiberboard as a template.

We measure the gap relative to the top bar with a template.
- You place the top strip cut on one side and move it along the cut of the template;
- Then go to the opposite side of the door and, using the same template, mark the cutting line.

Trimming the top strip at an angle using a trim saw.
Now we lay out the finished, trimmed frame strips on the floor and once again control the dimensions.

This is what a door frame looks like cut at an angle.
- The box is fastened in stages. First you need to tightly connect the planks together the way they should be;
- When screwing in the screws, the frame slats may crack; to prevent this from happening, before assembling, we need to drill channels for the screws. This is done with a 2.5 mm drill (our self-tapping screw is 3.5 mm);

Preparing to fasten the box.
- Now you can screw the screws into the ends of the box on both sides, and there should be 2 screws on each side of the corner.
There is a small nuance here; the vertical strip of the box to which the hinges will be attached does not need to be fully tightened on both sides; we will still have to remove it.

Fixation of the box with cutting at an angle.
If miter saw If you don’t have it in your arsenal, it’s better to fasten the box slats at right angles. It may not be as aesthetically pleasing, but the step-by-step instructions will be somewhat simpler.
We start by trying on the top cross member; we will embed it between the two side posts. Some craftsmen mount the crossbar above the side posts, there is not much difference, here it’s more convenient for everyone.

Along the perimeter of the frame we have a side, into which the door leaf rests when closing. To embed the top cross member on the side posts we need to remove this side. To do this, we attach the upper cross member to the rack, mark it, cut the side with a hacksaw, and clean the place for installation.

Now all we have to do is insert the top bar between the two side posts, drill holes for a pair of screws and secure the inserted bar with self-tapping screws.

If you decide to put the bar on top of the racks, then you will need to trim the inner edge on the top bar, then drill and drive the screws from above, as shown in the diagram below.

Do-it-yourself installation of a plank placed on top.
Installing hinges and handles
For a door, installing hinges is one of the most important stages. In principle, you can embed a lock and attach hinges after installing the frame in the opening, but if you are installing the doors yourself (without help), then it is better to do this right away.
Loops can be overhead or hidden. It’s easier to work with overhead butterfly hinges, since you don’t need to cut anything in the door leaf and frame, so we’ll start with them.
A little advice: if the door should open on right side, then you insert the hinges on the right, respectively, for left-sided opening, the hinges need to be attached to the left post.
Installation of hinges begins with markings on the canvas itself. According to the rules, the distance from the top or bottom point of the canvas to the loop should be 200 - 250 mm. You can measure with a tape measure, as in the photo below, but if you don’t have a tape measure at hand, then use the loops themselves, there standard size equal to 100 mm.

We make markings for installing hinges.
Don’t get confused: the small (inner) part of the butterfly hinge is attached to the door leaf, and the large part is attached to the frame post. Before screwing in the screws, you need to drill holes under them, only after that the screws are driven in.
All hinges have recesses for the screw heads, so make sure that these recesses “look” up. If the hinges are installed the other way around, the heads of the screws will remain above the hinges, and therefore the doors will not close completely.

Drill holes for butterfly hinges.
We have the box almost assembled, now we put it on the floor and put the door leaf inside. As you remember, we should have 3 mm around the perimeter of the canvas, so we immediately insert as many homemade fiberboard templates (3 mm thick) between the box and the canvas as possible.

One part of the loop is screwed to the canvas; to screw the second part of the loop to the box, we make a mark on the box. Next, unscrew the self-tapping screws securing the supporting vertical bar and screw the mating part of the hinges to it. Then we return the box strip to its place and fix it completely.

We screw the hinges to the vertical post of the box.
Self-installation secret loops are not much more complicated than the method described above. The difference is that you need to cut grooves for the hinges in the door leaf and frame. This is done using a mallet, chisel and knife.

Cutting grooves for mounting hidden hinges
As for the installation door handle, then you can read about this in detail and also watch the video in this article. And don’t forget that the hinges must be lubricated; you can learn about lubrication rules.
There are different methods for installing interior doors in a wall opening, it all depends on the specific conditions. Next we will look at the simplest and most popular options.
Method number 1. Classic
On this moment In our case, the frame posts must be cut to the height of the opening, the hinges and lock are cut in, the door is closed, and 3 mm thick templates are inserted between the door leaf and the frame.
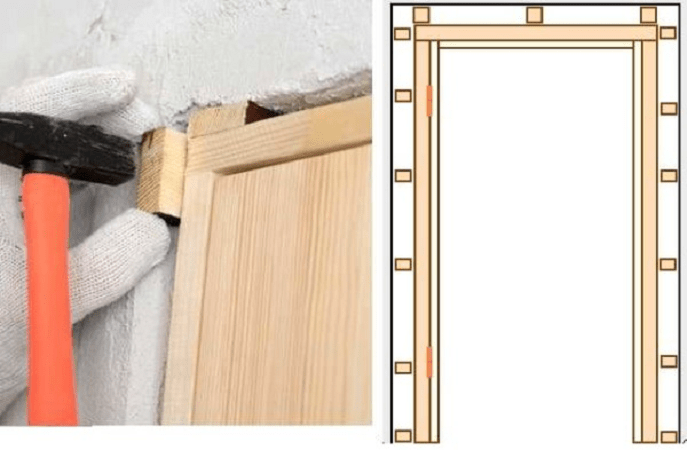
When door block inserted into the opening, first of all, wooden or plastic wedges are driven around the perimeter; they will hold the block until it is finally secured.

Classic scheme for installing interior doors using wedges.
Fixing is a rather important moment; here we position the block vertically and horizontally. Keep in mind: the wall is not always strictly vertical, so check the box with a plumb line.

It is better to check the vertical by plumb.
To prevent the door block from falling out from a strong push, it must be firmly secured with anchor bolts or at least long self-tapping screws. We recommend using anchor bolts thickness 6 – 8 mm.
The principle is simple:
- Drill into the box through hole and slightly drill into the wall;
- Remove the door block and drill holes for dowels at the drilling points;
- Place the box in place and secure it with anchors. The box should be clearly level, since we have already verified everything before.

If you fix the box with long self-tapping screws, then they are installed around the entire perimeter at intervals of half a meter, but the heads of the screws need to be hidden somehow. They can be covered with a decorative strip or plastic covers.
Anchor bolts are powerful things and 3 points are enough to fix the box - two points under the hinges and one under the lock plate. In combination with polyurethane foam, this is enough.
Now we fill the perimeter of the box with polyurethane foam. We move from the bottom up, the foam needs to be blown out without fanaticism, because when it expands it can squeeze out the door frame.

Plus, at the time of blowing in the foam, the door block must be assembled and three-millimeter templates must be inserted around the perimeter, this will protect the frame from deformation.
Remember: the door block cannot be mounted only on “bare” foam (without screws or anchors).
Method number 2. Metal hangers
If fastening the box with self-tapping screws or anchors is not suitable for you, the same can be done using metal hangers. These hangers are used for mounting frames under drywall.

Using hangers to fix the door frame.
The technology is similar:
- Assemble the box;
- Insert the box into the opening and level it;
- Fix the box with wedges in the opening;

- Bend the wings of the hangers along the wall;
- Mark the entry points of the dowel-nails and drill holes for them;
- Attach the wings of the hangers to the walls with dowel nails;
- Fill it with foam and wait for it to harden.
The size of the frame for double-leaf interior doors is twice as large, which means there is a higher probability of the posts and crossbars being squeezed out by foam, so installation on hangers is optimal here.

Fixing the box for double doors on suspensions.
Conclusion
Both of the above methods have been tested in practice and work perfectly. For the same craftsmen who want to install interior sliding doors We have prepared step-by-step instructions.

Installing interior doors with your own hands is not as difficult as it seems.
The ability to handle carpentry and measuring tools is already a reason to try to solve such a difficult task as installing interior doors with your own hands. The work is simple, but tricky in its own way. It will take scrupulousness and even tediousness in marking and adjusting, otherwise it will not be possible to install the interior door with the frame correctly.
Features of installing interior doors
At first glance, nothing complicated, but this is only a superficial impression. We are talking about not just installing the frame and door leaf into the interior opening, but doing it beautifully, without distortions, scratches or sagging hinges. If this is your first experience, then it is best to make detailed step-by-step instructions for installing interior doors yourself before starting work. This is not shameful for beginners. Even experienced craftsmen often make notes with their own hands - what not to forget and what to pay attention to when installing a door frame on a specific interior partition.
During the installation process, you will need to solve two of the most difficult problems yourself:
- Correctly assemble and install the frame of interior doors, align and secure it so that the frame does not sag under the weight of the door leaf;
- With your own hands, mark and cut out the mounting grooves on the vertical post of the frame and on the end of the interior door leaf.
U experienced craftsman It takes 2-3 hours to install an interior door; a beginner will need at least a day to completely install the frame and hang the door leaf.
Advice! It is not necessary to stupidly follow the instructions for installing interior doors, which recommend sequentially installing lock fittings, attaching hinges, and only at the very end solving problems with hanging interior doors. The main thing is to install the frame and door leaf with your own hands with a fresh mind, and you can put off the trim, locks and handles with trim for the next day.
There will be a lot of measuring and sawing. All cuts are made by hand with a hand saw, so, in addition to fresh strength, you will need to stock up on high-quality tools.

Tools for installing interior doors
A day or two before the start of work, you will need to assemble a working arsenal for working with lumber. You can collect it from friends or rent it. Why two days before installation? Because well before starting work, you will need to check with your own hands the serviceability and functionality of each tool:
- Construction levels - small, 70-100 cm, and large, 150 - 200 cm, with a working bubble indicator. Usually they don’t pay attention to the condition of the camera and beacon, considering them to be in good working order, but at rental stores you can sometimes find bent and even broken copies, these are the most important tool in the installation of interior doors;
- Marking tool - carpenter's corner with a ruler, tape measure and meter metal ruler. We check for the presence of angle marks at 90° and 45°;
- A screwdriver or electric drill with a bit attachment for cross-head screws. We check with our own hands how the cartridge holds, and the serviceability of the wiring - batteries;
- Cutting tool, you can cut the timber of interior doors with a jigsaw, but it is best to stock up on a pair of hacksaws - carpentry and metal. The first is used for cutting box parts, the second is used for fine cutting of platbands.
In addition to the tool, you will need a hammer, a clamp, a carpenter's chisel, foam in a can, tape and gloves. There is little dust and waste generated when installing interior doors, but you will still have to periodically remove it with your own hands so as not to spread it throughout the apartment.
In addition, it would be correct to have a hammer drill with a bayonet blade in stock, because when installing an interior door frame, problems may occur with the doorway in the wall. Ideally, the gap between the frame posts and the ends of the opening should remain 10-20 mm, for normal alignment and foaming of the cracks. In reality, the opening may be uneven, and you will need to knock down part of the concrete or stone with your own hands, a hammer drill or a hammer and chisel.
How to assemble an interior door frame
The best option would be to purchase a ready-made door kit, which usually includes:

In this case, the entire process of installing the interior frame box comes down to transferring the second parts of the hinges onto the frame parts with your own hands, assembling the hinges with self-tapping screws and installing them in the opening.

The entire job will take less than two hours. One of the options for installing interior doors with your own hands in the video
The only drawback of the above scheme is that not all manufacturers modern models interior doors manufacture their products in kits designed for do-it-yourself installation. Most often, the customer buys a door leaf, and the trim and frame parts are purchased with the expectation of installing an interior door with a frame on their own.

How to install an interior door with your own hands
First of all, you need to lay out the door leaf on a level area. Next, the selected pair of beams is laid to the left and right ends of the sash. Using a tape measure, we measure the width and expected height of the future supporting frame. Then, using a building level and a tape measure, check the dimensions of the interior passage.
Important! This is done in order to determine whether the platbands will cover the edges of the hole in the wall, and what thickness of additional elements should be used.

If you “miss” the height or width of the frame, you will have to redo the trim yourself or, even worse, you will need to raise the interior door in height.
Assembling a door frame frame of any size
In order to install the interior door without distortions, it is important to choose the correct distance between the left and right posts so that the door leaf fits into the frame with a small gap, no more than 2 mm on each side. In this case, the door will open freely without jamming in the hatch.
The easiest way to assemble the frame with your own hands is using a clamp, a saw and two blanks. Vertical posts, as in the case of preparation, are placed at the ends, leveled and secured with clamps.

On the side of the upper and lower edges of the canvas, an allowance equal to the thickness of the timber is left on the workpieces. At the same time, on the left allowance, a cut line is applied with your own hands at an angle of 45° for further joining with the horizontal crossbars of the frame. Without disassembling the structure, markings are applied to cut out the grooves for the canopies, lock and handle.
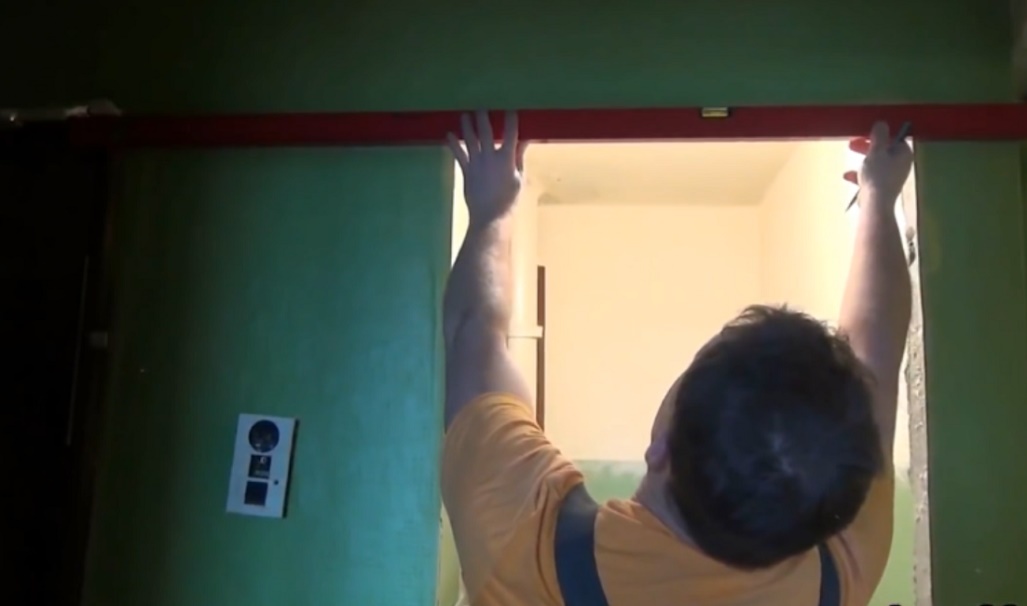
If the interior door is too wide or of a complex shape, then usually at this stage the configuration of the frame with the door is checked for compliance with the shape of the interior opening. To do this on wooden plank drive a pair of nails at a distance from each other equal to the outer width of the frame. The plank must be secured above the opening, and a couple of plumb lines are hung on the nails. If the gap between the frame and the wall is 10-15 mm, then the calculation is correct.
Installing hinges on an interior door
After all checks have been completed, it is necessary to cut out mounting grooves for the awnings in the canvas using a chisel or carpenter's knife and hammer. The easiest way is to mill a niche using hand router, but, as practice shows, the work can be done with your own hands and without expensive power tools.

If this operation is difficult, then for interior doors you can use overhead hinges or models for drilling. For installation you only need to drill holes for screwing in the fasteners.
We fix the frame in the doorway
- Mark the level of the upper horizontal cross member of the frame with a marker on the steppe, this will help to complete correct installation horizontally and vertically;
- Using wedges and a building level, we level the frame vertically and horizontally with our own hands. We fix the position of the frame in the opening with wooden plugs and wedges.
Advice! If the frame and door leaf are light in weight, then the frame can be fixed with mounting perforated petals to the wall of the interior partition.

Next, you need to blow out the space between the frame and the wall with polyurethane foam; while installation is being carried out on the polyurethane foam, you need to check it again and, if necessary, finally level it vertically using a long building level. Apply a small amount to the top mark building level and, if necessary, we adjust the frame to the required height.

Installation of door leaf
After the loot is firmly fixed with hardened foam, it is necessary to install the mating parts of the canopies. To do this, initially the door leaf is raised with wedges so that there is a gap of 1-2 mm between the threshold and the lower edge.
All that remains is to install the sash on the awnings, and you can move on to decorative finishing interior doors.
Installing trim on interior doors
Covering the frame with platbands is not particularly difficult. First of all, install the vertical trim strips. The height of the plank is measured according to the mark made earlier, after which the platband is applied to the frame and the cut line is marked at an angle of 45 degrees.
Advice! It is best to make an undercut with your own hands using a thin hacksaw blade on metal. First stick tape onto the cutting line. The plank is nailed with wallpaper nails or placed on glue.

The second vertical casing is installed in a similar way. After installation is complete vertical parts, you can mark the cut line on the horizontal strip and install it on the door frame in the same way.
What are the sizes of extensions for interior doors?
Additional strips are used as additional element to increase the width or thickness of the door frame. Most often, installing extensions on interior doors is required in a situation where the wall is much thicker than the canvas, and there is a gap between them that needs to be closed.
The width of additional slats ranges from 10 mm to 200 mm, for interior designs the most popular size is 10-20 mm, and often, due to the non-standard profile of the slot, the extensions have to be ordered or cut out with your own hands from the trim strips.

How to install extensions on an interior door
If after installing the box the unpleasant fact is discovered that vertical plane frame is recessed into the space of the interior opening relative to the wall surface, then the only way to correct the position is to use additional strips.
You must first determine the size of the extension; to do this, place a building level on the wall and use a ruler to measure the distance to the front edge of the box. Thin strips are nailed with wallpaper nails, wide extensions are glued to the frame.
Professional advice on how to install interior doors
Among the features of installing home doors, the following problem areas can be noted.
Before installing the trim, you need to make sure that the frame or additional strip is located in the same plane with the surface interior wall. Otherwise, even if you do it perfectly with your own hands, a gap will definitely appear between the platbands.
The second problem that we have to face is the sagging of doors when incorrect installation. To correct the position, you need to remove the door leaf, place washers, or trim the edge and install the door in place.
Conclusion
Installing interior doors with your own hands will require a little practice in installing awnings and extensions, but in general the work is not difficult, and with the right skill you can hang the door in a few hours. The craftsmen claim that with each installation, the quality of their DIY work doubles.
Today, do-it-yourself installation of interior doors is done in most cases. Manufacturers strive to simplify the installation of their products as much as possible, so almost anyone can handle this. Next, we will consider this procedure in detail.
Before you install the interior door yourself, you will need to choose suitable model. According to the opening method, they are divided into the following categories:
- Foldable. Such models consist of several doors at once that move along a guide. They are divided into two subgroups: books (consist of 2 sections and are durable) and accordions (an alternative to screens).
- Coupe (sliding). Have greatest number modifications: 1 and 2 doors, opening inward or along the wall, left- and right-handed, etc. The main advantage of such structures is space saving. At correct installation they also provide a high level of sound insulation.
- Swing. The last variety is the most popular. Installing doors of this type is much simpler, and can be done by people without carpentry skills (which cannot be said about other categories). In addition, their cost is much lower. The main disadvantage of such structures is that they take up a lot of usable space.
Installation of the first two varieties is carried out according to various techniques, which have significant differences. In this case, the master will need the skills of a carpenter, otherwise it will be impossible to achieve a positive result. Therefore, our step-by-step instructions will cover the installation of swing doors.
A few words about choosing a canvas and calculations
Technical characteristics must be selected based on room conditions. First, we decide on the dimensions of the canvas, so we measure the opening. Don't forget about the need to leave a gap. Between the racks and the original surface 10-12 mm, between the canvas and the timber 3-5 mm. This is necessary to avoid the door jamming. It may appear due to swelling of the canvas (from temperature fluctuations and high humidity). Standard width varies between 60-100 cm, height 180-220 cm.
Remember: the finished canvas cannot be adjusted, and expanding (narrowing) the opening is a labor-intensive task. Therefore, select the dimensions as accurately as possible - the complexity of installation will depend on this.
The technical clearances (12-15mm) and the width of the box are subtracted from the size of the opening and multiplied by 2. The resulting number is subtracted from the width of the opening. Calculation example:
- We have an opening 78.5 cm wide.
- 78,5 - (1,2 + 2,5 + 0,3) *2 = 70,5.
- This means that a model with a width of 70 cm suits us.
The standard door length is 200 cm, so you will have to adjust the opening to fit it. To calculate the required height, to two meters (or another figure if we are dealing with a non-standard model) we add the thickness of the box, the size of the technical gap and 1 cm (the distance between the canvas and the floor). If you plan to install a threshold, then add its thickness.

In addition to the dimensions, it is necessary to take into account the characteristics of the material from which the canvas is made. This is not so important, but you should not ignore this aspect. Remember a few simple tips:
- In rooms with high humidity It is not recommended to use models made from materials that are not resistant to moisture (chipboard, pressed sawdust, etc.). In a few years they will swell and lose their original appearance. In such cases, it is recommended to install laminated doors.
Advice: if there is a need to install this type, leave a technological gap 2 times larger, because such a canvas will swell much faster and more strongly.
- If there are small children or large animals in the house, it is better to avoid models with glass inserts.
Another important point - for newly built wooden houses When installing the box, it is recommended not to screw in the screws completely. This will allow her to easily survive shrinkage.
Where to start - preparatory manipulations
First, you will need to perform several labor-intensive and important operations.
What we need - study the tools
Tools for installing interior doors are not expensive or complicated. To complete all the manipulations you will need the following:
- A hacksaw with a miter box (it must be of a suitable size so that the box fits completely into its grooves, otherwise it will be very inconvenient to saw). You can use a circular saw.
- Building level. Ideally, laser - it gives maximum accuracy. However, there is no point in purchasing it for a one-time job - it is quite expensive.
- Drill with cutter.
- Pencil (or marker), tape measure.
- Hammer.
- Screwdriver or furniture screwdriver.
- Polyurethane foam with a gun.
- Fastening materials: finishing nails (usually included in the kit), self-tapping screws, dowels, screws (80×5), wedges.
- Two spirit levels (180 and 50 cm).

The first procedure is dismantling
This is the most difficult, and most importantly, the dirtiest stage of work. Self-installation of interior doors begins with dismantling the old ones. Let's look at everything step by step:
- During operations, an incredible amount of dirt and dust will appear. Therefore, immediately remove all furniture, carpets and other items from the room. We cover anything that cannot be moved with something. Don't forget about PPE (goggles, gloves, respirator).
- Filming old door from hinges. To do this, unscrew the screws that hold them. If the hinges are of the “male-male” type (that is, when one part is inserted into the other), then simply open the door and pull it up at a right angle. If the hinges are not lubricated, you will have to put in a lot of effort, so we do the work with a partner.
Tip: if you no longer plan to use the old canvas, you can simply tear it off if you have sufficient force. This is the most radical and fastest way.
- Next you need to dismantle the box. First of all, remove the mortar that holds the frame.
- Then in upper parts Cuts are made on both posts. This will make the extraction process easier: insert a pry bar into the holes made and just pull it hard. different sides.
- As a result, they will become loose and can be easily removed from the opening.

Preparing the original surface
The next step is to bring the opening into proper shape. The work is carried out in the following sequence:
- We dismantle the insulation (if any). We do this with gloves, because this group of materials irritates the skin.
- We remove construction garbage, after which we carry out a thorough audit.
- If there are materials that peel off easily, remove them. We also remove all fasteners (hinges, nails, etc.).
- As a result, we should get bare concrete (brick, timber - depending on what the walls are made of).
After such procedures, the evenness and integrity of the surface will most likely be compromised. Therefore, it will need to be leveled. There are several methods, but the simplest is plastering.
If, after cleaning operations, the width of the opening has increased (for example, the surface layer of plaster has fallen off), then installing extensions will help. These are wooden (in most cases) planks 6-30 mm wide. They are installed when it is necessary to “increase” the size of the opening. A more durable option is cement mortar.

Main scope of work
The order of installation of interior doors must be strictly observed, so all further manipulations are presented in the correct sequence.
Assembling the box correctly
Once again, making sure that the original surface is even, we begin assembling the box. It is sold in the form of bars of various lengths. It is necessary to make a U-shaped structure from them (if a threshold is to be installed, then rectangular). The second option is used mainly for toilets and bathrooms.
If you ordered the frame along with the door, then most likely it will be ready - you just need to assemble it (using long screws or nails). If purchased separately, it will have to be adjusted to size. This is the most difficult process, which will require maximum accuracy, because in case of the slightest inaccuracies the door will receive a slope, which will affect its operational characteristics.
Consider the assembly of a U-shaped structure:
- We lay two vertical posts on the floor, making sure it is perfectly level.
- We mark on them the height of the opening from the inside.
- From these points downwards we make a cut at an angle of 45 degrees, a miter box will help you with this.
- On the third rack (horizontal) we mark the width of the opening at inside. From these points we make a 45 degree cut in different directions. Do not confuse the direction, these three elements must be assembled into a single structure, so make a fitting with each new cut.
- Then we mark the places for the hinges and the lock. This can be done later.
- We assemble the resulting structure and connect it with large self-tapping screws. For each joint we use at least 3 fasteners.
Attention! Make sure that the self-tapping screw is vertical when tightening, because at the slightest deviation it will pierce the post.
For a rectangular structure, the assembly will be identical, only with the addition of a second horizontal post.

How to set the loops correctly
The awnings will determine how comfortable closing and opening will be, so perfect precision is required. Most people believe that two loops are enough for normal operation. We recommend using three (one placed exactly in the middle). In this case, even during long-term use, you will avoid distortions. So, you need to do the following:
- We apply loops to the applied markings and trace them with a pencil (marker).
- Along the drawn lines we make two grooves (on the door and the canopy) - to the depth of the canopy. A chisel will help us with this. The loop should be flush with the main surface.
- Having made the adjustment, we screw the awnings onto self-tapping screws of medium length (at least 3.5 cm) first to the canvas, and then to the racks.
- If necessary, we make adjustments: we place the structure on the floor and begin to open (close) - if the movement is not smooth, tighten the screws.

Insert the box into the opening
The next stage is installing the door frame. We do everything in this sequence:
- If the hinges are of the male-female type, then take out the door - this will make the work easier. Otherwise we leave it as is.
- Level all three posts. Achieving perfect verticality!
- We split the top crossbar with wooden wedges.
- We level it again and, if necessary, use linings.
- We drill through the side posts with a drill.
- Insert dowels into the resulting holes in the wall.
- Using long self-tapping screws, we secure the box.
- We carry out final revision and alignment.
Final chords - handles, trims
Having made sure of perfect evenness, we perform the final manipulations. First, the handle is installed on the door. To do this, a through hole of the appropriate diameter is drilled in the canvas (If you purchased full set, then you won’t have to do this). Then the two parts of the handle are connected. In most cases this is not difficult.
At the end the platbands are displayed - decorative elements, hiding all irregularities and forming the integrity of the structure. They are glued around the entire perimeter using special liquid nails. The joints are also formed using a miter box.