Master class on DIY New Year's topiary: making a tangerine tree. New Year's topiary photo
Topiary “Herringbone” is a unique New Year’s souvenir that creates an elevated festive mood. This decorative tree can be decorated in accordance with the symbolism of the coming year, which will make the gift even more relevant.
A DIY Christmas tree topiary can be decorated with a variety of materials. Tangerines, sweets, Christmas tree decorations, sisal, and fir cones are suitable. There is the widest scope for imagination! You can use the technique of combining different materials in one composition, and it will only benefit from this. But for a beginner in this fascinating business, it still makes sense to follow the proposed step-by-step instructions.
Options for creating a Herringbone topiary
To understand how to decorate a Christmas tree with tangerines, you need to remember one rule: the diameter of the base (pot) must correspond to the diameter of the crown. In this case, you will get a stable and harmonious composition.
If it is not possible to find a suitable container (vase, jar, glass), you can make it yourself from plasticine and old newspapers using the papier-mâché method. The process is as follows: the shape of the container is molded from plasticine and covered with finely chopped pieces of newspaper. The more layers of pasting there are, the more durable the papier-mâché will be.
The simplest option for creating a topiary is as follows: place a fluffy Christmas tree branch in a container of suitable size and strengthen it there with the help of decorative stones or any other material that weighs down the base. You can also use a quickly hardening composition: gypsum, alabaster, plaster.
Such impromptu Christmas trees are decorated in accordance with the holiday style. Suitable items include tinsel, pine cones, candies, symbols of the year, miniature soft toys, and Christmas tree garlands. To create such a souvenir, you don’t need step-by-step instructions; your own imagination is enough.

The crown of an ornamental tree traditionally has the shape of a ball. In order to make the “Christmas Tree” topiary, the master class suggests using tennis balls, plastic or foam balls. You can make the base for the crown yourself. To do this, you need to take a piece of polystyrene foam or hardened polyurethane foam and cut out a ball of the required diameter from it. The base of the crown can also be made from a balloon: cover it with newspapers using the papier-mâché method, and upon completion of the work, release the air from the balloon and remove it.
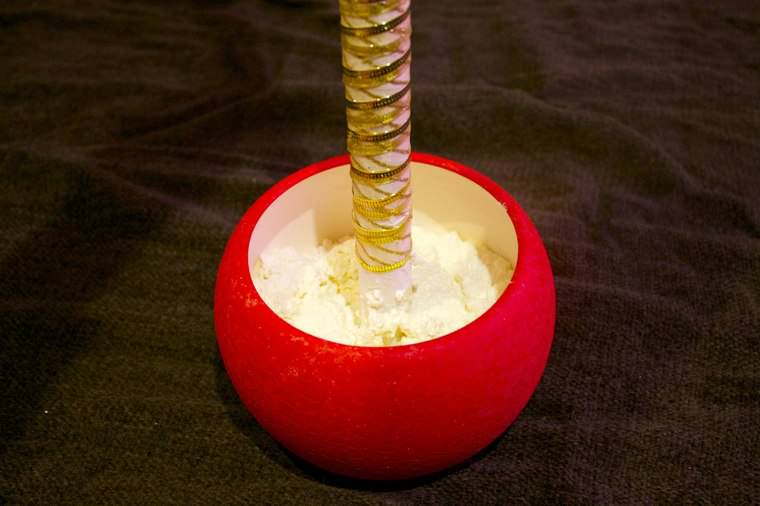
Photo gallery


Instructions for creating a topiary “Herringbone”
- thin cardboard (whatman paper);
- corrugated cardboard;
- wire with a cross section of 4-5 mm;
- scissors;
- compass;
- green sisal;
- green wool threads;
- leg-split;
- pencil;
- small pots;
- dry cement or gypsum mixture;
- glue gun or glue such as “Moment”, “Crystal”;
- old newspaper;
- decorative material: Christmas balls, bows, flowers, tinsel, rain, confetti.

Manufacturing process:
- Draw a semicircle on cardboard (whatman paper) using a compass. The radius should correspond to the desired height of the Christmas tree.
- Cut out a semicircle and roll it into a cone, fix it with glue or a stapler.
- Take a small piece of corrugated cardboard, place a cone on it and outline it.
- Cut out the resulting circle with scissors. It will serve as the base of the Christmas tree.
- Crumple the newspaper into a ball and place it inside the cone.
- Glue the top of the Christmas tree to the wire.
- The circle and cone are wrapped with green woolen threads.
- A hole is cut in the center of the circle and the wire coming out of the cone is threaded into it.
- The wire is wrapped in a spiral with twine. You will get a beautiful Christmas tree trunk.
- Cement or gypsum mixture is poured into the pots, diluted with water in the required proportion and a cone with a wire is placed in the container.
Next, they begin to decorate the flowerpot and cone in a holiday style. You can wrap the stand in beautiful paper napkins and stick rain and tinsel on them. The cone is wrapped in a spiral with a bright satin ribbon and Christmas tree decorations, candies, and decorative ornaments are attached to it. You can choose various options for spectacular decoration of the New Year tree. Decorative pins are used to secure the decor. A Christmas tree made of threads and sisal is an excellent decoration for the holiday.

DIY Christmas tree topiary (video)
How to make a Herringbone topiary from coffee beans
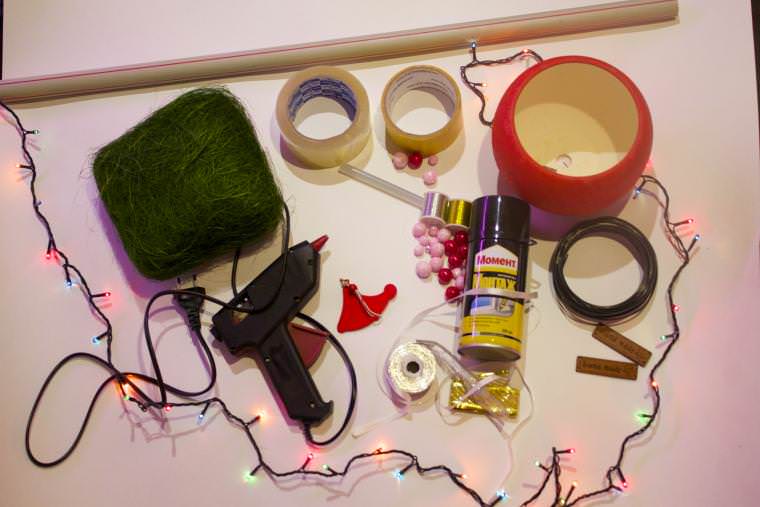
New Year's - a spectacular and stylish decoration. To make it you will need:
- thick paper or cardboard of dark brown color;
- leg-split;
- coffee beans;
- wooden stick;
- glue gun;
- bronze gouache;
- satin ribbon bow;
- glass or plastic container that will serve as a stand;
- decor for decorating the crown (beads, Christmas tree decorations of a suitable size, garlands, tinsel);
- building gypsum;
- sponge;
- scotch.
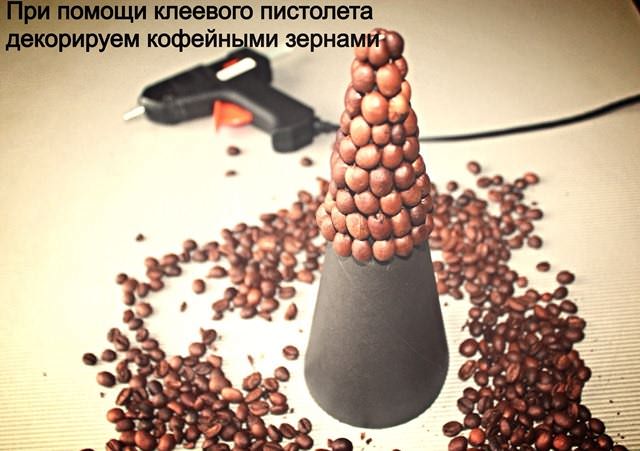
The main difficulty in making this craft is gluing the coffee beans.
This painstaking work will require perseverance and accuracy from the master. If you glue the grains slowly and closely to each other, the Herringbone topiary will turn out incredibly beautiful. To make this task as easy as possible, use a glue gun.

The most enjoyable moment in making topiary is decorating its crown. Any New Year's decorations are suitable for its decoration: tinsel, rain, sweets, small fruits. The “Herringbone” topiary, made by yourself, can be decorated in the form of a New Year’s tangerine tree.


Stages of creating a decorative tree
- A cone is made from brown cardboard, the lower edge of which is cut off evenly.
- Transparent tape is used to secure the edges of the paper.
- Bronze paint is applied to the sponge.
- A satin ribbon bow is glued to the top of the Christmas tree.
The master class suggests decorating the “Christmas Tree” topiary with a string of beads wrapped diagonally around the crown. The lower part of the cone can be covered with beads. Next, they begin to make the tree trunk. To do this, cut out a circle from cardboard of such a diameter that it can fit closely into the lower part of the cone. A hole is cut out in the middle of the circle into which a wooden stick is inserted.

The paper circle and the upper part of the barrel are coated with glue. After the crown is firmly glued to the wooden stick, it is placed in a pre-prepared container, which will act as a topiary stand. In order to strengthen the trunk in it, plaster is poured into a container and diluted with water. The Christmas tree in the stand is held in a vertical position until the binder hardens. Now it’s time to design the base of the topiary. The stand can be covered with Christmas tree needles, sisal, pine or fir cones, and confetti.
New Year's topiaries are an excellent element in the festive interior. To celebrate the New Year 2019, you can make several charming mini-trees with your own hands. It won't take much time, and the result will please the eye for a very long time. Below are some of the best DIY New Year's topiary options for 2019. Using the given instructions and step-by-step master classes, you can duplicate the products or use them as a basis for creating your own version of the decoration.
Classic herringbone
Materials:
- base: small flower pot (or decorative bucket), plaster (cement or polyurethane foam);
- barrel: a pencil, or wooden sticks, or a “Chinese stick”, or a cylindrical ice cream stick, or a branch (it is desirable that the diameter be at least 5 mm);
- crown: a cone made of foam plastic (you can buy it at a decor store or make it yourself by cutting it from a rectangular parallelepiped of foam plastic), or from thick paper;
- decor: New Year's tinsel, small balls (you can use different colors), cotton wool;
- for fastening: tape (regular and double-sided), super glue (or glue gun), twine (any other thick thread).

Step-by-step master class:
- For the future crown, a ready-made foam or paper cone is used. To make a paper crown, you need to take cardboard and make contours on it.
You can print out the template, or put a compass in the corner of the sheet and draw an arc. If there is no compass, use a pen with a thread tied to it. The free end of the thread is held at the corner point, the handle is pulled to the required length of the cone and an arc is drawn. The resulting cone is cut out and glued with tape along and across the connecting seam.
- In order to get a barrel, you need to take a straight stick or pencil. If the sticks are thin, then they are tied together to obtain a trunk of the required thickness. The trunk can be coated with paint or wrapped with twine or thread. There is no need to paint or wrap the entire trunk, just the part that will be visible is enough.

- The trunk is fixed in the base (flower pot) in a special hole, which is intended for water, using super glue. If there is no hole, then you can put a small piece of plasticine at the bottom and stick it into its trunk. To secure the base well, gypsum (cement or polyurethane foam) is poured into the pot.
Important! When working with polyurethane foam, it is necessary to take into account that it will increase in size.
- While the base dries, it is necessary to make the bottom of the crown. To do this, circle the base of the cone and cut out the resulting circle. You can use green cardboard. In its center you need to make a hole for the barrel. The base is glued to the cone with tape.
- The crown is placed on the trunk.

- Next, you should decorate the resulting Christmas tree. First you need to glue the balls with super glue or tape, distributing them evenly over the crown. It is better to use double-sided tape for this. With its help, tinsel is also glued: a piece of double-sided tape is placed on the top of the cone and the edge of the tinsel is glued to it. Next, they wrap it around the entire barrel, securing it with double-sided tape.
- You can also wrap the pot with tinsel around the circumference, securing it with double-sided tape.
- To decorate the base, cotton wool is placed in the middle of the pot. You can use grain, or sawdust, etc.

- Additionally, the tree is decorated with a small star on the top, beads, and small gifts can be placed under the crown.
Fruit topiary
New Year's topiaries can not only be part of the interior, but also decorate the festive table. To celebrate the New Year 2019, you can make a topiary dessert or.
Materials:
- base: a flat small plate and a large apple;
- trunk: long carrot;
- decor: kiwi, grapes, strawberries, carambola (cut in the shape of a star), orange and any other fruits, parsley or fresh mint leaves;
- Toothpicks are used to connect the decor.

Performance:
- The bottom of the apple is cut off so that its base becomes flat and stable.
- A recess is made in the upper part, matching the diameter of the base of the carrot. The “trunk” is inserted into it.
- Toothpicks (they should not be too long, so they can be broken) are evenly and densely stuck into the apple base and carrots.
- Next, fruits are strung on them. The voids and the bottom of the “Christmas tree” are decorated with greenery.
Topiary of tangerines
Another delicious New Year's topiary with which you can celebrate the New Year 2019.
Materials:
- base: flower pot, plaster (foam, cement);
- trunk: branch;
- crown: foam ball or round floral sponge;
- decor: small tangerines, green sisal;
- connection: PVA glue, toothpicks or skewers.

Step by step execution:
- Secure the branch in the pot using plasticine or a small piece of floral sponge. Fill with plaster (spray foam, cement).
- A floral sponge or foam ball is glued to the branch.
- Tangerines are attached to the ball using toothpicks or skewers. Fruits should be small in size so that they are securely attached and do not fall.
- The spaces between the tangerines and the base of the pot are decorated with green sisal. You can also use corrugated paper cut into strips.
Candy topiary
The principle is the same as in the previous version of topiary, only marmalades are used as decoration. Children really like these.
Materials:
- base: foam ball or cone;
- decor: marmalade candies (for a New Year's tree it is better to use red, green and white);
- fastening: toothpicks or skewers.

How to do:
The implementation of such topiary is quite simple: marmalades are pricked one by one onto the base using skewers or toothpicks. The length of the skewers can be adjusted using scissors or wire cutters.
A child will really enjoy making a tree like this. You just need to stock up on enough gummies, since in the process of creating a masterpiece, most of them can be eaten.
Pebble topiary
Materials:
- base: flower pot, plaster (cement or foam);
- barrel: stick;
- crown: foam cone;
- decor: pebbles (or large oval beads), paper napkins with a pattern in green tones, seeds (seeds, flax, grain, ready-made mixture for birds), twine or twine;

Master Class:
- Secure the trunk in the pot with plaster. You can additionally decorate the pot with a twine bow.
- Glue the cone to the barrel with PVA glue or a glue gun.
- Cut circles from napkins and wrap them around pebbles or beads. The napkins are glued well with PVA glue.
- Glue the stones to the conical crown (here it is more convenient to use a glue gun).
- Wrap the resulting Christmas tree with twine or string coated with glue.
- Pour grain into the pot. To prevent it from spilling out, PVA is first poured into it.
Balloon topiary
Materials:
- base: decorative bucket or flower pot;
- crown: foam rubber or foam ball, or round floral sponge;
- decor: small plastic ones, artificial Christmas tree branches or tinsel, decorated tape, snowflake stickers or stencils for snowflakes and white paint, silver paint;
- connection: PVA glue or glue gun.

Performance:
- Repaint the flower pot or bucket silver.
- After the paint has dried, stick snowflakes on it or paint them white.
- Cover the sides of the pot or bucket with decorated tape.
- Glue the ball to the base.
- Remove the fastenings from the New Year's balls and glue the balls to the ball.
- Decorate the spaces between the balls with tinsel or Christmas trees.
How to make a New Year's topiary 2019 with your own hands: video master class
DIY Christmas tree. Master class with step-by-step photos
Master class “Herringbone - topiary”.
Author: Skovoronskaya Galina Nikolaevna labor instructor of the State Budget Educational Institution of the Russian Federation orphanage No. 3 in Taganrog
The master class is designed for high school students, teachers and those who like to make gifts with their own hands.
Winter holidays are a time of gifts, joy, fun and magic! I would like to decorate the house for the holiday, prepare New Year's souvenirs for relatives and friends. Of course, you can buy everything in the store, but you can try to make something with your own hands and please your loved ones with original gifts.
Appointment of a master class.
I bring to your attention a MK for making a Christmas tree. This is a wonderful element of New Year's decor and an original New Year's gift that you can easily make with your own hands. To make a Christmas tree, you can use various materials that your imagination suggests and that you have on hand.
Goals: - making a Christmas tree,
- realization of creative potential;
Objectives: - to promote the development of aesthetic taste, spatial thinking, and imagination.
Materials and tools: - green sisal, burlap, twine, red organza, gold braid, green cardboard, branch, wire, thread, glue, pot, plaster, beads, ribbons and other decorative elements, glue gun, scissors, pencil.

Step-by-step manufacturing process:
1.Fold a cone from A4 size cardboard and glue it together;

2. Align the sides of the cone and cut out the bottom;

3. Take a wire 20 cm long and fold it in half. Wrap the wire with padding polyester and secure it by twisting it with thread;

4.Insert a wire into the top of the cone and glue it with a gun;

5. Insert the twig into the cone, secure it with paper, and glue the bottom to the base of the cone;

6. Wrap the Christmas tree blank (wire and cone) with green sisal, fixing it on the surface with a glue gun;

7.Secure the Christmas tree stem in a pot, fill it with plaster and set aside until it hardens for an hour;

8. Decorate the pot with twine, cover the plaster in the pot with sisal on top;

9. Cut 6 strips of 2 cm x 20 cm from red organza, cut 6 strips of 10 cm from metallized ribbon (5 mm wide);

10.Tie bows from organza and decorate them with gold braid, additionally decorate the bow for the top with a bell (you can use: lace, beads, stars, snowflakes and other decorative elements);

11. Decorate the Christmas tree with gold beads, glue them using a gun and arrange them in a spiral;
IMG]/upload/blogs/4623_7a292fe1af8687ed416f4aa1dddb88fe.jpg
12. Decorate the Christmas tree with organza bows, attach a bow with a bell to the top;

13. Decorate the edge of the pot with burlap and a small rope bow;

14. Decorate the Christmas tree with snowflakes;

15. Glue snowflakes and a small drum onto the sisal pot.

The Christmas tree is ready.

More Christmas trees.


Thank you for your attention. I wish you all creative success!
New Year is a wonderful time when we remember everything that happened last year, set goals that we want to achieve next year, congratulate our family and friends, and give gifts. But what to give to your loved ones? After all, you want something unusual and original, so that the gift stands and evokes pleasant memories of the giver. One of the original gifts can be topiary - the “tree of happiness,” as it is sometimes called.


But how to make a gift topiary for the New Year? In this article we will make a New Year's topiary with our own hands using a master class.
Photos will be attached to the work to make it easier for you to work and the manufacturing process more visual.
Materials for creating a New Year's topiary
- tangerines.
- a skein of linen rope (can be bought at any gardening and flower shop).
- a flower pot from which our tree will actually grow (you can also use any container, decorating it to your liking).
- a beautiful branch or driftwood, strong enough to withstand the weight of tangerines. Treated, varnished twigs can be found in a florist shop.
- scissors and a paper knife.
- a piece of foam plastic or floral oasis.
- spruce branches and mistletoe leaves for decoration.
- pieces of wire to strengthen the tangerines on the tree (a set of small hairpins will do).
- artificial snow (this can be crushed polystyrene foam or any other material, the main thing is that it looks like snow).
- brush for PVA glue.
Progress
1. Take tangerines and wrap them with rope crosswise. Be careful, wrap it tightly so that your tangerines do not fall out of the ropes. But don’t overdo it, otherwise you risk splashing the entire workspace with juice and damaging the product.

2. Coat the twig with PVA glue and dip it in “snow”, this is done so that the needles do not stick together.

3. Cut out a cone from polystyrene foam or oasis that will fit in the pot. To make the structure heavier, you can put a stone or a piece of lead at the bottom of the pot.
4. Please note that the pot must match the size of the entire composition, that is, be proportional.

5. Let's get to the most difficult and important part. We strengthen the branch in the oasis so that it does not dangle. We begin tying the tangerines one to the other, starting from the bottom. There will be fewer tangerines at the bottom, a little more in the middle, and the same number at the top as at the bottom. Then we decorate all this beauty with leaves and twigs.

New Year's topiary is ready. It will wonderfully decorate your table or be a wonderful gift for family and friends. And the New Year's mood that your craft will create either in your home or in the home of the people you love will more than pay off your efforts and perseverance. Be inspired by photo examples and have fun creating little “trees of happiness”!


Video on this topic
Step-by-step video master classes will help you decorate your home and create the mood for an upcoming miracle and holiday, in which you will see other incredibly beautiful and attractive crafts that will retain the warmth of your hands and be able to transfer it to those who are dear to you.
Despite the fact that December has just begun, I already want a New Year's holiday. And what will create a New Year's mood better than a Christmas tree? Although, recently New Year's topiaries have also become extremely popular. Such a small tree can be placed on a holiday table or used to decorate an office. In addition, the New Year's topiary will be a great souvenir!
We have already talked about what topiary is and what are the basic principles of its manufacture. Today we’ll talk about what features New Year’s topiary has.
Before you start making your own topiary, decide on its shape. The shape can be either round (traditional) or figured (for example, herringbone).

New Year's topiary ball

The principle of creating such a topiary is similar to the previous one, you just can use pine cones instead of Christmas tree decorations.

First, we glue cones to the ball-shaped base, and then fill the gaps between the cones with various decorative elements (beads, bows, small Christmas balls). The main thing is not to overdo it with decoration.


If you take a cone and spruce or pine branches as a basis, it will also turn out quite nice:

Video master class on creating a New Year's topiary from pine cones and Christmas balls:
Topiary made from edible materials (nuts, sweets, tangerines)
"Tangerine" tree
It's no secret that tangerines are a favorite New Year's treat. Therefore, we will consider the process of creating a “tangerine” topiary in more detail.

Prepare the following materials:
- tangerines
- a skein of linen rope (can be bought at any gardening and flower shop)
- a flower pot from which our tree will actually grow
- a beautiful branch or driftwood, strong enough to withstand the weight of tangerines
- scissors and paper knife
- a piece of foam or floral oasis
- spruce branches and mistletoe leaves for decoration
- pieces of wire for strengthening tangerines on the tree (a set of small hairpins will do)
- artificial snow (it can be crushed polystyrene foam or anything else, as long as it looks like snow)

We take our tangerines and wrap them with rope crosswise. We strengthen the wire as shown in the photo:

Lightly coat the twig (so that the needles do not stick together) with PVA glue and dip it in the snow.

We cut out a cone from polystyrene foam or oasis, which is shaped to easily fit into our pot.

Let's move on to the most difficult and important part. We strengthen the branch in the oasis so that it does not dangle. We begin tying the tangerines one to the other, starting from the bottom. There will be fewer tangerines at the bottom, a little more in the middle, and the same number at the top as at the bottom. Then we decorate all this beauty with leaves and twigs.

DIY New Year's topiary is ready! You can safely decorate your holiday table with it.
Remember that tangerines are a perishable product, so it is better to make such a tree on the eve of the New Year. As a worthy alternative, you can use decorative tangerines - plastic or made from polymer clay.

Candy topiary
What do you think of the idea of a New Year’s topiary made from candy canes?

The materials are the most standard: a foam ball, a stick for the trunk, a pot, a satin ribbon for decoration, a foam cube, adhesive tape and 200-300 grams of candy.

Pay attention to how you can secure the trunk in a foam cube, as well as decorate it:

And also see how you can cover a foam ball with colored adhesive tape so that you don’t need to further decorate the gaps between the candies:

The principle of creating a topiary is similar to those described above, but these 2 tips can be very useful to you.
Can decorate any holiday. To give this tree a New Year's look, use appropriate decorations, for example, a Santa hat:

Or make a coffee topiary in the shape of a Christmas tree:

Topiary made of sisal, fabric or felt
There are a lot of materials for creating a Christmas tree. For examples and patterns, you can refer to the article. Make a Christmas tree using any of the methods and secure it in a pot. The topiary is ready.
