Heels for women's shoes. How to change heels at home
Now we begin to prepare the heel replacement.
First of all, you need to carefully remove the old worn heel.
And this is where problems most often arise.
People came to my workshop with a request to remove the pin, with the help of which the heel itself is directly held in place. Customers have complained that they or their husbands spent an hour trying to remove the pin, only to end up with a mangled heel.
And seeing how I took it out in five seconds, they were amazed at this trick. But in fact, anyone who has a certain skill can do this and the main thing is to know how to do it.
I’ll tell you exactly this, and then you’ll see the video.
So, we take shoes in one hand and pliers in the other.
Using the ends of the pliers, we try to pull out the old heel, slightly twisting it around its axis.
It happens that the heel is pulled out quite easily and then you just have to install a new heel.
But most often the plastic comes off, but the pin remains motionless. And here the difficulty begins, how to get him out?
If you try to do this with pliers, then most often the pin will remain motionless, and everything that was sticking out, that could be caught on before, simply licks off. If you continue to operate in this way, you can ruin the plane of the heel, and in the future, even if you manage to pull out this pin, it will not be possible to install a spare heel, since the surface of the bottom will be damaged.
For this case, side cutters or nippers are needed.
The pins always have caps, of course, if the heel is not worn to such an extent. That the bushing is already visible.
It is necessary to lift the pin using the plane of the side cutters, gently pressing them.
This is the main point in removing a stuck pin.


The main thing you need to pay attention to is that the plane of the heel remains undamaged. That is, smooth. This way, in the future, the new heel will install correctly and will not come off.
But also the heel pin should fit tightly into the heel sleeve.


If the heel fails. It is necessary to ensure that all rules are followed. In the video you can see this in more detail.
It is necessary to somehow find a stop on which the heel part of the shoe (that is, the base of the heel) will rest so that the heel can be hammered in. If you suddenly happen to have a shoe's foot, then it will be perfect option.
Think for yourself what could serve them in your home. Maybe a leg from an overturned chair, some kind of block or something else.
Insert a new heel into the bushing and tap lightly with a hammer.

Do not hammer the heel straight in as it may unravel as it goes down.
That is, this moment must be controlled and if this happens, then carefully correct it with pliers so that the heel is installed Right.

Then finish the heel to the end.
Remember that as the pin deepens into the bushing, it will be more difficult to turn the heel. And if the heel is turned tightly, it may happen that it may break off the base of the pin.
For more reliable fastening of the heel, you can lubricate the pin at the base of the heel with glue. Before this, the surface of the heel can be cleaned sandpaper.
If we take all this into account, then change the spare heel, it will be very simple.
I will be glad to receive your feedback, which you can leave below.
 For those who decide to repair their shoes themselves,
be sure to visit the page
Historians claim that the first shoes appeared in Eurasia more than 30 thousand years ago. Shoes were made from animal skins and woven from plant leaves. Since then, shoe manufacturing technology has stepped far forward; artificial materials are often used for their manufacture, which are not inferior to, and even superior to, leather in wear resistance.
But even the best quality shoes wear out over time, especially in women's boots and shoes with stiletto heels. Usually, not the entire surface of the heels wears out, but only the back part. Therefore, it is necessary to ensure that wear does not touch the base of the heel. If the base is worn out, it will have to be ground down to make the entire supporting surface flat, which is extra work and reduces the height of the heel.

Factory heels, as a rule, are made of plastic and they are fixed to the base of the heel of the shoes using glue and pins, tightly inserted into the holes provided for them in the heel.
How to remove the heel
In order to change worn heels, you must first remove the factory ones from them. The contact line of the heels with the base of the heel is usually clearly visible. There is a light stripe in the photo above.

To remove a worn heel, you need to place the shoes on their side on a hard surface and apply forceful pressure with a shoe knife, rocking it in the plane of the blade, to the border between the base of the heel and the heel. You can also use with a simple knife or even a flat blade screwdriver. In this case, it is better to remove the heel from the side of the sole so that possible minor damage to the heel is not visible from the outside.

The heel has been torn off from the base of the heel of the shoes, and now removing it will not be difficult. In the same way, the heel is removed from the second shoe.

The photo shows a view of the removed factory-made heel from the installation side on the base of the heel of the shoes. Some factories include spare heels with shoes. Check to see if there are spare heels lying around in the box from these shoes. Then all repairs to replace heels will come down to spreading the factory heel with glue, for example “Moment”, and installing it on the heel of the shoes.

If there are no spare heels, then you can look in stores. Ready-made heels are available in plastic and metal. In the photo there is a metal powder heel for shoes with stiletto heels.

After removing the heels, you will see the heel of the shoes approximately the same as in the photo. Depending on the heel area, there can be two, three or even four holes for pins for factory heels. But the repair technology is the same for all cases.
Material for heels
The best material for new heels is sheet polyurethane with a thickness of 5-6 mm of medium elasticity. It can be purchased at junk dealers. When choosing, you need to check the rigidity of the polyurethane. When you apply strong pressure with your fingernail, it should bend slightly.

If polyurethane is not available, then rubber from car tires will work well. It also has high abrasion resistance. But to get a piece of flat rubber out of a round tire you will have to tinker.
Preparing the heel for installation on the heel
To make a heel, you need to apply its outline onto a polyurethane or rubber plate. To do this, you need to attach the heel of the shoe to the workpiece and circle it around the perimeter with a marker or ballpoint pen.

The shape of the heels for the right and left shoes, as a rule, is different and this must not be forgotten when cutting the workpiece. You can also trace a worn out heel with a pen, but I prefer to trace the heel.

After applying the markings, it is necessary to cut out the heels. You can cut polyurethane with a sharp knife, wetting its blade in water to improve sliding. But polyurethane is very difficult to cut with a knife, and I prefer to cut it using a jigsaw with a wood saw installed. Polyurethane is easily cut with a jigsaw.

For cutting, the plate with the applied markings is clamped in a vice. As soon as a few millimeters have been sawn, the plate is pulled back by hand so that the jigsaw file does not get pinched. Then the heel can be cut out quite quickly. You need to cut according to outside lines so that there is a reserve. The protruding part of the heel due to the level of the heel of the shoes can then be ground off using an emery board or cut off with a knife.

The new heels are ready and you can start installing them on the heels of your shoes. But before that, the heels themselves need to be prepared for installing heels.
Preparing the heels of shoes or boots for installing heels
Probably, looking at the photo above, you noticed the appearance of the heels after removing the heels. The plane is almost entirely filled with holes and the question arises, how to attach new heels?

The answer is simple, you need to install wooden plugs in the holes for attaching standard plastic heels. The holes for the pins usually have a diameter of 5 mm and a depth of 10-15 mm. First, measure the depth. If it is less than 10 mm, then using a hammer, you need to drill out the base of the heel to a depth of 15-20 mm.

If you drill electric drill, then you need to take into account that the drill can soft material“pull” the heel and the depth of the hole will be greater than necessary. I usually perform this operation manually, holding the drill in a special handle.

Plugs in heels for installing heels can be made from any piece of wood by sawing off the required piece to length and pricking using a log knife required diameter. You can also use ready-made ones, for example, wooden Japanese chopsticks fit well in diameter.

It is enough to cut them into pieces of the required length. If the stick is a bit thick, then trim it a little with a knife. After making the plugs, they can be driven into the holes of the heels. The diameter of the plugs should ensure a tight fit, but you should not make plugs with a diameter much larger more holes in the heel, as if the plugs are clogged, the heel may crack. The plugs should not protrude beyond the surface of the heel; it is better to let them be slightly recessed.
Installing heel caps
The heels are prepared for installation, wooden plugs are driven into the heels, and it’s time to install the heels on the shoes.

To securely fasten heels on heels, I use a combined fastening, gluing, followed by nailing with long shoe nails, which experts call Tex type TR. Shoe nails differ from ordinary nails in that they have flat edges, a diameter of 1-2 mm and a length of about 15 mm. The head of shoe nails is also of a special shape, small in diameter, but thick. The flat edges on the nail shaft prevent it from twisting when walking, and the shape of the head acts as a heel section and increases its service life.
If there are no shoe nails, then to attach the heel you can use simple finishing nails, shortening them and giving the rod a shoe shape, grinding it off with a file or on an emery column. Finishing nails are usually used to attach trim to doors.

To accurately hit the nails into the plugs driven into the heels, before gluing the heels, it is advisable to first mark the driving points on them. To do this, the heel is applied to the heel, the polyurethane is slightly transparent and the plugs are visible. All you need to do is put dots with a marker where the plugs are visible.

If the plugs are not transparent, if the heels are made of rubber, then you can attach the heel to the heel, move it toward you and make one mark at the level of the plugs, then move the heel to the side and apply a second line. You will get a cross into which you will need to hammer a nail. Since the diameters of the plugs are 5 mm, this method will provide sufficient accuracy.

You can nail the heel by placing the heel directly on the heel, but this is inconvenient, since the heel may move and not be installed accurately. Therefore, I prefer to first hammer all the nails into the heels so that the sharp ends appear on the opposite side of the heel. You need to drive the nails by placing the heel on the board so that the sharp ends of the nails do not flatten and become blunt.

For more reliable fastening of the heel, before nailing, the mating surfaces of the heel and heel are generously lubricated waterproof glue"Moment". After waiting for 5 minutes recommended by the rules of use, the heel is applied to the heel and pressed firmly.

There are special paws for repairing shoes using nails. But I make do with a big file wooden handle. I rest the file on a massive piece of metal, and rest the heel of my shoe on the handle.
As you can see in the photo above, the nails are hammered in, the heel is firmly installed on the heel, but the edges of the heel protrude somewhat beyond the contour of the heel. The protruding part of the heel must be removed by cutting it with a knife or using an emery column.

Shoes with new heels installed by yourself look no worse than new. If desired, heels according to end side Can be painted with a waterproof marker or paint.
Installing spare heels on shoes
If, when purchasing women's shoes, you found a spare set of heels in the box, then the first repair to replace worn heels will not be difficult. It is enough to remove the old ones and smear the surface of the heel and the pins of the new heel with glue and hammer it into the heel with a hammer.

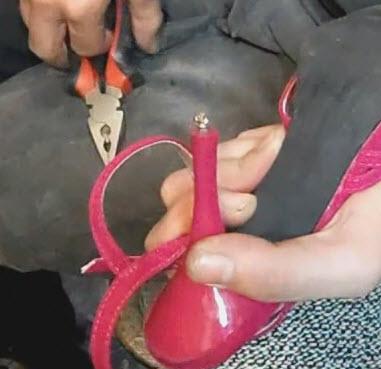
But sometimes a difficulty arises in that when removing worn heels, one of the pins breaks off and remains in the heel. It is impossible to remove the pin using pliers, since there is nothing to grab onto. The pins can be drilled out with a drill, having previously sunk them into the heel. But in this case, the walls of the hole will most likely be ground off, and the new heels will not hold securely.

To remove a pin from a shoe heel without damaging the walls of the holes, you must first drill a hole with a diameter of 2.5 mm in the center of the pin. If you have a self-tapping screw with a diameter of 3 mm, you can screw it into the drilled hole and remove the pin. It would seem that instead of drilling a hole in the pin, you can immediately screw a small-diameter self-tapping screw into it, and grab it with pliers to remove the pin. But in this case, the self-tapping screw will spread the pin to the sides, and it will hold even tighter in the heel and it will be impossible to remove the pin.

If you don’t have a self-tapping screw with an outer diameter of 3 mm, but you have an M3 tap, then you need to cut a thread in the drilled hole using it.


Now you can place a stop on the heel, for example the shaft of a screwdriver, and grasp the head of the screw with side cutters and easily remove the stuck pin from the heel.

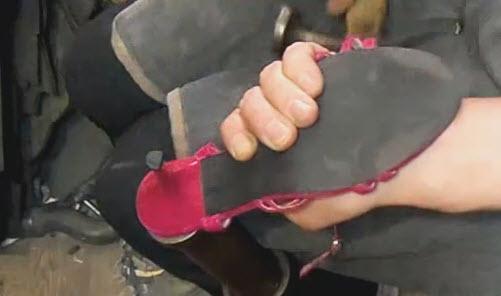
The pin was safely removed from the heel of the shoe without damaging the holes, and now you can begin installing the replacement heels.

It is not necessary to lubricate the pins of the heels and the surface of their contact with the heel of the shoes with glue, but to securely fix the heels and prevent dirt and water from getting into the gap, glue will not be superfluous. Moment waterproof glue is well suited for this purpose.

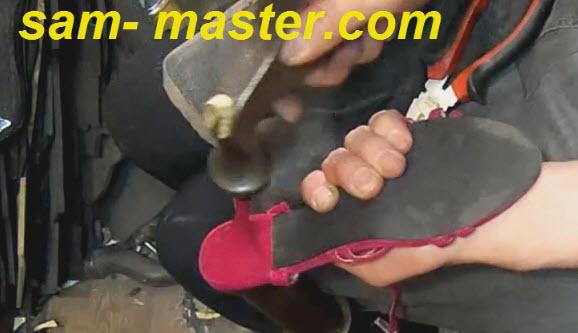
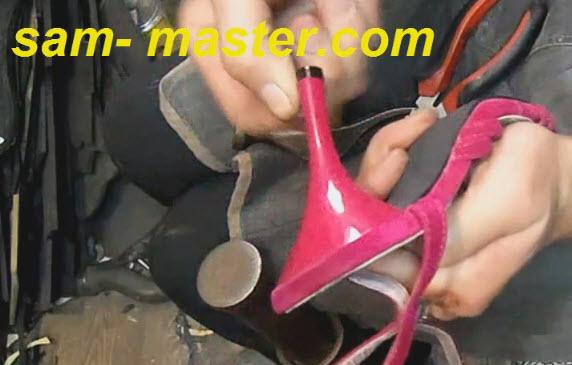
After covering with a layer of glue, the heel is inserted with pins into the holes of the heel and, even without support, hammered in with a hammer. Any residual glue that appears is smeared over the joint with your finger.

Replacement heels are installed on women's shoes, and now they look like new. The heels are enough to wear your shoes without repairs for another summer season.
Once you learn and practice how to make printed heels, you can even start making money from it.
The heels are the most common part of the heel; they wear out very quickly. Having become familiar with the operating technology, you can replace these elements at home.
How to make heels: removing worn elements
Please note that heels often wear out on only one side. Therefore, you should always monitor the condition of your shoes. Otherwise, the wear will continue diagonally, and if it touches the base of the heel, the heel will also have to be repaired. Typically, factory heels are plastic products that are fixed to the heel using special pins and glue. Worn elements must be removed.
- The shoes are turned on their side and placed on a hard surface.
- Using a sharp knife, loosen the heel.
- Movements must be careful so as not to damage the heel.
- The same steps are repeated with the second shoe.
Manufacturers include a pair of spare factory heels with the shoes. If they are, then you just have to lubricate them with glue and fix them.
How to make heels at home from polyurethane
If you don’t have factory heels, you can go to a specialized store and pick up ready-made heels from any material. Most popular materials:
- sheet polyurethane;
- rubber;
- plastic;
- metal.
Heels made from sheet polyurethane are very popular. You can buy it in markets where they sell various old things. It is durable, elastic and high quality. On the polyurethane you need to draw both heels, circling each heel. You can cut out the elements with a knife, remembering to moisten it in water. But this is labor-intensive work. If you have a jigsaw, this job can be done in a minute or two. You need to cut out the elements according to outside so that they do not accidentally end up too small. The protruding part can then be cut off with sandpaper.
How to attach polyurethane heels? Wooden plugs must be tightly installed in the holes from under the pins. The main thing is not to overdo it, otherwise the heel may crack. To securely fix the heels, you need to use two types of fastening.
VERY clear video, almost everything is shown. The glue, judging by the address, is Dismakol. You can replace the filing on the inside of the heel with a stone on a Dremel. You can check whether a regular hairdryer warms up the glue sufficiently beforehand. I'll check and record it here. YouTube channel
You need to make jambs on the worn heels and put heels on.
1. Sand the heels to a smooth surface (including the worn area) 1:44.
2. After turning 6:03 (the heel is hollow, all the “squares” between the jumpers are removed from the bottom) he picks up rubber pieces on the jambs. He doesn’t do anything with them (that is, he doesn’t cut them in any way, they’re just rectangular pieces of rubber), spreads them with glue, and lets them dry. He also smears the spots on the heels. The glue, based on further actions with it, is clearly “Desmokoll”. From another video - it should dry until “tack-free”; if the glue is absorbed, apply it again.
3. Heats up the heel with a hairdryer (the author has an industrial one, you can try a regular one) - not the heel, then presses the heel tightly with your fingers to the heel 7:05. " Now the glue should cool down and you can grind it
".
4. Then he grinds it using sandpaper on a machine, mentioning that he doesn’t cut thin ones with a knife, because can be torn from place. He grinds it right away - first the rectangles protruding beyond the heel, then along the contour of the heel, then the entire plane along the heel, i.e. together with the glued piece, it brings the heel to a smooth surface. 10:32. He does the same with the second heel.
5. Thick rubber heels - a sheet of shoe rubber with a pimpled one side, it bends poorly. First, the heel template - lays on a sheet of paper, rubs it along the contour with sandpaper until only the heel template remains. Ready 14:49. " Heel rubber, sharpened and polished
“As I understand it, an absolutely flat surface is slightly “ruffled” with fine sandpaper.
6. Then he traces the template on the rubber and cuts it along the contour quite roughly with a knife - apparently how it turns out evenly. He says he leaves about 1mm from the line. The cut is clearly not perfect, just close to a curved line.
7. Throw away the template and cut out the heels with a shoe knife. The internal parts are also cut, placing the rubber on the edge.19:26.
8. Then he immediately showed that both surfaces - the heel and the heel - were already coated with glue and dry. 19:20. He warms up the heel with a hairdryer, applies it, presses it hard with his hand, lowering the shoe internal part something like a “paw”, but it’s just a thick metal rod/pipe. Probably, you can use something like a thick round wooden trunk for “on the knee”. Next, he taps the heel with a hammer so that it gets a good grip. The same goes for the second heel. 21:04.
9. We wait about 10 minutes for it to cool completely, then on a sled we will file the inner semicircular part of the heel on the rough stone “cup” that comes with the machine. I don’t have one, but if necessary, you can probably use a Dremel with such an attachment or use a large attachment with a drill.
10. The last thing to pay attention to is that the shoes must stand exactly at the “heel - toe” level (well, or part of the metatarsus after the toes - depending on what the shoe is supported on), otherwise the foot will hurt.
HAPPENED!! And - yes - a regular hair dryer quite warms up the glue for a strong connection.
Beautiful shoes always attracts the attention of others. Beautiful shoes can surprise more than any other item in your wardrobe. Therefore, the task of fashionistas is to maintain the decent appearance of their shoes for as long as possible. It is worth remembering that most shoes have temporary heels, which were given to the shoes when they were purchased and are intended only for trying on in the store, but to wear them you need to put on new heels for everyday walking.
Despite the fact that many of us do not know how to replace heels ourselves and solve this issue in a shoe workshop, however, in fact, the process is not complicated.
What will you need when replacing heels?
If you decide to change the heels yourself, then prepare a knife, scissors, rubber or polyurethane, a rasp, a screwdriver, special shoe glue and spray paint. It is best to purchase the heel material yourself before replacing heels.
How to replace heels on any shoes - all stages of the process
To begin with, to replace the heel, remove the old heel from the shoe, if it has heel. You can do this with a regular screwdriver. If the heel is empty or hollow inside, then take a material from 4 to 7 mm of medium hardness and trace a piece of material with a pencil according to the shape of the heel. Cut out the heels with scissors.
If the heels are a little worn, they need to be restored before installing and cutting out the heels. You can straighten the heels using a rasp. When leveling, the heel height should be the same. After that, you need to choose nails that will fit. To do this, you need to measure the depth of the channel and the thickness of the heel. The nail thickness should be about 2 mm.
You need to apply special glue to the inner surface of the heel and to the cut of the heel. After the glue has dried a little, repeat the procedure a second time. Let dry a little more, then heat a little over gas stove and press the heel firmly against the heel. Now you can level and nail.
Cut off the remaining tapping material with a knife, and then you can treat the surface of the file. At the same time, the heel will look smooth and even.
After these procedures, you can start tidying up appearance products. To do this, degrease the surface of the heel. Spray it with spray paint, painting over any scuff marks. It is especially good to restore plastic heels in this way.
An interesting way to replace heels with coins
There are very interesting way, which will help you not only change heels at home, but also replace them with super durable material.
To replace the heels you will need drills, an electric drill and coins. To match the diameter of the heel bushing, you need to select a self-tapping screw, which we attach to the heel, using a coin as a heel. To prevent the coin from slipping off, you can attach it with glue before placing it on the heel. Thus, you will receive durable, inexpensive heels that can be easily replaced with your own hands. The main thing is to choose the right size of coin and screw, and use a drill the right size so that the hand does not fall off. Therefore, organize the process of such an interesting replacement of heels with maximum comfort.
At the same time, despite the apparent ease of the steps listed above, it is not always possible to obtain a high-quality result and replace heels the first time. Therefore, choosing professionals and trusting their experience will be the right choice when replacing heels. In addition, shoemakers can supply you with more durable metal heels. Although they do not last forever, they are still much stronger than ordinary heels. Therefore, you can show your ability to work and skill, or you can safely trust the professionals to solve problems with heels for your favorite shoes.