Proper wall finishing with laminate - interesting solutions and technological features. Decorating walls with laminate with your own hands: technology and artistic nuances. Is it possible to decorate walls with laminate?
Wall finishing with laminate can be done in several ways, both with a horizontal arrangement of panels and with a vertical one. Before moving on to describing the intricacies of technology, let’s get acquainted with the types of laminate suitable for wall decoration.
Which laminate is suitable for walls: adhesive, tongue-and-groove or click?
- For adhesive laminate The edges are smooth, without a lock. The adhesive laminate is laid on a flat surface using liquid nails or construction silicone: glue is applied to the back of the panel in a zigzag pattern, a strip is laid, glue is applied to the end, the next one is laid, etc. The glue drips that appear at the joints are immediately removed with a cloth lightly moistened with table vinegar. An adhesive laminate is not suitable for laying on sheathing due to the small contact area with the underlying surface. Floors are laid with adhesive laminate.
- Tongue and groove laminate panels equipped with a tongue and groove lock. It can be laid with glue without gluing the tongue and groove, so that the joints come out dry and always neat. When laying dry, the strips are secured into the tongue groove like lining: with small nails (only for wooden sheathing) or gluer brackets (for wooden and metal lathing). Tongue and groove laminate is suitable for all surfaces of the room: floor, walls, ceiling.
- Click laminate– improvement of sheet piling. The comb in cross-section is pear-shaped; the groove profile matches it. When laying it, the adjacent panel is tilted at about 20 degrees, the ridge of the lock is inserted into the groove, and, turning it towards the base, pressed - the lock snaps into place. Click laminate cladding has increased strength and resistance to warping. In addition to the glue, the click laminate is secured with nails into the grooves of the lock. Clayers cannot be used - the lock will not latch. Click laminate on the walls can be attached with glue to the wooden sheathing.

Laminate is also called MDF panels of the same size as laminate panels. This is very good material, but expensive, so it is not discussed in this article. But all the working techniques and subtleties for laminates based on fiberboard and chipboard are also suitable for MDF.
Tool for work
To cover walls with laminate, you will need some tools used for laying floors. There is no point in using them on the ceiling, because... everything is done there by weight. Click laminate strips can be precisely adjusted when laying using just a tool. It will not be possible to move them with your hands - the comb sits very tightly in the groove.
Technological subtleties
Where laminate is not suitable
The kitchen is not suitable for laminate finishing. Fiberboard and chipboard are inexpensive materials; the raw materials for them do not undergo complex processing. Therefore, laminate from excess humidity and temperature changes, it swells and warps. In the kitchen, fluctuations in temperature and humidity are not only large, but frequent and sharp.
For the same reason, basements, cellars, and closets cannot be finished with laminate. But the hallway is possible. Here the deviations of air parameters from sanitary standards They don’t last long and happen infrequently.
But for a balcony, even a very carefully equipped one, laminate is even less suitable than for a kitchen. On the balcony there are large seasonal fluctuations in temperature and humidity. Therefore, the balcony must be sheathed with plastic lining, eurolining or MDF.
Gaps
Due to the tendency of the laminate to swell when high humidity, with any installation method, it must be laid with a gap (indentation) from the corners of 15-20 mm around the entire perimeter. It is difficult to support it when installing it on a wall with spacer wedges, especially from below, so it is better to do this: lay a flat board or batten along the bottom required thickness. If installation is done using glue, we wrap this board or batten with one layer of thin plastic film. And from the sides you can already use wedges - here they are not loaded with the weight of the skin and will not slip off. Once the sheathing is finished, the gaps are closed with glued plinths.
Glue or lathing?
Most often it is recommended to lay laminate flooring on the sheathing. At the same time, the strength of the finish on any wall is guaranteed and additional sound and heat insulation can be made. But the artistic possibilities of finishing when laying on the sheathing are very limited. To obtain cladding original design The laminate is laid with glue (liquid nails, silicone) on a flat, dry wall without plaster.
Read about the nuances of forming wooden or metal sheathing at the link.
Advice: Many flooring manufacturers, knowing the desires of customers, are already producing special systems for attaching parquet and laminate to the wall. An example of such a solution is in the video below:
How to check if a wall is level?
To do this, you need an even strip as long as the height of the wall without a plinth. Before checking, plaster, baseboards, door and window frames are removed. The rail is led vertically along the wall; protrusions and depressions are marked with a pencil. The protrusions are scraped off or knocked down with a chisel to a shallow depression. Then all the depressions are filled with starting putty and rubbed down.
How to check the “evenness” of the rack itself? Right on the wall. Place the batten flat against the wall and draw a line along it with a pencil. Then we turn the rail 180 degrees and apply the ends to the ends of the line. If the line along its entire length coincides with the edge of the slats, it is even. If a deflection/kink is noticeable, you need another one. This method of checking a ruler is described in school textbook geometry.
Where to start?
Most often it is recommended to start laying laminate flooring from the left far corner and move it clockwise. There is nothing to object to here, but you can add: if you are left-handed, then it will be more convenient to start from the far right corner and go counterclockwise.
Horizontal or vertical?
Laying laminate on the wall is possible in both vertical and horizontal stripes. About the possibilities vertical laying We'll talk later, but for now we'll describe the methods of laying horizontal.
At first glance, laying in solid strips is simpler and cheaper, but it only seems so. The joints, which are in one line, must be covered with skirting boards, and the skirting boards themselves must be attached to the wall assembly nails(dowel-nails). Fastening holes for nails are drilled directly through the joints of the panels. Even if the cladding comes in solid strips along the length of the wall, it still needs to be installed at least every 1.7 m.
Why such complexity and additional costs? The fact is that solid panels will only lock each other in one direction. Without additional reinforcement, such a cladding will tend to fold like an accordion. Mechanical stress on fasteners (glue, nails, gluers) will be concentrated in some places, and in general the cladding will be unreliable.
For good strength, the cladding is laid with a “comb”: the number of strips is cut exactly in half, equal to half horizontal rows. If, say, 10 rows are laid along the height of the wall, we cut 5 strips. We carry out the laying, starting the rows alternately with a whole strip, then with a half. The joints spaced halfway across the length of the strip will evenly distribute the load on the fasteners.

In some cases, laying laminate flooring diagonally looks interesting. To do this, it is better to use a coating of two colors. Naturally, such work will require certain skills and experience.
Variations of vertical laying
The possibilities of showing your creativity in wall coverings increase immeasurably if you lay the laminate on the wall vertically, with glue on a flat, dry surface. The tedious and dusty work of cleaning and leveling the walls is offset by the cost of lathing.
For examples, we will use panels of only two types: long (or solid, if the height of the room exceeds 3 m) - the main ones, and pieces the size of the remaining height of the wall - complementary. Let's take the main and complementary panels of contrasting tones, say, dark and light. Let's see what can happen:
- We will lay out a strip of complementary panels 60-80 cm long along the bottom; We will sew the main ones up to the ceiling. Place a plinth on the horizontal joint. Vertical joints at certain intervals (say, after 3-4 joints) can be additionally secured with pieces of the same plinth, and the same can be run along the ceiling, also lined with laminate. What happened? Romantic, medievalist (medieval-looking) room with imitation ribs and ceiling beams. Instead of torches, linear fluorescent or freon lamps can be installed on the ribs instead of torches.
- We will sew only the bottom with the main panels, and leave a clean bleached strip along the top. For what? Or at least as a screen for lighting design LED strips. Who said that lighting design is only possible on the ceiling? There is no such law, and that’s it.
- We will place a strip of dark complementary panels in the middle of the light wall and decorate it with plinths. We will place paintings, photographs, decorative plates, souvenirs, straw applications, macrame, a collection of decorative weapons, etc., etc. Aesthetic and original.

As an option, cover the wall at the head of the bed with a laminate that matches the tone of the floor.
- We cut the complementary strips to length in a ratio of 1:3 (cut in thirds). We will lay them out along the top and bottom with a comb, and between them there will be the main ones. The result is a light (or dark) surface between two combs - minimal in labor intensity and economical in material, but quite a decent design solution.
- We will purchase the main and complementary strips in equal quantities and cut them into squares. The idea is clear: the walls are in the form of a chessboard. It’s not so trivial if you stick flat symbols on some squares chess pieces made of thick sheet plastic. You can depict a collection of chess studies.
- Let's cut both the main and complementary strips in a 1:2 ratio, and lay out a pattern from them, or simply scatter them in artistic chaos. The result is complete freedom of expression.
In the last option there is a stumbling block: if you lay it down as you please, then there will not be enough space for some fragment at the top, or there will be a gap. Therefore, the pattern (or artistic disorder) must be laid out on the floor in advance, just like that, without fastening, and transferred to the wall in pieces.
What if the room is narrow? In this case, you need to simulate the pattern on the computer in any program computer design, at least in the well-known CorelDraw, number the real fragments accordingly and arrange them in numerical order horizontally.
If you only have basic computer skills, then perhaps it will be easier to cut pieces of thick multi-colored paper to scale, lay them out on the table, and then transfer the numbering from there to the “living” pieces. Of course, you need to put numbers on them back side.
Conclusion
As you can see, covering walls with laminate is not only possible for almost anyone. Laminate also provides ample opportunities for the manifestation of creative abilities for people who do not have artistic education and skills. Even the most cheap laminate Only two tones allow the apartment’s design to express the individuality of its owner.
Video: example of complex laminate cladding of a loggia
Despite the fact that in the video the balcony is completely covered with laminate, we remind you once again that such a solution should be resorted to only if you are deeply confident in the good microclimate of the room, or use more serious laminated panels based on MDF.
Very often in construction, materials that were originally intended for one purpose find application in other types of work. The same thing happened with laminate. This material, as everyone knows, was first used exclusively for finishing floors, but over time, decorating walls with laminate with your own hands gained popularity. In order to carry out this work, you need to have information about some of the nuances that accompany the process, and be familiar with the types and methods of wall fastening. It's about these important aspects we'll talk today.
Types of laminate for wall decoration
There are three types of material that consumers can use for flooring, but not all of them are suitable for walls.
So, of the three types, only two are suitable - tongue and groove. Regardless of which type you choose, in order to achieve good result, you will need an additional tool, this is especially true when laying a click type, since it cannot be adjusted manually. These tools are not useful for installing laminate flooring on the ceiling, because all work is carried out suspended. We recommend you for these finishing works use the tongue and groove type.
Laminate installation tool
To lay laminate flooring, both on the floor and on the walls, you will need the following set of tools:

Material advantages
- Strength. If we compare it with polyvinyl chloride panels, our material is much stronger and can withstand heavy loads, this is especially true when finishing walls.
- Hygroscopicity. Thanks to its special structure and protective polymer coating it absorbs moisture less than, for example, MDF.
- Easy to care for. Unlike regular wallpaper easy to clean, no abrasions or holes are formed on it, correct fastening he doesn't leave the walls.
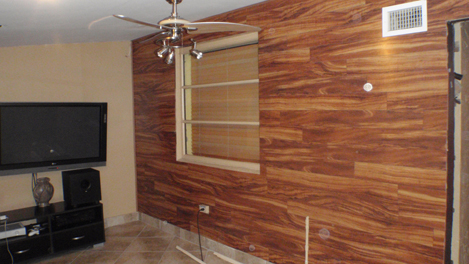
The wall is covered with laminate
Flaws
- Price. Very often, consumers include the price of the material as a disadvantage, which is really high compared to others and differs significantly, but this is compensated by the reliability, durability, and aesthetics of the coating, so this disadvantage is very controversial.
- The weight of the structure. Strength almost always means a lot of weight, so you have to calculate when attaching similar material on a vertical surface these are its characteristics.
Where laminate is not applicable
Possible only if your balcony is glazed and insulated, but the best material there will still be a lining. It does not respond very well to constant temperature changes, high humidity, and exposure to chemical liquids. Because of this, laminate is rarely used in kitchens, bathrooms, and toilets. It is not at all reasonable to lay it in cellars, basements, closets, not so much because of their unstable performance, but because of the high cost of the material.
It’s much easier and cheaper to finish the walls there ordinary plaster and paint. laminate is often used. The material lasts there for quite a long time, despite the fact that it is susceptible to contact with moisture. Its strength, aesthetics and durability can transform a secondary space into a chic and cozy corner. But optimal place the applications will still be the main residential areas. In the bedroom, living room, dining room, nursery, office - this material will “feel” great.
Some subtleties to consider
Laminate wall decor
When laying laminate flooring on any surface, gaps of up to 2 centimeters should be left to prevent deformation of the coating if the material swells under high humidity. When laying on walls, it is difficult to achieve the desired result using wedges. To make your work easier, experienced builders They put down a rail or a flat board, which is simply removed after installation of the structure. You can easily hide the remaining gap behind a plinth, which is glued after all work is completed. Fastening is possible only on a surface with increased strength - installation of such structures on glued drywall or plaster is not recommended.
Moisture is the enemy of laminate flooring, so finishing walls with laminate in the kitchen, bathroom, or toilet does not make sense. Rigid fixation is not applicable to this type of finishing, since, expanding when adapting to the room, the material must have room to “shrink.” If you chose click panels, then remember – fastening in locks is not applicable!
Fastening
There are three ways to attach panels to the wall:
- Glue.
- On the sheathing.
- For production systems.
They mainly use the method of fastening to the lathing, which allows not only to decorate the walls in an original way, but also to additionally produce sound and thermal insulation. If your idea is original and fastening to the sheathing deprives you of such a design solution, you can resort to fastening with glue, most often liquid nails or construction silicone are used.
It should be remembered that such installation is carried out only on a flat, dry, clean surface without finishing or even plaster. If your financial capabilities are not limited by any amount, then you can safely purchase a branded fastening system for wall work on finishing panels and parquet.
The instructions say that before starting work on installing the material, you need to make sure that the walls are even. This can be done using improvised means, running a long strip along the walls. Where you notice any unevenness, mark it, then eliminate the defect with putty.
It is recommended to start from the left corner, but this is a rule for right-handers; lefties will find it more convenient to start from the right. Before you start work, you should decide how you will lay the material - vertically or horizontally?
If you choose the classic, horizontal method, we recommend alternating laying a whole strip with two halves, this way you will achieve greater structural strength. All gaps after installation, as mentioned earlier, will be hidden behind the baseboards.
Vertical placement of strips using glue opens limitless possibilities to realize all your creative ideas. You can alternate not only stripes of different colors, but also play with their length. If your imagination doesn’t run wild, for some reason, then you can look at many options that you can easily use both independently and with the assistance of outside help. If your wall that you are going to finish in this way is not large sizes, you can even assemble the structure in the form of a shield on the floor, and then attach the whole thing directly to the wall.
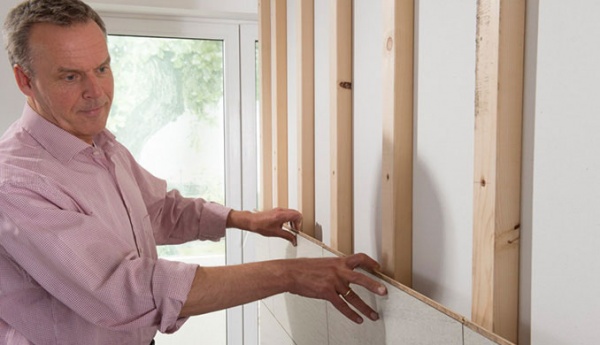
If your wall is so uneven that you can’t simply fill in small areas with errors, you simply need lathing. The pitch of such a frame is not allowed to exceed 60 centimeters. The material for it can be either wooden beams (4*4) or a metal profile.
We have tried to outline all the nuances that may put you in a difficult position, but if you have additional questions, either people who have already done this or specialists who will be happy to take on this work will be able to help you. The main thing when starting any work is to remember that nothing is impossible!
A practical floor covering is the original purpose of laminated boards. The ideas of designers have stepped forward; the latest trends in interior design are wall decoration with laminate. The reason for the popularity was the high operational properties material combined with originality and aesthetics. Classification, characteristics, finishing options and the procedure for installing laminate on walls will be described below.
Distinctive features of laminate
Selection preferences finishing material for flooring in favor of laminate is quite understandable. Easier maintenance compared to carpet, no traces of furniture movement, durability - these are the main advantages of covering with laminated boards. Over time, when the majority experienced the benefits of laminate flooring own experience, its use in wall decoration has become a trend. Key advantages of the material include the following points:
- Environmental Safety.
- Long service life (over 10 years).
- Laminate is not able to absorb odors and accumulate dust.
- The variety of textures and colors allows you to create an interior with individual finishing walls
- Easy installation.

Numerous advantages come with some disadvantages:
- When finishing walls using laminate, it may become deformed as a result of high humidity.
- Laminated boards are susceptible to fading and swelling in the heat and cracking when exposed to low temperatures.
- Relatively high cost of laminate. Compared to wallpaper, paint, and plaster, it loses in price terms, but the use of MDF panels in wall decoration will cost even more.

Material classification
Laminate can be classified according to several criteria: method of fastening, resistance to mechanical stress, which accordingly affects the thickness and price of the material. Mounting method is one of important characteristics when choosing material for wall decoration. Distinguish the following types laminate:
- Glue. In this case, there are no locks on the laminated board; the elements are fixed to each other by gluing. Wall mounting can also be done using liquid nails or silicone glue. It is not difficult to create a finish with adhesive panels; difficulties will arise during dismantling, especially if the task is to maintain the integrity of the parts.
- Sheet piling. In this case, the panels contain tongue-and-groove locks, allowing minimal joints to be left between the elements. To finish the walls, you will need to make a lathing; using clamps or small nails along the shunt groove will help create a reliable fixation. This method allows you to decorate even the ceiling with laminated boards.
- Clicky. It has a specific fastening system, which is an improved version of the tongue-and-groove lock. To connect the panels, the laminate is placed to the installed board at an angle of 20°, after which the grooves are joined and snapped into place. When finishing walls, installing lathing is also necessary. The strength of the panels can be increased by additional treatment with glue.
The rule of matching price and quality for laminate flooring is especially relevant. Therefore, if you want to get durable wall decoration, saving on cost is not recommended. The characteristics of resistance to mechanical stress are determined by the class of the laminated board.

Advice! The load on the floor is significantly higher than on the walls, so for flooring they stop at class 33 or 34 material. To finish the side surfaces, it is enough to purchase panels with a class from 21 to 31.

Nuances of choice
When choosing a laminate for finishing a room, you should take into account various factors that will influence it during operation. Compliance with the style of the interior is also important.

- It is better to postpone finishing the walls of a children's room until a later period, when the child grows up. Replacing damaged panels will result in a large sum, you can temporarily use less expensive interior design options.
- Having a cat with a habit of marking territory is a serious limitation for installing laminate flooring on walls. Over time, it can swell at the joints and gradually absorb an unpleasant odor.
- When planning to use laminate for wall decoration, consider the interior of the room. The color and texture of the panels should match the furnishings; it is preferable to decorate a small room with light shades.
- Please note that installation of adhesive panels requires a perfectly flat surface. It is better to cover significant differences on the side surfaces with lathing.


Design options for various rooms
Depending on the room where you plan to install laminate on the side surfaces, we offer various options its application.
Corridor
There are two main methods for decorating corridor walls with laminated boards. In the first case, they start from the length of the panels, combining laminate with other material along the entire perimeter of the room. The second approach to interior design is to form an accent wall where the main hallway furniture is installed.

Comment! Installing panels on a horizontal plane contributes to the visual expansion of the room; this method is suitable for corridors with high ceilings. Traditional vertical fixation visually raises the ceiling.

Kitchen
When decorating kitchen walls, laminate is usually located in the apron area. The choice of shade directly depends on the facade of the furniture; its combination is the key to a harmonious interior design. It is easy to care for such a surface due to the stability of the material before treatment. chemicals to maintain cleanliness.


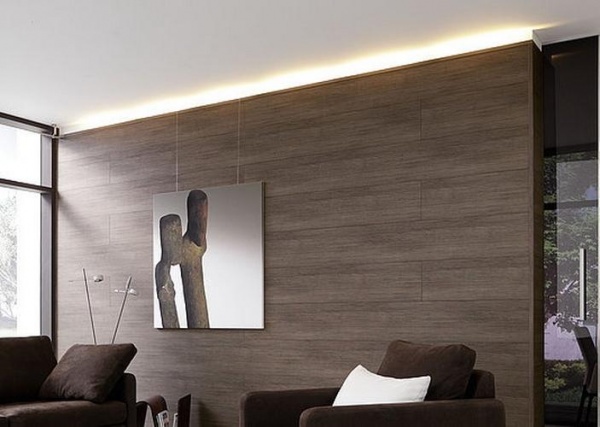
Living room
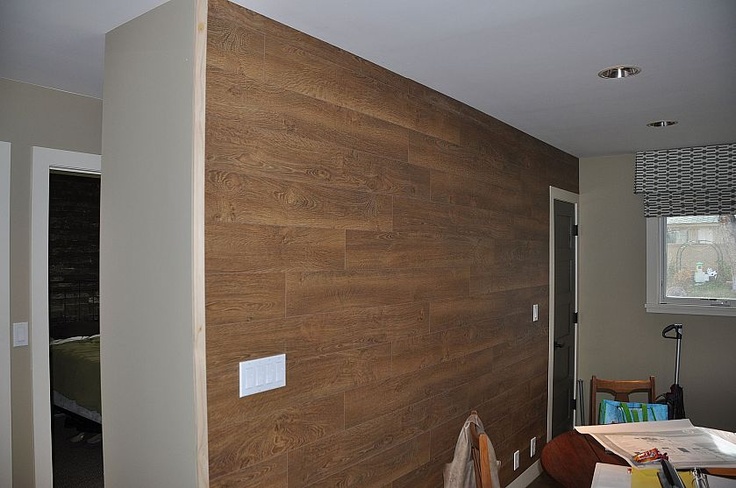
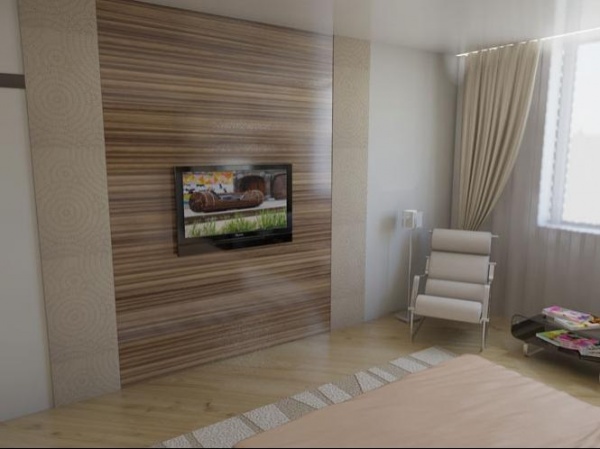
Fully finishing the side surfaces of the living room with laminate is inappropriate. Dosed design of an accent wall is the most correct solution when designing a room. Mostly panels cover the area behind the TV.

Individual details in the form of lighting or shelves with souvenirs will be an interesting addition to the interior. The classic approach is vertical or horizontal wall decoration. Diagonal fastening is less common due to the complexity of fastening and increased material consumption.

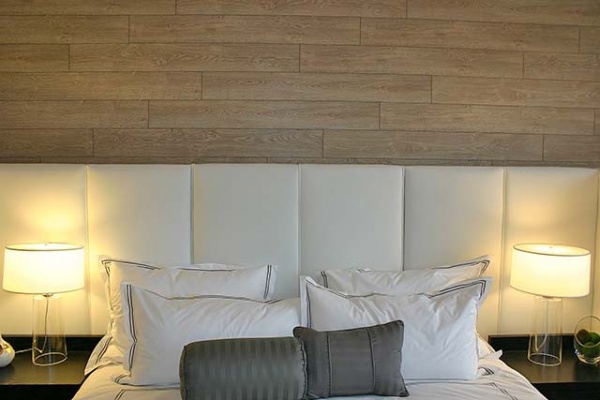
Bedroom
Laminate flooring looks no less original accent wall bedrooms. Typically this area is located behind the head of the bed. Formation harmonious interior The combination of the shade of the furniture with the finishing material contributes. Similar to the design of the living room, they are mounted on the wall lighting or shelves with your favorite accessories.


Loggia or balcony
The use of laminate as a finishing coating for balcony or loggia surfaces requires a careful approach.


Attention! Elegant finishing long time will retain its attractiveness if there is high-quality thermal and waterproofing of the room. In the absence of proper conditions, the material can become deformed without the possibility of recovery.
Attics
Decorating the attic walls using laminate looks organic. In addition, the designers have gone further, or rather higher, and propose using the material to cover sloping ceilings. The wood texture of laminated panels will fit perfectly into the decoration country house, contributing to the formation of an atmosphere of closeness to natural conditions.

A quick overview of laminate applications in various rooms testifies to its inexhaustible potential for wall decoration. Having familiarized yourself with the nuances of fastening, stop at suitable option It will be easier.

Selected moments of the installation process
When choosing various types Laminate for wall finishing should take into account some nuances:
- The adhesive laminated panels are attached to a perfectly flat surface. Pre-installation of plasterboard sheets on the wall will help achieve the desired result. But still adhesive material It is rarely used when decorating walls.
- The blade laminate is fixed to the sheathing by smearing both surfaces with glue, after which the panels are secured with miniature nails into the lock's tenon. An alternative when finishing walls can be the staples of a construction stapler.
- The process of installing tongue and groove laminate is similar to working with a blade type of material.
Performance qualities of laminate and wide choice color solutions, textures and patterns, relative simplicity installation makes you think about its possible use for wall decoration. Of course, first of all, this is a floor covering, popular and in demand, and not very often used as a wall covering. However, laminate can add interesting and fresh “notes” to the design of a room precisely when it is not used for its intended purpose. Which laminate to choose for installation on the wall and what are the specifics of such installation?

Arguments for"
At first glance, the idea of decorating a wall or niche with laminate looks unexpected. However, if you look at it, there are strong arguments in favor of such a decision:
- Beautiful appearance. Some models of this coating are difficult to distinguish from natural wood valuable species.
- Wear resistance, strength and long service life. Upper protective layer perfectly protects the laminate from external influences.
- Antistatic.
- Simple installation that literally anyone can do.
- Easy care of laminate flooring during use.
- Affordable price for a material with such characteristics and appearance.
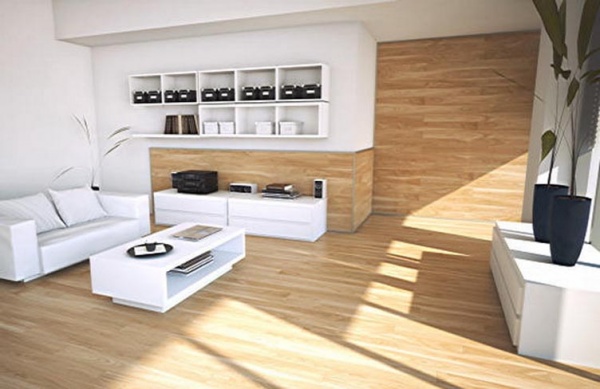
This coating has all the qualities to become part of the original and stylish design rooms, even if not in a very familiar “role”. Laminate on the floor and on the wall, matched in one color scheme, will help to visually expand the room.
Choosing a laminate for wall decoration
Important! To decorate walls, you should choose a low-class coating (21-23) - it will experience virtually no stress. This way you can save a decent amount. It is important for you to choose a material that matches the color and pattern of your design ideas. However, it is quite difficult to buy low-class laminate; stores try not to keep it in stock.
The choice of panel connection option (adhesive or locking) depends on the class of the laminate. Covering classes 21-23 are not available with a Click-lock; laminate of this class has only an adhesive connection. Laminate with an adhesive connection is mounted on a leveled surface, and the adhesive is applied in a zigzag pattern to the back side of the panel. Then glue is applied to the end of the panel and the next one is laid. Excess glue is immediately removed with a damp cloth, which is soaked in a weak solution of vinegar. A block is placed under the bottom panel as a stop so that the structure does not start to slide down.
Laminate flooring with Lock and Click locks is attached to the wall using liquid nails and clamps. Clamps are galvanized staples; they vary in size and shape. One type of clamp has teeth that are driven into the end of the panel and fixed with screws or nails to the sheathing or wall, the other has a flat protrusion that fits into the groove of the panel. Clamps are specially designed for fastening lining, laminate and other similar coverings to walls, providing a very reliable fastening.


Advice from experts. Lock connection Panels with Lock and Click locks do not need to be coated with glue. But experts strongly advise using gel for laminate flooring - the gel will help maintain the elasticity of the joint.
Where and how will we use it?
Let's start with rooms where laminate flooring should not be laid on the walls. This is a kitchen, a bathroom, an uninsulated balcony, a basement in country house. Changes in humidity and temperature will negatively affect the material, and it will quickly lose its appearance.
Traditionally, laminate is used to decorate walls in the hallway to the height of the panel. They decorate part of the wall above the head of the bed in the bedroom with this coating; they make it from laminate decorative panels behind the TV in the living room, niches are being trimmed. The difference in shades of material in the same color scheme on the floor and on the wall creates an interesting effect.


Features of the installation process
Laminate is intended for laying on the floor, and the technology for installing it on walls, taking into account all the features of this material, has not yet been fully developed. Only recently have some manufacturers begun to produce special frames for attaching this coating to the wall.
One group of experts cites a large practical experience and in videos posted on the Internet he demonstrates fastening with liquid nails, clamps and even self-tapping screws and nails. Some manufacturers (for example, Egger) show in video instructions that the first panel from the bottom is fastened with self-tapping screws at the bottom, and nails are hammered in the upper part (this is how the lining is attached).


Another group of specialists claims, and claims with good reason, that the coating cannot be fixed rigidly, which is why it is called a “floating floor.” A twisted screw or a hammered nail is not very compatible with the concept of a “floating floor”.
The truth, as usual, is somewhere in the middle. There is no point in refusing to use laminate as a material for decorating walls based on the theoretically correct judgments of the second group of specialists. But these judgments cannot be completely ignored either.
Important! During installation, try to avoid rigid fixation of the panels. How to do it? For example, the top panel in the structure is rigidly fixed to a metal sheathing using clamps. Next, the panels are secured with clamps with a flat protrusion, but the clamps themselves are not screwed to the vertical rail. Fixation is carried out only on panels of the 6-7th row, which gives some mobility to this part of the structure.
With the adhesive method of fastening, the wall surface must be dry and very smooth. You cannot attach the material to drywall that is simply glued to the wall - the entire structure will collapse under the weight. It should be remembered that laminate is a fairly heavy material.

For fastening to the sheathing, the pitch of the bars should not exceed 600 mm. For vertical installation laminate, the sheathing bars are positioned horizontally, and for horizontal lathing, the bars are mounted vertically.
A distance of about 10 mm should be left between the laminate structure on the wall and the walls in the room. The same distance should be between the structure and the floor. To maintain this distance, plastic wedges are used.
When laying laminate on a wall horizontally, it is necessary to maintain a checkerboard pattern or offset the next row by one third of the panel. Everything is the same as when laying it on the floor. With one long vertical seam, the load on the fastener increases. It is more convenient to start installation from the left corner of the wall and move to the right. However, it is more convenient for “right-handers” to work this way; it is more convenient for “left-handers” to start from the right corner.
Conclusion
You should avoid using laminate to decorate walls in rooms with large differences humidity and temperature.
Each person upon completion repair work I want to see an original result that will create warmth and comfort in the room. Modern masters They propose to finish the walls with laminate - a flooring familiar to everyone. This solution allows you to cover a room with wood, selecting the necessary texture, getting rid of the shortcomings of lining or MDF panels.
Before you decide to original method cladding, you need to weigh the pros and cons. Wall finishing with laminate has a number of important advantages. Let's look at the main ones:
- Modern fiberboard-based coatings are made from safe materials that are tested and certified.
- Laminate cladding allows for long years forget about repairs thanks to the strength and durability of the panels.
- On the wall, the flooring will be exposed to less impact, which is why you can purchase the most inexpensive types(classes 21-31).
- Modern market building materials offers a wide selection of laminate flooring with a variety of textures. Thanks to this, you can easily cover the wall with the most suitable slabs in color and texture.
- Installing laminate flooring is not a very complicated process. At the same time, caring for it is even easier. Thanks to the special coating, after completing all the facing work, the walls will simply need to be periodically wiped with a dry cloth to remove dust.
So, if you have an idea to decorate a room with wood, then it is best to use laminate for this purpose. It always looks quite organic, but is not demanding in terms of care. Despite all this, laminate finishing does have a few minor drawbacks.
Firstly, it quickly absorbs water, due to which it can subsequently swell and crack. Because of this, it cannot be used in damp areas. Failure to comply with these simple rules may lead to destruction of the top decorative layer.
Secondly, cladding with fiberboard-based boards is unacceptable in rooms with frequent temperature changes.
Choosing laminate for walls
Any construction and repair work using non-standard solution imply a painstaking selection of materials. Finishing walls with laminate determines some features that must be taken into account when choosing slabs. Let's consider each factor separately.

First you need to choose a suitable locking system. Adhesive laminate means there are no physical latches. Due to this, there is no need to struggle with the correct joining of the plates. Fixation to the wall is carried out using construction adhesive. This option has one small nuance: when joining the plates, excess glue may appear. The excess must be removed immediately with a cloth so that it does not have time to dry and spoil the decorative layer.
Tongue and groove laminate differs in that it has special locking connections. Due to the convex parts at the edges, the slabs cling to each other, without requiring additional gluing of the joints and forming a dry, rigid connection. With this type of fixation, panel strips can be secured in the groove with nails or special brackets and gluers. In this case, installation is carried out on a lathing made of wood or metal. Finishing with tongue-and-groove laminate is ideal for walls, as there is no need to bother with gluing the joints.
If you plan to have additional impact on the wall in the form of a shelf or lamp, then another type of connection is best suited. Click laminate is an improved version of tongue and groove laminate, as it has a more durable lock, which snaps into place at a certain angle.
Another factor that is worth paying attention to is the strength class, which determines the cost. The slabs must have a texture suitable for the interior, but they will not be subjected to special loads on the walls. There is no need to buy wear-resistant laminate with high abrasion resistance, which is classified as class 33-34. 21-31 will be enough.

So, in order to choose suitable laminated boards for walls, it is necessary to take into account three main factors: planned loads (it is worth paying Special attention on the quality of the top decorative layer if pets live in the house), interior style (predominant colors, their saturation), as well as the installation method and class of slabs.
Existing installation methods and necessary tools
Covering both floors and walls with laminate does not imply complex work. Tools you will need:
- ruler, square, pencil, level and tape measure for making marks, taking measurements, monitoring the orientation of a particular slab in space;
- small hammer;
- hacksaw or electric jigsaw;
- a wooden block (often called a boss) and special spacer wings to create gaps between the slabs and vertical surfaces.
When the basic set of tools is at hand, you can proceed to choosing the installation method. There are two fundamentally different methods for fixing laminated boards to the wall. The adhesive method is suitable for all types of laminate. It allows you not to have to worry about special fixation, but requires preliminary leveling of the walls with plaster. If this is not done, the panels may lie unevenly, and gaps will be visible in some places.

Based on this, glue method although it is the simplest, it still has a large number of nuances. However, it may turn out to be more expensive due to the need for breeding plaster composition, leveling walls, using glue.
The second method involves creating a special sheathing. It may seem that this method much more complex and too time consuming. Actually this is not true. First of all, there is no need to fuss with plaster or drywall. There is also no need to thin the glue. This allows you to make laminate finishing more economical. Secondly, it becomes possible to insulate the walls and increase their sound insulation by using the necessary materials in the gap between the wall and the slabs.
Considering the growing popularity of lathing when installing laminate, modern manufacturers of floor (and in this case, wall) coverings create special fastening systems that speed up and significantly simplify the installation process.
General sequence of actions for installing laminate flooring on a wall
The process of fixing the panels is not particularly labor-intensive, but it requires the person performing it to strictly follow several rules and the following sequence of actions:
- Calculation required quantity slabs for cladding. Calculations are carried out using a fairly simple formula: 10% is added to the working surface area for cutting and fitting.
- Surface preparation. If applicable glue method installation, the wall is plastered, leveled, and cleaned of dirt. In addition, you can use drywall to remove surface unevenness. In the case when it is necessary to create a sheathing made of metal or wooden slats install the frame. You can also purchase a ready-made mounting system.
- Select a starting point and proceed directly to installation. At this stage, either the panels are fixed to the wall using glue, or they are attached to the sheathing using nails or special brackets - gluers.
- The final stage. Installation of plinths in corner places, as well as at the junction of planes.
Thus, wall decoration with laminate - modern way give the room an original appearance. In this case, it is worth talking about the ease of installation of the panels, as well as the fact that they subsequently do not require special care. At the same time, it is possible to obtain any desired texture and color, ideally suited to other interior elements.