Installation of interior doors from A to Z. Do-it-yourself installation of interior doors: nuances of the process and execution algorithm
How to install an interior door, video and photo
Interior doors not only delimit space into separate zones, but also decorate the interior and create a mood. The design should be comfortable, safe and practical. When purchasing a block in a store, installation services are usually offered, but knowing how to install an interior door, you are quite capable of doing the work yourself.
Variety of shapes, opening methods, materials and stylistic decisions allows you to choose an option for any room according to the owner’s preferences.
Doors to the room are made:
- made of wood, plastic, glass, aluminum and their combinations;
- swing, sliding, folding, sliding, double-leaf;
- symmetrical, right, left;
- deaf, glazed;
- with or without threshold;
- paneled, panel, frame.
The surface is finished with plastic, veneer valuable species wood, laminate, leather, textiles. Cover with paints, varnish, enamel, paste over decorative films.

Before installing an interior door with your own hands, determine what is included in the kit and its design features.
What is included in a complete set of interior doors
The standard set of single-leaf swing structures includes:
- door leaf;
- box;
- platbands or capitals.
Additionally, the manufacturer may include in the kit:
- extras;
- threshold;
- crossbar;
- closers.
Sliding options are equipped with metal guides, rollers, a lower guide and a thrust mechanism. Accessories are usually purchased separately.

In typical apartments, the openings are standard - height 2060 mm, width 700, 800 or 900 mm, wall thickness 80 mm. Ready-made kits of the most common sizes are available for sale. In private homes, dimensions may be different. Then the door blocks are made to order.
Step-by-step installation of interior doors
How to install an interior door is a simple task for an experienced installer. But even a craftsman who knows how to work with wood is quite capable of it.
The purchased door is unpacked and carefully inspected to ensure the color of the components matches, the integrity of the corners, glass, and mirrors. After installation, the store does not accept quality claims.
Installation of interior panels includes the following steps:
- dismantling the old door and preparing the opening;
- insertion of fittings into the canvas;
- inserting the striker and hinges into the box;
- assembly door frame;
- installation of the block in the opening;
- hanging the canvas;
- installation of additions and platbands.

Before installing doors in new buildings, walls, partitions, rough or finished floors must be ready. If an old structure is being replaced in a room, the canvas can be hung on existing box if she is in satisfactory condition.
Dismantling the old box and preparing the opening
Dismantling old box start with the canvas. A pry bar is inserted into the lower gap near the floor or threshold and, pressing lightly on it, the door is opened slightly. The panel is lifted and removed from its hinges.
Using an ax and a hammer, the platbands are separated from the box. They file down the post in the middle of the opening, dismantle the vertical boards and the crossbar. Construction garbage deleted.

Before installing the interior door frame, prepare the opening. The standard gap between the block and the wall is 10-15 mm.
- 600x2000 mm - 680-700x2050-2070 mm;
- 700x2000 mm - 780-800x2050-2070 mm;
- 800x2000 mm - 880-900x2050-2070 mm.
If the dimensions of the opening differ on a smaller side, it will require its expansion or cutting of the canvas. Changing the width of the door is equivalent to redevelopment; for this you need permission from the BTI.
IN load-bearing wall It is prohibited to enlarge the opening. In non-load-bearing partitions, the width can be changed to 2 m, but a reinforcing lintel or metal frame around the perimeter of the door block will be required.
To narrow the opening, wooden blocks 50-70 mm thick are used. They are stuffed around the perimeter of the box. To reduce the width by more than 10 cm, the wall is laid with blocks, bricks, or a false partition is made of plasterboard.
Important. The thickness of a standard door frame is 70-86 mm. If the depth of the opening exceeds this value, additional boards are used to refine the gap.
Inserting fittings into the canvas
Before installing an interior door, the necessary fittings are cut into the panel - hinges, locks and handles. Common types of loops:
- straight;
- corner;
- hidden;
- screw-in
They are installed by inserting, screwing or laying on the canvas without preliminary preparation of the nest. Depending on which hand the door is opened with, the hinges can be left- or right-handed, universal. It is important not to make a mistake in their location, otherwise it will be impossible to correct the defect after installation.
The hinges are fixed at a distance of 150-300 mm from the top or bottom of the canvas. First, trace the outline of the fittings with a pencil, and use a chisel or hand router to select a recess corresponding to the thickness of the element. Make sure that the surfaces of the hinge strip and the door are located at the same level.
If the landing area is too deep, cut out a rectangular spacer from thick cardboard and place it under the loop.
The insufficiently spacious nest is carefully expanded and deepened. The final processing is carried out with fine-grained sandpaper.
The loop is secured to the canvas with self-tapping screws 35 mm long, which are usually supplied with fittings. The holes are marked with an awl and pre-drilled. The fastener caps are slightly deepened.

Step-by-step sidebar loops
After installing the hinges, mark the location of the handle and lock. 90-100 cm retreat from the bottom of the canvas, apply the contours of the side strip to the end of the door. The groove under the body of the locking device is made in the same way as the hinges.
Place a lock in the seat, mark the contours of the decorative strip and select a groove. After drilling the hole for the handle, secure the fittings with self-tapping screws.
Markings for attaching hinges to the door post can be done in two ways:
- on a fully assembled box;
- on a hinge stand.
In the first case, the structure is assembled, observing the technological gaps between the canvas, the top bar of the box and the floor plane or threshold:
- 3-4 mm from above;
- 8-15 mm from below.
The canvas is placed in a box and the markings of the loops are transferred to the side beam.
In the second case, the stand is cut with a miter saw at an angle of 45°, observing the necessary allowances. Apply to the side of the sash and mark the contours for the second “wing” of the hinges. Carefully select the grooves with a chisel, drill holes for the screws and secure the fittings. Similarly, mark the grooves for the lock strike plate on the other frame beam and install the part.
Important. For elements thinner than 8 mm, no recess is prepared.

When the racks have already been made to the required size, the top beam is sawed down. To do this, add a technological gap of 6 mm to the width of the web - 3 mm on each side. The excess is cut at a 45° angle using a miter saw or miter box. The bottom of the racks does not need to be touched.

The elements are assembled in the shape of the letter P, connecting at the joints with three self-tapping screws 45 mm long. They are screwed in straight or at an angle, having previously prepared holes with a diameter of 4 mm. If this is not done, there is a high risk of wood splitting. The threshold is installed in the same way as the top bar, maintaining a gap of 4 mm at the bottom.
Door frame installation
The assembled structure is mounted in the opening. If the box is narrower than the partition, it is placed flush with the wall of the room into which the door opens. Strictly monitor the verticality of the racks and the horizontal position of the top bar. Fix with wedges from scraps or bars, fasten to the wall with self-tapping screws to a depth of at least 30 mm.

Over time, the structure may shrink and the fabric may sag. Experts recommend how to install an interior door with your own hands, so that you can later adjust its position. To do this, screw in self-tapping screws in the places where the hinges and lock are installed. Firstly, the heads of the screws will be hidden under the fittings, and secondly, if necessary, slightly unscrew the fasteners and re-position the box without compromising its integrity.
Hanging the canvas and foaming
After the block is securely installed in the opening, hang the canvas - insert one part of the loop on the panel into the other on the box. Each part is secured temporarily with two self-tapping screws.

To prevent the sash from warping, the position is fixed using 3 mm thick cardboard spacers. They are inserted into the gaps between the canvas and the racks.
Sometimes craftsmen additionally install spacers. This will help avoid deformation of the racks when the polyurethane foam expands. Before foaming, the box and part of the canvas are sealed masking tape so as not to stain the surfaces of the structure with sealant.

Foaming the box
Installation of platbands and additions
Sometimes, before installing platbands on an interior door, installation of additional parts - extensions - is required. They are glued into the groove, which is formed by a quarter and a strip or solid board, attached with outside boxes.
In sloping openings for installation of extensions, a frame is made of slats glued or screwed to the wall. The top board is laid on vertical elements. The voids are carefully foamed.
Platbands are installed according to the following scheme:
- the upper part is applied to the installation site, marked and sawed off at 45° angles;
- fasten the element with thin finishing nails 25-40 mm long, deepening them by 1 mm;
- install the side trims, fixing them with fasteners every 100-150 mm;
- mask wax pencil holes.

By using telescopic L-shaped trims, you can do without nails.
After installing the platbands, check the operation of the locks, the size of the gaps, and the tightness of the closure of the canvas. Visible fasteners are masked with plugs.
Self-assembly and installation of interior door units does not require highly qualified or special skills from the performer. Serial connection of parts in accordance with the instructions and careful installation in doorway will allow you to get a satisfactory result even with the efforts of a beginner. You just need to stock up on the necessary tools and patience.
Methods for installing interior doors
There are different ways to install a door between rooms. It all depends on what its design is and what material it is made of. door block. A significant role in choosing one installation method or another is played by its intended purpose. If this is, for example, a door to the living room, then special strength is not required. But if the door separates the passage corridor from the server room, in which high-sensitivity devices or units with voltages exceeding 1000 volts are located, then in the interests of safety it is advisable to install a high-strength door. Accordingly, the installation method in the second case must meet completely different requirements.
Exist following methods fastening the door block in the opening.
- Fixing the frame on the mounting foam. The simplest, but not the most reliable way installations. Suitable for lightweight doors made of small fiberboard or MDF.
When dry, the polyurethane foam firmly glues the door frame to the wall opening
- Installation door frame on brackets. As a rule, all plastic doors (as well as windows) are installed in this way. Metal plates are used as brackets, which are used for suspended ceilings. The thickness of the direct suspension ranges from 1 to 1.5 mm, so the mount is quite rigid. The main disadvantage of this method is the need to plaster the place where the bracket is attached. The method is applicable when the walls have not yet been finished.
Ceiling hanger is used as a bracket to fix the door frame
- Hidden installation, i.e. fixing the door frame under the hinges in three places. The rest of the space is filled with foam. The result is a fairly strong and invisible mount to prying eyes. The frame suspension points are located in the following order:
- two - under the hinges;
- one is under the counter lock plate.
- End-to-end method. Installation is carried out using screws or anchors. Holes are drilled in the frame through which it is attached to the wall. Typically, two to four fixation points are used on each vertical post and one to two on the vertical bars. To prevent the holes from being visible, they are covered with plastic plugs on top. This fastening is considered the most durable and is used for heavy doors, including metal and armored ones.
With direct fixation, the frame is firmly attached to the wall and can support a heavy and powerful door
- Fixing the door frame on hinges. New way, developed relatively recently. Its essence is that the box is suspended on special hinges. Anchors are installed at the ends of the opening, and metal hinges are screwed onto the frame. During installation, the loop is placed on the head adjustable bolt. This method is good in cases where the doorway is uneven. Installation is very fast.
A set of simple fasteners allows you to install the door in a matter of minutes
In practice, several methods are often used simultaneously, and they also combine and combine fixation methods depending on the specific situation. In any case, polyurethane foam is almost always used today; it serves not only as fasteners, but also as a heat-insulating and sound-absorbing layer.
Video: technology for quickly installing doors in 15 minutes
What is required to install an interior door
As with any other installation work, for a successful installation interior doors Special tools and consumables are required.
Required Tools
When starting to independently install interior doors, you need to arm yourself with the appropriate tools:
- electric drill with a set of attachments (for screws with various slots);
- a set of wood drills (the larger the range, the better);
A distinctive feature of a wood drill is its sharp tip.
- hammer drill (if fastening is carried out on anchor devices);
- electric or hand furniture saw ( perfect option- miter circular saw);
Using a miter saw, blanks for the door frame, trim and additional elements are quickly and efficiently prepared
- Pobedit drills or drills for concrete (diameter 4 and 6 mm);
- miter box, a set of chisels of different widths;
The miter box is designed for cutting parts at different angles
- measuring instrument - hydraulic level, tape measure, square, etc.;
The accuracy of measurements during the assembly of interior doors is reflected in the quality of their further operation.
- knife, pencil, marker.
You will also need consumables:

What cutters are needed to install interior doors
If you have the opportunity to purchase or rent a router, you should definitely take advantage of it. By using hand router sampling for hinges and locks is significantly faster. There is no need for chisels, and the quality of the grooves improves. In order to optimize the process, it is advisable to use small diameter cutters. Thanks to this, you will have to cut less wood at the corners by hand. For example, a cutter with a diameter of 9.5 mm is ideal for door hinges. To remove the lock, a groove cutter of appropriate length is used (to the depth of insertion of the locking device).
The main characteristics of a groove cutter include the height and diameter of its working part, as well as the size of the shank for clamping the router
The average installation time for one door for a professional carpenter is 2 hours. If the hinges and lock are cut manually without using a router, this time increases to 3 hours.
Box trim saw
A few words about electric saw. When installing one door, of course, there is no point in buying a “circular”, especially an end door. You can use regular hand saw with a small (furniture) tooth.
Using a saw with small, straight teeth, you can make even and clean cuts of parts.
But if there is construction or reconstruction of an entire apartment in which from 5 to 15 doors are installed, you can at least think about renting tools. The quality and speed of assembly using a miter saw increases several times. Much also depends on the type of doors and trim. Some have to be adjusted to the required dimensions, others require virtually no cutting.
Preparing the opening for installing an interior door
The main task in preparation doorway is:
- removing excess materials from the end of the wall (residues of polyurethane foam, plaster, broken bricks, etc.);
- creating the right geometric shape holes in the wall (rectangle, not trapezoid).
If the brickwork is in poor condition, it must be plastered with cement mortar.
In new buildings, doorways should theoretically have dimensions close to standard. However, in practice this does not always happen. In a house or apartment where reconstruction is taking place, the old doors must be dismantled before installing new ones. If the opening is damaged, it must be restored - leveled and plastered.
The quality of installation of the door block is influenced by the following geometric parameters of the opening.
Height
The height is measured from the “clean floor”, i.e. from the level of the finishing floor covering - laminate, tiles, linoleum, etc. It is necessary that the height is the same over the entire plane. A similar requirement is imposed on the floor - there should be no bumps or holes on it, especially if the door being installed does not contain a threshold in its design - all defects will remain visible. The height of the opening should be 6–7 cm greater than the vertical size of the door itself.
The dimensions of the doorway must take into account technological tolerances for installing the frame and the required installation clearances
Width
The width of the opening is subject to similar requirements - it must be the same along the entire height of the door. Vertical planes should be located at right angles to the floor and be parallel. If this is not the case, the sidewalls need to be leveled. The width of the doorway is determined based on the width of the door leaf - 10 cm is added to it (5 cm on each side).
Thickness (or depth) of the opening
An important condition that must be observed when preparing the opening is that the end must have rectangular shape. In the lower part, at the intersection with the floor, a right angle (90°) should be formed. If the thickness of the walls is not the same, cracks will form under the platbands, which, in fact, is a defect.
Video: preparing a doorway before installing an interior door
Do-it-yourself interior door installation: step-by-step instructions
Since the overwhelming number of doors in surrounding life has a swing design, let's consider the installation procedure using the example of a typical interior door.
The most common type of interior doors has a swing opening mechanism
Rules and procedure for installing interior doors
Installation of a swing interior door is carried out in the following order.
- Development of a scheme for fastening the door frame in the opening. At this stage, it is necessary to clearly imagine (or better yet, sketch) the method of fastening. In our case, this will be fixation with self-tapping screws and polyurethane foam. It is also necessary to decide on the side into which the door will open. If there is no pre-thought-out plan, the following hint will help solve the problem: in small rooms, such as a toilet, pantry and bath, it is customary to open the door inward. Exit to the corridors from large rooms It's better to do it outside.
The most common way to fix the frame in a doorway is to install it using an anchor on mounting foam.
- Door frame installation. It is advisable to place the door that arrives from the store on a flat horizontal surface - a table, chairs or on the floor and unpack it. Assembly is carried out using 3.5 mm thick wood screws. Before screwing in the self-tapping screw, it is necessary to drill a hole that will prevent the wood piece (fibreboard, MDF, chipboard) from splitting. A drill of a smaller diameter is used, in particular 3 mm. For the same reasons, there is no need to screw the screws close to the edge of the parts - the standard distance is at least 5 diameters, i.e. 1.5 cm. To securely fasten the horizontal strips of the door frame, four screws are enough - two on each side.
When assembling the frame on the floor, place cardboard from the packaging under the box
- Trimming posts. Typically, a door frame is sold with a height margin of 5–7 cm. After fixing the side parts, it is necessary to measure the exact size and cut off the excess. To do this, the height of the opening is measured and transferred to the frame. It should be taken into account that there should be a technological gap of 2–2.5 cm between the frame and the wall. This gap is needed so that the frame can be aligned horizontally and vertically inside the opening.
The length of the side posts is adjusted after measuring the height of the opening
- Installing the frame in the doorway. If until this moment the door leaf was inside the frame, then to install the frame into the wall, the leaf must be removed. The frame is installed in the designated place and leveled using a level. Primary fixation is performed using plastic or wooden wedges. It is very convenient to use a set of thin wedges; with their help you can accurately align the box along all axes. It should be remembered that the racks of the box must be vertical in two perpendicular planes - on the side of the canvas and on the side of the wall. Proper operation of the door block depends 80% on the correct position of the door frame. A number of models of interior doors have a special decorative strip, which is disconnected and mounting holes are drilled under it. Upon completion of installation, the bar is put in place. To secure the frame with screws, you need to drill 3-4 holes with a diameter of 4 mm on each rack and transfer them to the wall with a pencil or marker. After this, the box is removed and sockets for dowels are drilled in the wall according to the markings. Do not forget that wood drills do not work in concrete. The brickwork is drilled with a hammer drill and a stone drill. The diameter of the drill is 6 mm, the size of the plastic sleeve. When the holes are ready and the dowels are inserted into the wall, the frame returns to its original position and is pre-fixed (“baited,” as the craftsmen say). Before the final tightening of the screws, the position of the vertical and horizontal parts of the box is checked again. Tightening is done in a circle, first tightening the screws half-heartedly, then with maximum force. In order not to overtighten the fasteners, during tightening the verticality of the racks is checked with a long two-meter level or rule.
Use of construction laser level increases the accuracy of door frame installation
- Installing the door leaf on the hinges. Since we are considering a lightweight interior door made of MDF or fiberboard, one person can hang the door on its hinges. It is enough to lift the door above the awnings and carefully place the hinges on the axis. After this, the door leaf must be closed and checked for correct positioning. If the door is installed in compliance with all technological standards (3-4 mm gaps on each side), it will move inside the frame easily and without effort on the part of a person. When open, the sash will not slam shut spontaneously, and when closed, it will not open. If the purchased door does not have recesses for hinges, you will need to make them yourself. To do this, a cutter is inserted into the tool, the depth of immersion into the wood is adjusted, and a groove is selected according to a pre-marked size using a translational movement. The accepted location of the hinges is 20–25 cm from the upper and lower edges of the sash.
The hinges are placed at the top and bottom at the same distance from the edges of the door leaf
- Filling the seams with polyurethane foam. This is a crucial moment, since such important door parameters as sound insulation and heat resistance depend on the filling density. It is better to use polyurethane foam with a low expansion coefficient. To speed up the setting and hardening of the polyurethane, the walls and door frame are moistened with water (sprayed from a spray bottle). Filling is done sequentially, from bottom to top, so that there are no voids left, but at the same time foam flakes do not fall on the floor. During the operation, it is advisable to cover the door with film, since prolonged contact with polyurethane can cause stains to appear on the laminated surface. As the foam dries, it increases in volume, so the seams are initially filled by 30–40%. After complete hardening (after 24 hours at an air temperature of 20 o C), the excess is cut off with a sharp knife. It is not recommended to open the door leaf during foaming and drying. It is advisable to insert pieces of packaging cardboard into the gaps (along the perimeter). This will prevent deformation and sagging of the frame if there is too much foam.
It is better to fill installation gaps with foam from the bottom up, carefully treating the voids
- Doorway trim. Upon completion of the door installation, it is necessary to tidy up the opening. To do this, slopes or platbands are installed in it. For interior doors, finishing with slopes is rarely done (although this is also practiced, depending on the installation location and the function of the door). The most common type of finishing is platbands and extensions. If the size of the wall is small and the width of the door frame coincides with it, platbands are installed on both sides and the finishing of the opening ends there. If the width of the box is not enough to cover the wall completely, add-ons are used. With their help, the plane of the frame expands, and the platbands are no longer attached to the frame, but to the extensions. It’s interesting that designers sometimes deliberately select colors for the extensions that contrast with the color of the door. Such solutions are original in nature and emphasize the door as an element of the interior. Installation of platbands is carried out in several ways, depending on their design:
- groove connection;
- gluing to the wall;
- hidden nails.
- Installation of accessories. The door handle and lock are usually included with the door. Or at least installation holes are prepared in the canvas. If they are not there, you need to mark the sash and use a router and electric drill to cut holes of the required size (for pre-purchased components). You should follow the instructions for installing the lock and door handle, which are included with the products. The approximate installation height of the door lock is 90–110 cm from the floor. The handle is mounted at the same height, 10–15 cm away from the edge of the door leaf.
The method of installing a door lock depends on its design, and it is usually located at a height of 90–110 cm from the floor
The type of connection between vertical platbands and horizontal ones can be different - rectangular or diagonal. From an installation point of view, a rectangular connection is considered simpler. For a diagonal joint, it is important to accurately cut the workpieces at an angle of 45 degrees. For this, craftsmen use a miter circular saw. But for small volumes, you can also use a carpenter’s miter box.
The diagonal connection of the platbands requires a perfectly even cut at an angle of 45 degrees, which is carried out using a miter box or a circular saw
Many modern models interior doors contain a rubber seal in their design. Its installation is most often carried out by gluing. The protective film is removed from the inside, and the seal is carefully glued around the perimeter of the entire door leaf.
Video: how to properly install an interior door
Installation of double doors
Double-leaf door blocks are a popular interior decoration. They fit especially harmoniously into wide doorways and emphasize the spaciousness of the room. Doors with two leaves are:

When assembling swing double doors, the algorithm remains the same as for a single leaf door. But there is one nuance associated with the door suspension. The first to be installed on the hinges is the sash with the latch, which is cut into the upper part of the leaf ahead of time. After installing the sash on the hinges, fix it with a latch and begin installing the other half of the door. In this way, the alignment of the canvases is achieved in relation to the frame and among themselves. The gaps adopted for a single-leaf door are also relevant for the double-leaf version.
The latch holds the door leaf in a stationary position
The sliding design of double doors is different in that it does not have a frame in the usual sense. The support for the door leaves is suspended profile, equipped with a rocker mechanism. Naturally, the installation of such a door differs from the assembly of swing structures. Installation is carried out on straight walls with sufficient space (space is needed for opening doors).
Around the sliding door you need to provide a reserve of free space for those leaving when opening the racks
Installation begins with the assembly and fastening of guide profiles (which can be either on top or below the doorway). Next, the procedure must be carried out in this sequence.
- Mounting brackets with fittings (carriages and movable rollers) on canvas.
A diagram of fastening the door leaf to the rocker mechanism indicating the weight of the door leaf is attached to each product
- Installation of sashes on the hanging mechanism.
- Fastening stoppers (rubber opening limiters).
Using the limiter, the free movement of the door leaf is adjusted to protect it from impacts on nearby objects and surfaces
- Installation of extensions and platbands on the doorway.
- Installation of additional door hardware(brushes, seals, grips).
On preparatory stage The wall plane is marked and leveled. This is important because the door leaves are constantly moving along the walls.
The main document that you need to read when installing sliding doors is the assembly instructions from the manufacturer. It reflects technical requirements installation instructions and basic operating rules.
Video: installing a double swing door
It is customary to install interior doors after finishing work has been carried out in the room. In particular, it is not recommended to prime, plaster or paint the walls after installing the doors. High humidity negatively affects wood-based material- possible deformation and bending structural elements door block.
Installation of interior sliding doors
A sliding door is one of the options for sliding interior doors. Unlike a double-leaf design, an interior sliding door can be single-leaf, three-leaf or even four-leaf. Moreover, one or two canvases can move. Installation is carried out in the same order as for a sliding door in accordance with the manufacturer's instructions.
Sliding doors save space in small spaces
Video: installation of interior sliding doors
Installation of sliding door structures
A characteristic feature of sliding interior doors is the movement of the door leaf along a support profile located on the floor. Installation is carried out after finishing the floor. The guide profile is installed in parquet, laminate, ceramic tiles or other floor covering. Often the door leaf is hidden in a wall cavity specially prepared for this purpose.
Before installation sliding door a false wall is built to hide the sash
There are options for making a false wall or a plasterboard box for sliding interior doors. But in any case, the suspension mechanism remains identical to that of all other types of sliding doors.
Video: installation of sliding interior doors
Installation of sliding interior doors
Sliding interior doors save space in small spaces. But their installation requires certain conditions, the main one of which is the availability of space to move the door leaf. Sliding doors can be single-leaf or double-leaf. The supporting rocker mechanism is usually located on top, and a restrictive profile is mounted below, which prevents the canvas from swaying during movement.
When planning are used various options location of the leaf in the doorway
Installation of glass doors
Glass doors are very original solution for interior decoration. Like doors made of other materials, they come in swing and sliding types. In private housing construction usually used swing type glass doors. In general, the principle and procedure for their installation does not differ from the standard one, but there are several features.
- The glass door leaf cannot be adjusted to dimensions; it cannot be sawed or cut. Therefore, to avoid mistakes, doors are ordered after finishing walls and doorway (when the dimensions no longer change).
- Installing a door is not a task you can do alone. The weight of the glass sheet is usually from 50 to 70 kg; it is difficult and dangerous for one person to manipulate such a sash.
- A glass interior door is mounted on a wooden or metal frame.
- The durability of glass doors is limited only by the wear resistance of the hinges. Pendulum hinges are considered the most reliable.
To assemble the glass door hanger, mounting holes are cut in the door leaf at the factory.
Holes for installing hinges are cut at the glass door manufacturer. You need to drill holes for the lock and handle yourself, using a glass drill of the required diameter.
Holes in the glass are drilled with special drills at low speeds
The advantage of glass interior doors is their almost unlimited service life. Their appearance is not subject to mechanical or chemical influence, durability glass block comparable to the strength of metal. The only thing that needs to be monitored is the safety of the hinges and fittings. Timely lubrication and removal of contamination are two necessary conditions for long-term operation of glass interior doors.
Video: installation of glass interior doors
Installation of fittings on interior doors
Installation of fittings is perhaps the most crucial moment in installing interior doors. It is when performing this part of the work that errors occur, leading to rapid breakdowns. Therefore, when starting self-assembly, you need to get ready for painstaking “jewelry” work. Mistakes are too expensive.
So, the accessories include:

All elements of fittings require precise insertion into the plane of the door leaf or frame, and this presents a certain difficulty for novice carpenters. The permissible error cannot be exceeded by more than 1 mm. Otherwise, there are no firm guarantees for the stable operation of the mechanisms.
Sampling is done manually (with chisels) or using power tools. At this stage of work, a manual electric router is used.
Thanks to its high-speed operation, the router makes neat and clean cuts in wood
Sequence of work
Installation of fittings on a swing interior door is carried out in the following order.
- Marking. Before you start cutting the hole, you need to determine where to install the hinges. As noted above, in order to evenly distribute the weight of the door leaf, the hinges are located symmetrically 20–25 cm from the edges of the door leaf. The contours of the loop are drawn with a sharp pencil and outlined around the perimeter with a knife, scalpel or semicircular chisel.
It is advisable to outline the contour of the loop with a sharp pencil, thin awl or scalpel
- Arranging a seat for hinges. Using a chisel, wood is gradually removed from the intended contour. It is necessary to control the groove depth within 2–3 mm. The accuracy of the cut is checked with a loop - when placing it in the designated place front part The fittings must coincide with the surface of the door end. When selecting hinges in MDF doors, the manual method is ineffective; it is advisable to use a router with a small diameter cutter.
The hinges should be flush with the surface of the fabric
- Preparing recesses in the frame. Having made the grooves and installed hinges in them, they proceed to the manufacture of similar seats in the door frame.
- Installing an interior door handle. The operation consists of cutting out a seat for the lock and a hole for installing a rotary handle. It is difficult to do without a router here, especially for a person who does not have carpentry experience. Using a long cutter, select a groove of a certain depth for the lock. A small cutter is used to cut out the countersunk for the lock escutcheon and the strike plate. To accurately determine the location of the locking tongue, it is lubricated dye(nail polish, chalk, paint) and released onto the frame. A hole in the counter plate is installed in the designated location.
Making grooves for door lock carried out using a router
- Installation of the latch. It is carried out depending on the design of the locking element. As a rule, installing a high-quality latch involves cutting out a masking groove. The device is applied to the edge of the door leaf, its shape is outlined and a groove is cut along it.
Video: inserting a lock into interior doors
How to check the correct installation of an interior door
Anyone who has to install for the first time interior doors, asks questions: is the door installed correctly and what needs to be done to make it last long and properly. There is a comprehensive answer to them, which consists of two points.
- A sign of correctly carried out installation is the same technological gaps around the perimeter of the entire canvas. This means that if the gap around the sash is the same size everywhere, the canvas is hung correctly.
- The door must pass a small test. When opening (and closing) the canvas, no extraneous sounds, creaks, or rustles (friction of one surface against another) should be heard. The sash moves easily, without any effort. If the hand stops, the canvas also stops; it should not move on its own.
If these two conditions are met, the door is installed in accordance with technical and operational standards.
Often the installation of an interior door is preceded by dismantling. Disassembly is carried out in the reverse order of assembly.
- Decorative elements are detached - platbands and extensions. To do this, use a pry bar or a large screwdriver. Decorative elements can be reused, so do not break them during dismantling. If these parts are kept intact, they can be painted, covered with laminated film and used when installing a new door.
Platbands are removed using a pry bar or an ax
- The fittings - locks and handles - are removed from the door leaf. The lock is unscrewed from the end of the door leaf. The rotary handle mount is located on one side of the door (at the bottom of the lever).
- The door leaf is removed. To do this, open the sash at an angle of 90 o relative to the frame and lift it by the lower edge using a crowbar, pry bar or other lever. Once the fabric is removed from the hinges, the awnings can be detached and reused.
To remove the fabric from the hinges, turn it at an angle of 90 degrees and lift it using a lever
- The door frame is removed. To disassemble the frame with the least effort, it is necessary to determine where it is fixed to the wall. Sometimes this is difficult to do with old doors, especially if the opening has slopes made of cement mortar. Then the usual one will come to the rescue electric jigsaw. If the frame is not planned to be used in the future, it can be cut in cross section and separated from the wall in parts. This greatly speeds up the dismantling process. The top crossbar is also released in the same way.
Using power tools speeds up door dismantling several times faster
If you do not have firm confidence in your abilities, of course, it is better to turn to professional installers, because correct assembly and installation is not the only, but a necessary condition for long-term operation of interior doors. But if you have at least a little experience in carpentry, and the operations described in this article do not give you any doubt about the possibility of repeating them, feel free to start installing the door yourself. You can save money and be absolutely sure of the quality of every action.
Do-it-yourself installation of interior doors is done in strict sequence; every moment, even the most insignificant, turns out to be important. If you make a minor mistake, it will result in major problems during the further operation of the building. The main condition for installation is a perfectly level vertical and horizontal position.
Only if these parameters are observed will normal opening and closing of doors be ensured. Step-by-step instruction for installing interior doors will help you get the job done. The first thing you need to pay attention to is the installation of the door frame.
Complete sets of interior structures
Installation of interior doors is carried out after finishing the ceiling and walls. At the installation stage, a subfloor and a finishing coating are required. Installation of skirting boards is carried out after installation of doors. Door components:
- Canvas without box and lumber. In this case, everything is purchased separately. Lumber is purchased, strips are cut to the size of the doorway and the corners are filed. In case of use standard box a cloth of the same size is used. Before purchasing, it is necessary to take all measurements so that you do not have to modify the elements. In this case, installing interior doors with your own hands will be as cost-effective as possible.
- Box and canvas. In this case, both elements will fit together, you just need to buy additional lumber, make planks and assemble the structure. It may be necessary to install extensions on interior doors. This point needs to be thought through in advance.
- Assembled block. All components have been assembled and adjusted; all that remains is to install the block in the opening, level it and secure it.
If you know how to install an interior door with your own hands, you can purchase any kit. The latter is suitable for beginners, as it is the easiest to install. For more experienced craftsmen, the first one is best, it is also the most economical. Such structures are not subject to additional adjustment.
Door frame sizes
Each country has its own standards; they differ, sometimes significantly. Width of swing doors according to Russian standards:
- 600 mm;
- 700 mm;
- 800 mm;
- 900 mm.
The same standards are in some European countries (Spain, Italy). The French differ by 1 cm (690, 790, 890 mm). The choice of standard depends on the owner, but it is best to use Russian ones, since they have a clear advantage - a wider choice.
If you happen to buy non-standard doors, it will be difficult to change them later. According to GOST, the width of the opening and the door leaf installed in it depends on the room in which the installation is carried out:
- For the kitchen, the height should be 2000 mm, width 700 mm.
- In the bathroom, the height is 1900-2000 mm, the width is at least 600 mm.
- For residential premises, the opening width is 600-1200 mm, the height is 2000 mm.
But these are standards; in reality, it happens that you need to adapt to a certain building. Sometimes it is better to choose a sliding door. To determine the dimensions of the box and canvas, you will need to measure the opening. After this, the dimensions of the block are selected. The size should be slightly smaller to allow mounting of fasteners and spacers. You need to take these parameters into account before installing the interior door yourself.
At the measurement stage, it is necessary to carefully inspect the walls and, if necessary, carry out repairs and strengthening. In this case, the door frame will be able to stay in the opening much better. Particular attention should be paid to the condition of the walls if you plan to install heavy doors. Needs to be attached wooden beam to the wall and plaster it, if possible. This approach will allow you to install interior doors in any opening without any difficulties. The thickness of the block should be 5 cm. After such an improvement, installing a door frame with your own hands will be much easier, and the reliability of the structure will increase.
Anyone can install doors from scratch with their own hands if they understand the nuances and parameters of the design. One important parameter of boxes is depth. According to GOST, the standard is 70-80 mm, but if the wall thickness in the house exceeds this figure (and this is in most cases), then you need to cheat. Installation of a door frame without a threshold is carried out flush with one wall, but with the condition that the slopes and opening will not interfere with opening. The remaining part of the wall is plastered and finished like the walls in the room. But it can be done with additions: a plank is mounted to match the canvas and trim. You can learn how to assemble the platbands from the instructions for them.
Assembly of door frames
How to install an interior door correctly? The horizontal strip is the lintel, the vertical ones are the jambs (posts). These are the main elements of door frames. If you bought them separately, you need to put them together. To do this, spread oilcloth, paper, cardboard on the floor, lay out the slats. All elements are connected.
If the box and canvas are purchased assembled, then the dimensions will all match. In most cases, installing an interior door threshold is not required. But you need to double-check so that you don’t have to start all the work again. All elements are laid on the floor of the box, with a canvas between them; the correct installation of interior doors must be done exactly this way.
Ideally, there should be an equal gap around the entire perimeter of the canvas - about 3-4 mm. With such a gap, normal opening and closing of doors will be ensured. Similar requirements apply to double-leaf interior doors.
A separate story is adjusting the height, regardless of whether you are installing doors in an apartment or in a bathhouse. The jambs of the box are 12-15 cm larger than the canvas. For proper installation, the racks rest against the joists. But during construction such an installation is used extremely rarely, therefore door jambs shortened to the required size. Installation of the interior door frame is carried out using self-tapping screws.
But be sure to make a hole with a thin drill before screwing in the fasteners. If the planks are sawn at 45°, it is necessary to drill holes on the side plank. Then you apply it to a horizontal beam and fix it with self-tapping screws. Similarly, you install the doors in the bathhouse yourself. You just need to pay attention to the material - the wood must withstand high temperatures and humidity.
How can you install an interior door yourself if the edges of the frame are filed at right angles? In this case, all the work is much simpler. But you still need to drill holes, especially if the box is made of MDF. Place the top one on the side beam, align the edges and make two holes.
There is a through hole in the top beam, and an end-to-end hole in the side. After that, connect the planks and you get a box. During construction, the lower bar is used extremely rarely. Make sure that the assembled box exceeds the dimensions of the canvas in length and width by 3-4 mm. Builders prefer a door frame without a threshold, so the racks have to be trimmed a little. When installing interior doors without a threshold, there are small advantages.
Quite often it happens that there are more jambs than necessary. Measure the height of the opening, subtract 2 cm (for filling with polyurethane foam). This value will be the height of the box. Take measurements from all sides, mark the values on the assembled structure and draw a line along which the cut will be made. The excess part is cut off. Installing interior doors with extensions is not much different. The differences are only in small details, which manifest themselves in several points.
Loop selection
Before purchasing accessories, be sure to decide which type you need - left or right. Stand near the opening in which you plan to install (the door should open towards you). This condition is mandatory, try not to confuse the sides. Open it towards yourself and look where the movement is happening - left or right. If to the left, then left loops are needed.
If the hinges are right, then the canvas should open to the right. Try not to mix up the hinges; mark their installation locations. Keep in mind that in some cases it may be necessary to remove the canvas (to remove furniture), so you need to be sure that this procedure will be painless and quick. Installing hinges on a door is a matter that requires special care, since a slight deviation can cost the door being crooked.
When installing wooden doors, you need to mark the outline of the hinges and remove the layer with a sharp knife. Pay attention to the thickness of the loops. To make the cut convenient, you need to make a vertical cut along the contour. If you make only a horizontal one, then the excess sections of wood will be difficult to separate. The cut is made either with a chisel or a special machine. Do the same with the door leaf. But sometimes a chisel cannot be used to shape a cutout beautifully. If the canopy falls on a knot, it is necessary to move it to the side. Installing doors yourself will not cause difficulties, but the work is painstaking. Now we need to consider how the awnings are installed.
Insertion of loops
Separately, you need to consider how door hinges are installed. The requirements for them are not very serious; it is enough to maintain a distance of 19 cm from the edges. You need to know how to assemble an interior door with your own hands and what tools are required for this.
To install or dismantle hinges, you will need the following set of tools:
- Drills with a diameter of 1-4 mm.
- Drill and screwdriver.
- Cutter.
- Awl.
For MDF doors, 2 hinges are enough, as they are lightweight. For heavy ones you need to put 3 loops - an additional one in the middle. All hinges, regardless of type and price, consist of 2 parts. One half of them has a pin. Important condition: install in such a way that this pin points upward. It will be wrong if it turns out to be directed downwards.
Insertion of loops and door locks It is best to do it directly on the floor, before installation. The fittings are fastened after marking and cutting. Place a loop, mark the outline and use a chisel to make indentations. First fasten the fittings on the jamb, then lay the canvas and mark the position of the second part of the hinge on it.
The installation of interior doors in a wooden house is simplified due to the fact that fastening can even be done with nails. All recesses are made with a milling cutter in a matter of minutes, but in the absence of such a tool, chisels can also be used. When closing, the hinges provide a gap of 4 mm. The installation of laminated doors is practically no different from the installation of wooden ones, there are only minor differences.
Final installation of the box
In practice, it turns out that assembling and installing interior doors is a painstaking task. The racks and ceiling are shaped like the letter “P”, install assembled structure in the doorway. Using a level, set the entire structure to zero. Achieve maximum evenness horizontally and vertically. Fix the position of the box using spacers and wedges, and punch the level from time to time. Be sure to ensure that the jambs are parallel to each other; tilting in any direction should be avoided. The ease of using the doors in the future depends on the evenness.
After checking all the installation parameters, fix the box in the opening using self-tapping screws or dowel-nails. The distance between adjacent fasteners should be 0.25-0.3 m. There should be approximately 2-3 fasteners on the ceiling, and 7-8 on the jambs. In the box you need to drill holes with a diameter of 4 mm, since the screws have caps that are usually 1-2 mm larger. If you installed a beam between the frame and the wall, installation is much simpler. Making interior doors in this case is simple, since the fasteners are more reliable.
If the walls are made of shell, brick or block, then installation is more complicated - you need to install dowel-nails. Please note that they should be in the bricks and not in the joints. It is not recommended to place doors at seams. Use a 4 mm drill to make a hole in the posts, leaving a mark on the wall. Once you have finished marking all the holes, dismantle the box and check if they are in the right place. To avoid getting caught in seams, pay attention to open areas masonry, make marks on the planks. Only after you are sure of the accuracy, make holes for the dowel-nails. This is exactly how they install wooden doors with their own hands. Installation is done in the same way plastic structures, but it’s easier to work with them - all elements are adjusted as precisely as possible.
Installing a doorway with your own hands is done in the same order, so the manual can be used for this case as well. Then you place the box and make sure that the holes in it coincide with the dowels. Adjust the position horizontally and vertically, secure with wedges and spacers, and only then fasten the box to the wall. You don't want to pull too hard as you may damage the wood or bend the jamb. Since the canopies were installed in advance, further installation of the canvas will not cause difficulties.
Installing entrance doors yourself will significantly reduce the cost of work.
Foaming gaps
After final fixation, place cardboard between the jamb and the canvas; you need to install it on the foam. Close the door and install spacers and wedges to prevent the frame from bending. Fill the gaps between the wall and the box 1/3 with foam, since the volume increases during the drying process. If there is too much foam, it will bend the slats. It must be left for a day to dry.
After that, remove the spacers, use a sharp knife to cut off the excess foam and proceed to further work - installing the extension or trim on the interior doors. You can apply a layer of putty to the foam and cover it decorative elements. Installing interior door frames with your own hands will not cause any difficulties even for an inexperienced craftsman who is encountering such a procedure for the first time. Correct installation of doors is the key to long service life of the product.
Application of fasteners and mortise details
Together with door hinges Self-tapping screws are sold. It is with their help that the fastening is made. Before screwing them in, you need to make thin holes in the wood. This will prevent the wood from splitting when screwed in. The fittings can be hidden, their installation is a little more complicated - it is necessary to make deeper mounting holes. The hole is best cut using a milling machine. Decide in advance whether you need to install additional interior doors; anyone can do it with their own hands.
When screwing in self-tapping screws, make sure that the hinges do not move to the side; if necessary, align them. If the hinges are inserted correctly, they will be located at the same level. If there is even a slight bulge, you need to deepen the area for the hinge to the required level. Using a ruler, check whether the canopy is seated correctly.
Press the ruler against the loop and evaluate the position. If it protrudes strongly, then there will be too large a gap between the door leaf and the frame. When the doors are installed correctly, normal opening to an angle of 180 ° is ensured. In this case, the maximum load on the hinges should not exceed 50 kg. Next, insert the loop parts by lifting the fabric. This will allow you to determine as accurately as possible the point at which both canopies will fit together.
When choosing canopies, it is best to choose hidden ones. They look much better, and the mounting rules are the same. After installation, be sure to check the smoothness of the move by engaging the latch on the jamb and the locking plate. If necessary, move the latch. This is required if there is extraneous noise when closing the door. The metal tab needs to be adjusted a little and the noise will disappear. In general, installing hinges on interior doors is quite simple; no difficulties should arise. It is enough to act strictly according to the instructions and use the recommendations.
Advantages and disadvantages of sliding interior doors
Installing sliding doors with your own hands is quite simple and does not require significant costs, and the design is much more attractive than conventional swing doors. There are 2 types of interior door designs:
- The hinged ones, the installation of which is discussed above, are attached to the box using movable canopies. This traditional version, the range of models on the market is very wide, the look is rich, but there is one drawback - they take up a lot of space. Installation plastic doors It won’t take much time to do it yourself, but using them in a small room will be problematic: when opening, they need a lot of space.
- Sliding ones are much more convenient, since with their help the space of the room is used more efficiently. And installing sliding interior doors with your own hands will not take much time if you carefully study the specifics of the work.
In turn, sliding doors are divided into 2 types:
- Sliding doors built into the wall slide into it and are recessed. The design has a mechanism that allows you to move the door parallel to the wall. Rollers are mounted on the canvas, and guides are mounted on the opening or on top of it. Rollers move along the guides, opening the opening for passage.
- A good option would be to install an accordion door yourself. Structurally, they are made of plastic or wooden slats. By moving, they fold and clear the opening. But one drawback is that cheap products are extremely inconvenient and impractical. Therefore, if the choice fell on such a design, then it is better to purchase an expensive and high-quality product.
Regardless of the design, all sliding doors have the following advantages:
- Non-standard and unusual, very original appearance.
- There are no blind areas; they do not interfere with the placement of furniture in the rooms.
- Complete safety, as there is no risk of hitting the corner of the door. But you should make sure that children do not stick their fingers between the door and the wall.
- A huge plus is that they do not open with drafts.
- Installing an interior door threshold is not required in most cases; only if you need to cover the guide at the bottom, a threshold is installed.
But there are also significant disadvantages:
- The prices for installing a sliding door from craftsmen are simply exorbitant. But if you do all the work yourself, you can reduce costs. Installing interior sliding doors with your own hands will minimize costs and compare them with the cost of installing swing doors.
- Low degree of insulation. You have to install a felt gasket on the end of the door. This is the only way to get rid of foreign odors, sounds, and light from entering the room.
- The pencil case into which the door goes is quite difficult to care for. But if you manage, you can use a vacuum cleaner to get the job done. When installing casings that cover holes, this is problematic.
- Repairing such a design is quite complicated, so when purchasing, be sure to take several rollers in reserve. The installation implies that elements that are rarely found on sale will be used. Sometimes people who installed such structures begin repairs after a few years and do not find spare parts in stores. We have to redo the mechanism.
Sliding Door Components
The main difference between sliding and swing structures is the mechanism of their functioning (rollers or canopies). Sliding interior doors can be equipped with the following mechanisms:
- In-wall, which allow you to remove the door leaf inside the wall. But there is one caveat: the system must be started at the time of erection of the walls, since voids will need to be left in them. In this case, the thickness of the wall will be greater. Due to this, the area of the room will become slightly smaller, but the walls will be freed up.
- External ones, which can be installed at any time, do not require rebuilding the walls. In this design, the canvas moves parallel to the wall. A small drawback: you will need to clear a small distance from the walls.
Guides are one of the important structural elements, runners along which the door leaf moves on rollers. They are placed on top, bottom, or on both sides. The sale and installation of such elements is carried out by stores, but it is better to do the installation yourself. Features of location options:
- Only the top guides are used - the most common method. It is used only if the weight of the door leaf is light. The advantage is that the risk of breaking the guides is extremely low, and the service life is high.
- If only the lower guides are used, there is a high risk of damaging them during operation. It is extremely difficult to achieve smooth movement of a door without an upper support, and constant clogging of the runners will make itself felt.
- Combined structures are assembled using doors large mass, or to improve smoothness.
Preparation for installation of sliding doors
Since the most popular type is the external structure, it is worth focusing on it. Do-it-yourself door installation requires the following tools and materials:
- Door leaf, trim, frame.
- Accessories (rollers, guides, locks, handles).
- Beams measuring 50x30 mm for fastening the guides.
- Hardware.
- Level, tape measure, ruler if necessary.
- Drill and screwdriver.
- Hacksaw.
- Chisels.
If the door weight exceeds 27 kg, 4 rollers must be used. For lighter structures, 2 is enough. To avoid deformation of the wall and damage to the wallpaper by handles and locks, use hidden doors embedded in the canvas.
At the very beginning, you need to decide on the installation location and opening side. If you plan to install 2 doors, consider how convenient it will be to use them. If necessary, the old door is removed and a new frame is installed. In living rooms, the gap should be maintained at about 10 mm. If there is no finished floor, then the laminate, screed, and leveling are taken into account.
- Measure the width and height of the sliding door. It is advisable to do this at several points (bottom, middle and top). The height of the door must be measured open and closed.
- The timber is being installed. Draw a straight line over top part boxes. From the line to the edge of the box you need to maintain a distance equal to the width of the guide. The beam is attached to this line. One caveat: the middle of the block must be located above the right half of the frame if the door is sliding to the right.
- The upper guide profiles are being installed. The runners are fastened to the timber using hardware. Check how the rollers slide on the runners. If necessary, replace the latter, otherwise the functioning of the doors in the house will be accompanied by inconvenience.
- Bottom skids can be installed in several ways. You can remove part of the floor covering, but this is for cases when it is necessary to install a structure with lower guides. You can mount the guide directly on the floor, but you will have to use this design with thresholds. But builders actively use the installation of doors without a threshold, although they prevent the guide from collapsing. But much more often they don’t put rollers at the bottom, they only use a packet knife. With its help, the door holds and does not deviate from the direction of movement.
Doors with a threshold are rarely used, without it it is much easier. The reason is the possibility of implementation normal operation, sliding compartment doors will be able to operate without damaging the floor covering. And this allows you to reduce the time required to maintain the structure.
Sliding doors: assembly and care
Rollers are hung at the upper end of the canvas, and holes are made at the lower end, between which a groove is knocked out. It should be 2 mm wide - slightly larger than a knife. The depth is the same as the height of the knife, in the range of 10-18 mm. The part that does not have a groove serves as a limiter. A door inserted into the grooves with a limiter is difficult to remove beyond its limits.
Installing hardware means installing a lock on an interior door; it’s not difficult to do it yourself. It is enough to have a simple tool - screwdrivers, pliers. Then 1 is executed important points– installing handles on interior doors with your own hands. All work is done carefully so as not to damage appearance, otherwise sliding sliding doors will look unattractive. If you have no experience, then it is better to entrust the work to specialists.
The final installation of sliding compartment doors involves getting into the guides. Finally, rubber stops are installed, which will prevent the doors from falling out during operation and will make the stop much softer. This design is much better than butterfly hinges, as it provides greater reliability and convenience.
For beauty, you can use decorative elements - platbands, which are installed on the box and upper runners. You can read the label on how to install them correctly. It is not necessary to cash out, since the mechanism itself is already a decorative element. To care for sliding doors you need to:
- Do not allow water to get on the door leaf or sliding door mechanism, especially if all the elements are made of wood.
- Carefully monitor the cleanliness of the runners and remove dirt in a timely manner. If debris gets on them, the door will not move or slide properly.
- Try not to jerk the compartment door or slam it, there is no need to apply force, as the rollers wear out more, and sometimes it is possible to “fly” beyond the limiter. Getting them into place can be challenging.
- Check the quality of the fittings, change the rollers in a timely manner.
- Reinstallation of door locks should be done as carefully as possible.
It is clear that installing interior doors from MDF with your own hands or an accordion is a drop in the ocean. It is much more difficult to maintain them in good condition, prevent breakdowns and make timely repairs. In general, they can last no less than simple swing structures. Installing sliding doors with your own hands is a guarantee that your home will have an element of novelty.
How to install it yourself
For a specialist, installing an interior door is not a problem. But if you are making repairs yourself, you may have a question: how to install the doors yourself so that they reliably perform all their functions. This article will help you understand this issue. Let us immediately note that we will be talking about solid wood doors.
The technology for installing doors differs only in that before selecting the recesses for the hinges, it is necessary to trim and remove the veneer layer with a sharp knife so as not to damage the coating. As for expensive interior doors, if you do not have installation skills, it is better to entrust this work to specialists. So, let's take a closer look at how to install it yourself.
A wooden frame and platbands usually come complete with the door leaf. If you bought only the canvas, you will need to separately purchase the door frame (see), additional elements, trim, and self-tapping screws for assembly.
In addition, you will need the following materials and tools:
- Anchor bolts for fastening the box into the opening.
- Wooden or plastic wedges.
- Polyurethane foam.
- Building level.
- Drill or screwdriver.
- Wood saw, miter box and chisel.
Before you start work, carefully read the instructions on how to install an interior door yourself + watch the video, which will help you better understand the details.
Installation steps
Determining the dimensions of the openings
Having decided which doors you want to install in your home, take care to fit the openings in load-bearing walls and partitions for them. Or, if expansion into a load-bearing wall is not possible, adjust your plans.
Having information about what kind of doors you will have - dimensions with frame - when constructing plasterboard partitions, builders will be able to immediately build the necessary openings by installing metal profiles at a certain distance. It will not be difficult to maintain the specified dimensions when constructing walls made of bricks, concrete blocks and other materials.
It is more difficult to bring existing ones into line with the required parameters. But if this is not done, there is a high probability that the door with the frame will not fit into the opening. And repairs after installation will have to be redone, eliminating large gaps between the frame and the wall, re-gluing the wallpaper or repainting the walls.
What do you need to know to calculate openings?
Need to know:

For reference:
Thresholds are usually installed on entrance doors to prevent heat loss. But it is advisable to use them for doors to bathrooms to protect living rooms from accidental leaks.
Knowing all this data, calculating the parameters of the opening will not be difficult. For example, consider the following standard ones: box size – 25 mm thickness and 40 mm width; canvas size 800x2000 mm.
By adding to the width the double thickness of the box and the size of the installation gap, which is usually 15 mm on each side, you get the width of the opening: 800 + 2x15 + 2x25 = 880 mm. If the platbands are wide enough, then this size can be a little larger - the gap between the wall and the frame will be blocked by the platband.
Attention! It is necessary to install gaps of 5-10 mm in the lower part to ensure air exchange. If the house is supplied liquefied gas, then for kitchen doors the gap increases to 15-20 mm to ensure ventilation.
So, the height of the opening into which the door we have chosen with a frame without a threshold will be installed (see), is calculated as follows: 2000 + 25 +15 + 10 = 2050 mm.
To the data obtained, it is advisable to add the amount of gap that must be left between the door leaf and the frame, but since it is only a few millimeters, it can not be taken into account in rough calculations.
A few words about why we need data on the width of the box. The fact is that installation is only possible in an opening of the appropriate thickness. If it is smaller than the width of the box, then the latter will have to be sawn lengthwise so that it does not protrude beyond the plane of the wall.
And this inevitably leads to deterioration in quality and appearance. In addition, not all boxes can be subjected to such rough adjustments. If the thickness of the opening exceeds the width of the box, you will need to take care of purchasing extras.
Installing the door frame
If the main repair work has come to an end, the doors have been purchased (the dimensions with the frame correspond to the openings), and there is no extra money left or you simply do not want to wait for the master, then you can install the frame yourself (see). After this, hanging them will not be difficult.

The door frame is assembled as follows:
- Place the vertical bars of the box on a flat, clean floor with the flaps up and insert the door leaf into them. Place pieces of packaging cardboard or strips of hardboard between the ends of the canvas and the rebates to provide a gap. Align the top ends of the bars with the top of the canvas.
- Attach the top crossbar to the ends of the vertical bars, align it with one of the racks and mark the length of the element along the edge of the second rack with a pencil. Then saw off the excess with a hacksaw or jigsaw.
- Attach the crossbar to the posts again and make internal parties marks on the pretend part. On the crossbar porch, make cuts along the marks using a hacksaw to make the cut smooth and neat. Chip away the excess wood and clean up the area with a chisel.
- Using a thin drill, drill holes in the crossbar and screw it to the posts with self-tapping screws.

Assembling the door frame yourself
Attention! The described sequence of work is applicable only for doors whose door frames have a rectangular cross-section. To assemble a box with a complex shaped section, the posts and crossbar must be sawn at an angle of 45 degrees.
- Saw off the frame posts to the height, taking into account the gap between the floor and the bottom of the panel. Please note that the box should not stand on the floor; it is fixed at a height of 1-2 mm from the clean floor to provide it with moisture and thermal expansion.
- Place the box in the opening, securing it with wedges, and align the posts and crossbar level in two planes. To ensure correct installation, measure the diagonals - they should be equal.
- After testing the door leaf, secure the frame in the opening with anchor bolts.
Using spacer wedges
Installation of door leaf
Many instructions have been written on how to install interior doors yourself, but there are nuances in this matter that come with experience.
- At a distance of 20-25 cm from the top and bottom edges, make markings for hinges (see) on the frame and the end of the door leaf, accurately comparing all dimensions and not forgetting about the technological gaps.

- Using a milling machine or chisel, make indentations for the hinges. The plane on which the hinges are attached must be perfectly flat.
- Disassemble the hinges and screw their lower parts (with the bushing) to the frame, and the upper parts (with the leg) to the door.
- Lubricate the hinge feet with graphite grease or machine oil and hang the door leaf. Check for correct installation.
- Before filling the gap between the frame and the opening with foam, place additional spacers just above the door handle and next to the hinges. Apply the foam in a thin layer, after covering the door with film and moistening the opening with water from a spray bottle.
- After the foam has completely dried, cut off any excess foam and protruding parts of the wedges.
Main stages of installation
Classic product installation technology includes several main stages, regardless of the chosen type of interior door:
- Installation of the box (installation in the opening).
- Installing the door leaf.
- Installation of additional elements.
Correct installation of interior doors with your own hands is done using power tools - drill, screwdriver, hammer drill.
If you need to saw the platbands lengthwise, it is recommended to prepare a circular saw of the “parquet” type. In addition, a miter saw or wood hacksaw is useful for installation, building level, hammer, pencil, tape measure, nail puller, water spray, mallet, miter box, chisels and consumables:
- screws, dowels;
- masking tape;
- polyurethane foam;
- wooden spacers and wedges.
Advice! Experienced craftsmen use a plumb line when installing a door and prefer a wooden mallet, since a rubber mallet leaves marks. To secure the box in the opening, it is better to use dowels, and for hinges, yellow-passed or galvanized self-tapping screws. Standard “standard” self-tapping screws, which are supplied with the product, are not recommended for use in installation.
It is better to make wedges for fixing the product during the installation process from bars and boards. Preliminary preparation Wedges of several sizes can be a waste of time, since the exact parameters of the products are determined “by situation” - during the installation process.
Step 1. Assembling the box
First you have to assemble the interior doors with your own hands - connect the parts with self-tapping screws. Before starting assembly, it is recommended to trim the gaps taking into account the floor covering. For residential premises, it is recommended to maintain a gap of 10 mm.

Assembly order:
- Saw down the lintel beam under the hinged one: attach two timbers, mark a line, make a cut and carefully chip off the end with a chisel.
- Connect the beams(loop, lintel) in a right angle using self-tapping screws.
- Cut the loops into the loop beam.
- Connect three beams, put on the door and adjust the lintel element.
Advice! When fixing the box, experienced craftsmen use pieces of cardboard or hardboard of the same thickness as spacers. Thanks to this trick, optimal gaps of 3–4 mm are provided between the edge of the door and the frame (bars). The main thing when using this method is to ensure that when screwing in the screws, the wedges do not “dangle” in the box.
The most critical area of work at this stage is the insertion of fittings, the quality of which determines the convenience of further operation of the door. Useful invention To help the “homemade” person there are goats - a device made of cardboard and pieces of wood that will hold the door in place.
Executed sequentially:

Helpful advice: the chisel must be held at an angle of 45 across the recess and hit the tool with sharp blows. After required depth formed, it is recommended to set the chisel vertically on the line and trim the edges - cut the canvas from the marks from top to bottom and clean out the recesses.
- Hang the door: first place the hinge in the upper slot, mark the hole for the screws and fix the hinges (see). After this, you need to install the canvas in the box, wedge it and apply markings to the jamb. Final stage work - fastening the hinge sash with screws;
- Marking the lock, spindle and keyhole on the end of the door. The height of the marking can be varied at your discretion, the main thing is to correctly mark the dimensions of the lock on the front sides and mark the position of the well;
- Drill holes for the well and spindle, a slot for the lock, clean it and align the edges;
- Fastening the lock with screws, installing handle covers and fastening.
The last stage of work on inserting a lock is attaching the receiving escutcheon:
- Close the door;
- Mark the position of the tongue on the jamb;
- Hang the overlay and measure the distance to the front side;
- The markings must be transferred to the jamb, attach the overlay and trace with a pencil.
The last stage of work is to make a recess and screw the part to the jamb. The slots for the latch and tongue are made with a chisel, after which the stoppers can be secured.
Step 2. Installation of the box
Secure the upper part of the box with wedges, installing wooden crafts at the level of the junction of the pillar and transverse parts. To fix the lower part, it is necessary to align the hinge side and check the correct installation in two planes (vertically, horizontally) using a level.
Then fix the opposite side of the box and firmly install the spacer opposite the lower wedges.
Step 3. Installation of the canvas
At this stage, you will have to install the interior doors yourself: hang the panel and check the functionality. The door should close smoothly, without spontaneous closing/opening in the ajar position.
The last stage is the application of polyurethane foam into the space of the box with the opening.

Note! Foam can damage the varnish of the door leaf, so it is recommended to seal the frame with tape before applying the composition. In addition, when drying, the foam increases several times in volume, which must be taken into account when installing the canvas, strictly observing the recommended gaps.
At this stage, every millimeter is important, since if the opening is reduced to less than 2 mm, for example, to 1.5 mm, the door will not close, and if it is larger, the gap and part of the interior of the adjacent room will be visible. Since foam, depending on the type chosen, can “behave” differently, it is recommended to reduce the risk of side effects - significant squeezing of the box slats.
To do this, experienced craftsmen apply the polyurethane composition as thinly as possible. The time for the foam to completely dry is indicated on the can, after which you can carefully remove the wedges or trim the woodwork, remove the spacers and cut off the protruding foam with a knife.
Step 4. Installation of additional elements

Additional elements must be prepared: measure the distance to the wall, taking into account the groove, and cut the strip using a jigsaw or hacksaw.
After this, you need to insert the bar into the groove and foam it at several points. It is more difficult to install an interior door with your own hands if the standard width of the strip does not allow you to cover the width of the opening. In this case, you will have to connect several additional elements.
Step 5. Installation of platbands
The last stage of installation is beautiful design the opening on the sides and top with decorative elements - platbands (see). After the DIY installation of interior doors is completed and the foam has completely dried, having firmly secured the additional elements, you can begin preparing the platband:
- Determine the required length;
- Cut the part at an angle of 45 using a miter saw;
- Drill holes with a diameter of 1.5 mm for nails;
- Secure the part with finishing nails.
If you are going to install interior doors with your own hands with a platband with a “beak,” then the installation process is simpler: you don’t need to file down the part, just remove the part of the “beak” at the top, insert the product into the groove and secure it with liquid nails. Upon completion of installation, the interior door is ready for use.
The final stage of door installation
To make the doors look aesthetically pleasing, you need to do something else. If the thickness of the opening in which the interior door is installed turns out to be wider than the frame, then it will have to be
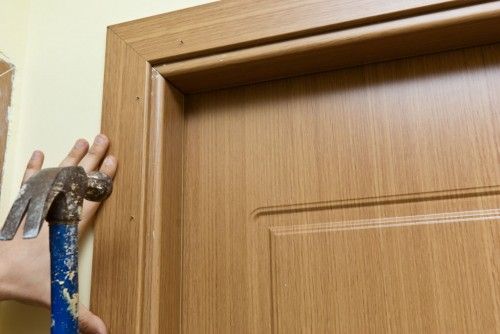
To do this, use a cutter to select a quarter of 10x10 mm in the box for attaching an additional board to it. Finally, the door needs to be framed with platbands.
Measure their length, cut the corners at 45 degrees using a miter box and nail the trim to the box with finishing nails. Or glue them to the wall with liquid nails.
Sooner or later you have to change your interior doors. The procedure is not so complicated that it is necessary to hire a specialist. If you have at least some skills in handling a saw, a level and a plumb line, you can tighten a few self-tapping screws - you can do it yourself. When replacing, before installing the interior door, the old one must be dismantled. And here too there are peculiarities. About all the subtleties - in photos and videos with detailed instructions.
Interior doors are made from different materials. Moreover, the material of both the door leaf and frame is different. The door leaf is:
- From fiberboard. These are the cheapest doors. Represent wooden frame, to which the laminated fiberboard is attached. They have low sound insulation, they are afraid high humidity, are easily damaged.
- From MDF. They cost much more, but the quality characteristics are much higher. They have better sound insulation, are not afraid of moisture, are stronger and more durable.
- Wood. The most expensive doors. They are made from different types of wood - from pine to oak or more exotic species.
Door frames are also made from the same materials. The worst choice is that fiberboard boxes bend even under their own weight, and hanging the door leaf on them is a real pain. So try to take either MDF or wood. There is another material: laminated wood. It is good because it does not need to be processed or painted, but the service life depends on the quality of the film.
Dimensions and equipment
Interior doors are produced standard sizes, it’s just a pity that the standards are different countries are different. For example, in our country, swing doors are made 600 - 900 mm wide with a pitch of 100 mm. In some EU countries the rules are the same - in Germany, Italy and Spain. In France, others are standard. Here are the most narrow doors 690 mm and further in increments of 100 mm.
Is the difference really that important? If you want to change only the door leaf without the frame, then it is important - you will have to choose from your segment or completely change it along with the frame. There is a much greater choice of interior doors of the same standard as in our country, while in France there is much less choice.

What width of doors you need depends on where you are going to put them. If we talk about standards, the following values are recommended:
- in the living room width from 60 to 120 cm, height 2 m;
- bathroom - width from 60 cm, height 1.9-2 m;
- in the kitchen, the width of the door leaf is at least 70 cm, height 2 m.
If, when replacing a door, it is decided to make the opening larger/smaller, permission is not required for this, but it is necessary to remain within the limits specified for each room.
How to determine what width of doors to buy? Measure the door leaf you have and you will know what you need. If there are no doors, find the narrowest place in the opening, measuring it, you can find out how wide the door block you need. This is a door leaf + door frame. So the outer dimensions of the door frame should be less than the measured value. For example, you got 780 mm, look for a block with parameters of 700 mm. Wider ones cannot be inserted into this opening.

The most full set interior door - with frame, extensions and trims
When choosing a door, pay attention to the equipment. There are three types of assembly:
- Door leaf. You buy the box separately.
- Doors with frame. Everything is included, but the box is in the form of separate boards. You will have to file the corners and connect, hang the hinges yourself.
- Door block. These are ready-to-install doors - the frame is assembled, the hinges are hung. Just cut the sidewalls to the height, align them evenly and secure them.
Even though the quality of the door leaf is the same, the prices for these kits differ significantly. But the difference in the time you spend on installation is significant.
Step-by-step installation of interior doors
In general, there are many subtleties. We will try to describe and illustrate the most common moments in photo or video material.
Step 1: Assembling the Door Frame
If you did not buy an assembled door block, the first thing you will have to do is assemble the door frame. It consists of two long posts located on the sides, and one shorter crossbar at the top - the lintel.
Connection methods
There are at least two options for how to connect these planks to each other:

Regardless of exactly how you plan to connect the elements of the door frame, the first step is to cut down the pillars and lintels on one side. Then they are placed in a box on the floor, checking the correct connection. Next, you need to decide on the height of the side parts of the door frame.
Determining the dimensions
When folded, the required length is measured along the inside of the rack. The racks are not always made the same: the floor is often uneven and this must be taken into account. To do this, take a level and check how level the floor is. If it is perfectly level, the posts will be the same. If there is a deviation, it must be taken into account: make one of the racks longer. Usually this is a few millimeters, but this is also enough for the doors to warp.
When calculating the height, keep in mind that the racks should be 1-2 cm longer than the door leaf (including cuts). Make a 1 cm gap under the door if you are not planning to put a rug under it. If there is a rug/carpet/carpet, it is better to make it larger. Don't be afraid to leave gaps. They are necessary for. Please note once again: the height is measured along the inside of the door frame - from the bottom edge to the cut. Having cut it off, try on the racks in the doorway.

Now you need to saw off the lintel to length and, if necessary, saw on the other side (if the joint is at 45°). The length of the lintel should be such that when folded, the distance between the posts is greater than the width of the door leaf. The minimum gap is 7 mm, but more is often done. 7-8 mm are distributed as follows: 2 mm for hinges, and 2.5-3 mm for expansion gaps. Any interior doors - MDF, fiberboard, wood - change their dimensions depending on humidity. To accommodate these changes, clearances are required. And 5-6 mm is not always enough, especially in damp rooms. For the bathroom, definitely leave a little more, otherwise in high humidity they may have difficulty opening.
So, we have decided on the minimum gaps when installing interior doors:
- for hinges - 5-6 mm;
- at the top, bottom and sides - 3 mm;
- bottom - 1-2 cm.
After you have cut all the pieces and made the cuts, fold the box on the floor. If you notice any shortcomings in the joint, correct them using sandpaper attached to a block. The more accurate the match, the smaller the gap.
Assembly
Regardless of the material of the box and the connection method, holes are pre-drilled for the fasteners so that the material does not tear. The diameter of the drill is 1 mm less than the diameter of the screw.
The box is folded and the angles are set to 90°. Holding the stand and lintel in this position, drill holes with a drill. If there is an assistant, he can hold it. If you are working alone, temporarily secure the correctly aligned box with two cross bars - closer to the top and one at the bottom. This will help you avoid mistakes and make the correct connection.

If connected at an angle of 45°, make three holes on each side. Two on top - a centimeter away from the edge, and one on the side - in the center. In total, three screws are required for each connection. The direction of installation of self-tapping screws is perpendicular to the connection line.

If you connected at 90°, everything is simpler. Drill two holes from above, pointing the drill straight down.
Step 2: Inserting the hinges
Most often, 2 hinges are installed on interior doors, but 3 are possible. They are placed 200-250 mm away from the edge of the door leaf. If the frame and door leaf are made of wood, choose a place so that there are no knots. First, attach the hinges to the door leaf. The operating procedure is as follows:
- We apply loops to the selected places and outline the contours. The easiest way to do this is with a finely sharpened pencil, but experts advise using a knife blade. This makes it more accurate and leaves smaller gaps.
- If they have it, if not, take a chisel and select a material for the thickness of the loop. There is no need to make any more sampling, just for the thickness of the metal.
- A loop is installed in the prepared recess. Its plane should be flush with the surface of the canvas.
- The exposed loop is fixed with self-tapping screws.
Having secured two hinges, lay the door leaf in assembled box, set the correct gaps: on the hinge side - 5-6 mm, 3 mm on the opposite side and on top. Having set these gaps, the canvas is fixed using wedges. Positioned exactly horizontally and vertical plane(you can use pads if necessary).
After setting, mark the locations of the mating parts of the loops. Sometimes it is more convenient to remove an already installed hinge and then install it in place. A notch is also made according to the markings. Depth - so that the surface of the hinge is flush with the surface of the door frame.
DIY door hanging is described in detail in the video.
Step 3: Installing the Door Frame
The assembled box must be correctly inserted into the opening. This is a very responsible task. Before installing an interior door, knock down everything in the opening that could fall off. If too loose wall, the surface is treated with primers deep penetration with an astringent effect. If there are too large holes, they are sealed with plaster; very large protrusions are trimmed off. It is easier to insert an interior door into the prepared opening. If this is your first time doing this on your own, make it easier on yourself.
The box is displayed without the door leaf. It is oriented strictly vertically. Verticality is checked not only by level, but also by plumb line. The level often gives an error, so it is more reliable to check with a plumb line.

To prevent the box from becoming warped during installation, install temporary spacers on the floor and bevels in the corners that give high degree rigidity. In order for the doors to open, they are inserted in the same plane with the wall. This is the only way it will open completely. If the wall is uneven, place the box not along the wall, but vertically. Otherwise there will be problems with opening or closing the door.

How to insert an interior door with your own hands - in the same plane as the wall
Once the position is selected, you can secure it. This is done using mounting wedges - triangular wooden or plastic bars. First, wedges are placed on both sides of the lintel - crossbars, then above the racks. In this way, the position of the box relative to the doorway is selected and fixed. Next, the verticality of the racks is checked again. They are checked in two planes so that they are not tilted forward or backward.

Then install the wedges at the bottom, then after about 50-60 cm, checking that the racks are exactly level. The crossbar is also wedged in the middle. Check whether the elements of the box are bent somewhere, and correct if necessary. You can start fastening.
Step 4: Attaching the Box to the Doorway
There are also two mounting methods: through directly to the wall and with mounting plates. If the wall allows and you are not afraid of the fastener caps in the box, you can attach it all the way through. It's reliable.
To install interior doors, it is enough to screw two self-tapping screws into the cutouts for the hinges and, on the other hand, under the plate of the lock mate. Additional holes are drilled in the cutouts. They are made so as not to fall into the holes for fastening the hinges or mating part. Make sure that the head of the screws is recessed and does not interfere with the installation of the hinges and lining.
Installation of interior doors according to this scheme is shown in the video. There are also several interesting nuances regarding the placement of the door frame.
If such a quantity of fasteners seems unreliable, drill through and cover the holes with decorative washers matched to match. Or there is also a special molding made of MDF with removable slats. The fastener is installed in the prepared groove and then closed with a strip.

The second method is secret, the fasteners are not visible. First, the mounting plates are attached to the back of the box. In principle, it can be used for plasterboard, but there are also special ones that are thicker, although when installing interior doors, plasterboard ones will suffice.
Step 5: Foaming
After all the gaps are set and the wedges are installed, the gaps between the frame and the wall are filled with polyurethane foam. For better polymerization, the wall is moistened with water from a spray bottle. Then squeeze out the foam, filling no more than 2/3. Too much a large number of foam may cause the box to blow inward. So don't overdo it.

To ensure that the doors are not warped by the foam, spacers are installed. But if you don't overdo it with foam, nothing should happen.

Spacers for fixing the frame - when installing the interior door this way, the frame should stand level
After the foam has polymerized (the exact time is indicated on the cylinder), the spacers are removed, the door leaf is hung and the operation of the door is checked. Next comes the finishing work: platbands, and, if necessary, additions.
You know how to install an interior door with your own hands. There is nothing overly complicated, but we tried to describe the main nuances. There is a lot of useful information in the video - these are recommendations from practitioners.