A wooden beam under the terrace is bent, how to straighten it. Strengthening wooden floors - ways to strengthen the ceilings and beams of the second floor
There are two options for arranging wooden floors: along beams and along logs. The choice of one or another method of performing work depends on the individual characteristics of the room and the preferences of its owners. Among the advantages of floors made on beams, it should be noted high level their strength and low cost of work. Let's look at how to build floors on wooden beams below.
Floor construction on wooden beams: performing calculations
The use of wooden beams, compared to reinforced concrete ones, is distinguished primarily by their more affordable cost and ease of work. In addition, the floor has almost the same strength characteristics. The use of wooden structures helps reduce total weight house and its load on the foundation base.
Among the advantages of floor beams in a wooden house, we note:
- high resistance and rigidity to loads;
- light weight compared to concrete beams;
- affordable price;
- Possibility of self-installation, without specialized technical equipment.

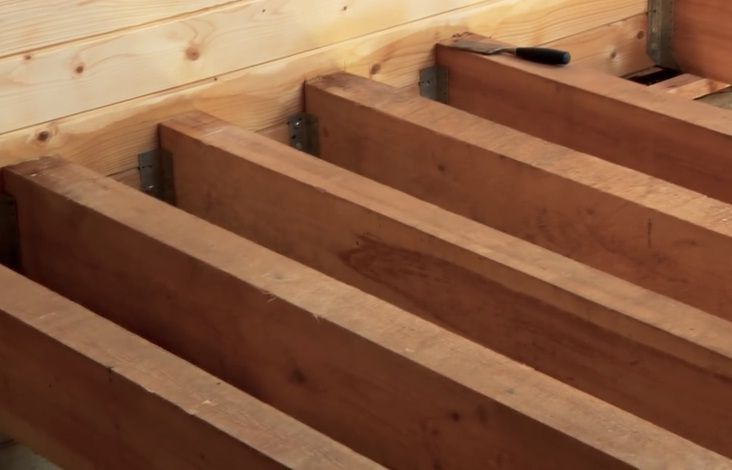
To install a floor on wooden beams, you do not need specialized equipment, since a few people are enough to lay the beams. The main load-bearing element of the structure is wooden beam. She has a shape wooden beam, the height of which ranges from ten to thirty centimeters, and the thickness from seven to twenty centimeters. Optimal step the laying of beams ranges from 65-100 cm. To determine the cross-section of the beam, one should take into account individual characteristics premises, load and weight of the building, span length and other important factors. Wooden boards connected to each other and mounted on an edge will help replace the timber. The use of hewn logs will be the most economical option arrangement of floor coverings.
In order to determine the cross-section of a beam installed in a particular house, you must first determine the level of load that acts on it. To determine the total load, the weight of the floor, the load from people and fittings that will be installed on it are taken into account. General value the total load is four hundred kilograms per square meter. In relation to this value, the section and size of the beam is determined from the table:

If the span is about 4 m, then with an installation step of 65 cm, a beam measuring 10x20 cm will be required. Please note that the length of the beam must be 15 cm longer on each side to ensure its installation in the wall. That is, to determine the length of the beam, add 30 cm to 400 cm, you get 4.3 m.
Correct calculation of wooden beams allows you to select optimal size materials with the help of which it will be possible to correctly distribute the load in the building.
Laying of wooden beams is carried out in a direction parallel to each other. At the same time, the interval between the beams must be maintained in almost all areas, with the exception of chimney pipes and other structural elements ceilings The interval for laying beams in a house made of wood is about one meter. If the house is made according to frame technology, then this distance is reduced to 50 cm. If given value increases in relation to the structural features of the building, then between the beams it is installed additional element, improving their load-bearing capabilities.

If in the area close to the staircase there is no place for attaching the beam, you should arrange it here additional design in the form of a wooden crossbar. This will become the place to install the beams. At the same time, beams can be installed directly on or into the crossbar. In order for beams to easily withstand the loads placed on them, the following requirements must be met:
- the optimal height of the beams will be at least one twenty-fourth of its length;
- the width of the beam should be at least half its height;
- if the beam is installed in the attic, then a width of one third of its height is sufficient.

Using this ratio, it is possible to select the optimal version of beams for arranging floors. If the installation of beams is carried out in a section of fastening grooves, then the size of the beams should increase slightly. In order to reduce the thickness of the beam, if the floor is quite long, support pillars are installed between them.
If the installation of beams is carried out in outbuildings, garages, change houses or other non-residential premises, the level of average load decreases and ranges from 100 to 300 kg per square meter. At the same time, the cross-section of the beams should also be reduced.
If you could not find the specified size of beams, then it is possible to construct them independently using regular boards. At the same time, they are laid in a checkerboard pattern, connecting to each other using nails.
During the further construction of the stove and chimney in the house, one should take into account the fact that the distance between it and the beam should not be less than thirty centimeters.

Flooring with wooden beams: features of installation of beams
The wooden beams are fixed directly to the wall. If the ceiling is installed in the attic, then the beams are installed on the last crown of the wall, made of timber or logs.
A hole should be made in the wall, comparable in size to the beam. Before installation, the beam should be covered with tow. If there are beams that are too thin, they are installed 10-15 cm into the wall. In this case, a special cutting method is used. It is possible to attach the beam using a connection called a dovetail.
This option is suitable for houses that are also made of timber. To fix the beam in a house made of wood, a trapezoidal connection is used, and a clamp is installed for additional strength. In this case, the crossbar and the beam will be on the same level. The easiest way to install floor beams is to install cranial bars and fix the beams on them. In this case, the size of the bars will be about 5x5 cm.

If the house is made of panels, then to lay the beam you should make a hole in the wall in the form of a nest. Each end of the beam is installed inside the holes. In this case, each beam socket must be at the same level. The optimal depth of the nest is about 15-20 cm, and the width between the beam and the wall is about 1 cm. Each of the ends that is installed in the nest is lined with tow. Next comes the process of treating the beam with an antiseptic solution. Thus, it will be possible to extend its service life and protect the coating from mold and mildew.
It is possible to fix the tow using steel anchors. One end of the anchor is installed in the socket, and the second is fixed on the beam with screws, while the length of the beam is calculated so that it does not fit into the wall and is equal to the length of the floor.
If the house is made of brick, then the installation of wooden beams will also require the construction of nests. They are supporting elements for holding beams. Try to build the nests as level as possible. In order to install the beams at the same level, you will need to level the bottom of the nests using concrete mortar. After the concrete solution has completely dried, roofing felt or roofing felt is installed on its surface to protect the wood from moisture.

In this case, the size of the nest is 6-10 cm larger than the thickness of the beam. The gap between the wall and the wooden beam should be about three centimeters. The depth of the nest is about 20-25 cm, but the beam is installed inside only 15 cm. The areas of wooden beams that are placed in the nest should be coated with hot bitumen.
Next, they are wrapped with roofing felt or glassine in two layers. After this, the rest of the beam is covered with a solution with antiseptic properties. After laying the beams in the nests, they should be filled with concrete mortar, for which crushed stone is used as a filler. The beams are aligned flush with the wall.

Flooring with wooden beams: features of floor construction
The rolling part of the floor is the ceiling on the rolling floor. There are several ways to lay out flooring. Most often, cranial bars are installed on the beam, the cross-section of which is 4x4 or 5x5 cm. The cranial bars are installed in such a way that they are flush with the beam. Next, a wooden roll is laid on the surface of the bars in the form wooden planks, the thickness of which is from 10 to 20 cm. At the same time, there should be no gaps between the boards. A ready-made wooden panel or ordinary plywood will help replace the boards. In order to arrange flat ceiling on the lower floor, installed on top of the runway plasterboard sheets or plywood.
Using another method of installing the roll-up, it is possible to significantly increase the ceiling area, if it is not large enough. Bars with a cross-section of 4x4 cm are installed on a wooden beam. The roll is laid on them, and its installation is carried out perpendicular to the beams. Next comes the installation of the filing in the form of boards, the thickness of which is the same as that of the previously installed bars.

In addition, to make the knurling, a beam is also used, the thickness of which is from 6 cm. Skull bars, the cross-section of which is 4x4 or 5x5 cm, are installed on the beam. Next follows the process of laying the beam. In this case, they are connected using the quarter method using a cut groove in the beam . The thickness of the beam depends on the height of the beams; they should be located at the same level. In this case, the beam performs the function of both rolling and filing. In addition, making a fastening groove inside the beam will help replace the cranial bars. In some cases, the bottom of the beams is left exposed and unfinished. This method relevant when used in a country style room.
Installing a floor on wooden beams: technology for performing the work
Next comes the process of arranging the floor on wooden beams. To begin with, bars are installed on each of the beams, in relation to which the surface of the flooring is formed. This stage involves adjusting the floor and constructing a rough covering. Therefore, it is allowed to use unplaned boards, however, it must be covered with protective materials and impregnations.

Next comes the work of waterproofing the decking. The best option is to use a clay-sand mortar that has the consistency of putty. Another option for performing waterproofing work is to use roofing felt. With its help, it is possible to provide high-quality waterproofing that does not take up much space. After this, the process of providing thermal insulation follows. The most popular materials for carrying out this work are the use of:
- slag poured between the beams;
- mineral wool;
- polystyrene foam;
- non-polystyrene;
- sawdust or expanded clay.

The most popular insulation for floors on wooden beams is mineral wool. It has high thermal insulation abilities, has a long service life, is resistant to rodents and is quite antiseptic.
Mineral wool is installed in such a way that it fits tightly to the floor surface. After this, a vapor barrier is installed, since this material not resistant to moisture, which can reach it through a wooden floor.
Further actions are related to the arrangement finishing flooring. It is possible to install it directly on beams, but it is best to pre-install the system from logs. Thus, firstly, under the flooring there will be extra space and ventilation, secondly, the noise level emitted by a wooden floor will be significantly reduced.
In addition, it is possible to construct a floating wooden floor. Warm floors on wooden beams are distinguished by the presence of rigid fixation to the surface of the walls. In addition, it has excellent sound insulation characteristics and low level creaking. As a final finishing material for arranging a concrete floor on wooden beams, planed floorboards, chipboard, laminate are used, parquet board or linoleum.
Wood beam subfloors are widely used architectural elements in building construction. Depending on the specific location and characteristics of the buildings, they perform various functions and differ in arrangement technology.
Subfloors are used for the following purposes.


The technology for making subfloors largely depends on their specific purpose.
Design features of subfloors
Features of the manufacture of subfloors take into account the methods of attaching beams or floor joists. Beams can be installed on different structures.
Table. Structures on which beams can be installed.
| Design name | Brief characteristics |
|---|---|
| This option is used during the construction of wooden log houses or panel houses. On columnar foundations Load-bearing elements of the first floor floor are installed. Due to the fact that the lower surface of the beams rests on the foundation, the subfloors can only be fastened to the cranial beam. They are fixed to the side surface of the joists or beams. Except in cases where the beams are made of round timber and do not have flat side surfaces. The second option is to install subfloors on top of the beams to support the base of the finishing flooring. |
| Subfloors are made on joists, fixed to the side cranial bars or top surfaces. A waterproofing barrier is used between the slabs and beams. |
| The ends of the beams lie on the foundation strip or lower crowns log house The subfloor can be installed both on the side surfaces and on top or bottom of the beams. |


It must be borne in mind that fastening the subfloors to the skull beam reduces the thickness of the insulating layer. If the width of the beams or joists is less than 15 cm, then it is not advisable to use this option. The point is that the recommended minimum thickness insulation is more than 10 cm; with a decrease in this indicator, the effectiveness of insulation is significantly reduced.

Beams are supporting elements for the construction of a floor or ceiling; they must withstand maximum design loads and have a safety margin. Depending on the purpose and operating conditions of the premises, the thickness of the beams and the distance between them are selected. The materials can be used beams with dimensions of 50×50 mm or more or boards with parameters from 50×150 mm. On lumber with smooth surfaces, the subfloor can be attached from the bottom, side or top; on round beams - only from the bottom or top.

Table. What elements does a classic subfloor consist of?
| Item name | Purpose and description |
|---|---|
| Main load-bearing element, absorbs all static and dynamic forces. In each individual case, individual calculations are made based on linear parameters and distance steps. Can rest on posts, foundation strip, floor slab, façade walls or bearing interior partitions. |
| Size - approximately 20x30 mm, fixed to the side surfaces of the beams, used for laying subfloor boards. |
| The waterproofing is laid on the subfloor, which serves as the foundation for the finishing floor. Vapor barrier is used to protect insulation from increased relative humidity; it is used on the first floors or ceilings. |


Depending on the specific placement and purpose of the subfloors, the listed elements may be added or excluded. We'll look at a few of the most commonly used types of subfloors.

Subfloor in a log house on beams
The beams must be thoroughly soaked with an antiseptic, preferably at least twice. The ends can lie on a strip foundation or timber, between concrete and wooden structures Two layers of roofing felt waterproofing must be laid. The upper and lower planes of the beams are hewn with an axe, side surfaces sanded. The subfloor will be made from sheets of moisture-resistant OSB approximately 1 cm thick. Keep in mind that the final thickness of the slab should be selected taking into account the distance between the beams. The main selection criterion is that the sheets should not bend under their own weight. You can also use cheaper materials: unedged sanded boards of the third grade, used lumber, pieces of plywood, etc.

Practical advice! If you plan to insulate the floor, then it is recommended to maintain the distance between the beams within 55 cm. The fact is that pressed or rolled wool has standard width 60 cm, due to this distance between the beams, the insulation will be pressed tightly against the side surfaces, and this greatly increases the efficiency of insulation. In addition, mineral wool does not have to be cut, which speeds up construction work and minimizes the amount of unproductive losses of expensive material.

Step 1. Place the beams in place at the specified distance, check the position of the top surfaces - they should all lie on the same level. It is better to use a rope to check. Stretch it between the two outer beams and adjust all the rest to this level. To adjust it, it is better to cut off the excess height; if this is difficult to do, then you can use pads. Professional builders It is not recommended to use wooden wedges; they will shrink over time. It is much better to use plastic or metal ones. Use a level to check the horizontal position of the beams.
Step 2. Remove the beam, unscrew it from the square. In the future, the element must be installed in the same place, otherwise the linearity of the finished floor may be disrupted, and unpleasant squeaks will appear when walking. Turn it upside down and place it on a free space on the foundation.
Step 3. From OSB boards, cut strips 5–6 cm wider than the width of the bottom of the beam. The length does not matter; if necessary, the strips can be joined.
Practical advice! In order to save material, not continuous strips can be screwed into squares at the bottom of the beam. The distance between them is 30–50 cm. The subfloor does not bear any load, the mass of insulation is negligible, and there is no need to make strong shelves to install the subfloor.

Below, across the beams, beams are packed - one of the possible options

Step 4. With help electric drill or a screwdriver, secure the strips to the beam. Use self-tapping screws, the length of which should be at least one third greater than the thickness of the OSB board. Otherwise, the fixation will be fragile. Instead of self-tapping screws, you can use ordinary nails of appropriate sizes.
Step 5. Proceed in a similar manner with all remaining beams. Unscrew them one by one, fix the OSB strips and install them in their original place.
Step 6. Cut the OSB boards to fit the width of the subfloor. If you have accurately maintained the distances between the beams, then you can prepare all the elements at once. If for some reason the distances between the beams are not the same, then each strip will have to be measured separately.

Step 7 Place the sheets on the shelves. There is no need to achieve a complete absence of gaps; the subfloor for insulation does not require exact adherence to dimensions.

Practical advice! To make work easier, cut the sheets 1–2 cm narrower than the distance between the shelves. The fact is that the beam has bulges on the sides that narrow the clearance; by slightly reducing the width of the sheets, it is much easier to install them in place. Another advantage of reducing the width is that a compensating gap appears. OSB boards change quite significantly during changes in relative humidity linear dimensions. If there are no compensating gaps, the sheets may swell. This is not critical for the subfloor, but swelling indicates low qualifications of the builders.
Step 8 To reduce heat loss, you can fill all the cracks with foam.

At this point, the production of the subfloor is completed, and you can begin laying the insulation. How to do it?
Step 1. Place a vapor barrier on the beams and subfloor, do not stretch it too tightly, and fasten it to the wood with a stapler. For vapor barrier, you can use expensive modern non-woven materials or ordinary cheap plastic film. There is no difference in efficiency, but the price may differ by an order of magnitude. Vapor barrier is a mandatory element, do not neglect it. The fact is that mineral wool reacts extremely negatively to increased humidity. As the indicator increases, thermal conductivity increases exponentially, which sharply reduces the effectiveness of thermal insulation. Another operational drawback is that the material takes a long time to dry. This means that wet wool will have prolonged contact with wooden structures. Such unfavorable conditions significantly reduce the service life of lumber.
Important! Never store insulation in open areas. If you suspect high humidity, dry the material thoroughly, use only dry cotton wool.
Step 2. Place the first layer of mineral wool 5 cm thick on the subfloor. Press the edges tightly together, avoiding the formation of gaps. Pressed mineral wool is slightly compressed and has elasticity, which allows it to occupy the most convenient place.
Step 3. Lay the second layer of insulation with the seams offset. To do this, first place the piece remaining from the last piece of pressed mineral wool. Using the same algorithm, insulate the entire area of the subfloor. Floor insulation thickness for northern regions countries must be at least 15 cm, for average climate zone 10 cm is enough.
Practical recommendation! You should not insulate the floor with one thin layer mineral wool, a thickness of 5 cm has almost no heat saving effect. Especially on the first floor, where there is a permanent natural ventilation and heat is quickly removed from the premises.
Step 4. Cover the insulation with waterproofing. For this you can use any special materials. The waterproofing is fixed with a stapler, the width of the overlaps is at least 10 cm, the ends of the material are hermetically sealed with tape.
Step 5. On top waterproofing membrane nail 20×30 slats or remaining OSB strips onto the joists. The slats will ensure ventilation of the finished floor and prevent mold from appearing underneath it.
The underground must have ventilation holes that provide multiple air exchanges. Don’t forget to cover the openings with metal bars to protect the underground from rodents. Modern mineral wool has very thin fibers; rodents can easily make passages in it and build nests. As a result, not only the thermal protection indicators deteriorate, but also mice appear in the premises.
At this point, the subfloor is completely ready, you can begin laying the finished floor boards.
Subfloor on the attic floor
It has several options; for example, we will consider the most complex of them. It is better to file the ceiling before installing the subfloor, but this condition is not necessary. When working with mineral wool insulation, it is recommended to use a respirator or mask to protect the respiratory system, and wear rubberized gloves on your hands.
Because ceiling covering missing, nail from below vapor barrier membrane. Attach it securely; at first it will support the weight of the insulation.
Important! When performing further work in the attic, make special passages for walking and place long boards in these places. To increase safety, it is recommended to temporarily fix them. The boards will somewhat complicate the process of laying insulation, but they will minimize the risks of unpleasant situations.
Step 1. Start laying insulation in the space between the beams attic floor. We have already mentioned that when calculating the distance between beams, you need to take into account the standard width of materials for thermal insulation. Lay it as tightly as possible; if there are two layers, then their joints should be offset.
Important! When laying rolled mineral wool, do not allow sharp bends - in these places the thickness of the insulation is significantly reduced and a cold bridge is formed. And one more piece of advice. Do not press down the cotton too much or artificially reduce its thickness. Unlike the pressed one, the rolled one cannot withstand any loads.
Step 2. Install a wind and vapor barrier membrane. Rolled mineral wool is easily blown through by drafts, and along with the supply fresh air heat is removed. The membranes are fixed to the beams with a stapler. Professional builders do not recommend stretching the membranes too much; it is advisable that they lie loosely on top of the insulation. In case of leaks, water will not get onto the insulation through the holes made by the stapler staples.
Step 3. Secure the membrane to the beams with thin slats. Lay subfloor boards on the slats. They can be screwed on with self-tapping screws or nailed.
Subfloor for laminate
This type of subfloor requires a more demanding attitude to the quality of the coating. If floors are made between floors, then insulation can be omitted. Warm air from the premises of the first floor does not go to the street, but heats the second floor. Due to this, the microclimate parameters of the rooms on the second floor are improved. Insulation is done only on attic floors.
The subfloor serves as the base for laminate flooring and must meet three requirements.
- Hardness. The thickness of the boards and the distance between the beams are selected in such a way that deformation of the planes is completely eliminated under the maximum possible loads.
- Humidity. The relative humidity of lumber should not exceed 20%. Before laying, the boards must be dried in a heated room for several days. During this time they will acquire natural humidity and will not change linear dimensions.
- Flatness. The deviation in plane height cannot exceed two millimeters per two meters of length. Otherwise, the laminate floor will begin to make very unpleasant sounds while walking, appearing due to the friction of the elements in the connecting locks. It is impossible to eliminate these sounds. You will have to completely dismantle the flooring, level the subfloor and only then lay the laminate again. The work takes a long time and is expensive, it is better to immediately pay attention to the quality. For subfloors, you should only use lumber that has been passed through a double-sided planer. The final adjustment of the subfloor to the laminate can be done parquet machine or with a hand plane. The choice of tool depends on total area coatings
The evenness of the base should be checked with a long level or rule; apply tools in various places subfloor and pay attention to gaps. If deviations are detected, the plane should be leveled with one of the tools. If the difference in height of the subfloor does not exceed a millimeter, then unpleasant creaking may disappear on its own after a few months of use. During this time the elements lock connection will partially rub in, the abutting parts will reduce their thickness. Those that are not used in are slightly deformed, due to which the density of the locking joint decreases. These changes will not affect the quality and durability of laminate floors.
When fixing the subfloor under the laminate, you need to slightly recess the heads of the nails or screws into the boards. The fact is that it is even theoretically impossible to achieve a perfectly even fit of the boards to the beams. Over time, in places where the boards sag, the nails may come out slightly from the beams, causing the head to rise above the plane of the boards. This is very undesirable for laminate floors. They are laid on a special bedding and have hermetically sealed waterproofing. Hardware caps with sharp edges damage the membrane layer, the tightness of the waterproofing is broken. Moisture that gets between the laminate and the subfloor through the holes causes fungi and rot to appear on the wood. It is impossible to see the problem in a timely manner; it is discovered after the lumber has lost its original properties. As a result, elimination requires complex special measures; sometimes it is necessary to change the supporting structures.
On a note! Wooden beams should be able to move a little, never fix them in a stationary state. Today there are special metal stops on sale that allow the ends to move along the length.
And one last thing. The most the best option for laying subfloors under laminate coverings, waterproof OSB boards or plywood. Sheets big size, due to this, the number of joints is minimized, and it is much easier to smooth out sudden changes in height. The slabs must be laid with damper gaps approximately 2–3 mm wide, which will compensate for the thermal expansion of the material. Otherwise, swelling of the laminate floor is likely; eliminating it will require the complete dismantling of both the finishing coating and the leveling base.
Video - OSB subfloor


Leveling wooden ceilings with your own hands will help you significantly save money on hiring third-party workers. However, in order to achieve a truly smooth and durable ceiling as a result of the work, it is necessary to strictly follow the technological process.
The content of the article:
Technological process of leveling wooden ceiling includes several stages: preparatory work(cleaning the surface, laying wiring, insulation), treating wood against pests, applying a primer to improve the quality of the original material and increase adhesion, marking a new ceiling plane, installing auxiliary elements, leveling the wooden ceiling. Let's look at the features of each of them.
Ways to level a wooden ceiling

Leveling the ceiling can be done in two ways. They are usually called “dry” and “wet”. The first is leveling using profiles and drywall, the second is plastering. Each option has its own advantages and disadvantages, as well as application conditions.
It is advisable to use plastering if the depth of unevenness does not exceed 3-5 cm. Too thick layer plaster makes the ceiling heavier, increasing the risk of it peeling off. With the “wet” method of leveling the ceiling, areas with fairly deep differences must be covered with shingles. To level a wooden ceiling better, use beacons.
Preparatory work before leveling a wooden ceiling

Preparing a wooden ceiling for leveling includes several stages:
- Check the ceiling for flaws, such as damage to boards and beams by pests, mold, and mildew. Replace heavily damaged parts of the structure and fastenings with new ones to avoid serious damage in the future.
- Remove old plaster. Those areas that hold tightly and will not interfere with further work can be left.
- If the ceiling was previously painted with water-based paint, use a solution consisting of water with the addition of iodine to remove it.
- Water-dispersion paint is washed off with special solutions, for example, Docker S4 quick-action gel solution (retail price - from 260 rubles per 1 kg). This product does not contain acid.
- Cut off any small protruding parts using a plane.
- If the boards are smooth enough, make notches on them for better adhesion of the solution to the wooden surface.
- The preparatory stage is the most best time for preventive treatment of wood against fungus and mold.
- Install electrical wiring.
- If necessary, install insulation and vapor barrier.
- Large cracks between boards can be repaired using rough putty and tow. The tow is thoroughly mixed with putty and driven into the cracks.
Fighting fungus and mold on a wooden ceiling

Fungus is a fairly common occurrence. It occurs when there is excessive humidity and poor ventilation air, as well as in case of insufficient heating of the room during the cold season. It affects any surface, including wooden products.
The fungus most commonly found on wooden surfaces has a bluish tint. This species is just as dangerous as the others: mold and decay fungi, as well as actinomycetes.
The bluish fungus destroys the structure of the wood, which is why moisture penetrates into it and lingers there. Due to this, mold and rotting fungus develop. The process of destruction of a wooden ceiling occurs quite quickly. This is why treating wood with antiseptic agents should not be neglected.
It is known that fungus can penetrate 1 cm or more into wood. If there are such areas, it is better to remove them and replace them with new boards. If the thickness of the boards allows, use a sharp knife or ax to cut out the affected areas. Waste containing fungus should be burned to prevent its spores from spreading.
Treat the entire surface of the ceiling with a brush or roller with an antiseptic, for example, Nortex-Doctor (from 100 rubles per 1 kg) or Nortex-Disinfector (from 170 rubles per 1 kg). Nortex-Disinfector is highly effective against serious damage to wood by fungus, as well as wood-boring beetles and termites. When purchasing an antiseptic, read the rules of use (material to which the product is applied, its consumption), and precautions.
Pay special attention to fungus control. Fungal spores enter the respiratory and digestive system, on the skin, causing harm to the entire body in the form of allergies, indigestion, sinusitis, pneumonia and other equally dangerous diseases.
Marking a wooden ceiling before leveling
Marking - important stage in leveling the ceiling. The final result depends on its accuracy, as well as the choice of the alignment method that will be most appropriate in a particular situation.
Rules for marking a wooden ceiling

A laser or bubble level is used to mark the ceiling. A laser level provides high accuracy with minimal effort and time, unlike a bubble tool. DEFORT DLL-9 is one of the cheapest manual laser levels(cost - from 440 rubles). The bubble level is used in conjunction with long rule, it is best to connect them to each other using tape.
- To accurately mark the new position of the ceiling plane, focus on the lowest areas.
- As you measure, make marks on the walls around the entire perimeter. Drive nails into them and pull a tight thread, tying it to the nails.
- If, as a result, the differences in the plane level are small - up to 3 cm, then you can use the “wet” leveling method, i.e. applying plaster.
Using shingles when leveling a wooden ceiling

If there is a second floor or attic above the room in which it is necessary to level the wooden ceiling, then shingles should be installed over the entire surface of the ceiling.
Shingles are a mesh of wooden slats 3-5 mm thick. The slats are stuffed onto wooden surface in two rows. The cell size is 5 by 10 cm. The second row is filled in a parallel plane at right angles to the first.
Applying shingles reduces the cost of plaster solution and also reduces the likelihood of a thick layer collapsing.
Installation of beacons for applying plaster to a wooden ceiling

Lighthouse - a special guide profile. Its task is to regulate the final level of plaster application.
The rules for installing beacons are as follows:
- Beacons are attached to the ceiling parallel to each other.
- The distance between them should be less than the length of the rule with which the solution will be drawn. If the width of the room is 3 meters, then fix the first beacon 50 cm from the wall parallel to it, the second - 150 cm, the third - 250 cm. With this option, the rule should be 160 cm, so that when stretching the mortar from the wall to the first beacon, the rule also relied on the second lighthouse.
- Install beacons in deeper areas so that the level of the new plane does not decrease. Then the layer of plaster will be smaller, because the new plane will run along the most protruding section of the ceiling. If the lighthouse is installed in the most protruding part, the ceiling level will decrease by the height of the lighthouse.
- Beacons should not be too flexible, otherwise they will sag when pressed as a rule.
- The optimal option for fastening the beacon profile is “eared”.
“Ushastik” is a fastening part for beacons, consisting of a screw and fastening. Installation of the “eared”: a screw is screwed into the leveled surface (it is possible to use a dowel), to which it is attached plastic mount with a plug that holds the beacon tightly. Using such fasteners, you can easily adjust the level of the beacon by screwing in a screw. The “ears” are installed at the required level. Then beacons are attached to them.
Priming a wooden ceiling before leveling
Before plastering, be sure to prime the entire wooden surface of the ceiling. The purpose of applying a primer is to deeply impregnate the wood. The solution fills microcracks, strengthens the structure, and prevents moisture penetration. The primer is designed to improve the adhesion of plaster to wood.
Rules for working with primer:
- Wear gloves and a hat when working.
- Wash all equipment immediately after finishing work with the primer.
- Apply the primer in several stages. The time specified in the instructions should pass between applications.
- Apply primer with any in a convenient way: brush, roller, spray.
Exists big choice primers. They can be classified by composition, type of surface being treated, and purpose. To purchase the most suitable primer, correctly explain to the seller what material will be processed and what coating will be applied.
A universal primer, in addition to increasing adhesion, improving the strength of the material, increasing resistance to external influences, is designed to fight pests, fungus and mold.
Leveling a wooden ceiling with plaster
Can be used as plaster on a wooden ceiling cement mortar homemade or other mixtures that are more flexible, for example, Rotband plaster. Rotband Knauf is a universal gypsum-based mixture that has good binding properties (retail price - from 400 rubles).
- The solution for leveling a wooden ceiling should be mixed in a small amount. The mixture containing gypsum dries fairly quickly.
- The prepared solution should be applied immediately.
- The solution should not be too liquid or solid. A liquid solution tends to spread during operation, while a solid solution does not adhere well to the surface.
- Using a construction mixer will reduce the time of mixing the solution, and the solution will be more homogeneous.
Applying the plaster should begin after the primer has completely dried.
- Apply the prepared solution using a spatula, starting with inside rooms, moving gradually towards the window opening.
- Apply the solution to small areas- up to 80 cm in length.
- Stretch the rule towards you. As a rule, press moderately against the beacons.
- In those areas where the leveled beacon is located at some distance from the ceiling surface, i.e. There is a gap, it is better to apply the plaster in two layers. The first layer is applied before attaching the beacon and is immediately covered with a painting mesh. In this case, the mesh should be slightly pressed into the applied solution by 3-4 mm. Next, the beacon is attached, and the final layer of plaster is applied, leveled along the beacons.
- Reinforcing mesh must be used over the entire ceiling area if the plaster layer exceeds 1 cm.
- When the solution has already been applied to the entire surface of the wooden ceiling, remove the beacons. If the beacon is made of a material that is resistant to oxidation, then it can be left without fear of rust.
- The recesses from the beacons should be sealed with the same solution.
The starting putty has a medium grain size and is used for initial leveling of the surface. The finishing putty has the smallest grain, which is why it is suitable for final smoothing of the surface.
Watch a video about wooden ceilings:
It is necessary to perform several basic tasks regarding a level and durable floor laid on joists. This is the exact alignment of the logs in one horizontal plane, their reliable fastening to the base, processing protective compounds, plus waterproofing the entire structure. Before you align the logs under the wooden floor, you need to select them correctly according to their cross-section. Because this indicator affects the reliability and strength of the entire structure. If the house is undergoing renovations and the joists have already been installed, it is recommended to open the floors and check the beams for their quality condition. If necessary, some of them are replaced with new ones.
New products appearing on the market floor coverings, which required a very flat surface when laying, were supplanted by the technology of constructing floors using joists. They were replaced by screeds filled with cement-based mortars. This simplified the process of leveling the base for finishing, but this technology also had several disadvantages. One of them was that we had to wait a long time for the screed to dry. And this could take several days.
Modern technologies for the production of lumber have brought back the method of constructing a floor using joists due to the correct geometry of the products produced, through the use of dry wood. They came to help protective impregnations, which penetrated the wood, increasing its service life and preventing deformation under loads. Manufacturers, using new technologies, began to produce improved, inexpensive materials for flooring joists. This is not only plywood, I would like to mention OSB boards. With the help of durable and smooth sheet and panel materials, it became possible to lay laminate, linoleum, and ceramic tiles on the floor along joists.

We must also pay tribute to the fact that wood construction has become fashionable again. Increasingly, customers give their preference to construction wooden houses. And in such houses, wooden floors look harmonious. Although logs for floor construction are used not only in wooden structures. Today they are also used in city apartments, especially on the ground floor, when the task is to insulate the floors.
But this design also has its drawbacks.
- Even wood floors treated with fire retardants are still flammable structures.
- It is not possible to install a heated floor heating system in them.
- When installing joists in apartments, be prepared for the fact that the ceiling height will decrease.

Design features of the installation
If we are talking about installing joists in a city apartment, then there is only one option for placement and alignment - laying it on a concrete floor slab, which is filled with a concrete screed on top. In principle, the result is a fairly flat surface, but 100% flatness is still a long way off. Therefore, the logs in the apartment will still have to be leveled.
In houses, floors are constructed in three ways:
- On the ground. The upper edges of the foundation are backfilled in several layers of different materials: crushed stone, sand, clay. All this is compacted and a screed is poured on top. The logs are installed along it. As an option, the logs are leveled along the foundation and filled completely. Only their upper ends remain on the surface, to which the flooring is attached. In this case, it is better to backfill with sand, and the wooden elements must be treated with protective agents before installation.
- On the foundation with or without support columns.
- Along load-bearing beams.

Leveling joists in an apartment
First of all, you need to determine the highest place on the floor. Usually this is either a corner of the room or one of the edges near the wall. Therefore, we measure the height of the ceiling in each corner of the room. Smallest size– this is the necessary place. Now, from this corner to the others, a liquid building level is stretched from a transparent vinyl chloride tube, which is filled with water, and an air bubble is left inside. If the bubble rises to the designated corner when the level is set, it means that the assumptions were confirmed - this corner of the room is the highest. The same can be done with the middles of the floor edges adjacent to the wall surfaces.
- Now a log is installed on the floor, one end of which is located in the selected corner of the room. The distance from the wall is 5 cm in the middle of the longitudinal axis.
- The opposite end is raised so that a short level placed on the joist shows the evenness of the installation. That is, the air bubble in the chamber should stop in the middle.
- A lining, previously cut from a block or plywood, is inserted under the raised end. There can be several spacers, it all depends on the magnitude of the plane difference.
- The log stands horizontally. It can be fixed to the floor, for example, with metal corners.

Now we need to install another joist element at the opposite wall and align it horizontally and in the same plane with the already installed one. Depending on the width of the room, you can use either a flat wooden strip or a long two-meter rule for this. One end of them is installed on top of the laid log in the corner of the room. You can start from any end. The rule is set to the horizon, which will be shown by an air bubble. A log is placed under its free end, and pads are placed at the end of it. The same is done with the other end. After which the log is attached to the floor.
So, two logs are installed and secured to opposite walls. Now between them you need to stretch several threads (4-5 lines), which will indicate a horizontal plane. The threads are attached at the upper ends to nailed nails. Now intermediate logs are installed along the threads, under which pieces of plywood or wood are placed. The main requirement is that the threads must touch the upper ends of the lags.
Manufacturers today offer adjustable designs with which you can easily set the logs. These are metal or plastic devices that are attached to the floor with dowels or anchors. They are equipped with beams that can be raised or lowered using threaded connection. Using this leveling option, you do not have to carry out complex measuring operations to determine the highest point on the floor.

Instead of adjustable designs you can use ordinary anchors, which are screwed into one end concrete base floor. A nut is screwed onto them and a wide washer is installed on top. A log is put on, on top of which a wide washer is installed and a nut is screwed on. Essentially, this is still the same adjustable device.

Alignment with foundation and supporting beams
The operation of leveling the logs along the foundation and along the beams is carried out in the same way. But there are also differences.
By foundation
Typically, the ends of the logs rest on the foundation, which is the basis for the floor. It is always not poured evenly, so the logs have to be placed in the same plane along the horizon. Here everything is done almost exactly the same as in the apartment.
- Two logs are installed at opposite walls.
- Each of them is aligned horizontally using building level with pieces of plywood placed under the ends.
- Threads are stretched between their ends, which in turn are checked for drop. The joist that is higher in height will be the main one, that is, the starting point in the process of leveling all other joist elements. It must be immediately secured to the foundation and walls of the house.
- The ends of the second outermost log are placed along the stretched threads, which is also immediately secured.
- Several more threads are stretched between the bars, defining the horizontal plane. Intermediate elements of the joist structure lined with plywood or wood are placed on them.

If the distance between the edges of the foundation is large, then support columns are built between them, on which the beams rest. The main requirement for constructing supports is to accurately adjust their height so that the logs fit tightly on them. If this cannot be done as accurately as possible, then pads are placed under the bars.
Along load-bearing beams
The floor structure based on load-bearing beams is considered very reliable. Installed on the foundation or ceiling large section beams or logs on which the logs are mounted. There are two options for leveling the floor structure.
- The beams are leveled.
- The logs are leveled.

It is more difficult to level with logs, because this lumber is not even in cross-sectional geometry along its entire length. Therefore, craftsmen try to process the upper and lower planes with a plane to give it the appearance of a plane. In this regard, it is better to use timber, because it rectangular section a material that today manufacturers produce with precise geometry.
- First, two beams are laid on opposite sides.
- They are leveled along the horizon, supported by pieces of plywood, but preferably metal plates.
- Then they are aligned in the same plane with each other, as was described with the foundation joists. That is, the log located above is left in place. Additional metal elements are placed under the second.
- After that, intermediate beams are placed along the tensioned threads.
- And the logs are laid and fastened along the beams without leveling.
Alignment of lags along beams is carried out in the same way. This option is easier in that it will not be necessary to lift heavy logs and beams to place plates under them. First, the logs are installed across the beams. That is, the logs are mounted on a large number of supports. Secondly, the beams themselves are reliable and solid foundation. Therefore, when choosing a lag section, you can choose beams of a small cross-section, such as those used to construct floors in apartments.

The leveling process itself is carried out exactly the same as in an apartment. There is only one deviation - the logs can be attached to the beams or with self-tapping screws directly, since both elements are wooden, or using metal corners. Otherwise, the installation technology is the same.
Another problem was observed in the wooden part of the house: the ceiling beams sagged by 10-15 centimeters. Probably, such a problem did not arise immediately and the logs holding the ceiling boards sagged over the decades of the house’s life. While there were interior partitions in the four-wall space, the curvature of the logs was not very noticeable, and perhaps these partitions supported the beams.
Walking through the attic, another problem was noticeable. The entire ceiling flooring noticeably swayed and sagged under the weight of a person.
One way or another, something had to be done about it, and in fact there are several ways to level the ceiling.
Leveling with metal profiles and plasterboard
A neighbor told me about the first method (they did it for him). The logs of the beam remain as is, and the curvature is leveled with sheets of drywall and metal profiles. The profile is attached strictly horizontally below the beams, and plasterboard sewn onto it forms a flat ceiling surface.
With this method, the ceiling level naturally decreases noticeably, and this is why we did not like this method. The ceiling in old wooden houses is already lower than the usual two to fifty modern apartments, and here there is another 15-20 centimeters minus. It will turn out to be a dugout. In addition, drywall cannot solve the problem of beams sagging when walking in the attic.
Leveling with floor supports
The second method is to install supports under the beams in the middle of the span. That is, the ceiling is raised with a jack, and in the middle, with emphasis on the floor, pillars made of wooden beams or round timber are installed. Subsequently, these pillars are hidden in partition walls.
The disadvantages of this method are the mandatory presence of partitions and the additional load on the flooring.
When installing the partitions, I still raise the beams, but mainly in my reconstruction the third method was used.
Aligning the ceiling with reference to the rafter beams
The third and fourth options are suitable for those whose rafter system is made the same as mine. In my house there are five logs running just above the four ceiling beams. rafter system. Over the years of stress on their edges, they also bent a little, but in the opposite direction. Actually, these logs were used as support.
Round timber spacers with a diameter of 8-10 centimeters were installed between the rafter beams. The ends were cut at an angle so that the round timber rested exactly and flush against the rafter beams. The spacers were nailed to the logs of the beams.

Photo of attaching the spacers to the rafter beams.
The clamps were made from a 20x4 mm steel strip 60-80 cm long. 12 mm holes were drilled at both ends for screws. There were two clamps and two spacers for each beam.

After installing the spacers, the actual lifting was carried out. It was installed from below on a stand made of timber hydraulic jack. A pillar made of round timber was attached on top of it, resting on the ceiling beam. Then the jack's work continued and the ceiling rose.


This system is not secure. When climbing, a wooden pole can turn to the side (I have 2 cases of 4 climbs), so a helmet won’t be superfluous here. It is advisable to cut the post to its maximum height, rather than select pads for the bottom. It is advisable to place the jack itself as low as possible, more stable, and preferably not on a beam, but on a steel plate. The load on it is less than when lifting the entire log house, and a six-ton truck is quite enough, but nevertheless...
At the top, the end of a post in a ceiling beam can leave a noticeable dent, and if important appearance logs, then you should put a board there.
The beam rises until it bends in the opposite direction, taking into account the fact that even if it is secured, it will sag after lowering the jack. The raised log is secured in the attic to two spacers with clamps and screws (10x120 mm).

Photo of the secured clamp.

Animated drawing of the ceiling rising.

A photo of what ended up in the attic.
It was not possible to completely eliminate the sagging; out of 10-15, one or two centimeters still remained. Moreover, the beams were bent with a reserve with a jack, but in the end the rafter logs sank. You will have to correct this matter when installing the partitions.
However, the ceiling swaying when walking through the attic stopped
Raising ceiling beams with studs
The fourth method was used when leveling the same beam in a tristen. The same spacers were used in the rafter beams, but instead of clamps there were steel studs with M10 threads. The ceiling beam and spacers were drilled through. And the lifting was carried out not with a jack, but by tightening the nuts on these studs.
Here it is advisable not to overdo it with tightening these nuts. You can break the thread, you can even break off the stud. It is better to tighten the nuts at once, two on each side.


Lifting beams with a pin
The photo was taken during partial dismantling of the attic to pour a concrete beam
The method has two disadvantages. The first is that the nut with a washer and a piece of stud end up in the room, it is noticeable, and it needs to be masked with something. The second is in a cold bridge running along a steel rod. After all, one end of the stud is in the attic and there is frost in winter, and the other is in the room and condensation will collect on it.
We had such studs there temporarily and were removed after ceiling beam lay down on a concrete beam.