Show houses covered with ondulin. Do-it-yourself roof made of ondulin
Onduline is one of the most popular roofing coatings. Demand is determined by its strength, aesthetic appearance and durability. If you want to improve your own home, we will tell you how to cover a roof with ondulin with your own hands as efficiently and quickly as possible.
What is the material
Initially, before proceeding with installation, you need to study the properties of the material. Ondulin is similar to slate, however, it has a flexible base. This roof consists of the following layers:
- main board - cellulose-fibre board;
- mineral additives and filler, which are responsible for strength;
- bitumen resin, which guarantees resistance to moisture;
- pigment is responsible for the aesthetics of slate.

The price of 1 m 2 of ondulin starts from 200 rubles, so the cost of a sheet with a width of 0.95 m, a length of 2 m, a thickness of 3 mm, a wave width of 9.5 m and a weight of 6.3 kg is 395 rubles. You can buy the material at any hardware store; many also provide home delivery.
Advantages of ondulin
Modern onduline material is produced on the basis of bitumen. The advantages include the following:
- lightness - because of this, there is no need to construct a reinforced rafter system before laying the roof;
- budget cost is ensured due to the manufacturing method and available component materials;
- Elementary care - just spray it with a hose or wait for the rain;
- the material is resistant to acidic and alkaline irritants;
- there is no risk of mold on the surface and inside the layers;
- roofing made of ondulin is environmentally friendly due to the characteristics of the components;
- resistant to precipitation in the form of snow and rain;
- the manufacturer determines the service life of 15-20 years;
- installation of ondulin is possible on top of the old roof, which will save on dismantling.

Disadvantages of operation
It is necessary to note the disadvantages of the material in order to ensure the possibility of an objective choice of roofing:
- sun and rain can cause the roof to burn out, which will negatively affect the appearance of the coating;
- resistance to water is ensured only for the service life specified by the manufacturer;
- if you intend to purchase a large volume of slate, then it may turn out that some sheets differ in shade;
- fragility - you should not walk on the surface, as most likely there will be dents or other damage on it; the same criterion should be taken into account during transportation;
- As you can see in the photo, the limited color range currently includes only 4 colors: brown, green, red and black.

The technology for laying ondulin is similar to fastening slate, but before starting work you should do a little preparation.
Features of working with ondulin
To correctly attach ondulin to the roof, you should learn some of the intricacies of working with this fashionable material. After studying them, you will be able to lay sheets on the roof of any structure yourself.
- If you still need to go through proper material, then it’s better to step on the crest of the wave.
- To renew the roof for a long time, it is better to carry out all installation work at a temperature environment in the range from -5C to +30C. If the temperature is above normal or, conversely, below -5C, reschedule the work to another time.
- Approximately 20 nails are used to fasten one sheet. This is exactly how many nails the sheet can hold in case of gusts of wind.

- Due to the nature of the composition, the coating may stretch. This leads to the appearance of waves over the entire roof area, which will only have to be removed by dismantling. To prevent stretching, the ondulin fastening scheme involves the use of sheets that are perfectly even in shape.
- Check that the overhang is long enough. Too long will look unsightly, and too short will lead to the collection of debris and dust under the roof. The most dangerous thing is that precipitation will constantly fall under the short overhang.

What you need to prepare initially
Note that the competent selection of the necessary tools and materials is much more important than the installation itself.
Perform an accurate calculation required quantity coverings. The dimensions of a standard onduline sheet are 200 x 95 cm. Be sure to take into account overlap allowances in your calculations. For overlap you will need to leave 9.5 cm in width and 10-15 cm in length. It turns out that effective area from one sheet will be 1.6 m 2. If you know total area roof, you can simply divide it by 1.6. This way you will get an almost exact number of sheets needed. Please be aware that results may vary depending on the roof angle and roof shape.
Preparation requires the availability of the following tools:
- hand saw for wood;
- hammer;
- nail puller;
- ladder;
- roof ladder.
In addition, you should purchase auxiliary parts, without which the work will not be of high quality:

- tong elements (protective shields) for the edge;
- cornice filler (foamed polyethylene, which prevents debris from getting between the sheets and the sheathing);
- skate (flexible);
- rubber drip aprons;
- specialist. nail fasteners with a rubber cap.
Making lathing and its features
- Laying ondulin on the roof involves arranging a continuous sheathing. It is extremely necessary so that the material does not sag later. For installation, waterproof plywood or OSB boards, and the step should be 40-45 cm.
- If the roof slope is more than 15 percent, then the sheathing pitch can be increased to 60 cm. And for areas with a lot of snow in winter, the sheathing pitch should be minimal. To build the frame, bars with dimensions of 4 x 5 cm, 5 x 6 cm or 5 x 5 cm are used.
- Install additional sheathing under the gable and ridge. The sheathing under the ridge is installed at a distance of 5-10 cm from its axis. This distance varies depending on the degree of slope of the roof slopes.
- The cornice is formed using a rubber apron, which can bend, enveloping the sheathing of the cornice at any angle. The apron is attached to the sheathing with ordinary self-tapping screws, and the overlap between the elements is 5 cm.

Important! Immediately before the construction of the sheathing, it is necessary to carry out waterproofing work.
- The last thing to install is the wind board, which should protrude 3 cm from the sheathing frame.
- After the frame is erected, be sure to check the entire structure for compliance with the geometry. To do this, measure the diagonal of each roof slope. If the values differ, all errors should be eliminated.
Ondulin installation instructions
To properly cover a roof with ondulin, you must adhere to a certain algorithm.
Important! Initially, you should take care of your own safety.
Here are the instructions for laying ondulin with your own hands:
- Attaching the first sheet should begin on the side farthest from the wind, and always from the bottom of the slope. To align the sheets, pull the cord along the bottom edge, taking into account that the sheet overhang should end at a distance of about 5 cm from the drip apron. The extreme wave of the sheet should go onto the wind board. Place the filler in the space of the waves between the sheet and the sheathing, releasing it with a screwdriver ventilation holes. If this is not done, birds may fly into the holes under the waves, and even hornets may take up residence.

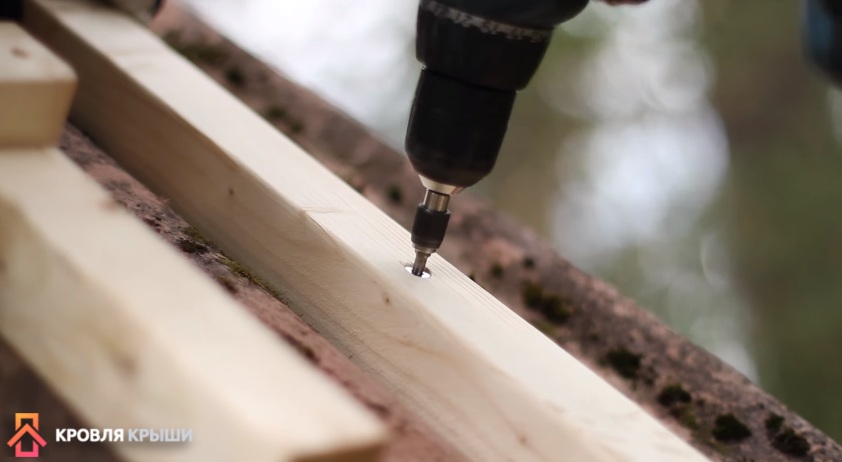
- Special nails are equipped with special heads, so fastening is carried out like this: with a hammer you punch a nail with an open head at an angle of 90 degrees, and after driving it in, put on a decorative cap.
- Remember that you will have three lines of fasteners on each sheet. To get a nail into the sheathing, either mark the sheet or stretch a rope along the sheathing line. It is important to remember that the indentation of the lines along which the nails are driven in will depend on the pitch of your sheathing, however, there cannot be less than 3 lines of nails on the sheet. Next, carry out the fastening according to the diagram below.

- Lay the second sheet overlapping 1 wave, and you will nail its first wave together with the overlap, that is, immediately into the sheathing through two sheets. During the process, make sure that the second sheet does not protrude beyond the boundaries of the lace that regulates the horizontalness of the bottom of the roof. In any other situation, the sheets will lie askew. If you need to cut off the tip of the sheet, you can use a hacksaw.

- Second - the next row relative to the first lies in order chessboard. To do this, take and cut the sheet lengthwise in the middle. Install an overlap between the rows of 10-15 cm. If the roof slope allows, then the overlap can be reduced, thereby achieving savings in material consumption.

- After completing the installation of the last segment, you can proceed to attaching roofing accessories that perform the functions of protection and decoration.
- The gable elements are installed on the wind board, which is pressed closely to the ondulin. The overlap of the pliers is about 15 cm. It is nailed to the end with the same nails.
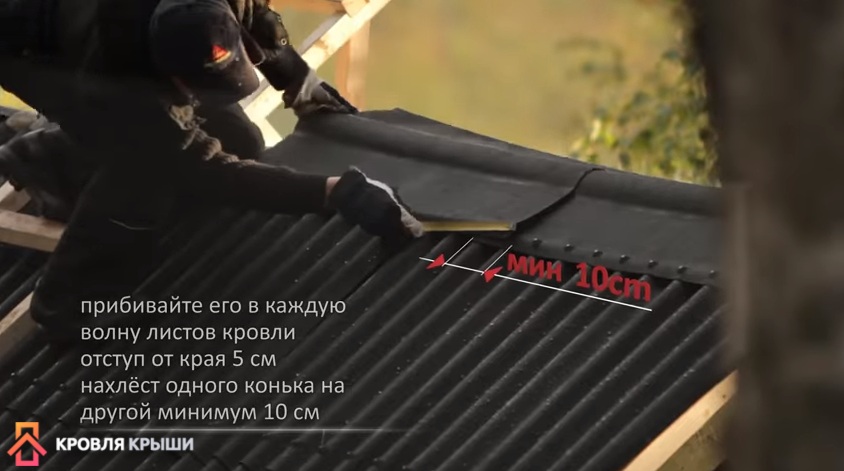
- The ridge for ondulin is attached to the edge of the roof opposite the predominant wind direction, just like the sheets. The ridge is nailed into each underlying wave, on both sides alternately. The overlap of the ridge elements is also 15 cm.

Important! Pay extreme attention to the quality of nail fastening. Their caps will be very visible on the surface, so initially take care of their correct geometry.

Now that you know step-by-step instruction installation of ondulin, here is a video instruction for a more detailed introduction to the installation process.

Now you can easily cover your roof using ondulin. Perhaps you already have experience working with this material? Share your impressions with the readers below.
1.
2.
3.
4.
5.
Roofing material such as ondulin is gaining popularity faster and faster today. Unfortunately, not all developers are sufficiently aware of all its advantages and some disadvantages; few of them can boast of knowledge about its correct installation.
Modern market roofing materials offers a fairly wide range of products, among which both the well-known slate and galvanization, as well as relatively new coatings, which only recently began to enter wide production, but are distinguished by a much more attractive ratio of price, quality and appearance, are famous.
After all, the functions of the roofing material should include not only protecting the structure from wind or precipitation, but giving the entire structure a unique, original appearance that makes this or that house stand out from the rest.
The material is made from cellulose or fiberglass impregnated with bitumen, which is painted in different colors(more details: " "). Next, we will talk about how to properly cover a roof with ondulin, as well as the work skills and tools necessary for this process.
Ondulin material, also called Euroslate, is very reliable, despite its lightness and cost-effectiveness. Unlike, for example, Finnish metal tiles, when it rains, ondulin does not produce any sounds ( useful article: " "). It has been produced for about 50 years both in Russia and in foreign countries, and its cost varies depending on one manufacturer or another.
Standards for laying ondulin on the roof
Covering the roof with ondulin is a process that does not require special skills or tools specially designed for this. If the owner of the house has some knowledge, you can do this work yourself.

When wondering how to lay ondulin, you should remember that installation can be done in the same way as laying standard slate. The only difference is that, due to the ability of ondulin to bend significantly, its installation can be carried out not only on ordinary flat surfaces, but also on surfaces with a more complex configuration.
At the moment when we cover the roof with ondulin, which is laid on top of the old roofing covering (roofing felt, slate, metal, etc.), the assessment of the rafter system can be carried out either personally or by a specially invited roofing team.
If the assessment results show that the rafter system can withstand the additional weight of the new roofing, then a sheathing is made of wood onto the old roofing, onto which ondulin sheets are attached. This will provide additional thermal and waterproofing.
Since ondulin has relatively low rigidity, the sheathing step must be frequent so that the sheets do not break or sag under the influence of external loads in the form of rain or snow. You can saw ondulin using electric jigsaw or a regular hacksaw for wood, which must be lubricated in advance to avoid the hacksaw blade getting stuck and to simplify the entire sawing process.
Instructions for installing ondulin on the roof
As mentioned above, the process on the roof is similar to laying a conventional asbestos-cement slate.
It is important to remember that you must always strictly follow all the points in the instructions that are attached to the finished material. This will help you better understand how to cover a roof with ondulin, without making significant or minor mistakes. Typically, these instructions are written quite clearly, and understanding them will not be difficult, even if your knowledge of the upcoming installation process is not so extensive.

Basic rules for laying ondulin on the roof:
- Initially, you need to install a continuous sheathing made of wood. In this case, factors such as roof slope and wind direction in a particular area must be taken into account. It is best to start work from where the wind influence is least.
- The distance at which the beams used to create the sheathing should be located from each other should be the same and equal to approximately 60 - 80 centimeters.
- If the distances are large, then it is necessary to install additional slats, which should be located between the beams. This will provide the structure with additional strength. Corner roof slope it should be at least 20 degrees.
- It is better to start laying the material from the lower roof corner, and it is recommended to cut the first sheet in the second row longitudinally into two halves.
- Ondulin sheets are fastened horizontally using special nails supplied with the material. 20 such nails should be used per sheet.
- In the first of the rows of covering, every wave crest is nailed, in the remaining rows - every second.
- It is important to remember the overlap when laying the second row. To do this, grab the sheet laid in the first row, then follow the same pattern. equipped with special rubber caps, the color of which is identical to the color of the coating. To make the surface of the coating look more attractive, it is recommended to nail these nails with colored heads at the same line level. This can be achieved by pulling a rope along which the nails will be driven.
- Ondulin sheets should be nailed vertically to the sheathing beams (more details: " "). The transverse overlap should be equal to 15 centimeters, and the longitudinal overlap should be no less than the length of the first wave.
- At the end of the installation of the overlapping covering, ridge elements are installed, which must be nailed along the wave of the ondulin sheet.
- If the roof on which the installation is being carried out is gable, then special corner parts should be used to install the ridge. The roof valley is made using additional sheathing.
Typically, the instructions attached to the finished material include not only the rules and regulations for laying the coating, but also detailed drawings that enable anyone to understand the entire process in detail, regardless of their professional skills and knowledge.

If you strictly follow all the requirements described above for installing ondulin on the roof, then this roofing covering is guaranteed to last more than 50 years (the first 15 years are guaranteed by the manufacturer). The guarantee also includes a certificate of hygiene and fire safety.
Additional covering elements
In addition to the ondulin itself as a roof covering, manufacturers also offer a lot of products intended for it. additional elements, which are made of the same material.
These include the following:
- ridge element;
- endova for ondulin;
- tong parts;
- nails;
- self-adhesive sealant tape;
- cornice filler;
- ventilation tube;
- apron covering.
In order for the roofing covering to look attractive and harmonious, as well as to achieve its greatest efficiency, all accessories used during installation must be original, that is, they must be supplied together with the covering material. Read also: "
Roofing – important element any structure, so it is very important to select the appropriate material for roofing and lay it correctly. Of course, the choice of material depends on the purpose of the constructed structure. So, tiles will look great on an expensive cottage. The shed near the house can be covered with roofing felt. If we take, for example, a country house, then ondulin is perfect for it - a beautiful roofing material that combines affordable price and high performance advantages with ease of installation.
Most of those who have ever been involved in construction believe that ondulin is precisely the material that can easily be laid by one person, because... These advantages relate to the ease of working with this material. However, it has other equally important advantages, consisting of:
- affordability, since you can purchase it for 400-450 rubles per sheet;
- no noise in the rain;
- external attractiveness.
Having decided to cover the roof with ondulin, we must not forget about its disadvantages:
- durability not exceeding 20 years;
- high burnability in the sun, which is especially typical for green sheets.
What kind of roof can ondulin be laid on and what should the roofing pie consist of?
The versatility of the material allows it to be used on any type of roof. As an example, let's take classic version country houses having cool gable roof and not intended for year-round residence, and therefore do not have insulation. The sheathing in such houses often has a large pitch, since the significant steepness of the roof implies the absence of significant loads: snow and rainwater They roll out of there almost instantly.

To ensure sufficient hydro- and wind protection of the under-roof space, so that condensation does not form, causing rotting of the rafter and sheathing material, the composition roofing pie should be included (in order, starting from the inside):
- waterproofing material;
- counter-lattice;
- sheathing;
- ondulin sheets.
The procedure for covering a roof with ondulin
The process of arranging a roof consists of operations performed in strict sequence.
Installation of waterproofing material
The waterproofing material, which may be, for example, the Favorit A film, is fixed along the plane of the rafters. Such a vapor-permeable film is necessary to:
- ensure the evacuation of vapors from the under-roof volume;
- protect the attic from atmospheric moisture and wind penetration;
- increase the tightness of the entire roof.
Laying the waterproofing should start from the bottom and make an overlap of 15 centimeters.
Laying counter-lattice and installing sheathing
The counter-lattice can be made of 50 x 30 mm bars laid along the rafters. It plays the role of a ventilation gap between the waterproofing and ondulin.


For sheathing, you can use 120 x 25 mm boards, which are packed across the sheathing bars at intervals of about 400 mm or even more if the roof slope is quite large.

Ondulin flooring
If you know in advance that you will not have an assistant when arranging the roof, then it makes sense to think about purchasing DIY ondulin measuring 2 x 0.76 m with 8 waves, since such sheets are much lighter than standard 10-wave sheets. Along with ondulin, you should also stock up on special nails with snap-on caps.
To ensure the evenness of the edge of the roof, the overhang of the sheet can be limited by bars nailed just below the lowest sheathing board.

Ondulin should be laid from below with an overlap of 1-2 waves. Each next row should overlap the previous one by 20-30 cm. When laying, a checkerboard order should be observed.
To cut ondulin, you can use a regular hacksaw for wood.

Ondulin sheets are fastened at the top and bottom of the sheet using nails with plastic washers driven into each wave.

If in the future you intend to replace the roof, then it is advisable to replace the nails with self-tapping screws, after inserting them into the closing caps.
Upon completion of installation, it is necessary to install the ridge element.
![]()

Thus, even one person can cover a roof with ondulin without the help of others.
Do you have any thoughts regarding ondulin and its installation? Please share them by sending us a comment.
We offer you video material where you can learn Additional information regarding the installation of ondulin on the roof.
In the list of modern roofing materials, widely used both in the private sector and in industrial construction, ondulin (or Euro-asbestos) occupies a special place, characterized by such remarkable properties as:
- external attractiveness;
- lightness and high wear resistance;
- quite reasonable price;
- ease of installation.
Ondulin, which contains bitumen, cellulose fibers, rubber and minerals(as a filler), can be classified as unique materials, manufactured in the form of standard wave-shaped sheets that reliably protect roofing structures from bad weather.
Before covering the roof with ondulin with your own hands, it would not be superfluous to familiarize yourself with some of its distinctive features. Like any roofing material, ondulin has its advantages and disadvantages. The indisputable advantages of such coatings include:
- high resistance to sudden temperature fluctuations;
- long service life;
- the possibility of laying blanks of material on the old coating;
- resistance to biologically active environments (mold and mildew);
- high environmental friendliness.

The disadvantages of ondulin coatings include:
- flammability of the material;
- the roughness of its surface, which contributes to the retention of snow on the roof plane;
- small selection of possible colors;
- “burnout” of the sheet surface under the influence of direct sunlight.
Features of working with the material
As noted earlier, one of the advantages of ondulin is the ability to quickly install it in combination with relative simplicity all operations performed during this process. Taking into account the fact that ondulin can be laid on old roofing, the economic effect of its use can be quite large.

In addition, when carrying out installation work With this material there is no need to use any complex tools, or special training for the work performer. The owner of the building being equipped is able to independently cope with the task assigned to him (even without outside help).
Since ondulin is soft, OSB sheets need to be fixed on top of the sheathing, which will prevent this roofing material from sagging. Ondulin is relatively lightweight and even with OSB sheets, the new roof is much lighter than the old tile and even slate roof.

In the case when the roof is being built from scratch, it is necessary to prepare a reliable sheathing of beams, which will serve as the basis for laying ondulin sheets. In addition to its direct purpose (as a load-bearing base), this part roofing structure can be used to place on it such important elements as heat and waterproofing.
The sheathing for ondulin sheets is done in small increments, sufficient to ensure that the covering material does not sag under the weight of accumulated snow, or OSB sheets are placed on top of the old sheathing. In addition, the parameters of the sheathing should be selected taking into account the angle of inclination of the slope, as well as the wind direction characteristic of your area.

For a classic slope covered with ondulin, the main parameters of the frame base are as follows:
- the optimal roof slope is at least 20 degrees;
- the typical step with which sheathing beams are packed is from 60 to 80 cm;
- with a larger step it will be necessary to use intermediate slats.

To build a reliable ondulin roof that can last for many years, it is recommended that you familiarize yourself with a number of provisions regarding the installation features of this material.
Such installation instructions contain the following recommendations:
- When moving along already laid sections of roofing, you should step on the crest of the wave of the workpiece, since the depression between them is not designed for heavy loads.
- All operations for laying ondulin coating are carried out at air temperatures from -5 to +30°C, guaranteeing the preservation of the declared characteristics.
- To fix one sheet workpiece, at least 20 fasteners from the purchased material kit must be used. The specified number of nails increases the reliability of fastening the material, taking into account possible loads (during strong gusts of wind, for example).
- To arrange the sheathing, bars with a cross section of 60×40 mm are usually used.
Roof slope

In each specific situation, the pitch of the sheathing is set depending on the angle of inclination of the slope being closed:
- when the slope slope is less than 10 degrees, as a rule, a continuous sheathing is made from OSB sheets or moisture-resistant plywood;
- at tilt angles from 10 to 20 degrees, the working step should be about 450 mm;
- at large roof slope angles, this figure can reach 600–800 mm.

In the first of these cases, the amount of overlap in height (end overlap) must be at least 300 mm; in this case, the side overlap is made in two waves of the sheet. At large roof slope angles, these figures decrease to 200 mm and one wave, respectively. We also note that to fit sheet blanks, a regular wood saw with a blade lubricated with technical oil can be used.
Sheet fastening technique
This subsection describes how to properly attach a sheet of ondulin to the sheathing.

The installation of the first row is carried out in solid sheets, starting from the edge of the roof. To fix them, special nails (resembling screws in appearance) are used, which must be installed in each wave crest. When laying subsequent rows, half sheets will be required (i.e., cut longitudinally into two parts), which are secured through one ridge. It goes without saying that each of these sheets (as well as rows) must be installed with a small overlap, the amount of which is indicated above.

Sheets fixed in a vertical position are fixed on the sheathing prepared for them with a longitudinal overlap (overlap) of one wave; while the transverse overlap should be about 150 mm. At the final stage of roofing work, the ridge elements of the roof are installed, which are secured with an overlap along the wave of the sheet used.

The cost of a standard sheet of ondulin measuring 2000×950 mm in different regions ranges from 380 to 400 rubles.

The total need for roofing material, as well as the amount total costs for its purchase is determined taking into account the number of sheets required to cover all roof slopes, the area of which is calculated by known methods. When determining the total area, one should not forget about the correction that takes into account the part of the surface hidden under the overlaps (between adjacent sheets and rows).
Video
Ondulin roofing is the cheapest roofing material after roll roofing. As consumers are well aware, there are no cheap and at the same time high-quality products; accordingly, in all performance indicators, ondulin is much inferior to more expensive roofing materials.
The warranty period does not exceed 15 years, but in practice even this short period of time is not maintained. The slightest deviations in the technology of roofing work have an extremely negative impact on durability; ondulin does not have a safety margin that allows it to level out small construction errors.

The only advantage is the relatively low cost of coverage. Why the relatively low cost? It's simple. You should take into account not only the price of materials, but also the overall operating costs of maintaining the building. And here they arise big problems. Ondulin is made from waste paper; after crushing, the mass is dried, impregnated with bitumen and painted. The sheets are pressed to give a wavy shape. Such material cannot be durable and strong; over time, the outer waves bend, snow blows in in these places or water leaks appear. Repairing an ondulin roof is very difficult; the sheets cannot support the weight of the builders. In addition, the surface fades and the slopes lose their attractiveness.
Disadvantages of ondulin
- Difficulty of installation. Even in normal temperature conditions Ondulin does not have the required rigidity; walking on it during fastening is strictly prohibited. And if the weather is sunny, then the surface dark sheets it gets very hot, the strength drops almost to zero, even driving nails into such material with the required force is problematic, the ridges immediately become wrinkled. And at temperatures below minus five degrees the material becomes brittle, which also significantly complicates roofing.


- High flammability. Paper and bitumen burn well, and it is very difficult to extinguish the flame. All assurances from manufacturers that ondulin is superior even to metal roofing materials in terms of fire safety are an outright lie.

- Ugly appearance.
Ondulin is attractive exactly until mosses begin to grow on its surface, and they quickly develop new surfaces. The fact is that the surface of the sheets is rough, dust quickly accumulates on it. Because of this, after just a few years of operation, excellent conditions are created for mosses; they cover the surface of the roof with multi-colored spots. High design indicators are irretrievably lost. But this is not all the problems arising from mosses. Their roots penetrate deep into the sheets of ondulin, its strength is critically reduced.

Experienced builders recommend using ondulin only in extreme cases and only for non-essential buildings: carports, outbuildings, etc. It is not economically feasible to use the material for arranging the roofs of residential buildings. And the appearance of such houses in a few years will raise many questions. Through no long time the roof will have to be replaced, and this will significantly increase the total estimated cost of the house.

Prices for various types of ondulin
Step-by-step instructions for laying ondulin
Let's look at an example quick repair country building, this is the most best option use of ondulin as a roofing covering. The work will be inexpensive; there is no need to dismantle the existing roof, which further reduces the estimated cost. And for such an old building, the service life of 10–15 years is critical; ondulin will easily withstand this time. You need to know that dismantling old coatings is a very expensive business; during this work, it is often damaged. rafter system. Another problem is that dismantling work can only be done in dry weather, and accurate forecast no one can give.
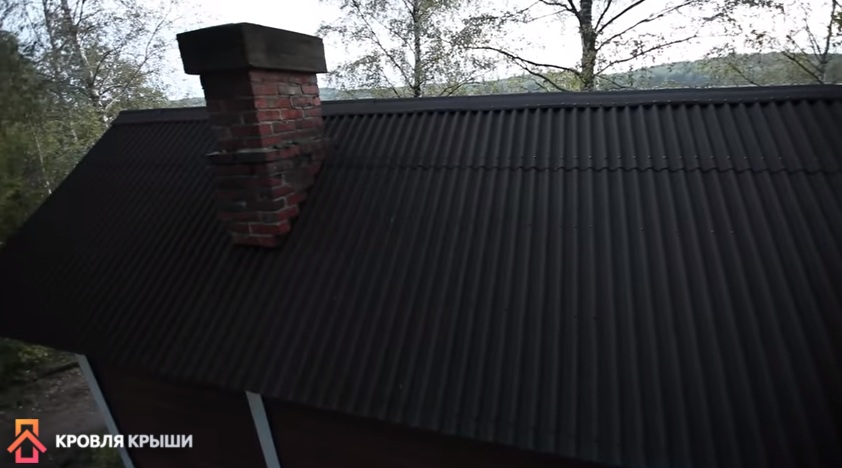
A small house is located in the forest on the shore of a bay, the roof is made of asbestos-cement slate, it has been in use for about 25 years. During this time, it has completely lost its original appearance, mosses grow on the surface, and a lot of leaves and other debris have accumulated. Although the tightness remained at the same level, the owner of the house decided to update the appearance of the structure. I decided to do it quickly and at minimal cost.

Practical advice. After a preliminary audit of the condition slate roofing The craftsmen decided not to dismantle the old slate; it would be time-consuming, expensive and unsafe. One of the advantages of ondulin is its low weight, and this allows it to be installed on old coverings; the rafter system can withstand minor additional forces without carrying out work to strengthen the load-bearing elements.
Another factor was taken into account - roofing work is done in late autumn, during this period it often rains. If the building has an old roof covering, then the work does not depend on the weather. The roof is gable, the area of the slopes is 50 m2.
Step 1. Count the amount of materials. For the sheathing you will need 30 linear meters timber 50x50 mm, to cover the slopes you will need 36 sheets of ondulin. Total weight materials are only 220 kg, which allows them to be transported on an ordinary passenger car. To attach ondulin, you need to purchase 880 nails. 20 for each sheet, and the rest are required for attaching skates (12 pieces, one meter long). The sheathing is fixed with self-tapping screws, for vertical bars the length of the screws is 80 mm (240 pieces are needed), for horizontal ones 70 mm (300 pieces are needed). The dimensions of the sheets are indicated by the manufacturer on the packaging, and the quantity is calculated using ordinary arithmetic formulas. If it is difficult to do this on your own, then sellers will always help practical help in the calculation of the roof and all additional elements.
Step 2. Purchase roofing materials and carefully stack them on a level area. To make it easier to take ondulin sheets, it is recommended to stack them on bars. If materials will be stored for a long time, they must be protected from sunlight.


Step 3. Prepare your tools. To carry out the work you will need an ordinary hacksaw, assembly knife, hammer, screwdriver, tape measure, pencil, chisel, rope, building level. The list of tools is basic; every owner should have them. Be sure to read the manufacturer's instructions for installing ondulin. This general tips, the manufacturer cannot provide for all specific situations that may arise during roofing, but general idea you will have.

Prices for popular models of screwdrivers
Screwdrivers
Step 4. Make two stairs from the bars. One is ordinary, and the second with a hook on a skate. It is recommended to work on the roof very carefully and in compliance with safety regulations. In addition, it is not recommended to walk on ondulin, but such a special ladder allows you to perform roofing work anywhere on the roof.

Step 5. Clean the surface of the old slate. To do this, you can use any available tools and brushes, Perfect cleanliness there is no need to achieve, but the main vegetation should be removed. The fact is that mosses grow well even in the most unfavorable conditions; if they are not removed, then the elements wooden sheathing will quickly lose their original load-bearing parameters.

On this preparatory work finished, you can begin installing the sheathing.
Installation of sheathing
Work should begin by checking the size of the slopes. If the house was built by responsible builders, then the edges of the slopes are strictly parallel and located at right angles. If there are inconsistencies, then during installation of the sheathing you need to take into account maximum dimensions. Immediately check the position of the corners of the slopes. Lathing can eliminate fairly large deviations in the old rafter system.

Step 1. Prepare blanks from the bars for the sheathing according to the available dimensions.

Important. Cuts should be made under the ridge on the old roof, due to this the surfaces of the structures will be located in the same plane. The depth of the cuts should be equal to the height of the projections of the ridge elements.

Step 2. Proceed to fixing the longitudinal bars of the sheathing.

In order for the self-tapping screw to fit into the old sheathing, pre-drill holes in the slate. These holes, by the way, will make the process of screwing in the screws much easier.
The strength of slate is much higher than the strength of ondulin; it is very difficult to screw a self-tapping screw into it. Attach the outer bars, stretch the rope between them.


All remaining sheathing bars will be fixed along it. There is no need to check the sheathing elements very precisely for several reasons. Firstly, the old roof is mostly flat; critical deflections are observed very rarely. Secondly, it is impractical to correct deviations in the position of each block. Thirdly, ondulin is very flexible material and will bend in the right place without any problems depending on the position of the sheathing.
Step 3. Strengthen the beam at every fifth wave of the beam, align the lower ends with a stretched rope. The fastening scheme is the same - first, holes are drilled in the block and slate, and only then the self-tapping screw is tightened.


Important. Special bars are attached near the chimney; the distance between them does not matter. The main condition is that the bars must be in the last wave of slate before the brickwork.
Step 4. Start nailing the horizontal bars. Joints should be made in the center vertical elements battens.

Practical advice. In places where two waves of asbestos-cement slate overlap, you need to make a cut in the block, due to which the difference in the height of the coating will be leveled and the sheathing will be even. The depth of the cut should be equal to the increased thickness of the coating at the overlap. Data is taken after measurements are taken.

The bars are fixed with self-tapping screws 70 mm long; at the joints they are screwed in at an angle of 45°. Due to this technology, the risks of cracking of the ends of thin bars are minimized.


The horizontal bars of the sheathing should be fixed with a pitch of 61 cm along the axes; these parameters are standard for ondulin sheets, but at the ridge the pitch changes taking into account the size of the slopes.

To make the work easier, it is recommended to make two templates and use them to control the distance between the horizontal lines of the sheathing. Working with them is much more convenient than using a tape measure to check the distance between each block. The length of the template should be 61 cm minus the width of the bars, in our case 61 cm -5 cm = 56 cm.


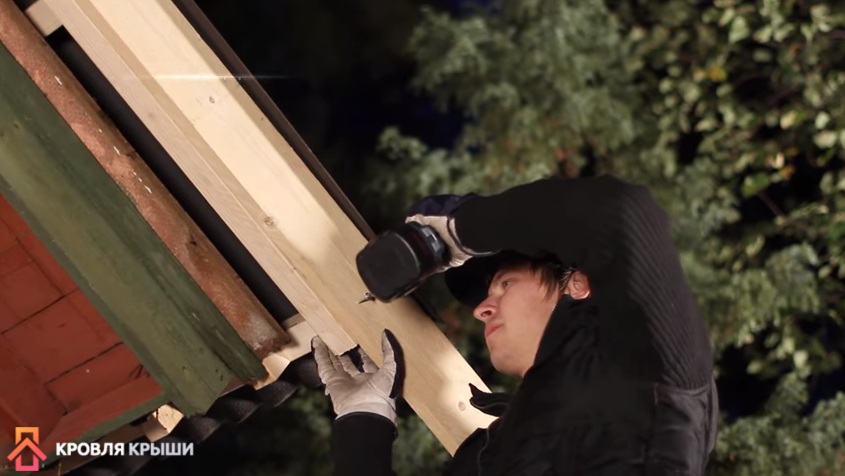
Step 5. WITH outside At the ends of the roof, nail the bars to which the wind board will later be fixed. Nail them strictly at right angles to the horizontal battens. This parameter must be precisely controlled; it is used to set the position of the first sheet of ondulin coating. And the first sheet is considered the most important; it is quite difficult to correct mistakes made later.

Step 6. Saw off the protruding ends of the cross beam; this is done after fixing the beam.

The sheathing is completely ready, you can start laying the ondulin.
Installation of ondulin
It was already mentioned above that the roof has some limitations: you cannot work in too hot weather and when sub-zero temperatures.
Step 1. Try on the first sheet of ondulin, so you can find out the length of the sheet that will have to be cut at the ridge. When trying on, you need to keep in mind that the overhang should be within 7 cm, and the overlap of the sheets should be approximately 14 cm. To fix the wind board, you need to provide an extension to one wave.


Step 2. Temporarily screw two pieces of bars along the edges of the slope and attach a rope to them. The extension is 7 cm, keep this in mind when attaching the pieces of bars.

Screw the screws into the ends and pull a rope between them; all the lower sheets of ondulin are installed along it. Pull the rope.


Installation of sheets should begin on the opposite side of the prevailing winds, in this way it is possible to reduce the likelihood of roof leaks.

We have already mentioned that ondulin when heated sun rays It softens greatly; if in this state it is exposed to wind, the edges will bend upward; in these places, the tightness of the coating will certainly be broken in the future. Of course, the appearance of the roof will also suffer significantly.
Step 3. Try on the ondulin sheets and prepare the top ones, they are shorter than the bottom ones. Sheets across the waves are sawed with a regular hacksaw, and it is better to cut the sides of the waves with a mounting knife. To reduce sticking, the fabric should be periodically moistened with water.

Important. First top sheet it must be made twice as narrow as the usual width, this is required to prevent four corners from appearing in one place.
Step 4. Install first bottom sheet ondulin, check its position along the rope.

If everything is normal, then fix the sheet. To do this, you first need to drive nails into the two outer waves of the bottom row, then into the middle row. The sheet is securely fixed on three hardware, now you can drive in all the other nails. If it is difficult for you to hit narrow bars, then draw marks on the surface of the ondulin. To do this, use a flat board, place it on a sheet and align lateral surface with the middle of the bars. Use a pencil or marker to make marks on each wave. If the nail does not hit the lathing, there is no need to be upset. Feel free to pull it out and drive it in a new place. There will be no noticeable leakage through the small hole in the upper crest of the wave. If a few drops of rain fall into the under-roof space, they will dry quickly.
Step 5. Drive in the remaining nails in a staggered pattern. Work carefully, do not damage the coating. The plastic part of the nails should touch the ridge, not press it in. Remember that ondulin cannot withstand heavy loads.

Fixing the sheet, diagram


Installation of Ondulin, photo. Uses 20 nails per sheet
Nail the last wave in an overlap at the same time as the sheet of the next row, remember that at least twenty nails should be used for each sheet. This amount may increase in areas of maximum possible wind gusts. The bottom row is driven into each wave, then two rows after one. Manufacturers of ondulin complete their roofing material with nails made of stainless alloys or galvanized, the lower part has notches to increase the fastening force of the hardware. All these devices perform only one function - increase the profits of manufacturers. Ordinary nails hold well not only ondulin, but also ordinary slate. For experienced builders There are no known cases where the roof was torn off due to the fact that the metal nails were completely rusted. Moreover, under ondulin, the material will simply tear over the nails, and will not pull them out of the wooden beam.
And one last thing. How can they rust if they are located under roofing material? If so, then there is a leak in this place and it must be repaired immediately. Remember that the overlap under the ridge must be at least twelve centimeters.
Horizontal and vertical joints should be located on the same line along the entire length of the slopes; periodically check their position. You can hammer in nails only after the sheet has laid flat on the sheathing; do not stretch it or disturb the sequence of driving in nails.
Step 6. Carefully measure the dimensions of the ondulin cut at the bypass site chimney. The sheets must be adjacent to the pipe with minimal gaps. To firmly fix the roof in these areas, install additional sheathing beams.

Step 7 Try on the last sheet, find out where the wind board is fixed. It should fit into the top wave of the sheet with reverse side. Screw the timber flush with the ends of the sheathing, and cut off the excess with a hacksaw.

Step 8 Secure the adjacent sheet of ondulin, but there is no need to drive in the last row of nails; this is done only after installing the wind board.
Step 9 Install the wind board and attach the ondulin to it. Reinstall the curtain rods.


Ridge installation
Prices for different types of roofing ridges
Roofing ridge
At this point, the covering of the slopes is completed, you can begin to mount the ridge. You should also work from the opposite side of the prevailing winds in the area. The overlap of the ridge is at least ten centimeters, the element is nailed to each wave of sheets.

Answers on questions
Due to the fact that ondulin roofs began to be used relatively recently, some developers have quite reasonable questions. We will try to give professional answers to them.
The sheathing spacing of 60 cm is cause for concern, is there any reason?
Yes, that's the distance between horizontal slats lathing cannot be considered reliable, especially in summer period time. There are times when you have to work on a ready-made roofing, install antennas, ventilation equipment and other engineering systems. The material will not support the weight of the installers during such a step; you should not trust the manufacturers’ statements. Always nail the slats more often, this will increase the stability of the coating. It is not necessary to nail all the slats; the layout of the hardware can remain unchanged.
Is it possible to install ondulin coatings in the northern regions of our country?
It's possible, but not necessary. Although the coating can withstand significant loads, it becomes brittle at subzero temperatures. In winter in these climatic zones there is a lot of snow, the heavy weight causes the rafter system to deform. Such deformations cause the formation of cracks in ondulin sheets, resulting in leaks and the need for repair work.

How to remove moss from the surface of sheets?
It is strictly forbidden to use metal brushes, and soft ones almost do not remove vegetation. You can try various pesticides, but you need to work with them in compliance with all safety regulations.

Prices for moss removers
Is it possible to straighten deformed ondulin sheets on the roof?
No, you can’t, you have to completely change the coating. There are several reasons for deformation: incorrect fixation order, too heat heating sheets in summer, violation of installation technology. But main reason– low quality coating.
What is the real service life of ondulin?
Very complex issue, manufacturers provide a guarantee from 15 to 50 years. Practice shows that after 8–10 years of operation, an ondulin roof requires major repairs. Major renovation– large material costs, which completely offset the low cost of the material.

Video - Installation of ondulin roofing