Antique electrical wire. Retro wiring on antique insulators: how to choose materials
- Hidden wiring in frame house – 300 rubles per m²
- External wiring in retro style – 350 rubles per m²
- External wiring in the house (in boxes) – 300 rub per m²
- Hidden electrical wiring in a house made of rounded timber - 400 rub. per M²
Calculation example: House 100 m² work 100 x 400 = 40,000 rubles
The increase in the cost of hidden wiring, in contrast to classic external wiring in boxes, is only 20%
Explanation: The amount of work per square meter includes all types of work (cable installation, panel installation, installation of sockets and switches, grounding installation, etc. except for the installation of chandeliers and sconces (negotiated individually))
We have extensive experience in carrying out hidden wiring in wooden houses; all types of work are provided with a 2-year guarantee
Some points to consider when carrying out hidden work
- At the construction stages, it is necessary to provide mortgages for conducting power lines from the power line (pole) to the switchboard standing indoors
- INSTALLATION IS CARRIED OUT BEFORE THE SUB-FLOOR IS CLOSED AND ITS INSULATION
- Interior door frames and the doors need to be installed AFTER the hidden robot! since in the openings grooves are made for the wires and side drilling is carried out for the consumer
- Sockets, switches, TV sockets are installed 60 cm horizontally from door and window openings,
Types of wiring:
To ensure fire safety and compliance with the requirements of the PUE, wiring in wooden house fits in metal pipes, metal hoses, cable ducts, corrugation or is attached to brackets, retro-style porcelain insulators. The most important thing is to ensure that the bare wire does not come into contact with the wood. load-bearing structures. Self-extinguishing are allowed polymer materials class IP44 or non-flammable (marked NG).
Features of wiring in wooden houses
There are installation nuances open wiring in a wooden house, depending on the construction technology, wall materials wooden building:
- log house - in the absence of cladding on the walls and ceilings, hidden wiring is impossible in principle
- SIP panels - hidden wiring in the house is carried out using a flexible drill or in factory channels marked with special markings
- frame construction - no restrictions
- panel house - any wiring options
- half-timbered – usually open wiring
Hidden wiring in a wooden house is most often made in panel board, frame, panel walls. Log houses and half-timbered buildings are not intended for gating by default, wooden surfaces They have a self-sufficient design, so they are not masked by additional cladding. Open wiring in a wooden house in retro style will emphasize power cable, in cable channels, on the contrary, will make it invisible.
Advantages of hidden wiring
According to the requirements of the current PUE standards, polymer materials for concealed electrical wiring are strictly prohibited. However, the standards were written even before the creation of non-flammable plastics, so some craftsmen use safe polymers. Hidden electrical wiring in a wooden house must be safe; any structural loads must pass through. Therefore it is necessary to provide:
- shrinkage - if operation begins before its end, in a year up to 20% of the electrical system will have to be redone
- change in geometry when drying - timber, board can tear metal corrugation
Therefore, installation is carried out by our employees taking into account the following nuances:
- small supply of cable - allows you to avoid rework, compensate for vertical movements of walls, created in a box
- pipe welding - only on straight sections
- sleeves – larger diameter in the nodes of the passage of walls to compensate for possible shrinkage
- foaming - the material has some mobility
The division of consumers into groups allows the use of cables with a wire cross-section of up to 2.5 mm. At the same time, hidden wiring fully meets the requirements of the PUE, since the wall thickness of the stainless corrugation is not standardized for this size.
Advantages of open wiring
In view of the above ban on high-tech PVC corrugations, ducts, and internal distribution pipes, owners prefer not to deal with bulky metal pipes, which are also difficult to fasten. Retro wiring in a wooden house has become in demand:
- safety – detection of the slightest faults is made as easy as possible
- easy installation – you don’t even need to mark the routes
- high maintainability – electrical adjustments are possible after any shrinkage
- aesthetics of perception - wiring in retro style is ideal option for wooden interiors
External wiring in the house is potentially safe and allows us to take into account the prospect of a further increase in the number of consumers. The industry produces really beautiful twisted cables in reliable isolation.
Call today to get free consultations, see examples of our work, get individual prices. We provide the highest possible guarantees and work only with reliable suppliers of materials. We give our customers factory prices for wiring, switches, sockets, and other electrical devices.
When creating an interior wooden house in retro style, plays an important role in the creation of the plan electrical wiring, which is an integral part of a modern home.
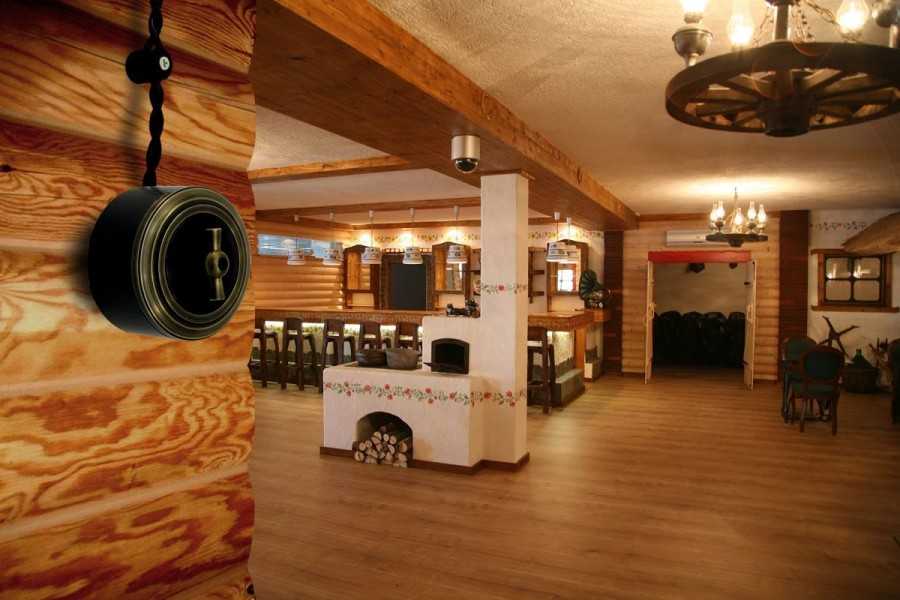
Retro wiring in a wooden house is wiring done openly using insulators onto which single-core electrical wires, twisted in a special way, are attached.
Currently, domestic and foreign manufacturers of cable products and installation products produce a large assortment products in retro style. This is due to the demand for these materials and the high profitability (cost) of the latter. The most widely represented products in this segment on the domestic market are the following companies: “Villaris”, “RETRIKA”, “Salvador”, “Fontini”, “Bironi” and “Gusev”.
Wires (cables)
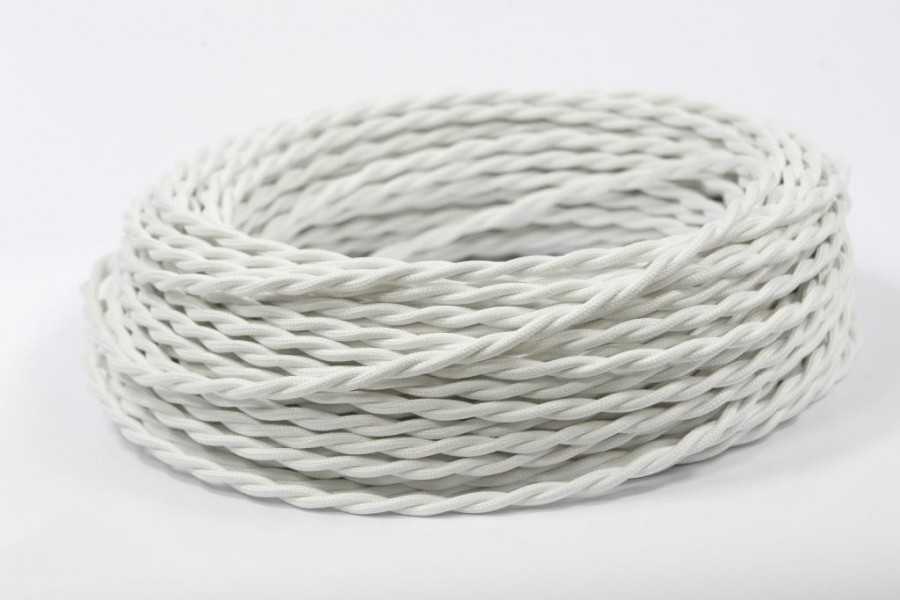
Retro style wire for wooden houseModern decorative wires (cables), used to create a retro style in a wooden house, are made of copper with a PVC sheath of polyvinyl chloride and a braid of synthetic materials, which do not support combustion.
2- and 3-core cables are available different colors(white, black, brown, Ivory, cappuccino, caramel, as well as gold and copper color), with a cross section of 0.75, 1.5 and 2.5 mm2.
Installation products

Sockets, switches and distribution boxes are issued various colors, which correspond to the selected color of the wires (cables) to be laid.
Insulators

Insulators are made of electrical porcelain and coated with glaze of various colors. Insulators have mechanical strength and are resistant to moisture. Dimensions of insulators:
- Base diameter – 18.0-22.0 mm;
- Height – 18.0 – 24.0 mm.
Other items
Switches - retro wiring in a wooden houseOther elements of retro-style electrical wiring include: frames for switches and sockets, screws and handles (switches) made with bronze or other coating.
Requirements for installation of open electrical wiring in a wooden house
Requirements for the conditions of installation of external wiring, installation methods, installation of devices and their selection are regulated by the Electrical Installation Rules (PUE) and are mandatory.
Some of the requirements of the PUE are taken into account by manufacturers of retro wires, such as:
- Wire insulation is made of non-flammable materials;
- Used as a current conductor copper wire.
In addition to the above, the following requirements must be met:
- Input and accounting unit electrical energy must be isolated from wooden structures;
- The power supply circuit must provide for the installation of an RCD, a grounding loop, and, when connected via overhead lines, surge suppression devices (arresters).
Advantages and disadvantages of open wiring in retro style
On to the pros of this type Electrical wiring includes the following:
Easy installation;
- Maintainability and accessibility of network elements;
- The use of modern technologies in the production of materials ensures high reliability of wiring;
- A wide range of color solutions allows interior design to be completed more fully and original.
There are also disadvantages, these are:
- High cost of materials;
- The range of manufactured wires (cables) does not allow connecting electric stoves, hobs and other equipment for connection of which the conductor cross-section must be higher than 2.5 mm2;
- Visual reduction of free space in the room;
- The difficulty of performing finishing and repair work during subsequent use.
Installation of retro wiring in a wooden house
 Installation of retro wiring in a wooden house
 Installation of wiring must begin with drawing up a plan indicating all elements of the network. It is advisable that by this time a plan for the arrangement of furniture and equipment (household appliances) has already been worked out.
Installation is carried out in the following sequence:
- Cable routes are marked. The work is done using a level. The distances between network elements should be minimal. The lines must be laid vertically and horizontally, turns must be made at an angle of 90°.
- Distribution boxes and installation products are installed in accordance with the developed network plan.
- Installation of insulators between distribution boxes and installation products (sockets, switches) is carried out. The distance between insulators should be no more than 800 mm, optimally 450 – 600 mm. The insulators are fastened to the walls using self-tapping screws;
- Wires are installed using installed insulators. The wires should not sag, but be in a state of tension. Touching walls and other structures is prohibited;
- When passing through walls, the wires are laid in a ceramic tube;
- Wires are connected in junction boxes and installation products;
- The connection of cable wires is carried out by pressing, soldering, welding or using special compressing devices;
- Control measurements of the insulation resistance of the installed section of the network are carried out;
- A connection is made to the metering unit (building input) and a test switch is performed.
Insulation resistance is measured with a megger or other special device.
DIY retro wiring in a wooden house
To install open electrical wiring, which includes retro-style wiring, you must perform the installation in the sequence given above. For this you need to have:
- Manual electric tool(drill, screwdriver);
- Hand tools (screwdrivers, pliers, side cutters);
- Monitoring devices (multimeter, megohmmeter);
- Set necessary materials(wires, installation products, fasteners and decorative elements);
- Basic knowledge of electrical engineering and desire to implement this work with your own hands.
Currently, retro-style wiring in wooden houses has become quite widespread, and therefore an increasing number of electrical installation companies offer installation services for this type of work. Therefore, in the absence of experience electrical installation work and without knowledge of electrical engineering, it is better to turn to specialists in order to avoid mistakes and, as a result, financial losses.
How to make a twisted wire with your own hands?
In order to reduce the cost of purchasing components, since original wires are quite expensive, you can make a twisted wire yourself.
Single-core copper wires in flame-retardant insulation may be suitable for these purposes, such as:
- RGKM – copper stranded wire with two-layer silicone rubber insulation and fiberglass braid;
- BPVL - copper wire with PVC insulation and thread braiding filled with varnish.
When purchasing the above wires, it is necessary to take into account that during the twisting process the wire consumption increases. The increase is 25–30% of the linear length of the mounted section.
It is not unimportant that these wires are produced in a wider range of conductor cross-sections, 4.0 and 6.0 mm2, which allows you to connect electric stoves and other energy-intensive consumers in the same style across all sections of the electrical network.
The disadvantage is that it is difficult to choose the required color, because... RGKM wire is available only in gray and white flowers, and BPVL is a special wire for aviation industry, and is not always available for free sale.
The manufacture of twisted wire should be done “on site”, after installing the insulators, in the following sequence:
- The purchased wire is cut along the length of the mounted section, taking into account the necessary allowance for twisting;
- The wires are twisted into a braid. If possible, after each insulator, the direction of twisting should be changed, which will allow, if necessary, to eliminate any sagging that has appeared.
To eliminate sagging that may be caused by home shrinkage or other external factors or the quality of installation, you should remove the sagging section from the insulators and make several additional turns, and then return the wire to its place.

At the dawn of electrification, electrical communications in residential premises were installed from stranded aluminum cable.
Two separate cores in single insulation were twisted into a twisted pair and, in this form, mounted on the wall using porcelain insulators. Junction boxes were not used at that time.
Modern retro wiring is made using modern technologies and is a reliable imitation of antiquity, surpassing the original in almost all technical and operational characteristics. The wiring design has been supplemented with elements necessary to ensure safety in accordance with modern regulations.
The first layer of insulation is made of vinyl, the second is a braid of non-flammable fiber, and on top of that is a decorative braid of cotton fiber, fiberglass or silk threads. To ensure safety, fabric insulation from natural fibers impregnated with fire-resistant varnish.
The retro-style cable's conductors are made of copper. Two types are produced for: lighting and basic, for socket connection groups. The differences between them come down to the thickness of the conductive wires.
For lighting, cables with a cross section of 1.5 mm² are used, the socket part of the wiring is made of wires 2.5 mm². For other powerful consumers of electricity, it will be necessary to lay hidden lines, since Retro cables with larger cross-sections are not produced.
Samples of retro wiring in a wooden house are shown in the photo:
Electrical wiring in retro style is used when decorating interiors in a wooden house. historical styles"common" origin: vintage, country, Provence, and also in some variations of the loft style. Decorating the interior of a wooden house with antique elements is a common and completely natural solution.
Open (external) retro wiring on insulators will perfectly complement the color of the chosen style direction in a wooden house.
In houses made of rounded logs, it is technically impossible to install properly. Therefore, installation on insulators remains the only way providing power while maintaining the aesthetics of the room.
Advantages

Flaws
- Openness of electrical communications on insulators has negative sides too. A direct consequence of the location on top of the support is less strength compared to closed type communications.
- External location structural elements assumes the presence of free space. IN small house this may prove critical.
- If the house is expected to have interior decoration,open wiring significantly complicates finishing work during repairs.
Introduce modern apartment impossible without power supply. But install the wiring on our own is quite real. Read in the next review.
Useful on how to correctly draw up an electrical wiring diagram in an apartment.
Material calculation
As a rule, exposed retro wiring actually turns out to be a combination. It is impossible to maintain uniformity of style when supplying electricity to the house and connecting powerful stationary current consumers. Retro cable large section not produced.
The input cable and individual connection groups such as an electric stove, electric boiler and other powerful equipment are installed in a hidden way. When calculating the required amount of wire, only the lighting and socket parts of the wiring are taken into account.
When choosing mounting elements it is worth take into account a small nuance: prices of materials vary greatly not only depending on the origin of the material, but also depending on the color of the design. For example, a brown set will cost almost three times less than a blue or gold one.
Approximate prices for components:
- Cable– 5,000 -15,000 rubles/bay;
- Roller insulator– 20-50 rub/piece;
- Switch, socket– 600-3600 rub/piece;
- Substrates and other insulation elements– 500-1,800 rub/piece.
In addition to the mentioned elements, you will need distribution boxes, self-tapping screws or screws, terminal blocks or PPE. Fasteners are selected after selecting insulators. This eliminates the possibility of errors in fastener dimensions.
 Tool kit for installing open wiring on insulators:
- Screwdriver;
- Level;
- Pliers;
- Screwdriver;
- Drill.
Installation on insulators
Electrical installation work is carried out after finishing, if any, has been provided. The procedure for installing open wiring is as follows:

The rollers are installed in increments of about half a meter, while the distance between the connection point and the nearest insulator must be at least 5 cm. At turns, two rollers are installed at a distance of 45 cm at an angle of 45° relative to the laid section of the route.
The wires are connected by soldering or using terminal blocks. Ceramic connectors are used to pass through the wall.
Retro wiring in a wooden house is easy to implement and usually indicates the excellent taste of the owner of the house.
Useful and educational video instructions on how to properly install retro wiring in a wooden house:
In a wooden house, electrical wiring can be laid different ways. So, people often install retro wiring.
Retro wiring in a wooden house is not only a way to organize a home electrical network, but also the perfect tool designing such an interior style as “Retro”. Why do many people want to organize this electrical wiring in their home?
Peculiarities
The reasons for this desire are different and they are explained by looking at its features. This type of wiring is open installation electrical cables inside the house. In this case, the cores of the electrical cables are twisted and secured on porcelain rollers.
The end result is that the entire internal electrical network is visible and acts not only as a means of transmitting current, but also as an excellent decorative element.
In addition, the home owner receives safe electrical network, since the wire does not touch the wood. In fact, between wooden wall and the wiring is air.
The use of porcelain rollers not only eliminates the possibility of any contact between the electrical cable and the wood, but also makes it possible to eliminate the problems that arise when installing open wiring in trays or using staples.
Thus, the installation of trays has some problems, since they are almost impossible to adjust to uneven surfaces wooden walls(especially if the walls are made of cylindrical timber). In other words, the trays distort the internal design.
As for staples, they are simply prohibited. Their use will result in direct contact of the electrical wire with the tree.
Of course, there is also the option of using corrugated pipes, but its appearance will definitely not make the interior decor better.
 It is worth saying that thanks to the use of porcelain rollers and twisted wire, retro wiring in a wooden house is very easy to install. Another feature is that replacing any wire is an easy procedure, because it is not hidden in pipes or behind plasterboard slabs.
It was mentioned above that retro wiring in a wooden house can be an excellent decorative element. It is worth noting that for such wiring, electrical cables are used, which are covered with artificial silk on top. Of course it doesn't burn. He may have different colour and pattern.
However, not only electrical wires can create beauty. As we know, retro wiring consists of porcelain rollers, as well as:
- sockets;
- rotary switches;
- distribution boxes;
- blocks in which the switch and socket are placed on the same base.
Of course, each of these elements is porcelain and looks antique.

Elements of retro wiring on a stand
Their color and appearance can also be different, and they are selected depending on design idea. Here it is worth saying that all these elements, unlike the elements with which wiring was created in the 20-30s of the last century, are made in such a way that they take into account all standards fire safety.
In this case, the sockets are characterized by the presence of a grounding contact. As you can see, each element of retro wiring, a photo of which can be seen below, is made in such a way that the final wiring in a wooden house meets all the requirements of the PUE.
Cables for retro wiring
 Creating such wiring has many nuances. The first is that the cables used to create it do not have a large cross-section. So, the cross-section can vary from 0.75 to 2.5 square meters. millimeters.
This means that such a wire can only be used as a separate branch that will extend from the distribution panel. We will talk about the nuances of the organization below.
The electrical wires themselves for this wiring are two- or three-wire. Each core is made of copper and consists of large quantity wire Also, each core has a double sheath, which is made of PVC plastic. Of course, the PVC sheath of each core has its own color. These colors are:
- Yellow-green.
- Brown.
- Blue.
It is worth saying that such wire is produced only at one Russian enterprise, as well as in Italy. As a result, he stands big money. All other porcelain elements are also expensive. In fact, retro wiring, which can be created in a wooden house with your own hands, is an expensive pleasure.
Features of installation and use

Installation of exposed wiring on the wall
As for installation, it is quite simple. According to the drawn up diagram, porcelain rollers, distribution boxes, bases for sockets and switches are placed.
After this, the wire itself is mounted and connected in junction boxes. Terminal blocks are used for connection. Next, the wires are connected to sockets, switches and lamps, as well as to the distribution panel.
Since the maximum cross-section of the retro cable is 2.5 sq. millimeters, then it cannot be used as an introductory one and as branches to which powerful devices (electric stove, etc.) will be connected.
In some cases, for a wooden house, the electrical input cable must have a cross-section of 10 square meters. millimeters. Accordingly, you need to use VVGng cable. Also, to power powerful consumers, you need to install a VVGng cable with a cross-section of 4 square meters. millimeter or more.
Helpful advice: since these electrical cables will not fit into vintage style, they should be installed in pipes that are hidden in the ceilings or behind the trim.
In some cases, there is a need to connect the retro cable and VVG. To do this, you need to use terminal blocks.
As a result, it turns out that retro wiring consists of those cables that fit the switches and lighting fixtures, as well as to sockets.
Video. Retro wiring in the interior:
People of the older generation remember well the wiring of Soviet times - twisted wires stretched along the walls, mounted on roller insulators. In the early 70s there was a fashion for hidden wiring, securely hidden under the plaster.
Retro wiring in the interior is becoming popular again today, especially when it comes to design for chalet, loft, vintage and country styles. At the dacha, in houses made of timber and logs, this is a rather original and safe solution.
Advantages
Design. For some retro styles, wiring is more of a rule than a preference. And in a wooden house, this design looks much more harmonious than plastic cable channels.

Excellent appearance. Thanks to the silk braid, available in a wide color scheme, the wires can be matched to almost any interior.

Minimum investment of time and labor. Installation of the structure is quite simple; no time is wasted on wall slitting and subsequent sealing.


Compliance with safety standards. Houses made of wood belong to the category of flammable buildings. Competent installation internal wiring in a wooden house is a complex and responsible task. Open retro wiring is a great solution!
Unobstructed access to wires, simple maintenance.
Flaws
Price issue. Wires, components, and accessories in retro style are not cheap, especially if we are talking about imported goods.

Low power. The cross-sectional diameter of a retro wire does not exceed 2.5 millimeters. This indicator will not allow you to enjoy comfort surrounded by powerful modern devices.

We'll have to think about removing the boiler and washing machine V separate room- boiler room or boiler house. Or adjust the design: external wiring, but with the usual powerful cable laid in steel pipes, aged to resemble brass.

Materials for retro wiring
Wires
What is a textile cable (aka retro cable)? This is a two-core or three-core copper electrical wire, packed in PVC insulation, then covered with colored textile braiding or fiberglass strapping. Twin-core wires are usually used for lighting. Three-core - for wiring (since the third core is intended for grounding).


The diameter of the wire cross-section is presented in three variations:
- 0.5 – 0.75 - maximum power - 2.9 kW.
- 1.5 - maximum power 4.4 kW.
- 2.5 - maximum power approximately 6 kW.
The outer braid material is technical silk or cotton impregnated with a fire retardant of complex composition.

Appearance - twisted and straight wires, presented in a wide range of colors.

Brands - products from Russian and European manufacturers are on sale. The most tested and well-known companies, engaged in the production and sale of professional wires for retro wiring, are presented below.

Production Russia
- Factory of electrical goods "Gusev"
- Bironi (using Italian technologies)
- VILLARIS (co-production)
- Gemini Electro (group of companies)


Made in Italy
- Gambarelli
- Cordon dor
- Fontini Garby

Made in Germany – Replikata (no representative in Russia)
Rollers
Used to secure twisted cable. They act as insulators (separate the wire from the wall). According to fire safety requirements for “combustible” walls, the wire must be separated from the wall by a distance of 12-18 millimeters and supported by insulators made of non-combustible material:

- Roller material: metal or ceramic.
- Dimensions: diameter - 18-22 mm; height - 18-24 mm.
- The upper part of the insulators can be wide or narrow. Narrow - for two-core wires. Wide - for three-wire.
- Color: available in assortment. The ceramic material allows you to perform decorative painting on rollers.

Electrical accessories
A decent look of exposed wiring and a true retro style is impossible without retro fittings. Europe, Russia and China produce a fairly large range of components and fittings.
- Retro cartridges
- Retro sockets
- Retro switches
- Retro socket boxes
- Retro cable passages
- Ceramic Terminal Blocks
- Retro distribution boxes
- Retro lamps, lamps and chandeliers

It is these little things that give the atmosphere that country charm.
Interesting. You can make retro wiring yourself. The main advantage of this method is the creation of a cheaper product without loss of quality. This approach allows for creativity.

At self-production, it is possible to use wires of a larger cross-section. You can work with thread-braided wires (RGKM or BPVL). As an option, the wires are woven into a braid.

Quantity of materials
To most accurately calculate the footage of wires and the number of piece materials, it is better to use laser level. With its help, the most optimal routes for laying cables are determined. Required amount insulators are calculated based on the desired installation step. For example, to lay 10 m of wire, you will need about twenty insulators.


How to connect electrical appliances with a large load
For a complete comfortable life You can’t do without large cross-section cables in your home. Electrical appliances such as electric stove or boiler, require serious sections. For laying such cables, special metal pipes small diameter.


Vintage pipes go well with outdoor wiring. This combined method will allow you to not deviate from the wiring installation instructions, fully maintain the style, and enjoy all the benefits of modern civilization without restrictions.

Basic rules for wiring installation
To install outdoor wiring in a retro style, you must adhere to the following requirements:
- Distance from the socket (switch) to the window or door slope must be at least 100 mm.
- The distance from the wiring line to the water and gas pipes is at least 500 mm.
- The distance between installed insulators is 700-800 mm. The last insulator is installed at a distance of 500 mm or less from the socket or switch. If the installation is carried out in a wooden house made of timber, the distance between the insulators may be less than 500 mm.
- A laser level will help you position the insulators beautifully in a straight line.
- The wires in the junction boxes are connected by soldering. You can choose distribution boxes with terminals. Twisting of wires is not allowed.
- Sagging of cables between attachment points is also not allowed. Optimal distance from wire to wall - 10 mm.

In general, installation of a structure requires a significant amount of time and attention to detail.

The wiring can be top or bottom. There are no strict rules in this matter. The lower option helps to save a little on material consumption. However bottom wiring, unlike the top one, is more susceptible to mechanical damage.


conclusions
Country wiring is rightfully considered one of the original and beautiful views solutions in a wooden house. A wide range of colors and a variety of components can create a cozy, ancient atmosphere in your home. To be convinced of this, look at the photo of finished retro wiring in wooden houses.


Photo of retro wiring