How to quickly make a shower in the country. We build a summer shower with our own hands at the dacha using photos and drawings
Most city residents cannot imagine summer without a dacha holiday, and a dacha without conditions of basic comfort and, first of all, the opportunity to take a shower.
This is especially true on a hot summer day, when life-giving moisture not only helps to wash away dust and sweat, but brings us back to life, giving us a feeling of freshness, cleanliness and complete rest.
A country outdoor shower has long ceased to be a primitive structure with a bucket of water and a ladle instead of a watering can.
Summer residents have a wide choice of materials for construction at their disposal - be it an inexpensive functional building or an exclusive architectural form that can become a real decoration of a suburban area.
Garden showers - construction options and functionality
Basic design any summer shower consists of several required elements:
- Shower cabin is a frame made of wood or metal, usually covered with light, durable, opaque material (board, corrugated sheet, awning)
- Floor with drainage system– wooden, tiled, concrete, with a shower tray. Two drainage options are used - into a sump (gutter) or drainage is installed to naturally absorb moisture into the soil directly under the shower floor
- Water container– minimum volume 100–200 liters for a family of several people
- Shower equipment: a set of hoses for filling the tank with water, a tap, a sprayer (watering can), a shelf for soap and shampoo.
Materials for building a shower: pros and cons
To build a country shower, you can use a wide variety of materials– specially purchased and those that are on hand or left after renovating a house or apartment:
- Wooden shower- classics of the genre! The frame of such a structure is made of timber and covered with coniferous and deciduous wood. For outer skin use planed boards, eurolining, block house, regular or profiled timber. The undoubted advantages of such a shower are natural, environmentally friendly pure material, incomparable aroma of sun-warmed wood, strength, reliability and aesthetic appeal of the structure
- Corrugated shower – inexpensive option, especially if the material remains from previous ones construction work. Galvanized corrugated sheet with a protective and decorative coating is a very strong, fairly rigid, durable material with excellent anti-corrosion properties, which is important when in constant contact with water. The corrugated sheeting is attached to a frame made of profile pipes and angles. Such a structure will always look neat and fit well into the natural landscape of the summer cottage. Unfortunately, this shower can only be used in summer, as the metal is thin and the cabin cools down quickly
- Can be built polycarbonate shower– cellular sheet building material from the thermoplastic family. It has unique characteristics - durable, lightweight, flexible, does not require additional protection against rust, and has a translucent or matte texture. For showers, it is better to choose matte polycarbonate; it is more suitable for intimate water procedures
- Brick shower– a solid structure that will serve you not only in the summer, but from early spring and until late autumn. This design requires a durable concrete foundation, a reliable drainage system, provides for water heating. The walls can be made of silicate or facade brick, the inside of the shower is most often lined with vinyl siding or wood. Disadvantages of a brick shower - significant costs and a long time for construction work
- A mobile version of a summer shower is a metal structure from profile pipes, covered with an awning. It’s easy to make it yourself by welding or bolting a frame from a metal profile and covering it with moisture-proof fabric
- You can build an outdoor shower at virtually no cost, using what is called industrial waste. These include wooden pallets or pallets for large-size cargo. After use, the pallet must be disposed of, but in the hands of craftsmen it can acquire a second life. Pallet boards are perfect for covering a summer shower, building shelves, benches and other garden utensils.
Recommendation! One of the most common cladding materials is lining - a thin planed board. It has several varieties: regular, eurolining - a profiled board with special tenons and grooves for joining, block house - a decorative board with the profile of a rounded beam, imitation timber - a panel made of planed boards.
Heated garden shower
For those who live in the country not only in the summer months, but in spring and autumn, and prefer to swim in warm water both on a sunny day and in cloudy weather, the best option would be construction heated shower.
What needs to be taken into account when constructing such a building?
Firstly, the shower should be warm enough to take water procedures in it both in April and October. In the winter months, it is still better to wash in a bathhouse.
Brick and wooden beams are ideal materials for construction; everything else will have to be insulated.
Secondly, requires a constant source of water, from which it is fed into the tank automatically or manually. This could be a water supply, a well, a borehole.
Thirdly, an important condition is availability of electricity, because in most cases it is this that serves as the source of energy for heating water.
What options for heating water in the shower are most often used:
- Electricity. Special tanks are sold with built-in electric heaters (TEH), the power of which determines the speed of water heating - the more powerful, the faster it heats. Having basic skills in working with electrical appliances, the heating element can be installed in the tank yourself
- Firewood. To heat water, you can use a time-tested wood-burning steel water heating tank - titanium. It's both reliable and cheap
- Gas. Water can be heated in a gas water heater using liquefied bottled gas.
Multifunctional buildings - two in one
 If there are no buildings on your site other than country house, a practical and useful structure can become utility blocks with several branches:
- Shower with toilet- the two most necessary “strategic” nodes. This is where you should start landscaping your summer cottage. Building them together will help solve both problems at the same time and at the same time save money. Optimal material: wood or brick
- Shower with changing room, which plays the role of a kind of dressing room. Here you can leave your clothes without fear of splashing them with water, dress calmly, and clean up
- Shower with essential for housewives who love home canning and outdoor cooking. The multifunctional room will help process the grown crops; it is comfortable to cook in it even in the summer heat. In addition, you will not heat up the house unnecessarily, keeping it pleasantly cool
- Shower with laundry– a very convenient combination of functionality, especially if there is a water heating system.
Choosing a place for a country shower
 To choose the right location for a future structure, you need to consider several factors:
- The place must be open and not shaded by trees - after all, even if a heating option is provided, we rely on the natural heating of water by solar radiation. In addition, the structure must be well ventilated and dry to avoid dampness and mold.
- If there is a drain hole, settling tank (septic tank) or drainage ditch, it is necessary think over convenient option draining using pipes or hose
- An important point when choosing a place for a shower is location of water source. It is necessary to predict the system for filling the container: manually using buckets, using a pump and hose, or provide automatic water supply.
Having determined optimal place to install a summer shower, you can begin its construction.
DIY shower construction technology
Summer shower dimensions
When determining the size of the shower, it is important to remember that its area should not be smaller 1 m2, the most suitable height is 2–2.3 m.
Specific dimensions are determined based on the size of the building material, in such a way as to minimize waste. For example, when building from a standard 6-meter beam, you can design a shower 2x2 m or 2x3 m.
Preparatory work: arrangement of drainage
 Option 1. We provide drainage into a drainage ditch or a special sump. For this we do marking the base shower according to the selected dimensions.
We remove soil from the marked area to approximately the depth of a spade bayonet, line the hole with roofing material and fill it with a layer of crushed stone in 15–20 cm.
We mount it right away water drainage system: we place a piece of hose or sewer pipe in the hole and lead it outside the perimeter of the shower. We install a drain pan on top (it is better to purchase a ready-made one) and connect it to the pipe.
Outside the shower sewer pipe can be laid in a trench or on the surface. Instead of a pallet, the floor can be concreted or tiled.
Can be used as a septic tank for soapy water eurocubes– plastic containers for bulk and liquid cargo, tied with a metal grid.
The undoubted advantage of these containers is their volume is no less than 1000l and durable plastic. By connecting two Eurocubes together and burying them in the ground up to the neck, you can get a home-made treatment facility for settling waste water.
Option 2. We mount drainage system directly under the shower. We dig a hole at least half a meter deep, fill it with 40–45 cm large crushed stone, pieces of brick, stone.
We finish everything with a layer of fine crushed stone in 5–10 cm. The water will naturally soak into the ground.
On this base we install a wooden grate along the width and length of the shower, which will act as a floor. Grate height 7–10 cm, we make it from wooden blocks measuring 2x3 cm or twenty boards wide 8–10 cm.
The optimal size of the gaps between the bars is 0.5–1.0 cm, a larger distance will create inconvenience during operation. The material for the grating must be carefully planed and sanded to avoid burrs.
DIY shower cabin construction
 The next step is to make frame.
At the corners of the shower we concrete four racks from a profile pipe measuring 50x50 mm or 40x60 mm, we provide another one for the door canopy.
From the same profile we make horizontal lintels, connecting the vertical posts along the perimeter - at the top, bottom and in the middle. It is best to carry out the structure by welding - this will ensure sufficient rigidity and stability of the structure.
Ready frame coated with anti-corrosion compound and painted. For cladding we use any inexpensive, lightweight and durable material - boards, corrugated sheets, siding, etc.
We fasten it all with self-tapping screws. Hanging the door- It’s better to buy it ready-made.
Strengthening the roof, using profile pipes as logs, we mount them on roofing material– slate, metal tiles, ondulin. Place a container of water on top.
Installation of shower equipment
 When choosing a water tank, size matters - the best option 150–200 l, shape - preferably flat for faster heating of water, color - black or dark for the same purpose.
Special tanks have finished holes for showering and water intake, so all that remains is to connect the supply hose, install a tap and a watering can or sprayer.
If we use an ordinary barrel, we drill a hole in the bottom, insert a squeegee - a piece of pipe with a thread, install a tap, install another squeegee and connect a sprayer (watering can).
Capacity required be sure to close to prevent debris and leaves from getting into the water.
Do-it-yourself wooden shower for a summer house
Foundation construction
 To make the design more thorough, it is advisable to make foundation.
To do this, we dig a ditch around the perimeter with a width of 15–20 cm and depth in 30–40 cm. Next, we make the formwork for the foundation.
We knock down the boards and install a box ( height – 15–20 cm) along the perimeter of the shower, focusing on the prepared trench.
We fill the ditch and formwork with concrete mortar. To prepare it on 1 bucket of cement M500 take 4 buckets of sand, 5–6 buckets of crushed stone, 1.5–2 buckets of water.
For the strength of the base in the above-ground part of the foundation reinforcement can be laid or pieces of thick wire. Align the fill in the horizontal plane using building level. The approximate height of the finished foundation is 10–15 cm. After the concrete has hardened, we remove the formwork.
Installation of a shower cabin
 Simultaneously with the foundation in the corners concreting pieces of reinforcement, on which we attach wooden supports from timber. We assemble the frame from the same lumber.
The choice of wood for cladding the frame is quite large. For heated showers it is better to use timber– the room will be warm, breathable and cozy.
For the summer option, you can purchase eurolining, block house, imitation timber from coniferous species trees.
Essential oils and resins contained in wood have bactericidal properties and are natural flavoring air - so washing in such a shower is not only pleasant, but also useful.
We attach the boards using self-tapping screws to the horizontal crossbars of the frame. For better ventilation in the upper part of the shower between the walls and the roof around the perimeter, leave a gap of up to 10 cm.
Roof and floor of a wooden shower
 It is easier to make a flat roof, single slope.
To ensure rainwater drainage, we make a slight slope by raising one side of the roof to 10–15 cm. Depending on the size of the shower, we use several beams the size of 10x10 cm(minimum 2).
Using nails, we attach wooden formwork from boards with a thickness of 20 mm, forgive it with roofing felt or other waterproofing material, covering with slate, metal tiles, ondulin, etc.
Advice! When making a roof, we make all the holes for pipes and hoses right away, so that later you don’t have to cut them out, violating the tightness of the roof. To ensure that the roof tank sits level, secure a wooden block underneath it on the lower side.
The floor in the cabin can be made from decking boards, teak, alder, linden or larch are best suited. Leave a gap between the boards 5 mm for water drainage.
Where can I buy a garden shower?
 If you don’t have the time or desire to build a shower in your country house with your own hands, you can trust professionals or purchase a ready-made design.
Retail retail chains building materials and household appliances, including online stores, offer a wide range of shower cabins made of wood, polycarbonate, fabric coverings and other materials that are collected at a summer cottage within a few hours.
Most common brands and their prices:
- German garden showers are very popular among summer residents brands Karcher and Gardena (Karcher and Gardena). This device can be used both in a cabin and in an open space (on the lawn, by the pool), installing it on a special tripod. The shower is connected through a hose to a reservoir, from which water is supplied using a pump. The garden shower has several water spray positions, is adjustable in height, and turns on at the touch of a button. Such a shower costs approximately from 1800 to 2250 RUR
- Garden shower step(sometimes called “stomper”) is useful in hiking conditions when there is no permanent shower. It supplies water from a container using a foot pump and is activated by stomping the feet. The shower is very economical and allows you to wash yourself with minimal water consumption. Estimated cost – 1250–1500rub
- Summer souls “Zelenovka”, “Aquatex”, “Sadovyi”– this is an opportunity to inexpensively purchase a full-fledged shower cabin, including one with heated water. Showers are installed directly on the ground or on a prepared base. The package includes a lightweight frame steel pipes, covered with awning or other waterproof fabric, plastic or steel tank with a capacity of 110–220 l, wooden pallet, electric heater. Cost of shower without heating – 5300–6500 rub., heated – from 6000 to 8500 RUR.
When deciding to build an outdoor shower, you do country holiday more comfortable, joyful and desirable for you and your family.
You can watch detailed information on how to build a summer shower in your country house with your own hands in this video instruction.
Install a garden shower personal plot recommended in the following cases:
- The country house does not have utility networks. The lack of running water significantly complicates the installation of a stationary shower indoors;
- The garden house is used only for short-term recreation in the summer. If you build a shower stall in such a room, then problems arise. big problems in preparation for her negative temperatures. It is necessary to completely remove water from the system, prevent freezing of pipelines, etc.;
- in order to save energy. Water for a garden shower can only be heated by sunlight. If you want to expand the functionality of the shower stall, you can also connect electric heating, but use it only in unfavorable weather;
- financial resources do not allow the construction of expensive capital bathrooms.
The presence of a garden shower significantly increases the comfort of relaxation on suburban area, you can wash in it after working in the beds, etc. It is impossible to list everything in one article possible options When arranging a garden shower, each owner can make changes depending on preferences, skills, characteristics of the site’s topography and financial capabilities.
To make it easier for inexperienced builders to choose the best option for a garden shower, we present a table of the most commonly used designs with a brief description of their characteristics.
| Name of structural element | Technical description |
|---|---|
| Frame | Can be made from wooden blocks or rolled metal. The dimensions of the bars are approximately 50x50 mm; slats measuring at least 20x30 mm are used to make side stops. It is better to make a metal frame from square or rectangular pipes measuring at least 20x20 mm. |
| External surface cladding | All types of lining are suitable, including natural ones. Widely used are profiled metal sheets, honeycomb or monolithic polycarbonate. Cheapest options – polyethylene film or thick fabric. |
| Water drainage | Some options may have special septic tanks, and most do not require storage tanks. Several tens of liters of water are quite successfully absorbed into the soil, especially if its composition is sandy or sandy loam. |
| Water tanks | Both metal and plastic containers are used. The best option– buy shower containers in specialized stores. The minimum container volume is 100 liters, external surfaces must be painted black. |
| Water heating | Sunlight or combined with application electric heating elements. It is recommended to make a specific choice taking into account climate zone accommodation and shower time. |
Garden shower
The construction of a shower consists of several stages; compliance with them allows you to avoid many troubles.
Stages of constructing a garden shower
The conditions listed below for placing a garden shower will increase the comfort of its use, reduce the amount of construction work and increase the time of use. These conditions are considered universal and must be taken into account when constructing any construction option.
- Location. The shower should be located in a well-lit area garden plot, very desirable on a hill. If the ground is sandy or sandy loam, then this arrangement will allow you to do without a septic tank or storage tank dirty water.
- The distance between the shower and the residential building should be minimal. It can be adjacent to outbuildings, a garage, etc. The main thing is that after water procedures there is a place for shelter, which will eliminate the possibility of hypothermia in unfavorable weather.
- Methods for filling a container under water. In all cases, the distance from water sources to the shower stall should be small.
After the issues with the location of the structure have been resolved, you should decide on the size and type of structure, and materials of manufacture. As we mentioned above, the choice is huge and depends only on the owner of the site.
Instead of building a frame, you can place the shower head on one of the walls of existing buildings, having previously taken special measures to protect it from moisture. There are options for placing a shower rail in an open space (vertical support, tree branch, etc.).
An original solution - the water tank is installed on the ground, and the supply is ensured using a special device, the so-called “treadmill”. It looks like a rubber mat with built-in water supply pumps. You need to press on them one by one with your feet, water is sucked out of the container and supplied under pressure to the shower head. Exercise and shower at the same time. Great option, can be installed anywhere in the summer cottage. To set up such a garden shower you do not need any construction skills, materials or time.
In this article we will dwell in detail on two more complex, but also more comfortable options. To build these structures you need construction material and a little time and experience. The frame materials are wood or profiled steel. The standard dimensions of the structure are 100x100 cm around the perimeter and 220 cm in height. You shouldn't reduce it, it will be inconvenient to wash. If you want to make a separate place in the shower for changing clothes and storing bath accessories, you can increase the perimeter of the structure.
Step-by-step instructions for building a shower with a wooden frame
Step 1. Make the markings concrete slab grounds. To simplify water drainage, it is recommended to leave a recess in the middle of the shower for natural moisture absorption. The fertile layer should first be removed from the ground, a sand cushion 10–15 cm thick should be poured, compacted and leveled.
Step 2. Prepare the formwork. You need to make two square boxes. One with a square side of approximately 100×100 cm, the second inner one with a square side of approximately 60×60 cm. The height of the formwork is at least 10 cm; for manufacturing, use boards approximately 20 mm thick and 10–15 cm high. If you are afraid that the boards will bend under load concrete, then reinforce the formwork around the perimeter with wooden or metal pegs. Check the corners with a square; the formwork can be assembled using ordinary nails.
Step 3. Place the formwork on the prepared site and check its position. The small box should be located exactly in the center of the large one.
Step 4. Prepare the concrete for pouring. For manufacturing you will need cement, sand and gravel in a ratio of 1:2:3. Accuracy of proportions of great importance does not have, the strength is quite enough for small loads. Fill the formwork with concrete and use a level lath to level the top surface horizontally. Allow approximately 10 days for the solution to set.
Step 5. Dismantle the formwork and begin making the frame. It will require bars measuring 50x50 mm or more; the amount of material can be easily calculated. It is necessary to add the length of four to the sum of two perimeters vertical racks.
Step 6. Make a base for the vertical posts. The bars can be connected in half a tree; a jumper should be made in the middle of the base; it will serve as an additional support for the wooden shower grate. Make sure that all corners are right; you can connect the bars with nails or self-tapping screws. The base bars (frames) should lie approximately in the middle of the concrete slab; the specific dimensions do not matter.
Important. Be sure to soak the base several times with an effective antiseptic. There is no need to install waterproofing between the frame and the concrete; it will only cause harm. The fact is that water gets on top of the insulation and cannot be absorbed into the concrete. As a result, wooden structures long time come into contact with water.
Step 7 Saw off the vertical posts to size, you need 4 of them. It is better to cut with a hand-held electric saw; if you don’t have one, you can use an ordinary hacksaw.
Step 8 Begin installing the vertical posts. For fixation, it is better to use galvanized metal corners. They greatly simplify and facilitate the work and guarantee proper stability of the structure. It is impossible to install vertical racks yourself; hire an assistant. Temporarily secure the racks with any pieces of boards; later they will be replaced with real stops. Constantly check the verticality of the racks, use a level.
Step 9. Make a second square from the bars, the dimensions are identical to the first, a water tank will be installed on it. If the container has a large volume, then you will have to install several additional jumpers; the distance between them depends on the size of the container.
Step 10 Using corners, secure the top square to the vertical posts. Check all frame elements with a level and correct errors if necessary. You can place wooden wedges at the joints; this will not affect the strength and stability of the structure.
Step 11 One by one, remove the temporary spacers and install the permanent ones. Use the same bars as for making the frame. The length of the spacers should be equal to the distance between the vertical posts; saw the ends at an angle of 90°. For fixation, use the same galvanized metal corners. Spacers are the most critical component of the frame; take all measures to ensure maximum strength.
Step 12 The frame is ready - start covering the side surfaces. Any material can be used for cladding. You can make doors to enter or use a retractable curtain. If the cladding is solid, then windows should be provided under the ceiling. Leave ordinary holes; you can cover them with glass or film. It is recommended to seal the sheathing cuts at the outer corners with even edged boards.
Step 13 Place a container of water on the roof of the frame.
Practical advice. If you plan to take a shower in rainy weather, then the roof should be covered with a piece of metal profile, and a hole should be made under the outlet of the shower head.
Step 14 Color wooden surfaces durable paint for exterior use.
You can install electric heating elements in the tank to heat water, but you must certainly follow the rules of the Electrical Regulations.
Step-by-step instructions for building a shower with a metal frame
To make the frame you will need a metal profile pipe, an angle grinder, a welding machine, a tape measure and a level.
After manufacturing, it is recommended to protect metal surfaces from corrosion processes with paint for exterior use. The amount of metal is determined based on the dimensions of the frame, as we described above. It is better to use a purchased water container; the length and width of the structure are adjusted according to its size.
Step 1. Draw a sketch of the frame indicating the length of each element. Take your time, carefully consider ways to strengthen the vertical posts. To strengthen loaded units, you can use pieces of rolled sheet metal with a thickness of at least 1 mm. Prepare squares or triangles with a side of 10–15 cm from it. Make sure that the angle is right and the cuts are even.
Step 2. Cut the blanks with a grinder. It is necessary to cut in compliance with all safety regulations; the grinder is a very dangerous tool. If you have many identical parts, it is recommended that you first accurately measure and cut one, and then use it as a template. This increases the accuracy of the elements.
Important. Make sure that cutting disc rotated in the right direction. At correct installation sparks should fly towards the master, but some people find it inconvenient to work this way and change the direction of rotation. This is very dangerous; while biting, the grinder is thrown onto the worker, which can cause serious injuries. It is impossible to hold the tool with your hands; the ejection force is too great.
Step 3. Start welding the frame. In order for the weld to be strong, maintain the welding conditions. The electrode thickness and current indicators depend on the profile parameters. For the frame, it is enough that the pipes have a wall thickness of 1–2 mm; such rolled products have the required physical strength and will fully withstand the load of a water tank. For welding, we recommend using a Ø 2 mm electrode; make sure that the slag is evenly blown off the surface of the molten metal and the seam is continuous.
How to weld a structure correctly?
- Prepare a smooth workplace, the dimensions should be such that the largest elements can fit freely.
- Place the two parts to be welded on the workbench and check their position under the square. As we already mentioned, the angle should be right and the parts should lie in the same plane.
- Tack the parts on one side, the length of the tack is no more than a centimeter, give the metal time to cool. During cooling, the unit will move to the side and the correct position will be disrupted.
- Using a hammer, trim the corners and turn the pieces over to the wrong side. Check the dimensions and spatial position again.
- Carefully weld the parts on the other side, now you can make a seam along the entire length.
- Turn the assembly over again and make a full tack weld. Weld metal pipes on all sides at the same time.
- Remove slag from the surface of the weld and check the quality of the weld. If there are large shells, then re-suture.
- Use a grinder to remove sharp metal stains.
Thus, you can independently prepare two side planes of the frame; all that remains is to connect them into a single structure. It is very difficult to do this alone; it is better to call an assistant. One will hold the elements, and the second will weld them. You need to constantly check the corners, don't rush. Practice shows that reworking an incorrectly welded frame always takes much more time than carefully checking the dimensions and spatial position during the preparation of structural elements.
It is better to make vertical posts and a platform for the tank from a rectangular or square pipe; with the same dimensions as a round one, they have significantly best characteristics physical strength for bending and compression. As jumpers, in addition to sheets at the corners, you can use any wire rod, square or reinforcement. There are pieces of profile pipe of sufficient length left - use them.
Step 4. At the bottom, weld a platform for the sheathing boards. The dimensions do not matter, it is intended only for emphasis. The grille can be made non-separable or assembled from individual elements. For manufacturing, take smooth lumber; the thickness of the boards or slats should support the weight of the washable ones. If you have thin materials, then make several jumpers for them.
Step 5. Install the frame over the shower location. This can be a concrete platform or ordinary temporary stone stops. The second option is preferable for several reasons. Firstly, there is no need to deal with earthen and concrete works. Secondly, at any time, if necessary, the shower can be moved to another place.
Metal frame - old lattice, wound with wire
If you weld legs with support platforms made of sheet steel at the bottom of the vertical posts. The dimensions of the platforms are approximately 20x20 cm, this is enough to guarantee the stability of the structure. Such a platform makes the shower more mobile when moving; for installation you only need to slightly level the ground under the supporting platforms; this work takes a few minutes.
Practical advice. Many people are concerned about water drainage. If your booth is located next to the entrance of the house, and everywhere on the plot sidewalk paths, then it is recommended to make a dirty water storage tank. If the shower is located at the back of the buildings, then you don’t have to waste time and effort on building outlets. For hygiene procedures, 10–15 liters of water is enough for one person, this is not a large number of It will be absorbed into the ground on its own without any problems. For complete peace of mind, you can dig a hole under the shower under 2-3 car tires, water will accumulate in it. After moving the frame, the tires are removed and the hole is filled with earth.
Step 6. Align the cabin, make sure that the racks are strictly vertical and the platform for the container is horizontal.
Step 7 Clean the surface of the metal structure from rust, oil stains and dirt, and check the stability of the frame with your hands. Everything is normal - you can start painting. Choose the color of the paint as desired, the main thing is that it is suitable for painting metal surfaces and for outdoor use. Don’t be too lazy to do the painting very well, use brushes, carefully rub the paint into the frame. If one layer is not enough for uniform coverage, you will have to repeat.
Metal frame coated with primer
Step 8 Place a container under water on the top platform and attach a shower head. If desired, you can make an additional outlet for dialing warm water for various economic purposes.
Water supply through a tee with taps on taps
If there are no doors in the cabin, and only a plastic curtain is hung, then the wind can blow it inside the cabin. This creates some inconvenience when taking a shower. There are several ways to correct the situation:
- Attach to the curtain in several places of attachment. Two approximately in the middle of the height is enough.
- Hang any “hangings” next to the plastic curtain. The main selection criterion is weight. The heavier they are, the better they will hold the curtain.
If you want to increase the comfort of taking a shower, then it is better to attach a door. For its manufacture, you can use both lumber and rolled metal. The design of the doors is elementary; they are hung on vertical side supports.
When making the frame, think about this point; little material and time will be required, but the convenience of using the shower will increase significantly. The compartment also needs to be equipped with wooden gratings for the feet.
Silicone mat to prevent feet from slipping on wet boards
If children will use the shower, be sure to install a shower head with flexible hose. Place the water supply switch tap at such a height that children can reach it without any problems.
Video - Garden shower options
Nothing like relaxing after a hard time working day in the country, like a summer shower. Water not only calms, but also refreshes, distracts from unpleasant thoughts and relieves stress. But what to do if there is no shower on site? If you don’t want to splash around in a trough or basin, you need to take care of comfort in field conditions and design a refreshing summer shower for your favorite summer house with your own hands, using finished photos and drawings.
How to build a summer shower with your own hands
Summer shower takes one of the first places among all country houses. Sometimes this is not just a way to wash yourself after a day of cultivating the land has come to an end, but also the only way to cool down in the heat.
First you need to choose a place to install the shower structure. To do this, you should examine your site for secluded places.
On the other hand, this place should not be far from the main building, so that you do not have to freeze on the way to a warm house if you decide to take a shower on a cool day.
Advice! If a solar heated tank is provided, ensure that nothing obscures the water tank.
After you have found appropriate place, pick up optimal sizes for your cabin. Please note that for ease of movement a person needs a room of at least 1 m 2. If a dressing room is planned for changing clothes and storing dry things while swimming, the building increases by another 60-70 cm. The height of the shower stall is approximately 2.5 m. So, the estimated dimensions of the shower for the dacha are 170x100x250 cm.
If the structure is supposed to be wooden, then next step construction will involve the construction of a frame made of wooden beams or a metal corner.
Next are the walls. Please note that for better ventilation, the walls should be no less than 20-30 cm away from the ceiling and pallet. The walls are constructed mainly from materials that were left over during the construction of the main dacha building.
Water supply in a country shower
When installing a shower for a summer house with your own hands, it is necessary to provide for the water supply and drainage in advance. Drain system laid at the stage of building the foundation, and organized during the installation of the tank.


In hot weather, quite often you want to freshen up at your dacha, but there are situations when there is no clean body of water nearby, and setting up a pool is a rather complicated and expensive task. To get out of this situation, it is recommended to independently build a summer garden shower for your dacha; it will save you in the summer heat and will perfectly refresh you. It will be especially pleasant to take it after a hard day at work. A shower will help you relieve tension, refresh, invigorate, calm and distract you from negativity.
This structure performs another equally important practical function - health care. It is recommended to rinse periodically in order to wash away dust that has settled on you, which may contain particles of fertilizer. Doctors have noticed that people who neglect summer showers and prefer to postpone hygiene procedures until taking a bath, more often turn to specialists with problems such as diseases of the gastrointestinal tract and skin diseases.
But what if there is no shower at the dacha? If you don’t want to splash around in a trough or basin, you need to arrange comfort in the field and build a summer shower with your own hands, using ready-made drawings and photos, studying the description step by step.
The choice of material and location are the most important parameters
This building has a huge variety of construction options, both from a technical and aesthetic point of view. But the general details are the same for any option, these are the frame, fence, tank and pallet (floor). But the options for their assembly are very diverse.
The simplest and most affordable option is to take a bucket, punch more small holes in it and hang it in convenient location. The main advantage of such a device is its absolute accessibility, but sometimes ten liters may not be enough to wash properly. And from an aesthetic point of view, such a design is not very attractive. Another advantage of this option is that you don’t need to build anything.
If you do not go the simple route, then an outdoor shower can be constructed from wood, metal profiles and various plastics. The choice of material depends on what tool you use. If you don’t have a grinder at your disposal and welding machine, then the structure will have to be built from planed bars. As a covering, you can use plastic lining, a board, or simply attach a waterproof film to the racks.
Each option has its own subtleties. For example, when assembling a wooden summer shower, you can use great amount design options, but plastic and metal constructions do not require special processing.
A very important point at the beginning of the assembly is how many people will use the shower and how often. Based on this, the volume of the tank is calculated, as well as the presence of a special drain.
The comfort of using a shower may vary. If possible, equip your dacha shower with a locker room yourself. In this case, you will avoid such an unpleasant moment as wet things. Highest degree comfort is a structure that houses a shower, a dressing room and a toilet. Of course, creating such a structure will require an investment of both money and effort. If the tank is painted black, the water will heat up faster.
When choosing a location for the shower, try to ensure that it is sunny and that buildings and trees are as far away as possible. This is important because the source of heating the water in the tank is the sun. Another point is that the shower should not be installed on a noticeably lowering ground, as this will impede the flow of water. Particular care needs to be taken of the drain itself.
For infrequent use and a small volume of water, a small drainage layer under the pan will be sufficient. And if a shower is used by a family of several people who will use it quite often, it will be necessary to install a septic tank. It should be located 2-3 meters from the structure itself, this is done so that it does not lead to the shower bad smell. You can plant moisture-loving plants near the summer shower - they will decorate the area and provide natural drainage.
Once the location and material have been determined, the construction of the structure can begin. To do this, study 5 simple options How to make a summer shower yourself.
Homemade shower cabin made of wood
Before you build a summer shower in your country house, you need to prepare everything necessary materials and tools for work. To create an outdoor shower structure, you will need the following materials:
- timber;
- self-tapping screws;
- rubber hose;
- shower kit, which includes a bracket, curved pipe, adapter, faucet and nozzle.
Stages of assembling a wooden garden summer shower:
- A shower pit with a depth of 40 cm and dimensions of 1 × 1 m is dug, a layer of crushed stone is poured onto the bottom of the pit, it will facilitate the rapid absorption of soapy water by the soil. After this, you need to lay cinder blocks in the corners. They must be leveled.
- After this we begin to make the frame. To do this, you will need boards 15cm wide and 30mm thick. A base measuring 1 × 1 m is made from them, 4 beams with a cross section of 70 × 100 mm are attached to it. Using lateral and two transverse jumpers inserted into the grooves, the frame is ligated. They also serve as reinforcements for the roof, where a hundred-liter tank will be installed.
- Frame covering. To do this, you can use clapboard, blockhouse or false beams. The gaps between the grooves should be about 2-3 millimeters. This is necessary so that when wet the timber can easily expand. We used a material that imitates logs to cover the shower.
- Finishing. Before painting, you need to prime the wood. A bioprotective antifungal impregnation is suitable for this; after it dries, the surface is painted with façade acrylic water-borne varnish in 3 layers.
- Then you need to hang a tank, the minimum volume of which is one hundred liters, a curtain, install shelves and attach hooks.
To independently create such a shower at the dacha, it will take 1-2 days. But a do-it-yourself shower cabin at the dacha will delight you throughout the entire summer season.

Country shower made of polycarbonate
When many people think of polycarbonate, a greenhouse comes to mind. Most people immediately wonder how to use such a shower, which is also transparent. But for showers there is special material who hides everything.
An outdoor shower made of polycarbonate on a metal profile is more durable than a wooden one and is not more difficult to assemble. To do this, you will need a profile pipe with a cross section of 40x20 mm with a wall thickness of 2 mm and a steel angle of 50x50 mm. The number of profiles is determined based on the dimensions of the shower: length and width - 1 meter, height - 2.1 meters.
The dimensions of the cabin are not important since its length and width depend on the dimensions of the tank. The posts must be 10 cm larger than the height of the frame; this is necessary for concreting.
For convenience, it is better to assemble the sidewalls on a flat concrete or asphalt area, using welder magnets to fix the profiles.
Step-by-step instructions on how to make a shower from a profile pipe and polycarbonate look like this:
- Two racks and two crossbars are laid in pairs on the site, after which they are welded overlapping.
- After installing the side frames vertically, two transverse profiles are attached to them by welding, the corners are checked and the joints are fixed with a working seam.
- As soon as the concrete screed has been poured under the booth, the finished frame is placed on it so that the legs of the racks are immersed in the concrete. The installation is checked for verticality (if necessary, the depth of immersion in the screed of the racks is adjusted).
- All that remains is to weld the door frame and attach the hinges to it. The final touch will be cutting the cellular polycarbonate and attaching it with self-tapping screws to the frame itself. Can be used to collect water steel pallet or at the time of concreting, make a special channel for drainage.
- For the reservoir, it is recommended to use plastic flat tanks. They are easier to install and act as a roof, completely covering the cabin.
An outdoor polycarbonate shower can look very attractive thanks to color scheme. Of course, such a design should not be put at the forefront. But for the owners themselves and their guests it will be very pleasant to use such a shower. In addition, polycarbonate does not require any special care.

Shower for a cottage made of brick
Creating a brick structure requires the construction of a foundation. To do this, you will need to dig a trench 400 mm deep and 200 mm wide along the perimeter of the future structure. The trench is filled up broken brick and is poured liquid concrete, so that it leaks between him. After a week has passed after the concrete has hardened, begin laying the brick on the cement mortar.
Don't forget about installing the door frame. The door itself can be made of wood, or a frame can be welded from a profile and a sheet of corrugated sheets sewn into it. When will you lay it down? last layer bricks, embed the transverse ones into the masonry wooden blocks, preferably brick thickness. The tank will be attached to them and the roof will be laid.
The roof will require rigid material. Corrugated sheeting or slate are well suited for this role. After the roofing material is secured, a hole is drilled in the middle of the roof. The tank is installed on the roof so that the supply tube passes into the hole. A tap and watering can are screwed onto the tube.
The optimal tank volume for such a shower is 200 liters. You can buy a plastic or galvanized tank in the store or make it yourself from stainless steel. Any container that has a neck for filling water can be used as a tank.
To create a heated brick shower, you need to install a 2 kW heating element into a metal tank. The reconciliation container must be painted black. This color is more attractive Sun rays, which allows the water to heat up faster. If you additionally install a wood-burning titanium in the cabin, then in addition to heating the water, you can also heat the cabin itself. In this case, you will need to install another cold water tank.
There are two methods for creating the floor and drainage of a country shower:
- dig a hole equal to the area cabins and a depth of 300 mm, fill with crushed stone on top of which install a wooden lattice pallet. This type of drainage works well with small amounts of water;
- if you plan to build a heated shower for a summer cottage, which will be used by a large number of people, then it is necessary to drain it. To do this, you need to lay a 50 mm sewer pipe from the dug hole to the drainage well. Fill the hole with crushed stone and fill it with concrete so that the drain is flush with the floor. Place a wooden pallet on top of the concrete.
A do-it-yourself summer shower for a cottage made of brick is built not for one season, but for long years, so it can be equipped with heating.

Summer shower made of corrugated sheets
A successful solution can be considered the construction of a country shower from corrugated sheets. This material is lightweight, strong and durable. For covering like this suitable material both wooden and metal frames, but there must be additional cross bars on it.
Additional emphasis will not hurt due to the fact that this material quite soft. For a metal profile, the frame is built similarly to the above options.
It is recommended to weld the door frame from a metal profile. The metal profile is fastened using galvanized self-tapping screws with a sealing washer through one wave. First, the corrugated sheets are attached to the side walls, then attached to the door.
If it becomes necessary to cut the material, use scissors or a special disc with teeth for an angle grinder; this is done so that the special tool does not burn out during cutting. polymer coating corrugated sheets

The frame of this shower is made of metal pipes. The wall cladding is made of brown corrugated sheets. The roof is also made of corrugated sheets. The opening between the roof and the wall allows light to enter the shower room.
A simple option for building a summer shower
Often many people think about how to build a summer shower with their own hands using a minimum of funds. This shower will be able to provide for a minimum of people and will allow maximum savings.
Most simple design the shower is installed near the blank wall of the main building. A water container with an attached shower head is also attached to this wall. The floor of such a shower is a wooden pallet or a concreted area for convenience, which is covered with a rubber mat. For walls, use a cellophane curtain or tarpaulin wrapped around a wooden frame.
You can use any available means as shelves for shampoos and soaps. For this purpose you can even use plastic bottle cut in half and nailed to the wall. The lower part of the bottle can serve as a stand for shampoo, and the upper part for soap or washcloths, which will allow water to flow freely and not stagnate.
From an aesthetic point of view, such a structure is noticeably inferior in contrast to a capital one, but nevertheless has the right to exist.

5 ideas for organizing a shower in the country
A fairly inexpensive and fairly simple country shower is a frame made of wooden blocks covered with planed boards.

If you have a grinder and a welding machine at your disposal, you can make an outdoor shower yourself from a metal profile and cover its walls with tarpaulin. In the absence of a welding machine, the frame can be assembled using threaded connections, reinforcing the corners with steel gusset plates. The sides can also be closed using a film screen placed on rings and a cord.

There is no need to build a shower frame if you attach it to the wall of your home. To do this, you will need to line it with waterproof material and bring a mixer with a hose to the surface. By filling the floor with large pebbles and performing simple drainage, you will get a fairly cozy and bright corner for taking water procedures. If you don't like it open option wall shower, can be placed next to light wall screen.

Considering further the options for a summer shower, it is worth noting that it can be made not only from purchased, but also from inexpensive scrap materials. Look at the photo below. The frame of this structure is made of wooden blocks. The fence is woven from willow vine, which can be found near summer cottages.

The shower can also be made from wavy metal sheet bent in a semicircle. For this option, you do not need to install a tank for heating water. You just need to connect to the water supply.

Now you know enough how to make a country shower yourself. If you are full of confidence in the need for a country shower, then go for it. Most the best option obtained after preliminary calculations. And after finishing this work, you can return to everyday dacha chores, in which case you have a place where you can freshen up.
Summer time gives us warm sun, greenery, flowers and a wonderful opportunity to take a shower fresh air. After a cramped city apartment, this procedure brings a pleasant feeling of renewal and unity with nature.
Despite the simplicity of the outdoor shower design, there are many interesting options its implementation. We will get acquainted with the most interesting and profitable ones for construction on a summer cottage in this article.
Options for a summer shower for a summer residence
It's no secret that you can build a summer shower for your dacha from different materials. For the frame, you can take profile metal or wooden beams. Cellular polycarbonate, corrugated sheeting, tarpaulin, polyethylene film, siding, and blockhouse are optimally suited for filling the walls of the cabin.
In addition to using frame structure, the walls of the shower stall can be made of blocks or bricks. The washing compartment can be single or interconnected with the toilet. This solution reduces the cost of construction and allows rational use of the site area (photo No. 1).

Photo No. 1 “Two in one” - a popular way to combine a shower with a toilet
The simplest and most inexpensive outdoor shower is a frame made of wooden blocks covered with planed boards (photo No. 2-3).

Photo No. 2-3 Summer shower with a cabin made of timber and boards

Photo No. 4 An example of the simplest prefabricated structure made of timber and boards, which can be covered with an awning
The main thing you need to pay attention to in this case is the strength of the frame on which the container will stand. The frame posts must be protected from rotting and reinforced with corner braces. The concrete floor can be replaced with a standard shower tray, directing the soapy water from it into a common septic tank.

Photo No. 5-6-7 Options for interesting, but at the same time uncomplicated wooden showers
If you have an angle grinder and welding skills, you can make a summer shower with your own hands from a metal profile and cover its walls with tarpaulin. If there is no welding machine, then the frame is assembled using threaded connections and the corners are reinforced with steel gusset plates (photos No. 8-9).
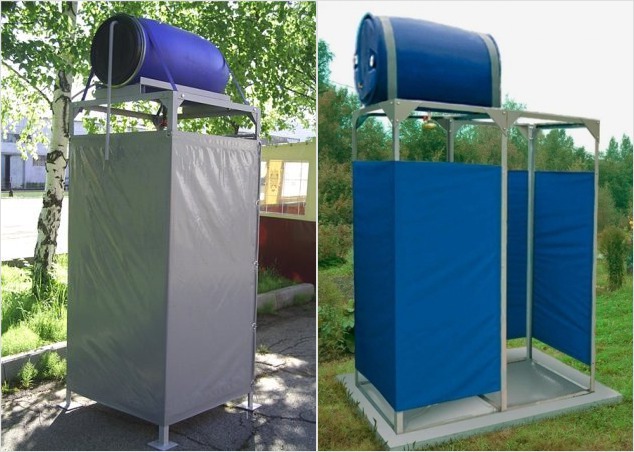
Photo No. 8-9 Summer shower made of metal profiles covered with tarpaulin fabric
This shower option is more convenient than a single cabin, since it has two isolated compartments: for undressing and washing.
Photo No. 10 shows a garden shower popular among summer residents. It also uses metal load-bearing frame, but the filling of the sidewalls is made of a film screen put on rings and a cord.

Photo No. 10 Shower stall with a metal frame and a screen made of polyethylene film
The metal base of the cabin can be easily combined with corrugated sheeting. This results in a simple and reliable design, well protected from the wind (photo No. 11).

Photo No. 11 Shower stall covered with corrugated sheets

Photo No. 12 Garden shower stall with dressing room (220x100) made of corrugated sheets and pipes
In factory conditions, cabins for summer showers are most often made using two materials: profile pipe and polycarbonate sheet. If you want to save money, the same structure can be assembled by yourself. The result is aesthetically pleasing, durable and practical (photo No. 13-14).

Photo No. 13-14 Excellent shower for a summer house - profile pipe and cellular polycarbonate
The dimensions of this design are designed for installation of a flat plastic tank with a "watering can".
The shape of the shower does not have to be rectangular and closed on three sides. Photo No. 15 shows an interesting solution based on a wooden beam wall and a metal pipe along which the screen moves. You can’t put a heavy tank on such a shower. It is designed to supply heated water from a home water supply.

Photo No. 15 Original “corner” outdoor shower
There is no need for a frame for a summer shower if you attach it to the wall of the house. To do this, you need to line it with waterproof material and bring the mixer with a hose to the surface. By filling the floor with large pebbles and making simple drainage, you will get what you dreamed of: a cozy corner for water treatments, filled with air and light (photo No. 16). If you don’t like the open option of a wall shower, then install walls light as in photo No. 17.

Photo No. 16-17 In summer, you can take a shower not only in the stall, but also near the wall of the building, and the fence of the wall shower will protect you from prying eyes
Climbing plants can be successfully used to fill the walls of an outdoor shower. All that is needed for such a solution is a lattice screen made of mesh, on which ivy, hops or grapes will weave a living carpet.
When considering the materials from which you can build a shower structure, do not forget about natural stone. The option shown in photo No. 18 will perfectly complement the landscape design.
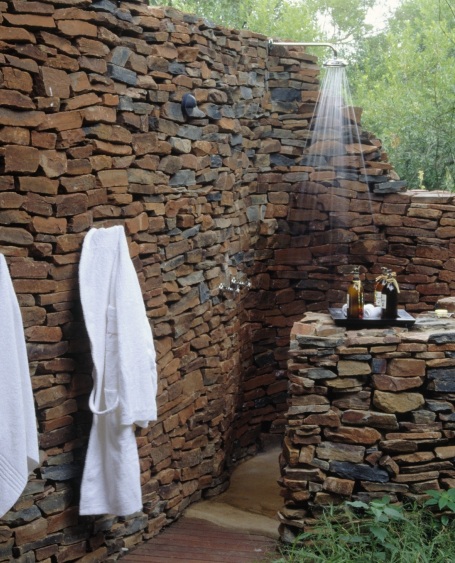
Photo No. 18 A wall made of wild stone, curled up like a “snail” - the best place for placing a summer shower
In this case, the fencing was laid dry, without using mortar. It is not needed here, because a flat stone was used in the work. It holds securely in the solid wall due to its weight. The considered option does not involve installing a container, since its appearance will spoil the beauty of the stone lace. Water is supplied to the shower head from an external water supply.
If there is an old tree on your site, do not rush to cut it down for firewood. Its trunk can be used as an original installation for a summer shower. Surround it with a concrete wall of a curvilinear outline, and your creativity will delight your neighbors and friends (photo No. 19).
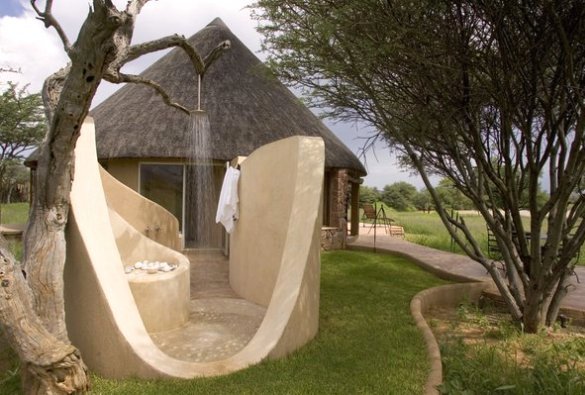
Photo No. 19 An old tree on the site is not a hindrance, but the basis of an original shower structure
Continuing the review of summer shower options, we note that it can be built not only from purchased ones, but also from inexpensive scrap materials.
In photo No. 20 you see such a design. Its frame is made of wooden blocks. The fencing was made from willow wickerwork, which grows next to the dacha plots.

Photo No. 20 Simple, inexpensive and beautiful - wooden frame covered with willow vine
Planning to build at the dacha utility block made of brick, do not forget to plan a shower compartment in it (photo No. 21-22).
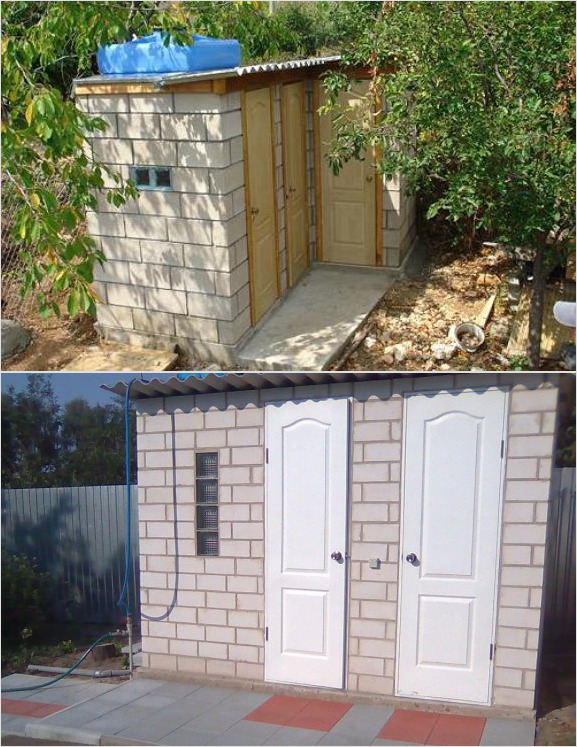
Photo No. 21-22 Compact outbuildings “shower-shed” made from blocks
On the strong stone walls of such a structure, you can easily install it of any volume and shape.
Estimated cost of ready-made options
Factory-produced shower cabins are available in several versions. Some have a metal frame equipped with a screen made of synthetic fabric. Others are sheathed with cellular polycarbonate or made entirely from modular plastic panels. The buyer is offered two planning solutions: a summer shower with and without a changing room.
The average price of an outdoor shower with a moisture-resistant awning and a plastic 200-liter tank (heated) is 15,000 rubles. For a frame-tent structure, complete with a changing room and washbasin, you will have to pay at least 18,000 rubles.
A single cabin made of cellular polycarbonate on a galvanized frame with a heated 200-liter tank can be purchased at a price of 20,000 rubles. This design can be supplemented with a locker room by paying an additional 5,000 rubles for it.
A summer shower cabin made of plastic on a metal frame, equipped with a heated tank, will cost no less than 24,000 rubles.
Please note that prices can vary greatly in the regions of the Russian Federation, so you can find out the most up-to-date information from local manufacturers.
How to build a summer shower with your own hands?
The choice of material in this case depends on the set of tools you have at your disposal. If the farm does not have a welding machine and a grinder, then the frame is made of planed bars. You can sheathe it with boards, plastic lining or simply attach film waterproof material to the racks.
An outdoor shower made of polycarbonate on a metal profile is more durable than a wooden one and is not much more difficult to assemble. For this work, you need to prepare a steel corner 50x50mm or a profile pipe with a cross-section of 40x20mm (wall thickness 2 mm). The quantity of the purchased profile is calculated based on the dimensions of the shower: height 2.1 meters, length and width - 1 meter.
The dimensions of the cabin may differ from those indicated, since its length and width depend on the dimensions of the purchased tank. The length of the posts should be 10 cm greater than the height of the frame (for concreting).

It is more convenient to assemble the sidewalls on a flat asphalt or concrete platform using welder's magnets to fix the profiles.
The sequence of operations looks like this:
- We lay two racks and two crossbars on the site in pairs and weld them overlapping.
- Having installed the side frames vertically, we weld two transverse profiles to them, check the corners and fix the joints with a working seam.
- Having poured a concrete screed under the shower stall, we place the finished frame in it so that the legs of the racks are immersed in the concrete. We check the verticality of the installation (if necessary, adjust the depth of embedding of the racks in the screed).

After this, all that remains is to weld the door frame and attach the hinges to it. The work is completed by cutting the cellular polycarbonate and fixing it with self-tapping screws to the shower frame. To collect water, you can use a steel pan or, at the concreting stage, make a drainage channel by installing a drain and a sewer pipe into it.