Warm water floor with your own hands. Underfloor heating from polypropylene pipes
There is a need for additional floor heating in all regions of our country: the first floors of residential buildings most years are subject to cooling. The solution to the problem is the installation of a separate heating system under the screed. The most commonly used conductor is poly. propylene pipes.
Pipes: marking and the right choice
Marking polypropylene pipes- the first thing they pay attention to when choosing a suitable conductor for hot water, since not every product is suitable for this purpose. What is hidden under encryption:
- Operating pressure PN, which the pipe must withstand during its entire service life at a water temperature of 20°C. For a warm floor, you should choose a designation not lower than PN20-25 - they are designed for hot water.
- Variety of material: PP - polypropylene. Its addition PP-1, PP-2, PPB indicates the type of raw material used - homopolymer or block copolymer. For hot water, pipes marked PPR, sometimes PPB, are suitable.
- The diameter of the conductors and the thickness of their walls in millimeters from 10 to 1200 mm. For internal systems heating and underfloor heating use pipes with an inner diameter of not more than 30 mm.
- Marking - designation of the manufacturer, year of manufacture.
Manufacturers
There is a lot of competition among pipe manufacturers in the market. Which ones to choose?
- Russian brands: Politek, PRO AQUA, Heisskraft, RVC, Santrade;
- Germany: Akwatherm, Banninger, Rehau, Wefatherm;
- Czech Republic: FV-Plast, Ecoplastic;
- Turkey: Pilsa, Kalde, TEBO, Firat, Vesbo and Jakko;
- China: Dizayn and Blue Ocean.
The characteristics of all products are indicated in the labeling and must comply with international standards. Which brand to choose - it is impossible to say unambiguously. It's a matter of personal preference.
Pros and cons of underfloor heating made of polypropylene pipes
Is it worth choosing products for organizing floor heating and can propylene pipes be poured with concrete under the screed?
Let's start with the pros of using the material:
- Resistance to temperature and pressure changes;
- Low thermal conductivity minimizes the loss of thermal energy;
- Low cost of pipes and their installation, maintenance;
- There are no deposits on the inner walls.
- The low flexibility of pipes with at least 8 diameters makes contours difficult";
- The temperature in the room during laying is limited - not lower than + 15 ° C;
- High odds linear expansion - conductors can change their dimensions when exposed to hot water. Polypropylene pipes can be laid in the floor screed, but it is necessary to correctly calculate and select them so that there is no internal stresses which can lead to rapid wear.
How long does the heating system last?
With the right selection of material, the service life of polypropylene pipes reaches 25 years - this is exactly what conductive products are designed for. If errors are made during installation or the use of pipes with lower characteristics, excessive stress in the walls may occur, which reduces the life of the polymer.
Styling features
First of all, a manifold cabinet is installed, to which the outgoing and return pipes are connected.
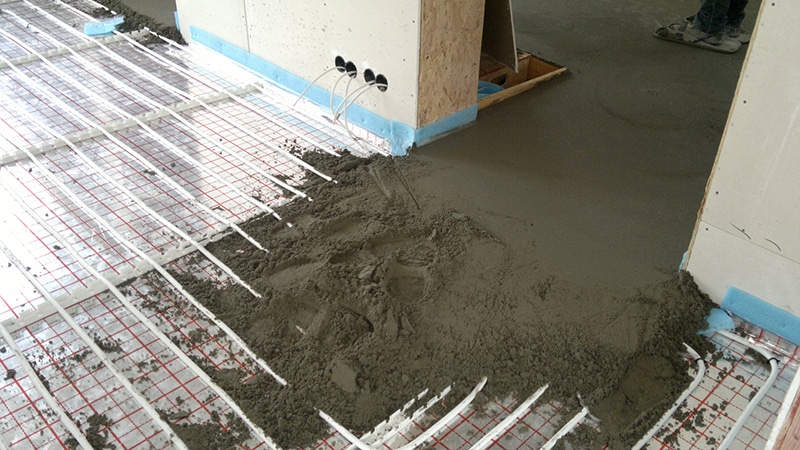
Be sure to lay waterproofing under the future "pie" to prevent the base from getting wet in case of a leak. For these purposes, polyethylene is used, overlapped and fixed with adhesive tape.
The damper tape around the perimeter of the room will save the screed from cracking after the solution has solidified during periodic expansion. Insulation throughout the floor area will keep the heat inside the room.
It is better to fasten the contour with the help of a reinforcing mesh, pressing the pipe with clamps. Here it is important not to overdo it and not pull the tube.
Laying is made from a coil, the length of one thread for effective heating should not exceed 50-80 meters.
Polypropylene pipes under the screed must be tested before pouring concrete: hot water under operating pressure. If the line is not deformed and everything went smoothly, the circuit is disconnected from the water supply, but left operating pressure online. After cooling, concrete is poured, to which special additives are added to improve the quality of the mixture.
You can use the finished floor only after the screed has hardened - not earlier than a month later.
Underfloor heating made of polypropylene pipes is popular because of its many positive properties. For do-it-yourself underfloor heating, it is more efficient to use these particular elements. Steel pipes- it's a survivor.
Advantages
If done floor heating With the help of PVC pipes, it is possible to achieve many advantages. These include:

Flaws
When using polypropylene pipes for underfloor heating, it is necessary to use elements with reinforced walls. Application conventional materials will result in reduced system life. Unreinforced walls cannot cope with the high load from the circulating coolant under pressure. Also, a certain effect is observed from the screed and other elements of the warm floor.
How to install polypropylene pipes
Another disadvantage of polypropylene is its instability to the effects high temperatures. Therefore, it is forbidden to use it in rooms with a high fire hazard. The normal operating temperature of polypropylene is +75°C (pressure up to 7.5 atm.). It can be operated at +95°C, but in this case, the service life is significantly reduced. Therefore, when installing an underfloor heating system, care must be taken to ensure that the coolant reaches the optimum temperature.
Varieties of polypropylene pipelines
Polypropylene pipes are popular for underfloor heating, water supply systems and other engineering networks in the house. They can be single layer or multilayer. Each option has its own scope.
Polypropylene pipes for water supply and heating systems
Single layer
Main varieties:
- RRN. Pipelines are made of homopolypropylene. Not used for underfloor heating, but widely used for water supply, ventilation systems;
- RRV. Manufactured from polypropylene block copolymer. Differ high strength and resilience;
- PPR. For production, a random copolymer polypropylene is used. Pipes from this material are able to effectively distribute the produced load along their walls;
- PPs. Pipes of this type are inflammable. They are able to work effectively at temperatures that do not exceed +95°C.
Multilayer
There are several types of multilayer pipes, which are reinforced with a reinforcing layer of the following materials:
- aluminum. A thin reinforcing sheet is applied to the outer surface of the pipeline. When connecting several elements, the aluminum layer is cut off by 1 mm. There are also variations where reinforcement is carried out inside - between the walls. Polypropylene pipes with aluminum reinforcement are able to work effectively at a temperature of +95°C (for a short time at +110°C);
- fiberglass. The reinforcing layer is placed between the polypropylene sheets. These pipelines are effective in underfloor heating;
- composite. A mixture of aluminum and fiberglass fibers is placed between two layers of polypropylene.
Preparatory work for laying a warm water floor
It is impossible to make a warm floor using polypropylene pipes with your own hands if you do not properly prepare the base for their laying:

Calculation of the required pipeline length
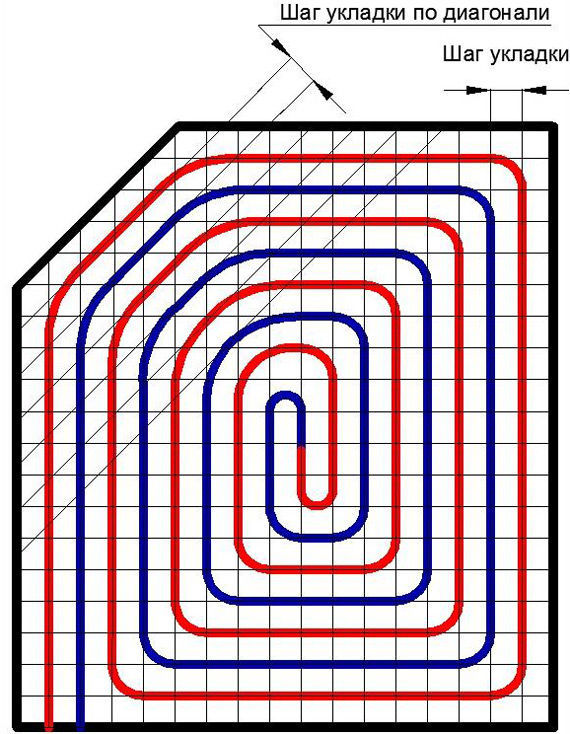
Laying pipelines with your own hands in a screed should be reproduced according to a certain scheme. A warm floor made of polypropylene pipes can take the form:

To install a warm floor with your own hands, the step between the turns should be from 10 to 30 cm. In most cases, 30 cm is enough. In areas with significant heat loss, you can reduce the step to 15 cm. The high efficiency of underfloor heating is maintained if the water circuit is made in cement-sand screed With maximum length 80 m ( perfect option- up to 50 m).
To calculate the required number of pipelines, you can use graph paper. On it, a plan of the room is drawn on a scale, where a diagram of a warm floor is depicted. By measuring the length of the contour, you can navigate about required quantity pipes. It is also easy to find out if you use a regular thread. It is laid on the floor according to the scheme that is chosen for the device of a warm floor.
After all the manipulations, it is enough to measure the length of the thread, which will correspond to the footage of the pipelines. When using any option, you need to increase the required volume by 10%.
Pipe laying
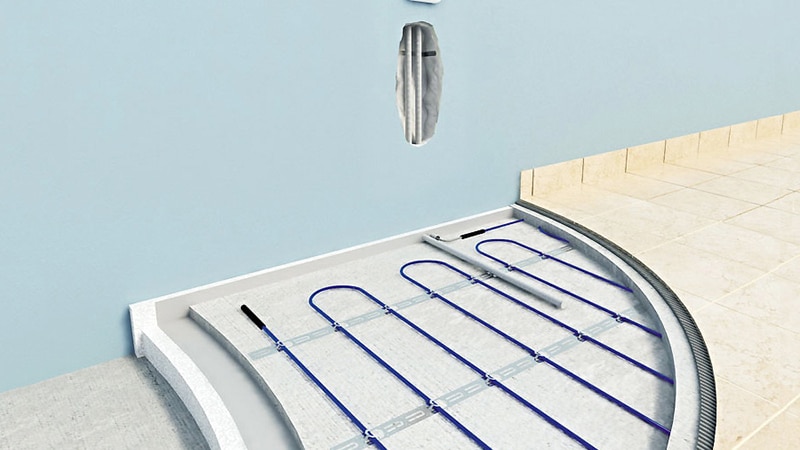
For laying polypropylene pipes in a screed, it is recommended to use the "spiral" scheme. In this way, it is possible to ensure a more uniform heating of the surface and facilitate installation. The pipes will be laid with a large radius, which is not the case when using the "snake" scheme.
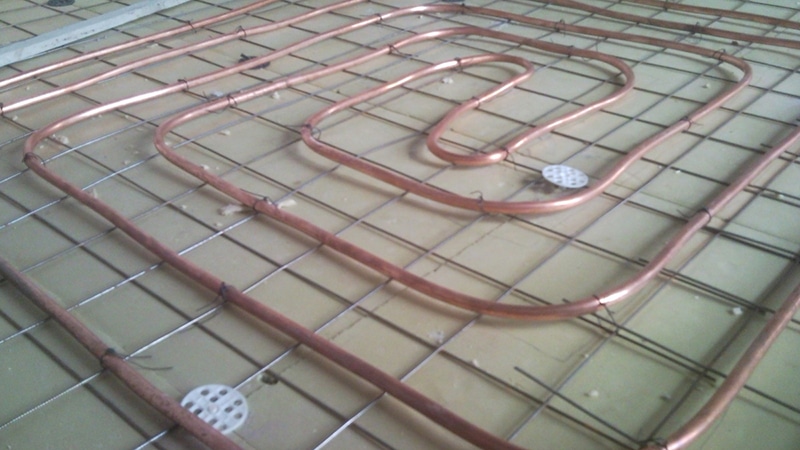
To fix the water circuit on the prepared base, lay metal mesh. It will also strengthen the screed layer, which will last a longer period. Pipes are attached to the grid using metal wire or plastic clamps.
The installation of these elements should be done every 0.8 m. The fasteners should not be overtightened so as not to cause deformation of the pipes. They can also be fixed directly to the thermal insulation using dowels.
Final stage
After installing the water circuit, you need to connect it to the collector group. One end is connected to the supply, the other to the return. After connecting to the collector, it is necessary to test the heating system. This can be done by running the coolant into the warm floor. The pressure of the system must be higher than the working one, but not more than 6 bar.

Every half an hour you need to raise its level to the previous level. Such actions are repeated three times, after which the floor heating is left alone for 24 hours. If during this time the pressure drops by no more than 2 bar, then the installation was successful. On the last step go to the screed. When it dries, you can start laying floor covering.
Video: Soldering polypropylene pipes
Secrets of the treatment of joint pain from our regular reader.
Hello!
My name is Gennady Alekseevich. I am a baker with over 20 years of experience. I am engaged in both repair and construction of Russian stoves and fireplaces. I always perform the work very efficiently and carefully, which negatively affects the condition of the joints. As I got older, the pain got worse and worse, to the point where I could no longer work. Having tried many medications and folk ways treatment, I realized how serious my disease was, since there was no positive effect. Until I came across one tool, which I want to tell you about.
It is a unique blend of the rarest and most powerful natural healing substances. This tool has proven its effectiveness not only to patients, but also to science, which has recognized it as an effective drug. Pain in the joints and back go away in 10-15 days, studies have shown. The main thing is to strictly follow the instructions in the methodology. You can order the product in the original packaging, with a quality guarantee, at
Modern cozy house impossible to imagine without effective and quality system heating, including underfloor heating. Despite the fact that this convenient innovation appeared not so long ago, its reliability, ease of operation and cost-effectiveness has already won the trust of many consumers. Underfloor heating is not only productive, but also pleasant. After all, even in winter time you can walk around the house barefoot, and at the same time feel warm and comfortable.
But how to make warm floors with your own hands? Deal on your own quite easy, because modern market pleases with a lot of quality and available materials. One of them is polypropylene pipes, which have become an effective and promising participant in this heating system. Let's consider how to make a warm floor with your own hands: a photo, in more detail, in order to avoid mistakes in the process of its installation.
Great alternative to traditional metal products steel polypropylene pipes.
Appearance of polypropylene pipes
Due to their characteristics, they are widely used in various engineering systems:
- internal hot and cold water supply;
- heating systems;
- sewer networks;
- for transportation of aggressive media, which is ensured by the chemical resistance of products;
- if underfloor heating is required.
The practicality and quality of polypropylene pipes determine a great demand for them and allow them to be used to solve important problems in different environments: in channels, walls, shafts, under plaster and in any soil.

Polypropylene pipes for underfloor heating system
Advantages of polypropylene pipes
The benefits of these products include:
- Durability- subject to the basic rules for operating the system, as well as the temperature regime in it up to 75 degrees, the products can last more than 25 years.
- Seam tightness is ensured by the use of a special technology for connecting the individual components of the pipeline using a soldering iron.
- Elasticity, high mechanical strength and frost resistance. Even if the transported liquid freezes, the products expand slightly and then return to their original dimensions.
- Not susceptible to corrosion, are not afraid of exposure to solvents and acids, salt deposits on internal surfaces.
- Absence in them bacterial flora.
- Low thermal conductivity and the absence of condensate are due to the same temperature of the coolant at the inlet and outlet of the system.
- low cost pipes and connecting elements compared with alternatives. High environmental performance of the material allows not to harm the environment during its operation and disposal.
- light weight compared to steel products.
Polypropylene pipes used for underfloor heating are exposed to high temperatures and change their dimensions. Usually, the coefficients of thermal and linear expansion are fixed in their characteristics. Therefore, experts recommend during installation to give preference to products fiberglass reinforced or aluminium.
Using Other Alternatives
Today, in addition to polypropylene, other types of inexpensive materials are used for heating systems, the quality of their work largely depends on the correct choice of which. For example, a cost-effective option for underfloor heating might be polyethylene pipes with excellent thermal conductivity and wear resistance.
Polyethylene pipes
They, unlike the propylene counterpart, are less susceptible to expansion under the influence of sufficiently high temperatures. When installing pipes made of cross-linked polyethylene, they need to be rigidly fixed, otherwise they can straighten out, which is one of their main drawbacks.
Also in great demand metal-plastic pipes, thanks to the inner aluminum layer, they have good thermal conductivity, and the polymer layers ensure their resistance to damage. Their small disadvantage is the internal formation of scale in places threaded connections fittings and higher cost compared to propylene counterparts.
Metal pipes for underfloor heating
Design and execution of underfloor heating
This system saves usable area, because it is located under any floor covering or cement screed. A warm floor made of polypropylene pipes with your own hands can be arranged by pouring them with concrete or other plasticizer. At the same time, the coolant circulates through them and evenly distributes heat, starting from the bottom throughout the room.
Appearance of the underfloor heating system
In this case, the source of heat can be a boiler or other types of heating. Temperature sensors ensure timely shutdown of the system immediately after reaching set temperature which saves energy.
Do-it-yourself installation of a warm floor is carried out in several stages:
- project preparation;
- laying and connecting pipes;
- checking and monitoring the system performance;
- arrangement of the screed;
- finishing coating.
Let's consider in more detail all the stages.
It is impossible to make a warm floor without preparing a project, which is needed to calculate the need for materials, the heated area, the temperature that can ensure the operation of the system, the location of the boiler and other nuances, including the diameter and length of the pipes. For the efficient functioning of heating, it would be more correct to entrust all calculations to professionals.
Installation of the system begins with the installation of a manifold cabinet, necessary for connecting the circuits to the base line, which is used to supply warm water and taken chilled.

Distribution manifold cabinet
The cabinet is installed above the floor level in order for the pipes to go down, while ensuring the removal of air and the normal functioning of the system.
One of the key points when installing underfloor heating is waterproofing, which can protect the room from water leaks. Film materials, such as polyethylene, are often used for this purpose.
To prevent cracking of the screed during thermal expansion, experts recommend using a damper tape, which is glued around the perimeter of the room.
In order to reduce heat losses, thermal insulation is installed that can cope with heavy loads and has a high thermal resistance. For this purpose, a foil coating is used, which has excellent mechanical strength, a small degree of compression and evenly distributes heat over the floor surface. A reinforcing metal mesh is used to fasten pipes and fix the screed.
Contour laying rules
To provide efficient work this heating system, the basic rules for laying circuits must be observed. Their total length should not exceed 80 m. For uniform heating, the optimal length is up to 50 m, the standard diameter is 2 cm. The calculation of the contour and its step is performed for each individual room, especially if they have different temperature regimes.

Underfloor heating process
Pipe laying can be performed using different schemes:
- spiral;
- double helix;
- snake - loops;
- snail.
Choice suitable scheme depends on the parameters of the room and the functional purpose of its zones. For example, a spiral scheme will ensure uniform heating of rooms with correct form, and the snake is more suitable so that the hot coolant first of all gets into the cold zones, and then heats other parts of the room.

Spiral pipe laying
After laying polypropylene pipes, they are fastened with clamps to a metal reinforcing mesh. Then they are connected to the circuits, and the system is filled with water to check for leaks in it. The pressure in the system must be 1.5 times the working pressure, but not less than 6 bar. Further, the pressure is increased to the previous indicator every half hour at least 3 times, and then left for a day. If during this time the pressure does not drop by more than 2 bar, then the laying is done perfectly.
Arrangement of the screed
When pouring the floor with concrete, first, using a horizontal level, a beacon profile is installed, along which the surface of the screed is leveled. The laying of the final floor covering can be started no earlier than 28 days after the concrete has completely cured.
Floor screed when laying the heating system
Warm floors under a tile
Tiled floors are durable, they are not afraid of moisture and exposure to aggressive liquids. Therefore, many homeowners opt for an electric warm field followed by tiling.

Tiled warm floor
In addition, they are economical, because they allow you to adjust temperature regime according to the season. The device of a warm floor under a tile is made cable, film and in the form of heating mats. Consider their pros and cons.
Cable underfloor heating system
Today, cable underfloor heating under tiles is used infrequently. Due to the high pie of this system, including concrete screed up to 4 cm thick, the height of the room creeps and the load on the base increases. Therefore, it is better to use it in rooms without decoration.
Cable floor heating system
Cheaper products include single-core cables. Their use is problematic in rooms with a complex layout, since there is a need for a thermostat. It is easier to lay higher twin-core options, the ends of which do not converge at one point. Such a floor is started after the screed or tile adhesive has completely hardened.
Warm floor from electric mats
This option is suitable for rooms with concrete base. The mats have a base of thin cables embedded in reinforced mesh. They are produced with a thickness of no more than 3 mm and do not reduce the height of the premises. Lack of screed and minimum thickness heating mats allow the use of such floors in rooms with low ceilings.

The appearance of the mats electric cable for underfloor heating
They are laid directly on concrete, covered tile adhesive to which the tile is attached. Despite the ease of installation of this heating system, it is much more expensive than a cable counterpart.
Film floor option
Underfloor heating film under the tile is one of the most modern and efficient electrical systems.

Film floor heating
It is easy to install and can be applied to all top coats. The coolant in the form infrared radiation not only has a high efficiency, but is also harmless to health.
Now you know how to make a warm floor from heating with your own hands, and the choice suitable option will allow you to independently create not only a reliable heating system, but also save on installation and commissioning.
Add to bookmarks
Underfloor heating made of polypropylene
Underfloor heating, which is made of polypropylene pipes, will create comfort and coziness in the room, provide a reliable heating system.
If under cold tile put a warm floor - this will allow you to walk barefoot.
When designing it, it is important to take into account that the temperature environment during work should not fall below 10 degrees.
A few words about polypropylene pipes
Polypropylene pipes are used quite widely in engineering systems of the for various purposes: water supply, heating. They are suitable for laying in the ground, in channels, in shafts, in walls under plaster or in open form. Their main advantage is in the way they are connected to each other, when the pipes, after thermal welding, turn into a monolith. For this, special equipment is used - welding machine, which is popularly called a soldering iron. Using it is quite simple, soldering takes only a few minutes.
Use a special soldering iron, then the pipes after thermal welding turn into a monolith.
Other advantages of these pipes are high mechanical strength and resistance to defrosting. Even if water freezes in the pipe, nothing threatens its integrity. It will expand and, after it thaws, will take its original shape.
At an operating temperature of pipes plus 75 degrees and a pressure of 7.5 atmospheres, they are guaranteed to last at least 25 years. The highest temperature they can withstand is plus 95 degrees, but then their service life will decrease.
The use of polypropylene pipes for underfloor heating is economically beneficial, because they are much cheaper than any other, for example, metal-plastic ones. This is especially true for connecting parts.
Water floor heating device

To arrange such a floor, it is necessary to lay pipes through which hot water will circulate, the source of which can be central heating or a separate boiler. One of the most common ways to install underfloor heating is concrete system heating. All work can be divided into several stages: drawing up a project, preparing the floor, laying the mesh and pipes, pouring concrete, laying the finish coat.
Drawing up a project for future work is mandatory, especially if floor insulation is planned for large area. When designing, it should be taken into account what the floors, walls and other elements are made of. This is necessary in order to calculate the desired temperature, which should be in the room. Then you need to determine the installation location of the collector, boiler. After that, it is necessary to draw up a layout of pipes, indicate the length of the circuit and diameter, as well as other parameters.
The heating water temperature must be set on the basis of a calculation that takes into account the type of room, the type of flooring and the outside design temperature. As a rule, the maximum temperature level for floor heating is +45 degrees with a water flow rate of 0.3 m / s for smooth heat distribution.
Preparatory work

The collector cabinet is best placed on the wall near the floor
In order for the thermal design of the room to pass according to the rules, it is necessary to start work with the installation of a collector cabinet - the basis of the future warm floor made of polypropylene pipes. It is designed to connect all circuits and the location of the adjustment elements. It is better to place it on the wall near the floor. Hot water supply and return pipes are connected to the cabinet, to which the collector group is connected.
The next step is the laying of waterproofing, which is suitable for polyethylene. It is overlapped and connected with adhesive tape. A damper tape must be glued around the perimeter of the room in which the underfloor heating is being installed. It will prevent cracking of the screed when thermal expansion occurs.
Then the insulation is laid. If this is not done, then heat loss will average 40%. The choice of material depends on the calculations of heat loss during the preparation of the project. Can be used as thermal insulation mineral wool, polystyrene, technical cork or other materials. You can use a special version for the water floor, which is equipped with a reflective surface.
Laying the contours of polypropylene floors
The diameter of the pipe and the laying step will depend on the specific location. In cold places (at front door, near windows) laying of polypropylene pipes is carried out more often, in places where furniture will stand, it does not fit. To fix a warm floor, there are two ways of fastening: to a reinforcing mesh and to thermal insulation.
Reinforcing mesh is a more rational option. It will make it possible to lay polypropylene pipes more evenly. In addition, it will increase the strength of the screed. Pipes are fastened plastic clamps or wire. To speed up installation, you can use brackets.
It is better to lay the floor from propylene from a roll or reel. This will keep the number of connections to a minimum. This will enable you to save time and money. The pipe is fastened every 80 cm. It is not worth tightening the clamps strongly, otherwise the linear expansion will lead to pipe deformation.
In order for the space to be heated evenly, the length of one circuit should not exceed 80 m. Ideal length- 50 m. All contours should have approximately the same length. The collector should be selected depending on the number of circuits. For example, if there are 7 circuits, then there should be 7 outputs.
There are several ways to lay polypropylene pipes, from which a warm floor is mounted. With the parallel or serpentine method, the pipe is laid in a zigzag pattern. This method is best for small room. The spiral method ("snail") is used in large rooms. The installation of pipes takes place in a spiral, alternating cold and hot, which allows for better heating.
The standard choice of pipes, taking into account their linear expansion and the required power, is 2 cm in diameter. You should pay attention to the quality of the pipes, since the warm floor is not installed for one year.
Completion of floor work
All circuits must be connected to collector system. One end is fixed in the supply manifold, and the other - in the opposite. After that, you need to make sure that the system is in working condition. To do this, you need to fill the system with water, separately for each circuit. At the same time, all taps and all valves must be open so as not to impede the exit of air.
Warm water must be pumped at a pressure that is one and a half times higher than the operating pressure, but not lower than 6 bar. After half an hour, you need to raise the pressure to the previous level. You need to do this procedure three times. After restoring pressure for the third time, leave the system for 24 hours. If during this time the pressure has dropped by no more than 2 bar, the installation has been carried out correctly.
To check how the system behaves when maximum temperature, you need to heat the water to 80 degrees. This will make it possible to verify the tightness of all circuits and connections and make sure that the warm floor is laid correctly. After complete cooling, it can be poured with concrete. It is important to remember that during these works the system must be under working pressure. It is imperative to add a plasticizer for underfloor heating to the solution, which will help improve the quality of the screed. You can use the system only after the screed has completely dried, not earlier than a month later.