DIY wooden flower pot. Decorating an apartment and garden - do-it-yourself flower pots
Flowerpots allow you to highlight the beauty of a plant and add originality to the interior of your home or garden. Especially if the product is made by yourself. You can buy or make flowerpots for flowers with your own hands from different materials, different shapes, design. Unusual, but simple options discussed in this article and how to make them.
Advantages of pots for planting plants
 Flower growers sometimes do not understand what a flowerpot is for and what its advantage is? After all, it’s easier to buy a beautiful flowerpot for a plant. Moreover, today manufacturers offer a wide range flower pots.
But flower pots have a number of advantages:
- Easy to replace. The flower does not need to be replanted.
- Masking of defects. Allows you to hide plaque and stains on flowerpots that appear after some time of use.
- In winter, the level of air humidity around the flower increases.
- Giving a stable position to hanging and tall plants.
Types of flower pots
 Depending on the location of the planter, it can be suspended, floor-mounted, wall-mounted or table-top. Floor flowerpots are designed for large tree-like plants. Hanging options are chosen for climbing vines. Wall-mounted specimens are used for decorative foliage plants. Table flowerpots are used for placing pots with flowering plants on tables.
Depending on the material used, there are forged flowerpots, glass, wood, plastic, etc. Depending on the number of pots placed, the design can be single or multi-tiered.
Making flowerpots with your own hands
It’s easy to make flowerpots and pendants with your own hands. So how to do this for beginners? IN financially the craft will be much cheaper than buying a finished product. To create a flowerpot with your own hands, any available materials are suitable: old vases, ropes, burlap, plastic bottles, polyethylene films, clay, concrete, old T-shirts, etc. There are a lot of ideas on how to make original item floral decor. Let's look at how to make the most popular and unusual options flowerpots that can decorate a garden area or living space.
Decorating flower pots and flowerpots using weaving and knitting
A flower pot woven using the macrame technique looks original and stylish. But to create such a decorative element you need basic knowledge about loops and knots. It’s easy to learn ancient art step by step thanks to the presence large quantity specialized literature, video lessons and photos on the Internet.
Before you start working, you need to practice casting on loops. To do this, take 4 light, thick 20-centimeter threads. For the base, it is advisable to take a thread of a different shade 40 centimeters long. 
There are the following methods for setting loops:
- Fold the thread in half. Place on top of the base with the loop facing up. Bend the loop over the base, thread the ends through and tighten the knot.
- Fold the thread in half. Place it under the base with the loop facing up. Bend the loop behind the base, thread the ends through and tighten the knot.
- Fasten the thread using the second method. Make turns with each separate end of the folded thread. Throw the end over the base, bend it around, and pull it through the loop.
Consider a master class on weaving macrame flowerpots. You will need a surface to work on, 20 meters of thread, scissors and pins. The algorithm is given below:

You can continue the craft with the Josephine knot. It consists of two loops intertwined. First, a knot is woven from two thick 50-centimeter threads. The threads are pinned side by side on the work surface. Next, bend the first end of the loop and place it on the second. The second end is placed on the first, and then placed under it. Then the second end of the thread is lowered into the right loop, threaded through the second end and placed in the right loop. Align the knot. Continue making the chain. It is important that the loops are the same. The ends of the threads should be trimmed and fluffed. You can find out how to make a support for flowers.
Making flowerpots from natural materials
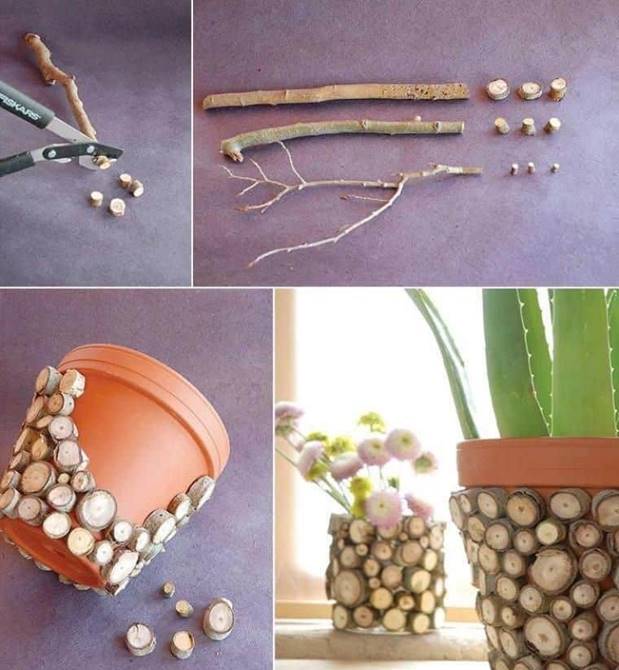
 An interesting decorative element is made from branches. To do this, take branches of birch, bamboo or viburnum about a centimeter thick and twine. It is important that the sticks are the same thickness. To create a flowerpot, the branches are cut into pieces, the length of which should be a couple of centimeters above the pot. Lay out the sticks on a flat surface close to each other. They are woven with twine and wrapped around a flowerpot.
You can also create a flowerpot from a piece of thick log about a meter long. Take small logs and place them vertically. A thicker log is placed on them and a recess is made in it for the pot. Stumps also make beautiful flowerpots. The bark is simply removed from the tree, a recess is created and the product is coated with a protective compound.
A flower pot woven from wicker looks interesting. But creating such a decorative element requires a lot of time and certain skills. A good floor planter can be made from an old box. It should simply be covered with stain and painted in a bright color. The finished product from the box can be placed on a bench, hung on a chain or rope.
Unusual ideas for creating flowerpots
There are a lot of unusual ideas for creating pots with your own hands at home. For example, some decorate flowerpots using 5 liter plastic bottles, newspaper tubes, and old T-shirts. This method is simple.
To implement it you need:

 The result is a grid with large cells. Non-flowering plant species will look good in such a flower pot.
A flowerpot-bicycle is made from twine or cable. To work you will need a plastic container, a round and three-core cable, skewers, toothpicks, a hot glue gun, cardboard, acrylic White paint, awl, scissors and brush.
The wheels are made from three-core cable. The rear two wheels should be small, and the front one should be large. The wire is slightly pulled out and the middle core is removed from the wire. Using the tails, the wire is connected into a ring and fixed with glue. Thus, 3 rings are created. Then they pierce the cable with an awl and insert toothpicks into the holes. On the front side, the tails must be hidden using small cardboard circles.
 Next, the rear wheels are connected. To do this, pull out the core from the cable and insert skewers. Cut and fix with hot glue. The wheels are connected using a heat gun.
Connect the front wheel and steering wheel. For this purpose, cut off the cable, clean the bottom and top. Pull the middle vein down and bend it back. The other two veins are bent. Take cardboard circles and make holes using an awl. 2 wires are inserted into each hole. Assembling the structure. The cardboard is glued together with hot glue. The remaining wire tails and empty cable are used to make pedals.
Next, the rear and front wheels are connected. A small piece of cable is stripped to half its length. Middle vein pull it out and insert the wire from the steering wheel in its place. The void is filled with glue. The excess is cut off from the core. The two outer wires are bent. Assembled structure painted in White color. When the paint dries, fix the flower pots with hot glue.
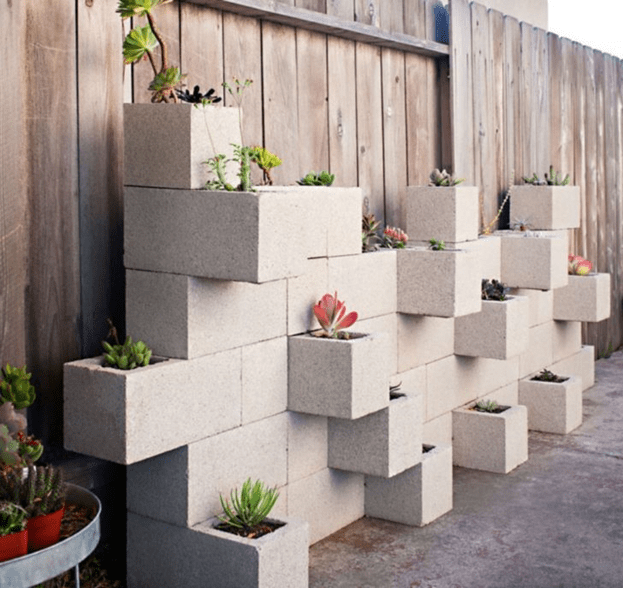
Application of building materials
For creating outdoor flowerpots Do-it-yourself building materials are also suitable.
For example, the original product is made from gypsum. To work you will need polymer plaster, wire, strips of fabric 10 centimeters wide, construction bandages, acrylic lacquer, dye.
Pots for indoor flowers can be of any shape. A plastic 10-liter bucket is suitable as a temporary base. It is installed on a flat floor with the bottom up. The surface of the bucket should be braided with wire, the edges should be tucked in carefully and hidden. The resulting frame is removed from the bucket.
Gypsum is diluted to the consistency of thick sour cream. Dip strips of fabric into gypsum mortar for a few minutes. The wire frame is covered with material along the inner and outer walls. There should be enough layers of fabric so that the thickness is 2 centimeters. The remaining solution should be coated with the walls of the product. The pots are left to dry for 12 hours.
An interesting idea is a DIY concrete planter. The operating algorithm is as follows:

An exquisite DIY pot for indoor flowers is made from old fabric, a rag and cement or peat. To implement this idea, they are preparing cement mixture and soak the fabric in it. The rag is placed on an inverted bucket and the folds are smoothed out. The workpiece is placed in the sun. When the cement dries, the pots are painted.
Where to hang the pots?
A flower pot with a flower pot will decorate any apartment, but it is usually placed on the balcony or kitchen.
 Hanging flowerpots can be placed in any room. But it is advisable to choose those rooms where the floors are tiled. It is also recommended to place the flowerpot with the plant on the bedside table or windowsill.
A pot for indoor flowers, suspended above the workplace, looks good. It is useful to place a flower in the bedroom, because plants saturate the room with oxygen. Using hanging planters you can add greenery to your living room. If there is a gazebo at your dacha, it is recommended to decorate it with hanging or floor planters.
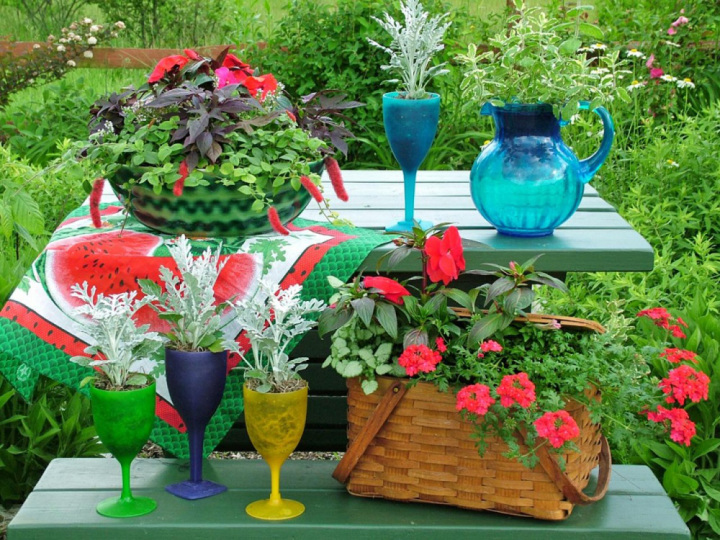
The desire to decorate the house and the surrounding space has always been in the blood of creative individuals. Firstly, it’s a pleasant pastime, and secondly, you get a lot of pleasure from the result of your handicraft. Flower lovers often look for original and beautiful pots in which to plant plants. And you don’t have to buy unusual specimens in stores; you can make them yourself from scrap materials. There are pots for home and garden, or rather, outdoor ones. This article will talk about how to make your own flower pots from existing materials. Be sure to look at the photos and videos, they will undoubtedly be useful to you.
Useful materials or how to make a masterpiece out of nothing
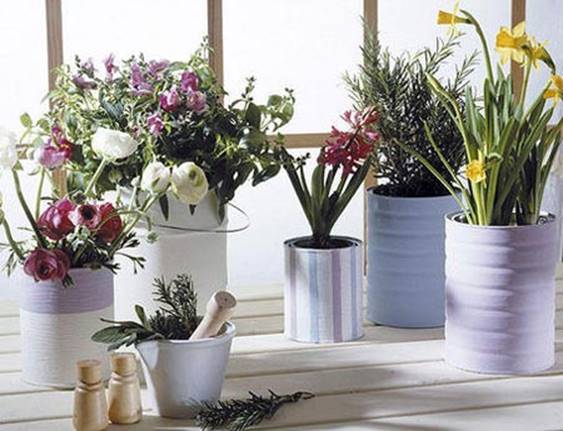
Everyone has unnecessary things in their house. I don't dare throw them away. Then there is only one way out - to give the objects a new life! One manufacturing option is to use old cans. Both large and small containers will work. Just wash the jar, remove the sticker, bend the sharp edges with pliers and the high-tech pot is ready. You can go further and apply any bright paint.
Advice. You can decorate jars different materials. For example, fabric, grains, stones, leather, fur, nut shells.
Plastic bottles are also considered a popular material for making DIY pots. You can use them to make flowerpots for climbing plants. And also make a floor pot with a stable base. For this you will need solid foundation, to which the neck is attached. The final step is to decorate the container.

Another one interesting idea for the garden - old worn shoes. Act as flower pots rubber boots, winter men's boots, sneakers, sneakers and even flip-flops. This style is inappropriate for apartments, but it is quite suitable for outdoor decoration.
An old bucket can also be used as a flowerpot. Just remove the handles and decorate it.
- a new trend in the field of needlework. There are no limits to your imagination. Any project can be turned into reality.
Outdoor Pot Ideas
Floor pots or flowerpots are widely used for growing flowers both in the garden and in the apartment. There are many different options their decorations. Let's consider decorating a pot with cereals. You will need:
- plastic or ceramic pot;
- paper sheet;
- felt-tip pen or pencil;
- copy sheet;
- PVA glue;
- brushes;
- peas;
- small beans;
- buckwheat grain;
- beans;
- lentils;
- flax-seed;

There is nothing complicated about this method. So, start the master class on making and decorating an outdoor flower pot.
- Create a sketch and transfer it to the pot using carbon paper.
- Apply glue to part of the design.
- Sprinkle with any cereal.
- Repeat the manipulations with the remaining parts of the pots.
- Give the product a rest and within a day you can decorate your garden or home with it.
Attention! There should be no areas left on the surface of the pot that are not decorated with grain.
Pot made of cement and rags
Making a pot from waste rags and cement mortar is as easy as shelling pears. From the title of the master class it is immediately clear what materials you will need.

- First of all, find an unnecessary rag or old fabric.
- Soak it in the cement solution.
- Place the cloth with cement on the bucket. Leave it like this until it dries completely.
Advice. The dried pot can be coated with paint.
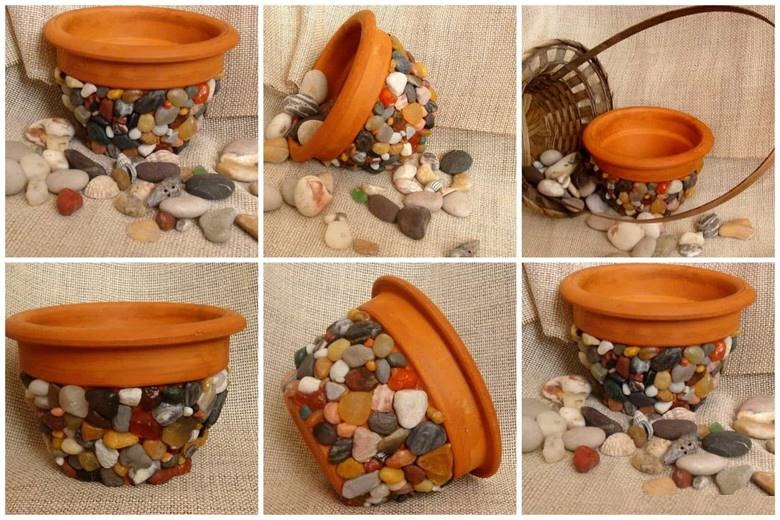
Flowerpot made of shells and stones
It is worth noting that all design options for flower pots are not complicated. And scrap materials can always be found among unnecessary things. Many people coming from the sea bring small souvenirs for themselves - pebbles and shells (as a memory of a wonderful vacation). Of course, they can be placed in an aquarium, and especially large specimens can even be used to ferment cabbage. But it is much better to use them, for example, to make outdoor flower pots. You will need:
- gypsum;
- plaster bandage;
- ceramic or plastic pot (can be replaced with a plastic mayonnaise bucket);
- pebbles and shells;
- colored soil for an aquarium;
- glue.
You will get the pot in nautical style. It can be displayed in the garden or placed on the windowsill of the house. But first, study step by step instructions. By following it, you will be able to create the first time beautiful flowerpot.

- Apply a plaster bandage soaked in water to the pot.
- It is necessary to cover the container with several layers of gypsum material.
- Make drainage holes in the bottom of the pot if they are not provided.
- Apply a layer of plaster to the surface of the pots for strength.
- Repeat the procedure several more times.
- Wait until completely dry. This will take about a day.
- Place pebbles, shells, etc. on the glue.
- The marine-style flower pot is ready. Violets, cacti or aloe will look great in it. Outdoors, you can place roses, marigolds or lilies in it.
Make floor, garden and outdoor pots very simple. Any unnecessary things will do: cans, plastic bottles, old shoes, bags, lamps, boxes, rubber tires, clothespins, newspapers, ribbons, wooden boards, wicker or burlap. You need to have a great desire to decorate your home and quite a bit of free time. Decorating pots from scrap materials is very entertaining. Both adults and children will enjoy this activity. And you can admire the result of your creation every day. Go for it and you will succeed!
DIY garden vases: video
Decorating flower pots: photo


Good housewives strive to make their home comfortable and beautiful. Flowers in interesting flower pots on the windows are one way to make your home feel cozy. Skillful hands can build flowerpots out of practically nothing. A waste container, which is just right to throw in the trash, easily turns into a designer masterpiece that produces pleasant impression on hosts and guests.


How to create a masterpiece from nothing?
Every home has old things that are a pity to throw away. They can be given a second life by making. It is enough to wash the container, remove the stickers from it, make a hole in the bottom - and new house ready for indoor plants.
Nowadays it is fashionable to plant flowers in worn shoes. The rubber one is especially convenient. You can’t place such flower pots made with your own hands from scrap materials in an apartment, but they are perfect for the street. 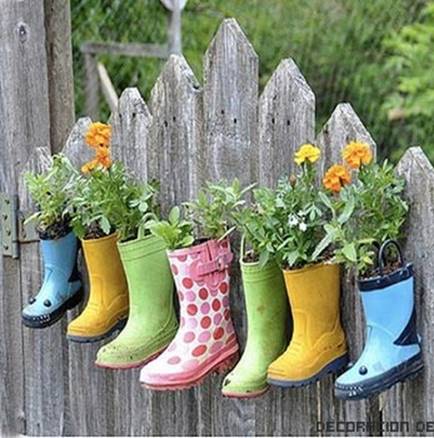
DIY pot made from plastic bottles
They are usually used to make pots for seedlings, but they are also suitable for creating real flower pots.
The simplest option:
- Cut off the top of the bottle.
- Use a thick needle to make a hole in the cork to allow excess water to drain out.
- Insert the top with the screwed cap into the bottom of the bottle, neck down.
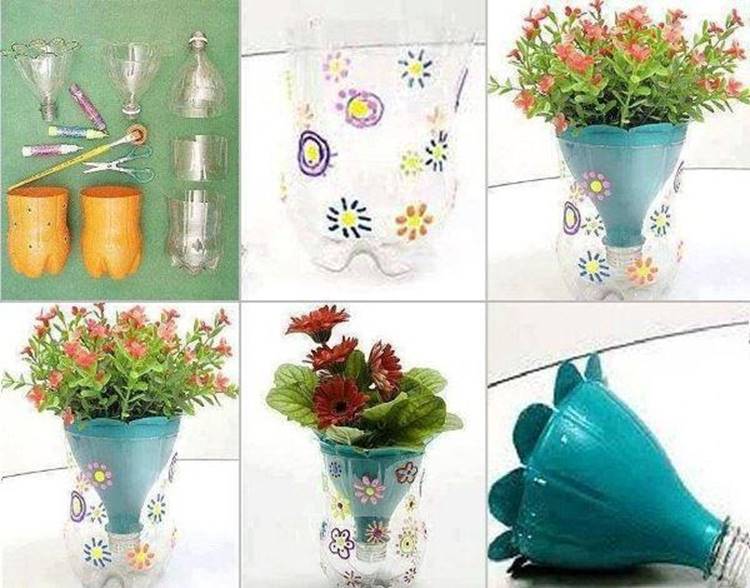
The simple pot is ready.
You can also make a flower pot in the shape of a large glass with your own hands. The disadvantage of this product is the absence of a hole for water drainage. To prevent the plants from dying, you need to fill the bottom with good layer drainage and place in a homemade flowerpot such representatives of the flora that are not afraid of overflow. It could be houseplant compact size - any, except cactus.
The best drainage in such cases is activated carbon. It effectively absorbs excess water and prevents roots from rotting. Activated carbon You can buy a large package at an aquarium store.
You will need:
- bottle;
- computer disk;
- glue gun;
- dye.
Manufacturing:
- Cut the bottle in half.
- If desired, make the edges curly in the form of teeth or waves.
- Apply glue to the bottle cap and glue it to the center of the disk.
- Paint with spray paint.
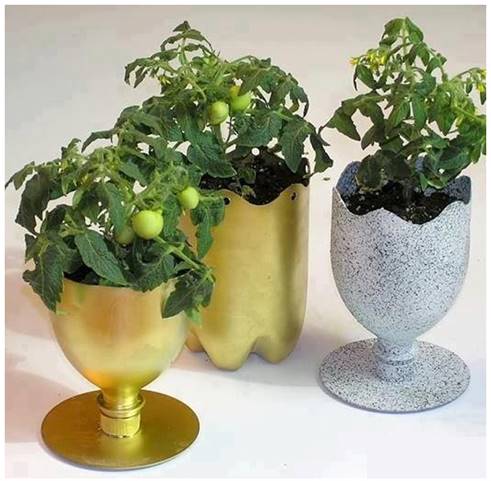
You can also paint the second part of the bottle, then you will get another flower pot.
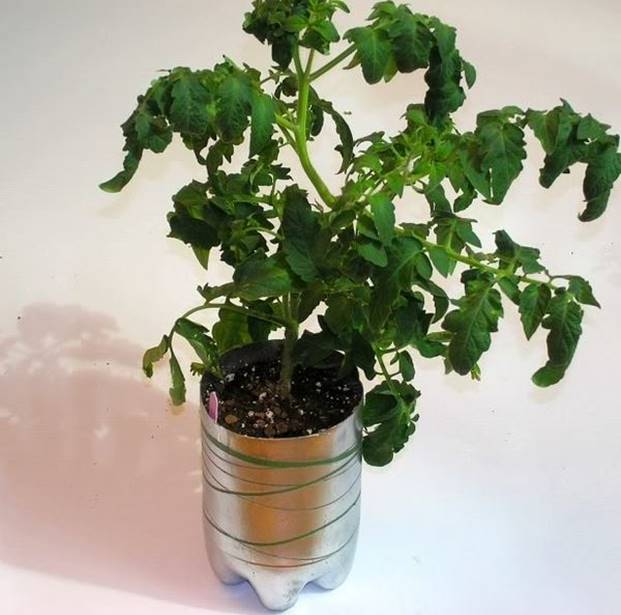
Now there are paints that imitate stone, wood, and metal. They can be used to decorate a regular plastic flower pot.
Cans in use
Flower pots made from tin cans are inappropriate in classic interior, but for decorating loft-style housing or country house they'll do. Cans from baby food, paints, canned food are durable and lightweight. If you remove the label from them, even without painting they will look decent.
If the vessel is damaged, covered with glue, scratches, rust, it will have to be renewed. The easiest way is to paint. The pattern and color can be any. The main thing that ready product The owners liked it.
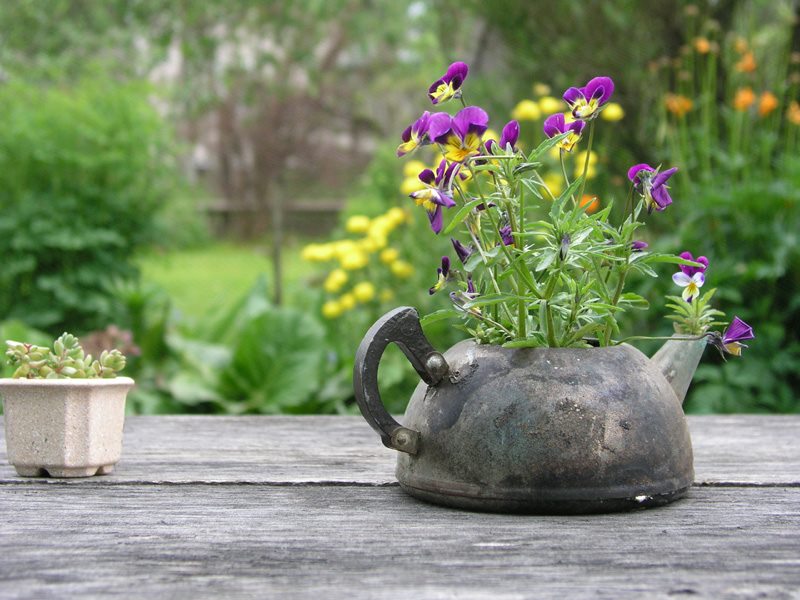
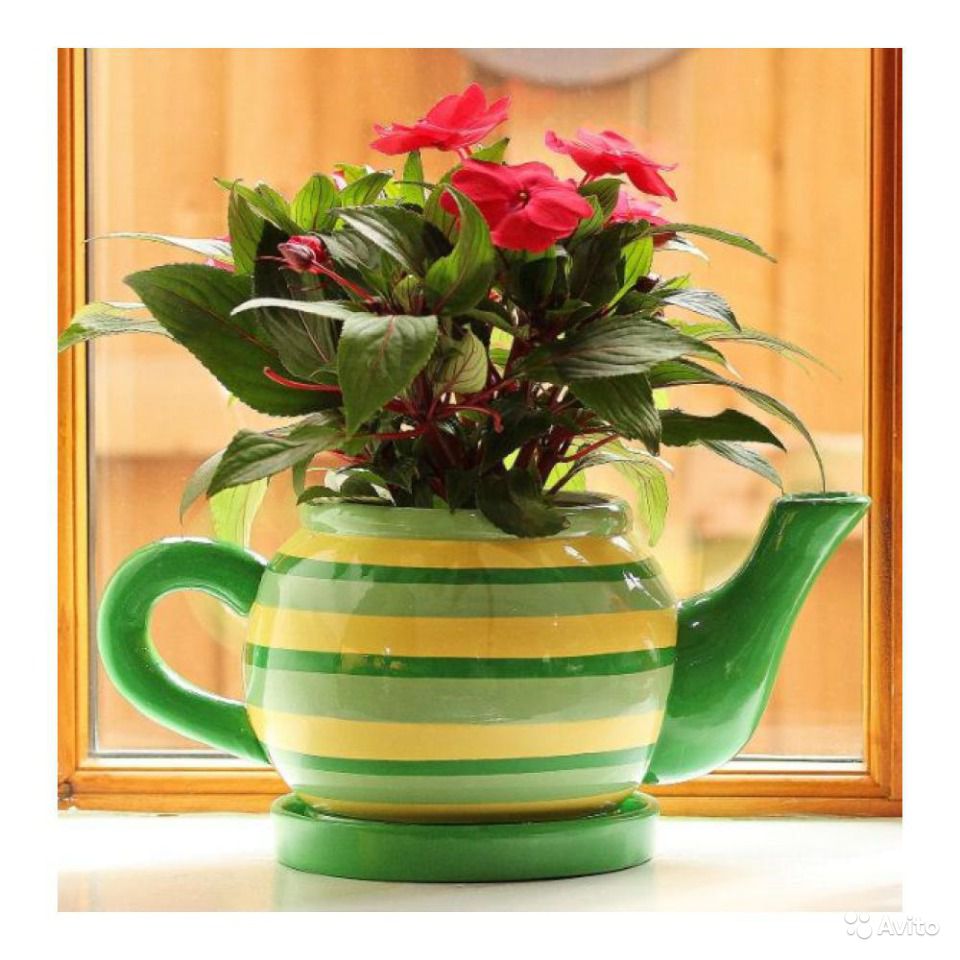
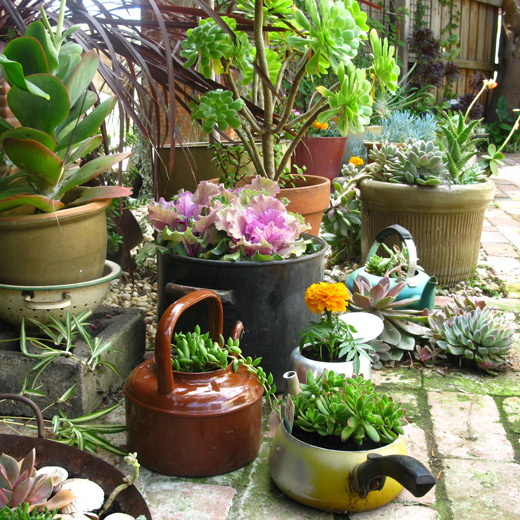
Old dishes
Pots, plates, teapots and any utensils can act as flower pots - they can also be made with your own hands very simply. Enough to renew the surface acrylic paint and make holes in the bottom. Make a new home for the flowers - great way benefit from a topped mug or bowl.
Teapots can be effectively hung by the handle, creating hanging pots with hanging plants.
Flowerpots and pots that you can make with your own hands from old dishes, photo:


There are special drills for ceramic tiles, but they are thick and not suitable for processing mugs.
Holes in a ceramic or porcelain cup make electric or hand drill by inserting a glass drill into it:
- A piece of paper is glued to the bottom of the cup.
- Periodically water the drilling site with water to prevent the tool from overheating.
A large mug with a massive bottom is drilled with a drill with a tile drill in small modes, without pressing the tool. During operation, the container should be upside down.
Grow only in transparent containers. The old ones cope with this role glass vases. You will need a special glass drill. To prevent glass dust from spreading throughout the room, the vase must be placed upside down in a bucket filled with water, so that it is completely hidden in the liquid. Water will protect against dust, dirt and overheating, and will reduce the likelihood of the vase cracking.
The drill is turned on at the lowest speed and allows the tool to enter the glass on its own without any physical effort. The slower the tip moves through the thickness of the glass, the less likely it is that the container will crack.
The easiest way to drill dishes is from metal. Pots are made from steel and aluminum teapots, cans, pans, cups, and mugs. Metal can be drilled even without a drill or drill bit, using a metal screw and a regular screwdriver.
Cement and rags - who would have thought?
It is not known who was the first to come up with the idea of making an outdoor flower vase from old rags and concrete, but honor and praise to the unknown inventor. His technique allows him to make exquisite garden decorations from waste material.
To make outdoor flower pots with your own hands you will need:
- a rag made of fabric that absorbs water,
- any container (for example, an old bucket),
- coloring pigment for adding to concrete,
- mixing container,
- strong polyethylene.
To stir the solution you need a paint spatula. An electric drill with the appropriate attachment will greatly simplify the work.
Making a vase:
- sift sand from debris and large stones;
- put a rag in the container and make a mark at the level to which it reached;
- pour water into the container up to the mark;
- fill with sand and cement 1:1;
- stir;
- wrap the bucket or other container you chose to make the vase with polyethylene;
- dip the rag into the cement mortar until it is completely saturated
- after 10 minutes, remove the rag and let the excess solution drain;
- place the rag on the mold, wrapped in film and turned upside down;
- straighten the fabric so that the bottom is even, and bend the edges with arbitrary folds or sharp creases;
- leave the product for 1-3 days;
- remove the rag from the container.
DIY cement and fabric planters, video:
The technology for making a flowerpot from scrap materials will be understood more quickly by those who made flower pots from vinyl gramophone records, melting their edges over the fire, after which they sagged in beautiful folds. Now that records have become a rarity, inventive people have figured out how to make similar products from ordinary fabric.
Ideas for floor vases
Floor vases are used to decorate apartments and country houses. In order not to purchase a vessel in a store, you can use the well-known papier-mâché - a mixture of wet paper with PVA. The substance is spread on a base made of any durable, moisture-proof material.
Papier-mâché allows you to create complex shapes and specific relief. If a smooth surface is needed, the dried product is sanded with an abrasive cloth and a leveling layer is applied.
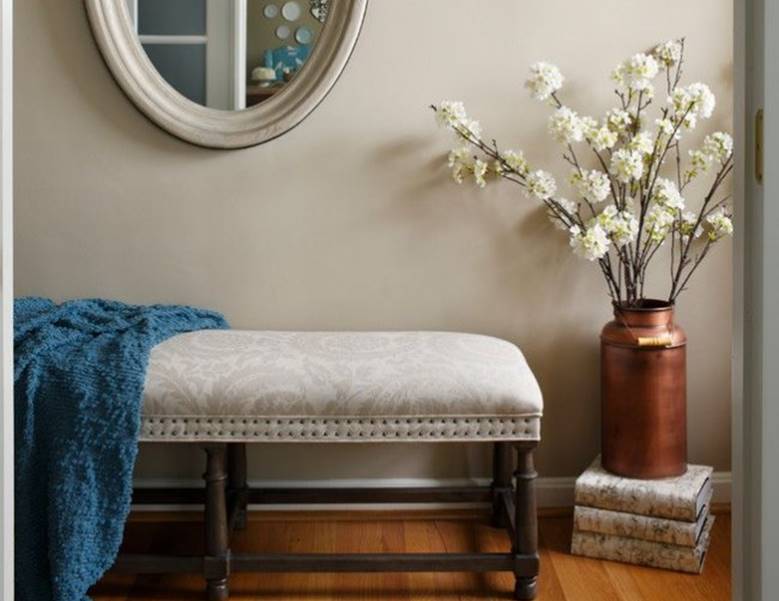
This retro-style vase is made from an old aluminum can, spray-painted in Brown color. You can decorate a bucket with flowers using the same method.
You can put both artificial and fresh flowers in a metal vessel. If you cut off the neck and drill several small holes in the bottom, the can can be covered with soil and used for growing live ornamental plants. Aluminum is cut circular saw, metal scissors, metal hacksaw, jigsaw.
DIY garden vases
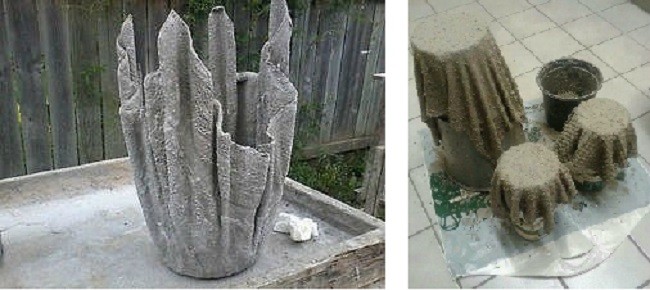
Garden vases are easiest to cast from concrete. The surface of the product is decorated with any natural materials, in this case pebbles.
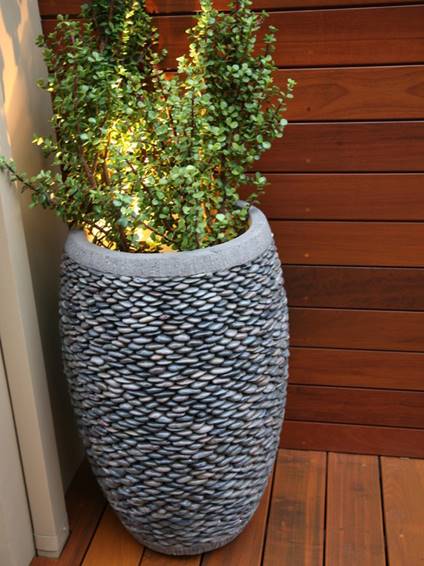
Such vessels are durable, take any shape in the hands of the master, have a significant weight, and therefore are not blown away by the wind and do not tip over.
Manufacturing technology:
- choose two containers different sizes, one of which freely fits into the other with a large gap;
- process sunflower oil both containers so that the solution does not stick to their surfaces;
- mix sand and cement 1:1;
- dilute with water to the consistency of thick sour cream;
- pour the solution into the bottom of a large container;
- secure the segment plastic pipe to create a hole for drainage;
- wait until the solution sets;
- place a small container in a large one;
- fill the gap with concrete;
- leave for 24 hours;
- remove the inner container;
- sprinkle the concrete with water;
After a week, the finished pot can be shaken out of the mold, covered with soil and plants can be planted in it.
Decorating pots
When it comes to plant pots, color is often more important than shape and even size. A beautiful design makes you pay attention to the design of flower pots.
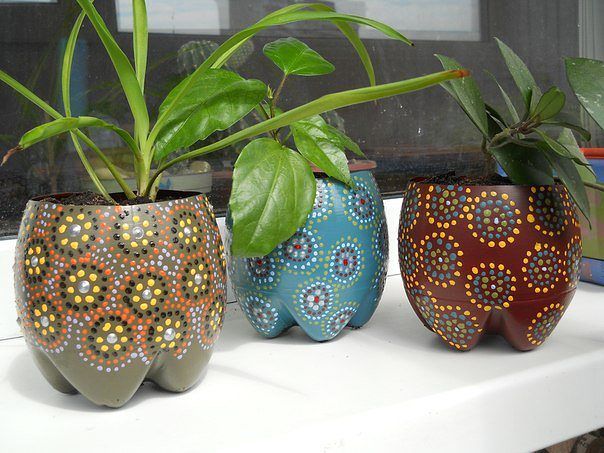
Many people grow indoor flowers in ordinary red clay, believing that such containers “breathe”, so the plants feel more comfortable in them. There is some truth in this. But even such a pot can be given a bright personality, without compromising its beneficial properties.
Decorating a dull flower pot with multi-colored pebbles, as in the photo, will not be difficult to do with your own hands:
 It is not necessary to cover the clay with an airtight layer of varnish or paint. You can take glue gun and cover the walls with beautiful pebbles or small saw cuts.
An interesting option for decorating flower pots - eggshell. Before work, it is very important to remove the film, rinse and dry thoroughly. The shells are glued with the convex side outward using PVA glue.
The final stage is coloring. You can paint both the shell itself and the walls of the pot.
Perhaps the most sophisticated way of decoration is decoupage. This technique involves the use of paper and can be used on any pots, including plastic and corrugated ones.
Pot decor with decoupage:
- Clean the surface of the pot from dirt and degrease with acetone.
- Cover with base paint.
- Cut out the necessary motifs from paper.
- Glue the paper to the surface.
- Cover with varnish.
Master class on decoupage of a flower pot on video:
You can decorate a flower pot with your own hands using lace. It adds sophistication to any product, even a cheap plastic pot. Working with this material is easy. The container is covered with PVA glue and the fabric is glued.
Instead of lace, you can take burlap or combine these two materials, and also additionally decorate the fabric with beads or seed beads. All additional elements They are also glued with PVA glue.


To decorate the garden and home, gardeners often use hanging flowerpots.
Baskets made of wicker look very beautiful, which can be made in a wide variety of shapes, for example, in the shape of a ball, a cone or a rectangular box.

Perhaps a harmonious decoration for any landscape design Flowerpots will be made of wire or forged metal. This option is especially attractive because it creates the feeling of a kind of complete “flight” of the flowerbed.

In addition to the shape, material and design of the flowerpot itself, when choosing it, it is important to pay attention to the fastening. In addition, the fastening of containers for hanging flower beds must be very strong and reliable.

This is necessary so that when decorating a flower bed in the yard, you can rotate the plant from time to time to protect it from sunlight.


Specifics of planting hanging flower beds
Planting a hanging flower bed depends on the shape of the flowerpot. In simple flowerpots, reminiscent of pots for indoor flowers, that is, those that have only one open surface, plants are planted as usual.
It is a completely different matter if the flowerpot is intended to create a hanging ball. In this case, the walls of the frame are filled with moss, which is designed to retain moisture, and the entire basket is covered with a special film, which is most often sold complete with such flowerpots

Then, in those places from which the shoots will subsequently grow, it is necessary to make small holes. The seedlings should be carefully inserted into the holes made, soil should be poured inside the flowerpot and the plants should be planted on top.
After planting flowers to create a hanging flowerbed with your own hands, you should water the soil a little and hang the flowerpot in a cool place for several days.

Hanging flowers in the garden: which plants are suitable for hanging flower beds
To create hanging flower beds, it is better to choose low-maintenance plants that do not have special requirements to the condition of the soil.
In addition, when choosing inhabitants for such flowerpots, it is important to take into account the ratio of the size of their root system to the size of the pot.
For example, petunia roots grow very quickly, and if the flowerpot for this flower is less than 6-8 liters, then it root system will soon fill the entire volume of the container, which is why the plant may die.

Very beautiful design will have a hanging flowerbed with your own hands when planting lushly blooming annuals, for example, pansies, petunias, verbena, marigolds, etc. in flowerpots.
Almost all house plants, including Kalanchoe, nasturtiums, daisies, young plants, sedums, etc., also get along well and grow in a hanging pot or flowerpot.

Of course, bright colorful flowers will always be a worthy decoration of any garden or interior, but do not think that only flowering plants can be used in the design of hanging flower beds. For example, flowerpots with herbs– mint, rosemary, etc.

And for those who love originality, we can advise you to make a very unusual, but very useful decoration - a hanging basket with small-fruited vegetables, for example, strawberries, which will bear fruit even on the veranda or balcony.
Specifics of caring for hanging flower beds
Caring for plants planted in hanging pots depends on whether they have trays.
Baskets without a tray prevent stagnation of moisture in the soil, which, on the one hand, is good, as it slows down the rotting of the plant root system, but on the other hand, it can lead to a lack of moisture if the flowerbed is located in a sunny area.

If the flowerpot is equipped with a tray, then you should not water the plant too often, and also install it in darkened areas.
In addition, the soil in hanging flower beds needs to be fertilized periodically, because... during watering minerals they are washed in it.

In all other aspects, caring for plants in hanging garden beds is no different from caring for plants planted in open ground– they also need to be watered regularly, remove dried leaves and control pests.

Hanging flower beds are exactly the addition that can add brightness and expressiveness to any suburban area They can be hung in gazebos and pergolas, on fences and poles, on garden benches, in the recreation area, on the summer terrace, balcony and even on the walls of the house - everywhere they will look beautiful and harmonious.

However, when designing hanging outdoor flower beds, it is also important to take into account the style features personal plot. You can beautifully emphasize the beauty of the landscape with the help of bright color solutions or unusual shapes, but you can focus on natural beauty plants.

If such hanging flower beds “settle” in your garden, rest assured that this decision will not disappoint you. Beautiful flowers and plants, neat and well-groomed, always please the eye and create an atmosphere of comfort, and if they are also hung in beautiful, original flowerpots, then one can only envy such arrangement of the site.
Old enamel bowls, flower pots, the buckets will be used to create flowerpots. The containers are hung on chains and hung as high as possible so that any passerby can see and appreciate this beauty.


It's such a pleasure to make simple things for the garden with your own hands. Treat yourself to a hanging flower pot; it can perfectly decorate the porch of a private house or a balcony in a city apartment. And we will share with you a master class on how to make it...


What you will need:
- A woven wire basket, you can use an old one or even weave it yourself
- Sphagnum is peat moss, it is used in gardening and construction; you can find and collect it in a swampy forest or purchase it in specialized stores
- Latex gloves
- Land for planting
- Small plastic trash bag
- Bucket of water (for soaking moss
- Beautiful flowers and plants for planting

Soak sphagnum fibers in a bucket of water, squeeze out a little and lay out the bottom of the basket.

After you post sufficient quantity moss, place a piece of polyethylene on top and make small holes in it, it will help partially retain moisture.

Fill the remaining space with potting soil.

Start planting your flowers and plants. It seems to me that hanging petunias or other hanging flowers would look great in this pot.

We decorate the garden with our own hands. Enjoy)))

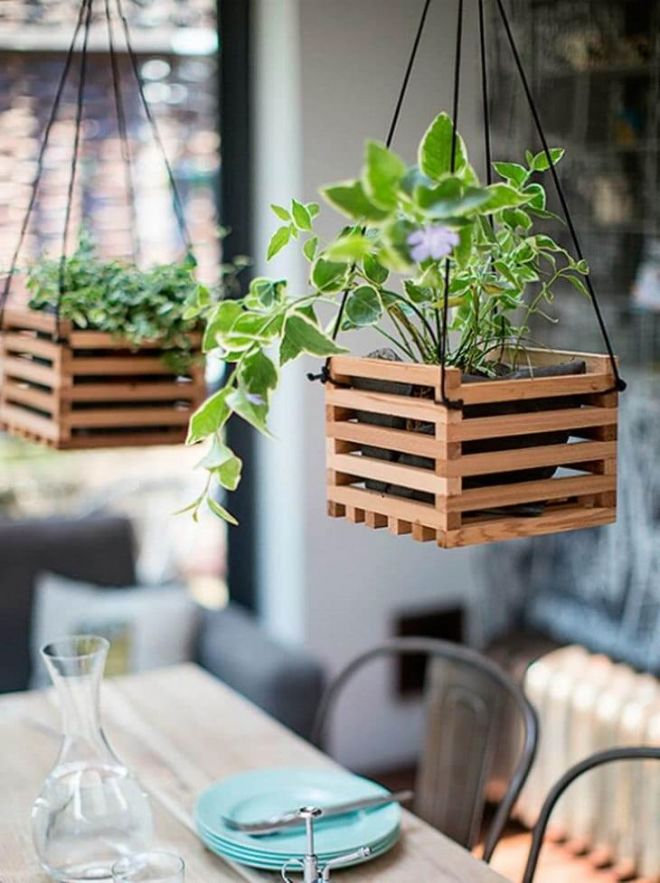
wooden planter
For an original hanging planter, you will need 24 bars 15-20 cm long. Laying them in a checkerboard pattern, they form a square box with through holes.
The bars are connected with nails or self-tapping screws. Ropes are tied to the bars at the corners of the upper edge of the flowerpot and the homemade flowerpot is hung on any tree in the garden.
Wooden flowerpot with violas:

Wooden planter similar to hanging swing, will “hold” a whole flowerbed with pansies(violas)
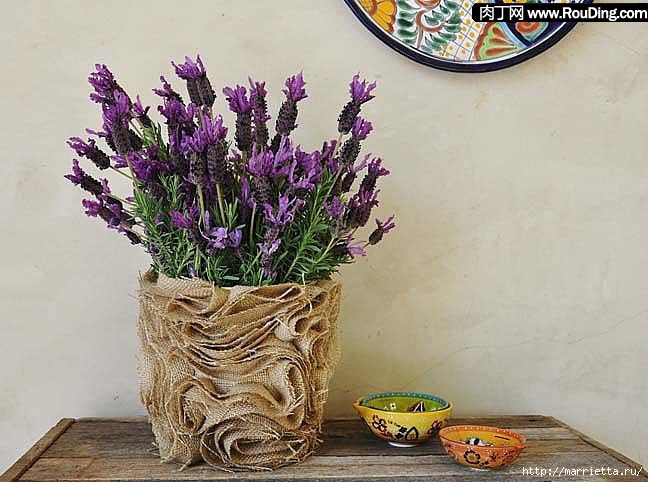
pots made of burlap (tarpaulin, felt)
Thick fabric, such as burlap, is perfect for making flowerpots in rustic style country. All you need to do is cut two pieces of fabric in the form of a semicircle or square, sew them together like a pocket and hang them on the fence.
For hanging, you can use a strip of fabric sewn to the top edge of the flowerpot or wire threaded into the fabric.
Hanging planters for the garden made of felt

You can place a pot of garden annuals in a felt pot.
New outfit for the watering can.
If you have old watering cans or buckets with basins lying around at your dacha, don’t throw them away, treat the surface with sandpaper to remove rust, and paint them in bright colors. It is fashionable to place pots (or bags of soil) and flowers inside. And these items will turn into funny flowerpots
You can hang them on racks, trees, fences

How to make a hanging flower pot from a plastic container
1. Materials and tools. The lampshade itself. Galvanized wire with a diameter of 2 mm from the latest project. Key ring. Round nose pliers and pliers.
2. We prepare three pieces of wire 25 cm long.
3. Using pliers, bend a round eyelet at one end of each wire.
4. At the other end of each wire we make a “U”-shaped bend. After all modifications, the length of the three blanks should be the same.
5. Using an awl or the sharp end of scissors, we make three holes with our own hands in the area of the neck of the lampshade.
6. Insert “U”-shaped hooks into the holes
7. We put wire blanks on the key ring. The pot is ready.
8. Planting plants. Plants can be varied, but it should be noted that the pot does not provide drainage and, if the plant requires frequent replanting, it may be difficult to remove the plant in this pot design.
Flowerpots can be made not only from cans, but also from plastic bottles(the most common source material, which is always at hand).
Paint the surface of the pots with paints

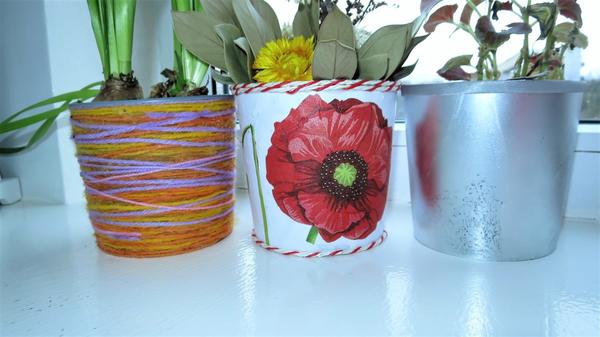
You can also decorate the pots with twine
For this we need a plastic bucket of ice cream or other products:  You will also need jute twine


Glue the beginning of the skein together with the handle fastenings.
And we begin to wrap the twine around the bucket. Make sure that each circle fits snugly together, without gluing the twine. When you have reached the bottom of the bucket, you can glue the last few circles, and also carefully glue the end of the twine.


Then all that remains is to make 4 holes and hang the flowerpot bucket decorated with twine.
Wicker flower pots
You can braid a flower pot to hang it in a simple way that imitates macrame.

In order to make a hanging flower pot, we will need about 10 pieces of thick rope, approximately 90-120 cm long, several large buttons and a metal ring. Decide on the sizes yourself.

Instructions:
We fold our pieces of rope in half and fasten them with a simple loop as shown in the figure:

Then select two loops next to each other and fasten their adjacent ends with a button as shown in the picture. It is better to place buttons at a distance of 5-7 cm from the ring.
Flower pots can be made from the most unexpected materials: old newspapers, unnecessary cages, bottles, twigs, pencils, rags and other improvised means.
What should I plant flowers in?
Before we tell you how to make flowerpots, it’s worth telling why they are needed at all. Home flowers grow best in clay pots. But, unfortunately, they cannot retain their original appearance for long. A plaque appears on the outer walls that cannot be washed off. Place these pots with your own hands in a beautiful flowerpot and see how the flower is transformed.
When choosing a pot, buy one that is 1–4 cm wider and 5 cm higher than the pot. Garden frames flower containers must be intended for open ground.
Some plants can be planted directly in a pot, but then you need to add drainage to the bottom. In this case, you will save on the pot.
Here are the materials from which pots and flower pots can be made, either with your own hands or purchased, from:
- clay;
- ceramics;
- metal;
- wood;
- glass;
- plastics.
- threads;
- vines;
- fiberglass.
- Clay pots have an untreated rough or smooth surface. Sometimes it is decorated with sculpting or painting. But such products are only suitable for indoor use; they allow water to pass through, so they are not suitable for the garden.
- Ceramic pots and flowerpots are treated with glaze. It decorates such products and allows them to keep water out. These containers are suitable for home and garden design.
- Metal flower containers are a modern appearance, they will look great in a room decorated in high-tech style.
- Wooden containers are made from environmentally friendly pure material, serve as excellent protection for flower roots from hypothermia and drying out.
- Glass ones have modern look, look beautiful in the interior. Since they are transparent, it is convenient to monitor the water level (for example, when watering orchids).
- Plastic - lightweight, frost-resistant, not afraid of corrosion, easy to clean. Orchids, whose roots cannot tolerate many materials, grow well in such containers.
Planter made from old bird cages

From the old birdcage It will make a wonderful flower pot. If you feel sorry to throw away this item, but the bird no longer lives there, turn the cage into a home art object. First, wash it, dry it, then arm yourself with this:
- acrylic paint of the desired color;
- brush;
- gloves.
To get less dirty with paint, start covering the rods with it first. inside, then - from the outside. Choose a shade that blends in with your surroundings.
Paint inside through the bird door. If the cage is collapsible, lay it out and cover its individual elements with tone. After the paint has dried, place 1-3 flower pots inside, preferably with young vines. When they grow up, they will beautifully wrap themselves around the cage, clinging to the bars.
See what interesting and unusual materials you can use to make a flowerpot and a large plant pot to place in winter garden or at the dacha.
Flower pots made from old things

It’s not so easy to guess that these flower pots are made from old rags. Here's what you'll need for this unusual craft:
- unnecessary rags or burlap;
- cement;
- water;
- latex gloves;
- capacity.
When the rag soaked in the solution is dry, turn it over.
Pour some expanded clay inside, then soil and plant the plant.

If you want to make a pot for home flowers, then take a small container. For a garden planter, this could be, for example, a 10-liter bucket.

Look how beautiful products made from burlap look (photo below left). The top of these pots was decorated with fabric flowers. If you have unnecessary openwork fabric, you can use it to make small and large pots and place them in the garden. Leave them as is or paint them.
Give a second life to old things, show your imagination by taking:
- canvas;
- PVA glue;
- water;
- plastic bag;
- acrylic paints;
- rope;
- acrylic lacquer;
- basin;
- brushes;
- a shaped plastic bottle or other container.
Place the fabric in the solution, remember it and wring it out several times.

Place the bottle in a plastic bag on a cloth soaked in adhesive solution (in its center). Fold over the edges, tie with string, and let dry. If the bottle is narrow, wrap it in newspaper, tie it, and put a bag on top.

If you want to make a flower pot for an existing pot, also wrap newspaper around it, but not much, and put a bag on top and tie it.
To make flower pots further, fold the edges of the fabric up with your own hands, covering the side seam with a fold. They need to be made around the entire container, tying the fabric with a string.
Place the workpiece in a warm place until completely dry. It is better to place it near the radiator or periodically dry the future decor item with a hairdryer.
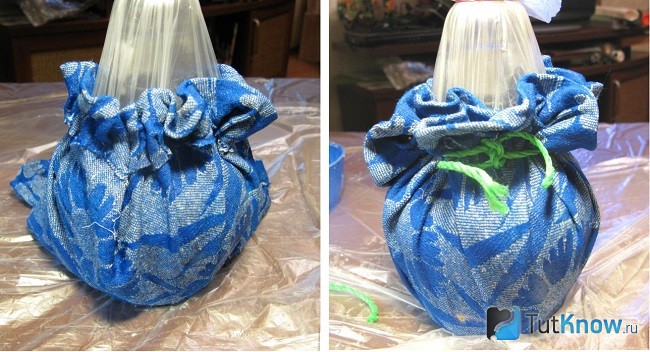
Without removing the bottle, paint the pot in any color, adding PVA to the paint for greater strength.

When this layer has dried well, remove the bottle from the container you made by untying the rope. Paint the outside of the planter with 2-4 coats of paint. When it dries, then apply varnish 2-3 times. You can put a pot with a plant in a flowerpot or make an inlay of artificial flowers.

And if you want to place a tree of happiness there, then pour plaster inside the container, place its trunk, and leave it like that until the solution dries.

Here are 2 more ideas on how to extend the life of old things. You can renew the pot by simply wrapping soaked water around it. cement mortar textile. Drape it as you wish and leave it on the pot after drying.

You can cut old things into strips and weave them into braids like this.

Apply PVA generously to the pot. Starting at the top, wrap the outside of the container in a spiral. In this case, the turns should fit tightly to each other.
Flowerpots for the garden made of wood
You can plant flowers in these at the dacha, and they will feel great. The excess water will go away, and the soil will warm up enough for the roots to feel comfortable. But it is better to place them where there are no cross winds or drafts.
Plant an ordinary indoor geranium in such a large pot, and soon you will not recognize it, since it will be completely covered with inflorescences.
Make such a flowerpot from leftover building materials, taking:
- bars;
- boards;
- antiseptic impregnation;
- wood varnish;
- hammer or screwdriver;
- screws or nails.
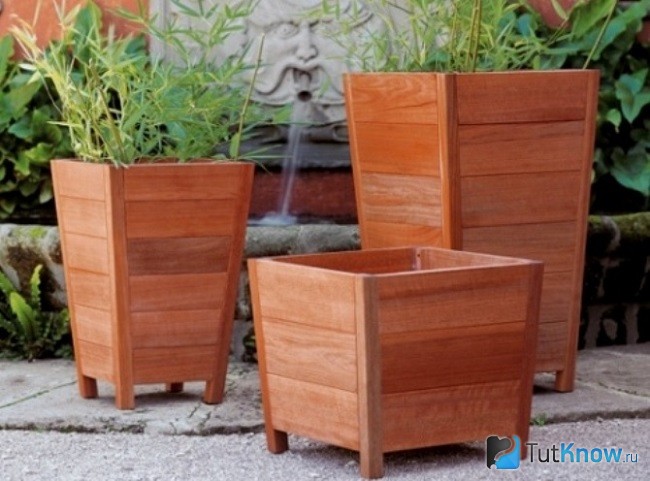
Craftsmen can make a large wooden pot like this or something similar and create a fairy-tale corner for children in their dacha.

Other flowerpots also look beautiful; use bamboo sticks and branches for them. To make flower pots from the first material, take
- bamboo sticks;
- jigsaw;
- thick twine;
- scissors;
- measuring tape.
Fold it in half, place the first stick in the resulting loop, twist this part of the twine in a figure eight, place the second piece of bamboo in the second loop.

Decorate the entire pot in this way, also connect the lower ends of the sticks, secure the twine to the first and last bamboo. This is how beautiful flowerpots for outdoor or indoor flowers are made.
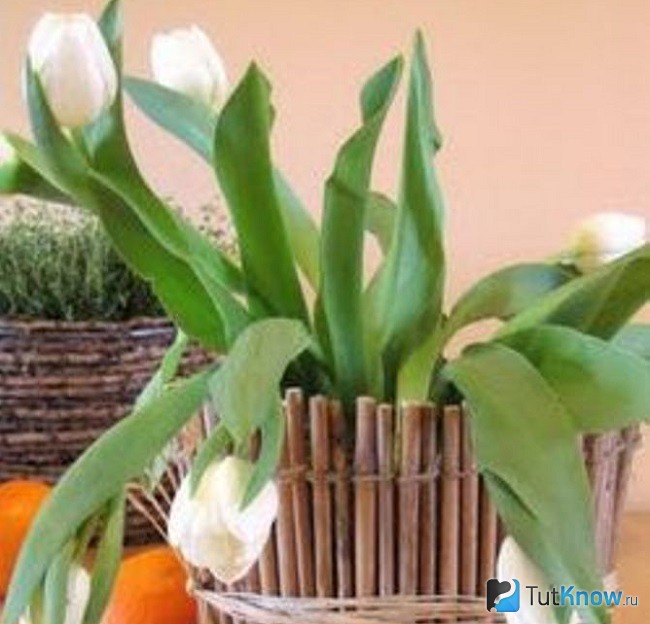
You can make your own flower pots from branches. If they have leaves, tear them off. Trim the bottom of the branches so that it is even on this side. Attach the blanks to the pot, wrap them with an elastic band or a beautiful rope.

We decorate plastic and clay pots with our own hands
There are many ways to do this kind of crafting. If you have an old plastic pot of sufficient size or a bucket of the same material, use a heated knife to make several round holes, pour soil inside, plant flower seedlings.
To prevent the soil from spilling out, first fill the container with soil to the first holes, plant the seedlings, then fill it to the second holes, plant flowers. So design the container higher and higher.
Look how beautiful the flowers look, including ampelous petunia, in such a pot. To hang it, use special fasteners or weave using the art of macrame plant pots and hang the pot. You can tie several metal chains with wire and hang a flower container from them.

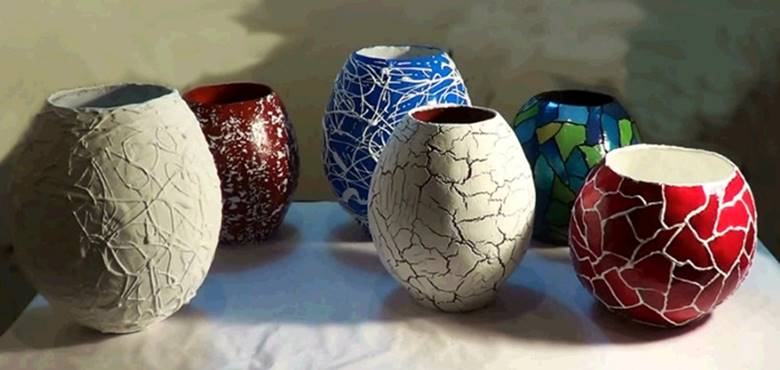
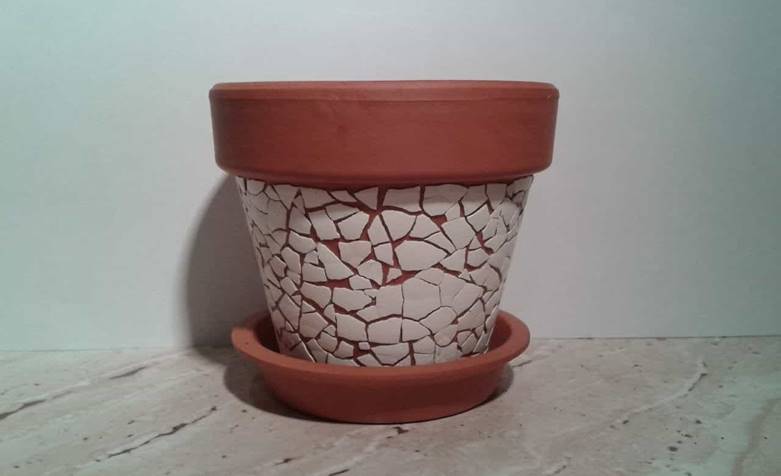
Photos of flower pots will help you see the idea in action. Decorate plastic containers It is possible not only with the plants themselves, but also in other ways. Try crackle. This method allows you to artificially age a thing. Craquelure varnishes are used for it. We will achieve this effect by decorating old plastic pots with our own hands, using eggshells.
Here's what you'll need to transform your flower container:
- shell from boiled eggs;
- acrylic paint;
- baking soda;
- mascara;
- sheets of paper.

If you use white or beige shells, then cover the pot with dark acrylic paint; this tone will highlight the mosaic elements.
- Remove the inner film from the shells of boiled eggs and rinse.
- Prepare a soda solution. Degrease the shells in this liquid and dry them. If you want to color it, do this procedure at this stage.
- Spread PVA on the surface of the pot, attach several shells to one area with the convex side up, cover with paper, press lightly. Then the shells will separate into smaller fragments and stick together.
- After holding this for a few seconds, move on to the next section. If you want the crackle cracks to be wider, then move the shells apart a little.
- Cover the work with ink, wait until it penetrates the design, then wipe off the excess with a slightly damp cloth. The mascara will remain only in the cracks, the shell will not change color.
- Finish the planter with varnish to seal the mosaic and make it durable.
For work we take:
- pot;
- alcohol-containing liquid;
- sandpaper - grit 70 and 100;
- moisture-resistant putty;
- marsh color acrylic paint;
- brush.
- Degrease the outside of the pot with an alcohol-containing liquid, then go over this surface with sandpaper.
- Cover the pot with putty and let it dry.
- Apply marsh-colored paint on top of this layer. When it's dry, sand it with 100-grit sandpaper.

And here is what happens as a result.

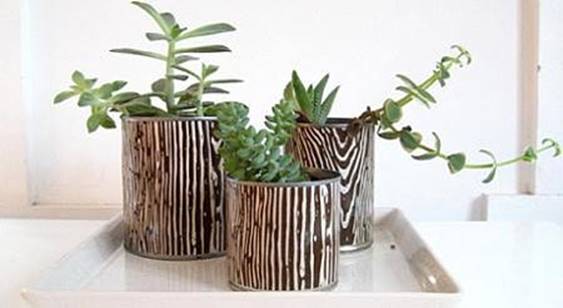
For you and others visual aids. Look how natural materials transform plastic flower pots.

After a forest walk, bring bark (from a dry tree), moss, and pine cones. Cut a piece of birch bark of a suitable size, wrap it around the containers, and secure it by tying it with twine.
And you need to dry the moss, glue it and the cones to the surface of a pot well greased with PVA.
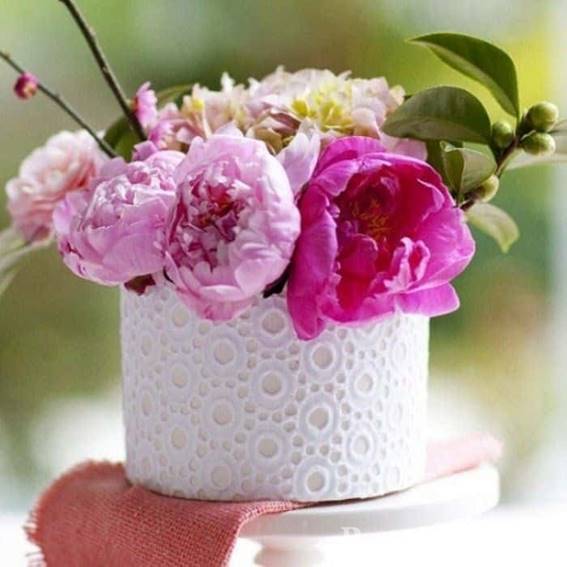
If you want to transform white flower pots, take just:
- containers for flowers;
- PVA glue;
- twine;
- brush.

If you want to update the container for flowers, this can be done even with ordinary pencils. Cover the pot with them around the area, placing them vertically and placing the rubber bands facing up. All that remains is to decorate with a bow and place new item interior in place.

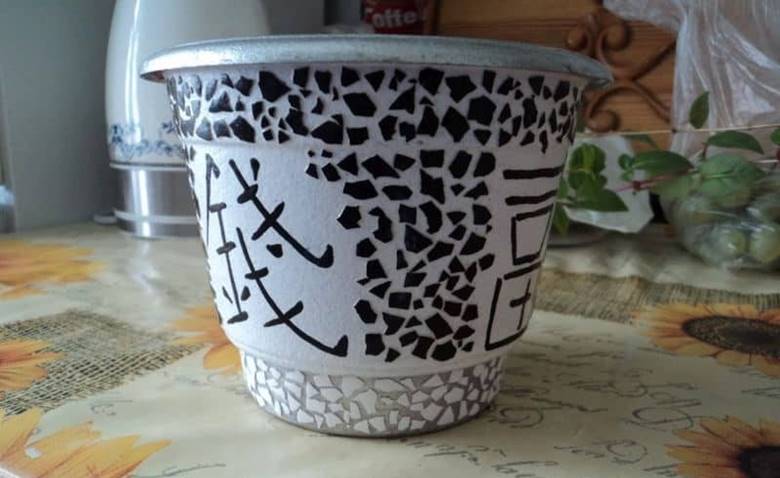
If you want to decorate a pot in oriental style, the next idea is sure to please. The already familiar craquelure technique was used for it.

Here's what you need to get creative:
- flower pot;
- eggshells;
- acetone;
- silver, white and black acrylic paint;
- toothpick;
- PVA glue;
Here's what the most suitable ones mean:

Draw hieroglyphs in the central part of the pot in a circle. Decorate the distance between them, as well as the top of the pot, with shells pre-painted with black paint.
To increase the distance between the mosaic pieces, push them apart with a toothpick. She will give them the desired location.
Decorate the bottom of the container with light shells. After painting with 2-3 layers of varnish, decorating the polka dots is finished.

The scope for this creativity is immense. In the second article we will continue this interesting and the desired topic. In the meantime, here is a selection of wonderful ideas for you that will help you decorate flowerpots or make them yourself: