Decoupage on old lacquered furniture. Decoupage table with napkins
Decoupage is simple and inexpensive way update furniture. An old cabinet, bureau or sideboard, decorated using a similar technique, becomes a real work of art, turning from a standard model into a real designer masterpiece. Can be used for restoration various materials– fabric, newspaper and magazine clippings, special paper. We invite you to learn an interesting and simple DIY decoupage of furniture with napkins, which is not difficult to do.
The principle of the decoupage technique is inherent in the name itself. WITH French, the word “decoupage” is translated precisely as “clippings”. This is the basic principle of work - cutting out various images and gluing them on the surface. You can decorate the most various items. From large furniture elements - cabinet fronts, table tops, doors, to the smallest things - vases, candles, original jewelry or caskets. When decoupage, everything depends on your imagination and patience.
The history of decoupage dates back to the 12th century in China. The heyday of decoration in this style came in the 17th century, when European aristocrats began to fill their homes with expensive Asian household items, and Venetian craftsmen, sensing good earnings, learned to add exotic notes to the products of local furniture makers.
In our time of faceless industrialization and templates, any hand made products are in great demand and interest among creative people. Therefore, decoupage is again at the peak of popularity.
The most common today are six main types of decoupage techniques:
- classic (direct) decoupage is a basic method in which a picture is glued or implanted onto a prepared surface. If you want to decorate a product made of wood, MDF or chipboard, the surface must first be sanded and primed. This method is good for beginner needlewomen, as it will help you understand the basic techniques of decoupage;
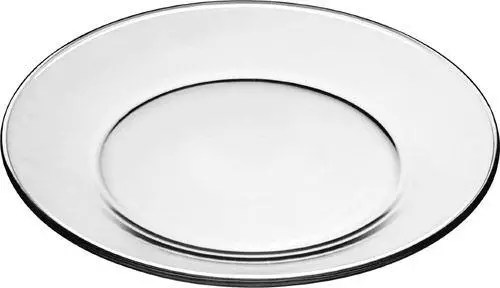
- reverse decoupage - used for decorating transparent surfaces - dishes, glass, mirrors. Differs from direct sequence of actions - first on reverse side a base is applied (a napkin, a clipping or any other picture), and then the surface is primed and varnished;
- artistic (smoky) decoupage is shading and drawing of the background, which allows you to effectively emphasize all the outlines and nuances of the design. Using smoky decoupage, you can create a full-fledged picture with shadows, volumes and accents, as well as hide small flaws in the work. A colored haze is created using pastels or acrylic paints, after which the surface is coated with matte varnish;
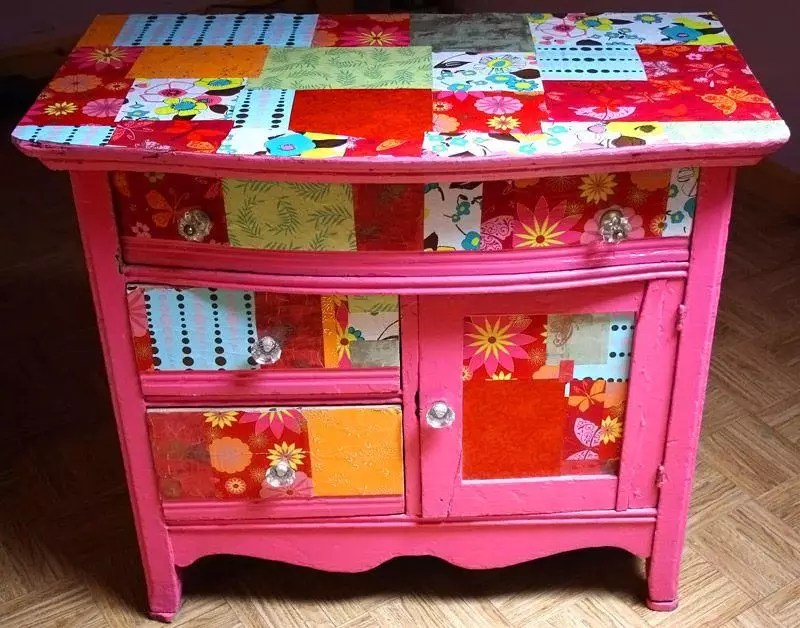
- deco patch – paper patchwork. This version of decoupage uses pictures that have been previously torn into arbitrary pieces. This style of decoupage is also great for beginners, as it does not require any special skills and is based only on the artistic intentions of the author. The flaps can be glued overlapping or almost end-to-end, leaving a thin border. Thus, the item can be given a touch of artificial antiquity or create the effect natural stone. Don't forget to cover your finished work. protective layer acrylic varnish;
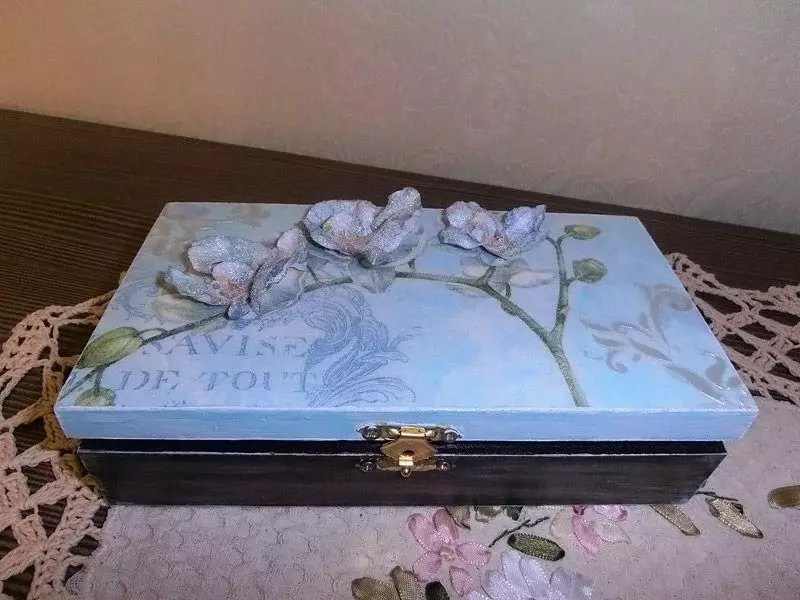
- volumetric – modern version a technique that creates pictures with a fashionable 3D effect. This is a technique for experienced craftsmen; it is better for beginners to start with simpler work. For three-dimensional paintings you will need modeling paste, special art gels, putty, and a base. The base is pieces of fabric, multi-layer napkins, or you can use decoupage cards or special Sospeso Trasparente equipment.
Working in the 3D decoupage technique requires a lot of experience and accuracy, but the result is very impressive and unusual.


Choice of motives
There are a great many motives for decoupage, all of them are limited by the personal preferences of the author and the degree of integration of the decorated object into the surrounding interior. You can cut out a beautiful pattern from paper napkins, decorate the selected surface with old photographs, use pictures from magazines, or make a printout with the design you like on a laser printer. Furniture modules standard models, decorated using the decoupage technique, will immediately attract everyone's attention, bring zest and exclusivity to interior decoration your house.
Since decoupage is most often used to restore worn out, problem areas on furniture, bright and ultra-modern designs are rarely used as a basis for decoration.
The most common subjects used for decoupage furniture are:
- floral motifs;
- pastoral drawings;
- country style;
- fruits, berries, vines;
- angels, religious subjects;
- birds;
- Japanese, Asian motifs;
- old postcards or photographs.
It is precisely such scenes that fit most organically into the interior of the beloved Provence, ethnic or always relevant classic style.


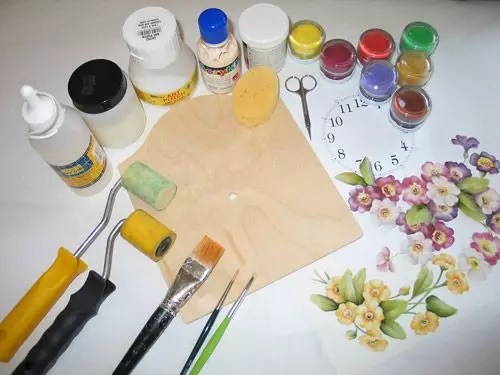
Tools and materials
The decoupage technique opens big choice for self-expression and does not require significant material investments. But still, for a correct and beautiful result, you need to arm yourself with some tools and materials.
What tools are needed for this:
- sharp small scissors. Regular manicure, medical or special tapestry scissors will do. The main condition is a short, sharp blade. The most the best option Teflon coated scissors will be used. Such scissors are not subject to corrosion, glue and paint do not stick to them;
- decoupage knife with a rotating blade or scalpel - used for processing dense materials;
- brushes of several types - for shading, applying glue and a protective layer (varnish). These must be synthetic products different thicknesses. It is also convenient to use a soft foam sponge for these purposes;
- primer – for surface preparation. You can use PVA glue or putty with acrylic;
- glue – special decoupage (for dense applications), PVA, wallpaper, paste, acrylic lacquer, egg white;
- background paints – acrylic, pastel, pigments;
- roller - for smoothing the glued picture.


Materials for decoupage you will definitely need:
- napkins - available material, recommended for beginners. You can purchase special products in craft departments, or you can simply buy regular sets of three-layer napkins with a beautiful pattern. A pack is very inexpensive, so if you make a mistake, you can easily start over using a different paper picture. The disadvantage of this material is its fragility and ability to stretch and form folds during operation. It is advisable to apply the napkin to a light surface; a dark base will simply “eat” the design on a thin material;
- decoupage cards - sold in specialized stores and represent various sizes drawings collected in sets on a specific topic. Since these products are intended specifically for decoupage, their material meets all technical requirements - they are elastic, difficult to tear and do not change their size and shape when in contact with water. Decoupage cards are especially convenient for restoring very dark surfaces;
- rice, banana or mulberry paper – fibrous material, used to decorate transparent surfaces. It cannot be cut with scissors; the design must be carefully torn off with your hands. Due to its texture, such paper does not tear, perfectly follows all the outlines of the object, so it is easy to work with it and get an effective result;
- printouts are an option for those who want to make an exclusive decoration by printing their favorite design on a regular laser printer. Use the cheapest thin paper or tracing paper - it will absorb the paint better and, when decoupled, will not stand out much on the surface of the object. To prevent the printed design from blurring during work, spray it with regular hairspray.


Decoupage using a cabinet as an example
Many houses have old furniture, which still regularly performs its functions, but has already lost its external attractiveness. Or maybe you just don’t want to part with your favorite thing, but want to give it an individual and unusual look? Try your hand at decoupage technique. And we will show you how to decoupage furniture with a napkin step by step using the example of a standard kitchen cabinet.
Step-by-step instructions on the stages of work:
- remove the door and prepare the surface - polish it with a grinder or sandpaper. Using putty or soft wax, fill all cracks and scratches on the furniture. Leave to dry completely;
- prepare the base - select a paper napkin with a design you like and carefully remove it from it upper layer– this is what we will apply to the facade of the cabinet door;
- Apply a thin layer of glue to the inside surface of the napkin. You need to act very carefully, apply the glue using a thin flat brush, avoiding getting in excess. Leave the napkin for a while so that the glue completely saturates the material. To glue paper products, you can use regular stationery PVA. In order to conveniently transfer the drawing and not spoil it, work on a plastic file;
- transfer the napkin to the front of the cabinet, arrange it to your liking and smooth the material with a brush. Make movements from the center to the edges to remove excess air and smooth out wrinkles;
- the main work is completed. Now I'm left final stage– varnish the surface. This should be done no earlier than after a few hours; it is better to leave the product overnight. Matte or glossy acrylic varnish is suitable for the protective layer. Apply varnish at least 4 times. This process is best carried out using an aerosol spray.
In this simple way of decoupage, without special costs, you can make an original, exclusive item for your home. Look at examples with photos of how old furniture was transformed after its restoration using decoupage.


Nuances of technology
Modern needlewomen are not limited to simple gluing beautiful pictures. Today, there are several decorating techniques using decoupage that help give furniture an original, unusual look:
- gilding – the decorated surface is covered with a layer of gold leaf, which is an inexpensive analogue of gold leaf. This method allows you to enhance the effect of luxury and royal chic, perfect for interiors in Baroque, Art Deco, Empire style;
- patination - creating a patina, artificial aging subject. This decoupage technique is actively used in rustic or classic interior. The general background of the decoupled surface depends on what type of patina is applied - silver, bronze or a noble shade of natural wood;
- tinting – creating a background and shading using acrylic paints. Used to add contrast and enhance the color of the design;
- Craquelure is another type of adding a visual effect of antiquity to the surface. This is a very unusual decoupage technique, in which cracks form on the object, emphasizing the originality of the material. There are two types of craquelure - one-component (cracks in the paint layer) and two-component (cracks are added in the top layer of varnish). Enough difficult process, looks especially beautiful on transparent surfaces - saucers, vases, decorated with cute pastoral or floral scenes.
Decoupage – great way not only to give " new life» old things, but also a wonderful process of self-expression. Many designers admit that this hobby is so exciting, it allows you to forget about problems, and the result is so pleasing that decoupage has become their main activity. Try it too, because with our tips, doing decoupage will become much easier.
Old furniture is not a reason to send it to a landfill. Moreover, having on hand a little paint, glue, varnish, beautiful illustrations and, of course, imagination, you can do a simple decoupage of old furniture with your own hands, turning it into an original, unique exclusive. Moreover, you can decorate almost any surface with the help of decoupage (this is both, and, and even), you can decorate a room, or even the entire apartment, in your own special style.
The word "decoupage" has French roots and means "cut". And speaking at all in simple language, this procedure can be called varnished applique, although acrylic paints are also used. With the help of decoupage, old furniture literally gets a second life. This technique turns old thing into a real masterpiece. See the example in the video:
Master class on decoupage furniture with napkins using a simple technique
We select materials for work
- an object for decoration - a bedside table, and in general anything you want;
- finishing material - three-layer napkins;
- scissors;
- sandpaper may come in handy (when processing a wooden surface);
- a brush 1-2 cm wide for applying glue. The brush is slightly wider for applying varnish;
- decoupage glue;
- acrylic varnish (and if you take colorless acrylic paint, then you won’t need varnish). If the surface will come into contact with water, it is better to use wood varnish or yacht varnish;
- acrylic paints.
- In order to decoupage old furniture with napkins, you need to carefully cut out a design that will serve as an applique. Some people cut off the pattern along the contour for an aging effect.
- Apply glue to the prepared surface at the location of the application. Glue and carefully level the pattern so that there are no bubbles. Be sure to let it dry. You can additionally decorate with acrylic paint to give expressiveness to the drawing or more individuality. It is also important to use paint to achieve the effect of merging the pattern with the surface.
- Polish the surface. You will need to apply 2-3 layers of varnish. The decor item must be dried between layers.

We try to decorate with unnecessary wallpaper with our own hands

Old wallpaper scraps, combined with glue and imagination, can turn ordinary, old, ugly furniture into an original, unique piece of furniture.
You will need:- wallpaper glue;
- brushes, roller;
- large, sharp scissors and another small one;
- ruler;
- sandpaper;
- decoupage glue;
- acrylic paints;
- acrylic lacquer;
- wallpaper;
- object for decoration.
Step-by-step master class on working with wallpaper
The surface of the furniture must be cleaned of dirt. Sand it with sandpaper. Especially if there are scratches or cracks.
If there are dark spots on the surface that will be visible through the wallpaper, then you should paint it with acrylic paints.
To decoupage old unnecessary furniture with wallpaper, you can use the entire surface by gluing whole piece wallpaper or several, making up the intended pattern. Even individual cutouts from the drawing pasted onto the surface look original. This technique is almost no different from the traditional technique of working with napkins.
Attention to the video:
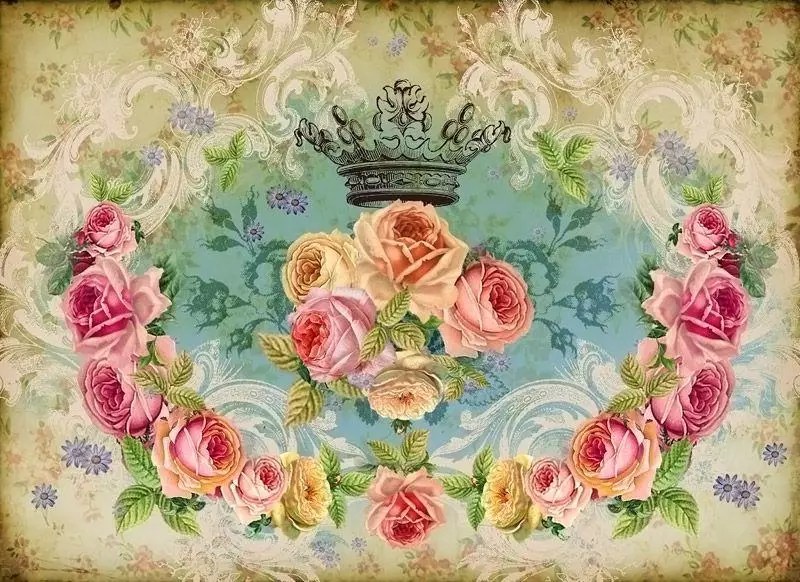
Trying our hand at creating a vintage style

By definition, vintage is a winemaking term that literally means “aged wine.” From winemaking the term has become fashionable and is understood as original item previous generation. Things that are older than 30 years are already vintage. Age is not yet a basis for classifying an item as vintage. Vintage items should be original pieces of art, as in the photo above, and fully express fashion trends of its time. To decoupage furniture in vintage style and give an aging effect, you can use craquelure varnish. As this varnish dries, it forms cracks of various textures - this depends on the thickness of the applied layer. Then rubbed into the cracks Oil paint, it remains only in the recesses. Thanks to decoupage of furniture in vintage style, it acquires a noble antique look.
Exquisite decor in Provence style

Provence is one of the most popular techniques because it is associated not just with the village, but also with the sea, sun, smell flowering plants, that is, with a wonderful holiday in the lap of nature. All this affected the aesthetics: sun-bleached colors, like in a photograph, many living and dried plants, naturalness, simplicity, uncomplicated lines. Decoupage of furniture elements in the Provence style must include one or more required colors: white, cream, beige, pale lemon, terracotta, burnt orange, the color of sunflower petals, blue, pale green, color sea wave and lavender.
Furniture restoration using decoupage techniques

The technique of restoring furniture with decoupage is not much different from working on other surfaces. Let's look at the basic tips.
If you want to restore a cabinet using decoupage, as in the photo, a cabinet or, then you will need acrylic paints, decoupage glue or pva, napkins, acrylic varnish. If you will be doing decoupage on surfaces that may often come into contact with water, it is better to use regular wood varnish. It’s even better to use yacht varnish - it most reliably protects the surface from water.
We restore polished furniture in a couple of evenings
In order to decoupage polished furniture, the first thing you need to do is wash it with dishwashing detergent that breaks down grease. All smooth surfaces (such as laminate) should be washed with a degreaser. Acrylic paint does not adhere very well to polishing, but, in principle, polished furniture can also be painted with acrylic paint. Subsequently, simply cover it with several layers of acrylic varnish, and better than varnish for wood.

- PVA glue
- brush for applying it,
- emery,
- scissors,
- acrylic lacquer,
- decorative napkins with images of vegetables, fruits or dishes. You can also print any image you like on a printer.
A simple and detailed MK for beginners
- We will need to sand down everything you decide to decorate.
- After this, it is recommended to coat the surface with a primer. If you are going to do decoupage kitchen furniture and glass, it must be degreased. Well suited for these purposes detergent for dishes.
- Using miniature scissors, cut out the details of the design. It is better not to cut out the smallest details, but to complete them after gluing them using acrylic.
- To avoid accidentally tearing the napkin, after it is applied to the surface to be pasted, it should be soaked in glue. For these purposes, you can use a medium-hard brush. It will also help to smooth out folds along the edges and in the center of the cut-out image.
- When the glue is completely dry, some details can be completed with acrylic paints.
- When the paint has dried, the entire drawing must be covered with a layer of varnish. Varnish is necessary in order to protect the image from high levels of humidity, which is almost always observed in the kitchen. The varnish, whether matte or glossy, is applied in several layers.
Decorating furniture elements with fabric

In order to decoupage furniture with fabric, we prepare the materials the same as with the standard technique of working with napkins.
- We cover the object of decoration with two layers of PVA glue using a thick brush or roller.
- Then we cut the fabric into pieces of the desired sizes and grease it with PVA glue.
- Let dry for 40 minutes. After spraying with spray, we glue the fabric to the bedside table using the patchwork technique or as your imagination dictates.
- When the fabric sticks well to the cabinet, it can be varnished.
That's how easy and simple everything turns out. More details in the video:
We create stylish children's furniture for your baby

Decoupage of children's furniture will never go unnoticed. An ordinary children's cabinet can be turned into a work of art. And if you make it with your favorite cartoon characters that the child really likes, then you can be proud of such a thing, since it will be a child’s favorite thing. As an example, take a look at .
Read our article about how you can not only decorate furniture, but also.
The decoupage technique for decorating products and decoupage furniture is again at the peak of popularity. This is the simplest and affordable way update interior, give old furniture individuality and sophistication. Using various images on paper or matter, a little imagination and creative inspiration, you can transform furniture facades, doors, table tops and backrests into works of art.
Furniture decoupage: preparing materials
Select the image you want to transfer to the surface of the furniture. This could be a drawing on paper, a napkin, or a fragment wallpaper, print on textiles or skin, lace. It is advisable to purchase special decoupage glue, but in the absence of one, PVA will do. You will also need a sponge, a soft brush and acrylic varnish.
Important! Depending on the decoupage technique and style future product you may need Additional materials and tools.
Work process
- We prepare the surface. If without treatment, then it does not need to be washed. Lacquered or painted furniture must be degreased (dishwashing liquid is suitable), rubbed with sandpaper and dust removed.
- If the furniture is really old and has cracks and chips, we will mask them with wood putty and furniture wax.
- Prime the surface with transparent acrylic varnish. Dark furniture It is better to paint it in light colors.
- We apply the adhesive composition to the base and place the images cut out along the contour in the order prescribed by the previously drawn up sketch.
- After the glue has dried, the composition is coated with acrylic varnish. If desired, additional decorative techniques are used.
Application of napkins
Quite often, table napkins, which are usually multi-layered, are used as images. All you need is a top layer with a pattern. The surface of the base must be light. When applying varnish, the napkin becomes more transparent, and against a dark background the design will lose its contrast.
Of course, each of us has things in our everyday lives that are scary to look at, but we don’t dare throw them away. You just can’t say goodbye to your grandmother’s shabby sideboard?
Or, perhaps, you just don’t want to part with the children’s, and therefore so dear to your heart, stool?
Then this article is for you. All over the world it is gaining increasing momentum DIY furniture decoupage It’s very easy to do, and most importantly, interesting!
What is decoupage?
First of all, when getting down to business, you should understand what decoupage is. This is a decorative design based on cutting from a variety of materials - paper, leather, napkins, and then gluing them onto the selected item.
She is originally from China, but greatest prosperity reached precisely in Europe, from where it came to us. The method is also called “art for the poor,” but do not take this as an insult, we are talking about materials that are more than accessible to each of us.
After all, various napkins, magazine clippings, and just three-dimensional pictures from the Internet are the basis for creative implementations. This art does not set rigid boundaries, so do not limit the flight of your imagination, do not hesitate to implement even the most daring idea!

Basic techniques for do-it-yourself furniture decoupage
Today, there are several implementation technologies. Let's talk and analyze each of them.
Classic do-it-yourself furniture decoupage
This method involves covering the prepared plane with the picture you like. This can be done dry, wet or hot. This method does not require any special skills, which means anyone can decoupage furniture with their own hands.
The dry method of gluing clippings is the easiest for beginners and the most popular among professionals. The pre-prepared motif should be applied with a flat, wide brush. It is important to note that you need to apply from the center to the edges, removing all bubbles.
Wet, or as it is also called, wet method decoration. The prepared cutting is first moistened with water using a cotton pad (do not overdo it, the ornament can easily “float”), then filled with glue.
The glue can be distributed in the same way as in the dry method - with a brush, or with a cotton swab, or even with your finger.
The hot method involves using a regular household iron. The plane is treated with glue, and after it dries, the prepared motif is applied. Carefully, through wax paper, iron at medium temperature.
Experiment and choose the method you need, remember that this is purely individual!
Furniture decoupage technologies
- Reverse decoupage technology
Suitable for glass or tinted objects. It differs from the previous one only in that it is applied to the back of the object; - Artistic “napkin technology”
One of the most interesting. It involves combining the “appliqué” and the canvas into one whole; the complete picture is recreated through artistic painting or other methods of decoration; - Decoration "deco patch"
It involves not just a combination of a carved ornament and a canvas, it implies the merging of many pictures into one whole, filling the voids of the canvas. In other words, individual pieces are glued end-to-end and form a single solid background; - Using volumetric decoupage
A stereo effect of the picture is achieved. Let me explain that with this technology, the applique is glued to a pre-prepared part from a molded element (it can be made of polymer clay, cold porcelain, etc.)

Decoupage of old furniture with your own hands is not only useful, because you give new life to things, bring new colors to them, but also exciting!
Let's look at this topic in even more detail, because it is one thing to paint a picture, and quite another thing to effectively decorate the selected item.
Basic effects of decoupage
Tired of the color of the facades? Or maybe they are too worn out? This means it’s time to add gloss and shine, which can be achieved by using various effects. Let's look at the main ones:
Adding volume with shadows
Well, of course, what could be simpler and more effective than a correctly placed shadow? You need to apply the shadow with a dry artificial brush, carefully driving in and blending the pastel according to the design. Remember, the blurrier the boundaries, the more “live” the shadow.
Gilding
Fancy some gorgeous inlay? This can easily be achieved by resorting, for example, to analogues of gold leaf sheets.
Or you can do it even simpler - glue sheets of gold or silver paint, and the worn-out item will literally shine!
Toning, or creating a gradient
In nature, you will never find a flower, leaf, or blade of grass of a single color. Nature has endowed each of its components with unique colors.
Try to give naturalness to the picture. Gently use a flat brush to create a beautiful unevenness of color, let it “glare” in some places, and darken in others, on the contrary.
Creating artificial wear
Achieved by creating abrasions on the field of the applied design. Artificial aging gives a flight of fancy and allows you to fantasize about the history that this item carries.
Craquelure effect
Similar to the worn-out effect in that it also creates artificial aging. Only craquelure is the formation of cracks by applying a special varnish, which, when dried, gives cracks of any shape and size.
Patination
Also from the category of “old” techniques. In other words, this is the creation of dark spots that imitate wear. Patination is usually applied to the corners of furniture.

Now we have learned even more about this wonderful technique. But how can you make sure that decoupled items fit organically into the interior of your home? Think in advance about the style in which you will do the work.
Some motifs resemble summer lightness, while others resemble the seriousness of shapes and patterns. For example, for provencal style Motifs such as wildflowers, rustic ornaments, wreaths and bees are typical, but to create a Victorian style use gold leaves, artificial aging, ornaments of lush bouquets and angels.
But this absolutely does not mean that the decoupage technique is just a prerogative dacha options, absolutely not! Many things can be “modernized” with decoupage, and they will look fashionable, bright and catchy.

Master class on furniture decoupage
The correct technique for decoupaging furniture involves the presence of certain stages that will allow you to complete the work efficiently and with pleasure. Let's talk about the main ones.
Preparing interior items
Before starting work, familiarize yourself with the selected surface and inspect it carefully. There should be no chips on it and deep scratches, it should be hard and homogeneous. If wooden surface dried out, or large chips have formed in it, treat them with epoxy glue, remove the residue with a special spatula and wait until it hardens. If you decide to paint the surface, first sand it using sandpaper, apply paint. Only after complete drying can you begin to work;
Preparation of material
Think seriously about what exactly you want the thing to be? How should it fit into the interior? What does she need to add that will highlight the style of the entire room.
Find suitable options for decoration, these can be napkins, lace, pieces of paper, magazine clippings, and even pieces of leather. How exactly to prepare the appliques - tearing or cutting - is up to you.
If it consists of an ornament that is difficult to cut out, and its background matches the tone of the surface on which you will apply it, I recommend that you simply carefully tear it off.
If you need to cut out a specific design, for example, a flower, I don’t recommend tearing off the napkin; spend a few minutes of time, but do everything as carefully as possible.
Application
The application techniques were described above; it is worth adding only that the beauty of the future product depends on accuracy. Do not rush under any circumstances, do everything as carefully and efficiently as possible, remember that it is better to spend time and ultimately be proud of your work than to rush and then regret what you did.
The final stage of application should be opening the surface with varnish.
Do it necessary manipulations– tint the tenderloin, or give it a gradient. Take another look at the end result and check for any bubbles under the application or pieces of debris.
Everything suits me? Then feel free to take up the brush and coat your creation with varnish.
By the way, decorating something in a horizontal plane is much more convenient than in any other plane, so think about this factor in advance.

How to get rid of furniture defects
So, you have chosen a decoration object. It could be an old chest of drawers, a chair, or an entire closet. Sometimes objects, especially wooden ones, dry out or acquire defects on their surface over time. Don’t rush to get upset, all this can be fixed.
- A chip has formed on the tree. It's simple: use a cotton swab dipped in iodine to carefully treat the chipped area;
- The crack is too deep. There are several options:
– Furniture wax, which can be replaced with mastic. Heat the material and rub it thoroughly into the crack;
- Epoxy adhesive. As discussed above, apply epoxy to the crack, remove the residue with a spatula and let it harden;
– Furniture putty. It can be selected in different tones, according to the tone of your product. - If the varnish is damaged, remove the varnish and re-treat it;
- If the surface is swollen from moisture, fill a syringe with PVA glue, carefully pierce the swelling in several places, and inject the glue. Cover with a cloth and place under weight for several days;
- If it comes unstuck PVC film- glue it with “Moment” glue;
- It appeared on the tree because of the heat White spot? Automotive polishing mastic will solve the problem. Wrap it in a napkin and rub vigorously. Abrasive components will remove the stain, and polishing components will polish the surface;
- Small scratches can be carefully painted over with a marker.
In this article we learned about a wonderful activity - decoupage of old furniture with your own hands. As a rule, a creative approach is characteristic of women, because they are the ones who create comfort and warmth in the house! A old table, a closet or chest of drawers will be just the thing for your creative impulses.
Feel free to create and experiment, bring even the most daring ideas to life. Don’t grab onto a grandiose object, just start small, and you will see how all the mystery, comfort and originality of decoupage will unfold before you.


DECOUPAGE OF OLD FURNITURE WITH YOUR HANDS
Decoupage is a fascinating and uncomplicated activity that has many techniques and is accessible to even the youngest craftswomen. With its help, you can make exclusive interior items that will decorate not only your home, but also the exhibition halls of art galleries. In this review, we will look at how to perform with your own handsdecoupage for beginners step by step with photo. Don't worry that things won't work out, it's actually very simple. With the help of this technique, old furniture, dishes, shoes and many other things will find a new life in your home.
Products with decoupage are works of art
First of all, let's understand the definitions. Decoupage is gluing a design onto a surface. The picture can be placed on wood, leather, fabric, glass and almost any other product.
Reverse decoupage is the same process, but has only one feature - the picture is glued under the material. This can only be done on transparent surfaces: glass and plastic. Of course, in this case the picture is pasted face up.

For your information! If a plate is used for direct decoupage, then in the future it will only serve a decorative function. And when using the reverse technique, the dishes can be used as usual.
Tools and materials for work
| Materials and tools | Note |
| Using this technique you can decorate a book, dishes, flower pots, bottles, furniture, . In general, literally everything that is in your home. |
| Pictures can be used from special decoupage cards and napkins. In addition, for this purpose, craftswomen use drawings on fabric, old newspapers, and magazine clippings. |
| You can use regular nail scissors or special tool, which is sold in craft stores. The main thing is that the edges of the blades are very sharp. This is the only way to carefully cut out the desired image on a thin napkin. |
| You will need flat soft brushes. The pile in them should be tightly fixed. Lost lint can be a serious problem. It is better to have several brushes of different widths for smoothing and applying glue and varnish. |
| It is best to use regular household PVA. You can buy a specialized composition, but it will cost more. Among varnishes, it is better to give preference to acrylic. It does not emit toxic substances and is easy to use. |
| To decorate the work, paints on acrylic base, sponges, primer, sandpaper, craquelure. |


Decoupage kits
Basic Techniques
You can fix the drawing on the surface different ways, let's look at them:
Method one
A simple technique of decoupage from napkins consists of placing it on an object and securing it with glue. After drying, the surface is varnished.

Method two
For reverse decoupling, a transparent base is used. The image is glued face down to the glass. After drying, fix with varnish.

Method three
Artistic composition. To make it, many images are used, which, when glued, are combined into one. To make the picture look like one whole, painting, shadows and accents are added.
Method four
This technique is called "decopatch". For it they use pictures from magazines, drawings on fabric. In order to get rid of clear boundaries, the edges of the paper drawings are torn off. The surface is completely filled with images.

Method five
Creating a three-dimensional image. This is a technique that requires the talent of an artist. First, an image from a paper napkin is pasted on. And then painting is done on it with careful drawing of all the smallest details.
Decoupage bottles for beginners: step by step with photos and recommendations
- the simplest and most affordable material from which you can make original gift. You can buy a bottle of wine or fill the container with your own homemade drink. Luxurious decoration will make an impression in any case.

We have already listed the materials and tools necessary for the work, so we will not dwell on this in detail. The only thing that needs to be added to the list is a windshield wiper. They pre-treat the bottle, which has been cleared of labels.
Important! It is better to work with a glass vessel while wearing gloves. Your fingerprints are unlikely to have artistic value, so it's best not to leave them.
Bottle decoupage sequence for beginners, step by step with photos:
| Illustration | Description of the stage |
Applying primer  | For priming, you can use acrylic varnish or PVA. The soil should dry well. |
Making the background 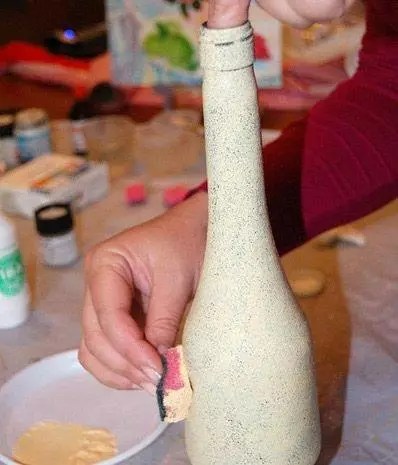 | For the background you need to use white or light acrylic paint. You may need to apply two or even three coats to achieve a completely opaque surface. |
Applying images 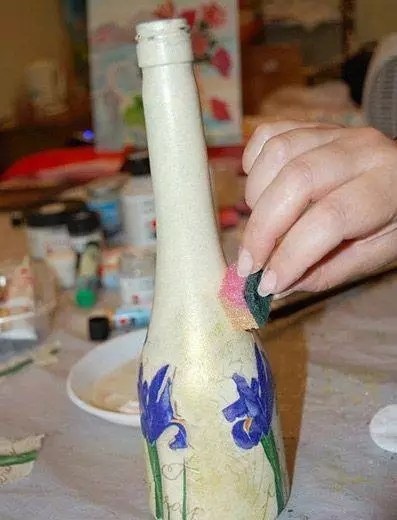 | The design on the napkin is carefully cut out with scissors. If the background of the picture and the bottle matches, do without scissors and carefully tear off the napkins. To make the design on the print easier to apply, it should be soaked in a plate of water. |
We fix the drawing  | You need to apply varnish over the surface of the drawing. This can be done with a soft flat brush or a spray bottle. You should make sure that the picture is not covered with wrinkles. If necessary, it must be carefully straightened with a brush. |
Finishing  | After complete drying, you can carefully sand minor imperfections in the work. To highlight details, use a brush and dark paint. After finishing, apply finishing layer varnish coating. |
Another option original design- decoupage bottles with tights. Master class on video:
Some tricks of decoupage on glass for beginners: step-by-step recommendations with photos of applying a design from napkins
The first experience of gluing a napkin can be unsuccessful: wrinkles and folds inevitably appear, which spoil the whole result. Some tips on how to avoid this:
- To apply a design to a convex surface, you can make “darts” on it. Cut the edges of the picture with scissors or even cut out triangular pieces. It is better to be careful with the last option; there is a risk of ruining the image if the angle of the cut is incorrectly calculated.

- You can apply glue to the surface, and then apply the design and straighten it with a brush. Another method would be just as good - apply glue over the design, straightening it at the same time.
- If the image is applied to an almost flat surface, you can pour glue into the center, apply a napkin and carefully disperse the composition, straightening the material over the surface.
- Perfect flat sheet You can paste the image using an adhesive pencil.
- You can apply a design using a piece of polyethylene (a bag or a stationery file). The design is placed face down on polyethylene and moistened with water. Then a bag with a wet napkin is applied to the surface to be pasted. The package is removed, the napkin remains.

A simple master class on decoupage shoe boxes
The smooth surfaces of a cardboard shoe box are an excellent basis for decoration. This interior box will become a favorite place for household little things.
| Illustration | Description of the stage |
Surface preparation 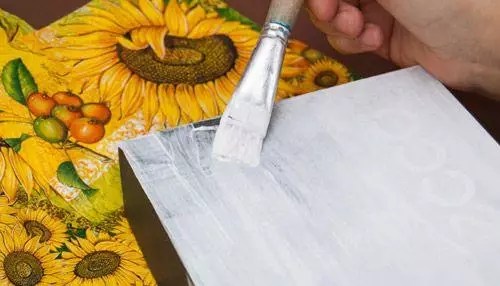 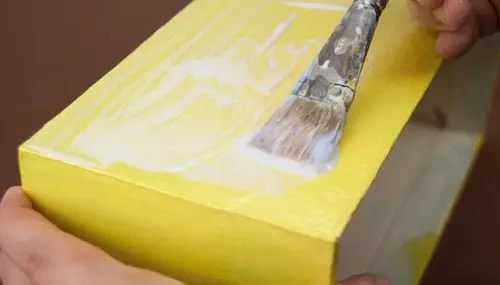 | The corners of the box need to be strengthened with pieces of masking adhesive tape, and then the surface should be primed with acrylic primer or paint. After drying, the primer should be lightly sanded with fine sandpaper. You may need to repeat the procedure if the layer does not lie flat enough. Then you need to paint the box with the color chosen for the background. |
Drawing 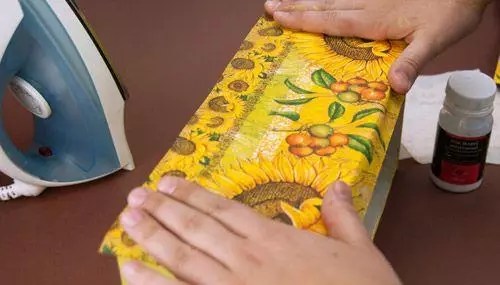 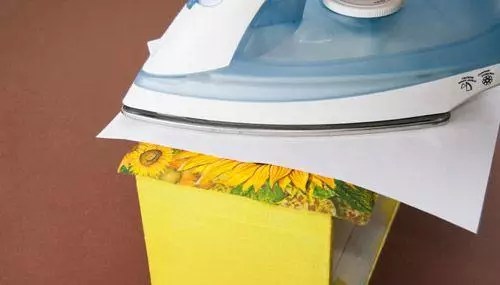 | The place for the drawing is covered with decoupage glue. After the layer has completely dried, a pattern is placed on top and smoothed with a hot iron through a sheet of paper. Afterwards the napkin is covered thin layer varnish Too much thick layer will cause the design to become covered in bubbles. This procedure is repeated over the entire surface of the box. |
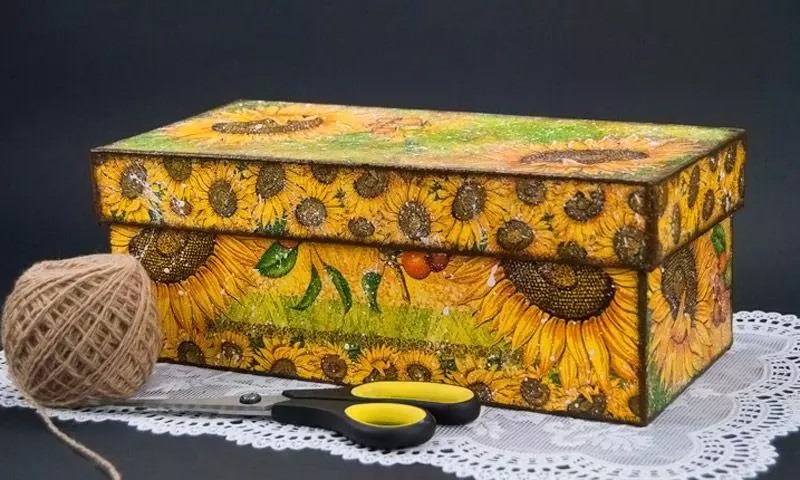
Decoration and finishing   | Using a foam sponge, apply background paint and other shades to match the image. Small details are drawn with a brush. To add some casualness, you can squirt white paint on top using the bristles of a toothbrush. Afterwards the final varnish coating is applied. |
Decoupage of furniture in Provence style: master class on updating a chest of drawers
Having tried my hand at simple things, you can safely start decoupage with your own hands using napkins. In addition to the usual list of working materials, you will need wood putty. It is used to pre-level all the cracks, cracks and other irregularities on the surface of the chest of drawers, cleaned of old paint.
Sequence of decoupage of kitchen furniture with your own hands, photo and description:
| Image | Operation description |
Preparation  | The furniture must be thoroughly cleaned of all layers, and defects must be smoothed out with putty. After drying and sanding, all surfaces are coated with a primer and sanded with fine sandpaper. |
Preparing pictures  | The design on the napkins is carefully cut out or torn off by hand, and the bottom layer is removed. The picture is coated with glue and applied to the furniture. The application is carefully straightened with a brush. |
Finish coating  | No need to hurry. All drawings must dry. You need to varnish all the furniture, not just the place of decoration. On large areas This is convenient to do from a spray bottle or spray can. This way the varnish will lay down in a thin layer. For the best effect, you need to apply 3-4 layers in succession, waiting for complete drying between treatments. |
 | Result. |
Helpful advice! If you need to apply a design to a polished surface, the polishing is pre-treated with sandpaper until the shine disappears.
When decorating furniture with fabric, the process is practically no different from that described.