How can you make a built-in wardrobe with your own hands? A detailed algorithm that will allow you to make a built-in wardrobe in the hallway with your own hands according to the proposed schemes. Make a wardrobe in the hallway.
Floor: - Walls: - Ceiling: - Wardrobe: -
30-10-2016, 16:04
Target: to place, in a narrow passage and minimal hallway space, a place to place current clothes, shoes, a small pile of accessories and a mirror for a family of 4 people. And do it as inexpensively and quickly as possible, in short, assemble the wardrobe with your own hands.
Attention: the calculation is made for a separate case. For other cabinet models, the scheme is the same, the only difference is in the costs and amount of material. To visualize and calculate dimensions, it is convenient to use our online wardrobe designer.
Tools you will need:
- drill for confirmation
- square
- roulette
- screwdriver
- level
- pencil
- Straight arms
Expenses
- cash - about 11,000 rubles
- temporary - 1 day
Materials
We go to Leroy Merlin, buy components there and cut them as needed. If Leroy is not in your city, you will have to look in local stores.
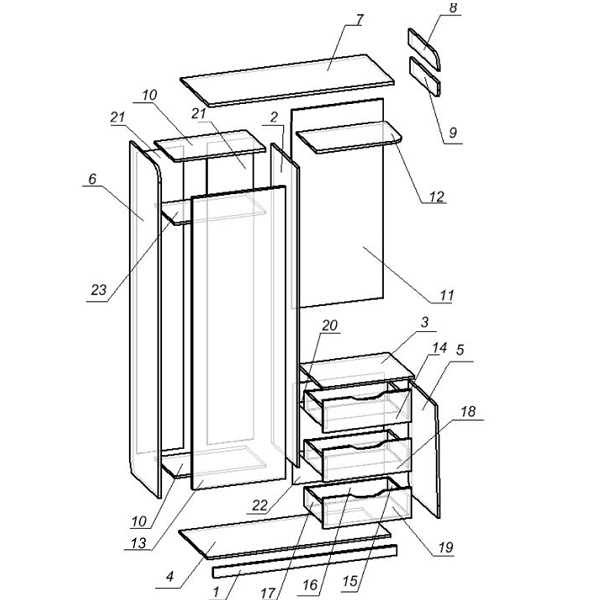
- Guide set 1383 mm - 1 piece
- Sliding door, 2455x604 mm - 1 piece
- Furniture part laminated chipboard, 1200x300x16 mm - 3 pieces, sawed exactly in half
- Furniture part laminated chipboard, 2700x400x16 mm - 4 pieces, we saw them in height, as well as two pieces for parts with widths of 350 and 366 mm.
- Furniture part laminated chipboard, 2700x300x16 mm - 1 piece
- Sectoral laminated chipboard shelf, 350x350x16 mm - 6 pcs.
- Schlegel - 5 meters, door stops - 2 pcs.
- Confirmats (a lot), 16mm screws (a bunch) and furniture corners, 30 pieces

Assembly
We do the preliminary assembly of the corner elements. We combine sheets with a width of 350 and 366 mm, as indicated in the figure, and first tighten them with confirmations. It is convenient to do this on editing table, but in its absence, stools can also be used. Here we attach the sectors with 2 confirmata on each side. To ensure an even placement of the confirmations, it is recommended to make preliminary markings. For a wide sheet, one confirmation per sector is sufficient for now. We repeat the procedure on a symmetrical element.

WITH assembled structure remove the wide (side) sheet of chipboard (it will get in the way) and place the half-assembled structures against the wall. This should be done carefully so as not to scratch the ceiling or tear off the sector elements.

Again, more specifically, we assemble the side elements. At this stage, you can attach the entire structure to the floor and ceiling, if you are confident in the accuracy of the markings. Assembling a wardrobe with your own hands does not tolerate mistakes. When fastening, be sure to check the vertical installation

We install a vertical sheet 30 cm wide in the center of the structure. We install rectangular shelves, securing them with furniture corners to the vertical risers, taking into account the fact that these shelves are installed on the same level with the sector elements, the confirmations from the sectors will be hidden.
Now you can finally attach the structure to the walls and ceiling. The structure itself is quite massive and a pair of fasteners for each vertical element is enough - a total of 6 pieces.

We install the guide under the clothes and screw the hooks for clothes. The quantity is optional, but in practice a couple of hooks are enough in the corner, and 3-4 inside half the cabinet.
Cut the guides to the required length. You will need to saw off half of the top one - in connection with one door it is not needed, and it will not physically fit. The top can be secured, the bottom can be simply placed for now, its fastening will come later. Don't forget to put door stoppers in the bottom guide

We install the door in its place. We check that the door fits well into the upper guide and does not fall out of it. To lift the door, you can place a laminated chipboard strip under the bottom guide - sheets 100 mm wide are sold in Leroy. It can be raised to a small height by adjusting the rollers. We control the vertical installation of the door and finally secure the lower guide.

Now you can attach a schlegel and a mirror to the door if desired, install the door in place and use the screws on the lower rollers to adjust its position relative to the cabinet body.

Amazing! So we assembled the wardrobe with our own hands. Over the course of a year of operation, it performed just fine.

Most pieces of furniture are quite simple in their design, which is quite reasonable. Cabinetmakers trace their craft back several centuries, but the production of furniture on a mass scale began relatively recently. And until this moment, each owner of the house made tables, chairs, beds, and cabinets independently.
You can do it yourself now. Moreover, modern tools and materials greatly facilitate this process.
The furnishings in the hallway are neither ceremonial nor universal; all that is required of it is spaciousness, compactness and a neat appearance. There is a minimum of decoration here. Well, to be honest, decorating furniture is a simple and enjoyable task.
- Chipboard – the best option For self-made wardrobe or hanger. The material is easy to cut, process, is lightweight and does not require reinforced fasteners or fittings. In addition, chipboard is very affordable.
- Plywood - although almost the same lightness, is distinguished by its high density and strength. From plywood at home you can make not only curved elements, but also ones with a slotted pattern.
- MDF is slightly inferior to plywood in terms of strength. An undoubted advantage of the material is the possibility of various processing. MDF can be painted, stained, tinted, and so on.
- Fiberboard is a material for the back walls of cabinets, cabinets, chests of drawers, and so on.
- Glass or mirror – assembling a cabinet door from glass or mirror yourself is not such an impossible task. But, firstly, you will have to purchase and cut the profile yourself, and, secondly, glass is heavy, you will need at least one assistant.
- If you decide to make a hallway from solid wood, then purchase furniture board in appropriate quantities.
- Wooden beam - any frame structure is assembled from timber.
- Edged boards - pine is most often used, as it is the most affordable wood.
TO additional materials includes plasterboard - for arranging built-in niches, and furniture edge– a required element.
Depending on the type of furniture for the hallway you will need various kinds accessories:
- guides for drawers and tires for the sliding system, if constructed;
- door hinges, locks and handles, if you plan to equip a chest of drawers or;
- hooks for clothes - this attribute is required.
The quantity and quality of fasteners are also selected depending on what exactly is being assembled:
- nails, screws, self-tapping screws;
- furniture confirmations and dowels – when assembling furniture you cannot do without wooden fasteners;
- metal and plastic furniture corners;
- stubs.
The set of tools is quite standard: a screwdriver, a drill, a jigsaw or wood saw, a key for confirmation, a mallet. If the fastening is done with glue, and this is quite acceptable, then a clamp is definitely needed. To check verticality and horizontality, you will need a square and a building level.
Photo of hand-made furniture for a small hallway (after renovation)
How to make a hallway with your own hands
The most critical stages of self-production include taking dimensions. If a mistake is made here, all the rest of the work will go down the drain.
The model of a closet, hallway or chest of drawers is carefully calculated. Can be used finished drawing, if the dimensions are suitable for the hallway. If not, and own experience in drawing business is too small, it is better to contact a specialist and get finished project to the required sizes.
Chipboard, MDF and plywood cutting and edging are offered at most stores that sell this material. This service is relatively inexpensive and will save a lot of time and effort.
Photo of a built-in wardrobe in the hallway, made by yourself

Closet
Making it yourself is both easier and more difficult at the same time. Easier, because some parts do not need to be calculated and cut out. It’s more difficult, since the cabinet is “tied” to the niche, which means the project must take into account the features of the walls and floor.
The level of “embeddedness” can be different. Ideally, this is a niche that is equipped with shelves and a bar with hangers, and a sliding system. Moreover, in this case, the sashes are mounted as interior door- to the wall and to the floor. But much more often, built-in means a closet that occupies a corner of the room. In this case, one side and back wall are missing, and often the floor and ceiling are missing.
- The basis of such a product is a wooden frame. For the case described above, two frames are required - front and side, which are assembled with screws or nails. On the frames, in places where shelves and partitions are supposed to be installed, transverse slats are fixed.
- The installation location of the frame is marked on the walls, floor and ceiling, and holes for fastening are drilled. On frame structure It is advisable to mark the places of fixation.
- First, the front frame is secured to the wall and ceiling with dowels. Verticality is checked with a level. Then install the side one.
- Inside the resulting niche, they are mounted to the walls wooden slats under the shelves. The shelves are cut out of plywood or chipboard. The parts are not secured, but simply laid on the slats. If desired, secure with nails.
- The sidewall can be sheathed regular drywall, and then paste over or paint to taste, or cover it with laminated chipboard. Here you can install rounded shelves. They are attached to wooden frame, so the strength of the skin is not important. But if a hanger bar is installed in this compartment, then the side panel is sheathed with chipboard or plywood, since drywall will not withstand such a load.
- Last to be installed sliding doors. The upper guides are mounted on the ceiling, and the lower ones - on the floor. It is very important at this moment to respect the dimensions. For reliability, use a mock-up of the door: any part the height of the door, the same sheet of drywall is inserted into the upper rail and, after checking the verticality, mark on the floor the place where the lower rail is attached. In this case, it is really better to measure 7 times.
- The sash is inserted into the upper tire under some pressure - the upper rollers allow this, and then into the lower one. The position of the door leaf is adjusted using adjusting screws. The sash should move smoothly and freely.
The described option has small sizes and a fairly simple device - only two compartments. If the hallway area allows, you can make a much more spacious structure, but in this case it is recommended to assemble the frame from chipboard, not bars, and connect the parts with a common floor or ceiling. The latter method is easier to implement. This design allows you to install not only shelves and a bar, but drawers, clothes lifts and so on.
In this case, assembly is carried out on dowels - parts with each other, and confirmations - shelves. The holes for them are drilled in advance, and then the cabinet is assembled like a construction set. The work requires not so much qualifications as accuracy and patience: a lot of holes are drilled, and each corner mount must be kept in a clamp for at least a day.
The following video will tell you how to make a built-in wardrobe in the hallway with your own hands:
Regular hallway
The standard option for furnishings in the hallway is in the form of a shelf or stand with hooks, if there is room for it. The main element here is, of course, the hanger.
The most popular and easiest to implement option is wall-mounted. This is a shield - solid or consisting of vertical slats, which is attached to the wall. A shelf for hats is a must. Such a stand is constructed from plywood, chipboard or edged boards- optional.
- At the first stage, the dimensions of the product are determined and the amount of material is calculated.
- The material is prepared for work: the boards are cleaned and sanded sandpaper or a sander. Chipboard is cut to size and edged. The undoubted advantage of chipboard or plywood here is the ability to give vertical elements different shapes, sometimes very intricate.
- The boards are opened with varnish. If you are not satisfied with the original color, then first treat it with an appropriate stain.
- According to the diagram, the vertical elements are secured to the crossbars with self-tapping screws. The shelf for hats is fixed with confirmations: holes are pre-drilled for them in the boards and at the end of the shelf.
- Secure the selected hooks for clothes. It is advisable to place them in two rows: the top ones for clothes, the bottom ones for bags and keys, or, if there are children in the house, for children’s clothes.
Making such a model original is more than simple. To do this, boards or chipboard elements are given an unusual shape, for example: slats are cut out in the form of a picket fence and secured different shapes hooks No less original is the hanger, where the base is irregular shape a piece of wood, like a cut from a trunk, and the hooks are varnished fragments of branches with knots.
In this video you will learn how to assemble a wardrobe with your own hands:
This video will help you with assembly radius cabinet for the corridor:
Corner option
With hooks it is no more difficult to make than a simple wall one. But for the stability of such a structure, it is usually assembled from solid material– Chipboard, plywood, not boards.
The classic model is a module of two parts connected at right angles, with an upper and lower rounded shelf. Rectangular shape undesirable, since the angle visually needs to be softened. Yes, and using such a shelf is inconvenient.
- Manufacturing also begins with a drawing, where the dimensions are indicated and the places where the shelves are attached are marked. The latter are installed on confirmations.
- Chipboard is cut with a jigsaw or a hacksaw and must be edged.
- Holes for dowels are drilled on the front surface of one panel and at the end of the other. At the same stage, holes are drilled for the confirmations.
- The dowels are lubricated with glue and the sidewalls are assembled. After drying, the shelves are fixed to the confirmations.
- Install hooks for clothes and bags at a convenient height.
If there is not enough space in the hallway, you can attach it to such a hanger by simply gluing it to one of the sides.
DIY corner wardrobe in the hallway

Drawings and photos
Photos various options hallways can be found in unlimited quantities. Unfortunately, nothing but appearance models, one cannot judge by them. Drawings are much more informative.
If you decide to use a ready-made drawing, then, firstly, you need to make sure that the dimensions indicated in it are suitable for the hallway. Secondly, the working diagram indicates not only general parameters, but also the distance between parts, taking into account their thickness. If the material used in manufacturing differs in size, this difference must be taken into account.
The best version of the drawing is a diagram with a dimensional table, which indicates the parameters of each part separately, as well as the attachment points.
DIY drawings-photos of hallways
 From chipboard
  Compact coupe
  With a mirror
If you're tired of constant clutter and lack of storage space, you should think about a wardrobe. The most appropriate place for its installation - a bedroom or hallway. In the article we will talk about the wardrobe in the hallway, it is a little different from the usual one.
Features of the wardrobe in the hallway
As a rule, the width of the hallway is small, so narrow furniture with a depth of 45-50 cm is installed in it so as not to block the passage. You can safely subtract approximately 8 cm from the total depth - they will be eaten up by the width of the sliding door rails. If the hallway allows it, it’s better to do standard depth a 60 cm closet to make it more convenient to store clothes on hangers.
The second difference: filling. If the main elements of filling a closet in the bedroom are shelves and pull-out laundry baskets, then in the hallway you need to provide space for outerwear, shoes, household goods and cleaning supplies.
View from the kitchen
Glossy doors with a gray-beige pattern
Section for outerwear and shoes (80 cm)
Shoe shelf
Wardrobe section (160 cm)
Household block (80 cm)
Bright wallpaper inside
View from the front door
The width of the corridor turned out to be 150 cm
View from the entrance
Filling a wardrobe in the hallway
What contents and accessories can a wardrobe have?
- Shelves can be made from the same laminated chipboard, but you don’t need to skimp on the edges: melamine won’t last long.
- Tubes for clothes are used only in cabinets with a depth of more than 500 mm (for ease of use), and the hangers are located perpendicular to the back wall.
- For wardrobes in the hallway (less than 500 mm), the use of end hangers (pull-out) will be relevant. They can be mounted parallel to the back wall, but in terms of capacity they are inferior to standard clothes rails.
- Drawers. Do not buy cheap white guides for 30 rubles, they will not allow you to open more than half of them normally. Ball slides are better (they are usually not painted), they allow the drawers to be pulled out completely without the risk of tipping over. The overpayment will be no more than 100-150 rubles. for a couple.
- Shoe net – important element each hallway. There are multi-level and retractable ones.
- one full-length side wall;
- 1-2 internal partitions the full height of the cabinet, depending on the number of doors;
- a narrow piece about 10 cm wide - to refine the remaining 3 sides of the opening (floor, ceiling and wall);
- the rest of the details for arranging the shelves (almost always a mezzanine is made for rarely used things, and the rest is optional);
- Assembly begins by installing the main walls and edging the opening around the perimeter with narrow strips of laminated chipboard.
- The frame is attached to the walls, ceiling, floor with dowels.
- The parts are assembled together using corners. If you want to do it beautifully, use plastic furniture corners that will cover the screw heads. If the main thing is a reliable result, you can use small steel angles.
- Best and modern way fastening parts to each other - use furniture bolts (Euroscrew), but they require preliminary drilling of holes, which is difficult to do by eye. To create holes, use a special confirmat drill (you can do without it, but you will have to use several drills of different diameters).
- If fastening with euroscrews is planned, furniture dowels are used for additional rigidity and preliminary fixation of parts.
- The Euroscrews are tightened with a hexagon, and plugs are inserted into the caps to match the color of the cabinet.
- When the base of the cabinet is ready, they begin to install the partitions, and then the shelves themselves.
- Corners - simple, but ugly. This method is good only in extreme cases when other types of fastening are not suitable.
- Confirmats (euroscrews) - reliable, suitable for high loads, but they are used only in invisible places, so as not to spoil the appearance with caps.
- Eccentrics are a good, but labor-intensive method, and the screw head (plug) will be visible from the bottom of the shelves.
- Shelf supports – best option, they are not visible from both sides.
Wardrobe 40 cm wide
Narrow wardrobe in the hallway
Cross rods for clothes
filling
The remaining elements, as a rule, greatly increase the cost of filling, and are rarely used.
Cabinet design

An example of filling a three-door wardrobe with an ironing board and a vacuum cleaner. When filling, the wardrobe is usually divided into zones using partitions according to the width of the doors. IN classic version The main filling space is occupied by a dressing room with a hanger bar, open and closed shelves for clothes and shoes. The rest of the space is taken up utility block for storing an ironing board, vacuum cleaner and other things.
When designing, you can use special programs like “Basis-Closet” (it’s paid, but you can find other analogues, or do a good search on the Internet), and if you want, you can actually do everything on paper.
Since usually one wall of a built-in wardrobe is a wall, you will need a minimum of parts:

An example of a built-in wardrobe with one full-size wall. The connection between the sliding door and the wall is formed by a narrow strip of laminated chipboard.
The minimum distance from the inside of the wardrobe door to the beginning of the shelf in the Aristo and Laguna sliding systems is 9-10 cm. The Versailles sliding system allows you to make shelves close to the top rail, but it is recommended to retreat at least 1 cm.

Selection of materials
For the walls of sliding wardrobes, standard laminated chipboard with a thickness of 16 mm is most often used. Of course, you can save money and use available materials, plywood and others, and then improve them: paint, glue, finish with leftover laminate, etc. But in such cases, the result will be appropriate.
To fill the blind doors of sliding wardrobes, laminated chipboard with a thickness of 10 mm is used.
The main material for making furniture is laminated chipboard; many people know about its harmful formaldehyde emissions. Edging allows you to reduce the indicator, but, of course, does not completely remove the discharge.
Many domestic producers the environmental friendliness of laminated chipboards is neglected to reduce production costs, and some of the types can exceed the maximum established concentration by up to 40 times. If we take chipboard from foreign manufacturers, for example, Egger with class E1, then they can emit up to 8 times more formaldehyde than recommended by GOST 10632-2007.
E1 class chipboards are no longer produced abroad, but only ultra-safe Super E class boards are used.
For the corridor and hallway, class E1 is ideal, but costs more than the domestic one (450-800 versus 350 rubles per square).
For doors, try to use non-marking materials. The most win-win option is a mirror, or a mirror with laminated chipboard inserts. It is better not to use sandblasting, as stains on such glass are difficult to remove.
Cabinet assembly


Drill for confirmation

Attaching a clothes rail
Fastening the shelves

Options for shelf holders made of plastic and metalShelves can be attached in several ways, we list them.
Sliding doors
The most difficult element of a wardrobe is the sliding doors. You can’t skimp on fittings here, otherwise you’ll suffer with doors jamming and falling out. In almost every city you can find domestic sliding systems from Aristo, Versailles, Polish Laguna, they are pretty good for their price.
Attaching a 4 mm mirror to a profile using a silicone attachment A sliding wardrobe in a hallway usually consists of two, less often three doors. Each door is a canvas enclosed on four sides in a frame made of aluminum profiles. It does not have to be uniform, the parts can be combined freely, and a special profile is used for joining at any angle. Standard profiles are designed for chipboard thickness of 10 mm.
A mirror 4 mm thick can also be easily inserted into such profiles, after first placing a silicone seal around the perimeter, which will add the missing 6 mm.
The main thing is to buy mirrors with a special elastic film that will hold the fragments in the event of a strong impact.
Can be ordered ready doors or assemble them yourself. There are no particular difficulties: you just need to put the material in a frame and tie it with screws.
With closed handle
The service of manufacturing custom furniture is quite popular in this moment. Compose wardrobe design You can contact any of the specialized companies. The ordering process is often long, but the result is furniture that fully meets the requirements of the owner of the premises.
You can make such a cabinet yourself.
To make a wardrobe, you must complete the following steps.
- Invite a specialist who will take measurements (you can do this yourself).
- Make drawings of the wardrobe. The project indicates all previously received sizes.
- Calculations are made of all furniture elements, the position is calculated shelves .

Decide what specific items you plan to make a closet for. Take their measurements and plan a place for them in the closet.
- When working you can use special programs for designing furniture that are available on the Internet.
- Send documents to the factory.
- Install ready-made furniture in room.

Follow the drawings very carefully and carefully, because then you will have to assemble the wardrobe exactly according to them.
How to choose doors?
This is an important element wardrobe , which must be chosen carefully. To begin with, it should be said that the framework doors can be made from aluminum or steel.

The first option is more preferable, as it is reliable and long-lasting.
In addition to this, there are different ways pendants doors . The shutters can rest on the lower guide, or hang on the upper one.

It all depends on how the coupe is used.
If we are talking about using it as a dressing room, you should choose the second option. In this case, the lower guide will not interfere with the floor due to its complete absence.

The aluminum from which these components are made has significant rigidity, so under normal operating conditions it is almost impossible to damage them.
Now it's time to choose the door material. It could be:
- chipboard;
- Mirror;
- WITH flowed with photo printing.

It all depends on your preferences, as well as the location of the wardrobe.
If you install it in the hallway, it is most convenient to choose a mirror, as this increases the functionality of the furniture.

Sliding wardrobe with mirror – stylish solution, which is suitable for any interior.
It is very important to pay close attention to dimensions product, as well as its contents. Depending on what the location will be shelves inside, the ease of use of the furniture depends. First of all, it is important to consider the methods of application wardrobe

A standard product must have several shelves, drawers, and clothes hangers.
Coat hooks are also often used. Today it is possible to use special aluminum systems for internal filling, dimensions which may be different.

When designing a compartment, you should pay attention to the number and type of items that will be stored in it.
Features of self-made wardrobes
At the coupe handmade,there are a lot of advantages. First of all, you can be completely confident in the quality of the furnishings, realize the layout shelves and hooks in the way you need.

However, the main difficulty is the compartment doors.
The following items must be purchased:
- D va bolts designed to fix the support wheels;
- P ara support wheels that will help positioning doors in the lower profile, which is a guide;
- H four screws for tightening. they are designed to connect horizontal and vertical profiles;
- P ara supports, with the help of which doors positioned at the top;
- N directly the profile itself.

Accessories for wardrobes.
Using the above items, as well as using drills of different diameters, assemble the frame doors.

Assembling the wardrobe door.
The further process is as follows.
- Think about how you will make the cabinet frame coupe . As a rule, chipboard is used for this purpose.

The main material for the manufacture of wardrobes is laminated chipboard.
You can purchase the material at specialized stores; you just need to choose a color. At the moment, there are a significant number of companies that cut chipboard to create cabinets coupe .

Usually a list of parts with dimensions is enough for you to make a cut.
Before contacting such a company, you must complete all the required calculations, determining dimensions future product.

A project is drawn up in which all the elements of the wardrobe are outlined.
- After you prepare project , it is necessary to perform “cutting”. You can often order edging of parts for a coupe from such companies. This means that sections of the material are covered with an edge: melamine or plastic.

The use of this method increases the service life of the wardrobe, making it more durable and reliable.
- You can start assembling at home coupe .

Installation of the wardrobe frame.
Using the above fasteners and tools, the parts are connected in series.

Installation of the wardrobe base.
Last to be hung doors which definitely need to be adjusted. Only in this case will they “ride” correctly along the guides.

The dimensions according to which the project was drawn up must be strictly observed.
The final stage is decorating the cabinet. The closet can be decorated in various ways.
- Glass. If the project includes this material option, you can choose matte or patterned. The glass is inserted into the door frame.

The structure does not look as massive as a regular wooden one, but it brings lightness to the interior.
- Mirror with sandblasted pattern. This is a special white pattern that is made in special chambers with sand under pressure.

This design looks original and is suitable for various interiors.
- Photo printing. If you turn on project doors with a picture, you can be sure that guests will not leave your closet unnoticed.

The photographs used to make such sashes may vary.
You can either use the database of a specialized company or use your own photos.

A film with a picture printed on it is placed under glass.
- Chipboard. The most affordable is project , which contains doors made of this material.

Everything is simple here - the canvas, the thickness of which is approximately eight millimeters, is inserted into the door frame.
As you can see, an important nuance when making a cabinet is the design. It must be drawn up in detail and carefully.

The appearance of the wardrobe and the interior as a whole depends on the project.
The layout of Russian apartments is such that sometimes you can find niches in them where a closet just begs to be. Such spaces are located in corridors, kitchens or bedrooms. You can’t put a sofa or armchairs, the corner is too far away, but installing shelves for storing things would be optimal solution. Often, owners have the idea of making a built-in wardrobe with their own hands, and this decision is completely justified. Thanks to this design, you can effectively use the niche space, and beautiful facade and false panels can not only enliven a room, but visually even make it larger, for example, if you make mirrored wardrobe doors. So, where to start if the desire to personally have a hand in improving the apartment burns in your soul. We propose to consider all stages of work point by point.
Before you get down to work, you first need to decide what material you plan to make the built-in wardrobe from; it depends on:
- how to build drawings;
- what tools are needed for installation;
- what assembly scheme to use to build the cabinet into the space allocated to it.
Depending on the specifics of the material, the process of arranging cabinets in niches can differ radically.
| Material | Degree of compliance with the task | Rationale | Solution |
| Tree | Not very suitable for built-in cabinet type. | The air humidity in the niche is higher relative to the room as a whole. Wooden parts may swell and warp. The reason is changes in humidity from the blank wall towards the doors. When you open the cabinet, the humidity changes sharply, which triggers negative processes. | Take straight-grained wood, without knots, strands, or cracks. The wood must be seasoned and impregnated as much as possible with a water-polymer emulsion or hot drying oil. |
| Lining | Limited fit. | Due to the fact that the frames of the doors will need to be made of wood, which is sensitive to moisture. | Use only when required by the interior design. |
| Gypsum plasterboard sheet (GKL) | Unsuitable as a basis, although it has great potential. | Heavy, brittle and low-strength material. For the manufacture of load-bearing structures no good. May bend under its own weight. At vertical installation deformed. | Used for finishing only. The shelves are made in the form of a box-shaped spatial structure based on a frame. Requires putty and decorative finishing. Only standard C and U profiles with standard fasteners are suitable for the frame. |
| Laminate, MDF, fiberboard | Great choice. | Simple construction design. Minimum costs. The materials are not sensitive to changes in humidity. |
Fiberboard – medium, high density. A thin bar inside a niche will quickly move. |

Wooden lining

Drywall


You will also need to purchase:
- self-tapping screws with dowels;
- guides and mechanism for sliding wardrobe doors;
- double sided tape;
- alcohol wipes for degreasing surfaces;
- friezes to the guides;
- mounting angles;
- hanging racks;
- rod holders.
Before installation, collect all the tools necessary for installing cabinets:
- electronic rangefinder or tape measure;
- level;
- electric jigsaw for cutting;
- screwdriver;
- screwdriver;
- electric drill for holes in the wall;
- hammer.
Before starting work, it is useful to look at the installation instructions for built-in wardrobes.

Rollers and fasteners


Materials
Design and drawing development
Before you take on cabinet drawings, you need to understand how to take measurements correctly. Not always the niche in which you plan to install a sliding wardrobe will have the correct geometric shape. That is why measurements in a niche must be carried out according to the following rules:
- first, measurements are taken along the back wall: at the top, at the middle level, at the bottom;
- then we also measure the “front part” with an indentation;
- height measurement also occurs in three positions from the “rear” and from the “front”.
Installing a built-in wardrobe without such measurements can lead to the fact that the body, made without taking into account errors and differences, either will not fit, or when trying to assemble the structure, serious gaps will be discovered. It will be a shame if the cut shelf turns out to be smaller the right size and just fail. Before installing, carefully calculate all errors in order to leave allowance for installation. Sometimes it happens that the end drawing of the shelves resembles a trapezoid rather than the expected rectangle. It all depends on the quality of the walls, the density of the plaster on internal corners niches.
Next we move on to the drawing. If you do not have drawing skills, it is better to contact a designer. Based on your data and wishes regarding the material, they will make a drawing of your future wardrobe in a niche. In such work, you need to remember to take into account the thickness of the material, the edges, if you want to thoroughly cover the cut points, and the margin for the mechanism of the compartment itself, which also needs to be about 10 cm.
Having in hand detailed diagrams you can be sure that the production of cabinet parts will be more accurate. Allowances left when taking into account wall errors will make the installation more accurate.
Now, as for the design of the future cabinet: without much experience in drawing up drawings and installation, give up complex radial facade designs. Here you need not just skills, but good professional experience in order to calculate and then competently assemble such a structure. Limit yourself to more simple option cabinet, which you are guaranteed to be able to control during assembly. All decorative elements Please order strictly according to the drawing.


Sawing and fittings
If you decide to assemble a built-in wardrobe yourself, leave the sawing to a professional furniture workshop. Building a high-quality drawing is half the battle; another question is whether you have the skills to cut out all the necessary parts and how long it will take you. Involving assistants in this situation is more than justified:
- furniture makers purchase materials at wholesale prices, you will have to do the same at retail prices, and this is an overpayment of at least 20 percent;
- According to your drawings, specialists using computerized equipment will cut the parts quickly and with fewer defects. Cutting on a machine is of better quality than doing it manually, even with the best saw;
- Your cuts will be edged. This will help protect parts of the built-in cabinet from moisture and excessive swelling of materials. For details that will be visible, this will give additional decorative effect. The edge can be simple or thick with chamfers.
If you take laminate or MDF for the product, then the thickness for the body should be at least 16 mm, and for the doors - 25 mm.
As for the fittings, they can be purchased at specialized furniture stores. Before you begin installation, make sure you have everything you need.

Preparing parts

Cabinet parts
Fastening the frame
Before you begin installing the chassis, it is useful to look step by step video DIY built-in wardrobe. Even professionals watch training programs from time to time. If you have basic experience, this will help build sequential algorithm actions. Detailed description procedures will indicate important nuances, which implies built-in furniture. The installation instructions will help you maintain order. installation work and get a functional result.
Built-in wardrobes are different in that they do not actually have their own frame. The floor, walls and ceiling of the cabinet are created in the niche itself. In this case, the frame will mean the false panel to which the compartment guides are attached.
When attaching such a frame, it is very important to compensate for unevenness if the ceiling, floor or walls form a slope. If this is not done, the compartment door guide will tilt and movement of the doors may become impossible.
To compensate for existing gaps, MDF or laminate inlays are used. The frame is leveled and secured with self-tapping screws to the walls along with the inlays. Decoration of cracks is carried out using friezes - decorative strips that are attached to double-sided tape or glued. The frieze is pre-cut from chipboard of the same tone as the rest of the cabinet parts with allowances, which are trimmed directly during the installation process.

Measurements and drawing

Installation of frame frames

Fastening the frame
Door preparation
For built-in furniture, doors are the facade. The most common compartment configuration is doors with guides along internal type. The drive rollers can be located either at the top (suspended) or at the bottom (thrust). Floor option characterized by quietness and greater reliability, but require maintenance. Owners will need to regularly clean the grooves from dust. The upper design of the built-in rollers is less reliable compared to the first, but does not require special supervision, since the grooves do not become clogged.
We assemble the door; depending on your choice, the rollers are attached directly to the door leaf or using special frames. It can only be attached to the canvas when wood or chipboard is used. The facade can be made of plastic, glass, plates, mirrors. Some boast a cabinet with a prefabricated front.
Most often, doors are installed along two or three parallel guides. By assembling the rails in this way, you will get several doors, which will move overlapping each other while using the cabinet. The minimum overlap for this installation when closed will be 2 cm.
If quantity door leaves if the number is even, then they are distributed in a checkerboard pattern along the guides, and if the number is even, then they can be left joined. Many consider the disadvantage of the compartment system to be the inability to gain access to the entire built-in structure at once. If, according to the description, the cabinet has doors different sizes, there is a high probability of hard-to-reach dead zones.
Another option for mounting guides is external. It is used much less frequently, since built-in cabinets do not often have space for running guides along the wall. This type of installation is suitable for samples built into a niche, otherwise the door leaves will sag. With this installation, dead zones are eliminated, but it is necessary to leave free space for the doors. If you want the doors to be removed, you will need to install a special frame. It makes sense to be puzzled by such an idea when planning a major overhaul.

Compartment door diagram
Fastening the shelves
Installation of cabinet shelves is carried out before the doors are secured. Once you have assembled the false frame panels, begin marking the interior space to secure the mounting angles. It is recommended to use a level to ensure that the cabinet shelves are installed strictly horizontally. Directly during installation, thanks to the allowances left, the parts of the parts are adjusted to the interior space of the cabinet. This is a normal procedure, but you should act carefully so as not to cut off excess:
- If the shelf is more than 800 mm long, be sure to install additional fasteners in the center area. The fact is that such a length under load contributes to the deflection of the material, so the structure should be strengthened;
- if you plan to install honeycomb shelves (lattice), use furniture clips;
- To install cross-shaped structures when dividing shelves into sections, dowels with additional PVA fastening are used.
During assembly corner models compartment, the shelves can be fastened using a stand in the corner part. This option helps to make the most of the space in the corner itself and prevent the formation of a dead zone.

Installing shelves

Shelf mounting option
Painting and installation of doors
If you plan to paint the cabinet doors, then start coloring before installing the shelves. This way, the door panels will have time to dry while you are installing the interior of the cabinet. Acrylic enamels are very good for sliding wardrobes. They give beautiful colour, shiny surface and, if necessary, easy to clean. This will be a practical choice if your closet is intended to store outerwear. Some people prefer to cover the structure with drying oil. Before painting, it is better to prime the surface, then the paint will lie evenly and adhere well.
To paint the interior surfaces of the cabinet, it is also better to choose a paint that is easy to clean and will not leave marks on things. Be sure to choose quality option, otherwise you will have to repaint the cabinet very soon.
After all the cabinet parts have dried, you can install the doors in place. If there is no misalignment during installation of the guides, the mechanism will move smoothly, without jamming.

Fastening the guides

Door installation
Light and finishing
After the cabinet structure is completely assembled, it is necessary to take care of the finishing department and lighting arrangement. Make sure that there are no defects on the internal surfaces of the cabinet structure that could later lead to damage to things. Close all screw caps and eliminate cosmetic defects.
For large closet lighting is required. It is recommended to use for illumination LED devices. They save energy, do not heat up and will not burn things when heated. At the same time, they provide enough light so that you can easily find the right thing inside the closet.
Self-production of a sliding wardrobe built into a niche good idea for lovers self-assembly structures that will not only be able to take measurements and draw up a drawing, but also read it when they receive it from a specialist. Despite the apparent simplicity, the work still requires certain skills, so the decision to independently furnish a niche with a closet should be approached responsibly. Sometimes independent work It may come out cheaper than the work of professionals and vice versa. The video will help you make such built-in wardrobes with your own hands, and the installation process is not as complicated as it might seem.
