How to build an attic floor with your own hands. The design of a gable mansard roof: how not to make mistakes during construction
Attic in a private house - perfect solution to expand the living or useful utility area without adding an upper floor. Arrangement of the attic in attic space– this is an original and new exterior of the house, saving energy through reducing heat losses in the roof, and increasing living space. But big sizes at home is not a reason to start work on arranging the attic: you need to have a foundation with a sufficient margin of safety for the weight load, since the finished attic space will have to be completely redone.
Features of the attic
The main thing that distinguishes an attic from ordinary rooms is that it has almost no walls in the usual sense, since the walls are a modified rafter system constructed from many inclined roofing surfaces. Therefore, the design of the window will be very different - it should not interfere with natural light, and must take on loads in the form of precipitation and strong wind - the impact of weather conditions on sloping roof stronger than on massive building elements.
Important! SNiP regulations stipulate that the area of the window opening should not be less than 10% of the floor surface in common area. Therefore, when dividing an attic space with partitions, it is advisable to also make a window in each newly formed room.

It is easier, cheaper and faster to install inclined windows in the attic roof than to make a special vertical projection under it, violating the design calculations. In any case, the window opening must be waterproofed or a window with reinforced glass and a reinforced metal-plastic profile must be ordered.
Advantages of installing a tilted roof window:
- A large flow of natural light, smoothing out chiaroscuro;
- There is no need to radically alter the shape of the roof or change its relief;
- Simple installation, feasible for the owner himself.

The degree of illumination depends on the area of the opening, which is proportional to the angle of inclination of the roof. Therefore, the conclusion is obvious: the steeper the sloping attic roof, the wider and higher the window opening should be. The thickness of the metal-plastic profile should almost fit into the distance between the rafters, so that there is something to attach the window to without destroying the rafter system. If you order a wider window, you will have to make a reinforced lintel that fastens the rafters cut at the place where the window is inserted. If you need to install a wide window, you should first think about the option of installing two small adjacent windows so that the roof remains solid. 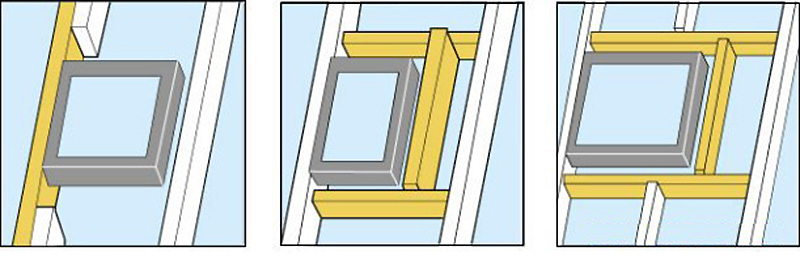
When installing a dormer window (a vertical dormer window that requires the frame to be moved outside the attic), the geometric shapes of the roof must be complicated by installing the top and side valleys, and the installation or installation also becomes more complicated roofing. Ready system It is much more difficult to redo the rafters than to install a new attic window in your individual one. Valleys must be carefully waterproofed, since their location and geometry relative to constant atmospheric influences make these places most vulnerable to the penetration of moisture and cold. In regions with high average annual precipitation, it is recommended to install snow guards over dormers. But the main advantage of a dormer is that you can stand next to it in full height- outweighs all eliminated shortcomings.
A window recessed into the roof is made if access to the balcony is provided through this window. In other cases, this is an unattractive option: poor natural lighting, unjustified complication of the roof geometry, high labor costs with minimal effect. 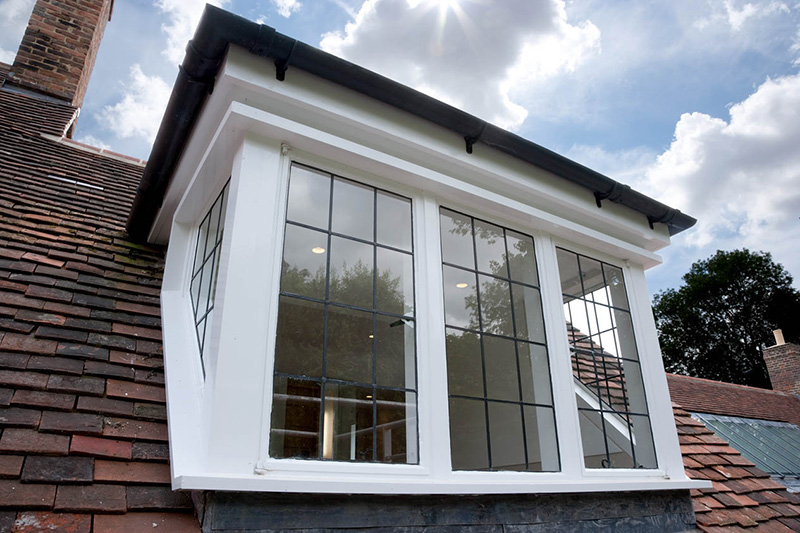
Most affordable option- a window at the end of the attic - cheap and practical solution, which can be fully implemented without outside help.
Attic rafter system
IN individual construction a house with an attic is often built with a sloping roof, although this is an expensive solution. Broken mansard roofs, due to their design features, greatly increase usable area interior spaces of the attic. With the same width of the foundation of the house and the floor, the rooms in such an attic will have a larger area due to the projections and niches than the rooms under the roof conventional design. 
The standard design of a sloping roof allows you to lower the eaves overhangs much lower, not only making the exterior of the house very original - such overhangs protect the walls and foundation of the house from wind and moisture, directing precipitation away from the home.
The more difficult sloping roof with your own hands, the stronger the dependence of the reliability of the structure on the materials from which the roof is made, on climatic conditions, on the thickness of the beams rafter system and other factors. The classic do-it-yourself mansard roof, drawings of which are given below, has a slope ratio of the lower slopes to the floor of 60°, and the upper slopes of 30°. 
SNiP stipulates comfortable height ceilings in attic rooms- at least 2 m. Therefore, a scheme with a roof slope of 600 is completely justified, and the reliability of the structure is ensured by thicker floor beams and rafter beams than with a conventional arrangement gable roof.
In the classic construction of an attic, the force of the wind and the load from the weight of snow on the sides of the roof with a large slope are not taken into account. Snow will accumulate on the upper surface of the roof, made with a slope of 300-450. The greater the angle of inclination of the roof, the stronger the windage of the roof, so in climates with strong winds it is necessary to build roofs with a small slope, and this poses a problem for arranging an attic - the area of the house in such conditions should be quite large.
Sloping roof schemes
The frame of a sloping roof is constructed from first or second grade pine lumber. To carry out calculations, parameters such as the cross-section of timber and sheathing boards, the dimensions and weight of roofs made of various building materials, snow and wind loads, and the spacing of rafters are regulated. 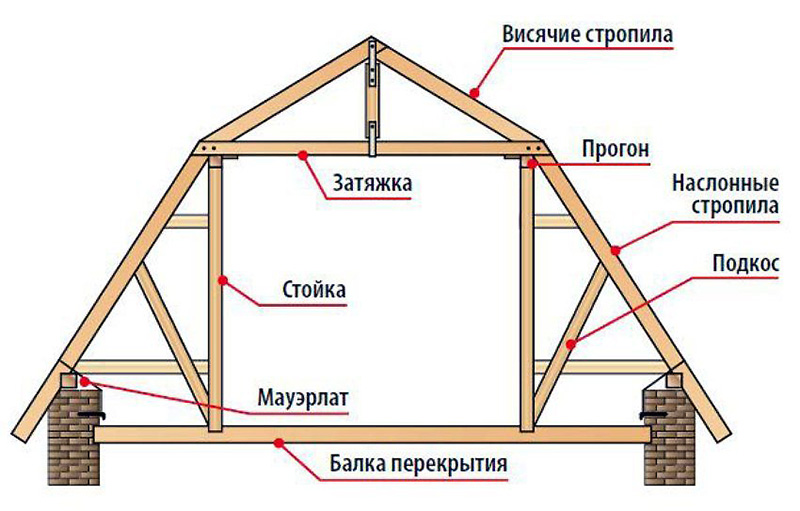
A roof design with a hanging rafter system is justified if the base of the triangle (top in the figure) has a size of ≤ 4.5 m - this determines the width of the attic. If the width is greater, then layered rafters are installed, which are mounted on the wall.
How to calculate a broken type roof
The pitch between the rafters is often determined by the width of the insulation - this solution allows you to save on roll materials, and the distance between the rafters is selected 2-3 cm less than the width of the insulation material. For example, with a mineral wool slab width of 60 cm, the distance between adjacent posts should be 57-58 cm. 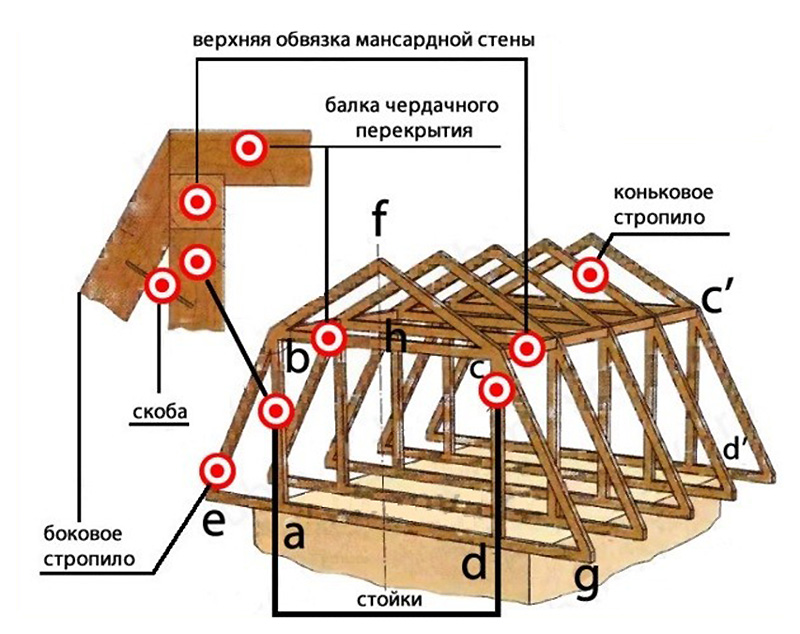
The rafter boards are also calculated in width based on the insulation parameters. To ventilate the layers of thermal insulation, it is necessary to provide a ventilation clearance of 20-30 mm, otherwise the accumulating condensate will cause rotting of the wood, and then damage to the insulation. For conditions middle zone the thickness of the insulation can be no more than 230-250 mm, therefore the minimum width of the rafter legs is 230 mm with a board thickness ≥ 50 mm. The greater the wind, temperature and snow loads in the region, the thicker the rafters should be made. 
We recommend: To save lumber, insulation can be laid in two directions: along and across the rafters, making a thin and sparse sheathing between the layers. At minimum thickness slabs basalt wool 100 mm, you can use a 50 x 150 mm board, leaving a 50 mm ventilation gap.
Installation of attic roof
The mauerlat on the attic roof is equipped with standard techniques - fastening the timber to the wall with tying wire, anchors or studs. If the house is made of timber or logs, then the upper crown of the log house, impregnated with an antiseptic and substances that increase the moisture resistance of the wood, can serve as a mauerlat. 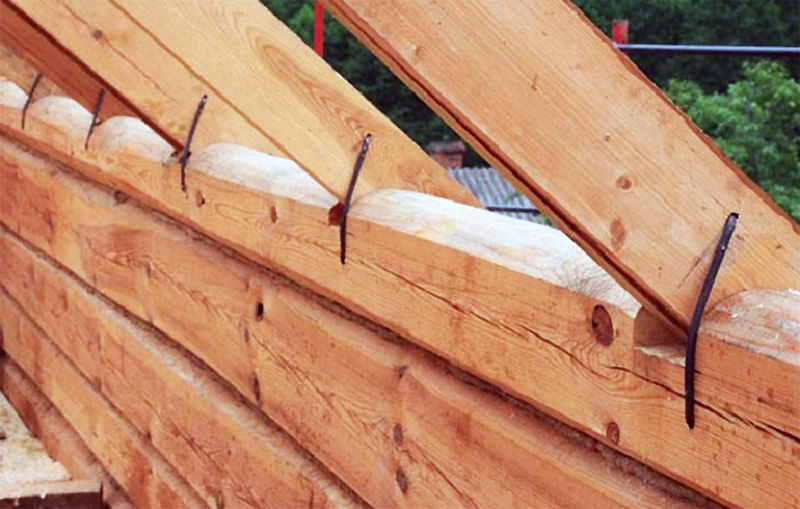
For a Mauerlat in a house made of cellular concrete A monolithic reinforced grillage is poured on top of the walls, and the Mauerlat itself is attached to rods concreted into the wall. For walls made of brick or reinforced concrete, there is no need to make such a concrete grillage - the wall material itself is quite strong and will withstand any method of fastening the rafter system. It will only be necessary to make two-layer waterproofing around the entire perimeter of the house, and the Mauerlat beam with a cross-section of 150 mm.

To assemble elements truss structure use long nails - 150-200 mm. At corners and at the intersections of load-bearing walls with internal partitions at home it is better to make bolted connections, or use double-sided threaded rods. It is also recommended that all intersections of roof elements be additionally reinforced with metal plates. 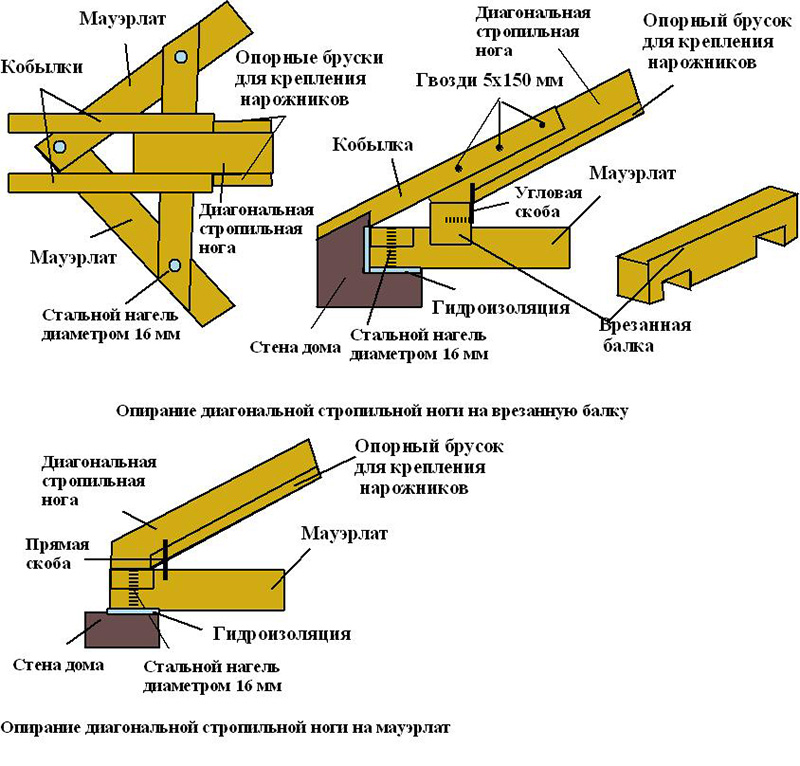 Assembling elements of the rafter system
Mansard is the roof under which the living rooms. The shape of the attic roof can be different, but most often the attic is equipped under a gable roof. The most rational solution to obtain the maximum usable area of a residential attic is a mansard roof with a broken slope line.
Construction stages mansard roof with your own hands are in many ways similar to the construction of a conventional one, as well as the names of the elements that make up its frame. These include:
- Mauerlat - a support beam that transfers the load from the rafters to the walls of the building;
- Floor beams - boards that form the attic floor and the ceiling of the lower floor;
- Racks – vertical supports supporting the rafter system;
- Purlins – horizontal supports for rafters;
- Crossbars are transverse horizontal elements that tighten the roof slopes together, otherwise they are called puffs;
- Rafters - boards that form the main contour of the roof;
- Suspension - a suspended rack that supports the tightening and redistributes the load between the rafters;
- Lathing - boards or sheets of plywood designed for laying roofing on top of them and transferring the load to the rafter system;
- Rabs are boards fixed along the axis at the bottom of the rafters and designed to form a roof overhang.

The cross-section of roofing elements is determined using calculation; the article presents the most commonly used materials in private construction.
Construction of a sloping mansard roof and its differences
As already mentioned, a roof with broken slopes is somewhat different from a simple gable roof. The difference lies in the shape of the opposite slopes: they are not a straight line, but consist of two connected under obtuse angle stingrays The roof can be either symmetrical or have different shape opposite slopes - it depends on the project.
Thanks to the broken shape, the usable volume significantly increases attic room. The lower part of the rafters is usually installed at an angle of about 60 degrees to the horizontal, and support posts supporting these rafters play the role of a frame interior walls. The upper part of the rafters is most often installed at a slight angle, from 15 to 45 degrees - this allows you to save materials, but maintain the functionality of the roof and its resistance to snow loads.


Vertical posts resting on floor beams, purlins and tie rods connecting them form a parallelepiped that limits inner dimensions attics. To give the structure additional rigidity, struts are installed between the floor beams and the lower rafters. After installing the upper rafters, hanging supports - headstocks - are installed to strengthen the truss and eliminate sagging of the crossbars. To further strengthen the lower rafters, they are pulled together with the racks using contractions. The elements are fastened using nails and bolts or studs.
Calculation of the dimensions of the attic roof
The main condition for a comfortable attic installation is the ceiling height - it should not be lower than 2.5 meters. To ensure such a height of the room, the break line of the attic roof must be at a height of at least 2.8 meters, taking into account the thickness of the insulation layer and internal lining attic, as well as the thickness of the finished floors.
Before you start purchasing materials and building a roof, you need to draw detailed drawing, which will indicate dimensions houses, slope line and attic height.

Drawing - dimensions of the attic roof
Technology for constructing a sloping mansard roof
- Install a Mauerlat around the perimeter of the house. IN wooden buildings The mauerlat is the top beam or log. In stone - brick or block - buildings, the mauerlat beams are attached to studs or anchors, fixed in the walls during laying at a distance of no more than 2 meters. Align the Mauerlat along the inner plane of the wall; the remaining wall outside is laid later decorative masonry. Mauerlat timber made from dry softwood usually has a cross-section of 100 or 150 mm. The timber is sawed off to the required length, the anchor pins are straightened if necessary and the timber is placed on top of them. Tapping lightly with a hammer. Indentations from the studs remain on the timber; a hole of the required diameter is drilled along them. You can also mark the timber using a tape measure, but the likelihood of error in this case is higher. Placed on the wall roll waterproofing, you can use regular roofing felt in two layers. The Mauerlat is put on the studs and the nuts are tightened.

- For floor beams, coniferous timber with a section of 100x200 mm is usually used. The floor beams are placed either on top of the mauerlat, extending 0.3-0.5 meters beyond the plane of the walls, or in specially designed pockets in the masonry. In the first case, the beams are secured using corners and self-tapping screws. To make the ceilings even, the beams are laid in strict sequence: first, the outermost ones in level, then, by pulling the string, the intermediate ones are aligned along them. The pitch of floor beams is usually from 50 to 100 cm, but the most convenient is a step of 60 cm, which allows you to lay insulation boards without trimming. To level the height of the beams, they are propped up or linings from the board are used. If the beams are placed in special pockets in the masonry, their ends must be processed coating waterproofing and wrapped with roofing felt. Align them in the same way.
- Racks are installed on the outer floor beams. The outer racks are made of 100x150 mm timber; the height and installation line of the racks are determined according to a previously prepared drawing. The racks are leveled using a level and plumb line and temporarily secured with jibs in perpendicular directions - along and across the axis of the roof. This will allow you to install the racks without deviation in any direction. The jibs are made from any board and nailed. A string is pulled between the outer drains and the remaining racks are placed along it with a pitch equal to the pitch of the floor beams, that is, on each beam. All racks are secured in the same way as the outer ones. You should end up with two rows of posts of the same height, running parallel to each other.
- Purlins from 50x150 mm boards are laid and secured on the racks, the purlins are secured to 150 mm nails and to corners using self-tapping screws. Place crossbars made of 50x200 mm boards on the purlins with the narrow side down - this will increase their rigidity. Since there will be no load on the crossbars during operation, such a section of the board is quite sufficient; however, in order to prevent their deflection and increase reliability during the installation process, when installing the crossbars, temporary supports made of boards no thinner than 25 mm are placed under them. The top of the crossbar is fastened with one or two boards - also temporarily, until the rafters are installed. In this case, the boards should not be placed in the middle of the tightening - there they will interfere with further installation, but retreating about 30 cm. After installing the racks, purlins and crossbars, you get a rigid structure that limits interior spaces attics. To increase its strength, it is subsequently secured with struts and contractions.
- Installed from 50x150 mm boards. First, a template is made from a 25x150 mm board - it is easier and faster to process. A board of the required length is applied to the upper purlin, the shape of the cut is drawn directly on the board and it is cut out. Apply the template to the purlin in the places where the rafters are installed, and if it matches everywhere, then top part All rafters can be made according to a template. The lower part, resting on the mauerlat next to the floor beams, is cut out in place each time. The rafters are secured using corners and self-tapping screws and nails.

- To make the upper rafters, you need to mark the center of the roof. This can be done using a temporary stand nailed to the Mauerlat and an extreme tie from the end of the roof so that one edge of the board runs along the center line of the roof. The rafters are aligned along this edge. Next, prepare a template from a 25x150 mm board, placing it at the edge of the installed board at the desired level and to the purlin on which the lower rafters rest. Mark the upper and lower cuts and cut out the template. Apply it alternately to both sides of the roof, checking how accurately its center is marked. If the rows of racks are made in parallel, then there should be no problems with installing the upper rafters - they will all have the same size.
- Perform according to the template required amount rafter legs. The rafters are installed on purlins and connected at the top using overhead metal plates or cutting boards with self-tapping screws. In the purlin, the rafters rest on the notches and are secured to the corners. In order for the rafters to stand straight, they are secured using struts, installed with the lower end on the ties. This is how all the rafters are placed. Attach hanging racks - pieces of board 25x150 mm. The upper edge of the board is fixed at the junction of the rafters, the lower edge - to the tie.
- Place struts under the lower rafters from a 50x150 mm board, resting them with the lower oblique cut against the floor beam and securing them to the corners, and attach the upper edge to the side of the rafter leg, nail it to one or two nails, and then drill through hole and secure it to a bolt or stud. After installing the lower struts, remove all temporary supports and posts.
- Sew up the gables, leaving door and window openings. If the floor beams are laid in wall pockets, fillies are attached to the lower rafters - boards that continue the line of the rafters and form the roof overhang. When laying floors on top of the mauerlat, the beams already protrude to the required distance, and there is no need for fillers.
- , corresponding to the type of roofing - continuous or sparse. Waterproofing is placed on the sheathing and installation of the roof covering, for example, begins.

A broken attic roof usually does not need insulation - only the walls and ceiling of the attic are insulated. The air space created under the rafters ensures good ventilation of the attic, reduces heating of the attic rooms in the summer and provides additional thermal insulation in the winter. Therefore, when covering the gables, it is important to leave ventilation windows in the upper part of the roof, above the attic floors.
Video - instructions for constructing an attic roof
The attic design of the attic space allows not only to increase living space home, but also to make the building unusual and beautiful. Moreover, a building with this type of roof can be made in almost any style. Roof mansard type, the execution options of which can be very different, are found both in urban areas and in rural areas. Let's look at how to create such a design yourself, and find out what its features are.
Mansard roof - options
This roof has special design slopes, usually consisting of an upper flat part and a steeper lower part. Thanks to this shape, a fairly spacious room appears inside, which can be used as an attic or even turn into a very cozy living room.

The history of attics began in the 17th century, such a roof design was invented by the architect Francois Mansart - it was a derivative of his name that such a roof was named. But this Frenchman was far from the first to implement the idea of economical use of the attic floor of the house. The mansard roof was first built by Pierre Lescot, also a Frenchman, who worked on the construction of such famous buildings as the Louvre and Notre-Dame de Paris.
On a note! In the 19th century, poor people usually lived on attic floors, but now this floor can appear in the housing of fairly wealthy people.

Nowadays, attics are quite often constructed during construction. country houses or small two-story cottages, but the idea may well be implemented when creating other types of buildings. The attic has a number of advantages:
- it is cheaper to build a house with an attic than with two full floors and a roof;
- foundation costs during the construction of such a structure are also reduced;
- an attic can significantly increase the living space of any building;
- it gives the house an unusual and beautiful look;
- it is not difficult to build the structure, the work can be completed quite quickly;
- the attic is always associated with comfort;
- a house with an attic is warmer by reducing heat loss through the roof.

But attics also have several disadvantages. This type of attic space has sloping ceilings, which results in low wall heights, making it difficult to choose furniture. Also, the roof must be well installed so as not to leak and not let heat out of the house - you will have to spend money on good hydro- and thermal insulation materials. And building attics is still more difficult than, for example, a regular gable roof.

Design Features
The attic is a universal element. It was also used for ordinary houses, and for the construction of country houses, often this type of attic space was chosen even for the construction of palaces. Of course, it could decorate workshops, commercial buildings, etc. And despite the fact that they were used for its construction different materials, were chosen different styles, the attic still remained an attic - it has certain design features.

So, this building may have different geometric shape– triangular, broken, have symmetrical or, conversely, geometrically complex and non-standard slopes. It can be located both across the entire width of the building, and only on one side of it relative to the longitudinal axis.

On a note! If the roof has a broken shape, then the lower part will have very steep slopes with an inclination angle of about 60-70 degrees, and on the top the slopes, on the contrary, will be flat (about 15-30 degrees).
But whatever the attic, it will be located within the walls of the main building. In relation to the external walls, the attic may be slightly wider, but then it rests on the ceiling extensions. If the offset is large, then you will have to install additional supports (for example, columns, walls, etc.).

Height mansard roof it cannot be less than 2.5 m, otherwise it will not be possible to create a spacious room under it. Windows, which also need to be provided here, will be manufactured using special technologies using durable tempered glass and a reliable frame. They will cost several times more than usual. And supporting structures can be made of reinforced concrete, metal or wood. But in the case of the latter, it is important to carefully consider fire safety measures.

The mansard roof is a multi-layer structure, which complicates installation. It can be insulated completely or only in the area where there is a living room - where there is heating. But in any case, the design of the attic implies the presence of rafters, a ridge, the roofing material itself, thermal and waterproofing, and a vapor barrier layer. The interfloor ceiling will serve as the foundation under the roof.
Rafters for an attic roof must have good load-bearing capacity. The cross-section of the materials used will depend on the angle of the roof slope and cannot be less than 5x15 cm at a pitch of 100 cm. If the slope angle is 45 degrees, then a pitch of 140 cm is maintained.
Attention! In areas where it snows frequently and the amount of precipitation is high, it is recommended to install rafters at intervals of no more than 80 cm.

If the attic will be used as a living space, it is important to consider that in this case there is a risk of formation large quantity condensation under the roof. Because of this, pockets of mold may appear inside the structure, fungus may develop, etc. The presence of a large amount of moisture will also negatively affect the insulating properties of the material. That is why it is important to follow all the rules for installing an attic roof, and thermal insulation material must be reliably protected from moisture not only from the outside, but also from the inside, that is, a layer of vapor barrier material is also located on this side.

Important! Don’t forget about creating roof vents that will allow air to circulate quietly inside the roof structure and help remove condensation.

Types of mansard roofs
There are 4 main types of mansard roofs, which differ from each other in their design features. They can be divided into single-level and two-level. The first ones are the simplest to implement, usually combined with a broken line or gable roof with a slope angle of 35-45 degrees. The second involves the arrangement of two rooms at different levels. A mixed support system is used here.
On a note! When building an attic under a gable roof, the height of the walls can be no more than 1.5 m, followed by sloping ceilings. With a broken-shaped roof, the ceiling height along the perimeter of the walls is up to 2.5 m.

When building a house, you can choose one of the types of attics - a single-level attic with a gable roof, a single-level with a sloping roof, with external consoles, or a two-level with a special mixed type of supports.
Table. Main types of attics.
| Type | Description |
|---|---|
| In this case, the attic has one level and is located under a regular gable roof. The simplest option, the design of which does not require the use of complex calculations. Rainfall with a simple gable roof goes away on its own, there is no need to equip any additional elements. |
| In this case, the attic also has one level, but the rafter system is performed differently. It looks like four roof slopes are formed. A much larger room can fit under it, but creating such a roof is more difficult. |
| Of the single-level attics, this is the most difficult option. Here the room under the roof is even more spacious. Usually in this case the attic room is shifted to one of the edges of the house. This design allows you to make large vertical windows on one side. The main disadvantages are the complex shape and the complexity of construction. But under the edge of such an attic you can make a functional canopy where a terrace, garage or other extension can be located. |
| The most difficult option is the attic, since at least two rooms under the roof are arranged here, located at different levels. When designing a house, such a design immediately becomes part of its structure. |


The attic roof can also have a balcony. It is created according to the principle of window construction. The main thing that load bearing capacity walls made it possible to equip it. By the way, the balcony can also be supported by columns, but in this case it is built above the entrance.

Types of rafters for attics
Rafter trusses can be of two types - and layered. You will have to choose between them depending on the method of attachment to the walls of the house. Hanging ones are simpler and are usually used for houses that do not have a middle load-bearing wall. The rafters rest only on the main walls of the house, without intermediate supports. The width of the span between the walls cannot be large - usually it does not exceed 6 m. If the span is larger (over 9 m), then it will be necessary to install struts and headstocks.

Layered rafters are usually used to create houses with two spans, that is, those that have a load-bearing wall in the middle. In this case, the rafters have three support points - directly this wall, as well as the main ones around the perimeter of the house.
Material for the manufacture of the rafter system
Rafters can be made of metal, reinforced concrete or wood. Each material has its own advantages and disadvantages. Wooden rafters are environmentally friendly, they are easy to use, and can be easily adjusted to the desired size. But wooden structures They are afraid of excess moisture and are susceptible to the formation of mold and mildew.
On a note! Before construction wooden materials it is recommended to process protective compounds, which will extend their service life.

Metal and reinforced concrete structures You can not cover them with such compounds - fungus and mold do not appear on them. Due to this, they are considered more reliable and durable. But the main disadvantage is that, if necessary, adjusting them on site to the right sizes It will be difficult, and the slightest error in the calculations can lead to the roof being skewed. Also a master who works with reinforced concrete or metal rafters, may encounter other difficulties - this is a large mass of products, which forces the use of special equipment even to lift elements.
Difficulties and features of arranging an attic roof
When designing and constructing an attic roof, a number of design features should be taken into account, based on which a number of operating rules are formed. For example, the power plate must be secured very securely anchor bolts. It is he who will experience the maximum load, and therefore support the entire roof. It is additionally recommended to wall up the anchors cement mixture, if the main walls of the house are made of stone, brick and other similar materials.

It is also important to remember correct design and layers of the roof. For example, mansard roofs cannot be covered with metal roofing materials. They get very hot and on the top floor in the summer it will be too hot, there can simply be no talk of any comfortable living. It is not recommended to use roofing felt as a waterproofing material - when heated, it begins to smell specifically. It is best to cover the attic roof with slate or soft tiles. For thermal insulation, it is usually recommended to purchase mineral wool, which is laid waterproofing film on both sides.
Attic insulation calculator
It is difficult to imagine the modern design of a cottage or house without the presence of an attic floor. It is also being built everywhere in old houses in place of a dilapidated attic, thereby increasing the total living space. A do-it-yourself attic is a complex project, but doable.
Do-it-yourself attic construction - first steps
In fact, this is not so - most specialists in the field attic construction unanimously agree that from the angle of inclination and other changes in the design of the rafters, the walls experience enormous load and are subject to significant deformation. Therefore, before making an attic yourself, we highly recommend contacting a specialist so that he can carry out preliminary calculations and, based on them, draw up a design for a rafter system that is suitable in your case.
Construction of houses with an attic - choosing the right technology
Today there are quite a lot of buildings that have a clearly defined attic. This or absolutely new house, where the attic was designed in advance, or it was attached to an old building, which was originally thick-walled and solid. The easiest way to recognize an attic is by its gable sloping roof - this is the most suitable design for the construction of an attic floor.
The use of a gable sloping roof on the walls of a house compared to pitched roof exerts a huge burden. However, for an attic room it is much more convenient, since it creates a lot of space inside.
The gable broken structure has a drawback - in the absence sufficient quantity load-bearing supports, the roof is less strong compared to a single-pitch roofing system, and additional load-bearing supports put additional pressure on the walls. The construction of a gable sloping roof, as a rule, requires the use of layered rafters, which require massive building walls that can withstand vertical and horizontal loads.
How to build a house with an attic - roofing system
The convenience of the attic space determines the ability to move at full height under the rafter system. Please note that for insulation you will need to allocate from 10 to 15 cm from each surface, including the ceiling. So the first impression about the height of the attic may be wrong. However, the safety of the entire structure should be put in the first position. To install additional reinforcing beams, it would be correct to cut off some part of the attic rather than risk destroying the entire roof frame.
Before building a house with an attic, prepare necessary tools and materials. With tools, everything is simple: a hammer, a hacksaw or a jigsaw, all kinds of measuring tools. Materials - nails or screws of various lengths, antifungal agent, 40 * 150 mm board for lathing at intervals, for creating a continuous sheathing - OSB sheets.
The type of roof covering determines the design of the sheathing. If you plan to use soft material for the roof, then the best option there will be a continuous sheathing, and if it is hard - by force own hands The sheathing is installed in a staggered manner. In the process of installing a wooden frame (rafters and sheathing), you should immediately make places for the location skylights. It is also necessary to think in advance about reliable fastening window frames
Attic in a private house - auxiliary elements
There are primary and secondary elements of the attic. The first includes insulation, rafters and supporting structures, and the second includes windows, doors and drainage systems. Both of them play important role. The hardest thing can be to decide on the windows. Before you start choosing windows for the attic, you need to clearly understand their purpose in terms of functionality. Today, the building materials market offers the buyer two types of windows - inclined and vertical.
It is known that the first ones are mounted directly in the roof plane and transmit 40–45% more natural (sun) light than vertical ones. But in winter, the slanted windows are covered with snow, which negatively affects both the overall illumination of the room and their technical condition. The doors to the attic act as a kind of connecting link between this room and the main building. They should be selected according to two main criteria: the first is strength, the second is good properties thermal insulation.
In addition, the doors should not stand out from general interior and through them there should be a free entrance to the attic. Creating an attic with your own hands is impossible without a drainage system. In this regard, with vertical windows much simpler, since they come complete with ebb and flow, but when installing inclined windows, you need to carefully consider the gutter system in advance, otherwise the room located under the attic will constantly experience negative impact excess water and moisture.
Do-it-yourself attic - thermal insulation of the room
Considering that the roof slopes are directly affected by atmospheric temperature changes, the attic room must be carefully lined with thermal insulation. It is even more necessary if the roof is covered with metal slate or metal tiles. One of the thermal insulation options is mineral wool slabs, which have a fairly high density and thickness.
This material is environmentally friendly, and also has excellent heat resistance, maximum fire resistance and is easy to install. When laying thermal insulation, you need to create some distance between the roof itself and the insulation; this gap should be left to ensure natural ventilation layer of thermal insulation. Best thermal insulation is considered external - in this case, a layer of insulation, together with a vapor barrier and waterproofing, is laid on top of the rafter system, before the roofing material is installed.
This method allows you to achieve a monolithic coating and avoid the appearance of cold bridges. However, home owners do not always have the opportunity to carry out insulation before laying the roof. In such cases it is used internal insulation. The material is laid in the spaces between the rafters ( mineral wool, polystyrene foam, polystyrene foam) or sprayed onto all structural elements (ecowool, polyurethane foam).
IN modern world efficient use everyone square meter living space is quite understandable, which is why many people who want to acquire their own private home plan to build an attic at the design stage. Also, do-it-yourself renovation enthusiasts often convert an old attic into attic floor or adding an additional extension to an old house.
So that the attic, built with your own hands, turns out to be reliable and does not place unnecessary loads on load-bearing walls buildings or foundation, you need to be aware of all the specifics design features add-ons this type. Next, we will try to understand the types of attic floors, the specifics of its construction, examples of photos, structures of this type, as well as the main stages of how to make an attic.
Main types of attic structures
The construction of an attic, as in principle, any other construction with your own hands, begins with choosing the type of structure for this room that is most suitable for the main building. At the same time, the attic may differ structurally according to the type of roof: single-pitch, gable or sloping roof. If speak about appearance attic structure, then it directly depends on the materials used during its construction. At the same time, depending on the design features of the main structure, the following types attic premises:

Features of the attic space
 Every person who is faced with the construction of houses knows that the main building is placed on a foundation, which is calculated based on the mass of the structure. If the attic was brought into general project, then the additional load from it is already included in the foundation parameters. In such a situation, an additional floor can be erected from any available material.
However, if this was not done, that is, the construction of the attic occurs after the construction of the main building, then it is necessary to calculate the additional load on load-bearing structure premises and foundation. This is necessary to ensure that the mass of the attic floor does not damage the building. Therefore, to construct a room of this type, lightweight building materials should be used: wood, aerated concrete or sip panels.
You can build an attic with your own hands from various building materials , but if you look at it, then, in fact, such a superstructure is nothing more than pitched roof, resting on load-bearing walls. Of course, each attic floor system is very different depending on the design features of its construction, but in general it consists of the following standard elements:

I would like to note that according to the standards prescribed in SNiP minimum distance from the floor surface to the highest part ceiling structure, must be at least 250 cm. If the height parameters do not correspond, then such a room is considered an attic.
How to build an attic - construction technology
The most important thing when building an attic floor with your own hands is rationally provided insulation, ventilation and compliance with all technological processes taking into account the drawn up floor plan. In this case, all wooden parts of the structure must processed by means, protecting them from moisture and fire. In order for the attic floor to stand for many years, you must adhere to all the rules and conditions for its construction:

Step-by-step instructions for building an attic with your own hands
Because of technological features attic design; its construction with one’s own hands is accompanied by certain difficulties. When drawing up a drawing of such a superstructure, it is necessary to make calculations take into account all possible loads, the angle of the roof slope and the permissible weight of the room. In this case, all stages of work on the construction of the attic floor will occur in accordance with the plan.

Features of an attic extension to an old building

If an attic was planned, the construction of which will take place on a building of an old structure in order to obtain additional living space, then it would be advisable to dismantle old roof. Also during the construction of a new roofing system it is necessary to correctly calculate the load on the load-bearing walls and foundation of the house. It is important that the load is distributed evenly, and the walls are additionally strengthened.
It is also necessary to understand that the ceiling of the old building acts as the ceiling of the lower floor and the floor surface of the attic. Therefore, it must be taken into account that in the resulting interfloor space there may be warm and humid currents, which can lead to the formation of condensation and, as a consequence, fungus and rot.
After the preparation stage has been completed, construction of the floor allocated for the attic begins. During the construction process, it is important to strictly adhere to the design plan for the construction of the walls and roof of the room. Any deviation from the project may entail uneven load distribution, violation of the geometry of the attic structure and, as a consequence, destruction of the foundation of the building.


