DIY wooden garden table drawings. We make a beautiful and strong country table with our own hands
What could be better than a summer holiday? own dacha? Indeed, the popularity of this type of recreation not only does not decrease from year to year, but also attracts everyone with its accessibility. more people. Dacha for many of personal plot with beds and greenhouses turned into full-fledged place recreation, a full-fledged culture is formed in society country holiday. And, you must agree, what would a vacation be without comfortable and comfortable furniture? The dacha has already ceased to be a place where all the junk from the apartment is taken, and the arrangement of the dacha requires a full functional furniture, created specifically for the dacha.
Advantages of making country furniture

Choosing furniture for your dacha, of course, will not be difficult, given the variety of furniture that manufacturers offer. But besides the trivial purchase of the items you like country interior There is another way out - self-production country furniture.
This approach to arranging country house will not only allow you to save money, but will also bring a lot of positive emotions. If you like to do something “with your own hands,” then making furniture yourself will help you realize your creative inclinations, enjoy working with wood, and the result of the work done will be a useful and necessary thing for the household. You can rightfully be proud of the result of the work done, because there is nothing better than seeing something you personally created. If you are already excited about the idea self-made country furniture and have firmly decided to try your hand at this business, then, for sure, you are now tormented by many technical questions. But first things first. Let's try to roughly divide all the questions that concern you into 2 large groups: "what to do?" and “how to do it?”

The answer to the first question is actually the most important. This is the area of strategic planning. You should not take on work that you cannot complete, otherwise, instead of enjoying the work and excellent result you'll turn out to be another one headache. If you do not have special skills and special tool, you should not take on very difficult work.
An indispensable attribute of a country house is a large wooden table with a set of chairs included. A large comfortable table at which all family and friends could gather will never be superfluous - this, one might say, is the basis of a set of country furniture. It is its creation that can be done first.
Material selection

Now it's time to answer our second question. And first of all, you should decide on the choice of material for the future table. Naturally, a person comes to the dacha to take a break from the bustle of the city, to spend a little time in nature, so in our table you will refuse all artificial materials that are used in modern furniture. Our table will be comfortable, beautiful and environmentally friendly, and the most environmentally friendly material- this is, of course, a tree. It is from wood that it is best to make a table for a summer house with your own hands, because in addition to being environmentally friendly, wood is also very convenient for processing. After choosing the material, you should focus on creating the table design. To create a table you can use ready-made design solutions or spend a few hours creating your own original design project. As an option, you can use a simple table design shown in the diagram.

Materials and tools for work

After choosing a table model, you should calculate in detail the need for materials to create the table: the number of boards, timber, fasteners and paint. It is, of course, better to purchase the required materials with a small supply. Before you start, you need to have everything necessary tool, preferably electric. Your tool list should look something like this:
- Electric planer. For primary surface treatment of boards.
- Electric grinder. For “finishing” surface treatment of boards, sanding boards.
- Drill-driver. Used for installing fasteners and drilling holes.
- Jigsaw. For making curved surfaces and cross-cutting boards.
- Roller and brushes for painting, hammer, set of chisels.

The assembly order will look something like this. First of all, the tabletop boards are cut and prepared. They can be installed closely or left a distance of 3-4 mm, which is somewhat simpler. We fasten the treated boards to two bars with self-tapping screws or special furniture bolts, while the heads of the screws must be recessed into the wood. To make cross-shaped racks, we cut the ends of the boards at the desired angle, joining the boards is done in half of the board. To select the joining grooves, we make cuts limiting the groove, and select the excess wood with a chisel or a router with a barrel cutter. We securely fasten the assembled supports to the tabletop, after which we measure the required length of the longitudinal stiffener. It is advisable to attach the finished and processed stiffener to furniture screws, which will allow it to be adjusted in the future if necessary. It is advisable to coat the finished product with a natural water- or oil-based stain.
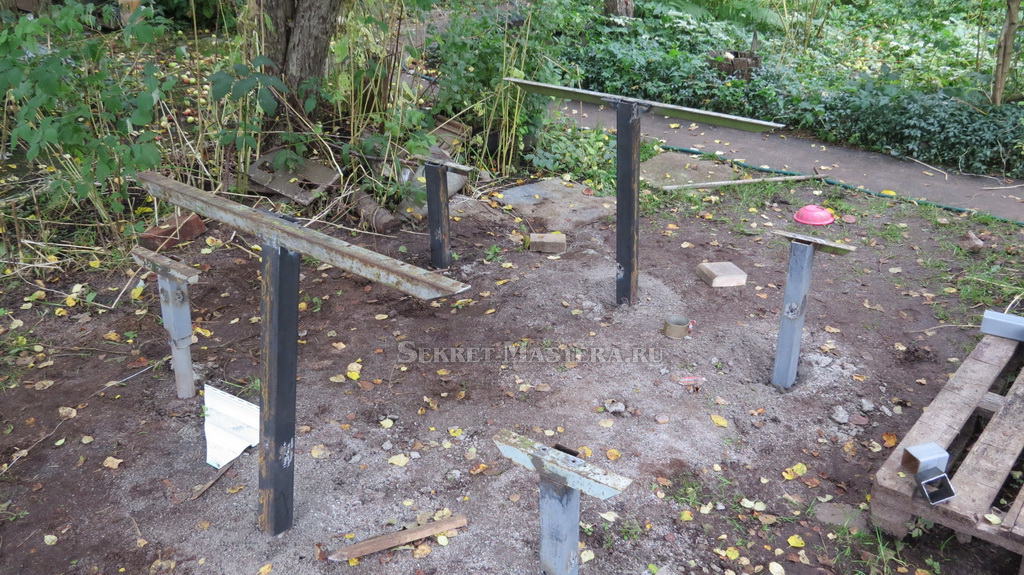
How to make a table for the dacha. DIY garden table and benches. We will talk about installing a new table with benches in the garden at the dacha. To unite the family, it was decided to install a new table through collective efforts. The old wooden table according to the quickly erected scheme was no longer suitable; it had to be renewed every 5-7 years. In the construction of the table and benches, new and traditional Construction Materials- metal and wood. The table turned out to be reliable and, compared to previous versions, it will last a long time. Provides detailed step-by-step instruction with photos and videos.
How to make a table with benches with your own hands

The design of the table was developed through collective efforts, taking into account material capabilities, skills and the availability of tools. The table is done and the choice of design option is probably no longer worth discussing. Old table was built from wood. Buried in the ground under open air raw posts and bench boards and table tops were attached to them. The lifespan of the pillars is 5-7 years depending on the thickness; the boards last up to 10-12 years. The table and benches were actively used from April to early October. Table and benches all year round exposed to precipitation in the form of snow and rain. The new table is made on metal frame, and the flooring of the table and benches is made of boards. The boards are dismantled in October and put away in a protected place, and in the spring they are fixed back to the frame. In this way, the life of the flooring and the entire table is extended. For critics, I want to say that there is a resting place under a canopy in the garden ( ).

 Pile "Yuventa"
Materials for the construction of tables and benches:
- Six Yuventa screw piles for installing a fence, 2400 mm long, head section 50x50 mm;
- 10 — 12 edged boards 2000 mm long with a cross-section of 150×50 mm, to speed up the work it is better to purchase planed ones, pay attention to the thickness of the boards - it should be the same;
- metal pipe square section 60×60 mm 4 m long;
- metal corner with shelf 40-5o mm, length 3.5 m;
- metal paint 1 liter;
- yacht varnish 1-4 liters;
- paint brush;
- solvent for paint and varnish 0.5-1 l;
- self-tapping screws for fastening boards 50 pieces;
- cement, sand
Tool for building table structure:
- Welding inverter;
- a circular saw;
- laser level, tape measure, bubble level;
- electric plane;
- grinding machine with cutting and cleaning discs;
- screwdriver with a set of drills and bits.
Instructions for making a table with benches with your own hands


A drawing was prepared to install the table. See photo. The table width was chosen to be 1100 mm (6 boards 150 mm wide and one 200 mm wide). When changing the width of the table, pay attention to the distance between the bench and table posts.
- The place for installing the table was chosen a long time ago, under the crowns of apple trees and next to artificial pond with fish. On site, pegs mark the places where the piles will be installed.
- We install Yuventa piles. To do this, a device for wrapping was made from a piece of 60x60 mm pipe. See photos and videos. In view of the features of my area, which are described in detail during construction on sandy soil, we had to make recesses for each pile. Without this recess, the pile would collapse before it was fully tightened. The recess is made petrol hole drill
. The recesses for the bench piles are dug at right angles. And for two table piles at a certain angle towards each other. This was done deliberately to make the table more stable.

 Digging a hole with a motor drill
 "Iuventa" piles for the table
 - The Yuventa piles were driven according to the standard scheme. Watch the video. Be sure to control your efforts so as not to destroy the pile before it is fully tightened. In my case it was a team effort. When tightening, you must try to comply with the intended locations of the pile and their inclination. Small errors in accuracy can be compensated for during subsequent assembly. See the details of the work at video example
.


 The Yuventa pile is twisted
 - After tightening the pit piles covered with sand in layers with humidification and compaction.
- For long service piles, the internal space of the pile is necessary, small mechanization was used. After concreting, we close the heads from exposure to precipitation and allow the concrete to harden. The piles must be cleaned of contamination immediately.

 Concreting piles
 - We cut square pipes 60x60 mm into 4 pieces of 550 mm and 2 pieces of 900 mm.
- We insert the pipes into the pile heads at a distance of 10-20 mm from the ground.
- We weld 60x60 mm pipes onto the heads, using the installation gap to eliminate inaccuracies in installing the piles. Try to install the bench posts strictly vertically, and the table posts coaxial to each other. Welding was carried out at 6-8 points at the points of contact between the head and the stand. Immediately clean the welding areas from scale.

 The posts are welded to the piles
 - mark the pipe cutting lines. Do it exactly. The cutting level from the ground surface for bench posts is 500 mm, table posts are 760 mm.
- Bulgarian with cutting disc cut the posts according to the markings. You need to cut carefully and precisely. The surface of each cut must be horizontal. Corners will be installed and welded to the ends of the racks.


- We cut the corners. The size of the corners for attaching the bench boards is 250-300 mm, you only need 4 pieces. The table will require two corners of 1000-1100 mm each (determined by the selected table width). The edges of the corners in vertical plane are cut into a cone, and all edges are rounded. The surface should be smooth and free of burrs.
- We weld the corners to our racks, controlling the horizontal plane of the shelf along two axes using bubble level. Just in case, gussets were welded to reinforce the welding site to the rack. When welding the corners of the benches, you can slightly shift the center of the welding of the corner to compensate for errors in installing the pile (the distance of the table stand from the bench stand).

 Welding corners
 Corners are welded to the posts
 - I used boards for the table and benches from construction scraps. frame house. The boards were not planed. Therefore, half a day was devoted to partial planing and sanding of the boards.
- We try on the boards and place them on the corners. The boards of the benches should be parallel to the boards of the table. The boards are marked for subsequent assembly. The position of the boards at the corners is also marked.

 Trying on boards
 - We mark holes in the corners for the screws for fastening the boards. A total of 14 holes for the corner of the table and 4 holes for the corner of the bench. We drill holes.

 Drilling holes in the corner
 Holes on the corner of the bench
 Holes on the corner of the table
 - The boards are impregnated with an antiseptic and, after drying, covered with paint or varnish. I coated the boards with yacht varnish.


- At the same time as varnishing the boards, the posts and corners are painted with protective paint. To prevent water from getting inside the racks, plugs are made ( polyurethane foam) at the ends of the pipes.
If you have your own land plot, then it can be furnished beautiful furniture so that it is convenient not only for gardening work, but also for relaxation with the whole family or big company. High-quality garden accessories can be quite expensive. Thrifty owners would like to offer a scheme according to which it is quite possible to make a garden table with your own hands, in order to ultimately get strong and reliable furniture. Please read the information provided below carefully. She will help you understand how to make a table in your country house with your own hands.
1
2
3
To design country table with your own hands, you need to take minimal amount materials and tools; moreover, most of them are quite accessible and are found in almost every home. So, what should you prepare in advance:
- material to be used as a base. Many modern masters prefer wood. The main advantage of wooden benches is that they are completely safe from an environmental point of view. In addition, their appearance is very aesthetic. To make things easier for yourself, you can take new boards. When purchasing lumber, make sure that it is sufficiently dry; wet wood should not be used for work. You need to keep it for several months in a well-ventilated room, and only then start working. If you follow this advice, then a table made of timber with your own hands, made and installed, will serve for a long time. Of course, you can make a table from stone or metal, but this will require a lot of investment and effort, time and money. Stone, as the main material, is durable and reliable, however, it is much more difficult to process;
- fasteners (nails and screws);
- drawings of garden benches and a table for a summer house with the indicated proportions. Can be found ready-made options or create furniture diagrams yourself. Choose a project or make an original layout based on the options presented on our website. If you are planning to create a high-quality and aesthetically pleasing table in your country house with your own hands, then the drawings will definitely be useful to you;
1
2
3
4
5
6
- sandpaper. If you have a grinding machine, this will significantly speed up the work process and help make the garden table perfectly smooth;
- varnishes and antiseptics for wood processing. They are needed so that a table made of boards can be used for a long time. If you use the products presented according to the instructions, you will receive a wooden outdoor furniture piece that will not lose its functionality due to moisture or insects.
How to make a table for a garden?
1
2
3
4
If you are planning to design a wooden table for your dacha with your own hands, then you can suggest the following course of action:
- Cut the boards 140 cm long and make a frame out of them, fastening the individual elements with self-tapping screws. Make sure that the boards are positioned at right angles to each other. In order to check the correctness, measure the diagonals: if there was no error, then they should be completely identical. The finished frame is needed to ensure the strength and reliability of the entire structure.
- If you are planning to create round table, then make the legs. To do this, cut 4 boards 80 cm long and process them grinder to give an aesthetic appearance. Chamfer the ribs using a suitable tool. Attach the workpieces to the frame with inside. For each leg, select 4 fasteners to ensure the most secure connection.
- Attach the crossbars to the middle of the legs. They will act as a frame for a shelf, which can be used for its intended purpose for arranging some things or dishes. On the other hand, this detail will make the furniture more rigid. Fix the crossbars at an angle of 90º. To avoid making mistakes, check the accuracy with a square.
- Place the base on a flat surface and check how stable it is. If the structure does not wobble and you have no doubt about its reliability, bring the surfaces into proper condition by grinding. For this type of work, it is recommended to use sandpaper or a special machine. Using the device will help simplify the task and complete the task faster.
- Assemble the tabletop. To create it, it is recommended to use boards of various types of wood. If you are planning to construct a round table, then you will need to cut the tabletop to the appropriate dimensions from a solid piece of wood. This will allow you to create a table with your own hands that will look stylish and unconventional. Treat the material with stain in advance. Secure the boards with nails, and secure the shelf with self-tapping screws. Level the surface with a special machine and apply paint to it (alternatively, you can use clear varnish). You can significantly simplify your work if you purchase or order ready-made wooden stands. You won't have to waste any time or effort on processing it.
- Place the prepared tabletop on the frame and fasten the individual elements. Metal corner for these purposes will suit best way. At this point the assembly process can be considered complete.
- As soon as country table was built, cover its surface with several layers of a substance with antiseptic properties, and after it is completely absorbed into the surface, with two layers of varnish. Thanks to these simple manipulations, you can make your garden table more resistant to impact. external environment. As a result, you will receive economical garden accessories that will last for a long time. for long years without losing all its presentability. You can place them in the garden without worrying about the wooden table cracking after the first rainstorm.
If you have some material left, you can use it to construct wooden benches with your own hands.
When not in use, they can be placed under a table or under an awning to extend their service life. Design ready-made furniture You can, based on your wishes and skills. You can decorate a homemade garden table with carvings (photos on our website will help you catch inspiration).
How to make a table from logs?
1
2
3
If you wish, you can make a table for your garden with your own hands using another type of material - logs. It is also environmentally friendly and easy to process. With its use outdoor table for the dacha will be created according to the following scheme:
- Prepare the log house for further work: plan the surface of the logs using a plane, cut into separate parts, process sandpaper to remove all burrs. Make the joints perfectly even, make holes, making sure that their diameter matches the diameter of the reinforcement. It is important that the individual holes are spaced 30 cm apart from each other.
- Assemble the elements that form the log table. When connecting parts “into a bowl,” cutting should begin by filing in the center. Make sure that the cutting is exactly at the specified depth. To perform this work, it is more convenient to use a chisel or an ax.
- There is another option for fastening parts: in the places where one part is connected to another, holes are made, and reinforcement is inserted into it. To make your own garden table more durable and reliable, use epoxy glue. All parts are folded according to the drawing. If the reinforcement is too long, it is shortened. The result is to create a split table from logs with your own hands, which is very convenient to use.
Specialists make high-quality objects from wood with their own hands, connecting individual parts with self-tapping screws. This option is also acceptable; if you are going to make a wooden table for your garden, take note of it. Benches can also be constructed from logs when you have lumber left over.
Finally, I would like to note: to garden tables have not lost their attractiveness over the years, they need to be properly looked after, in particular, protected from precipitation and hidden under a canopy.
By the way, setting up the canopy itself is quite simple; just use the most primitive means at hand, for example, shower curtains. They need to be fastened together so that they form a dense canopy, under which precipitation does not penetrate. If it is not possible to arrange a shed, it is better to move the furniture into the house.
How to make a country table
Arranging a summer house is a constant process. Either you build something or improve it. Moreover, furniture is constantly needed and tables are most in demand in the country. And put it in the garden, and near the house, and also in the gazebo. We will tell you how to make a table for a summer house with your own hands in this article using the example of ready-made projects.
Homemade table from pallet boards
The material for this table was disassembled pallets. Naturally, you can use new boards. There is only one condition - they must be dry. You can buy dry ones (this costs more) or buy regular ones, put them somewhere in ventilated stacks and keep them for at least 4 months, or better yet, six months. In general, any furniture, including garden benches. made from dry wood.
We are assembling a table for the street - to put it in a gazebo, so we will not glue the boards of the tabletop, but will fasten them from below, using planks. This is a very simple country table and very cheap.
Having disassembled the pallets, we get boards with individual colors and patterns. Having worked a little magic, rearranging them several dozen times in different ways, we achieve the required result. It turns out to be quite a nice tabletop.
We assemble a tabletop from boards
Take the side parts of the pallet. We use them for the table frame. We first sand them with coarse sandpaper, then fine sand them to the required smoothness (grain 120 and 220).

The side slats will go to the sides of the table
We take the planks that remained unused and use them to fasten the tabletop. We place them in the place where the joints of the boards are located. We use two screws to fasten each board with a joint, and one for a solid one.
From the treated sidewalls and two boards (also sanded) we assemble the table frame. We fasten its parts with self-tapping screws at the end (two for each joint). The frame can be glued or also “planted” on self-tapping screws. Only they are long. For each, we pre-drill holes with a drill whose diameter is slightly smaller than the diameter of the screws.

The tabletop is almost ready
We turn the assembled tabletop over and sand it. The procedure is the same - first use sandpaper with coarse grains, then with fine grains.
Next is installing the legs. We select four boards of the same size, check their length, and adjust if necessary. Then - sanding again. This is easier than sanding the legs that are already screwed on. We screw the sanded boards to the frame. These will be the legs. For each there are two self-tapping screws, fixed diagonally (look at the photo). For greater stability, we install jumpers at the bottom. You can leave about 10 cm from the floor to the lintels. We connect everything with self-tapping screws, so that the boards do not crack, we pre-drill holes.


The DIY garden table is almost ready. All that remains is to coat it with varnish
After removing the dust, varnish again. In theory, the varnish should lie flat, but it depends on the wood, so another sanding/painting cycle may be needed. As a result, we get this homemade country table.

DIY garden table ready for use
If you don’t like mismatched boards and traces of old nails, you can make the same design into boards. This table can be rectangular, or square. All sizes are arbitrary - please see the space available.
Country table made from leftover boards
This DIY garden table is assembled from leftover boards different breeds and sizes. Pine boards 25 mm thick and 50 mm wide were used for the tabletop frame, and 15*50 mm leftovers for the legs. We make the frame according to the dimensions you need. This table will stand on the veranda, which is small in width. So let's make it narrow - 60 cm, and length 140 cm. The height of the legs is 80 cm (everyone in the family is tall).

Assembling the frame, attaching the legs to it
Immediately cut two long boards of 140 cm each. To make the tabletop width 60 cm, subtract twice the thickness of the board used - this is 5 cm. Short bars should be 60 cm - 5 cm = 55 cm. Fold the frame, following right angles, twist with self-tapping screws. We check whether the bars are folded correctly - we measure the diagonals, they should be the same.
We cut the boards into four 80 cm boards and attach them from the inside to the assembled frame. You can use 4 screws for each leg.

Making jumpers for the shelf
At approximately the middle of the height of the legs we attach the crossbars. This is a frame for a shelf. The shelf can be used for its intended purpose, and it also increases the rigidity of the structure. We fasten strictly at right angles, checking with a large square.

We put the frame on the floor and check whether it wobbles or not. If everything is done correctly, it should stand rigidly. Next, take sandpaper or a sander and sand.
Let's start assembling the tabletop. From finishing works There were boards of different types of wood left, some painted with stain. We alternate boards of different colors.

We fasten the tabletop boards with finishing nails, carefully finishing them off with a hammer. You can secure it to the shelf with regular nails or self-tapping screws. Then we smooth it out with a sander. Final stage- painting. Very unlucky with the choice of varnish. Bought too dark appearance didn't like it. I'll have to sand it again and paint it a different color.

Homemade table for the cottage is ready
Wooden table with glued top
This design features L-shaped legs. They are assembled from boards of the same thickness. In this case 20 mm. In order for them to hold well, 5 self-tapping screws are needed. We pre-drill holes with a drill with a diameter 1-2 mm smaller than the diameter of the screws. Then with a drill larger diameter drill holes for the caps. Diameter can be matched to furniture plugs suitable color or make them from a wooden rod. Another option is to use wood putty, to which you add wood dust that remains after sanding. After drying and sanding, the marks will be difficult to find.

Legs with markings for fasteners
When assembling the legs, you must ensure that the angle is exactly 90°. You can choose timber as a pattern. First, coat the joint of the two parts of the leg with wood glue, then install the screws in the following sequence: first the two outer ones, then the middle one, and only then the other two. After the glue has dried, we sand the legs, varnish them and dry them.

Table legs are ready
It's time to make the tabletop. We assemble it from boards of the same thickness. We select the size as needed. You can use fragments different widths. It is only important that everything looks organic, and that the sides of the boards are smooth and fit together without gaps.
We coat the sides of the boards selected for the tabletop with glue, lay them on a flat surface (some kind of table) and tighten them with clamps. In this case, we got by with one, but preferably at least three. We tighten it so that there are no gaps in the resulting shield. Leave it for a day. Having removed the clamps, we get an almost finished tabletop. It still needs to be trimmed - align the edges, and then sand it. You can trim with a jigsaw or regular hand saw. It's difficult to get a straight line using an angle grinder, but you can try. After sanding we get a beautiful tabletop.

Gluing a tabletop from boards
Using the same technique you can make an oval or round table top. You just need to draw the appropriate line and trim the glued boards along it.
To make the table look more attractive, we will make a frame. We take a thin strip, sand it with sandpaper and fasten it around the perimeter of the tabletop. You can also use finishing nails. Only we also first coat the planks with wood glue, and then with nails.

We fasten the bar around the perimeter
After the glue has dried, we sand the joint again with sandpaper.

This is what the finished tabletop looks like
Now you can attach the table legs. We assemble a table frame from four boards (there is no photo, but you can do it as in the previous paragraph). We attach it to back side glue the tabletops, then install furniture confirmations through the tabletop. A preliminary hole with an extension for the cap is drilled for the confirmations. The holes for fasteners are masked in the same way as on the legs.
We attach the legs to the fixed frame. We place them inside the frame. You can attach it with regular self-tapping screws. That's it, we made a table for the garden with our own hands.

The board table is ready
How to make a garden table from wood with benches
For this table we used 38*89 mm boards (we unraveled them ourselves), but you can take standard sizes. A difference of millimeters will not greatly affect the results. In the photo below you can see what should happen.

To connect the parts, 16 cm long studs with washers and nuts (24 pieces) were used. All other connections are made with nails 80 mm long.

We connect the table parts together with studs, washers and nuts.
The parts are installed in place, drilled with a drill through hole. A stud is installed in it, washers are put on both sides and the nuts are tightened. Everything is catching up wrench. Why is this option convenient? For the winter you can disassemble it and take it to a barn or garage.
Making seats

Drawing of a bench with dimensions
We cut the boards according to the drawing required size. Everything is needed in double quantity - for two seats. We sand the boards, Special attention pay attention to the ends.
The short sections that we use to fasten the three boards of the seat along the edges are cut at an angle of 45°. First, we assemble the structure that is attached to the seat from below. We take a board about 160 cm long and attach two short boards sawn at an angle to the end of it. You need to attach it so that this board is in the middle.

Bottom seat support assembly
Then we attach the legs to the resulting structure (you can use nails). Then we add more boards cut at an angle and tighten everything with studs and bolts.
We attach the seat boards to the resulting structure. Since this is an outdoor table, there is no need to knock them together closely. Leave a gap between two adjacent ones of at least 5 mm. We nail it to the supports (which have been sawn down), two for each board.

Fastening the seats together
We fasten the finished seats using four boards 160 cm long. We fasten each leg with hairpins (if you walk, you can put two hairpins, installing them diagonally or one above the other).

We connect the legs to the boards using pins
Assembling the table
The table is assembled according to a different principle. Please note that for the tabletop, the transverse boards along the edges are cut at 52°. We attach them at such a distance that the legs fit in. 2 nails for each board. You can use finishing ones, with small heads, or you can drive them deep and then mask the holes with putty.

How to make an outdoor table out of wood
Now we need to assemble the cross legs. We take two boards, cross them so that the distance between their ends is 64.5 cm. We outline the intersection with a pencil. At this point you will need to remove the wood to half the thickness of the board.

This will have to be cut out
We make the same notch on the second board. If you fold them, they turn out to be in the same plane. We connect with four nails.

How to do X-shaped legs for garden table
We make the second table leg in the same way. We are not assembling the table yet.
Installing the table
Now you need to attach the legs to the structure on which the benches are installed. We place them at an equal distance from the benches and fasten them with pins.


Table leg fastening unit
Now we install the tabletop. We also fasten it with pins. The last stage is painting. Here everyone does as he pleases.
Outdoor table for a summer residence with benches
Variations on a theme
According to this drawing, you can make separate benches and a table for a summer house or garden. The design is reliable and simple to implement.

Separate benches and a table for the garden according to the same drawing

You can make the appearance more decorative by slightly changing the design of the seats and tabletops

Another option with separate benches

Painted white
DIY garden table: drawings

Stable country table

Simple table with X-shaped legs

Garden table made of wood

Homemade wooden table with a crossbar at the bottom
http://stroychik.ru
At the dacha there are very important items, but which you can do yourself, so as not to overpay, so our topic today is DIY garden table. You are free to make it any size you want to get a small table set, and a large one so that the whole family and guests can fit behind it, as well as folding models, functional, original, which are used as decoration, and so on. Below we will give you examples of each of the above groups, and also see how difficult or easy it is to make this important item.
Do-it-yourself wooden table for a summer house
Wood is relatively accessible and inexpensive, depending on what type of material you want to use to create DIY wooden table for the garden. In the vast majority of examples we are talking about wooden boards of one thickness or another, which make up the tabletop, and for the legs and supporting elements of the structure it is used wooden beam, perfect suitable material for this task.
We can talk about the advantages of boards for a very long time, but, first of all, this is the availability of the material, its low cost, and, what is very important for home craftsmen and those for whom even simple tasks are an important task - working with wood does not require many complex, expensive tools and no knowledge of operating techniques is required. In principle, assembling a stool is a compulsory program for boys since school days, and we assure you that assembling DIY garden table made of wood not much more difficult.

But before you choose among the models DIY garden table, drawings and schemes, you will need to decide which one you need and for what purposes. The degree of success of the design may greatly depend on this, since the table itself will be good, but will not be suitable for the task at hand. So, if you need a portable model, then you should not make it using logs or the like heavy material, since moving such a colossus will not be easy. Round varieties look very interesting, but they are better used for filling the same round shapes. After all, although the circle allows you to seat guests, there will still be significantly less space on the surface of such a tabletop than on a round one. It is also important what the legs will stand on; if it is a completely flat concreted area, then you can choose models with four level legs. They look very elegant and are quite simple to make. But if you want to arrange a feast on the lawn or you are not confident in the absolute flatness of the floor surface, then it is better to choose more stable leg options, for example, oblique ones, which will allow you to maintain the stability of the structure in this situation.
DIY outdoor garden table
Is it the tree ideal material DIY outdoor garden table? Many doubt this, because in this case it wooden surface Water will constantly drip, both from rain and, for example, from watering, and this can negatively affect the wood. But since everything positive points Since there are already very many designs of this type, it is worth thinking about special compounds that are used to paint wood. They do not change its structure, on the contrary, they can emphasize it, make it even brighter, even “more expensive”, but at the same time, they prevent the absorption of water into the surface and the appearance of all negative phenomena that are related to this. Therefore, just after finishing production, don’t be lazy and don’t save money - coat the finished product with a high-quality paint and varnish composition.

There may be several areas on the street where it would be appropriate DIY wooden table for a summer house, drawings which you could see above. First of all, this is a summer terrace or a place for eating, located near summer kitchen. There you will need a large, wide tabletop, which, ideally, is equipped with benches or chairs of exactly the same design, so that it all looks like one set. But not only for eating we may need a table, but also for carrying out gardening work. For example, in a garden it is best to install it in some picturesque clearing, fit it into landscape design. It is also needed on the finished one, because with it you can draw, sculpt, and play board games.
We would like to talk a little about special tables that are gaining more and more popularity among owners summer cottages. The fact is that a new variety has been added to the traditional set - a bar counter. This is a table top unusual shape– it is located on very high legs so that the person who sits behind it and who stands behind it are the same height. Such entertainment as a country bar, decorated, for example, in a beach style, greatly decorates the site. In the photo you can see what this might look like DIY wooden outdoor garden table.

There are no particular difficulties in the bar counter format; you will only need to understand what its size, height and width will be most comfortable for you. Another mandatory design element will be the presence large quantity shelves and drawers where you can put dishes and all other accessories for creating cocktails. The material for the construction can be either boards or pallets - boxes, which are in great demand today, although you will have to work with it no less than when knocking down table with boards for the garden with your own hands. The fact is that in these boxes there is not only their shelf life, but also the initially good or bad quality of the wood, therefore, in pursuit of ease of assembly, you can end up with a product of poor quality, crooked and with an uneven tabletop. And all because after one season of use the board begins to “lead” in different sides, so it’s worth not only buying high-quality pallets initially, but also letting them sit for some time before work.

Continuing the theme of the bar counter, we want to show you a few more tall varieties. These are also auxiliary tables-trolleys, mobile and convenient for moving within the entire site. They come with small wheels that make them easy to carry, but also think about the material you use to make them as light as possible. In addition, developing the idea of a bar counter, you can do something much larger by making a circular tabletop, for example, on a fence framing a barbecue area. And the idea with the design of the stand round shape, which goes around the tree - it is not only practical, but also very beautiful. Previously, we could only see benches that were placed in a similar way, but it turned out that they would cope with this task just as well.
How to make a garden table with your own hands
To develop the theme of useful furniture, we will briefly show you the process of creating an auxiliary table. In this case, when solving the problem, how to make a garden table with your own hands, two main stages are used - creating a frame and designing a tabletop.

To create a frame, an appropriate drawing is selected, the length of all the boards and timber that are part of it is marked, and then they are sequentially knocked together. You see it is already ready, assembled frame, decorated with a pergola element on the high back. This will not only decorate the craft, but such a perforated plane can be used for storage kitchen utensils. On top, on the recess, you need to lay a tabletop made of smooth material, for example, a laminated wide board, so that there are no gaps in the surface between the boards, since dirt will easily get clogged there. A technical hole is cut for a metal sink purchased at a plumbing store, as well as all the holes for communications, taps, and pipes that you will need. When installing a sink, carefully seal the edges of the hole; this will secure the element in the countertop and prevent water from penetrating inside. All that remains is to connect the structure to dacha system water supply, and drain the drain into a septic tank or cesspool.

If you want to DIY a traditionally shaped table, this will give you some advantages as you will be able to outfit the tabletop with very useful features. For example, make a small hole inside, in the center, where you can, if necessary, insert a large umbrella, protecting everyone who sits around it from the scorching rays of the sun.

And in the case when there is special requirements towards functionality, you can go even further towards creativity. For example, make a recess in the middle of the table, inside of which there is a cooler bag. Ice is poured inside it and bottles of beer are placed - for a long summer feast. For those who don’t like beer creativity, they can place moss or unpretentious garden plants, which will simply decorate the appearance with their presence.
DIY garden table photo
When we use pallets, as we have already talked about, it is best to use a combination of them with other materials, or non-standard shape For finished product. You can see how beautiful this can look to improve your country life by looking at the example of creating DIY garden table, photo which is located below.

And also examples of more traditional tables with a “zest” - a folding element that makes such furniture extremely convenient to use. If you don't need them, you can easily reduce them by half overall size or, in general, put them away until the need arises.

DIY table and bench for your garden
The ideal option, if you feel a sufficient degree of skill, is a whole set consisting of DIY tables and benches for your garden.


The examples above show that these kits can be different forms and sizes, but at the same time they look very stylish and expensive, precisely because they are made in the same style and their designs echo each other.