Methods of fastening MDF panels. How to install MDF on walls
MDF panels for walls - boards made from wood fiber by dry pressing wood shavings. The construction material is different medium density, and to give it high degree strength, sawdust is mixed with urea resins and processed using high temperature and significant pressure. Finally, the MDF panel is further processed to achieve aesthetic appeal.
Features and Benefits
MDF for walls is prepared using the same technology, but the finish of their surface is always different, in this regard, several types of these panels for walls can be distinguished:
- created using as decorative finishing coverings from natural veneer. The products are distinguished not only by their excellent strength and reliability, but also by their high price.
- panels are the most popular and in demand of all types of material. To create these panels, pasting with melamine film is used. This allows you to imitate the structure of natural wood, which is so popular when decorating the walls of a room. To improve the appearance of the slabs, they are covered with a high-gloss film.
- Technical and office premises, workshops and garages are finished using painted MDF panels. In this case decorative coating is a layer of paint. On such models there is no imitation of the tree structure.
MDF panels have improved technical characteristics. When creating them, the manufacturer does not use harmful resins rich in phenol.
After grinding and processing the wood chips, the resulting dust is treated under high temperature in special ovens. The process lasts until lignin is released, which ensures the gluing of the raw material.

The main advantages of the MDF panel are:
- attractive price;
- possibility of use both for leveling the surface of walls and for decoration;
- ease of installation without the help of a qualified specialist;
- strength;
- reliability;
- resistance to mechanical damage;
- ease of care.
There are several mounting methods wall panels from MDF in the course of work related to decorating the surface of walls indoors. One of them requires the assembly of a frame and sheathing, while the other requires a special adhesive for wall panels.
Frame mounting
To assemble a high-quality frame and sheathing, wooden blocks or metal profiles are used. Both structures are required for fastening decorative material when decorating residential and office premises. The methods of attaching panels to the frame allow not only to visually change the internal space, but also to hide certain defects found on the surface of the walls. When choosing how to mount, you need to take into account the degree of unevenness of the base. Significant flaws in the form of voids, dips or bumps can be corrected with the help of a high-quality frame and sheathing.
Fastening the wall panels to the frame is necessary during work related to leveling the surface. In rooms with high humidity For the construction of the frame, only a metal profile is used. The construction of the sheathing allows for installation additional insulation. Frame for fastening panels with your own hands in dry and warm room assembled from wooden beams: prepared wood (bars with a section of 30x40) must be installed and secured strictly vertically along the entire perimeter of the room.
The very first (starting) profile is attached directly to the floor, the second - to the ceiling. Having installed horizontal profiles along the entire perimeter of the room, proceed to attaching vertical guides. The distance between the bars does not exceed 60 cm. This is due to the fact that the dimensions of the MDF panels are as follows:
- width ranges from 153 to 200 mm;
- the length depends on which company is the manufacturer; this parameter reaches from 2 to 2.6 m;
- thickness from 5 to 14 mm.

Installation Features
Installation of MDF panels, metal profile or bars starts from any corner of the room by laying individual elements vertically or horizontally. If it is necessary to create additional noise or heat insulation, insulation boards are placed between the lathing slats.
The distance between the slats in this case depends on the parameters of the thermal insulation material used. It is 2-3 cm smaller than the width of the insulation, which allows the mineral wool slabs to be tightly laid.
Each MDF panel is equipped with a special groove for installing clamps and fastening to the frame. The frame itself is fixed using “crabs” and brackets. MDF fastening panels to the wall cannot be called complex process, if the structure frame is assembled correctly and strictly according to the level.
When creating the sheathing, it is important to remember that the fastening elements (screws), or rather their length, are selected taking into account the thickness and height of the bar or profile. The self-tapping screw must be embedded into the wall to a depth of at least 40 mm.
Before constructing the frame, you need to determine the highest point on the wall surface and set the vertical and horizontal from this value. All work is carried out under constant supervision building level equipped with a spirit level. It is necessary to check not only the horizontal and vertical, but also both diagonals on each wall being sheathed.
The dimensions of MDF panels are of great importance when it is decided to attach them to the wall using a frame, and when performing work using a special adhesive composition, certain types of panels are chosen.
It is more difficult than covering a correctly assembled frame with such panels.
Glue mounting
Before attaching MDF panels to the wall, you must:
- Clean the surface from any dirt, dust, remnants of old coating in the form of paint, wallpaper or cracked plaster.
- All areas to be restored must be plastered again.
- After the solution has completely dried, prime the wall for maximum adhesion.
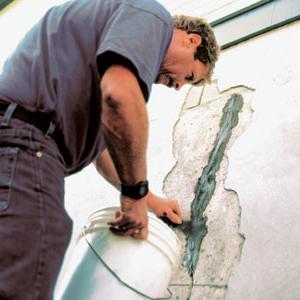
Knowing how to attach MDF panels to the wall, you can complete all the work in the most short term. It is necessary that the surface is not only carefully prepared, but also absolutely flat. MDF panels must be glued to the wall in such a way as to ensure complete adhesion and avoid air getting under the components of the structure.

If tiled or ceramic tile glued to the walls in one motion and cannot be dismantled and re-glued, the peculiarity of the process of gluing MDF panels is that the future cladding cannot be glued immediately. It must be pressed against the wall, held for a few seconds and torn off. After this, let the glue dry slightly and re-attach the panel to the wall surface. You can glue MDF only by applying significant force when pressing the panel.
If the wall surface is prepared incorrectly or poorly for gluing MDF panels, the fixation will not be strong and durable.
Panels with adhesive applied to their surface must be laid on a clean, dry, absolutely flat and smooth wall. The quality of the cladding also depends on how correctly the first panel was glued. It must be secured in strict accordance with the vertical mark made using a plumb line or laser level.
The final stage is the installation of plugs and other decorative elements. The inner corners are fixed with glue. Its color is selected exactly to match the finishing material and applied with a thin snake, trying to avoid the appearance of excess on the panels after pressing the corner.
You can study all stages of the work in detail by watching the video.
Interior decoration using MDF wall panels is very popular due to the many positive qualities which this finishing material has. This is not only an opportunity to perform all manipulations without involving qualified specialists, but also increase the strength and reliability of the structure. MDF wall panels allow you to change the interior space of a room, giving it attractiveness and increasing its aesthetics.
Wooden boards become more and more expensive every year. Not everyone can afford to decorate and furnish a room from natural material. The choice, most often, falls on an inexpensive, practical substitute.
MDF appeared on the building materials market a long time ago and quickly gained popularity. MDF has been going on in Russia for several decades. You don’t have to be a master of the highest order to quickly and inexpensively give a room a new, ennobled look. All you need is precision, accuracy and basic home craftsman skills.
What are MDF?
This building material is produced by hot pressing of dry crushed waste from wood processing enterprises. Under the influence of steam, sawdust becomes soft and pliable. The smallest fibers, twisting, are connected to each other even without the intervention of adhesive components. As a result, the structure of the panel becomes similar to felt, but compacted with enormous pressure. What do MDF panels look like visually? The photos used in the article will give you an idea about them.
MDF boards are not distinguished by any super-strong characteristics, but due to the absence of adhesives in their composition, they are completely harmless. The panels can be installed using any wood glue.

Tool used
Of course, you can’t provide everything, but the main tool, which you can’t do without, should be at hand:
- Roulette. It is better to use a 5-meter specimen.
- It can be made from a regular harness with a nut attached to the end.
- Drill attachment. Perfectly replaces a screwdriver.
- Metal bench square with different legs. It is useful for cutting slopes.
- A jigsaw or any fine-toothed hacksaw. It is advisable to have two hacksaws - with a transverse and longitudinal cut.
- A grinder for cutting metal profiles if the frame will be assembled from them. The tool must have a protective casing.
- The usual tools that every owner should have: a knife, screwdrivers, a pencil or marker, a set of drills, a hammer, small nails (shoe nails).
Preparatory work
Before attaching MDF panels, you will have to do a lot preparatory work. It is necessary for the reliability of the fastener. WITH wooden surfaces everything is clear - here the installation process is much simpler. Difficulties arise with brick walls.
First of all, you need to remove the baseboards. It is better to remove swollen or crumbling plaster completely, down to the base. Will be immediately noticeable hidden defects main walls that need to be removed.
Installation process
Finishing with MDF panels is carried out in two ways:
1) using glue;
2) installation of a rigid frame.
The frame is assembled from wood or from special MDF (this is made of thin metal).
It is easier and cheaper to make lathing from. Although the entire frame will need to be processed later fire-fighting composition. This will also take some time. Wall panels are attached to the slats using clamps (another name is clips). The slats themselves are located perpendicular to the wall panels.

Frame method
So, let's look at how to attach MDF panels. Depending on the size of the boards, the number of rows of slats will be different. In a standard room, where the ceiling height does not exceed 2.5 m, 4-5 runs along the entire wall will be enough. The main thing is that after installation the panels stand tightly and do not “play” after any touch.

The top bar of the frame is attached 15-20 cm below the ceiling. The bottom bar is fixed at the same distance from the floor. The middle frame slats are placed in equal proportions between the outer bars. It is advisable that the distance between the slats does not exceed 50-60 cm. Also, do not forget about fastening the frame around the perimeter around windows and doors.
Where the groove is located on the panel, a clamp is attached. After trying on the upper and lower elements and making sure that the wall board is level, the outer clips are fixed to the planks with self-tapping screws. After this, the remaining fasteners are added - according to the number of frame runs. The next board is inserted with a tenon into the groove of the first panel and is also fixed with clips along all the planks.
Do not forget that the very first panel is rigidly fastened along all the slats with self-tapping screws on the tenon side. The outer board, which is rarely intact, is also tightly attached. All traces of installation are usually hidden behind decorative corners. Great option in this case - MDF profile. He will fit in organically overall design premises.

Glue method
Another way to attach MDF panels requires a perfectly flat and clean wall. The load-bearing surface can be any - plywood, concrete, brick or plasterboard. Panels are often glued using “liquid nails”. This glue is suitable for any surface.
This installation method has serious disadvantages. Dismantling the premises is difficult. The board keeps breaking. To level the wall, you have to clean off the remnants of hardened glue, and this is quite difficult.
Replacing several wall boards with new ones will also entail a lot of problems. The entire remaining wall may rise up, lose all harmony, and, accordingly, its attractive appearance.
Besides, inner part MDF boards are not treated with a moisture-repellent composition, and in case of wetness load-bearing wall The panel will swell over time and begin to warp.

Which way is better?
If the height of the walls is large or you decide to lay MDF panels horizontally along the length of the room, a frame option is better suited. This method also provides for insulation of the walls, however, this will slightly reduce the volume of the room. This method is also useful in cases where there is a large uneven surface.
It’s quicker and cheaper to “ennoble” a room with low ceilings and smooth walls. glue method. Here the loss in room size will be minimal.
It is worth deciding on the performers of the upcoming work. Installation of MDF panels consists not only of the direct installation of the boards themselves. Before starting work, you need to decide on the quantity of purchased material and fasteners. We must also remember that there are certain nuances that to an ordinary person, may be unknown to the average person. In the future, finishing walls with MDF panels will take time, proportional to your experience.
Pre-treatment and repair of main walls also require some knowledge and skills. The solution comes naturally - it’s better to entrust the repairs to professionals.
Now you have an idea of how to attach MDF panels. There is nothing tricky or extremely complicated in such work, but the master, of course, will do it both better and faster. However, it all depends on the thickness of the wallet and the amount of experience you have in conducting similar works. The choice is yours.
The decoration of any room should be carefully thought out. The design must be not only beautiful, but also functional. For example, MDF panels can subsequently be washed; they will not quickly become dirty and age. In addition, this material has additional advantages.
The ideal finish would be one for which MDF is used. Do-it-yourself installation is quite simple. No special knowledge is required here. So even a non-professional can handle the job.
What is MDF?
For the production of which very small shavings are used. For production it is necessary high pressure and temperature. In order for the chips to stick together into one mixture, urea resins are added to it, which are considered a connecting link.
MDF wall panels (even an amateur can do the installation with his own hands) are used for cladding vertical surfaces in residential and office premises. Other types of material can be used for making furniture, arranging partitions, laying flooring. Very often they are made from slabs Acustic systems. The thickness of the material reaches 4 mm. There are some conditions for storing these products: humidity - no more than 70%, temperature - no higher than 25 degrees.
Material advantages

Covering with MDF panels has some advantages:
1. High level of moisture resistance. Some types of materials can even be used to decorate the bathroom.
2. Good strength. The slabs are well pressed.
3. Low cost. You can purchase them at any hardware store at an affordable price.
4. Resistance to temperature changes and biological effects. Mice will not be able to chew through such cladding.
5.Easy to handle and use. You can cut the material with a regular jigsaw or circular saw.
6. Good soundproofing qualities.
7. Products retain heat well, and they can also be painted, laminated, and varnished.
8. Possibility of creating an original design.
9. Easy cleaning of panels.
MDF wall panels, which can be installed by hand only after assembly necessary tools, are made of natural material, so they are environmentally friendly.
Disadvantages of the product

Among the disadvantages of this material are the following:
Combustible.
Quite a large mass. This feature does not allow the use of shields for all walls.
The presence of synthetic resins in the product. Although they do not evaporate and are not harmful to health.
These disadvantages are not significant when correct operation material.
What types of slab fastenings are there?
Before that, you need to understand the connection methods. They are like this:
- Tenon and groove. This is the simplest type of locking elements. Laying is done joint to joint. A feature of this installation is the need for a base made of metal profiles or wooden sheathing.
- Groove-groove. Here, too, special training will be required. The wall will need to be reinforced with U-shaped profiles.
- Glue. This method is used quite often. However, the panel should be light in weight and the wall should be perfectly flat. Requires special adhesive composition. Naturally, dust and dirt await you during the installation process. But if you have a small room and the availability of free centimeters is essential, then it is better to choose this method.
- Profile. It allows you to level the base and attach large-format products.
What tools are needed for the job?

If you purchased MDF wall panels, do-it-yourself installation should be done only after all required material and the devices will be ready. You will need:
- Building level.
- Slats for the construction of sheathing.
- Bench square for correct angle determination.
- Plumb.
- A drill, as well as a special attachment for tightening screws.
- Hammer and pliers.
- for cutting panels.
- Special fasteners.
- Screw, self-tapping screw in the required quantity.
These tools should be sufficient to install the panels. Other equipment may be required to prepare the surface.
Types and features of panels

In order for the finish to last a long time and with high quality, you need to choose the right facing material. There are these types of panels:
- Regular. They have high strength, but do not have special protection from moisture. Therefore, such products can be used for wall cladding in dry rooms: hallways, living rooms, bedrooms.
- For rooms with high humidity levels. Such MDF panels are suitable for the kitchen. It is in this room that moisture often accumulates and temperature changes occur.
- Heavily loaded. They can be installed in bathrooms, as they have the most high level protection from the harmful effects of moisture.
Naturally, we must not lose sight of decorative properties MDF boards. With different designs and color schemes you can create wonders. For example, to make a room seem larger, use light or white panels. To get an original and unique interior, you should pay attention to material with an individual design pattern.
Naturally, when choosing, you should pay attention to specifications and quality. Buy material only from licensed stores. It is better to choose those manufacturers who have a good reputation and customer reviews.
Features of surface preparation
Before doing this, you must prepare the base. In principle, this is not difficult to do. First, remove the previous finish or its fragile parts. If the basis for fastening the slabs is wooden sheathing, then there will be no need to level the wall. It should be pre-marked.

The adhesive method requires a perfectly flat surface. If the defects or level differences are small, then you can use the usual plaster mortar. Naturally, the walls will then need to be primed in order to maximize adhesion to the glue.
Most often, wooden sheathing is used. It's not difficult to do. The slats are installed vertically and horizontally. The distance between them should not exceed 30-40 cm. To fasten the slats, a screw, self-tapping screw or nail is usually used. Please note that everything wooden elements should be treated with a special antiseptic.
If metal profiles are used for the sheathing, then the space that remains between them can be filled mineral wool or other insulation. In addition to retaining heat, you can provide additional sound insulation.
Installation features

Interior decoration with MDF panels has a certain sequence:
- Fastening the first panel. She's screwed on internal corner using self-tapping screws. If necessary, the slab is trimmed to length. Since each panel has a ridge, it will have to be ground down a little. Metal fasteners are used for additional fixation.
- The next planks need to be screwed close to the previous ones. On the side of the groove, the product is fixed with additional fasteners.
- Installation of the last panel. If necessary, it is cut to width. This element is attached to the sheathing with self-tapping screws.
- Next, you need to repeat the above steps for each wall. After completing the work, a narrow plinth should be installed along the upper edge. It is fastened with nails or self-tapping screws.
As you can see, you can handle this work yourself.
MDF panels are in very high demand. However, improperly installed material can worsen the interior of the room. Therefore, try to follow the recommendations of experts.
For example, when laying slabs, always use a plumb line and this will help you attach the products evenly.
You can sew up the entire wall or part of it with this material. For example, you can only attach panels to half the height of the base. This will make it possible to use additional finishing materials, as well as diversify the interior.
If there are small irregularities on the wall, then small pieces of plastic can be placed under the wooden slats. They will strengthen the sheathing. That's all. Let your home be beautiful and unusual. Good luck!
All more people every day are chosen as finishing material MDF panels for the walls of your house. It is believed that worthy alternative painting and wallpaper, but also has additional positive qualities.
In this article we will talk not only about MDF installation on the walls, but we will also reveal the secret of the popularity of this material.

Before we move on to talking about installing MDF panels on walls, let's figure out why this material is becoming more and more popular every day. Of course, it has many advantages, but there are no less disadvantages, and some of them are so significant that they make repairing some rooms using these panels simply impossible.
So, what are the main qualities of MDF that would distinguish it from other finishing materials:
- Installation of MDF panels on walls is a very simple process. and you can do it yourself, without involving professional builders. This largely affects the final cost of repairs.
- Since the installation of MDF panels on walls is carried out on a special sheathing, the free space between the wall remains for air to breathe, and this is very good, as it allows the accumulating condensate to completely dry out. Also, this space can be used for additional wall insulation, if necessary.
- Conventional MDF panels are very susceptible to moisture. The boards themselves tolerate this contact with ease, but the texture pattern can be damaged, therefore, if you are choosing a material for finishing the walls in a complex room, such as a bathroom or kitchen, then you should choose special boards, but we will talk about this a little below.
- Panels are convenient for restoration of damage. If a defect has formed somewhere that cannot be masked, it is enough to replace the damaged segment, and you do not have to redo the entire repair.
- MDF panels can be used to cover not only walls, but also ceilings, this way you can decorate the entire room in the same style.
- Big choice decorative solutions . MDF panels can imitate natural wood or stone, as well as be completely plain. Such diversity allows you to create the most daring and original interiors.
- Relatively low price.
As you can see, the panels are a good option to decorate your home, but before you go to the store and choose the designs you like, you need to know what these panels can be and which of them can be used in rooms with a complex atmosphere.
What types of MDF panels are there?

So:
- Ordinary panels without a protective layer. Most cheap option, which is only suitable for living spaces, such as a living room or bedroom (see Decorating the bedroom: looking for options). It is not advisable to use this material in the kitchen or bathroom, as it will quickly lose its appearance and will fall into disrepair.
- Laminated panels. This option is suitable for the kitchen. The panels do not absorb odors and can be washed using detergents. The only thing such panels are afraid of is mechanical damage, such as scratches. If at least one defect appears on the surface, the destructive effect will spread throughout the finish.
- Veneered MDF. Perfect option for residential premises. Veneered panels are no longer just an imitation of natural wood covering; a thin section of wood is actually glued onto them. The appearance of this material is excellent, but as a consequence this is reflected in the price, which can be several times higher than that of conventional panels.
- Cork MDF. The most expensive option, which uses cork veneer as a decorative layer. This option is perfect for a nursery, especially since the panels do not contain chemical components that could harm your or your child’s health.
- Sheet MDF. All of the above panels belong to the lining class, that is, they are assembled using tongue-and-groove technology. Sheet MDF does not have connecting grooves, and is mounted like ceramic tiles on glue joint-in joint
Which of these options to choose for decorating your home is up to you, based on characteristic features premises and financial capabilities, but do not fall into savings. If you cannot afford laminated MDF for the bathroom, then it is better to abandon it altogether than to install ordinary panels that will become unusable in a few months.
Advice! Choose your panel manufacturer carefully and always ask for quality certificates from the seller. Some manufacturers deliberately call their panels moisture-resistant in order to raise their prices, although in reality they are not.
Installation

Before installing MDF panels on walls, we strongly recommend that you watch the video in this article, which shows the entire process and provides detailed instructions that will help you better understand the entire installation technology.
Like any other repair, installation of MDF on walls begins with preparing everything necessary. On average, it takes half a day to decorate a medium-sized room, but searching for any tool or part can take much more time, and in addition, nerves.
Important! Before installing MDF panels on the wall, they need to be allowed to rest in the room where they will be installed. This is necessary so that the material gets used to the humidity and temperature of the room and takes its shape.
Preparation and marking

Before you begin to attach the guide battens, the wall must be treated protective impregnations and put markings on it. Optimal distance between the guides is considered to be from 40 to 60 centimeters, while the panels will not sag and the fixation will be as strong as possible.
It is most convenient to use for marking laser level, but this device is expensive, and if you plan to finish, for example, a bathroom or toilet (see: Facing toilet panels: making the right choice), then buying it is unprofitable and it is better to replace it with the usual water level, plumb line or chalk thread.
Important! If the panels are planned to be installed vertically, then the sheathing will be horizontal, and vice versa. This necessary rule, and it simply won’t be possible to install the panels any other way.
When the lines are drawn along the entire perimeter of the room, on each of them, with a distance of approximately 50 centimeters, you need to put a mark, which we will need in the next step.
Stage two - installation of the sheathing

The lathing shown in the photo is a guide made of wood or a metal profile on which MDF panels will be mounted on the wall. So, in those places where we placed marks in the previous stage, we drill holes and fix special table braces that will hold the guides.
The more guy wires there are on one guide, the stronger and more reliable the entire structure will be, and therefore the entire finish as a whole. Based on the level readings, we attach beams or profiles to the guy ropes. Here it is very important to strictly observe the parallelism of all segments, since if they stand unevenly, this will also be reflected in the panels that will be in constant voltage, and sooner or later they will simply burst.
Advice! If you are building a sheathing from wooden beams, be sure to treat them with special impregnations that will protect the wood from moisture and temperature changes.
Panels

So, all the worst, dirtiest and most difficult, all that remains is to install the MDF panels on the wall, and compared to the construction of the sheathing, this is the simplest stage. You can start from any convenient angle, the main thing is to do it “by hand”.
Simply place the panel in a corner and secure it in one of the following ways:
- For staples and a stapler.
- For furniture nails with small heads.
- Self-tapping screws.
- For special clamps.
Which method you choose is up to you; it will not affect the quality of the finish. So, the first panel is fixed, and we insert the ridge of the next segment into its groove. Fasten it in the same way as you fastened the first panel.
The process is clear, so we continue like this around the entire perimeter of the room. That's all, all that remains is to install decorative elements, which are easiest to install with special glue.
Corners for MDF panels do not have a rigid shape, and depending on the need, they can be either internal or external. That’s it, our finishing is ready, and you can enjoy the result, and if you still have questions, then many articles have been written on this topic on our website, in which you will certainly find answers to any questions.
Today the simplest and in a fast way To make the walls of your home beautiful and smooth, decorate them with MDF panels. This solution is, of course, not suitable for all rooms, but for corridors, stairwells, storage rooms and hallways, this material will be almost ideal. We will talk about it in this article, in which, together with the website, we will look at how to install MDF panels using frame and frameless methods with your own hands.
There are two ways to fix MDF panels on the walls - the so-called adhesive and frame. Both of these methods are good and are used depending on the circumstances. If finishing walls with MDF panels involves hiding any communications, then frame method MDF fastenings. When it comes to finishing smooth walls, then the glue method is used.
Wall decoration with MDF panels photo
Installation of MDF panels: frame installation method
The very name of this method speaks for itself - to implement it you will need to build a frame, which in some way resembles the structure that is used for. The difference lies only in the position of the load-bearing ones - if they are installed vertically to fasten plasterboard sheets, then MDF provides for a horizontal arrangement of profiles. In this regard, the peculiarities of constructing such a frame arise.
In principle, at the first stage everything happens in a similar way - the plane of the future frame is hammered out, then guide profiles are attached along the perimeter of the wall, on the floor, ceiling and adjacent walls. This is where the differences begin. In a given plane, vertical load-bearing profiles cd are installed not after 600 mm, but after 3000 mm, which is standard length bearing profile.

Installation of MDF panels: frame method
This is done in order to subsequently install horizontal load-bearing profiles cd between them, the pitch of which is 500 mm. They are connected to vertical profiles using crab CD connectors, and fixed to the wall with the same U-shaped brackets.
Installation of the frame is the main work in the process MDF installations panels. The fastening itself is an easier process that almost anyone can handle. MDF panels are attached to the frame using clamps (special clamps). Before fastening it to the frame, the clamp itself is inserted into a groove located at the end of the panel, thus ensuring their reliable fixation to the frame. The clamps are designed so that they do not interfere with inserting the next panel into the groove.

DIY installation of MDF panels photo
Installing panels with glue yourself: installation features
Installing MDF panels on walls using glue is much easier - the entire installation process is greatly simplified by the absence of metal or wooden frame, the construction of which takes quite a lot of time.

Installation of MDF wall panels photo
Before we begin directly attaching the panels, let’s first look at the glue that is used for these purposes. Or any glue will not work here - you need a composition that has certain qualities.
- Firstly, the glue must be plastic even after hardening - the fact is that MDF panels made from pressed cardboard are highly susceptible to deformation depending on the temperature and humidity in the room. Therefore, an adhesive is needed that can dampen these same temperature expansions.
- Secondly, the adhesive used for MDF panels should facilitate their fastening even in places where the walls are slightly curved. That is, the texture of the glue should make it possible to spread it like thin layer, and thick - in a word, it should be thick enough. These requirements perfectly fit the so-called “”, which are successfully used by almost all craftsmen to solve the problem of how to install MDF panels.

Liquid nails for mounting MDF panels photo
The installation of panels using glue itself looks quite simple - its technology is almost completely described on a tube of “Liquid Nails” glue. It is not recommended to violate it. To begin with, the walls covered with panels must be cleaned of dust and dirt - in principle, if you are going to seriously engage in self-repair, then the priming process, which is performed to clean the walls from dust and dirt, and at the same time to improve the adhesion of materials, should become a habit. They always prime everything, everywhere.

Priming walls before installing MDF panels photo
After the primer has dried, the actual gluing of the panels begins. While it dries, you can do other preparations - for example, cut several dozen panels to size.
The glue is applied directly to the panel itself in a dotted manner and in a checkerboard pattern - the glue drops should be large. Once the adhesive has been applied, the panel is pressed against the wall, tapped firmly and torn off. This is required by gluing technology - you need to tear off the panel so that the glue is weathered and the panel does not peel off from the wall under its own weight. To speed up the process and make installing MDF panels with your own hands faster, you can immediately, one after another, smear up to a dozen panels, attach them to the wall and tear them off. While the glue is weathering, you are allowed to take a smoke break - after five minutes, the panels can be hung on the wall again and thoroughly slammed down.

How to glue MDF panels to the wall photo
It is easy to glue the panels; it is much more difficult to trim them evenly and accurately. In this regard Special attention it is necessary to pay attention to slopes and similar obstacles that come across the installation path of MDF panels. It should be understood that the appearance of the room completely depends on the even trimming of the panels.

Installation of MDF panels on walls
Well, in conclusion, we will dwell on the main installation nuances that are typical for both methods of fastening MDF panels.
- First, there are the angles. It should be understood that it will not be possible to bend MDF panels, so they are simply cut as close to the corner as possible, after which the cut edges are safely overlapped with a special corner, which can be used for both external and internal corners.
- Secondly, this is the frame - the lowest horizontal profile should lie on the floor. In this way you will ensure reliable fastening skirting boards.
- Thirdly, to avoid misalignment in the future, the first panel must be installed in accordance with vertical level and secure firmly with self-tapping screws in places where they will subsequently overlap (at the bottom with the baseboard, at the top of the ceiling, in the corner decorative overlay). It is advisable to check the position of the panels with a level in the future - you don’t need to check everything in a row, but you need to apply it to every fifth panel.
That's basically it. This is how MDF panels are installed. This process is neither complicated nor simple, like, in general, any finishing work, wherein important role plays your attitude to the little things, which together have an impact on the overall picture of the repair. Simply put, there are no trifles in this matter.