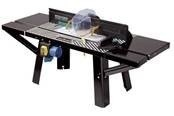
DIY metal milling table. Homemade table for a router
Milling is a wood processing process that requires high precision and quality. That is why special tables are used for such work. Currently available for sale great amount tables for a router, but their price is very high. That is why home craftsmen are increasingly trying to make a milling table with their own hands. Let's talk about how to implement this idea and what to pay attention to.
About the table design
Often the milling table is installed on a workbench, however, it makes sense to create a separate structure. In this case, the product must be rigid and stable. Some structural elements need to be upholstered with stainless steel to increase strength, and a metal profile should be used to add rigidity. The router itself is mounted at the bottom of the tabletop. During operation, no structural elements should interfere with it. It is also worth noting that if you are planning to make a milling table with your own hands, then install the mounting plate. The router will be attached to it, so it must be very strong and stable. It is advisable to use a material such as textolite or a metal sheet. In general, assembly is quite simple, but not fast. Let's talk about everything in order.
Necessary tool for the job
Before you start designing something, you need to acquire a tool so that you don’t have to run back and forth during the process. It will be very useful for you electric jigsaw. If there is none, then you can get by with a regular hacksaw, although the labor intensity in this case will increase significantly. The same applies to the plane. A regular one will do, but an electric one is better, since working with it is much easier and faster. The chisel is also necessary attribute. A block with sandpaper can successfully replace a grinding machine. In addition, it is advisable to have a screwdriver and an electric drill in your arsenal.

After this, you can begin assembly work. I would like to draw your attention to the fact that if you want to obtain accurate products, then place a ruler on the table. Often, making a milling table with your own hands goes without any problems, but before you start, it is advisable to acquire the drawings, which you can find in this article.
Deciding on the type of table
The first step is to decide where to install the milling table. In addition, there are different kinds such products. For example, there are portable milling tables that are distinguished by their ergonomics and small in size. In addition, there are stationary ones, they are assembled specifically for the router and are the most preferable option if you plan to perform large volumes of work. There are also aggregate milling tables. In this case, the router is installed as an extension of the saw table. This saves space, but is not always convenient or practical.
If you plan to use the router table not too often, then it is suitable for you portable option. It does not take up much space and can be easily moved if necessary. If there is plenty of space in the workshop, then a stationary table is better. For ease of movement, equip it with wheels.

Making a milling table with your own hands: part 1
First of all, we take 2 clamps. After this we make the main hole for the cutter. As a guide, you can use thin plywood secured with bolts. After this we move on to the bed. This element is a stationary element of any milling table. By by and large This is a frame on supports, in the upper part of which a tabletop is placed. Almost any material can be used to make the frame, from plywood to steel sheet. The most important requirement is to achieve maximum rigidity and stability, so it makes sense to take care of reliable fasteners. The size of the bed must be selected according to maximum sizes workpieces that you intend to process.
We continue work
On next stage you need to take care of the bottom of the bed. It must be deepened by 10-20 centimeters in relation to the overhang of the tabletop. Often, a bed 150 centimeters wide is sufficient for processing large workpieces. For example, on such a bed you can work with door trims, ends of facade blanks, etc. The height of the frame in this case should be about 80-100 cm, and its depth - about 50 cm.

It is extremely important to pay attention to the height of the bed. As noted above, the optimal height is 80-100 cm. But it is best to try making adjustable supports. In this case, you can adjust the height to suit you. The most common table material, such as chipboard, is suitable. For example, a countertop made from a regular kitchen table, the thickness can be from 26 to 36 mm. It is desirable that the coating be wear-resistant. But all this is not enough to make a milling table with your own hands. Drawings or at least a sketch are a mandatory attribute.
About the mounting plate
The router is attached not to the table, but to a special plate. As a material, it is best to use something durable, but at the same time thin. Let's say a steel sheet will not worst decision. This is quite durable, but not the most convenient option. If you value comfort, then give preference to PCB with a thickness of 4-8 mm. In the center of the mounting plate, you need to drill a hole with a diameter that will be equal to the hole in the base of the router. The sole is equipped with threaded holes that are necessary for fastening. If there are no holes, you need to make them yourself. Of course, you can also use special clamps for clamping. Any solution that provides a reliable and strong connection will do.

Assembly instructions
At the first stage, the tabletop is attached to the frame. A mounting plate is installed on the frame. Before attaching it, you need to attach it to the table and trace the outline with a pencil. Then a seat is selected. Prioritize angles seat should be slightly rounded. Next, using a cutter that is larger than the thickness of the plate, a through hole is made in the shape of the router sole. At this stage, accuracy is not too important. Under the countertop, provide space for a dust collector and other accessories.
The milling cutter is started from below, after which it is attached to the plate. Using self-tapping screws, the mounting plate is attached to the frame. The caps must be recessed with self-tapping screws so that they do not interfere with the work process. In principle, we practically made the milling table with our own hands. Homemade table It is advisable to equip it with upper and lower clamping devices.

Briefly about installing the drive
If you are assembling a full-fledged milling table, then you need to take care of the electric drive. In particular, you need to choose the right power. The minimum should start at 500 watts, but this will only be sufficient for shallow sampling. The optimal solution would be a 100-watt electric motor. In this case, it will be possible to process wood of any thickness using any cutters.
The engine installation process itself should not cause you any difficulties. Please note that if you connect a three-phase motor to a single-phase network, the efficiency of the motor will decrease by half. Therefore, it is better to use a single-phase motor. If the motor is three-phase, then use a star-delta connection diagram.
DIY milling table: photos and something else

After you have assembled the milling table, do not rush to get to work. Do a test run and see how well everything works. After that, read all the safety rules. For example, it is advisable to use protective screen. But along with this it is necessary to use glasses. In the very accessible location An emergency shutdown button of the “mushroom” type is installed. In this case, it is necessary to think through everything correctly, it is desirable that there is no possibility of accidental pressing.
Take care to install lighting near your workplace. Since the working area near the cutter is the most dangerous, it should be clearly visible. If you have some free time, don’t be lazy and install a mechanism for raising and lowering the cutter. If necessary, you can even make a turntable with your own hands. In this case, the milling machine can be used more conveniently. It is useful when working with workpieces various dimensions. In principle, this is all that can be said about how to make a milling table with your own hands.
Milling table will make your work easier and help increase the accuracy of workpiece processing. You can buy a ready-made one, or you can make a milling table for a manual router with your own hands, using woodworking skills. We have prepared quite detailed information for you step by step instructions for making a table.
The essence of all designs of a horizontal milling table is the same, the idea is clear - you need to think it over for yourself and implement it, taking into account your capabilities. And in the end, you will get a machine that allows you to process workpieces much more accurately and perform operations that previously seemed difficult for a manual milling cutter.
Decide on the size of the working surface, based on the dimensions of the workpieces being processed and the free space in the workshop. Start small - build simple table top, incorporating modernization possibilities into the design. Work on it and little by little bring it to mind.
Make a table top
The simplest table for a router is a separate work plate placed on carpentry trestles or between pedestals. The device costs pennies and can be manufactured in a few hours, but will allow you to perform a significant proportion of the same operations as a multifunctional machine. All you need is MDF or birch plywood with a thickness of 19-25 mm. Better fit a plastic-coated panel that provides less frictional resistance, and a plate laminated on both sides will not warp during use.
Set the exact right angle of cut on the circular saw, cut the parts according to size and sand the ends.
 Cutting diagram: 1 - main plate; 2 — support base; 3 — front wall of the stop; 4 — gusset (4 pcs., dimensions for 19 mm plywood); 5 — drawer (2 pcs.); 6 — side bar; 7 — connecting strip (4 pcs.)
Advice. Measure the thickness before cutting sheet material, often different from the standard. Amend the drawings to eliminate problems when assembling the structure.
Remove the plastic cover from the router base.

Draw a line in the middle of the slab and place a mark 235 mm from the edge.

Place the pad so that later the main router controls are closer to the edge of the table. Visually align the center of the cover with the marked point and mark the locations for drilling holes for the mounting screws.
Determine the center location for the sole with equally spaced screws.

For a base with asymmetrically placed screws, measure the diameter of the pad and the distance from the outer circumference to the cut of the sole.

Mark a mark with a pencil in the middle of the beveled side, calculate the distance from it to the center:
- S = D / 2 - (D - H)
Position the cut perpendicular to the midline and mark the center of the sole.

Mark the locations of the mounting screws.

Drill holes for mounting and for the cutter, countersink the recesses. Mark semicircular cutouts in the base and front wall of the stop.

Cut out the bends with an electric jig saw. Make auxiliary frequent cuts perpendicular to the edge of the part, slightly short of the marking line. Then move the saw a little closer contour line— the pieces will fall out without interfering with the movement of the canvas. Sand the cutout with sandpaper wrapped around the pipe.
Attach the connecting strips to the bottom of the tabletop.

Glue all the pieces together and secure them with additional screws. Select screws that are longer than the standard ones by the thickness of the plywood and install the router from the bottom of the slab.
 1 — side strip for fastening with clamps on trestles; 2 - drawer; 3 — countersunk guide holes; 4 — front wall of the stop; 5 - self-tapping screw with countersunk head 4.5x42; 6 - scarf; 7 - support base
Fasten the table to the trestles with clamps, secure the position of the stop with clamps and get to work.
Make a solid base
The worktop can be installed on a frame of low height, sufficient to accommodate the router. The portable table is stored on a rack, and for work it is fixed on a workbench. If you often mill and have free space in the workshop, add support pedestals to the tabletop and get a full-fledged machine.
Cut the cabinet elements according to the dimensions given for the 820 mm high table, or change them so that the table top is level with other equipment.
 Frame details: 1 - outer side panel; 2 — internal panel; 3 - rear panel; 4 - base
Place the tabletop with the back side facing up. Install the side panels sequentially and screw them with screws, pre-drilling the guide holes. Secure the base, place the frame front side down, align the right corners and install the two back panels.
Finally, attach the wheel supports to the bottom of the body using roofing screws. Place the wheel mounting pads no closer than 20 mm from the edges.
 1 — side stand; 2 — wheel support; 3 - bottom; 4 — internal stand; 5 - rear panel
Use the free space in cabinets to solve the problem of storing tools and consumables.
Embed the mounting plate
Get a longer cutter reach by placing the tool on a 4-6 mm thick plate made of duralumin, getinax or monolithic polycarbonate.
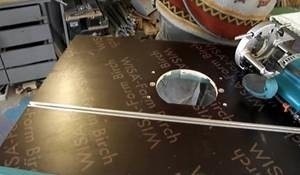
Cut a square with a side of 300 mm from the sheet and place it on the workbench. Glue the plastic router sole on top double-sided tape, placing it in the middle face up. Using a drill of the same diameter as the mounting screws, drill holes in the plate, using the plastic trim as a template. Remove the sole, use a countersink or a large drill to make indentations for the caps.
Screw the plate to the disconnected router, insert an 8 mm drill into the collet. Lower the tool body until the drill touches the surface and rotate the chuck, marking the center. Unscrew the plate and use a hole saw to make a hole at the mark.

Place the plate on the tabletop and trace the outline. Draw and cut the cutout by inserting the jigsaw blade through drilled hole. Straighten the ends with a file and sand with sandpaper.

Secure thin boards around the marked outline with clamps.

Clamp the copy cutter with the bearing in the collet, set the milling depth according to the thickness of the mounting plate. Carry out the milling in several passes, then add 0.5 mm with the micrometer adjustment of the router and make the final pass.
Drill through holes under the screws and expand them with reverse side table tops with an 11 mm drill bit for self-locking nuts. Clean the surfaces and install the nuts with epoxy glue, aligning with the screws.

Fit the mounting plate to the cutout, place it in place, drill the mounting holes and countersink from the front side. Attach the part to the router base, insert the tool into the tabletop and tighten the screws. Check that the plate is flush with the plane of the tabletop; if necessary, compensate for errors with washers.
Improve your focus
For faster and more convenient machine setup, upgrade the parallel side fence and add a rotary fence to help machine the ends of narrow parts. The latter can be taken from a stationary circular saw. Cut aluminum T-profile guides into the surface of the slab. To make cutouts in the tabletop, use a router or circular saw with a mortise blade.

Lightly round with sandpaper top corners grooves Cut the profile to size, drill holes according to the diameter of the screws, and countersink them. Place the parts into the grooves, make thin holes and tighten countersunk screws.
Drill 7mm holes in the base of the stop, select hex bolts and plastic handwheels with nuts.

Install a guide profile in the front stop bar to secure clamps, auxiliary pads and protective devices.


Cut a cover from plywood with a hole in the center, secure it to the gussets located near the cutout of the longitudinal stop. Connect the adapter fitting and connect the vacuum cleaner when working on the router table.

Add a safety shield made from plywood scraps and a strip of plexiglass to the stop.

To make oblong cuts, drill 7mm holes at the indicated points, connect them tangents and make cuts with a jigsaw.
Make homemade clamps and clamps necessary for milling small elements.

The comb clamp can be made from maple wood, choosing a section with a straight grain pattern. Make the gaps between the ridges on a circular saw:
- Set the cutting height to 50 mm.
- Set the cutting width to 2 mm.
- Make a cut.
- Pull the workpiece back with a hand pusher.
- Turn the board 180° and saw through the other side.
- Move the stop by 5 mm, repeat the operations.
- Move the stop back again and make cuts throughout the entire workpiece.
Secure the clamps to the guide using bolts and wing nuts.
 1 - stopper; 2 — comb clamp; 3 — protective shield; 4 - aluminum guide; 5 - pipe for vacuum cleaner
Sand the surfaces of the parts, especially in areas where the workpieces will pass during the milling process. Clean the machine from dust and coat it with oil.
 1 — drawer for cutters; 2 - trapezoidal groove for stop
Let's summarize the project
Materials needed:
- Plywood 19x1525x1525 mm - 2 sheets.
- Plastic 4x30x30 mm.
- Several dozen screws.
- Aluminum guides - 2.3 m.
- Wheel support with brake - 4 pcs.
- Wood glue and epoxy.
- M6 bolts with nuts.
The ability to take your time and think through each step, to accurately mark and cut out blanks, or the desire to learn this came in handy. The result is a high-quality milling table for little money. In the future, it is worth thinking about equipping the machine with a switch and a mechanism for adjusting the milling height.
A milling machine is a professional woodworking tool that requires special installation. For installation, a milling table can be used, which is rarely found on sale, and those that are on the market cost big money. Therefore, it is much easier to make a milling table with your own hands. It is the presence of a special machine that allows you to optimize the work as much as possible, make it safe and process workpieces more quickly. This is due to the fact that it is not the tool (milling cutter) that moves along the material being processed, but the part that moves along the resulting machine. Below we will describe how to make a homemade milling table.
From choosing a table for milling machine The quality of work largely depends.
Selecting material and type of table
Professional carpenters always try to make themselves a specialized milling machine. It not only simplifies the work, but also allows you to make more accurate and accurate cuts that will not differ from factory ones. Many foreign companies offer some models of specialized machines for milling, but these models are either not well thought out (not ergonomic and inconvenient) or cost a lot of money, which will take a long time to pay off. Homemade machine, made for yourself, will save money and will be convenient during operation. To make a machine for yourself, you must first decide on the type of its design.

Typically used as a tabletop for a milling table. MDF boards or wood of different species.
In principle, all types of machines can be divided into 3 types:
- free-standing (personal, non-portable);
- portable (small portable);
- expandable (stand - wing to table).
Deciding on the type is quite simple, for which you need to know the operating time on the machine. For long and long work you should select a separate machine. In case of rare use tool will fit and portable. An attachment or wing to the table is suitable if there is little free space. The advantages of a free-standing table include the fact that when long work With the tool, you don’t have to turn it off.
For the manufacture of machines, you can use MDF boards (for the table top), pine boards (relatively cheap material) or boards made of any other material. It is much easier to use MDF. This is the cheapest material for furniture production and is easy to process. If financial opportunity allows, then preference should be given to natural wood.
Special mention must be made about metal. Some people consider metal to be the most durable material, and they are right. Metal is much stronger than wood, however it has significant shortcomings. For example, it is an ideal conductor, so it is not recommended to mount an electrical device on such a surface. Another drawback is the weight. You should be concerned about the strength of the legs, which must withstand not only the surface of the table, but also the sum of the masses of the tool, parts and workpieces, and the weight of a person. Moreover, in winter unheated room the metal will be cold and create discomfort for the working master; the metal may rust. Therefore, it is strongly recommended to avoid metal.
Design details

To make a good multifunctional table, you should know the operating principle of the router.
In order to make a good machine, you need to know how a milling cutter works and how best to process workpieces with it.
Thus, a milling cutter is primarily used for processing longitudinal edge details. If it is necessary to mill grooves across the workpiece, it is recommended to provide a special groove in the design for the stop-carriage. In addition to the above-described function, additional clamps can be attached to the groove for better processing blanks.
A stop placed longitudinally, which will serve as a guide for the materials being processed, will significantly simplify the work. This stop must be perfectly flat and even, the working plane of the stop must be perpendicular to the plane of the table surface, and the stop itself must be movable. The latter is required to adjust to the dimensions of the parts being processed. With proper manufacturing of such a stop, the machine will be able not only to mill, but also to joint (plane) materials. A groove should be provided in the stop that will allow installation auxiliary tools. It can also be equipped with mounts for a vacuum cleaner hose, which, when working as a blower, will allow you to quickly clean the surface being treated from shavings and sawdust, improving visibility.

A properly made milling table with metal plates will allow you to quickly change the cutter if necessary.
But the most important thing is the method of attaching the router. To fasten tools, metal tabletops are usually used, which are in the form of a small plate that is attached to the tabletop. The router is attached to this plate with screws or bolts in specially made holes. Using such a mini-surface will save up to 1 cm in milling depth, you can quickly dismantle (install) the tool and fix the tool more smoothly to the metal tabletop.
The speed of removing the router from such a plate will allow you to very quickly replace the cutter on it. There is also a gain in terms of fastening. So, if to attach a tool to wooden tabletop very careful leveling of the surface is required, it is necessary to drill holes in the right places, which for another model of the tool may not be suitable both in diameter and in terms of attachment points, but in the case of a metal mini-surface, the surface of the boards is leveled only at the place where the metal sheet is attached, points The mounts will always be static, which will allow you to quickly change the tool if necessary. Each router has its own mounting points, so before installing it, it is recommended that you familiarize yourself with its drawings.
Installing the router using the drawings is not difficult - just drill the holes, maintaining the dimensions (distances between them).
Table manufacturing procedure

A properly assembled milling table allows you to process a variety of surfaces.
A primitive homemade table may look like this: a tabletop made of MDF, fixed on 4 legs, on (under) which a tool is installed, a board is fixed on the tabletop - a guide, which can be fixed to the table with clamps. This is the simplest option. However, it is irrational, because part of the table top (at least 50%) will not be used during the work; in addition, there is a high probability of uneven installation of the router, which will cut uneven grooves. It is more rational to use this design on the folding wing of the table. This will significantly save space in the workshop and rationally use the work surface.
The next option differs from the previous one in its advanced capabilities. So, a hole is made in the middle of the table for mounting the tool, a guide board is made with a groove for processing thin workpieces, and fixed with self-tapping screws. Next, a groove is made (at some distance from the router), which will allow the workpiece to be milled at an angle.
The portable machine is very easy to iron. Small legs are attached to the tabletop (the size is equal to the length of the router +5-7 cm). The dimensions of the tabletop itself are minimal, allowing you to install only a router +15-20 cm. This option will be mobile (portable), but it will be inconvenient to work on long time. This mini-machine is suitable for extremely rare tool use.
Individual workplace
Let's consider making a “serious” table for a router.
First, it’s worth talking about the sizes. On average, the size can be 1 x 1 or 1 x 0.7 (0.8) m. This will not only allow you to work comfortably on the table, but also place other auxiliary items on it. A frame (legs, which should be attached not only to the tabletop, but also have an additional tie) is knocked under the tabletop.
Then they work on the tabletop. To make it, you need to knock down boards (under right size), carefully plan them with a plane and sand them sandpaper so that there is an almost smooth surface. Then plywood is glued onto the tabletop. This will make the surface almost perfectly flat. To prevent the plywood from peeling off under the influence of vibrations, it should be additionally secured with self-tapping screws. When the glue dries and the plywood is secured to the tabletop with self-tapping screws, a hole is cut in the middle of the tabletop for mounting the router. The hole must have rectangular shape and have dimensions equal to the size of the router + 50-100 mm in length and width.

The surface of the milling table top should be flat and smooth.
The next step is to prepare a metal plate to which the router will be attached. It should have a size equal to the size of the hole + 2.5-3 cm in length and width. Tool mounting points are determined locally.
Next, you should install a guide board or stop. The latter is preferable. It is better to make the stop movable (as described above) and double so that it can be used to clamp the material. Mobility is ensured by grooves along the entire length of the table into which metal guides are inserted. An anchor is made on the stops themselves, which will fit into the guides. It can be cut out of wood or wheels can be attached to a stop.
For ease of work, grooves are cut into the tabletop, which will allow you to process workpieces at an angle. Their width and distance between them is determined by the master. Several drawers for tools can be attached to the bed. So that the table has a pleasant appearance, you should make slopes on the table top and legs. and also varnish all surfaces.
Such a table will allow you to quickly process workpieces without straining, which will make the time of wood processing enjoyable.
A person who loves to create and make things on his own will get great pleasure from creating a router table. This is a rather difficult, but exciting task. Making a table for a router yourself means getting a structure that costs much less than one made at the factory. When producing a milling table, it is imperative to follow safety precautions.
The milling table is designed for processing materials, cutting shaped holes, and making joints. A table made by yourself will be more economical and much more convenient than a purchased one.
Work in which it is necessary to perform milling is always associated with the movement of the tool along the surface of a rigidly fixed workpiece. However, when you need to mill a part with small dimensions, some difficulties arise. To solve this problem, you can make a table for the router yourself. In this case, the tool will have a stationary mount; the workpiece itself must move. As a result, it will be possible to quickly carry out end processing and remove overhangs.
Standard milling table

The simplest way to create a table for a router is to mount the router directly to the tabletop. Fastening occurs through a drilled hole. This setup has proven to work well. In this case, the router is located at an angle of 90° to the tabletop; it is rigidly fixed to the table, which dampens excessive vibration.
Such an installation is considered the best if the router has solid foundation, if it has the ability to regulate the immersion of the tool. The base of the router must be fixed to the tabletop so that the router can be lowered to the required depth. This installation method has some disadvantages that need to be kept in mind.
Firstly, the thickness of the table top affects the working range of the tool; it allows you to work with cutters that have long shanks.
Secondly, the work is limited by the single diameter of the hole for attaching the cutter.
And lastly, if you have one router, its constant installation and removal, changing the cutter, and adjusting the height is very inconvenient.
Return to contents
Bed production

The bed is understood as the main part, without which not a single router table can do. To do it, the most suitable different materials. You can use metal profiles, MDF boards, wood, etc.
Perhaps the most the best option a metal profile will be used. Existing butt joints are secured only with bolts during assembly. Welding work are excluded. The design will be highly reliable, it will be technologically advanced and easy to assemble.
The dimensions of the bed do not have fixed dimensions; they are selected by each craftsman purely individually. The main criterion will be the size of the parts that have to be processed. To accurately determine the dimensions of the bed, it is best to make a small sketch.
In order to make it convenient to work, the frame needs to be deepened into the floor by about 15 cm. The most important parameter of the table is its height. The optimal length would be 1 m. To get maximum convenience, it is worth equipping the table for the router with adjustable supports.
Return to contents
Cover device

Best suited for this part kitchen countertop, made of chipboard, having a thickness of 40 mm. This material perfectly dampens vibration, it has a solid, absolutely smooth surface, along which the workpiece moves perfectly.
Modern phenolic plastic of high hardness is also suitable for the production of the lid. It has an absolutely flat surface and is not afraid of moisture. Plastic does not cause any difficulties in processing, which makes it possible to make grooves where they will be installed aluminum profiles and stops. The only drawback is its high cost.
To make router tables more reliable for long-term use, you can make an aluminum tabletop. This material never corrodes and is lightweight. But before manufacturing, aluminum must be clad so that there are no dirty marks left on the workpieces.
Return to contents
Plates for installing the router into the table

Router tables have the plates needed to mount directly into the table. This method has several advantages.
Due to the fact that the plate is no more than 10 mm thick, it is possible to easily get the router to replace the cutter.
You can use additional insert plates to make it possible to use different cutter diameters. Such an insert plate can become a support plate during the operation of milling surfaces on large parts. The plate gives the router increased stability; the use of plates helps to mill wide grooves of parts.
Inserting the plate is quite difficult. It is necessary to first drill a mounting hole in the table to obtain a tight fit for subsequent insertion of the plate. When there are large gaps, increased vibration occurs. If the plate does not have a reliable, tight attachment to the table, milling accuracy will not be maintained. Too much big hole, drilled into the table top of the milling table being manufactured will lead to its weakening. Therefore, when calculating the diameter of the hole, care must be taken to create reinforcement for the tabletop. It has great importance so that the tabletop and insert are made flush. Additional gaskets, washers, etc. will help cope with this problem.
One of the main assistants of a carpenter is a wood router. This hand tool is indispensable when it is necessary to:
- cut a groove;
- make a groove;
- make a tenon connection;
- process edges, etc.
However, when performing some carpentry work, it is not always convenient to use this tool due to the fact that you need to simultaneously hold the workpiece and operate the router. Therefore, many craftsmen resort to tricks by making a milling table for a hand router. With a table that is a reliable addition to your milling tool, you can achieve wooden elements the quality and accuracy are in no way inferior to joinery products made in professional furniture workshops on milling machines.
A homemade table for a manual router significantly increases the productivity of the tool and facilitates processing work wooden products. It is not difficult to make such equipment, and, in addition, unlike a standard milling table produced by various manufacturers, this table will have the dimensions, design and options chosen directly by the craftsman who makes it.
To perform any engineering work, and equipment manufacturing is one of these, it is necessary to draw up a sketch of the future machine. On it you need to indicate your vision of the project indicating the actual dimensions. Based on the sketch, you can easily select materials for the manufacture of the future structure, their quantity, determine the construction budget and stock up on the tools necessary for processing machine parts.
Option 1. Instructions for making a table for a manual router
Materials for making a milling table
To build a milling table you will need:
- 4 square bars;
- chipboard and plywood scraps, the dimensions of which are determined when constructing the table drawing;
- hardware (nuts, bolts, screws, hinges, etc.);
- jack;
- metallic profile;
- six-millimeter steel plate;
- aluminum guides;
- movable carriage-support (guide from the saw);
- manual frezer.
Drawing of a homemade milling table (option 1)

In any case, before you start making any such table, the drawing must be completed indicating all dimensions and determining the location of the working elements relative to each other.
Step by step assembly
Let us consider in detail each step in the manufacture and fastening of each element of a homemade milling table.

1st step. To make a stationary base for the table, you will need bars and chipboard cuttings, from which we twist the legs and further strengthen the rigidity with the help of horizontal connecting panels made of plywood. In the right side part we cut a hole for the start button, which will be connected to the hand router.

2nd step. The table top is made of chipboard. We make it liftable together with a router, for which we install hinges and make an additional support base from 15 mm plywood.


3rd step. To move the workpiece smoothly along the table, for example, to cut a groove in it, a moving carriage-stop is used. We cut a groove in the tabletop for the guides of the movable stop and install a metal profile into it. You can use a guide from an old saw as a stop carriage.

4th step. We also make the longitudinal stop from chipboard and make it movable to adjust the gaps around the cutter. To ensure mobility, we cut perpendicular grooves in the upper part of the stop and fasten the stop to the tabletop with clamps. We cut a small groove in the middle to suck out chips and other milling waste.

5th step. From thin plywood we make a box with a hole for connecting a vacuum cleaner hose, which will remove dust and shavings formed during the milling process. We fasten the box behind the perpendicular stop.

6th step. We take a six-millimeter steel plate and screw it to the tabletop flush with the surface. During the fastening process, we make sure that its edges do not protrude above the tabletop, otherwise the parts being processed will cling to them. A manual router will be attached to the plate from below.

7th step. We attach the router by the aluminum base to the bottom of the plate using bolts, but do not forget to pre-drill holes for the bolts in the base. Fastening hand tools to the removable plate, and not directly to the table, provides savings in milling depth and allows you to easily replace the cutter.

8th step. We are building a router lift. To do this, we use a car jack, which allows us to change the height of the cutter with maximum accuracy.


9th step. We remove the handles from the router and instead screw in aluminum guides, which we connect to the jack mechanism.

Design and video of a homemade milling table for a manual router
Before you start making a milling table, you need to accurately determine its design features. This article provides instructions on how to make a simple router table. For other details of the first assembly option, see the video below.
We check the reliability of fastening of all elements - and the milling table is ready with your own hands!
We offer several more models of wood milling machines made by yourself for your taste.
Option 2. Another milling table and other assembly features
We offer a table design for a router with a detailed analysis of its components.
Materials and tools.
In order to make a table for a manual router with your own hands, you will need the following materials:
- metal corner or pipe (for the frame);
- aluminum guide;
- axles for attaching the router;
- putty, primer and paint for metal;
- self-tapping screws; furniture bolts 6 x 60 mm;
- Hexagonal adjusting bolts with nuts – 4 pcs. ;
- Finnish moisture-resistant laminated plywood, 18 mm thick (you can use another material);
- boards or plywood scraps (for making a rip fence).
The following tools are also required:
- welding machine (for metal frame table);
- drill and drill bits;
- screwdriver;
- jigsaw;
- milling cutter;
- spatula, brushes, rags.
Basic drawings


Design features of the milling table
An existing workbench can be adapted for a milling machine. But it is more expedient, to eliminate the influence of strong vibration during operation of the cutter, to make a separate structure that ensures the stability of the table.
The main loads during equipment operation are transferred to the base. Therefore, the frame must be reliable and stable. The bed is understood as a fixed base on which the router is located. It takes all the loads and is a structure in the form of a table with a fixed lid. It can be made from a metal pipe, angle, channel, wood, chipboard.


It is necessary to take into account that the router itself is attached to the tabletop from below, which means that there needs to be empty space there.

The router is attached to the table through a high-strength and rigid plate for installation work. It is preferable to make it from metal, textolite or tongue and groove board.

The base of the router has threaded mounting holes for mounting. If there are no threaded holes, threading is done independently. If the task is impossible, secure the milling device using special clamps.

Start the work by using a milling cutter to select the shape and thickness of the mounting plate. To make it easier, straight corners on the mounting plate must be rounded with a file. A recess in the table top ensures that the plate is positioned flush with the table top.

Make a hole in the center of the plate for the tool to exit, drill holes for attaching the plate to the table. The next step is to drill holes for connection milling device, keep in mind that the fasteners must be countersunk.


How to make a work surface and base

Making the base of the future milling table begins with the frame. For ease of work, the table cover should protrude 100-200 mm from the front part. Special attention When designing the frame of the bed, pay attention to the installation height of the working surface. This size is decisive for the convenience of working at the machine. According to ergonomic requirements, it should be 850-900 mm, depending on the person’s height. For convenient operation of the future milling machine, you can install height adjusters at the bottom of the support. This will allow, if necessary, to change the height of the table; if the floor is uneven, it will help to align the tabletop.
A Soviet-era kitchen countertop will be useful as a working surface for the future machine. Most often it is made of 36 mm chipboard sheet covered with plastic. Wood-based material will reduce vibrations that occur during the milling process, and the plastic coating will ensure excellent movement along the surface of the workpiece. If you don’t have an old countertop, use MDF or laminated chipboard with a thickness of at least 16 mm.

Choose a place for the future milling machine in your workshop; the dimensions and type of future design depend on this. This may be an aggregate machine located on the side circular saw, desktop version, or maybe a free-standing stationary machine.
If the use of a milling machine is not regular, reduced to one-time work from time to time, it is enough to make a small compact table.
You can make a milling machine yourself. It is a structure that fits on standard table. For work you will need chipboard, two boards. Fasten two boards parallel to a sheet of chipboard. Attach one of them to the tabletop with bolts; it will serve as a guide and as a stop. Use the second one as a limiting stop. Cut a hole in the table top to accommodate the router. Attach the router to the table top using clamps. The compact milling machine is ready.
If you have a lot of free space in your workshop, then make a full-fledged stationary milling machine. It will be more convenient to work on it than on the desktop version
Option 3. Cheap homemade router table
The sketch is ready. Materials have been purchased. The tool, laid out in its place in the workshop, is waiting for the moment to serve its owner. The master is also serious and is not going to grab everything at once. He will sort everything out and do everything step by step.
Stage No. 1.


Start by making the frame of the future machine. Can be applied next way manufacturing the bed. profile pipe Using a grinder, cut the 25×25 to size, then weld the blanks intended for the frame on which the working surface will be located. Weld a pipe on one side along which the parallel stop will subsequently move. Weld 4 supports to the frame.
To fix the table cover, frame the perimeter of the frame with a corner, then it will sit in the recess.
Use the second method of making a frame. It implies additional supports for the working surface. Weld stops for milling equipment in the middle of the table. The size between them should correspond to a convenient mounting of the router.
For structural stability, connect the lower supports with jumpers at a height of 200 mm from the floor.
Stage No. 2.
Paint the resulting structure. Why prepare surfaces: clean metal pipes and degrease with solvent, then prime. If there is a need to putty surfaces, apply a special putty mixture and apply primer. After complete drying, paint with PF-115 enamel.
Stage No. 3.
Cut the work surface according internal size frame, install it tightly in the corners. Then drill holes in the upper frame for fastening the table cover. Mark the tabletop itself, drill and securely connect it to the frame using furniture bolts. Table dimensions 850×600×900.
Stage No. 4.


Step back 200-250 mm from the edge and cut a T-shaped guide along the length of the working surface.
Stage No. 5.

Trim half of the milling axes. This will make it possible to almost double the distance from the sole to the guide axis, which in turn will expand the range of capabilities of the tool.
Stage No. 6.
Remove the sole from the milling equipment, mark holes in the middle of the working surface of the table for its fastening and drill them. Drill a hole in the middle of the table cover for the device. On both sides of it, drill holes for attaching the clamps of the router axes.
Stage No. 7.
On the underside of the tabletop, make a hole for the base of the router.

On both sides of the hole drilled through the hole, make grooves for installing the router axes. The size of the groove and the axis must match.


Along the edges of the grooves, use a Faustner drill (picture above) to drill holes for the hexagon adjustment bolts.


Stage No. 8.
Cut two pieces of pipe to fit the width of the large groove and drill holes in the center for the permanent bolts. They will serve as clamps for the axes of the milling device. Screw the nuts onto the bolts.

Stage No. 9.
Install hexagon bolts and nuts on both sides of the axles to adjust the plane of the milling equipment.

Stage No. 10.
Now make a rip fence. Take a small piece of plywood and cut a groove in it so that it can move along the pipe that was previously welded for this purpose. Using a jigsaw, cut three strips of identical size, where its length is equal to the sum of the length of the table and the width of the guide pipe and four plates for them in the form of stiffeners.
On strip No. 1, make a semicircular hole to remove wood waste. It should coincide with the slot in the working surface of the table. In strip #2, cut a square hole in the same location.
Cut strip No. 3 of plywood into equal parts. Attach one to the back of the square hole strip with bolts or guides. The plywood halves should move in opposite directions. Install an aluminum guide along the upper edge of this strip.

Stage No. 11.
Fasten plates No. 1 and No. 2 together with the sides with half holes. Fasten two stiffening ribs along the edge of the resulting hole and two on the sides at a distance of 70-100 mm from the edge.
Cut a square of plywood to the size of the distance between the ribs, cut a hole in it the diameter of the vacuum cleaner hose. Attach the square to the stiffeners.

Stage No. 12.
Secure the rip fence with clamps. This is done to make it easier to move the stop. If it is intended only for a milling machine, then secure it with brackets with grooves for movement.
Stage No. 13.
Weld a bolt to a 6 mm thick metal strip. Make the clamps from wood with two grooves for two bolts.


Stage No. 14.
Install milling equipment: thread through side holes cut off axles of the device, put nuts on them and secure the device with pipe clamps.

Stage No. 15.


Turn the table over and use the hex key to lift up the router.
To make it easier to lift the router, it is advisable to install a lift based on a jack.
Option 4. Milling machine based on a desk

A milling machine based on a desk is considered economical and convenient option solutions. The list of photo drawings contains a table with specifications of parts by size and recommended material.

Part sizes and materials


