Construction of a drainage ditch. Do-it-yourself site drainage Technology of site drainage diagram
Quite often, a person chooses a plot for his dacha himself, but he already receives ready house in one area or another. After some time during the operation of the property, it becomes clear that the ground is characterized by an increased level of humidity. This is a rather unpleasant phenomenon, as it causes the most various diseases plantings present on the site. The most unpleasant thing is that groundwater gradually completely erodes the foundation, there is water in the basement, and outbuildings are also shrinking.
A large amount of accumulated moisture causes swelling of the soil, which in turn leads to the fact that paths, blind areas and other decorative elements territory decorations begin to lose their appearance and fail. To get rid of excess moisture, you can use special drainage systems. How to complete them will be discussed here.
Selecting the type and category of drainage
The drainage system in a suburban area can be closed or open. The latter option is suitable for draining water from previous rain and melting snow. Closed and backfill drainage is no less popular. All of them are described in detail.
Open type
To arrange open drainage, the area will need to be dug around a certain perimeter with special small ditches that have beveled edges of about 30 degrees. The total depth of such ditches should be approximately 0.7 meters, the width should be 0.5 meters.
The slope in this case must be observed without fail. If the suburban area is located on a certain slope, it is optimal for the ditch to be located across such a slope. This will help catch any draining liquid. In this case, the flow is directed into a common channel, and not from one section at once.

The open form of a high-quality water drainage system is convenient and simple. In this case, ditches can be made at approximately the same depth, but those made of plastic or durable concrete trays and closed on top. Before laying them on the bottom, you first need to pour standard sand in a volume of up to 10 cm. At the same time, you will need to install special sand catchers, that is, plastic containers that retain sand and other debris.
Important! From time to time, such trays need to be cleaned to avoid flooding.
Closed or hidden drainage
This type is already used for effective liquid drainage. Trenches and small ditches are dug to a total depth slightly below the level of the area where the soil freezes. They are also carried out in compliance with the required slope. Drainage pipes are laid in the dug ditches, through which water will be drained to the drainage well.

There are several basic rules regarding how to arrange a closed form of a system:
- A similar system is installed around the house, which will help effectively remove moisture from the foundation.
- If the territory suburban area is located in a lowland, it is worth laying drainage pipes.
- Before digging, it is imperative to determine the features of the site, its slope and topography. This can be done using special tools, as well as on a purely visual level, for example, by observing where surface water flows.
Important! During construction drainage system, many people have a desire to bring installed pipes and various drains coming from the roof. These are erroneous actions; after some time, the drainage system will quickly overflow and cease to perform its main functions. the best option there will be pipes being laid with their simultaneous discharge into the well.
After the work has been carried out, it is worth determining whether the required slope has been maintained. To do this, you just need to pour water into the trenches and then just watch where it goes. If everything was done correctly, the water will flow freely and not stagnate.
Backfill drainage
This drainage option is slightly similar to the one described above. The difference is that in this situation, which is common among summer residents, pipes are not used at all, but the ditches are filled with ground brick or crushed stone up to about half. Quite fine crushed stone is poured on top, and turf is laid on top.

A drainage system of this type usually silts up very quickly. You can protect yourself from this trouble by simply laying a small layer of special material, for example, geotextiles, which will perform an important filter function. The material will ideally absorb water and at the same time not allow small particles to pass through.
These are the three main options for an effective system, among which the most popular is closed form drainage system. Its arrangement will be described in more detail.
Selection of materials for closed site drainage
To arrange high-quality and effective drainage, it is important not just to study the technique of arranging such a system. It is also necessary to choose the right materials – geotextiles, pipes, and so on.
Pipe selection
The best option would be to purchase pipes made of polyvinyl chloride. The preferred diameter is 110 and 63 mm. Such pipes are corrugated over the entire area, and there are also special holes into which water will penetrate. The inside of the pipes is completely smooth, which will greatly facilitate the exit of water.
It is mandatory to install special inspection wells that will allow you to observe general condition the entire drainage system as a whole. If the drainage pipes are clogged, they can be cleaned using such wells by directing a stream of water from a hose into them under strong pressure.
Regarding the selection of quality plastic pipes, then implement this process stands based on the following rules, which are related to the type and category of soil present on the site:
- If the soil is crushed stone, standard drainage pipes that have perforations are optimal;
- For sandy soil You will need to purchase pipes with a high-quality filter made of geotextile. They will help prevent sand penetration;
- For special silty soil, pipes equipped with filters made of coconut fiber are optimal. They can be replaced with ordinary pipes that are perforated. It will be enough to simply wrap them in pre-prepared geotextile;
- For special loams, a pipe with a functional filter made of special geofabric is ideal.

If there are certain restrictions in the variety of assortment or in material terms, you may not choose pipes so carefully. It will be enough to simply cover the trench with geomaterial and pour a crushed stone layer everywhere. In such a case, you can lay simple drainage pipes that have perforations, which, by the way, can be done on your own using a drill.
Selection of geotextiles
On this moment There are many different manufacturers geotextiles, as well as varieties of the material itself. Geotextiles made from polypropylene are optimal for drainage.

The material is ideally resistant to influence external environment, and is also characterized by optimal filtering qualities. In the process of purchasing high-quality geotextiles, it is worth finding out the density of the material.
Important! For effective drainage, a canvas with a density of 60-110 g/m2 will be sufficient.
It matters to pay attention to general structure material. Geotextiles must be made from a thread with a continuous structure, since those made from scraps will very quickly fall apart.
Selection of backfill materials
For high-quality backfilling, it is recommended to use sand and simple crushed stone. There are no special requirements for sand; as for crushed stone, you should be a little more careful with it. Professionals do not recommend purchasing crushed limestone, as sooner or later it leads to serious salinization of the soil cover. When choosing crushed stone, you should pay close attention to the size of the fraction, which can range from 20 to approximately 60 mm.
Important! All materials for reliable backfilling of trenches must be completely clean, that is, they must first be washed.
Pipe laying method
As noted a little above, all pipes for arranging drainage should be selected with strict consideration of the soil category. The same rule applies to the method of laying them. In soil that is characterized as crushed stone, the structures can be installed without the use of a special filter base. For all other soils, the pipe laying process is carried out as follows:
- After complete leveling, the wells are installed. Such devices must be installed at all turns, as well as where the angle of inclination of the pipes is changed. On completely straight areas, wells are installed at a distance of approximately 50 meters from each other. All laid pipes pass through the wells, so it is worth providing for the presence of holes. They are necessary to monitor the general condition of the entire water drainage system. Also, with the help of wells, it is quite possible to clean wells using water pressure.
- Prepared sand should be poured onto the very bottom of the trench, which must be compacted with a special tamper. Such a layer is at least 5 cm. Geotextiles are laid on top, firmly fixed at the very edge of the trench, gradually covering it too.
- Crushed stone is backfilled, its layer should be approximately 6-9 cm. Pipes are already placed on it and also covered with a small layer of crushed stone. It is desirable that its thickness be at least 20 cm. Thanks to such manipulations, the pipe ends up in a special “jacket” of crushed stone.
- The filled crushed stone must be covered with the remaining free edges, and everything is covered with soil on top.

Execution Process self-execution The drainage system in suburban areas is quite simple, the main thing is to follow certain instructions.
How to determine pipe laying depth
The depth parameters that must be observed during pipe laying directly depend on certain climate conditions. The soil category also matters.
Important! The most important condition is that the pipes must be located below the area where the soil freezes.
The optimal depth will be 80 cm, but more is allowed. This value will be quite sufficient for clay-based soils. Due to their fairly high porosity, such soil freezes very quickly, but to a small depth. In sandy soil, pipes must be laid tens of centimeters deeper; such soils freeze much more strongly.

At the same time, the depth is influenced by the average temperature regime, characteristic of a certain region. In regions where the depth of general freezing is greater, installing pipes at a depth of approximately 80 cm will be sufficient. If the soil is characterized as clayey or loamy, this figure will be 160-170 cm.
How to choose a site for wells
For a well, where all the water that is removed through the drainage system will always flow, it is worth choosing the lowest location in the suburban area. Water is removed from it using a modern country drainage pump, and it can also seep into the deepest ground layers of the soil.

Wells for water drainage, which are part of the systems, are of two main types - absorption, that is, filtering, and also water receiving tanks. The first ones are installed in areas with sandy loam or special sandy soil composition, and a small volume of water is also important. Ground brick elements are poured onto the bottom of such a well; simple crushed stone is also suitable. Pre-prepared geotextiles are also laid on top, which will serve as a filter.
As for water intake wells or collectors, a pair of concrete rings are placed in a dug hole, then a layer of small brick is poured in, and turf is laid. If there is a lot of moisture present in the soil, the thicker the layer of backfill produced will be. Liquid from such devices can be pumped out using a simple pump.
Summing up
After a fully equipped high-quality system, you should not move around it with heavy types of equipment for some time. This is necessary so that the system does not get pressed and therefore does not fail. All construction work on the territory of a suburban area should be completed before creating a drainage system, since restoring it will be much more difficult than creating something new later. This applies to all types of soil, and it does not matter at what time the development of a high-quality and functional drainage system was carried out.
If some points about the arrangement of the drainage system are not very clear, you can familiarize yourself with this video.
With full compliance certain rules related to installation functional system, you can be guaranteed to obtain a structure that will effectively remove excess moisture from the site, completely protecting it from unpleasant waterlogging. It is quite possible to independently build high-quality drainage in a suburban area on your own.
The problem of flooding and increased waterlogging of the soil is familiar to owners of plots located in central region Russia. Dampness and stagnant water after snow melts do not allow proper preparation summer cottage to the summer season, and waterlogging of the soil with constant precipitation is detrimental to many plants. There are several ways to solve these problems, but the most effective is the arrangement of drainage.
In what cases is a drainage system necessary?
Drainage is a technology for collecting and discharging groundwater, melt and storm water from a site, technical and residential buildings. The drainage system prevents leaching, heaving and waterlogging of the soil, which occurs due to oversaturation with moisture.
Arrangement of a drainage system is not necessary at every site. In order to determine how much your area needs drainage, you will need to carry out visual inspection. Pay attention to whether the area is flooded after the snow melts, how quickly water is absorbed after watering the plants, whether there are puddles after heavy rain and downpour. If you have observed these signs more than once, then drainage is required.
The drainage system helps remove stagnant water from the site
If visual confirmation is not enough, then you can conduct a simple experiment - using hand drill or a regular shovel, you should dig a hole 70–100 cm deep. It is better to do this in several places on the site. If after 24–36 hours water accumulates at the bottom of the hole and does not leave, then this is direct evidence of oversaturation of the soil with moisture.
Soil drainage is carried out under the following conditions:
- high occurrence groundwater;
- the site is located in an area with clay soil;
- the site is located in a lowland or vice versa - on a slope;
- The location of the site receives a large amount of precipitation.
The presence of drainage helps preserve finishing and facing materials used for styling garden paths, finishing of the basement and facade of the building.
Types of dehumidification systems
Dehumidification systems land plots there is a great variety. At the same time, in various sources their classification may differ greatly from each other. In the case of drainage systems for suburban and summer cottages It is recommended to use the simplest and most proven solutions.
Surface type drainage
Surface drainage is the simplest and most efficient system. The main task is to drain the soil by draining water formed as a result of rainfall and uneven melting of snow.
Grids protect the open drainage system from large debris
A surface drainage system is constructed across the area of the site, around the house and adjacent buildings, near garage structures, warehouses and the courtyard. Surface drainage is divided into two subtypes:
- Point - in some sources referred to as local drainage. Used to collect and drain water from a certain place on the site. The main area of application is drainage of areas under drains, approx. entrance doors and gates, in the area where containers and watering taps are located. Often used as an emergency system if another type of drainage is overloaded.
- Linear - used to drain the entire area. It is a system consisting of receiving trays and channels arranged at a certain angle, ensuring a constant flow of water. The drainage system is equipped with filter grids and sand traps. Trays and drains are made of PVC, polypropylene, HDPE or polymer concrete.
When installing a surface drainage system, it is recommended to combine point and linear drainage. This will provide the most effective work systems. If necessary, point and linear drainage can be combined with the system described below.
Deep drainage
Deep drainage is carried out in the form of a pipeline laid in places where constant drainage of the soil or lowering of the groundwater level is necessary. Drains are laid with a slope in the direction of water flow, which enters a collector, well or reservoir located outside the site.
The process of constructing deep drainage in a suburban area
To lower the groundwater level, pipes are laid along the perimeter of the site to a depth of 80–150 cm. In cases where it is necessary to drain water from the foundation of a building, pipes must be laid below its depth. And also drainage pipes can be laid over the entire area of the site with a certain pitch. The distance between drains depends on the depth of their placement and the mechanical composition of the soil.
For example, when installing a drainage system, when drains are laid to a depth of 0.9–1 m, the recommended distance between them is at least 9–11 m. loamy soil under the same conditions, the step between drains is reduced to 7–9 m, and on clay drains to 4–5.5 m. More detailed data for different laying depths can be seen in the table below. Information taken from the book “Draining land for gardens” by A.M. Dumblyauskas.
| Depth of drains, m | Distance between drains, m | ||
| Sandy soil | Loamy soil | Clay soil | |
| 0,45 | 4,5–5,5 | 4–5 | 2–3 |
| 0,6 | 6,5–7,5 | 5–6,5 | 3–4 |
| 0,9 | 9–11 | 7–9 | 4–5,5 |
| 1,2 | 12–15 | 10–12 | 4,5–7 |
| 1,5 | 15,5–18 | 12–15 | 6,5–9 |
| 1,8 | 18–22 | 15–18 | 7–11 |
When laying the pipe, the features of the terrain are observed. According to the technology, drains are laid from the highest to the lowest point on the site. If the area is relatively flat, then to impart a slope, a slope is formed along the bottom of the trench. The minimum slope level is 2 cm per 1 running meter of drainage pipe when constructing drainage in clay and loamy soil. For sandy soil, a slope of 3 cm per 1 meter is maintained.
When installing long drainage, you should follow minimum slope along the entire length of the drainage route. For example, for a drainage system 15 m long, the minimum level difference between the starting and ending points of the route will be at least 30 cm.
If possible, it is recommended to exceed the stated slope standards. This will ensure faster drainage and reduce the risk of silting and clogging of the drain. In addition, digging a trench with a large slope is much easier than measuring 1–2 cm.
Drainage in a summer cottage - the simplest methods with instructions
To carry out drying yourself land plot through the drainage system, you will need to familiarize yourself with the work technology, calculate and purchase the necessary materials, prepare tools and a place to perform the work.
Surface drainage of a summer cottage
Open surface drainage is a universal solution for draining summer cottages without large area. For example, for typical plots of 6 acres. You can take the diagram below as a basis. It shows a herringbone-shaped drainage route. The distance between the drains, as stated above, is selected based on the type of soil (see table).
An example of the location of the drainage system in a summer cottage
To carry out the work you will need a shovel and a bayonet shovel, a tape measure, bubble level, hammer and sharp construction knife. The materials you will need to prepare are gravel of fraction 20–40, geotextiles, edged bars or boards 2–3 m long.
To construct surface drainage on a summer cottage, you will need to do the following:
Sometimes, the base of the trench is concreted along the entire length of the drainage route. This allows you not to worry that over time the earthen walls will begin to crumble, water flow will deteriorate, etc. But this approach is more labor-intensive and requires the ability to work with concrete mixture.
Draining the area using deep drainage
Deep drainage is a standard solution for draining suburban and suburban areas. A deep drainage system can be installed even when there is a protective blind area, concrete or slab paths around the building. If necessary, they can be partially dismantled, but the overall structure will not be damaged.
An example of a drainage system project in a suburban area
Work on the construction of deep drainage includes the following:
- According to the design plan of the site, it is necessary to draw up a diagram of the location of drainage pipes and determine the water discharge point, that is, the place from where the collected water will be drained into sewer pipes leading to the drainage well. The depth of the pipeline must be below the freezing level of the soil. For the North-Western region this value is about 60–80 cm.
Preparation of trenches for the construction of deep drainage
- Taking into account the plan, a trench is dug along the perimeter and area of the site with a depth of up to 1 m. The width of the trench is at least 30 cm. All horizontal sections of the trenches are combined into unified system, which is supplied to the water discharge point. After this, trenches are dug maintaining a slope of 2–4 cm per 1 m of surface. To check the quality of the drainage, the trenches are spilled with a large volume of water. If necessary, the slope towards the drainage well increases.
The pit for the drainage well must be dug at the lowest point on the site
- At the lowest point of the site, a place is created for the installation of a water intake or filter drainage well. For large areas located on loamy and clayey soil types, it is better to install storage type wells with a volume of up to 1000 liters. For small areas, you can use both storage and filter wells. The type of tank is selected based on the type of soil.
A wide sheet of geotextile is laid on top of the gravel layer.
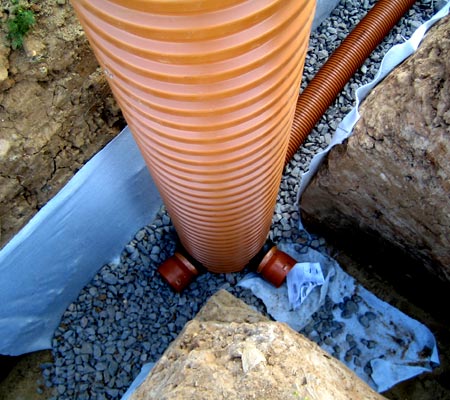
- Fine gravel is poured into the bottom of the trench. The thickness of the layer is 10 cm. A geofabric is laid on the gravel with an overlap on the walls of the trench. To fix the canvas to the walls, wooden or plastic pegs are used, which are driven into the ground. After this, a 10 cm layer of crushed stone with a fraction of 50–60 is poured onto the laid geotextile and carefully leveled in compliance with the slope. A drainage pipe from Ø 110 mm is laid on the crushed stone.
- Modular inspection wells are installed at the drain turning points. The diameter and height of the well depend on the expected volume waste water. To connect the pipe to the mounting hole, a coupling is used, which is coated with a waterproof sealant before joining. Similar actions are carried out to connect the drainage pipe to the well pipe.
An inspection drainage well is installed in places where the drainage pipe turns
- Before backfilling, the drainage system is checked for functionality. To do this, it is drained through drains large volume water. If the water quickly drains and enters the well, then everything is done correctly and you can move on to the final stage. In other cases, you need to find and fix the problem.
- A 20–30 cm layer of gravel of fraction 20–40 is poured over the drainage pipes and carefully leveled. After this, the drains with laid crushed stone are covered with geotextiles. A 10–15 cm layer of quarry sand is poured on top of the geofabric and thoroughly compacted. The remaining space in the trench can be filled with fertile soil or regular soil from the site.
Methods for drying an area without drainage
Excessive moisture in the soil and stagnation of water on the site are not always associated with high level groundwater. Sometimes this occurs due to abnormally low temperatures and heavy precipitation. The combination of these factors leads to the fact that moisture does not have time to evaporate, and puddles and mold form on the soil surface.
Sanding clay soil- one of the ways to drain an area without drainage
If, due to some circumstances, it is impossible to install a drainage system, then there are several effective ways to drain the land:
Of the above methods of draining a site, the most effective are adding a sufficient amount of fertile soil and constructing trenches around the perimeter. On average, 1 m 3 of soil will cost 550–600 rubles. For a plot of 6 acres, 10–12 m3 of soil is sufficient.
The easiest way to drain the soil on a site
Construction of shallow trenches filled with crushed stone is the most in a simple way drainage of a summer cottage. Despite its overall simplicity, this method is very effective and can cope with large amounts of water formed during snow melting.
Work on arrangement of trenches around the perimeter and area of the site includes the following:
If desired, the second layer of crushed stone can be reduced, and the remaining space can be covered with soil from the site. This will hide the drainage under a layer of turf. It is not recommended to plant flowers and greenery on top of the drainage trench. This is fraught with their death due to high humidity in this place.
How to clear a clogged drain pipe
Failure to comply with the technology for laying drainage pipes is the main reason for stagnation and poor drainage of water from distribution wells. In addition, very often stagnation of water is not associated with a blockage at all. Insufficient slope does not ensure constant and uniform drainage of accumulated water towards the drainage pit.
To clear small blockages, use a steel cable or a hose with strong water pressure.
The easiest way to unclog drain pipes is to use a steel cable drain cleaner. At one end of the cable there is a spiral-shaped nozzle, at the other there is a handle with which you can rotate the cable, creating a mechanical load at the site of the blockage.
To clean pipes Ø110 mm or more, it is recommended to use a cable with a steel brush of the appropriate size. During the cleaning process, it is necessary to lower the cable into the drainage pipe until its end reaches the blockage. Next, by rotating the cable clockwise, you need to try to break through the blockage or move it towards draining the water. Usually, small accumulations of silt and leaves can be pushed through without much difficulty.
If it was not possible to remove the blockage, then you will need to call specialists who, using a pneumatic installation and other equipment, will not only clear the blockage, but also carry out preventive cleaning of the entire surface of the drainage pipes.
Video: do-it-yourself site drainage
Oversaturation of the soil with moisture and stagnation of water on the site are big problem, which affects not only the growth of fruit-bearing crops, but also reduces the service life of a residential building. But it is worth remembering that excess water can be dealt with using a drainage system. It is much worse if there is enough fresh water and moisture, and the construction of a well is impossible due to certain circumstances.
Not everyone is destined to become the owner of a personal plot on a flat, open and at the same time dry area. Areas with a high level of groundwater and the threat of flooding are not very convenient for development, but this is not a reason for grief. Device drainage ditch or the whole system groundwater drainage will help get rid of this problem.
Construction of a drainage ditch around the house
Drainage is the process of drying the soil in marshy areas, removing excess water from the ground. This is also the name given to a system of pipes, trenches, and wells installed for these purposes. Why is it needed?
Drainage systems are smart engineering solution, which allows you to get rid of the problem of groundwater in your personal plot. Typically, the territories of gardening cooperatives and villages with individual development are protected from flooding by a drainage ditch in which a pipe is laid, with the possibility of discharging the collected water to a lower place.
It is quite possible to build protective structures at your dacha with your own hands, but this must be done before landscaping begins. Drainage ditch, pipe, well, drainage system - these elements create a drainage system on the site.
 Installation of a well for drainage on the site
 To strengthen them, you will need a large amount earthworks both with your own hands and, possibly, with the use of special equipment.
Types of drainage in a summer cottage
The water drainage system at the dacha is a network of pipes and channels connected to each other, which are arranged in such a way as to collect and remove excess water from buildings, yards, and gardens in the most convenient way and thereby strengthen these objects. If drainage is done correctly, then surface water will not be able to harm the foundation in any way, the possibility of mold and fungi will disappear.
Before starting landscaping work on the site, it is necessary to determine the degree of threat of flooding, your capabilities and select the necessary and most suitable drainage system for this case.
Open or surface drainage
The easiest system for DIY work.
 Design of an open drainage ditch made of granite cobblestones
 Large-scale excavation work is not required here; ditches dug throughout the territory into which a storm pipe drains its water, rain flows, and excess irrigation flows off are sufficient.
Deep drainage system
More difficult option, which is needed in an area with a high level of groundwater located in the lowlands, and will also not be superfluous in clayey and loamy areas. The basis of such drainage is a drain - a pipe that is laid in a trench at a certain depth. The trench leads to a catchment well or larger diameter sewer pipe.
Vertical drainage
This structure is in the form of several wells located around the building. The water collected in them is pumped out by a pump. In order to make such a drainage system, engineering calculations and design are needed.
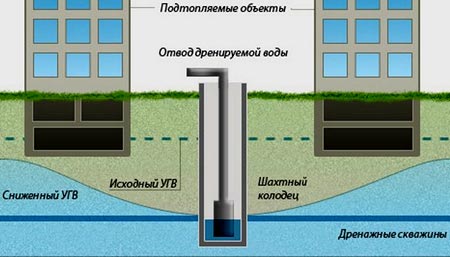 Scheme for installing vertical drainage wells
 Beam system
Complex type of irrigation and drainage structures. Consists of pipes and wells. It is mainly built on large areas or on industrial sites.
Open drainage device
The simplest option for drainage in a dacha is open drainage systems. They are divided into two types: point and linear. Point ones are storm water inlets that are fixed in the places where the drain ends.
Such storm inlets are usually equipped with grates for collecting debris. A linear version of open drainage is a drainage ditch.
The simplest drainage systems are easy to make with your own hands. The art of creating engineering communications was mastered by the ancient Romans. A version of Roman drainage is still used in some farms today. Ancient engineers came up with the idea of strengthening drains with bundles of thick rods that prevented collapse.
 Option for installing an open drainage ditch
 It’s easy to make such a simple reinforcement with your own hands; you don’t need a pipe here, and it can last 15 years.
Stages of creating a drainage trench on the site:

Quite often, areas allocated for gardens, cottages and private buildings are located in areas with excess moisture. To remove excess water from the surface of the earth or from the depths of the soil, a trench system is constructed various types that help solve this problem. Drainage is also needed in an area with a slope if there is an excess amount of moisture in the soil or there is a large amount of precipitation.
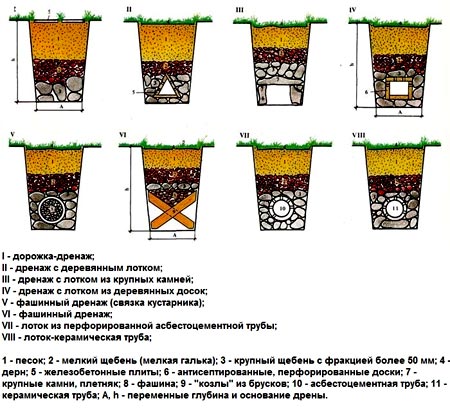
To understand how to properly make drainage on your garden plot, you need to get acquainted with their types. Based on the method of installation, drainages are divided into several types. The first one should be named open type drainage It is a system of trenches with a depth of 20 to 30 cm, the walls of which should be located at a slope of 30 degrees relative to the bottom.
It is used to remove excess water from the soil surface in areas during heavy rainfall and spring melting of snow. All trenches are dug at a certain slope so that water flows to the side general sewerage or some kind of water collector. To prevent the walls of open drainage from crumbling or collapsing, they are strengthened with stones, concrete or plants with a strong and branched root system.

Open drainage type
The second can be called closed or deep drainage, which can be horizontal or vertical. This species helps to drain water inside the soil in areas with high groundwater levels. Deep horizontal drainage is a network of special pipes with holes connected to a reservoir, sewer, ravine or well. They are located at a depth of 0.8 to 1.5 meters and covered with crushed stone and sand.
Vertical drainage refers to drainage wells where water accumulates from a trench system and which are connected to a sewer system or a reservoir or ravine. If there is no way to connect such wells to the sewer system, then the water is simply pumped out using a submersible pump and transported in tanks.
It is also worth mentioning the backfill type of drainage, which is most often used on heavy and clayey soils. It is a fairly deep trench, half filled with large crushed stone, on which a fine fraction of crushed stone is poured, and on top of a layer of ordinary garden soil (from 15 to 35 cm).
 Closed or deep drainage
  Backfill type of drainage
Drainage pipes
When creating a drainage system for draining water in a garden or adjacent area, as a rule, special perforated pipes are used, made from various materials. The term perforated means that there are holes of various diameters (from 1.5 to 5 mm) across the entire surface of the pipes. Nowadays, pipes made of polyvinyl chloride (PVC) and polyethylene are mainly used for drainage construction. low pressure(HDPE) and high-density polyethylene (LDPE). They have high strength, they pass water well, do not corrode and are quite resistant to aggressive environments.
They also produce asbestos-cement and ceramic pipes, but they are rarely used because they are heavy and difficult to carry out installation work quite high. And their service life is shorter than plastic drainage pipes. For asbestos-cement and ceramic ones it is 30 years, and for plastic ones it is from 50 to 60 years.
Plastic drainage pipes are produced single-walled with perforations (holes) and a geotextile filter on top of the pipe, and double-walled with perforations and also with a geotextile filter. There are also pipes with a filter made of coconut material, which are used on soils with a large amount of clay. Drainage pipes with a geotextile filter are used on sandy soils. Filters on pipes are needed to ensure that the holes in the pipes, sand and gravel do not become clogged with silt and small particles of earth.

Single-wall perforated pipes are used at a depth of 2 to 4 meters, and double-walled pipes are used at a depth of up to 6 meters. The diameter of the pipes can vary from 63 mm to 200 mm. All plastic drainage pipes have a corrugated surface. The smooth inner surface of plastic pipes helps to pass large amounts of water quickly. In addition, these pipes are easy to install and have a reasonable price.
It is rare that someone is lucky enough to become the owner of absolutely flat area land. On a flat surface it’s quite easy...
Making surface drainage
To know how to make drainage on a site, you need to know its construction technology. The drainage system for removing water from the ground surface is usually made of main or main trenches, which are often located along the perimeter of the site. They have a slope towards the sewer. There are also auxiliary trenches that run throughout the entire site from the places where the largest amount of water is formed to the main ones. Accordingly, the auxiliary trenches have a slope towards the main ones. Typically it ranges from 1 to 3 cm per meter.
Before you begin constructing the drainage, be sure to draw a plan of the site and drainage system. Mark trenches and monitor slope while excavating using tools. This will help avoid unpleasant surprises after all work is completed. Remember that the walls of surface drainage are located at an angle of about 30 degrees to the bottom. It is advisable to strengthen them. This can be filling with crushed stone or gravel, as well as finishing with large stones, concreting and planting various plants.
After digging trenches, be sure to check how the water will flow through the drainage system. To do this, run along it sufficient quantity water and watch how it passes through it. If it stagnates in some area, it is better to eliminate this problem before the work is completed.


It is also worth noting that an open drainage system can become the center landscape composition plot, if it is decorated with beautiful combinations of stones of different shapes, sizes and colors.
Making deep drainage with your own hands
A network of drainage trenches to remove water deep into the ground is dug according to a plan drawn up in advance and marked on the surface with the required slopes. The width of the trench at the bottom is usually at least 40 cm, and the depth is determined by the project. But usually it ranges from 0.8 to 1.5-2 meters. The slope varies from 2 to 5 cm per 1 linear meter trenches.
A small layer of clean river sand (coarse-grained) about 10 cm high is poured onto the flat and compacted bottom of the trench, which is also carefully leveled and compacted.
Then the bottom and walls of the trench are covered with non-woven geotextile fabric, the density of which is about 200 grams per square meter. Moreover, the fabric is positioned so that it should completely cover the walls and still extend to its edges by 15-25 cm. A layer of washed crushed stone with a height of 15 to 25 cm is poured onto the fabric, which directly depends on the composition and water permeability of the soil. On lands with a large amount of sand, the layer height is about 15 cm, and where there is a lot of clay in the composition, the crushed stone layer is increased to 25 cm.
Crushed stone must also be compacted and leveled taking into account the required slope. You need to check the slope after each poured layer, its leveling and compaction. A perforated drainage pipe is laid out on it, which is then covered in layers with crushed stone or gravel. Moreover, each layer must be carefully compacted. The layer of crushed stone on top of the pipe is from 10 to 25 cm.

On top of the drainage pipe and the fill around it, the edges of the non-woven geotextile fabric are wrapped over each other with an overlap. Then a layer of sand 10 to 30 cm high is poured, after which the trench is filled with ordinary soil, which was removed during digging. remember, that river sand, crushed stone and gravel used in the construction of a deep drainage system must be free of soil, clay or other small particles. Drainage made in this way will drain water well and will last for many years.
When we buy a building plot, the question arises: to choose a flat or sloping site. Frequently offered…
Drainage on a slope
From areas located on slopes, it is also necessary to drain excess water from the surface and from inside the soil. After all, large amounts of precipitation and water formed as a result of melting snow cause land erosion, contribute to landslides, and also erode the foundation various buildings, paths, retaining walls and steps. For such areas it is necessary to combine open and deep types of drainage.
Actually, the installation of a deep drainage system in areas on a slope is not much different from that carried out in horizontal areas. But still, there are some points that should definitely be taken into account when performing these rather complex works. With this location of the site, it immediately becomes clear that the well for collecting water or sewerage should be located at the lowest point. The main or main trenches are dug, if possible, next to the fence.


Auxiliary trenches are directed to the main one at a certain angle. It turns out something like a Christmas tree. If the slope of the terrain is not enough for good drainage of water, then trenches are dug, gradually deepening so that the overall slope is from 2 to 4 cm per 1 linear meter of drainage.
If the site on the slope occupies a fairly large area, then it is worth dividing it transversely. drainage trench, which will collect water from the territory located above. Water will drain from it through buried drainage pipes into the lower water intake or sewer system.
It is worth remembering that the construction of a drainage system on a site located on a slope requires preparation, attention, careful execution and, of course, financial costs.
Don't be upset if you get an uneven piece of land. Thoughtful and competent drainage will help turn the disadvantages of your garden into advantages.

Don’t want to put up with excess moisture in your summer cottage? And you are doing the right thing. Excess water in the soil will bring nothing but harm: crop failure, death of plantings, swampy areas, destruction of the foundations of buildings. A simple way to get rid of a complex problem is to install a drainage system yourself.
Reasons for installing a drainage system
If the area of the land is flat, and the soil is fertile and absorbs water, then you are incredibly lucky. In this case, there is no need for drainage.
Drainage of a summer cottage is required in the following cases:
- The site is located on clay soil.
- Low location of the territory.
- The country house stands on a slope or at the foot of a hill.
- The region where the dacha was built is characterized by frequent and heavy rains and snowfalls.
- Groundwater flows at a distance of less than 3 meters from the surface of the earth.
Excessive soil moisture is judged by standing puddles and vegetation. Thus, sedge and reeds grow in wetlands.

Confirm the need for drainage once again by conducting an experiment. Dig a hole 700mm deep and check after 24 hours to see if water has collected there. If yes, then drainage at your summer cottage is required.
Types of drainage systems in the country
High humidity in the territory of a summer cottage is due to for various reasons. Depending on this, one or another type of drainage is chosen:
- Surface is the easiest way to drain the soil. This type of drainage system is designed to protect the site from water, the source of which is precipitation in the form of rain and snow. It is installed in areas without sudden changes.
Surface drainage is a set of trenches dug along the perimeter of the territory. Flowing into ditches, water enters the installed lowest point collector systems.

Surface drainage
The external drainage system is divided into two subtypes: point and linear.
- Deep drainage – closed method drainage of land. It is resorted to in the following cases:
- When country house built on an uneven surface;
- when groundwater is close to the surface of the earth;
- with clay soil.
A do-it-yourself deep drainage device runs along the perimeter of a residential building and around agricultural buildings.
Preparation for construction work
Drainage is a system of ditches and pipelines. In order to correctly connect the elements to each other, it is necessary to make complex engineering calculations and draw up a drainage diagram. You can’t handle this alone, so call the specialists of the Marisrub company for help.
Taking into account the characteristics of the soil and landscape, experts in their field will draw up a design diagram and advise you correct device gutter

The drainage system diagram contains the following information:
- The place on the site where the installation of the drainage system begins. This is the highest point in the territory.
- The lowest point of the system relative to the collector;
- Location of main and additional ditches;
- Dimensions of trenches and pipes;
- Name and quantity of consumables;
- Installation diagram of pipelines and wells;
- Trench inclination angle.
When starting to install drainage yourself, take into account certain nuances:
- The entire land plot is subject to drainage. Therefore, drains for buildings and plants are included in a single system.
- Material and time costs are inevitable. On average, it takes up to 3 months to install a drainage system.
- Drainage of the area is carried out in the summer.
- The pipes are installed at a depth below the freezing point of the soil, and the drainage system around the residential building is laid below the base of the foundation.
Installation of surface drainage
Making an external drainage system with your own hands is easy even for novice builders.

Installation is easy:
- Using the design as a guide, dig ditches according to the marked lines. Observe the dimensions: depth – 500 mm, width – 400 mm. To prevent the walls of the trench from crumbling, they are made sloping at an angle of 30 degrees. Externally, the trench resembles an inverted trapezoid. The main ditches drip at a slope towards the water collection point - a well or reservoir. Additional branches of the system are made at an angle to the main trenches. The slope size is from 50 to 70 mm per 1 meter of length.
- Check the operation of the drainage system. To do this, pour 2-3 buckets of water into the ditches and watch the flow. If liquid accumulates in the area, adjust the slope angle.
- Fill the ditch with crushed stone. Coarse material is laid underneath, and the top layer is formed by smaller crushed stone. This is recommended for water filtration.
To extend the life of the structure, buy plastic trays and place decorative grilles on them. To prevent clogging of the trays, additional sand traps are installed.
Thus, with the help of simple manipulations, you have installed an external linear drainage system with your own hands.
Point drainage is necessary for local water drainage. It is installed in places where precipitation drains from the roof and in areas where plants are watered.
Installation of deep drainage
The construction of a closed drainage system is considered difficult to do with your own hands and is economically expensive. To install deep drainage you will need:
- Plastic pipes with drainage holes and with a diameter of 10 cm for the main trenches or 7.5 cm for additional ones.
- Connecting elements for pipelines;
- Water collector for waste water. Reinforced concrete rings, plastic cans, and car tires are suitable as collectors.

DIY installation of deep drainage consists of the following steps:
- Dig ditches sloping towards the sewer, 600mm deep for clay soil or 900mm deep for sandy soil.
- Place a 10 cm layer of sand at the bottom of the trench and compact it thoroughly.
- Cover the trench with geofabric so that the edges reach the sides.
- Pour crushed stone 20 cm high and lay drains on top with the holes facing down. Inspection wells are installed at pipeline bends. They help monitor the operation of the drainage system and clear it of blockages.
- Pour more crushed stone and wrap the geomaterial into a roll.
- Fill the trenches with soil and cover with turf.
Deep drainage is a reliable thing, but the installation is expensive. That's why thrifty owners summer cottages have found a way out of the situation: they replace pipes with a bunch of branches and brushwood, and geotextiles with moss or turf.
– this is not a luxury, but a necessity. Therefore, approach the issue of installing it responsibly in order to avoid troubles in the future.