DIY slab fence. Slab fence: technology for constructing horizontally and vertically oriented structures Slab fence
Every owner, as soon as he has a site for construction, first of all wants to mark the boundaries of his property. Some people prefer a blind structure to hide from prying eyes, others decide to make the fence more decorative. But many are not ready to spend a significant amount on this. So it's a matter of choice suitable material relevant. At a huge number options, you can choose a fence made of slabs. It is original, inexpensive and environmentally friendly, as well as great opportunity design and build a fence with your own hands. Fortunately, you don’t need any special skills or knowledge for this.
Croaker: advantages and disadvantages of the material
Croaker is one of the species unedged boards, until recently considered a waste product from wood processing. It is obtained by cutting a log. It looks like a semicircular board on one side, most often covered with bark. Therefore, the croaker is very cheap. At proper preparation and processing - a very durable material that is resistant to various weather conditions. Fits perfectly into any project. One of the most important indicators croaker - environmental friendliness. Even if you decide to put up a new fence over time, the old fences can be used for burning.
The disadvantages include:
- labor-intensive work, since each die requires manual processing;
- instability to fire - wood tends to burn.
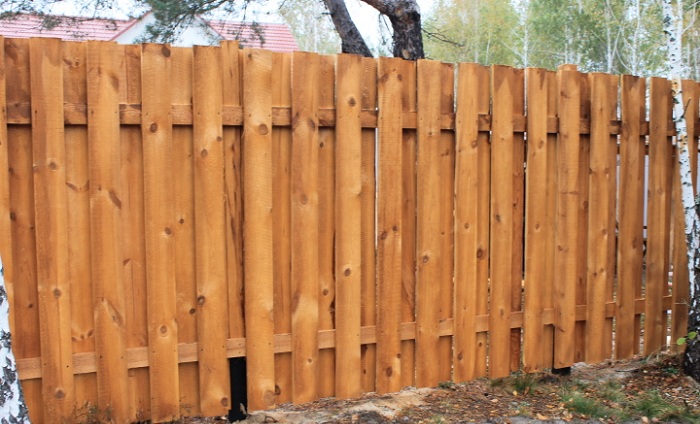
Photo gallery: options for beautiful slab fences
Croaker is an excellent material for making fence decor  The slab can be installed vertically or horizontally
  You can practically build from a slab monolithic structure
  The slab fence is very reliable
  Croaker can serve as a decorative element for a gazebo
  The slab fence is durable and beautiful
  A double fence is stronger than a single one
Preparing for construction: calculating the area for a wooden fence
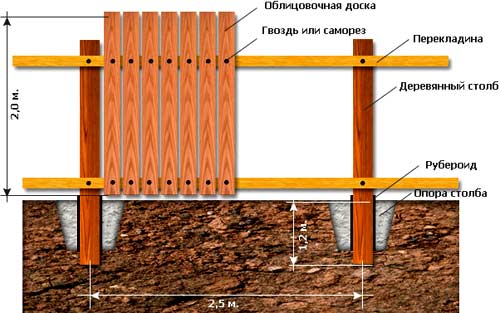
Before you begin construction, you need to do everything necessary measurements and prepare a design project. The fence can be entirely wooden or combined. It is installed as strip foundation, so they attach it to poles. The slab is combined with metal, brick, stone, concrete.
To make a fence, calculate the number of posts required for fastening. The width between them should be at least 2 m. If they are placed further apart, the structure will be less durable. You also need to determine the method of attaching the dies and calculate their exact number in one span. At vertical mounting it is necessary to determine how many transverse runs will have to be installed. They can be made from slabs, after sawing them lengthwise.
How to select and process the material correctly
At sawmills, as a rule, slabs are sold in bulk or sorted into bundles. The second type is divided into two types - wood and business. The first one is only suitable for heating, as it is too thin and uneven.
The business one is not much more expensive, but has a thickness of 35 mm, and approximately the same length of the die. The width varies from 20 cm and more, which eliminates deformation. Please ensure that the number of knots is small, as holes may appear in their place during the drying process. It is necessary to purchase material with a reserve of 15–20%.
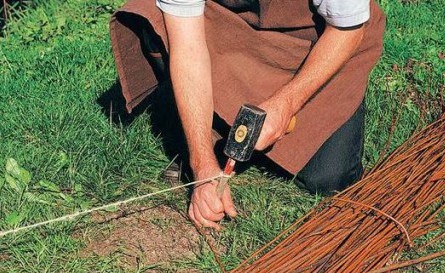
Cleaning should begin immediately upon delivery. This is very important, because the croaker is sold undried, and bark beetles or woodworms grow under the bark, which will quickly spoil the wood. While it is raw, this is quite easy to do. For debarking, a shovel with a well-sharpened blade is used, carpenter's ax or skobel. The tool must be sharp so that the process takes a little time. You can use a encryption machine.
When the croaker is cleared of bark, it needs to be sanded and dried. Workpieces with cracks and knot holes should be rejected immediately. Only after this can you begin to treat with an antiseptic. Here you can choose traditional drying oil or give preference to a new generation of antiseptics: with a tinting effect, for fire protection, preventing wood cracking, etc. To save time, it can be applied using a spray bottle. If this is not possible, a regular brush will suffice. The antiseptic is applied in 2–3 layers at intervals of 7–8 hours.
If you set out to surprise with the result, use a technique such as brushing ( artificial aging tree). It must be carried out at the stage of preparing dies. Treat the wood cleared of bark with special brushes with metal bristles, removing the softest fibers of the tree. Then sand with an abrasive brush or coarse sandpaper. Cover the treated dies with stain or special dyes. After drying, polish the wood, and after installation, cover it with several layers of varnish.
Step-by-step instructions for installing a fence at your dacha with your own hands
Having finished preparing the dies, proceed to preparatory work for installation:
- To do this, the territory is marked out using pegs and rope. The location of corner posts, gates, and wickets is determined. These places are marked with pegs. A rope is stretched between them to ensure a straight fence line.
- Holes are prepared for the pillars. It is best to use an ice drill for this. This will significantly speed up the process. The depth of the hole is approximately 1–1.2 m, the diameter is 2 times larger diameter pillar The length is calculated taking into account the underground part. As a rule, it is necessary to add 50–70 cm to the height of the fence - the amount by which it will be dug into the ground. Easier and more reliable to use metal poles with welded plates for fastening purlins. It is enough to level them and concrete them. A pipe with a diameter of 7–8 cm and a wall thickness of 3.5 mm is suitable. If you use wooden poles, it is better to give preference to oak, pine or larch with a diameter of about 20 cm. First protect the part that will be in the ground from moisture. For these purposes, you can use Kuzbass varnish, hot resin, and cover the top with roofing felt or geotextile. You can simply treat the lower part with fire. This will “seal” the wood capillaries and protect the post from moisture from below. Another option is to soak it in used car oil. But this method of processing is suitable only if the fence is installed for a short period of time.
- Metal pillars need to be concreted. To do this, install a support in the pit strictly vertically, controlling the process with a level. It is best to strengthen it with wooden spacers. Concrete is poured into the hole. You can fill the hole entirely, or you can only fill it halfway, filling the remaining hole with crushed stone.
- After the concrete has hardened, you can begin installing the fence. Beforehand, screws, self-tapping screws or nails are briefly immersed in drying oil or waste machine oil- this gives additional protection to the dies from moisture at the attachment points. And only after this can you begin to attach the purlins onto which the dies will be nailed vertically. The purlins are attached with the convex side inward. When positioned horizontally, the dies are attached directly to the post, and there is no need for runs.
- When fastening the slab vertically, the dies can be stuffed overlapping, without a gap, or an indentation of 5–10 cm can be made. It is not advisable to attach them end-to-end, since such stuffing looks sloppy.
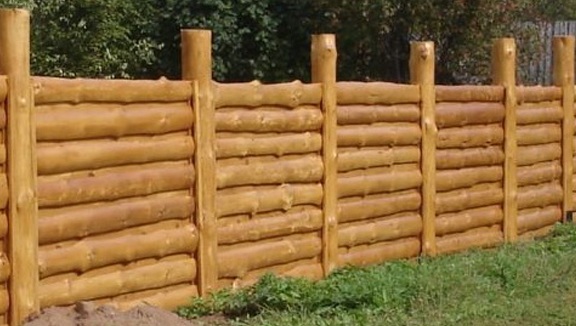
- At horizontal mounting The dies can be attached either with a gap or with an overlap - in a herringbone pattern (it should be at least 1.5–2 cm, since the wood can dry out, which will lead to the appearance of cracks). They are nailed directly to wooden posts.
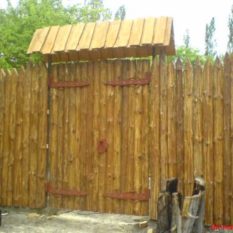
- Once installation is complete, you can begin decorative finishing. There are a lot of options. The top of the fence can be made smooth or curly. In the first case, the level can be cut to the required height using a cord and trimmed using a jigsaw. The figured top cut is made with a special pattern. It is easy to build it yourself from thick cardboard.
- To increase the service life, spans can be decorated with decorative gable roof or leave open cuts, having previously “sealed” them with waste oil.
- The final stage is painting. This important point, since the presence of this coating affects the durability of your fence. As a rule, slab fences are tinted with stain and varnished. Various tinting impregnations can be used. There are many of them now, and they are presented in a wide range of colors.
If you use a façade oil paint, you will need to apply 2 layers. It will last 5-6 years, and then you will need to cover the fence again. A budget option- prepare a special “Swedish” paint yourself. All components can be purchased on the construction market. It does not allow air to pass through, covers the wood well in one layer and lasts much longer than oil. This paint is absorbed into the wood to a depth of 1–1.5 cm and does not form a film on top. It can be used even if the wood is not sufficiently dried. During production, it is necessary to strictly follow the recipe.
Pour 2 liters into a metal bucket warm water, heat and, stirring, add 193 g of rye flour. Then add 87 g into the paste iron sulfate and the same amount of salt. Heat the mixture over low heat for 5 minutes, stirring, then add 87 g of red lead. To give a specific color, you can add concrete pigment. Lastly, you need to pour in 107 ml of drying oil (you can replace sunflower oil). To stir thoroughly. Dilute the finished paint with 1.5 liters of water to obtain a more liquid consistency.
Video: DIY unedged board fence
A slab fence can be the simplest or the most exclusive project. One should not be afraid to combine the most various materials and have a desire to create. Croaker is an inexpensive, but durable and beautiful material.
In woodworking, a slab is a side cut of a whole log along with the bark. It looks like this - one side is cut, the second part is the untouched surface of the trunk.
According to grade, the material is divided into 2 types:
- Wood-burning,
- Business.
Wood croaker  Unprocessed business croaker
  Processed business croaker
  Processed and sized business croaker
The first one goes for kindling, as is obvious from its name. But the second one can be used not only for fences, but also for formwork, manufacturing external cladding(mainly outbuildings), floors for attic spaces
Therefore, the fence is built from business slab.
Features of fences
The disadvantage is a lot of work. If you buy a slab for a fence, it must not only be dried and brought into decent condition, but then also covered with anti-rotting agents and painted.
Despite the complexity of installation, wooden fence from slab is a candidate for the top three popular and most budget-friendly fences, along with corrugated sheeting and chain-link fencing.
Photo gallery


Also, a disadvantage, compared to metal or concrete structures, can be considered fragility. A fence made from slab boards, even with constant touch-up and repair, has a service life of no more than 10 years.
Design advantages:
- Natural environmental friendliness. Fences made from slabs and unedged boards not only do not harm the environment, but also have a beneficial effect on health, since they are made from natural, untreated wood.
- Low cost. Being a product of the woodworking business, croaker is affordable for any owner.
- Easy to install. And at the same time finished product there will be an attractive aesthetic appearance. You can even make an antique fence from slabs.
- In any embodiment, this structure will perfectly protect the site from unwanted glances and uninvited visitors.
So valuable and accessible natural material, like a croaker, cannot but interest those who are looking for suitable inexpensive material for building a fence. Moreover, you can build a fence from slabs with your own hands.
Preparation of material A
When choosing a croaker, you need to be aware that you will have to work a lot.
First of all, it needs to be pre-processed: 
- First, sorting occurs and the highest quality boards are selected.
- They are then cleared of the bark with an axe. You can’t leave the bark - under it, despite treatment and prevention, there will definitely be bark beetles, which will reduce the life of the structure by three times.
- After cleaning the bark, the material must be dried. Then sand the surface and cover with antiseptic in several layers.
After final drying, you can begin installation.
How to do it?
Video of the construction of a fence from slab:
Prepare materials and tools:
- Gorbyl.
- Support pillars.
- Beam for crossbars.
- Screws and nails.
- Hammer, screwdriver, axe, shovel or drill.
- Cement mortar, crushed stone.
You need to build a slab fence at your dacha with your own hands in several stages:
- Marking
Marking is necessary because without it it is impossible to build a beautiful slab fence.
Having marked the boundaries of the site, the line of the fence is marked and the installation points of the support pillars are indicated.
- Installation of pillars
When constructing this type of fence, the following principle is used: fastening boards to support pillars one by one.
You can install a fence in spans, that is, first knock down one completed span, and then attach it to the poles.
But this method is heavier - the span weighs more than tens of kilograms, so most builders prefer the first option.
Holes are dug in the marked area to allow the installation of support pillars. They are buried by a third (for a one and a half meter fence, a hole half a meter deep is drilled).
A wooden pole is installed in the hole. The base is covered with crushed stone and filled with cement mortar.
Knocking down a fence
Knocking down a fence horizontally
There can be two options here - the boards are nailed vertically or horizontally:
- If horizontal, the boards are attached to support posts.
- If vertical - to the cross beam.
Can be secured with nails or screws. You can nail the slab in a row or overlap.
Knocking down a fence vertically
The top part can be trimmed decoratively with a jigsaw or saw, cut into a pattern or geometric shapes, sharpen.
The finished fence may or may not be painted, but it must be processed. Especially if you didn’t pre-coat the boards with anything when preparing them.
What to process?
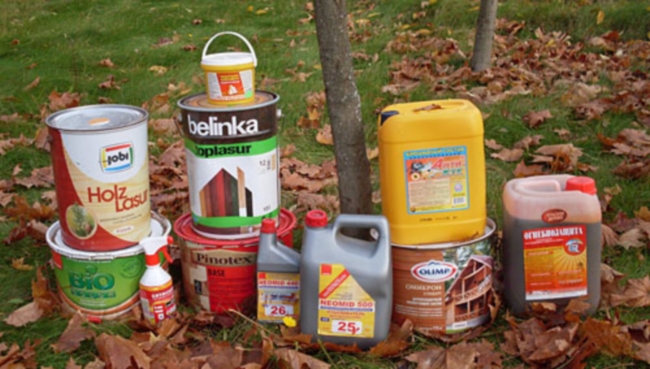
Wood processing products
Antiseptic for wood, stain and any composition available to you that can protect your structure from dampness, mold, fungi, beetles and natural influences.
After processing, if you do not want to paint over the wood texture, coat the surface with varnish.
This will extend the life of the fence for several more years.
Recycling wood waste can be no less profitable than primary wood processing. Skillful hands can easily turn an ordinary slab into almost anything - from a temporary fence at a construction site to designer furniture that will delight the most discerning buyer.
Nowadays, recycling any waste (not just wood) is becoming “good form” for entrepreneurs, since these technologies save environment and at the same time make it possible to obtain new materials at a low cost of raw materials.
These are boards that are sawn (or sawn not along the entire tree trunk) on one side and convex and covered with bark on the other. Typically, these woodworking remnants make up 0.1 part of the total purchased material.
There are two types of croaker:
- Wood (or small) is a material that is no longer useful in construction.
- Business (or large) - boards of sufficient thickness and length so that they can be used to make various wooden products.

What can be made from slab
There are many applications for both types of croaker.
Business Croaker can be used to create:
- various types of fencing;
- formwork, cladding strips;
- finishing of openings;
- pallets (in the form of a container board);
- wooden furniture;
- ceilings and subfloors;
- products for design decoration;
- wall elements for wooden structures.

From a wood slab you can make:
- firewood for heating;
- wood chips;
- sawdust for fertilizer;
- sawdust fuel.
Additional information: business slab has huge advantages over boards, logs, timber - it is the relative light weight of the material and low price. Therefore, it is widely used for the construction of residential, utility, and storage buildings.
Processing equipment
Currently the market offers quite a large assortment a variety of equipment for processing slabs. When choosing a machine for processing, you need to focus on final goal- what kind of material you want to get after processing. It is also important to consider the quality of the final product, since different mechanisms produce boards of varying degrees of smoothness, length, width, etc.

As a rule, to work with a slab, you need a slab-rib (edging) and dividing machines. The first one cuts the edges, processing the slab into boards of a given thickness (usually 10.5 - 15.5 cm). The second divides the finished board into separate parts of the required length.
This video clearly shows the operation of the machine that produces edged boards from slab
These machines have a fairly simple design, so the cost of each starts at about 100 thousand rubles. In order not to overpay and not to clutter up with equipment useful areas, it would be more profitable to purchase a special line for processing slabs, which combines the functions of several machines at once.
As a rule, the slab processing line is equipped automatic system supply of lumber with an adjustable speed of movement of the board (determined by the operator depending on the parameters of the slab), several saws, which allow you to obtain 2 or more finished boards in one pass. The cost of such a line on the market is from 200-300 thousand rubles.
By the way: when the machines operate, two are obtained at once useful material- slabs and sawdust processed into boards. The latter can also be used (as fertilizer, packaging material, for mulching the soil, making fuel, particle boards and fibreboards, etc.) or sold.
Processing slabs into chips can also be profitable and in a simple way its disposal. To do this, you don’t need to buy expensive equipment - a regular wood waste crusher will suffice and circular saw(the simplest option) to cut long pieces of slab into more manageable pieces that the crusher can handle. As a rule, this method is used for processing wood slabs, which are of little use for construction, finishing and processing into edged boards.

Processing slabs at home
It is unlikely that anyone would want to install a woodworking line at home or in their garage in order to organize the mass production of boards from wooden waste. Of course, you can buy a couple of machines and start processing slabs, but in any case, a handicraft “factory” will not be able to cope with large volumes of raw materials.
Therefore, it is much more profitable and convenient to make, for example, designer furniture, interior items from sawmill waste at home, or to make custom repairs using “wild”, little-processed wood. You can learn more about these ideas by watching the video:
Of course, even such work requires the use special tool. But on the other hand, this type of processing can be more profitable at home.
Please note that for various products it is better to use coniferous slab - it has a more interesting texture, is also almost not subject to rotting and is less permeable to moisture even without special treatment. Also coniferous wood It is particularly durable, but can be easily processed in in capable hands masters
Is there any benefit to recycling?
With the right approach, recycling sawmill waste can bring good profits. For example, a slab processing line installed at a woodworking enterprise can reduce the amount of waste and increase the volume of board production by 10%.
Large enterprises often sell croaker at bargain prices or give them away for free on a pickup basis. Thus, raw material costs can be minimal or approach zero, but at the same time, one processing line can produce up to 65 thousand cubic meters of slab boards per year.
In many regions, on highways adjacent to gardening, you can see trucks filled with the remains of boards and slabs. Many summer residents and rural residents use such trimmings as fuel, buying them in whole cars. For these purposes, even serious processing of wood waste is not required - it is enough to cut it into small pieces, which can be done even with an ordinary circular saw.

As for hand-made slab products - designer furniture, interior items, etc. - then they require serious labor costs, but at the same time they can be sold at a high cost, completely paying off the process of processing and creating the finished product.
Conclusion
Currently, recycling wood waste is positioned as a fashionable business idea. This is due to the fact that such production quickly pays off and begins to make a profit. In addition, the recycling of wood waste allows us to maintain the ecological balance on the planet and leave more living forest for posterity.
We build the original and most cheap fence from a slab. How to make a fence from slab: photo, video. Options for slab fencing.
A fence made from slabs is the most cheap option construction of timber fencing. Croakers are waste (sides) that remain when cutting logs; they are practically not used in construction and can usually be purchased at sawmills for almost pennies.
You can buy croaker at any sawmill, the cost is pretty cheap. I do not recommend taking a slab made of poplar; it is not durable, breaks and rots quickly. If you take a slab from birch, it will be difficult to drive nails into hard wood.
Support posts.
Wooden posts with a diameter of 15–20 cm can be used as support posts. The length of the posts depends on the height of the future fence; it must be taken into account that approximately a third of the length of the post is buried in the ground.
Cross members.
If the direction of the slab boards is vertical, then you will need cross members to which they will be attached; boards or beams will do.
Tools (axe, hammer, level).
To begin with, the croaker itself must be cleared of the bark; if left with the bark, the wood will quickly rot, and the bark will still flake off and fall off. You can clear the bark from the croaker with an ax or a large cleaver.
How to quickly clear the bark from a croaker video.
We are standing a fence made of slabs.
To begin with, the croaker itself must be cleared of the bark; if left with the bark, the wood will quickly rot, and the bark will still flake off and fall off.
You can clear the bark from the croaker with an ax or a large cleaver.
Next, you need to install support posts under the fence, but first they need to be treated with an antiseptic, and the part that will be buried in the ground must be tarred or at least covered with used motor oil. If there is no resin or oil, you can do as our grandfathers did before, simply burn the lower parts of the pillars over a fire; the soot will prevent the wood from rotting for quite a long time.
But most effective way This is to cover the wood with bitumen, heat the bitumen in a bucket over a fire and use a brush to cover the part of the post that will be dug into the ground.
The pillars are dug into the ground, digging holes under the pillars with a shovel is a rather labor-intensive process, it is better to use a garden hand auger, the process will go much faster.
The distance between the posts is no more than 2 - 2.5 meters, otherwise the fence may sag.
The slab can be attached horizontally directly to the posts. The boards can fit tightly together, or you can leave a gap. We level the boards and nail them to the posts.
If you place the slab boards vertically, you will need cross members to which they will be attached.
The crossbars are attached to the posts, then the slab is attached.

Reading time ≈ 3 minutes
The construction of a fence is an indispensable part of landscaping a dacha or country house. Using wood to build a fence is a way to create a beautiful and environmentally friendly structure. And if you make a fence from slabs with your own hands, you can also save a lot. After all, the cost of such material is much lower than that of a board, and appearance even more interesting.
Features of the material
A slab is the name given to the end board when sawing a log longitudinally, which is convex on one side. This is low quality lumber, with bark, the cheaper it is, the more knots it has. One side is smooth and the other is semicircular. Most often, a slab is taken for kindling, but with a skillful approach it will turn into an original part.

It is better to remove the bark so as not to provoke rotting. However, if you do not remove it, you can make a fence stylized as an ancient town. If you decide to treat the surface, you will need a hatchet and Grinder. As a last resort, use a regular shovel. But a grinding machine gives a better result. Processing can be carried out on a sawmill. But doing the work yourself will save money.
The final stage of preparation for construction work will be treated with special means that will protect the wood from exposure to the atmosphere and insects. It is advisable to tint the workpieces; this will significantly improve their external qualities. These works are performed after drying the slab from which the bark has been removed.
Preparatory stage

On preparatory stage It’s not just the croaker itself that is cooked. It is necessary to take care of other components, without which it is impossible to build a fence.
- Support posts (square or round pipes).
- Cross members (metal joists).
- Rope.
- Self-tapping screws or nails.
- Shovel.
- Materials for concreting supports.
Features of installing a slab fence

First, holes are dug for the installation of support pillars with a depth of 1-1.5 m (depth of soil freezing). It's better if they come from metal supports. The standard distance between supports is 2.5 meters. For strength, the pillars are not simply buried, but strengthened with concrete mortar. A rope or thread is pulled between the fixed supports to determine where the fence itself will be. This technique eliminates unevenness.

How exactly to make a fence from a slab depends on the owner. The boards can be mounted vertically or horizontally, overlapping or with gaps. Only if you decide to overlap, you should remember that the boards should overlap each other by at least 2 cm, because the material dries out by about 1.5 cm over time. In general, there is no limit to your imagination here. The presented photos and videos will help you choose the best option.

Sometimes this material combines with others. For example, a wooden slab fence is installed on a stone foundation and secured between brick support pillars. Other variations can be used.

In order for a garden fence made of slab to please you for decades, you must follow the following recommendations:
- It is better not to use boards that are too wide; over time they will crack, this will spoil the appearance and reduce the strength of the structure.
- The support pillars must be deepened to the depth of soil freezing.
- A gable roof over the fence will enhance the countryside flavor and give the building an ancient look. In addition, this is a good technique for protecting against excess moisture.

A fence made from an ordinary slab will become a kind of face of the house. After all, such material is not often used for barriers. Its appearance is no worse than that of other materials, and the cost is much lower.