Disk Drill is a program for data recovery on macOS. How to Recover Deleted Files on Mac for Free
Even using such a proven and fairly reliable tool as Time Machine, you cannot be completely confident in the safety of the created backups. The external media on which the data was backed up may crumble, there may be no access to the network storage... alas, the list can be continued for a long time. In such cases, specialized applications for recovering deleted data. It so happened that we practically did not talk about such programs, but today we would like to talk about the program Disk Drill Pro, which can not only restore what the user has already deleted, but also significantly facilitate similar operations in the future.
Attention! The program developers have provided us with two licenses for this application, which we will raffle off among our readers.
The competition is over, thanks to all participants!
After standard installation of the program, the user will be prompted to immediately activate the Recovery Vault system to protect the Mac system drive, enable diagnostics of the status of hard drives based on S.M.A.R.T data. and view a demo tour highlighting the capabilities of Disk Drill Pro. All this can be used at any time later.

As you can understand from the contents of the screenshot, Disk Drill Pro has Russian localization. Unfortunately, it is not entirely perfect: there are phrases in English (including the demo tour), and the translation itself often looks like the result of Google Translate.
You'll then see a welcome window that contains a bunch of links to Disk Drill Pro's two operating modes (Protection and Recovery), as well as various reference books and other websites related to the program. By the way, the Russian version of the application website has a much more competent translation than the application itself.

Finally, you will be taken to the main program window, which has a visual interface and a simple structure consisting of two tabs (according to the number of Disk Drill Pro operating modes).
DATA PROTECTION
This tab enables/disables the unique data protection algorithm Recovery Vault, as well as the system for guaranteed data recovery. Recovery Vault can greatly facilitate the recovery of deleted data from a particular disk due to the fact that when it is enabled, service records of the file system and attributes of deleted files are saved in a special program storage. When using the Guaranteed Recovery System, in addition to all the above actions, the program will make hidden copies of all deleted files and save them according to certain rules. For each disk, you can use one or both technologies at once.

Note that it is not enough to turn on this or that system - it still needs to be properly configured. In the advanced properties of Recovery Vault, you can specify additional protected folders, as well as exclusion masks, based on which files of certain types will not be taken into account during protection. When the system is turned off, you can also clear the storage of service records and file attributes here.

In the settings of the guaranteed recovery system, in addition to all of the above, the storage period for copies of deleted files is flexibly regulated (from 1 day to a year, or even without restrictions), as well as the conditions under which the database of protected files will be cleared. Here you can also set the minimum file size for guaranteed recovery (from 16 MB to 32 GB or, alternatively, without restrictions).

RECOVERY
Data recovery mode can be called the main operating mode, since this is what the user will have to deal with most often. As the name suggests, it is designed to recover deleted files from various media. Disk Drill Pro supports working with any drives that the user can connect and mount to the Mac OS X system (internal and external hard drives SATA/SSD/USB/FireWire/eSATA, hard drives of camcorders, iPod mini and iPod Classic, any types of flash drives and memory cards). File system support declared HFS/HFS+, FAT16/FAT32, NTFS, EXT3, EXT4 and others, as well more than 110 file formats(the full list can be found on the developer’s website).
There are at least three file recovery options.
- Recovering protected files
The easiest way is to undo the deletion of files from media that was previously protected using Recovery Vault.
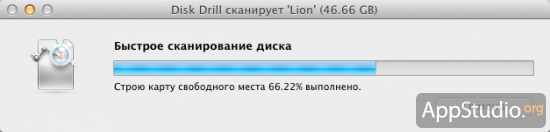
- Quick Scan
Quick scan to identify recently deleted files. Can only be applied to specific sections of the media. After the scan is completed, the user will be asked to mark in the list of found files those that he wants to recover, specify the folder/media where the recovered files will be saved (it is strongly recommended not to save to the scanned partition), select files to recover from the list and, in fact, start recovery process. If you wish, you can save the recovery session so that you can later return to it and restore the files found during this session, rather than starting all over again, since the search results may be completely different.

- Deep Scan
Not only individual sections, but also the entire media can be subject to deep scanning. The coarse scanning process is quite long and therefore, as a rule, it is used only if a quick scan does not bring the desired results.
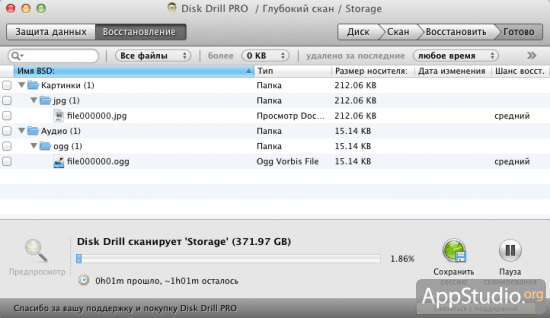
After the scan is completed, the procedure for recovering files is no different from that for a quick scan.
In addition to three file recovery options, the program has two more quite useful functions.
- Backup to DMG image
Create a backup copy of the selected disk or partition into a DMG archive and save the latter in the specified location.

- Search for sections
A function that allows you to find and restore a disk partition that was accidentally (or intentionally) deleted.
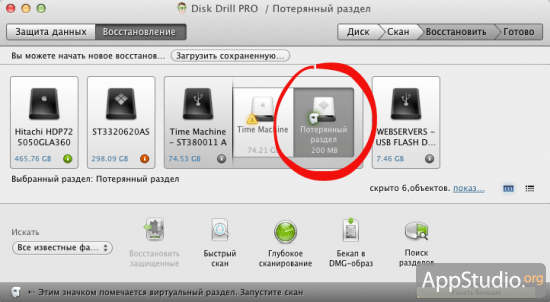
The found partition can also be scanned for the presence of deleted files on it (and the files themselves can be restored), or you can save it in a DMG image and then restore it using Disk Utility.

As a pleasant and no less useful addition, we can note the ability to display the hard drive temperature indicator in the menu bar, which also serves as an application icon. Clicking on the icon will display a small context menu (when monitoring the temperature of several disks installed in a Mac, the corresponding number of icons will be displayed in the menu bar).

The Disk Drill Pro settings menu is very simple and contains 5 tabs with a minimum of settings located in them. Among the options are the ability to select certain types of files that the application will look for during scanning, setting a master password that limits unauthorized access to important functions of the program, working with S.M.A.R.T. disk parameters. In general, the user does not even have to look at this menu, since Disk Drill Pro works great without additional settings.


As you know, it often happens that the value of information and data stored on certain media is many times greater than the value of the media itself or even the entire computer. It is for these reasons that applications that allow you to recover lost data have a fairly significant cost. Disk Drill Pro is also no exception in this regard. The purchase will cost the user 89$ , but the nice thing is that for users living in the CIS countries it works 50% discount, as a result of which the final 44,5$ doesn't seem like a lot of money, especially if what's at stake is restoring a data archive that you've been compiling over several years. There is also a completely free version of Drill Disk Basic, which has the same functionality as the Pro version (including the Recovery Vault system), except that it does not have the ability to recover files. There is also a third edition of the program, which is called Disk Drill Media Recovery and is distributed only through the Mac App Store. The strict requirements imposed by Apple on applications placed in the Mac App Store forced the Disk Drill developers to abandon a number of quite important functions and significantly reduce the cost of the application. The program began to cost “only” $29.99, but at the same time it lost the ability to work with partitions of hard drives installed in the Mac and, accordingly, the Recovery Vault system.
Each of us has had situations where we could not find a certain file, and then sadly remembered that it had been deleted. And if on a PC running Windows and Mac OS, data recovery is an ordinary matter, then not everyone can cope with data recovery from a smartphone.
But this is not so difficult if you use the Disk Drill application.
Disk Drill is a cross-platform application for quickly recovering various types of data from popular information sources. The program has been in existence for several months, has already become a favorite among many users, and after a recent update it also now has support for mobile devices. Accordingly, it allows you to recover lost information from gadgets based on Android and iOS OS. Naturally, we are interested in the first option, but we will not forget to mention other key features of the utility.
To recover data from any Android device, we need a full-fledged computer with the Disk Drill utility installed, a USB cable and a patient - a mobile device with lost data. Next is a matter of technology.
 We launch Disk Drill, connect the mobile phone to the PC and scan the connected gadget. No preparation or additional programs are required. The only thing is that you must have USB debugging enabled in the settings on your smartphone.
 As the scanning process progresses, we will see all kinds of files for recovery, they will be grouped by type, for example, photos, videos, documents, and so on. The program allows you to restore almost all data so that it was ever on our device and has not yet been “overwritten.” If Disk Drill did not find the files we needed the first time, then it is recommended to use a deep scan. It will last longer, but its result should certainly please you.
![]() When restoring a file, you can preview it if it is a picture or video, and also listen to it if it is an audio file. And if we need a specific file, we can use the search and various sorting options.
When restoring a file, you can preview it if it is a picture or video, and also listen to it if it is an audio file. And if we need a specific file, we can use the search and various sorting options.
 This way we can recover up to 100 MB of data. Why is this so? Yes, because these are limitations of the free version of Disk Drill. Agree that this amount of data is more than enough to recover all contacts, SMS messages and even a couple of dozen photos and documents. By the way, the paid version of the application costs $49.
 We can find a detailed list of files that can be recovered in the application settings. If necessary, you can disable any specific formats to make scanning faster.
In the same way, you can recover files from iPhone, USB drives, and other devices. Everything is as simple, clear and without unnecessary problems.
Disk Drill is a very simple, functional and hassle-free program that allows you to recover files from Android smartphones, tablets and removable data storage devices without ROOT rights or other serious things. The free version of the utility is more than suitable for use, but the paid version has no restrictions on the amount of information recovered and has more advanced functionality.
![]()
Today we will talk about a powerful, popular and useful utility called Disk Drill.
This application, thanks to its modules, allows you to perform a wide variety of operations with the hard drive, monitor its condition, recover lost data, including iOS devices, perform “smart” hard drive cleaning, search for duplicate files, create backups and even a recovery disk. But first things first.
Duplicate Finder - search for duplicate files
Disk Drill's Duplicate Finder tool will scan your disk for duplicates and free up extra space. It is also convenient to use for your online storages such as Dropbox and Google Drive. Network folders will also work.
How to use Duplicate Finder:
- Drag or add an area to search for duplicates.
- Click “Scan”. Wait. See how much space you can recover.
- Select duplicates to delete, or use auto-select. Click "Delete". Ready.
We tested this tool and its results were more than impressive. Judge for yourself:
The program found 3404 duplicate files with a total volume of more than 30Gb. Very good.
Creating a bootable recovery disk
To increase the chances of recovery or in cases where the system partition is damaged, Disk Drill allows you to create a bootable recovery disk.
This tool will require a flash drive or any other writable media of at least 2 GB.
How to create a bootable recovery disk:
- Select the disk - source of Recovery from those running on OS X 10.8.5+.
- Select the disk that will be bootable.
- Reboot your Mac while holding down the Option key. Select the "DiskDrill Boot" partition for safe data recovery.
Creating a backup
Disks fail, it's inevitable. Disk Drill can be used to create a byte-by-byte copy, and recover data from it, rather than from a damaged disk.
How to make a DMG backup:
- Select the disk or partition for backup.
- Select the backup storage area. You may need another hard drive for backup. Click "Save".
- Wait while the backup is created. Use Disk Drill's Attach Disk Image option to mount a disk image.
Disk Cleanup
Disk Drill's Cleanup module will help you see where the free space on your hard drive has gone. By building a visual map of your files and folders, you can quickly remove unnecessary items.
How to use Disk Cleanup:
- Select the drive to render. Click "Scan".
- Wait. Look at the constructed visual map. Select a specific folder by clicking on "Select".
- Select the required files and folders. Click "Delete".
As you can see from the screenshot, the program allows you to determine the most “loaded” folders, opening which you can see which files with the largest size are taking up space.
Data recovery
And of course, the main purpose of the program is data recovery.
It is noteworthy that Disk Drill recovers data not only from local drives, but also from flash drives, external hard drives, and even iOS mobile devices connected to the computer.
To begin with, we formatted our working flash drive in FAT32, then copied several images onto it and deleted one of them.
After this, the process of searching for lost (deleted) data was launched.
The program not only found the deleted file, but also thousands of other files that “lived” on this flash drive before formatting!
Data recovery from iOS devices
Disk Drill's iOS recovery is based on backing up iOS using iTunes. Whatever is in the backup, everything can be restored: photos, videos, audio, etc.
iPods with iOS 5 and higher installed are also supported.
Recovery begins by scanning the latest device backup.
After scanning, the program will display all found files, which can be easily recovered by clicking on the appropriate button.
How much does it cost?
Disk Drill is available as a free version - Basic package. With it you can restore files, including protected ones, perform backups, and view all recovery methods.
Those who are serious about the safety of their data and the health of their hard drives will be interested in Disk Drill Pro. The issue price is $89. This is the full version of the program, with all modules and the ability to install on 3 computers.
Our verdict: Disk Drill definitely deserves the attention of all users of Mac computers and iOS devices.
Download Disk Drill from the developers website
For those who are already familiar with the program, we inform you that the developers recently released a large update to Disk Drill 3.
What's new:
- Ability to recover data from iPhone, iPad, iPod Touch
- Ability to recover data from Android devices (rooted or USB mass storage mode only)
- New free duplicate file search feature
- New free feature for creating a bootable USB flash drive
- ExFAT, EXT4 support
- Working with Mac OS 10.12 Sierra
- New interface
And finally, the most delicious thing :)
The developers kindly provided 5 license keys for Disk Drill Pro!
Take it, test it and be sure to write down in the comments about how successfully you spent time with the program!
Keys for Disk Drill Pro
629BF-BA7EE-485E3-D5451-20705
7FBBA-B4AFC-083DB-74AAA-31ED4
94A56-36A4D-7C1D6-0E660-5E10E
A53E2-2D161-4EB27-0C056-4E8A5
The procedure for recovering deleted data after emptying the recycle bin, formatting or deleting a disk partition is no longer some kind of super task that only computer specialists can handle. Any more or less experienced user can try to recover their deleted data today, having understood the work of special programs for file recovery. Fortunately, there are more and more of them, designed not only for IT professionals, but also for ordinary people. The range of programs already existing on the software market for recovering user data such as Wise Data Recovery, Toolwiz File Recovery and Recuva from Piriform has recently been supplemented with another product - the Disk Drill program. This, in fact, will be discussed further. In this article we will talk about the specifics of Disk Drill, and also consider how to work with this program.
1. About Disk Drill
In the Windows data recovery software market, Disk Drill is still a new product, but it is far from new in the Mac OS software market. Having only one drawback - the lack of Russian language support - Disk Drill has a lot of advantages. These include free use, a simple and intuitive interface, and product-level functionality for professional use.

Disk Drill for Windows can be downloaded for free from its official website.
Disk Drill can recover deleted files from disks - both regular hard drives and SSD drives, flash drives and SD memory cards. Be it emptying the Recycle Bin, be it reinstalling Windows on a formatted system partition, be it completely deleting a disk partition - in all these cases the program will try to help with the recovery of deleted photos, documents, the contents of your personal library, archives, and other files. If the files were deleted not too long ago, unless they were already overwritten by other data, the chances of successful recovery may be quite high.
In addition, the program can offer an additional feature called Recovery Vault - a feature designed to guarantee and simplify the file recovery process.
Despite its free distribution, Disk Drill, at the level of paid serious software, can perform data recovery on a DMG image of a disk partition or removable drive created by the program itself. This helps prevent data damage on physical media.

2. Run a scan for deleted files
The developers of Disk Drill, apparently, had a tough task to create the simplest possible product for the average person. Having launched the program, in its window we will see the partition table of the hard drive and connected external storage devices. Near each disk partition and device there will be three buttons for the main functions of the program. The first and most striking of them is “Recover”, a button to start the process of scanning deleted files on a selected disk partition or external storage device. But we won’t rush to press it, since by default this button launches all software data recovery methods. It is more advisable to search for deleted files by using separate recovery methods. They are available in the drop-down list next to the “Recover” button. By clicking this list, we will see the following options:
- Run all recovery methods– this is the same as pressing the “Recover” button, i.e., starting the file recovery process using all methods;
- Undelete protected date- canceling the deletion of files as part of the Recovery Vault function;
- Quick scan– launch a quick scan of deleted files;
- Deep Scan– launch a deep scan of deleted files.
Select "Quick scan".

Why "Quick scan"? If, for example, a file was recently deleted, there is no point in using a deep scan, since the file will most likely be found during a quick scan. To simplify and speed up the procedure for recovering deleted data, it is better to start by undoing file deletion. Naturally, this will happen in the future, when the Recovery Vault function is active. Then you need to resort to a quick scan, which, in fact, was chosen in our case, since Disk Drill has just been installed on the system and Recovery Vault is unlikely to be of any help at the moment. And only if, after completing a quick scan, the necessary deleted files are not found, you can launch a deep scan and distract yourself with your business. Since deep scanning is a lengthy process, the program provides for pausing it and starting it again in the future, even after restarting the computer.

3. Recover deleted files
After launching a quick and deep scan in the program window, we will gradually observe the process of finding deleted data. In the “All files” tab, which is active by default, we will see all the files found. You can narrow the search area for the desired deleted files by switching to other vertical tabs on the left side of the program window, where the data will be filtered by individual file types - pictures, videos, audio, documents, archives. You can try to find the file you need by entering a key query in the search field at the top left.

You can also search for files in the list found by the Disk Drill program, focusing on the size or date of deletion. To do this, there are two corresponding options at the bottom left.

In the process of searching, for example, the desired deleted pictures and photos, you can use the option to preview them.

By default, in Disk Drill, the folder where the recovered files will be placed is the Documents folder on drive C. This path can be changed.

After checking the required folders and files for recovery, click the “Recover” button.

We confirm the decision.

If the restoration is successful, we will see a window like this.

4. Recovery Vault function
When you activate the Recovery Vault feature, Disk Drill will track all deleted files and capture their metadata for fast and successful recovery. To activate the Recovery Vault function, in the main program window near the desired disk partition or removable media, click the “Protect” button.

Let's get to the settings window for this function. Set the switch at the top right to the “On” position. Expanding the “Choose folders to protect” option, we will see preset folders that are already protected by the Recovery Vault function. You can expand this list by adding your own folders or entire disk partitions and removable media using the “Add folder” button.

The option below – “Choose files to exclude from protection” – is a list of file types that will not be protected by the Recovery Vault function. Exceptions for some types of system files are already set here. Using the “Add exclusion mask” button you can add your own file types. You need to register them according to the model of the preinstalled file types.

As mentioned, you can recover deleted files from folders protected by the Recovery Vault function using the “Undelete protected date” option in the drop-down list next to the “Recover” button in the main program window.
Have a great day!
The utility that we will talk about now should simply be present on everyone’s computer. This amazing application is capable of recovering previously accidentally or deliberately erased files from your hard drive. Disk Drill is considered the best tool for returning the necessary data in almost two clicks.
How to get back a deleted file on a Mac computer?
If for some reason you have erased the necessary files from your Mac device, the first thing you need to do is install the Disk Drill utility. This program is created precisely for such cases. It is able to identify deleted data and, with the user's choice, return it to its original state. The program is capable of finding deleted files on MMC, USB-Flash, HDD and other electronic information storage media. It is possible to identify previously deleted departments and return them to their previous state.
There is no need to study the program, because when you first launch you will be presented with a training slide show, after viewing which you will understand the basic principles of operation and functionality of the Disk Drill utility, which will be enough to start fully using the application.
Let's look at the recovery principle step by step using the Disk Drill utility on Mac
1. Download the latest version from the manufacturer’s website.  There are two versions of the utility - free and pro version. If you need an additional kit, choose the second option; if you plan only to recover deleted data, the free one will be enough.
2. If data needs to be restored to removable media, connect the device before starting the utility.
3. Launch Disk Drill and specify the search for the desired disk. Depending on the size of the device and the number of files on it, scanning time may increase. 
4. Now you can specify the desired folders that you want to return. 
This is the principle behind data recovery using the Disk Drill utility on a Mac device.
In addition, Disk Drill has integrated Recovery Vault technology, which increases the likelihood of recovering previously deleted data on a hard drive or removable storage device. When the Recovery Vault function is activated, the attributes of system and service files will be saved on the dedicated storage.
Recovering files using the Disk Drill utility on OS Windows
The Disk Drill application functions on Windows no worse than on Mac, without any errors. To begin recovering the necessary data, you must first download and install the software. Let's go along. And click on the hefty green button with the intriguing name “Download”. 
Installing the program is nothing unusual - constantly press the “Next” button. After installation, a program icon will appear on the desktop. Then, connect removable devices to the computer on which you plan to return data. Then you need to launch the software (click on the icon) and the interface opens. 
The program immediately identified all media. We begin recovery on the flash drive. Click on the arrow to the right of the “Recover” button to the right of the USB Device inscription. The context menu falls out 
You will have several scanning options available to you:
- Run all recovery methods;
- Deep Scan;
- Universal partition search.
Let's try Run all recovery methods. Scanning started. Depending on the scanning mode, disk size and amount of data, the operating time of the software will depend.
The utility found 176(!) deleted files and shows the location WHERE the data can be saved (of course, the storage location can be changed). Press the “RECOVER” button 
When the scanning is completed, you need to check the boxes next to those files that you want to return or simply restore all data without exception. Then the Disk Drill program will ask you to specify the path where you want to save it, and in the end you will receive the previously deleted data in a separate folder.
The program itself will create the necessary folders by category: pictures, videos, documents, audio and archives.
Let's look at a specific case of recovery
After the scan is completed, look at the left side of the program and select the type of recovery data. For example, you are interested in video files. To do this, click on “Video” on the left and click on the small cross on the right (to open the folder of found videos) 
The folder opens. Files with AVI and MP4 extensions were found. For example, check the first file. By the way, pay attention to the names of the files - they do not match the names of the deleted ones. 
Press the RECOVER button (by the way, please note that in the example the data will be restored to drive D). But, ATTENTION! The recovered video file will be located at D:\Video\avi I.e. the program will create a Video folder on the disk (what was restored?) and an AVI folder in it (what extension did you choose?)
As you can see, everything is quite simple. With the Disk Drill utility, you can easily recover deleted data from a Mac device or computer on Windows OS.