Economical DIY wood stove. What is good about a long-burning stove - types of fuel, do-it-yourself assembly rules
32846 Solid fuel as the main source of heat has not lost its position for many decades. And even today, taking into account the electric and gas alternatives, solid fuel boilers are still very popular, especially when it comes to long-term combustion.
Such equipment can work on different types, starting from…
Solid fuel as the main source of heat has not lost its position for many decades. And even today, taking into account the electric and gas alternatives, solid fuel boilers are still very popular, especially when it comes to long-term combustion.
Such equipment can work on different types, from sawdust to coal. Depending on the region and the cost of fuel, preference is given to one type or another. Of course, natural gas is the most inexpensive heating method, but it is not available in all areas and regions. Electricity is the most expensive source of heat, although it is ubiquitous. And if we are talking about a long-burning stove with our own hands, then we will be able to save not only on operation, but also on manufacturing. You can make such a stove yourself if you understand diagrams and drawings and know how to work with metal.
Why boilers and furnaces are more economical to operate
In order to figure this out, let’s use the opposite method and compare it with conventional ovens.
What are the disadvantages of a standard stove:
- extremely low efficiency, which at best is 80%;
- the need for constant monitoring of fuel burnout - the filling time is 2-4 hours, depending on the volume of the firebox;
- lack of ability to automate combustion.
The long-burning stove eliminates these shortcomings, resulting in it becoming an optimized analogue of a traditional stove.
Here, the combustion process is replaced by smoldering - due to the limited amount of oxygen, the firewood in the firebox does not burn, but actually smolders, simultaneously releasing pyrolysis gas. In turn, it burns in a separate chamber, due to which the efficiency of the unit increases by 12-15%. As a result, the burning time of one stack of firewood increases to 8-10 hours.
Furnace diagram
As for process automation, this has been successfully implemented in pellet stoves, where pellets are used as fuel.
For reference! Pellets are pressed sawdust, dust, rot, wood chips and other fine waste from the woodworking industry, treated with natural resins.
This stove is presented together with a bunker for pellets. When some of the fuel burns out, the firebox is automatically filled with additional volume. Without human intervention, such a long-burning stove can operate for several days.
Manufacturing process
It is better to start making a stove by finding a suitable room. Working with metal is, in principle, very dusty, and considering that all this will need to be welded and sawed, it is better to use a utility room where there is 220 V electrical wiring.
Technical nuances when constructing a furnace in the video:
Required materials and tools
- a metal container with a minimum volume of 200 liters (a used gas cylinder is ideal for this purpose);
- 2 pieces of pipe ∅10 cm;
- channel;
- refractory bricks for masonry (55 pcs.);
- a piece of sheet 60-80 cm diagonally;
- ready-mix or cement mortar for masonry;
- a set of tools for working with metal;
- electric arc welding and electrodes;
- mounting level;
- plumb lines.
As a base, you can use any metal container with a wall thickness of at least 4 mm. Even a fire extinguisher will do, but it is advisable to install such a stove only in small rooms.
Manufacturing process
Initially, it is necessary to prepare the furnace body. To do this, we repeat, you can use any container made of steel, cast iron, stainless steel with a wall thickness of 4-5 mm. Most often, a used gas cylinder is used as a base, which must be washed and primed to eliminate the smell and gas residues.
If there is no suitable container, it can be welded from a steel sheet 5-6 mm thick with a diameter of at least 40-50 cm. The bottom is welded to the cylinder. The lid is prepared separately. You can make the future stove rectangular or square - the shape does not matter, it is important that the welds are airtight.
The roof of the cylinder or fire extinguisher will need to be cut off. A spark cylinder can create a semblance of detonation. First fill it to the brim with water and start cutting.
If you cook a container from a sheet, it is better to make the bottom not from a circle along the diameter of the cylinder, but from a rectangle - you will immediately have a stable base.
Separately, cut out another circle from the sheet with a diameter a centimeter or two less than the diameter of the barrel, and in it cut out a circle ∅10 cm for the pipe. Use welding to weld the pipe to the hole.
At the edges of the steel circle from the channel, weld legs that will simultaneously hold the base and push the fuel during its combustion.
The length of the pipe section should be at least 15 cm greater than the height of the entire structure so that at the end of combustion the pipe is one level higher than the edge of the barrel.
From the top of the cylinder (fire extinguisher) or separately from a sheet, cut out a circle for the future lid. It is advisable to weld a kind of “skirt” along the edges so that the lid fits as tightly as possible.
In the lid, cut a hole ∅10 cm for another pipe.
On the body of the barrel itself, cut two holes - for the firebox and for the ash pan. For each of them, place a door on the hinges, and weld a handle from a corner or channel to it. Both holes are connected to each other by a grate on which fuel will be placed.
Example of a rectangular long-burning stove
Foundation structure
The total mass of the stove is not large, even taking into account the lining of refractory bricks. However, the foundation under it must be strong and stable.
You shouldn’t make even a small excavation under the foundation; a completely flat area filled with concrete is enough.
Bricks from which the stove spot is laid, ceramic tiles, cement floor, etc. can be used as the base. In principle, only one thing is ideal straightness, which should be checked using a mounting level.
Chimney
This is an essential element of absolutely any solid fuel stove. A pipe with a diameter of 10-15 cm, welded on top with a slight deviation, will serve as a chimney for a homemade design.
The length of the straight section of the chimney must be at least the diameter of the entire stove so that combustion products are discharged unhindered. When arranging a chimney pipe, angles of more than 450, a large number of bends before leaving the room and a minimum length are not allowed. It is optimal when the chimney pipe is absolutely straight to the exit. By the way, to make cleaning easier, it should be made of two parts.
The only exception concerns the rocket stove; in this case, the chimney is used as an additional heat source and passes either under the floor or under the sunbed.
Reflector
This is a metal or foil sheet mounted on the wall behind the stove. The main task of such an element is to reflect heat from the wall and prevent fire. As an additional bonus of the reflector, the temperature in the room increases due to the return of heat from the wall and the redistribution of heat flows.

Final assembly of the structure
Finished body
Decorative design
Brick lining is a purely personal matter, which depends only on aesthetic taste. The presence of a brick shell does not have much effect on the efficiency of the furnace. According to some data, the burning time of one stack of firewood increases due to a decrease in heat loss, although this effect is very doubtful. A pure experiment using one type of stove and type of fuel, where in one case there is a brick shell, and in the second there is not, has not yet been carried out.
Covering the stove with bricks or not is optional. Choose whether it is worth performing additional work if, for example, such a stove is located in a utility room or a separate boiler room.
The principle of a long-burning stove using solid fuel (wood, sawdust, wood chips or pellets) is the same in all cases - whether such a unit is in a garage or heating a country house. The pyrolysis process, which occurs with minimal air access, significantly increases the boiler efficiency and burnout time.
Before building a stove with your own hands, pay attention to the following nuances:
- individual sections of the chimney are collected in the direction against the movement of gases;
- there should be at least a meter of free space around the stove so as not to pose a threat to health or property;
- install the stove on a small pedestal. So that it can be carefully removed and the chimney pipe separated - in this case, cleaning will not create any hassle.
How to make a regular bubafonya (long-burning stove) with a water jacket - video:
Making your own long-burning stove
Wood stoves are actively used to heat premises for various purposes - these can be living rooms, outbuildings, garages and much more. Gas cannot be carried everywhere, which supports the demand for solid fuel units. After all, firewood is a fairly cheap source of heat, and in some cases even free. If we make a long-burning stove with our own hands and install it indoors, we will have at our disposal an easy-to-use unit.
In this review we will look at:
- Operating principle of long-burning furnaces;
- Their advantages and disadvantages;
- the most efficient wood stove designs;
- how to make a good stove with your own hands.
After reviewing the information presented and the homemade drawings, you can independently assemble a slow burning stove for a garage, cottage, outbuilding and any other buildings.
Structural features of furnaces
A long-burning stove is convenient because it can burn on one stack of wood several times longer than traditional stoves and fireplaces. This is directly related to its design features - it is equipped with a large firebox, and some of them burn wood under certain conditions, with minimal access of oxygen to the combustion chamber and subsequent combustion of pyrolysis gases.

Sealing the seams will prevent combustion products from entering the heated room.
Long-burning stoves have large fireboxes - a large amount of firewood and other types of warm fuel are placed here. Due to this, the frequency of approaches for laying fuel is reduced. Classic stoves and boilers with miniature combustion chambers require new portions every 2-3 hours. In the daytime you can still put up with this, but at night a person wants to sleep, and not bother with adding firewood.
The worst thing is if everyone works during the day - there is simply no one to put logs in the stove. During this time, the temperature in the heated rooms will become quite low, so the evening will have to be spent not on rest, but on kindling in order to create comfortable conditions. However, at night you will have to do the same thing as during the day - throw more and more portions of logs into the insatiable firebox of the wood-burning stove.
The operating principle of a long-burning furnace depends on its design:
- Units with a large firebox - their long operation is explained by the use of large combustion chambers, into which a lot of firewood is loaded;
- Pyrolysis units - here solid fuel is burned with a minimum amount of oxygen and forms pyrolysis gas;
- Units without pyrolysis, but with limited combustion intensity, are “bubafonya” stoves made from a barrel, which have a simple but very original device.
The stoves themselves can be made from a variety of materials - stone, refractory brick or metal.
The key to longer burning of your stove is the use of normal firewood, and not rotten logs with low calorific value. Beech, oak, hornbeam and some varieties of fruit trees burn the longest.
Advantages and disadvantages
Let's look at the main pros and cons of homemade long-burning heating stoves. Let's start, as usual, with the positive features:

Compactness and relative mobility are the main advantages of potbelly stoves.
- Cheap - most often they are assembled from cheap sheet metal, old capacious gas cylinders, barrels and much more. All this can be found in ruins and in old enterprises. Some people may rummage around in their garage or shed - there will probably be unnecessary metal there for a homemade long-burning stove;
- Ease of assembly - no one requires ultra-precise adherence to the chosen scheme. For example, the same pyrolysis stove-stove can have a variety of sizes;
- High efficiency - a properly assembled long-burning stove can provide heat to large rooms without requiring frequent approaches to add fuel.
There are also certain disadvantages:
- Not the most attractive appearance - homemade products really cannot please users with good appearance;
- Some types of stoves cannot be used in residential premises - the same “bubafonya” will create a lot of smoke and stink before it reaches operating mode;
- A long-burning furnace with a water circuit will be difficult to implement - you need to somehow ensure that heat is drawn into the heating circuit.
Despite some obvious disadvantages, homemade long-burning wood-burning stoves are in definite demand.
A long-burning stove is an excellent unit for heating greenhouses. Heating them with electricity or gas is expensive or completely impossible, but by purchasing cheap firewood, you can provide greenhouses with life-giving warmth throughout the winter.
Types of long-burning stoves
If you have planned to build a long-burning stove with your own hands, you have all the tools and you are not afraid of difficulties, then you will certainly need the information from the next section of our review - in it we will talk about the varieties of these stoves.

The simplest of all stoves is the potbelly stove. It is an iron stove assembled from an old gas cylinder or from sheet metal. In order to ensure long-term combustion, its internal volume is made very large - this is most easily realized in models made of sheet steel, you just need to select a drawing that is suitable in size.
This stove can operate on wood, coal, or compressed solid fuel. It is easy to use, easy to melt and produces a large amount of heat. It is also characterized by unpretentiousness. If you need a simple stove for your dacha, feel free to choose a potbelly stove - it will be the simplest and most affordable option.

This option is good because we can implement long-term combustion in it and work on the design. The network contains drawings of similar stoves with large combustion chambers and afterburners - these are so-called pyrolysis units. They burn not only fuel, but also gases formed during pyrolysis. A brick unit will be bulky, but very effective. Here are its advantages:
- Long-term heat retention through the use of brick or stone;
- Excellent appearance - just find a suitable project and make neat masonry;
- Possibility of working in residential premises, unlike the same “bubafoni”.
The disadvantage is that to assemble such a long-burning stove you will need experience in bricklaying.

The presented long-burning stove has impressive dimensions, runs on wood and has an extremely simple design - depending on the volume, it can burn for up to 20-24 hours, without requiring frequent approaches to laying firewood. To make it, you will need a pair of metal containers with lids (100-200 liter barrels are suitable), pipes for the chimney and air supply, as well as a channel to create a weighted piston.
The “Bubafonya” long-burning stove is most often used for heating non-residential buildings - garages, greenhouses with garden crops growing in them, technical premises and utility rooms. Some craftsmen equip it with heating circuits, which allows them to heat living rooms without the risk of filling them with acrid smoke.
Making your own oven
Let's figure out how to make a long-burning stove with your own hands, using available materials and suitable tools. We will make a “bubafonya” and a potbelly stove, after which we will consider ways to modernize our homemade equipment.
Making a potbelly stove
Long-burning potbelly stoves are good because they are made from any available materials - these are various barrels, old capacious cans, pieces of large-diameter pipes or simply sheet metal. We chose sheet steel as the starting material - it is a more convenient material to process. You can adapt a barrel for this, but doing work in its internal volume is not very convenient.

All sizes are presented rather as guidelines, a kind of averaged best option. You, in turn, can deviate from the dimensions of the parts to create a stove that satisfies your specific wishes.
The design of a long-burning furnace is quite clear from the drawing presented above. Here are its main components:
- Combustion chamber - wood burns in it with the formation of pyrolysis gas;
- Afterburner – combustion of pyrolysis products occurs in it;
- Doors of the combustion chamber and ash pan - they are purchased in the store, but you can make them yourself;
- Chimney - in most cases it is a pipe with a diameter of 100-150 mm.
You can deviate from the drawing in one direction or another. But remember that as the size decreases, the burning time decreases and the power of the long-burning stove decreases.
The lower the power, the smaller the heated area. Therefore, it is best to provide a small reserve.
To make a long-burning stove like a potbelly stove, we need sheet steel with a thickness of at least 3 mm - this will ensure a long service life of the heating equipment. If the steel is thin, it will begin to burn through - after a couple of seasons, holes will form in it. Therefore, special attention is paid to the thickness of the steel. The optimal thickness is 3-5 mm.
For our example, we will take the classic scheme of a potbelly stove, modify it and get at our disposal an effective wood-burning stove for a home. At the initial stage, we prepare the side sheets - in our drawing they have dimensions of 450x450 mm. Next, we make the lower walls, front and rear walls - their dimensions are 200x450 mm. As a result, we should get a rectangular box. But don’t rush to weld it together - there is a lot of work ahead.
First you need to make a base - this is the bottom wall and two side ones. We weld them together, weld the grate at a height of 80 mm from the bottom. Now we need to prepare the front wall of the long-term heating oven - we weld both doors into it, and then weld it to our structure.
We prepare two metal sheets measuring 200x370 mm. We weld the first of them to the front and side walls at a height of 160 mm from the top. Next, we prepare the back wall - we weld small metal tubes into it, which should fit into the space between the two inner sheets that form the afterburning chamber - secondary air will be supplied through them. Then we weld the back wall and a second metal sheet at a height of 80 from the top (welded to the side and rear walls).

The damper is used to regulate air flow. It is this that improves the efficiency and quality of traction.
Our DIY long-burning stove is almost ready - all that remains is to figure out the top cover. We make a hole in it with a diameter of 100 mm and weld a piece of pipe for the future chimney. Now it remains to find out whether you need a hob or not - it is also welded into the top cover. At the last stage, we install the lid in place and weld it - the stove is ready, now it can be installed on a non-combustible base, attached to the chimney and started.
When starting the long-burning stove presented above, let it burn, then cover the ash pit so that the wood barely smolders and the generation of pyrolysis gas begins.
Another interesting long-burning pyrolysis furnace is shown in the following figure. It is made from a barrel or a piece of large diameter pipe and is equipped with a suitable lid. In the lower part, at a distance of 80-100 mm from the bottom, a metal disk with a hole in the middle is welded. A door is welded between the disk and the bottom, on the side wall. The resulting space forms our firebox. We weld a chimney with a diameter of 70-100 mm in the upper part.

In terms of low cost of use, such a stove is a real gift, since there is no shortage of sawdust in a private home.
The resulting long-burning furnace receives heat by burning pyrolysis gases generated when heating sawdust. The sawdust itself is poured into the main volume, and to prevent it from spilling into the firebox, it is compacted using a wooden cone. When the stove starts, a fire is lit in the firebox, the cone is removed - after a while the unit will begin to produce heat.
We make “bubafonya”
If you are making a stove for heating premises for household or technical purposes, you should pay attention to the stove under the slightly funny name “bubafonya”. It has a simple but original design that provides a lot of thermal energy. It works like this:
- The lid is removed, firewood is loaded (small chips are placed on top);
- Kerosene-soaked rags are placed on top of the firewood and in the spaces between them;
- The rags are set on fire and the wood is set on fire;
- A piston is installed in the oven, the lid is closed - the unit begins to generate heat.
In order to understand the essence of this unusual long-burning stove, you just need to look at its diagram. The unit consists of three main parts - a body, a chimney, a heavy piston and a cover.

This picture clearly demonstrates the scheme and principle of operation of the “bubafoni”.
“Bubafonya” is simple to make; the easiest way is to build it from two whole metal barrels (without holes) with a volume of 150-200 liters. Thick steel is not particularly needed here, since due to the limited supply of oxygen, combustion will be slow and low-temperature. Let's see how to make such a long-burning stove with your own hands. Here are step-by-step instructions:
- We cut off the lid from the main barrel and prepare the combustion chamber;
- We weld a piece of pipe with a diameter of 100-150 mm into the side wall of the combustion chamber (in the upper part, according to the figure) - this will be the chimney;
- We prepare the top cover - we make a hole 40-50 mm wide in it, through which the piston pipe will pass. Bend the edges of the lid outward with gentle blows of the blade, tamp the edges of the barrel (combustion chamber) inward - the lid should fit tightly onto our barrel;
- We are preparing the piston of our long-burning furnace - we take a pipe with a diameter of about 40-50 mm (it should fit into the hole in the lid), weld the lid from the second barrel to it from below, and you cannot weld the pipe itself - air will pass through it. We weld pieces of a thick L-shaped channel to the bottom of the piston cover so that the piston itself is as massive as possible. The diameter of the piston itself must be such that it can be easily inserted into the combustion chamber (there should be gaps about 5 mm wide between the walls and the piston, through which combustion products will escape).
Our self-made long-burning stove is ready - all that remains is to install it on a non-combustible base and test it. How this stove is set on fire is described a little higher.
Some models of these long-burning stoves operate on one load of firewood for up to 20-24 hours or more, generating a large amount of heat.
Increasing efficiency

Additional sheets of iron can be replaced by a wall made of bricks. It heats up more slowly, but it releases heat longer.
The long-burning stoves we reviewed are distinguished by their high efficiency - the fuel in them burns slowly, and in the same potbelly stove there is also the production of pyrolysis gases, which provide additional heat. Let's now figure out how to increase the efficiency of our self-assembled equipment. In all three stoves we can increase the thickness of the metal - thereby it will accumulate heat and slowly release it into the environment. The easiest way to do this is with sheet metal potbelly stoves, choosing thicker steel.
We can also equip all three stoves with long horizontal sections of chimneys. The thing is that any solid fuel stoves (including long-term combustion ones) send a large amount of heat into the atmosphere. By equipping the chimney with a long horizontal section, we will leave some of this heat in the room - the approximate length of the section is 3-4 meters.
As for potbelly stoves, we can equip these long-burning stoves with additional metal plates that wrap around the body from the back and sides (distanced from it by 40-50 mm). Between the body and the plates, cold air will be sucked in, heated up and sent upward - that is, we made the most ordinary convector. If desired, other ovens can be equipped with such convectors.
There are a couple more upgrade options. The first option is to cover the corner in which the long-burning stove is located with galvanized iron, so that the generated heat is reflected into the room and does not go into the walls. The second option is to line the stove with heat-intensive bricks or natural stone.
Video

Solid fuel stoves running on wood have one serious drawback: it is very difficult to automate the combustion process, and for some designs it is impossible. From time to time you have to take a break from your work and add firewood, which burns out in about an hour. To extend the operating time of the furnace on one load, the furnaces are equipped with a long-burning mode.
What is long burning mode
Wood combustion is a complex physical and chemical process that occurs in several stages. When ignited, while the temperature in the stove is low, the wood heats up and darkens. At temperatures above 200 degrees, pyrolysis begins - decomposition under the influence of temperature into solid residues and pyrolysis gases. These gases themselves are flammable because they contain hydrogen, carbon monoxide, organic vapors and carbon in the form of soot. It is the combustion of pyrolysis gases that produces a bright flame with a high temperature.
In a conventional furnace, complete combustion of pyrolysis gases does not occur due to a lack of oxygen. In long-burning furnaces, a separate chamber or combustion chamber is intended for afterburning of pyrolysis gases, where they are enriched with atmospheric oxygen. Thanks to this, fuel is burned more completely, less soot and other harmful substances are released into the air, and the efficiency of the stove increases.
To avoid excessive temperature in the wood pre-combustion chamber, air access into it is limited. The firewood begins to smolder, releasing a large amount of pyrolysis gas. Due to the slow smoldering of firewood, the operating time of the stove on one load increases significantly, in some cases reaching 6-8 hours. This phenomenon is called the “long burning mode”.
Long-burning sawdust stove: video
Advantages and disadvantages of long-burning stoves
Like any other unit, such ovens have their pros and cons.
The undeniable advantages include:
- economical consumption of firewood;
- high efficiency, up to 85-90%;
- versatility in the choice of fuel, firewood, waste from woodworking enterprises, sawdust, and pellets are suitable;
- small sizes;
- ease of control - using an air damper;
- simplicity of design, thanks to which it is easy to make a long-burning stove with your own hands.
Long-burning stoves are not without their disadvantages:
- during combustion, condensate is released, on which soot is actively deposited in the chimney, therefore special requirements are imposed on the chimney design - it should not have corners, bends, its design should be as accessible as possible for cleaning;
- To switch to the long-burning mode, the stove must first be heated in the usual mode to warm up the stove itself and the chimney, otherwise the combustion process will stop.
All the described features of long-burning stoves are relevant both for industrial heating units and for home-made stoves.
You can increase efficiency by adding a water circuit to the stove, as shown in the video.
Design of long-burning furnaces
Long-burning stoves have design features. They consist of two chambers or combustion zones, in one of which pyrolysis of wood occurs, and in the other, afterburning of wood gases occurs. The location of the cameras relative to each other may be different.
In some models, fuel is loaded from above; as a result of primary smoldering, the firewood compacts and settles, and gases enter the afterburning chamber, which can be located either below or through a partition on the side of the first chamber. Such stoves are often equipped with blower fans to direct the draft into the desired channel.
In other models, the pre-combustion chamber is located at the bottom, and the pyrolysis gases rise into the upper chamber without forced draft. Such stoves do not require a fan, but their loading chamber volume is usually smaller.
To regulate the combustion intensity, an air supply channel with a damper is provided. It can also have different shapes and depends on the type of stove. To compact the fuel and make smoldering more intense, some stoves are equipped with a weight that lowers as the wood burns. Typically, long-burning sawdust stoves have this design.
Application of pyrolysis furnaces
Long-burning stoves using wood, pellets or sawdust are often used to heat utility rooms and workshops, garages, and greenhouses. They can also be used to heat a house, but it is necessary to ensure that the stove is sealed, as carbon monoxide may be released.
If you use a pyrolysis stove to heat a garden or residential building, it is better to equip it with a water circuit connected to the heating radiators, and install the heating unit itself in the boiler room.
 This article talks about how to simply make a smokehouse for cold smoking, which at home will help you prepare real delicacies from the most ordinary products.
You can find out how to make a smoke generator for cold smoking by looking here.
Here you will find the most understandable drawings for creating an effective potbelly stove with your own hands: http://gidpopechkam.ru/pechki/burzhujki-chertezhi.html
Materials for making a long-burning stove
Long-burning stoves can be made by hand from sheet metal or various metal structures. Examples and drawings of such stoves are given below.
Barrel stove
 A home-made heating device intended for heating utility rooms, made from a two-hundred-liter metal barrel. The stove runs on sawdust, shavings and other woodworking waste. Inside the large barrel, a small barrel for loading fuel is installed on a stand. Below it is an ash pan - a drawer made of sheet metal.
The stove itself is placed on a stand, the role of which is played by a car disk. A smoke pipe is made from pipe scraps with a diameter of 100-150 mm. The barrel is equipped with a sheet metal lid with a handle and an opening for air supply.
A log sharpened to a cone is installed inside a small barrel; it is indicated in the drawing. Sawdust is poured around it. After compaction, the log is removed and the sawdust is set on fire. During the smoldering process, gas is released into the space of a large barrel, where it is burned.
Furnace with water circuit made of metal pipe
 A homemade long-burning stove made of a metal pipe, which can burn wood or sawdust, is equipped with a water circuit. Loading is done from below; to intensify combustion, an air distributor is installed inside the stove, pressing the smoldering wood.
A telescopic hollow pipe is installed in the center of the disk, through which air flows directly into the combustion chamber, where, thanks to the ribs welded onto the disk, it is evenly distributed over the entire surface of the firewood. It lowers on its own as the fuel burns out. You can lift it before loading using a cable.
The loading door is located in the center of the oven. At the bottom there is a cleaning door and an ash pan. At the top there is a chimney. The stove is equipped with a water circuit with pipes for water inlet and outlet. Such a stove with a water circuit can heat small houses and other premises quite efficiently, and you can make it with your own hands from scrap materials.
Furnace from a waste gas cylinder
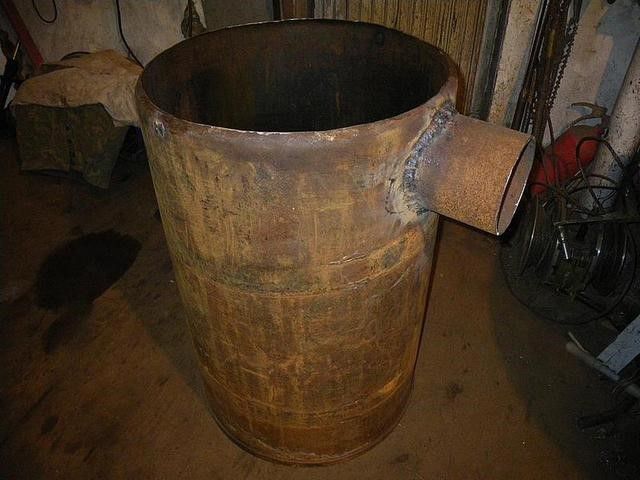
 A stove can be made from a gas cylinder without extra costs or searching for suitable material. The dimensions of the 50-liter cylinder are perfect for making such a stove, and the wall thickness and tightness make it safe to use.
The design of the furnace as a whole does not differ from the previous model, this can be seen in the drawing. A propane tank with a cut off top is used as a body. You can make a cover of suitable size with your own hands from sheet metal with a hole for the air distributor pipe.
Fuel is loaded through the top, filling the volume of the cylinder almost to the chimney. This stove operates on sawdust and other waste, as well as small firewood. The fuel is carefully compacted, ignited using wood chips or an ignition agent, an air distributor is installed, and then covered with a lid.
 The efficiency of such a stove is quite high, and thanks to its sealed housing, it can be used to heat rooms where people stay for a long time. If desired, it can be equipped with a water circuit by passing the chimney through the boiler.
Stove "Bubafonya" from a gas cylinder
Making a long-burning stove with your own hands from a fifty-liter gas cylinder is presented in the video.
The design of the stove is as simple as possible; it consists of only a few parts: a body, a lid, an air distributor and a chimney. For stability, the stove can be placed on legs from the corner. To remove ash from below, you can make an ash pan with a door.
Another video.
Sequencing
- The remaining gas is released from the gas cylinder and washed several times with water.
- Cut off the top of the cylinder. You can use it to make a furnace lid by making a hole with a diameter of 65 mm in the center. The edges of the lid and the furnace body are ground so that the lid fits tightly onto the body.
- In the upper part of the cylinder, a hole with a diameter of 100 mm is made for the chimney and a piece of pipe 30-40 cm long is welded horizontally.
- At the bottom of the cylinder, a cleaning door is made for the ash pan. To do this, cut out a rectangular section of the cylinder body, grind the sections, weld the hinges and install the door on the resulting hole. The door is equipped with a latch.
- The balloon is placed on legs for stability. They can be made from a corner, pipe scraps or a wheel rim.
For ease of carrying, rod handles are welded on the sides.
- The most important part of the furnace is the air distributor. It must be heavy enough to effectively press down sawdust and wood chips, withstand the high temperature of the oven, and also have diverging blades. They can be made from corner scraps. The distributor itself is made of thick-walled steel - at least 6 mm. Cut out a circle with a diameter 20-40 mm smaller than the inner diameter of the oven with a hole in the center. A pipe with a diameter of 60 mm and a height greater than the height of the stove is installed in the hole. Air will flow through it to the combustion chamber. The blades are welded at the bottom of the disk.
- You can paint the stove body yourself with paint based on organosilicon compounds, having previously removed scale, rust and dirt from its surface. Any other paint will quickly burn, since the stove heats up to high temperatures during operation.
The temperature of the walls of a gas cylinder stove can heat up to 350 degrees during combustion! To avoid serious burns, use caution!
The homemade sawdust stove “Bubafonya” can be equipped with a water circuit. In this case, it is installed in a permanent place. Typically, this stove is used as a mobile stove: it can be placed in a greenhouse during freezing periods, used to heat a workshop or barn in the winter, or used to heat a garage. Subject to fire safety requirements, Bubafonya is safe and effective.
 Wood boilers for heating a private home
 Basic models of brick stoves for wood-burning homes, their features and manufacturing methods
 How, using drawings, to build brick ovens for a home with a hob with your own hands
 How to make a smokehouse with your own hands, if you have drawings and dimensions
The problem of conservation and economical use of energy resources is currently very acute. City residents usually do not have many opportunities to save money, since all apartments are connected to a central heating system. Prices for housing and communal services for all apartments of equal size will be the same, so everyone finds themselves in the same conditions. Another thing is the private sector with an individual heating system. This is where you can be smart and have room for a creative approach to solving a problem. In this article we will learn that long-burning wood-burning stoves for summer cottages are one of the most optimal options for getting out of this situation.
Actually, the efficiency of our home heating will depend on two main factors:
- Quality of insulation (thermal insulation) of the walls and windows of the building;
- The efficiency with which our heating installation (furnace or boiler) uses fuel.
The purpose of this article is to introduce you to one of the types of economical and productive wood-burning stoves that allow you to ensure the most complete combustion of logs. These heating installations are called pyrolysis furnaces. Every year their popularity is increasing, so many are thinking about building such a heater with their own hands. How long-burning pyrolysis furnaces work, their internal structure, as well as instructions for self-assembly - you will learn all this by reading our article.

Long-burning wood stove in the country
The main physical phenomenon, without which it is impossible to imagine the operation of any furnace, is the oxidation of various substances by oxygen contained in the air. Fire, tamed by our ancestors millions of years ago, has become so familiar today that we don’t even think about how combustion occurs, with which each of us has been familiar since childhood. The seemingly simple question “how does wood burn?”, in fact, requires a separate explanation. After all, without understanding the basics, we will not be able to understand how economical pyrolysis furnaces work and why they are so good and economical.
Actually, the formation of a flame occurs in several stages:
- First, the wood heats up and dries, releasing water vapor into the environment, which prevents fire from starting. This requires an external source of energy, which is usually flammable paper, kindling liquid, or a pile of small burning wood chips.
- Firewood, which from a chemical point of view is a complex organic structure, consists of three main elements: carbon, hydrogen and oxygen. When heated, wood disintegrates, and these components, in the form of various simple gaseous compounds, begin to be released into the surrounding space. The general name for all substances formed during fuel heating is pyrolysis gases, and for the process itself is pyrolysis.
- At the next stage, the wood decomposition products ignite and accelerate the pyrolysis of the remaining logs more and more, providing the fire with fresh fuel.
- In the end, the tree burns, leaving behind some of the coals that did not have time to react with the oxidizing agent.

Actually, the idea that made it possible to build long-burning furnaces is to ensure the most complete decomposition of fuel in such a way that after its use there is practically no unburned waste left. To do this, it was necessary to slow down the pyrolysis as much as possible so that the entire volume of firewood would gradually and completely disintegrate into pyrolysis gases.
Why are stoves called long-burning stoves?
A long-burning stove is quite easy to distinguish from a regular one. The fact is that the implementation of the idea of high-quality and complete pyrolysis required the introduction of not one, but two combustion chambers into the stove design. In the first, the firewood slowly smolders, emitting a gas mixture of methane, hydrogen and other components. Smoldering is ensured by an artificially created lack of oxidizer supplied to the firebox. Further, entering the second chamber, the gaseous pyrolysis mixture begins to burn fully, providing heating to the room in which the boiler is installed. Often, the secondary firebox is also additionally blown with air using a special fan. This ensures the most complete oxidation and combustion of the entire volume of gases, and leads to a significant increase in the efficiency of the entire heating installation.
Pyrolysis ovens are often also equipped with a separate cooling circuit, which evenly distributes heat throughout all rooms in the house. Such a heating boiler copes well with even the most severe winter frosts, providing high-quality heating of the entire living space. An example of a block diagram revealing the internal structure of a pyrolysis stove with a water block can be seen in the figure below.

Advantages and disadvantages of pyrolysis furnaces
Nothing in this world is perfect, so even long-burning wood stoves are not without their drawbacks. The main ones are the following:
- The price of modern high-tech long-burning pyrolysis furnaces with good efficiency indicators will be quite high. However, you can save a lot of money by designing a heating device yourself.
- Pyrolysis boilers of industrial production often require additional uninterrupted power supply to their auxiliary units: air injection systems (combustion chamber pressurization), water heating circuit pumps, sensors, etc.
- Long-burning stoves are more finicky in terms of moisture requirements for wood logs. Insufficiently dried firewood placed in the firebox of a pyrolysis boiler can easily go out, stopping the operation of the entire heating system.
- Compared to gas (electric) boilers, boilers or water heaters, long-burning stoves are significantly larger in size and also require additional free space for storing firewood.
- You will have to add fuel to the pyrolysis boiler manually; this operation cannot be fully automated 100%.
- A more complex water circuit design compared to other types of heating installations. The fact is that too supercooled coolant, returning from the batteries to the boiler heat exchanger, can interrupt the smoldering of the wood and extinguish the firebox. To avoid such a situation, you have to install an additional pipe (the so-called “bypass”), which allows you to mix already heated water with cold water. Naturally, as the complexity of the heating circuit design increases, the total cost of the entire device also increases.
At first glance, the list of disadvantages of long-burning wood stoves seems very impressive. And many people have a logical question: why is this type of stove so popular and in such good demand? The answer is simple and obvious: all the disadvantages of a pyrolysis installation are more than compensated by the advantages that the owner of such a device receives:
- Fuel energy is used almost 100%. All loaded firewood will burn to the ground, completely transferring its heat to the heated room. High-quality industrial-made long-burning stoves have fantastic efficiency indicators, up to 90 percent. For greater clarity, we provide a table below that compares the operating efficiency of different types of boilers.

- Long-burning wood stoves are convenient and easy to maintain, and produce almost no waste. There is nothing left of the firewood except a handful of ash.
- Environmental friendliness of the heating system. With full pyrolysis combustion, only water vapor and carbon dioxide are released into the atmosphere. During operation of a high-quality pyrolysis oven, you will not feel any extraneous unpleasant odors, compared to a conventional oven. This is explained by the fact that the source of such aromas are unburnt complex organic compounds. In a long-burning furnace, fuel oxidation occurs 100%, so it can easily be heated even with industrial waste.
- One “filling” of logs is enough for 10-15 (and sometimes more) hours of continuous operation. No ordinary wood stove can burn for that long.
- The heating system based on a pyrolysis boiler very quickly warms up the house and enters operating mode.
- The power of a heating device using the pyrolysis effect can be easily and smoothly adjusted, just like a gas or electric one. Unlike conventional solid fuel installations, in a long-burning furnace the main heat is generated by gas burned in a separate chamber. Accordingly, by controlling the level of oxygen supply to the firebox, we can easily change the heat release of the entire system.
Choosing a long-burning stove for a summer residence
Actually, having decided to acquire a long-burning stove, the future user faces the question: which one is better to choose? If you are planning to make a pyrolysis boiler with your own hands, then the available options will be limited only by the materials you have, as well as your engineering ingenuity and imagination. We will tell you more about how to make a long-burning wood stove for a summer house later, but now let’s try to give some useful tips to those who decided not to bother and buy a ready-made heating system.
The main parameters that should be followed when selecting available boiler models are:
- Limitations of the budget allocated for the purchase of a gas generator furnace.
- The area of the house that is to be heated using a pyrolysis unit. Depending on the characteristics and configuration, long-burning stoves can heat from 80 to 250 square meters of living space.
- Operating time of the unit when fully loaded with fuel. There are three subcategories of gas generator boilers: with a minimum operating time (up to 4 hours), with an average heating period (up to 8 hours) and, in fact, long-burning furnaces (they burn at one gas station for more than 8 hours).
- Other technical and functional characteristics of the device.
- Appearance and design of the pyrolysis furnace. Functionality and efficiency are, of course, a priority, but do not forget that a gas generator boiler is also an element of the interior of the house. It is highly desirable that the heating installation fits harmoniously and naturally into the interior space of the room in which it is located.
A few words about the main characteristics according to which long-burning pyrolysis boilers are classified. Based on materials of manufacture, they are distinguished:
 | |
 | |
 |
The first two are suitable for those who want to get the most compact device, and the last type will appeal to lovers of the classics. Such a brick stove can easily become a highlight in the interior of any home.
According to the method of loading firewood: manually or semi-automatically. The second type will cost more, but will reduce labor costs for boiler maintenance.

Pyrolysis plants can be equipped with various “add-on components”, so they should also be classified according to the presence of additional functional units. They can be a hob or a special transparent fireproof door that can turn an ordinary solid fuel heater into a full-fledged and aesthetic fireplace.
Naturally, you should understand that you will have to pay extra for any design and technological delights. It is for this reason that prices for long-burning gas generator stoves vary in a wide range from 10 to 100 thousand rubles and above.

Installation of a purchased gas generator furnace
Installation of a finished industrial gas generator boiler requires special attention, so we will devote a separate section of the article to this issue. Actually, the general connection diagram for a pyrolysis furnace with a water circuit looks something like this:

It should be noted that this is only one of many options for wiring the heating circuit. Different manufacturers may offer their own schemes, which will differ in some ways. Therefore, in each specific case, carefully study all technical documentation accompanying the device. As for this scheme, the so-called three-way valve deserves special attention: it is responsible for mixing hot water into cold water and preventing the stove from overcooling.
The cold water heating mechanism can be implemented differently. Below you can see two more possible connection diagrams for pellet pyrolysis boilers:
|
|


The combustion room in which they plan to place the boiler must meet certain requirements:
- be spacious and have high ceilings. Preferably from eight square meters; area and with a ceiling height of two and a half meters;
- have a special platform for installing the boiler;
- the ceiling, like the walls themselves, must consist of a material resistant to temperature and fire;
- the room must be equipped with at least one window opening;
- the distance from the wall to the front of the boiler should be about two meters;
- it is advisable to surround the boiler with an additional brick jacket;
- the room must have a chimney and a ventilation system (exhaust).
In general terms, the boiler installation algorithm is as follows:
| Preparing the furnace room. We remove everything unnecessary and prepare tools and materials for work. |
Laying the foundation (installation of a concrete slab) for a gas generator boiler. Preparing the foundation for a purchased stove is not much different from that for a homemade stove; we will discuss this process in detail below. In general terms it consists of the following steps:
|
|
|
|
| Direct installation of the pyrolysis furnace on the foundation. |
| Connection to the heating system (piping the water circuit). |
| Installation of a chimney and exhaust ventilation system. |
| Switching on and setting up relays and boiler automation systems. Test run and testing of the system in action. |


Making a long-burning stove with your own hands
We have dealt with the main guidelines in choosing a ready-made long-burning stove for a summer house, and now let's find out how to make such a device at home yourself. In the next two sections of the article we will look at the manufacturing technology of both metal and brick pyrolysis boilers. It should be noted right away that you cannot do without minimal bricklaying skills, as well as the ability to work with a welding machine, so get down to business only if you are 100% confident in your abilities.
Pyrolysis oven from improvised means (barrel, cylinder, thick-walled pipe)
The easiest and cheapest way to assemble a gas generator stove is from an old cylinder or metal barrel. Such a device will not have a particularly attractive appearance, but it is quite suitable for heating a summer house, garage, utility room or greenhouse. In addition, this type of stove is very mobile and can easily be moved to any other place.

Materials and tools for work. Workplace requirements
| The basis for our masterpiece of engineering fantasy can be: | |
| Volumetric metal barrel. Ideally, it should hold at least two hundred liters, have no external damage or signs of corrosion. The metal must be thick enough and durable. It is advisable to choose barrels made of steel - this will have a positive effect on the durability of our heating device. |
| A used fire extinguisher or a gas cylinder that has outlived its useful life would also be a good housing for a gas generator furnace. Naturally, their dimensions should be comparable to the volume recommended above for the barrel. |
| The cylinder body is one of the most popular for making homemade stoves |
| In addition, the body of the future stove can be welded from scratch using sheet steel or cuttings of thick-walled pipes. |
| Once you have made your choice and decided on the body of the future stove, start looking for additional materials. Namely, support legs for the heating installation. The simplest solution would be to make supports from: | |
| Fittings |
| Pieces of thin pipes |
| Metal profile scraps |


In addition to all of the above, we will need:
- Sheet steel from which we can cut a circle equal in diameter to the body of our furnace;
- Pieces of metal profile for making a pressure piston;
- Stove door, which you can order ready-made or make yourself;
- Two metal pipes. One with a radius of about 5 centimeters and a height equal to the height of the stove body +15 centimeters from above, and the second with a radius of 7.5-8 centimeters and a length of about 5 m. The first will be useful in the manufacture of the pressure piston air duct, and from the second we will make a chimney.
Having obtained all the necessary materials, we begin to search for a suitable workplace to carry out all the necessary installation operations. The room in which we will assemble the stove must meet a number of requirements, namely:
- Have good ventilation so that welding can be used in it;
- Good lighting at any time of the day;
- Have an uninterrupted power supply;
- Have reliable noise and sound insulation. During the installation process you will have to use a grinder and welding, and insulation will allow you to disturb your neighbors to a lesser extent;
- Be spacious enough so that we can safely store all the structural parts and tools there;
- Be protected from any atmospheric influences that could lead to damage to the metal parts of the oven.
Instructions for assembling a homemade gas generator stove
| The sequence of operations for installing a pyrolysis furnace will look like this: | |
| We are preparing the body. It will be enough to simply remove the top cover from the barrel, but you will have to tinker a little with the cylinder or fire extinguisher. They need to cut off the top. This should be done using a grinder, evenly and carefully. The cut off part will later serve as the main cover of the structure. You should start sawing a cylinder or fire extinguisher only after you make sure that they are empty and pour water inside. |
| If sheet steel was chosen as the basis for the gas generator furnace, remember that square-shaped bodies have better stability than round ones. |
| Having prepared the body, we proceed to install the legs. They need to be welded to the bottom of our homemade heater in such a way that the entire structure stands level and stable on them. The correct installation of the legs can be checked using a plumb line or level. If you make a mistake with the length of any of them, just shorten them with a grinder. |
| Let's start making the pressing piston-feeder. We cut out a circle of sheet steel with a diameter slightly smaller than the inner diameter of the stove. If the stove is not round, then we select the dimensions of the piston so that it has a small gap with the inner surface of the housing and moves freely up and down. |
| In the center of the circle we cut a hole that is suitable for our air duct pipe. We connect the circle to the pipe by welding. After this, we check how the piston will move inside the barrel and how much the pipe protrudes from above the body. This height should be about 15 centimeters. |
| We attach pieces of metal profile to the bottom of the piston by welding. They will not allow smoldering firewood to “suffocate” and go out, and will also help improve the quality of pressing the logs to each other. |
| Let's start making the oven lid. If this is a barrel, then the old lid will serve as it. Well, in the case of a cylinder and a fire extinguisher, the previously sawed off upper part will come to the rescue. It is necessary to cut a hole in the lid for the air duct, and it is also advisable to weld handles to it, which will make it more convenient to remove it for loading firewood. Remember that the hole should not interfere with the movement of the duct: its pipe must slide freely up and down. Leave a small gap. |
| We fasten the door to remove ash. Using a grinder, we cut a hole according to the dimensions of the door, weld the hinges and install our hatch. |
| We attach the chimney pipe. The hole for it must be made with a grinder at the very top of the body of the gas generator boiler. We weld a section of the previously prepared pipe under the chimney, taking into account that its shortest length should exceed the diameter of the cylinder body. |
| It is also necessary to design control valves for the chimney and air duct. They will help you control the draft and operating time of the heater on one load of wood. Various condensate very actively collects in the chimney of a gas generator stove. Therefore, the pipe must be protected with heat-insulating materials, cleaned regularly, and a container must be installed at its base to collect the released condensate. In addition, it would not hurt to install a protective umbrella-reflector on the top of the pipe, which will prevent precipitation from getting inside it. |


Video. How to make a pyrolysis oven from a gas cylinder
Rules for igniting a pyrolysis furnace
| The process of lighting a gas generator furnace consists of the following steps: | |
| First, you need to remove the internal feed piston by first removing the top cover of the device. |
| Next, we put firewood into the combustion chamber, pressing the logs tightly together. Remember that to light a pyrolysis stove you only need dry logs. Otherwise, it may go out at any time. The highest point for loading firewood should be considered the beginning of the exhaust pipe-chimney opening. |
| Throw a pile of wood chips on top of all the logs and cover them with a rag soaked in fire starter fluid. If there is no flammable liquid at hand, then the rags can be replaced with pieces of paper. |
| We put the piston with the air duct in place and close our gas generator stove with a lid. We light a piece of rag and throw it inside through the air duct. In this case, matches will not be able to help us, since they will go out as they fly through the pipe. |
| We give the fire about 20-30 minutes to burn up. Then we cover the chimney with a damper so that the wood stops burning and begins to smolder. From this moment on, the stove will enter its operating mode, and you will fully enjoy the warmth, comfort and coziness it gives. | |


Remember that when installing a long-burning gas generator stove in any room, you must strictly adhere to the rules for its use:
- The body of the heater reaches significant temperatures, so keep away any items that may spontaneously combust or are heat sensitive.
- Leave enough free space around the gas generator boiler. Furniture cannot be placed next to it, and the walls themselves can also be damaged under its influence. It is advisable to build a special protective jacket made of bricks around the stove. Brickwork will not only protect things around it, but will also help retain heat for a longer period.
- When cleaning the firebox of a homemade stove, leave a certain layer of ash after each time. It will serve as a protective cushion and prevent rapid burning of the lower part of the gas generator boiler, which can lead to breakdown of the entire device.
Laying a brick pyrolysis furnace
A gas generator furnace can be assembled not only from metal parts, but also laid out using bricks. Before we begin to directly consider this issue, we will need to understand the meaning of some fundamental terms that characterize the qualities of materials for furnace work. Actually, there will be only 3 such concepts: heat resistance, heat resistance and fire resistance.

Heat resistance is the ability of a material to withstand heating to high temperatures and subsequent cooling. During such thermal changes, the substance must not change its structure, geometric shape and chemical composition. At the same time, over the entire range of operating temperatures, heat-resistant compounds must withstand the initial design physical loads and not collapse.
As for heat-resistant materials, their main advantage is the ability to maintain initial mechanical characteristics when heated or cooled. The coefficient of thermal expansion of such compounds practically tends to zero. Heat-resistant materials are the basis not only in the furnace industry, but also in the production of mechanisms and machines designed to work in extreme conditions.
Refractory are heat-resistant or heat-resistant substances that are resistant to aggressive chemical environments. In the stove business, they are used to construct chimneys, the inner surface of which is constantly exposed to gaseous combustion products, which often settle during cooling in the form of caustic condensate.
Materials and solutions used for laying various elements of the furnace
Since individual elements of the stove structure carry different functional loads, the brick (as well as the mortar) must be selected individually for each of them. Let's look at everything using the example of a classic wood-burning stove.

- The “pillow” (also called the “root”) of the stove is the basis of the foundation of the stove made of reinforced concrete. It is poured in such a way as to be mechanically independent from the foundation of the entire building. This condition must be met without fail, since the stove and the house differ in the rate of shrinkage. Filling is carried out in the usual way; there are no distinctive features in this process.
- A layer of waterproofing material. It can be constructed from ordinary roofing felt, folded in a couple of layers on top of the stove cushion.
- Furnace foundation. Its laying requires a careful and scrupulous approach. An error when assembling the foundation will lead to the fact that the entire structure will have to be rebuilt. Red solid brick - this part will not feel strong temperature effects. Kiln mixtures should be complex, cement-lime, with three or more components.
- Fireproof blind area with a heat-insulating layer. It is made from a mineral sheet of asbestos placed on top of a sheet of iron. The third, top layer, completes the structure with a felt cloth treated with clay impregnation (liquidly diluted clay, the so-called “clay milk”).
- The main part of the “body” of the stove, which performs the function of a heat exchanger. The operating temperature of this element very rarely exceeds the threshold of six hundred degrees Celsius, but it is constantly exposed to acrid smoke and the chemically aggressive compounds it contains that can settle in the form of acid condensate. Therefore, the brick for this part of the stove requires a specialized stove, red, solid ceramic type M. The mortar, in turn, is clay, one-component.
- Stove firebox. In a pyrolysis furnace, it will consist of several chambers, each of which is subjected to a very powerful thermal effect. The temperature inside the firebox can reach values of up to one and a half thousand degrees. You need a special brick, the so-called fireclay, and you need a clay-fireclay mortar.
- The “source” of the chimney pipe. It must withstand the same impacts as the furnace heat exchanger, so the materials that need to be used for its laying are similar to those in point No. 5.
- The chimney fluff is a structural element designed to provide an elastic connection between the chimney and the ceiling, preventing its possible subsidence. The brick here needs a stove M150, and the mortar is lime.
- A fire separator is an iron box, inside of which there is a layer of non-flammable heat-insulating material.
- The main part of the chimney pipe. They lay it with ordinary red brick, since it is not subject to strong thermal or chemical influences. The solution is lime type.
- The chimney fluff, which completes the stove structure, is also made from the same materials.
Preparation of materials and tools for masonry
As it has already become clear to you from what you read above, for the stove masonry we will need to stock up on three types of bricks:
- red solid - it will be used to make the foundation and part of the chimney
- red ceramic stove M150 – for assembling the main part of the stove body
- fireclay for laying combustion chambers
Further, we cannot make the foundation of the furnace without cement. Accordingly, it also needs to be purchased. In addition, we additionally buy roofing felt, sheet steel and various auxiliary stove accessories: doors for adjusting the air supply, a hatch for loading firewood, etc. The quantity and type of materials chosen will depend on the specific stove laying scheme that you choose for yourself. We will consider one of them in our article, but you should not limit your flight to your engineering imagination only within the framework of a single instruction.
As for stove solutions, you can easily prepare them yourself. This process is quite labor-intensive and takes some time, but it allows you to significantly save on materials and reduce the final cost of creating a brick pyrolysis furnace. This issue is discussed in more detail and with all the necessary instructions in the article. .
The tools we will need are:
- Master OK
- Roulette
- Construction level and plumb line
- Hammer
- Containers for preparing furnace solutions and pouring foundations
- Shovel
- Sieves for sifting sand and straining clay
Making the foundation of a brick gas generator furnace
Long-burning stoves are distinguished by the fact that they must quickly heat up and switch to operating mode within a minimum period of time. For this reason, the foundation of a gas generator stove must be placed at least at a distance of 70 centimeters or more from the foundation of the building itself. In addition, it is advisable to fill the gap between both foundations with sand.
| The process of creating a furnace base consists of the following steps: | |
| We dig a hole for the foundation. It should exceed the dimensions of the oven by 10 centimeters in each direction. According to our specific order scheme, this is approximately 1.20 m by 85 cm. The depth of the hole should be 70 centimeters |
| We put a bitumen-based waterproofing layer on the bottom and sprinkle it with a layer of sand about 10 centimeters high. |
| On top of the sand we place a layer of broken brick or crushed stone, on top of which the base of the stove foundation will be located. |
| We build formwork from boards and a reinforcement frame, fill it all with concrete. |
| After waiting for the solution to dry, we place a layer of roofing felt waterproofing on the concrete base. Then we lay the foundation of the stove on top in two layers of solid red brick, checking the quality of the masonry with a level. |
Oven with fire protection area | We complete the structure with a fire-resistant blind area and thermal insulation made of asbestos and steel sheets, covered on top with felt soaked in clay milk. |


Basic rules for laying a pyrolysis furnace. Ordinal scheme
When starting to lay a gas generator furnace, remember that you must strictly adhere to the following rules:
- Each of the furnace elements must be assembled from the appropriate type of brick that will withstand all temperature and chemical influences. We have already written about this above.
- The masonry should be carried out strictly according to the chosen order plan in order to avoid mistakes and the need to redo the work again.
- After every 2-4 rows, be sure to check the quality of the masonry with a level or plumb line. You don’t want the oven to turn out crooked, do you?
- In each row (as well as between rows), it is necessary to perform a complete dressing of the seams.
- The width of the joints in homogeneous brickwork should be about three millimeters. At the junctions of fireclay and red bricks, the size of the seams must be increased to six millimeters. The same rule applies to connections between brick and steel elements.
- Seats for various doors and valves should be made with a small margin, taking into account the possibility of thermal expansion of parts. Between the metal and the brick, it is imperative to place asbestos gaskets, or intermediate layers of special building mixtures based on sintering compounds. For example, you can use fireclay or silicone for fireplaces - these materials can withstand high heat and, at the same time, ensure the tightness of all connections of the body and stove fittings.
Finally, as an example, we will give you one of the possible row diagrams of long-burning furnaces. Naturally, before starting construction, you must definitely evaluate the dimensions of the room and the size of the space that you plan to allocate for the gas generator boiler. In accordance with these initial parameters, you should choose the scheme that suits you. It will be quite easy to estimate the size of the future heating installation, because the dimensions of one brick are standard and for a solid red brick they are 25x12x6.5 centimeters.

As an additional bonus, we also invite you to watch the video, which shows one of the possible options for making a brick pyrolysis oven yourself. The author demonstrates step by step each stage of stove laying, and also conducts a practical test of his device in action.
Video. Do-it-yourself long-burning brick oven
The maximum heating effect with a small amount of fuel can be achieved only by using a device with high efficiency. Such a device is a homemade stove with a long burning time, which does not require constant loading of fuel. For such a stove, it is enough to make a one-time full load of firewood, and it will burn for 10 hours, or even more. Such units are convenient for use in small greenhouses and country houses. You can make such a stove yourself using available materials, and you don’t need to call a specialist for this.
Homemade long-burning stoves: model options
For holiday villages there is a problem with heat sources, and without heating a country house there is practically no way to survive. Everyone knows that outside the city there is no central heating line, no gas pipeline, as well as periodic power outages, and not every owner can afford boilers.
Standard wood-burning stoves have the disadvantage that they quickly burn through the wood, which means that you need to constantly monitor the addition of fuel to them.
A stove with a long burning time, which runs on solid fuel, is capable of burning and maintaining the temperature in the room for 10 hours, since the fuel in such a stove does not burn, but smolders.
Solid fuel stoves with long burning are designed to operate on:
- Firewood or coal;
- Wood shavings and sawdust;
- And also on pellets and fuel briquettes.

In markets and on the Internet you can purchase an assembled factory oven, which has different dimensions and power. Such stoves have an aesthetic appearance, but their cost is quite high. If you construct such a unit yourself, you will save a decent amount, and the materials for making such a unit can be found in a barn or garage.
Long-burning furnace design: drawings
Such furnaces as long-burning furnaces have their own design features in the presence of two combustion chambers.
Namely:
- One combustion chamber performs fuel pyrolysis;
- The second chamber burns wood gases.
The location of these 2 combustion chambers may be different from each other. There are models of long-burning units that are loaded with firewood from above. As a result of primary smoldering, such models compact and lower the firewood to the bottom, and the gases enter the afterburning chamber. The afterburning chamber can be located not only below, but also through the side partition from the first chamber.
Furnaces of this type are always equipped with blower fans, which direct the draft in the required direction, namely towards the afterburner chamber.
In other furnace models, the combustion chamber is located below the afterburning chamber. Thus, the gases rise into the afterburning chamber without forced draft. Ovens of these models do not require a fan, but they have a smaller loading chamber. In this case, the air supply for combustion intensity is regulated using a damper. The damper also has different types, depending on the type of stove.
We will look at the simplest version of the stove. This design is considered the best option for a country house or cottage. As an example, let’s take the Stropuwa long-burning furnace. This furnace is vertically cylindrical in shape, which can be constructed from a pipe with a diameter of 250 to 450 mm.
The materials needed to construct the furnace are:
- Pipes with a diameter of 250-500 mm, 100 mm pipe and 80 mm pipe;
- Steel sheet with a thickness of 4 mm;
- Channel.
You also need some tools.
Namely:
- Welding machine and gas cutter;
- Hammer and grinder;
- Chalk and tape measure.

We begin the construction of the furnace by welding the lower pancake to the body. After this, we install a pipe-shaped press inside and install a pancake with a hole on this press. We simply put the pancake on a press, which is a pipe with a diameter of 80 mm, and scald it along the edges of the stove body.
Next, we hang doors made from the cut out part, but only with welded corners around the perimeter. An asbestos cord or strip must be attached under the corners; this is necessary to seal the combustion chamber.
Slow burning stove: advantages and disadvantages
Such a stove has pros and cons, in principle, like any other unit.
The main advantages include:
- Economy in fuel consumption;
- High efficiency, which is 90%;
- Versatility of fuel types for optimal performance;
- Small dimensions;
- Ease of control of the unit and air supply;
- Lightweight design.
All these positive aspects apply not only to stoves that are manufactured in factories, but also to stoves that are actually hand-made. Homemade fast-burning stoves are very easy to make from any material, even from fittings, but this requires drawings. Without them, the stove will not function, and all your new chimneys will become unusable.
Sequence of actions and design of a long-burning furnace
The design of the oven is very simple. It consists of several parts such as: body, covers, chimney and air distributor. In order for the stove to stand stably in place, you can use the corners that need to be welded to the body, and in order to conveniently remove ash, you need to make an ash pan.

The procedure for making the furnace should be as follows:
- We release the remaining gas from the old gas cylinder and then rinse it with running water. After washing, we cut off the top part of the cylinder, from which we can then make a furnace lid with a 6cm hole in the center. The edges of this upper part and the body itself must be sanded so that it fits tightly onto the stove.
- We make a hole in the top of the cylinder, and then weld a piece of pipe with a diameter of 4 cm horizontally, this is necessary for the chimney.
- Next, we make a cleanout door for the ash pan at the bottom. To make such a door, you need to cut a rectangle at the bottom of the cylinder, clean the body and weld the cut metal to the cut piece of the hinge and install the already made door in the cut out place, but it is important not to forget the valve.
Using this method, you will get an excellent slow-burning pyrolysis oven, which is very easy to make yourself.
For stability, the balloon is placed on legs. To do this, you need to cut off 4 identical corners and weld them to the furnace body. And in order to make it convenient to carry, if necessary, we weld grate bars on the sides of the body.
Homemade long-burning wood-burning stoves (video)
Now you know how to create a masterpiece yourself. To make the stove look beautiful, you can paint it, but first clean the body from scale, rust and dirt. Such paint is necessary for the reason that any other paint will fade very quickly due to the high temperature of the furnace body during operation. Draw up drawings, come up with ideas and go ahead with your creations.
The heating problem is especially acute in private sectors and industrial parts of cities filled with warehouses and garage cooperatives. There are many heating methods, ranging from heated floors to air guns and fireplaces. Most of these require lengthy installation or serious financial expenses, but there are also those that allow you to enjoy warmth without much investment.
To create optimal temperature conditions in small and medium-sized rooms, you can make a long-burning stove with your own hands. The home-made design differs from other devices in its high level of efficiency and indiscrimination of combustion objects. It can operate on wood, sawdust, paper, waste and other fuels. Accordingly, the cost of maintaining heat is minimal, and the return exceeds all expectations.
- After adding firewood to the firebox, user participation in the heating process is not required. Energy can be released for up to 20 hours, which minimizes the time spent on refueling and servicing the stove.
- The structure does not require a solid foundation for installation; it is small in size and characterized by low weight, as a result of which it can be installed on the ground or metal flooring. The base must be non-flammable, otherwise a fire cannot be avoided.
- Furnaces can easily withstand long-term downtime and can only be used in severe frosts.
- A small amount of waste is generated due to the almost complete burnout of solid fuel; the remaining ash can be sprayed as fertilizer.
- Despite the fact that it is mandatory in every design, a homemade stove produces practically no corrosive gases, which is very useful in densely populated areas.
Installation of heating devices of this kind is typical for rooms with an area of up to 50-70 sq.m. Larger buildings require a water circuit, which is not possible in this case.
The principle of operation of a homemade wood stove
Note: Constructing a long-burning stove with your own hands is possible using many schemes, but they function the same.
The fuel is loaded into the boiler, where it is ignited. At this time, oxygen is supplied to the firebox through special dampers. When wood burns well, access to air is minimized, which leads to the accumulation of heavy gases such as hydrogen and methane inside the heating boiler. They give a huge release of kinetic energy. An attempt to make a similar increase in power in a conventional stove will lead to heavy smoke, but will not improve the result in any way.
Preparing to create a structure
A long-burning stove consists of a main part, legs, adapters and a chimney. Like other heating elements, it must comply with all fire safety rules, otherwise sanctions may be imposed on the owner, including administrative penalties. For assembly and welding, you need a medium-sized room where it will be convenient to work with a single-phase or three-phase electrical network. If a long-burning furnace is created in an open space, it is recommended to use generators.
Structural elements:
- a barrel, pipe, cylinder or other container with a capacity of about 200 liters, a thick sheet will do;
- metal scraps or channel for assembling legs;
- steel sheets with a thickness of at least 5 mm;
- pipes with a diameter of 100-150 mm for connecting the internal sections and creating a chimney.
Homemade long-burning stoves can be assembled from scrap materials, but it is necessary to monitor the quality and tightness of the seams, and also carefully check the fit of the dampers to avoid smoke leakage into the residential or industrial premises.

The working tools will be an angle grinder equipped with a metal cutting disc, a welding inverter, a square and a tape measure, as well as a heavy hammer. All equipment can be found from neighbors or rented, which will significantly reduce the cost of assembling a long-burning stove with your own hands.
Note: You should not use old and rusty pipes or used raw materials - this will significantly reduce the service life of a long-burning stove made by yourself.
You will lose a lot of time and effort, and the device will operate intermittently and malfunction, which can ultimately lead to a fire in the room.
Design production algorithm
- If you used a barrel as a basis, you can skip the first step. Otherwise, from available materials you need to create a square or cylindrical container with a bottom, but without a top. If a cylinder is used, then it is necessary to cut off the part with the valve with a grinder; if only a sheet is available, then it needs to be bent, the connecting seam made with an autogenous one and the bottom welded with a thickness of 5 mm or more.
- Legs are attached to the bottom of the future stove or long-burning fireplace. They serve for better stability and prevent the floor covering from catching fire during prolonged smoldering of the fuel.
- This stage involves the manufacture of a pressure part for fuel with a channel. You will need a circle of metal whose diameter will be slightly smaller than the inner diameter of the barrel. It should fit freely inside the cylindrical shape. A hole with a radius of 50 mm is cut out in the center of the disk; a pipe of such length must be welded to it that 10-15 cm protrudes beyond the main heating structure. This is not a chimney; this pipe is needed because oxygen is needed for ignition. You need to make a damper at the top to limit the amount of air entering.
- To prevent smoke from entering the room, you need to make a lid. It is noteworthy that the supply pipe should also protrude from it, but there should not be large gaps between the sheet and the pipe. 2-3 mm is quite enough.
- The long-burning furnace has a hole for removing spent fuel. The container must be tightly closed with a door.
- At the last stage, the chimney is welded. Its length depends on the location of the unit. The chimney cuts into the top cover of the structure. The diameter of the gas vent must be at least 150 mm.
Only one method is described here, but the general principles of assembly are clear. It is often suggested to place a grate under the fuel - this simplifies the collection of ash. Some circuits contain heat-conducting elements or a water circuit that will prevent a fire. Laying firewood can be done from above or from the side - it all depends on the imagination and practicality of the master. A self-made long-burning stove is much different in functionality from store-bought counterparts, but is characterized by a high level of efficiency. Of course, if it is designed correctly.
How to use a homemade heating device
After the long-burning stove is completely ready, it needs to be tested. To do this, remove the top and pressure caps and tamp the tank with fuel. The denser the woodpile is stacked, the longer the unit will smolder. Press the fuel into a circle with a channel, close the tank tightly and light the fire. Instead of matches, you need to use a rag soaked in gasoline or kerosene; paper will also work. The fuel is ignited through an air pipe. Do not worry about gas contamination in the room during the flare-up - all harmful resins are discharged through the chimney to the street. After 15-20 minutes, close the damper; your participation in the operation of the heating system will no longer be needed for about 13-17 hours.

Technical nuances
A long-burning stove is not the simplest design; like many others, it has its own characteristics in its creation. Below are the main points that require increased attention from the master.
- Use natural fuel whenever possible. Cones, needles, branches, dry grass - all this contains many elements for the formation of gas, which increases the operating time of the device.
- The chimney can be detachable for ease of cleaning, but the fewer joints, the better it will function.
- The diameter of the chimney pipe should not be large - this will reduce draft, and a small one will not cope with the removal of combustion products.
- The heating unit does not need to be placed close to objects and walls; installation next to curtains, bookcases, gasoline tanks, and so on is especially not recommended.
- Make doors to clean all parts of the boiler; fuel should be loaded into a clean tank - this will increase heat transfer.
A home oven is exactly the case where size is not the main thing. The main emphasis should be on the accuracy of the design and the quality of fit of the seams. If the level of the room allows and it will not look bad from an aesthetic point of view, place the unit in the center of the room, this way you will increase the heated area to the maximum.